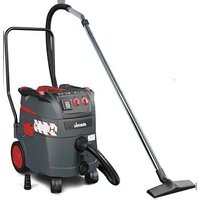
ISP iPulse H-1635 - Vacuum Cleaner Starmix - Free user manual and instructions
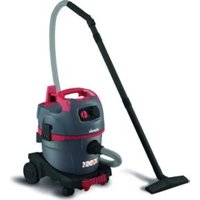
Find the device manual for free ISP iPulse H-1635 Starmix in PDF.


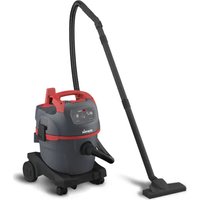
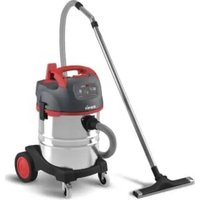
| Product type | Vacuum cleaner for liquids and dust |
| Brand | Starmix |
| Model | ISP iPulse H-1635 |
| Dust category | H (suitable for hazardous, carcinogenic and pathogenic dust) |
| Supply voltage | 220-240 V~, 50/60 Hz |
| Rated power | 1400 W |
| Maximum power | 1600 W |
| Air flow (at fan) | 75 l/s |
| Vacuum (at fan) | 280 hPa |
| Air flow (at hose) | 45 l/s |
| Vacuum (at hose) | 245 hPa |
| Sound pressure level | 69 dB(A) |
| Weight | 15.6 kg (16.7 kg with handle) |
| Dimensions (L x W x H) | 53 x 40 x 56 cm (92 cm with handle) |
| Container capacity | 35 litres (estimated based on FBV 25/35 filter bag) |
| Filter cleaning system | Automatic via differential pressure measurement |
| Automatic start function | Yes, for connected power tool |
| Power outlet for tool | Yes, max power 2000 W |
| Speed control | Yes, continuous |
| Hose diameter setting | Yes (21, 27, 35 mm) |
| Fill level indicator | Yes, with audible signal on M and H models |
| Main filter type | Pleated filter cassettes (cellulose, polyester, HEPA) |
| Filter bag | FBV 25/35 felt bag (optional) |
| Intended use | Commercial (hotels, schools, hospitals, factories, etc.) |
| Maintenance | Regular cleaning of sensors and filters; replace filters if necessary |
| Repairability | Repair only by qualified personnel; use original parts |
| Safety | Explosion protection, automatic shut-off in case of foam/liquid, restart protection |
Frequently Asked Questions - ISP iPulse H-1635 Starmix
User questions about ISP iPulse H-1635 Starmix
0 question about this device. Answer the ones you know or ask your own.
Ask a new question about this device
Download the instructions for your Vacuum Cleaner in PDF format for free! Find your manual ISP iPulse H-1635 - Starmix and take your electronic device back in hand. On this page are published all the documents necessary for the use of your device. ISP iPulse H-1635 by Starmix.
USER MANUAL ISP iPulse H-1635 Starmix
natural_image
Exterior view of a gas station vacuum cleaner (starmix) with red and black components, coiled tubing, and control panel (no visible text or symbols on device body)Bedienungsanleitung (original)
Operating instructions
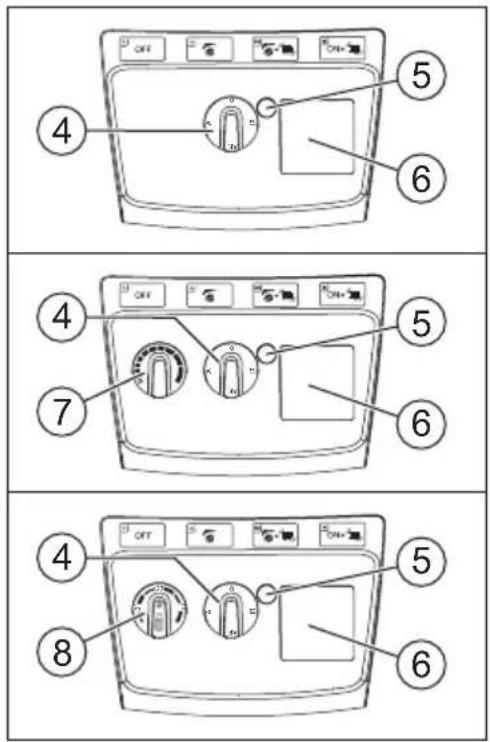
| de Beschreibung | ||||
| 1 Kabelhaken | 7 Drehzahlregulierung* | 13 Behälter | 19 Aufnahme-Reling für Werkzeugbox* | |
| 2 Griff 8 Einstellung Saugschlauch-Durchmes ser und Motordrehzahl* | - 14 Rad 20 Fahrbügel* | |||
| 3 Schalterplatte 9 Verriegelung 15 Verschluss | ||||
| 4 Drehschalter* | 10 Ansaugstutzen | 16 Motorgehäuse | ||
| 5 Füllanzeige* | 11 Drehschieber innen | 17 Trägerplatte | * je nach Ausstattung | |
| 6 Steckdose | 12 Lenkrolle | 18 Deckel | ||
| en Description | ||||
| 1 Cable hook | 7 Speed control* | 13 Container | 19 Mounting rail for tool box* | |
| 2 Handle | 8 Setting suction hose diameter and motor speed* | 14 Wheel | 20 Push handle | |
| 3 Switch plate | 9 Lock | 15 Latch | ||
| 4 Rotary switch* | 10 Intake socket | 16 Motor housing | ||
| 5 Fill level* | 11 Rotary slide inside | 17 Support plate | * depending on the equipment variant | |
| 6 Plug socket | 12 Castor | 18 Cover | ||
| fr Beschreibung | ||||
| 1 Crochet de câble | 7 Contrôle de vitesse* | 13 Bac | 19 Rail de montage pour la boîte à outils* | |
| 2 Poignée | 8 Réglage du diamètre du tuyau d'aspiration et de la vitesse du moteur* | 14 Roue | 20 Poignée de poussée | |
| 3 Plaque des commutateurs | 9 Verrouillage | 15 Loquet | ||
| 4 Sélecteur rotatif* | 10 Prise d'admission | 16 Logement du moteur | ||
| 5 Niveau de remplissage* | 11 Glissière rotative à l'intérieur | 17 Plaque de soutien | * en fonction des caractéristiques de l'équipement | |
| 6 Prise de courant 12 Roulette 18 Couvercle | ||||
| es Descripción | ||||
| 1 Gancho del cable | 7 Control de velocidad* | 13 Recipiente | 19 Riel de montaje para caja de herramientas* | |
| 2 Asa 8 Ajuste del diámetro de la manguera de aspiración y de la velocidad del motor* | 14 Rueda 20 Empuñadura | |||
| 3 Placa de conmutadores 9 Cierre 15 Pestillo | ||||
| 4 Conmutador giratorio* | 10 Toma de admisión | 16 Carcasa del motor | ||
| 5 Nivel de llenado* | 11 Válvula giratoria interior | 17 Placa de soporte | * depende de la variante del equipo | |
| 6 Enchufe 12 Castor 18 Cubierta | ||||
| pt Descrição | ||||
| 1 Gancho para cabo | 7 Controlo de velocidade* | 13 Recipiente | 19 Trilho de montagem para caixa de ferramentas* | |
| 2 Pega | 8 Ajustar o diámetro da mangueira de sucção e a velocidade do motor* | 14 Roda | 20 Pega de pressão | |
| 3 Placa de comutação | 9 Bloqueio | 15 Fecho | ||
| 4 Interruptor rotativo* | 10 Tomada de entrada | 16 Caixa do motor | ||
| 5 Nivel de enchimento* | 11 Inclui controlo deslizante rotativo | 17 Placa de suporte | * dependendo da variante do equipamento | |
| 6 Tomada | 12 Rodizio | 18 Tampa | ||
| it Descrizione | ||||
| 1 Gancio per cavi | 7 Controllo della velocità* | 13 Contenitore | 19 Binario di montaggio per scatola utensili* | |
| 2 Maniglia 8 Impostazione del diametro del tubo flessibile di aspirazione e della velocità del motore* | 14 Ruota | 20 Maniglia a pressione | ||
| 3 Piastra interruttore | 6 Serratura | 15 Fermo | ||
| 4 Interruttore rotante* | 10 Presa di aspirazione | 16 Alloggiamento motore | ||
| 5 Livello di riempimento* | 11 Cursore rotante all'interno | 17 Piastra di supporto | * a seconda della variante dell'apparecchiatura | |
| 6 Presa elettrica | 12 Rotella | 18 Coperchio | ||
| nl Beschrijving | ||||
| 1 Kabelhaak | 7 Snelheidsregeling* | 13 Bak | 19 Bevestigingsrail voor ge-reedschapskist* | |
| 2 Handvat 6 Instelling voor zuigslangdiameter en motorsnelheid* | 14 Wiel | 20 Duhandgreep | ||
| 3 Schakelplaat | 15 Slot | 15 Vergrendeling | ||
| 4 Draaischakelaar* | 16 Stopcontact | 16 Motorbehuizing | ||
| 5 Vulniveau* | 11 Draaischuif binnenin | 17 Steunplaat | * afhankelijk van het model van het apparaat | |
| 6 Plugstopcontact | 12 Wieltje | 18 Beschermkap | ||
| da Beskrivelse | ||||
| 1 Kabelkrog | 7 Hastighedskontrol* | 13 Beholder | 19 Monteringsskinne til værktøjskas-se* | |
| 2 Håndtag | 8 Indstilling af diameter på sugeslange og motorhastighed* | 14 Hjul 20 Skubbehåndtag | ||
| 3 Kontaktplade | 15 Lås | 15 Lås | ||
| 4 Drejekontakt* | 16 Stikdåse | 16 Motorkabinet | ||
| 5 Opfyldningsniveau* | 11 Drejeventil inde i | 17 Støtteplade | * afhængigt af udstyrsvarianten | |
| 6 Stikkontakt | 12 Møbelrulle | 18 Dæksel | ||
| sv Beskrivning | ||||
| 1 Kabelkrok | 7 Hastighetskontroll* | 13 Behållare | 19 Monteringsskena för verktygslåda* | |
| 2 Hantera | 13 Ställa in sugslangens diameter och motorhastighet* | 14 Hjul 20 Körhandtag | ||
| 3 Strömställarplatta | 15 Lås | 15 Spärr | ||
| 4 Vridomkopplare* | 16 Insugsuttag | 16 Motorhus | ||
| 5 Fyllningsnivá* | 11 Skjutomkopplare inuti | 12 Stödplatta | * beroende på utrustningsvarianten |
| 6 Eluttag 12 Hjul 13 Skydd | |||
| no Beskrivelse | |||
| 1 Kabelkrok | 7 Turtallsregulator* | 13 Beholder | 14 Monteringsskinne for verktøykas-se* |
| 2 Händtak 8 Innstilling av sugeslangediameter og motorturtall* | 14 Hjul 20 Skyvehåndtak | ||
| 3 Bryterpanel 9 Lás 10 Hengsel | |||
| 4 Rotasjonsbryter* | 10 Inntakskontakt | 10 Motorhus | |
| 5 Fyllingsnivá* | 11 Rotasjonsbryter innside | 17 Støtteplate | * avhengig av utstyrsvarianten |
| 6 Stikkontakt | 12 Avbøyningsvalse | 18 Deksel | |
| fi Kuvaus | |||
| 1 Johtokoukku | 7 Nopeuden hallinta* | 13 Säiliö | 18 Työkalupakin kiinnityskisko* |
| 2 Kahva | 8 Imuletkun halkaisijan ja moottorin nopeuden asetus* | 14 Pyörä | 20 Työntökahva |
| 3 Kytkinlevy | 9 Lukitsin | 15 Salpa | |
| 4 Kiertokytkin* | 10 Imuistukka | 16 Moottorin kotelo | |
| 5 Täyttötaso* | 11 Suljin sisäpuolella | 17 Tukilevy | *riippuen varustuksesta |
| 6 Pistorasia | 12 Kääntyvä pyörä | 18 Suoja | |
| el Peripyrραφή | |||
| 1 Äγκιστρο καλωδίου | 7 Puθμιστής ταχύτητας* | 13 Doxείο | 19 Páya συναρμολόγησης για την εργαλειοθήκη* |
| 2 Λαβή | 8 Púθμιση της διαμέτρου του εύκαμπτου σωλήνα αναρρόφησης και της ταχύτητας του μοτέρ* | 14 Póða | 20 Λαβή ώθησης |
| 3 Πλάκα διακοππών | 9 Kλειδαριά | 15 Ασφάλεια | |
| 4 Periστρεφόμενος διακόπτης* | 10 Υποδοχή εισαγωγής | 16 Περίβλημα μοτέρ | |
| 5 Επίπεδο πλήρωσης* | 11 Periστρεφόμενο τμήμα ολίσθησης προς τα μέσα | 17 Πλάκα στήριξης | * ανάλογα με το μοντέλο της συσκευής |
| 6 Υποδοχή φις | 12 Μικρή ρόδα | 18 Κάλυμμα | |
| tr Açıklama | |||
| 1 Kablo kancası | 7 Hız kontrolů* | 13 Kap | 19 Alet kutusu için montaj rayı* |
| 2 Tutamak | 8 Emiş hortumu çapı ve motor hızı ayari* | 14 Tekerlek | 20 Itme tutamağı |
| 3 Šalter plakası | 9 Kilit | 15 Mandal | |
| 4 Döner šalter* | 10 Emme yuvası | 16 Motor gövdesi | |
| 5 Dolum seviyesi* | 11 İç döner sűrgű | 17 Destek plakası | * modeline bağlı olarak |
| 6 Priz 12 Ön tekerlek 13 Kapak | |||
| pl Opis | |||
| 1 Hak przewodu | 7 Sterowanie prędkością* | 13 Pojemnik | 19 Szyna montażowa dla zestawu narzędziowego * |
| 2 Uchwyt | 8 Ustawianie średnicy węża ssącego i prędkości silnika* | 14 Koło | 20 Rękojeść |
| 3 Płytką przełącznika | 9 Zamek | 15 Zatrzask | |
| 4 Przełącznik obrotowy* | 10 Gniazdo włotowe | 16 Obudowa silnika | |
| 5 Poziom napelnienia * | 11 Wewnętrzny suwak obrotowy | 17 Płyta nośna | * w zależności od wariantu wyposażenia |
| 6 Gniazdo wtykowe | 12 Rolka | 18 Pokrywa | |
| hu Leirás | |||
| 1 Kábelhorog | 7 Fordulatszám-szabályozás* | 13 Tartály | 19 Szerszámdoboz szerelősínje* |
| 2 Fogantyú | 8 A szívótömlő átmérőjének és a motor fordulatszámának beállítása* | 14 Kerék | 20 Tolófogantyú |
| 3 Kapcsolólemez | 10 Zár | 15 Retesz | |
| 4 Forgásirány-kapcsoló* | 11 Bemeneti aljzat | 16 Motorház | |
| 5 Töltöttségi szint* | 11 A forgócsúszka | 17 Támasztólemez | * A berendezés változatától függően |
| 6 Csatlakozó aljzat 12 Görgő 18 Fedél | ||||
| cs Popis | ||||
| 1 Kabelový hák | 7 Kontrola rychlosti* | 13 Kontejner | 19 Montážní lišta pro skříň na nářadí * | |
| 2 Rukojeť 8 Nastavení průměru sací hadice a otáček motoru* | 14 Kolo 20 Zatlačte rukojeť | |||
| 3 Přepinaci deska 9 Zámek 10 Petlice | ||||
| 4 Otočný přepinač* | 10 Sací zásuvka | 16 Kryt motoru | ||
| 5 Úroveň plnění* | 11 Otočná uvnitř | 17 Podpěrná deska | * v závislosti na variantě zařízení | |
| 6 Zásuvka 12 Sypátko 16 Víko | ||||
| sk Popis | ||||
| 1 Hák na kábel | 7 Regulátor rýchlosti* | 13 Nádoba | 19 Montážna lišta pre box s náradím* | |
| 2 Rukovát 8 Nastavenie priemeru sacej trubice a rýchlosti motora* | 14 Koleso 20 Držadlo | |||
| 3 Spínacia doštička | 9 Zámok | 15 Závora | ||
| 4 Otočný spinač* | 10 Sací otvor | 16 Kryt motora | ||
| 5 Úroveň plnenia* | 11 Otočný posúvač vnútorný | 17 Podporná doska | * v závislosti od variantu zariadenia | |
| 6 Zásuvka | 12 Koliesko | 18 Veko | ||
| ro Descriere | ||||
| 1 Cârlig cablu | 7 Control viteză* | 13 Recipient | 19 Şină de montaj pentru cutia de scule* | |
| 2 Mâner | 8 Reglarea diametrului furtunului de aspiratie și a turației motorului* | 14 Roată | 20 Mâner împingere | |
| 3 Placă de comutare | 9 Încuietoare | 15 Závor | ||
| 4 Comutator rotativ* | 10 Priza de admisie | 16 Carcasa motorului | ||
| 5 Nivel de umplere* | 11 Dispozitiv rotativ în interior | 17 Plácuță suport | * în funcție de varianta echipa-mentului | |
| 6 Priză | 12 Rotiță | 18 Capac | ||
| sl Opis | ||||
| 1 Kljukasti kavelj | 7 Nadzor hitrosti* | 13 Zabojnik | 19 Montažna timica za škatlo za orodje* | |
| 2 Ročaj | 8 Nastavitev premera sesalne cevi in hitrosti motorja* | 14 Kolo 20 Pritisni ročaj | ||
| 3 Preklopna plošča | 9 Ključavnica | 15 Zapah | ||
| 4 Vrđljivo stikalo* | 10 Vhodna vtičnica | 16 Ohišje motorja | ||
| 5 Stopnja napolnjenosti* | 11 Rotacijski drsnik notri | 17 Podporná plošča | * odvisno od možnosti opreme | |
| 6 Vtičnica | 12 Kolešček | 18 Pokrov | ||
| hr Opis | ||||
| 1 Kuka za kabel | 7 Regulacija brzine* | 13 Posuda | 19 Tračnica za postavljanje kutije s alatom* | |
| 2 Ručka | 8 Postavljanje promjera usisnog crijeva i brzine motora* | 14 Kotač | 20 Ručka za guranje | |
| 3 Upravljačka ploča | 9 Brava | 15 Zasun | ||
| 4 Okretna sklopka* | 10 Usisni priključak | 16 Kućište motora | ||
| 5 Indikator punjenja* | 11 Unutarnji okretni kliznik | 17 Nosiva ploča | * ovisno o varijanti opreme | |
| 6 Utičnica | 12 Kotačić | 18 Poklopac | ||
| sr Opis | ||||
| 1 Kuka za kabl | 7 Kontrola brzine* | 13 Kontejner | 19 Montažna šina za kutiju za alat* | |
| 2 Ručka | 8 Postavljanje prečnika usisnog creva i brzine motora* | 14 Točak | 20 Drška za guranje | |
| 3 Ploča sa prekidačima | 9 Brava | 15 Reza (kvaka) | ||
| 4 Rotacioni prekidač* | 10 Ulaz za usisavanje | 16 Kućište motora | ||
| 5 Nivo napunjenosti* | 11 Unutarnji rotacioni klizač | 17 Ploča za podršku | * u zavisnosti od varijante opreme | |
| 6 Utičnica | 12 Pokretni točak na nogari | 18 Poklopac | ||
| bg Описание | ||||
| 1 | Кука за кабел | 7 Управление на скоростта* | 13 Контейнер | 19 Монтажна шина за кутията за инструменти* |
| 2 | Дръжка 8 Настройване на диаметъра на смукателния маркуч и скоростта на двигателя* | 14 Колело 20 Дръжка за местене | ||
| 3 | Платка за превключване 9 Ключалка 10 Резе | |||
| 4 | Въртящ се превключвател* | 10 Входно гнездо | 15 Корпус на двигателя | |
| 5 | Ниво на пълнене* | 11 Въртящият се плъзгач вътре | 17 Носеща плоча | * в зависимост от варианта на оборудването |
| 6 | Щепсел на щекера 12 Бобър 13 Капак | |||
| et Kirjeldus | ||||
| 1 | Kaablikonks | 7 Kiiruse regulaator* | 13 Mahuti | 19 Tööristakasti paigaldusraam* |
| 2 | Käepide | 8 Imemisvooliku läbimõõdu ja mootorikii-ruse seadistus* | 14 Ratas | 20 Lükkamise käepide |
| 3 | Lülitite plaat | 9 Lukk | 15 Sulgur | |
| 4 | Pöördlüliti* | 10 Sisselaskeava | 16 Mootori korpus | |
| 5 | Täituvuse tase* | 11 Sisemine pöördklapp | 17 Tugiplaat | * sõltuvalt seadme variandist |
| 6 | Pistikupesa | 12 Rullik | 18 Kate | |
| It Aprašas | ||||
| 1 | Kablys kabeliui | 7 Greičio valdíklis* | 13 Talpykla | 19 Irankių déžės prijungimo bėgiai* |
| 2 | Rankena | 8 Siurbimo žarnos skersmens ir variklio sūkių nustatymas* | 14 Ratas | 20 Stūmimo rankena |
| 3 | Jungiklio plokštė | 9 Užraktas | 15 Sklendė | |
| 4 | Rotacinis jungiklis* | 10 Ileidimo lizdas | 16 Variklio korpusas | |
| 5 | Užpildymo lygis* | 11 Rotacinis vožtuvas viduje | 17 Atraminė plokštė | * priklausomai nuo įrangos varianto |
| 6 | Kištukinis lizdas | 12 Ratukas | 18 Dangtis | |
| Iv Apraksts | ||||
| 1 | Kabela ākis | 7 Apgriezienu vadība* | 13 Tvertne | 19 Instrumentu kastes montāžas sliede* |
| 2 | Rokturis | 8 Sūkšanas šljūtenes diametra un moto-ra apgriezienu iestatišanas skala* | 14 Ritenis | 20 Stumšanas rokturis |
| 3 | Slēdža plāksne | 9 Blokētājs | 15 Fiksators | |
| 4 | Grozāms pārslēgs* | 10 Ieplūdes ligzda | 16 Motora korpus | |
| 5 | Piepildīšanas līmenis* | 11 Grozāms aizbīdnis | 17 Atbalsta plāksne | * atkarībā no aprīkojuma varianta |
| 6 | Kontaktdakšas ligzda | 12 Ritenītis | 18 Vāks | |
| ru Описание | ||||
| 1 | Крюк для кабеля | 7 Регулятор мощности* | 13 Контейнер | 19 Монтажная рейка для ящика с инструментами* |
| 2 | Ручка | 8 Установка диаметра всасывающего шланга и частоты вращения двигателя* | 14 Колесо | 20 Ручка для толкания |
| 3 | Панель переключателей | 9 Замок | 15 Защелка | |
| 4 | Поворотный переключатель* | 10 Воздухозаборное гнездо | 16 Корпус двигателя | |
| 5 | Уровень заполнения* | 11 Внутренняя поворотная заслонка | 17 Поддерживающая планка | * в зависимости от разновидности оборудования |
| 6 | Розетка | 12 Колесико | 18 Крышка | |
| zh 说明 | ||||
| 1 | 线缆钩 | 7 速度控制* | 19 容器 | 19 工具箱安装导轨* |
| 2 | 手柄 | 8 设置吸入软管直径和电机转速* | 14 轮 | 20 推手柄 |
| 3 | 开关板 | 9 锁 | 15 闭锁装置 | |
| 4 | 旋转开关* 10 进气插口 | |||
| 5 | 液位* | 11 内部旋转阀 | 17 支撑板 | * 取决于设备变量 |
| 6 | 插头插座 12 小脚轮 | |||
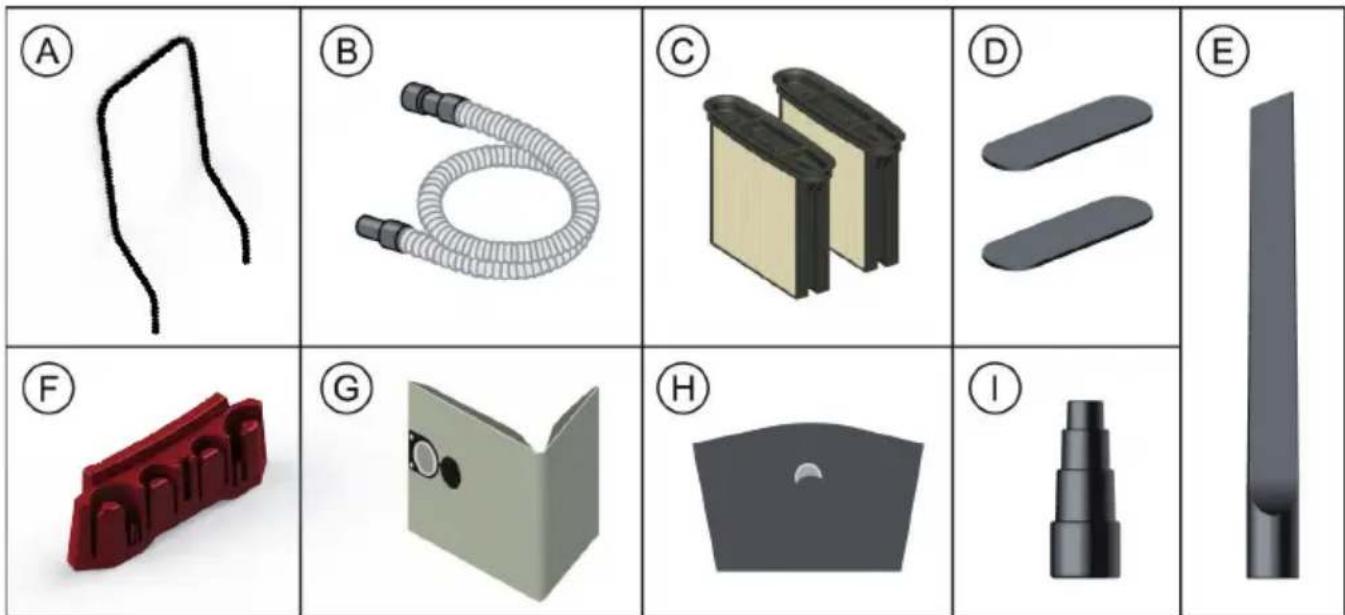
| de Zubehör en Accessories fr | Accessoires | es | Accesorios | ||
| A | Fahrbügel A Push handle A | Poignée de poussée | A | Empuñadura | |
| B | Saugschlauch B Suction hose B | Tuyau d'aspiration | B | Manguera de aspiración | |
| C | Faltenfilterkassetten C Folded filter cartridges C | Cassettes filtrantes pliées | C | Cartuchos de filtro plegados | |
| D | Motorschutzfilter D Motor protection D | Protection du moteur | D | Protección del motor | |
| E | Gummidüse E Rubber nozzle E | Buse en caoutchouc | E | Boquilla de goma | |
| F | Zubehördepot F Accessory F | Accessoire | F | Accesorio | |
| G | Vlies-Filterbeutel G Fleece filter bag | G | Sac filtrant en feutre | G | Bolsa de filtro de lana |
| H | PE-Entleer- und Entsorgungsbeutel | H PE emptying and disposal bag | H Sac d'élimination et de vidage de PE | H | Bolsa de vaciado y eliminación de PE |
| I | Reduzierstück | I Reducer | I Adaptateur | I | Reductor |
| pt | Acessórios | it Accessori | nl Accessoires | da | Tilbehør |
| A | Pega de pressão | A Maniglia a pressione | A Duwhandgreep | A | Skubbehåndtag |
| B | Mangueira de sucção | B Tubo flessibile di aspirazione | B Zuigslang | B | Sugeslange |
| C | Cartuchos de filtro dobrados | C Cartucce del filtro a pieghe | C Gevouwen filterpatronen | C | Foldede filterpatroner |
| D | Proteção do motor | D Protezione del motore | D Motorbescherming | D | Motorbeskyttelse |
| E | Bocal de borracha | E Ugello in gomma | E Rubberen mondstuk | E | Gummidyse |
| F | Acessório | F Accessorio | F Accessoire | F | Tilbehør |
| G | Bolsa de filtro de lă | G Sacchetto del filtro in pile | G Fleece-filterzak | G | Filterpose i fleece |
| H | Bolsa de esvaziamento e descarte de PE | H Sacchetto di svuotamento e smaltimento in polietilene (PE) | H PE-afvalzak | H | Pose til miljøvenlig tømning og bortskaffelse |
| I | Redutor | I Riduttore | I Reduceer | I | Reduktionsanordning |
| sv | Tillbehör | no Tilbehör | fi Lisätarvikkeet | el | Aççəsouáp |
| A | Körhandtag | A Skyvehåndtak | A Työntökahva | A | Λαβή ϛθησης |
| B | Sugslang | B Sugeslange | B Imuletku | B | Eúkaμπτος σωλήνας αναρρόφησης |
| C | Vikta filterpatroner | C Foldefilterpatroner | C Suodatinpatruunat | C | Αναδιπλούμενα φυσίγγια φίλτρου |
| D | Motorskydd | D Motorbeskyttelse | D Moottorin suoja | D | Προστασία μοτέρ |
| E | Gummimunstycke | E Gummidyse | E Kumisuutin | E | Ελαστικό ακροφύσιο |
| F | Tillbehör | F Tilbehör | F Lisävaruste | F | Aççəsouáp |
| G | Fleecefilterpåse | G Fiberduk-filterpose | G Kuitukangaspölypussi | G | Σακούλα φίλτρου φλις |
| H | PE-tömnings- och avfallspåse | H PE tømme- og bortskaffingspose | H PE-tyhjennys- ja hävityspussi | H | Σακούλα αδειάσματος και απόρριψης PE |
| I | Reducer | I Reduseringstilkobling | I Sovitin | I | Εξάρτημα συστολής |
| tr | Aksesuarlar | pl Akcesoria | hu Kiegészítők | cs | Příslušenství |
| A | Ítme tutamagí | A Rękojeść | A Tolófogantyú | A | Zatlačte rukojeť |
| B | Emiş hortumu | B Waż ssący | B Szívótömlő | B | Sací hadice |
| C | Katlanmış filtre kartuşları | C Skladane wkłady filtracyjne | C Hajtogatott szűrőpatronok | C | Skládané filtrační patrony |

natural_image
Simple black line drawing of a curved shape resembling a stylized letter or symbol (no text or symbols present)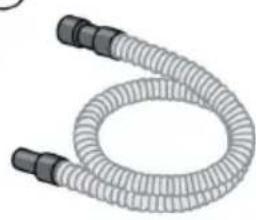
natural_image
Illustration of a coiled tube with two connectors (no text or symbols)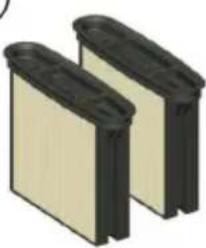
natural_image
Two identical black-and-white oval-shaped objects with beige fill, resembling battery packs or containers (no text or symbols visible)
natural_image
Red plastic mechanical component with multiple grooves and mounting holes (no text or symbols visible)
natural_image
3D rendered image of a gray mechanical part with a circular button and a black hole (no text or symbols)


| Motor koruması | Zabezpieczenie silnika | Motorvédelem | Ochrana motoru |
| Kauçuk meme | Dysza gumowa | Gumi fúvóka | Gumová tryska |
| Aksesuar | Akcesorium | Tartozék | Doplněk |
| Ipek elyaf filtre torbası | Materiałowy woreczek filtrujący | Polárszűrőzsák | Fleecový filtrační sáček |
| PE boşaltma ve atik torbası | Woreczek jednorazowy z PE | PE kiüritő és ártalmatlanitó tasak | PE sáček na vyprázdnění a likvidaci |
| Redüktör | Reduktor | Csökkentő | Reduktor |
| sk Prislušenstvo | ro Accesorii | sl Dodatki | hr Pribor |
| Držadlo | Måner împingere | Pritisni ročaj | Ručka za guranje |
| Sacia rubica | Furtun de aspiratie | Sesalna cev | Usisno crijevo |
| Skladané filtračné kazety | Cartuše de filtru pliabile | Zloženi filtrirni vložki | Filtarski ulošci |
| Ochrana motora | Protecția motorului | Zaščita motorja | Zaštita motora |
| Gumová hubica | Duză de cauciuc | Gumijasta šoba | Gumena mlaznica |
| Príslušenstvo | Accesoriu | Dodatna oprema | Oprema |
| Tkaninové filtračné vrecko | Sac de filtrare din lână | Filtrirna vrečka iz filca | Filtarska vrećica od flisa |
| PE vyprázdňovacie a likvidačné vrecko | Sac de golire și de eliminare a PE | PE vrečka za praznjenje in odstranjevanje | PE vrećica za pražnjenje i odlaganje |
| Redukcia | Reductor | Reduktor | Reduktor |
| sr Pribori | bg Akcesoари | et Tarvikud | It Priedai |
| Drška za guranje | Дръжка за местене | Lükkamise käepide | Stūmimo rankena |
| Usisno crevo | Смукателен маркуч | Imemisvoolik | Siurbimo žarna |
| Presavijeni filter kertridži | Сгънати филтърни касети | Kurdfiltri kassetid | Gofruotų filtrų kasetės |
| Zaštita motora | Защита на двигателя | Mootori kaitse | Variklio apsauga |
| Gumena mlaznica | Kaучукова дюза | Kummist otsik | Guminis antgalis |
| Pribor | Аксесоар | Lisaseade | Priedas |
| Vunena filter kesa | Филтърна торбичка | Fliisist filtrikott | Multininio filtro maišelis |
| PE vreća za pražnjenje i odlaganje | Полиетиленова торбичка за изпразване и изхвърляне | Polüetüleenist tühjendus- ja jäätmekott | Vienkartinis PE dulkių surinkimo maišas |
| Reduktor | Редуктор | Siirdmik | Reduktorius |
| lv Piederumi | ru Дополнительные принадлежности | zh 配件 | |
| Stumšanas rokturis | Ручка для толкания | 推手柄 | |
| Sūkšanas šljūtene | Всасывающий шланг | 吸入软管 | |
| Gofrētas filtra kasetes | Складчатые кассетные фильтры | 折叠式过滤器滤芯 | |
| Motora aizsargs | Защита двигателя | 电机保护 | |
| Gumijas sprausla | Резиновая насадка | 橡胶喷嘴 | |
| Piederums | Приспособление | 配件 | |
| Flīsa filtra maisiņš | Флисовый фильтр-мешок | 无纺布过滤袋 | |
| PE iztukšošanas un likvidēšanas maiss | Полиэтиленовый мешок для удаления отходов | 聚乙烯废物清空清理袋 | |
| Pārejas gabals | Переходник | 减压器 |
Deutsch (original)
Head of Quality Assurance
English
1 Explanation of symbols and signs used
| Symbol / Signal word Description | |
| ⚠️ | This is the warning symbol. It warns against possible risk of injury. Follow all instructions which are marked with this sign to avoid injury or death. The warning symbol always appears in association with the signal wordsDANGER, WARNING and CAUTION. |
| DANGER! | Identifies a hazard with a high degree of risk which will cause death or serious injury if not avoided. |
| WARNING! | Identifies a hazard with a medium degree of risk which could cause death or serious injury if not avoided. |
| CAUTION! | Identifies a hazard with a low degree of risk which could cause minor or moderate injury if not avoided. |
| NOTE | Identifies advice or instructions to simplify work and to ensure safe operation. |
| △ | Identifies a requirement which needs to be met before an action is taken. |
| ▶ | Identifies steps to be taken one after the other by the user. |
| ↳ Identifies the results of an action. | |
2 Important safety information
| ⚠ WARNING! |
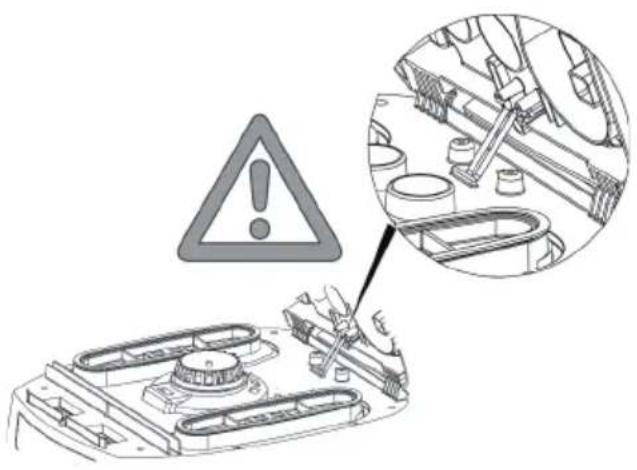
| Danger of suffocation! Do not allow children to play with packaging material, e.g. plastic bags.Do not climb onto or sit on the vacuum cleaner.Risk of falling when working on stairs. Pay attention to standing safely.Do not pull the mains connection cable and suction hose over sharp edges, do not bend it or clamp it.The mains connection cable and suction hose always must be routed in such a way that no one can trip over it.If any foam or liquid is discharged, immediately switch off the vacuum cleaner.Always keep the inside of the lid dry.Do not use the vacuum cleaner including accessories in the following cases:Mains connection cable or extension cable is defective or showing cracksThere is visible damage to the vacuum cleaner, e.g.cracks in the housingIf you suspect an invisible defect, e.g. after a fall |
| ⚠ DANGER! |
| Risk of explosion and fire! Do not run the vacuum cleaner in a potentially explosive environment.Keep away the vacuum cleaner from flammable gases and substances. |
⚠️ DANGER!
Risk of explosion and fire! Do not use the vacuum cleaner to vacuum up the following:
- flammable or explosive solvents
• materials soaked in solvents
• potentially explosive dusts
• liquids such as petrol, oil, alcohol, diluents - materials hotter then 60^ C
WARNING!
Improperly repaired devices pose a hazard for the user. Only have repairs carried out by experts, e.g. the customer service. Only use original accessories and spare parts.
WARNING!
Only use the socket on the vacuum cleaner for the purposes specified in the operating instructions.
In case of any inappropriate usage, improper operation or repair, the producer shall be exempt from liability.
Do not use damaged extension cables.
If the mains connection cable of the vacuum cleaner is damaged, it must be replaced by a special mains connection cable, which is available from the manufacturer or its customer service.
Never allow electrical brushes to come into contact with the mains connection cable.
The voltage on the rating plate must match the mains voltage.
Switch off the vacuum cleaner and disconnect the mains plug after use and before maintenance.
When unplugging, only pull on the mains plug and not on the mains connection cable.
Never touch the mains plug with wet hands.
Only connect the vacuum cleaner to a sufficiently protected electric socket.
Do not open the vacuum cleaner outdoors in the rain or during a thunderstorm.
Store the vacuum cleaner dry and indoors, protected from frost.
WARNING!
Vacuum cleaners for dust class L are suitable for vacuuming/sucking up dry, non flammable dusts that are hazardous to health with workplace exposure limits (OEL) > 1 mg/m ^3 .
Vacuum cleaners for dust class M are suitable for vacuuming/sucking up dry, non-flammable dusts, non-flammable liquids, wood dusts and hazardous dusts with workplace exposure limits ≥ 0.1 mg/m ^3 .
Vacuum cleaners for dust class H are suitable for vacuuming/sucking up dry, non-flammable dusts, carcinogenic and pathogenic particles as well as non-flammable liquids, wood dusts and toxic dusts with workplace exposure limits < 0.1 mg/m ^3 .
WARNING!
The machine may not be used by persons (including children) who have reduced physical, sensory or metal capabilities or who are inexperienced or lack the knowledge of how to use the machine.
Children must be supervised to ensure that they do not play with the device.
Do not point nozzle, tube or hose at people or animals.
WARNING!
Only use the brushes supplied with the vacuum cleaner or those specified in the operating instructions.
Using other brushes can compromise safety.
When being used in food processing businesses: Immediately clean the vacuum cleaner after use and disinfect it to avoid microbial contamination.
Do not use any steam jets or high-pressure cleaners for cleaning.
Only operate the vacuum cleaner under supervision.
Disconnect the vacuum cleaner from the mains in the event of a longer work interruption.
Do not clean filter cartridges using compressed air.
WARNING!
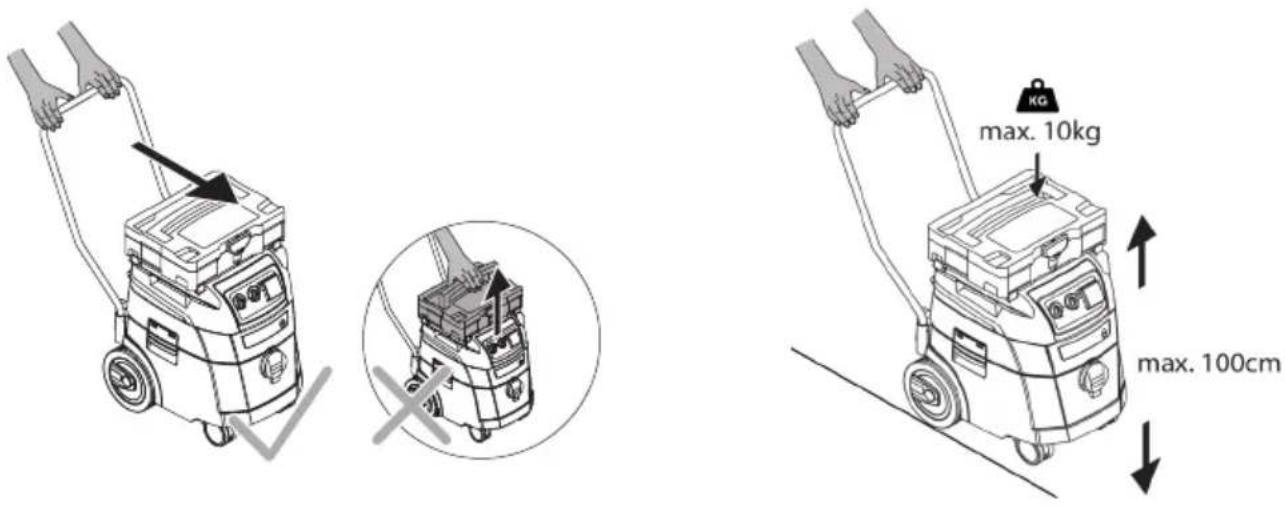
Do not lift the vacuum cleaner at the mounted toolbox.
Load the toolbox with a maximum weight of 10 kg.
Do not stack the toolboxes higher than 1.00 m (total height with vacuum cleaner).
Before opening the cover, remove the toolbox.
Read the operating manual carefully before starting to use the vacuum cleaner. The operating manual provides important instructions for safety, commissioning, operation, maintenance and care. Keep the operating manual in a safe place and, in case you sell the unit, hand it on to the next owner.
The manufacturer reserves the right to carry out modifications to the design and equipment.
Do not perform any other work than described in this manual.
This machine is intended for commercial use, for example, in hotels, schools, hospitals, factories, shops, offices and in the rental business.
When unpacking, check for completeness and transport damage.
Before use, the operators should be provided with information, instructions and training for the use of the vacuum cleaner and the substances that it is to be used for, including the safe procedure for the removal of the gathered material.
3 Display and control elements
| Switch position Function Description | |||
| 0 |  | Vacuum cleaner is switched off. | - Plug socket under voltage |
| A |  | Vacuum cleaner is switched off. | - Plug socket under voltage- Operation with power tool, filter cleaning function switched off- When the tool is switched on, the vacuum cleaner automatically switches on. After the power tool is switched off, the vacuum cleaner runs on for approx. 10 seconds to prevent any residue from collecting in the hose |
| AR |  | Standby mode | - Plug socket under voltage- Filter cleaning at start-up and automatic filter cleaning function after differential pressure detection- When the tool is switched on, the vacuum cleaner automatically switches on. After the power tool is switched off, the vacuum cleaner runs on for approx. 10 seconds to prevent any residue from collecting in the hose |
| IR |  | Vacuum cleaner starts immediately | - Plug socket under voltage- Automatic filter cleaning function starts after differential pressure detection |
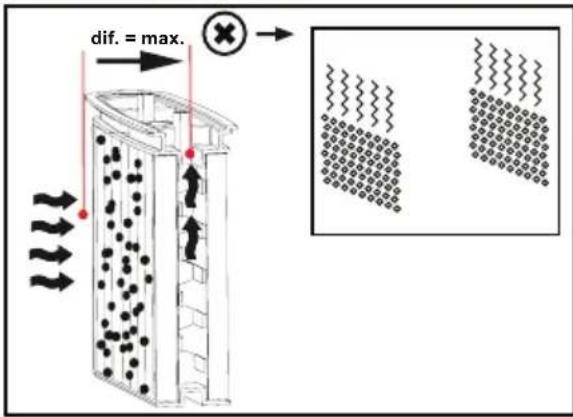
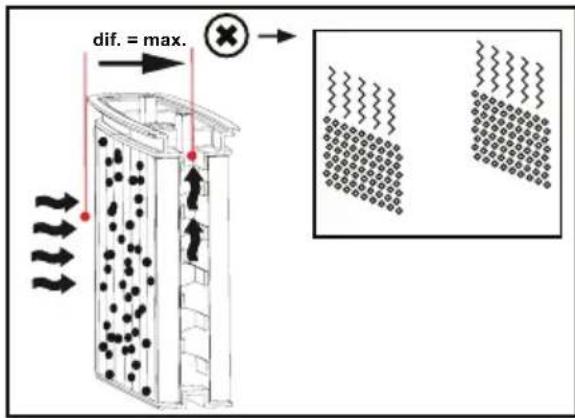
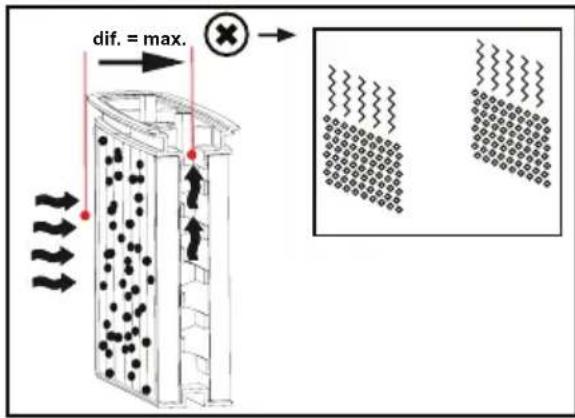
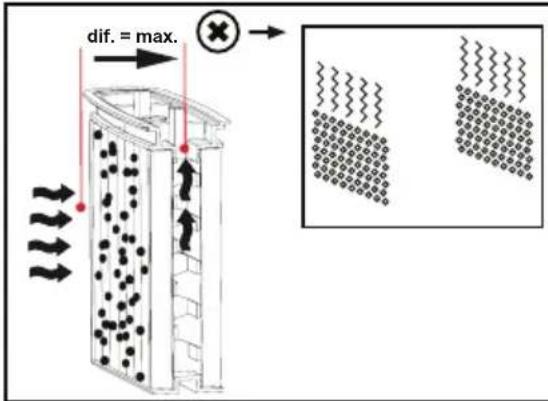
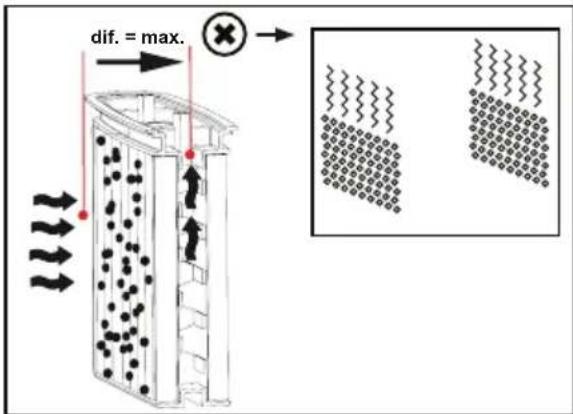
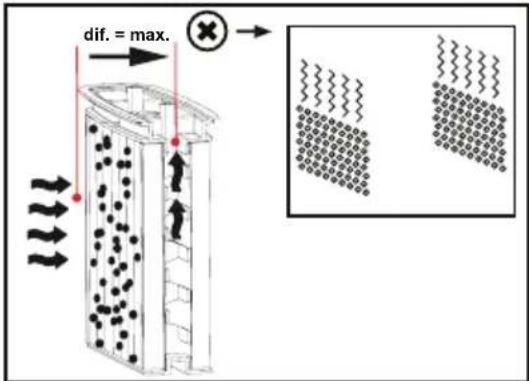
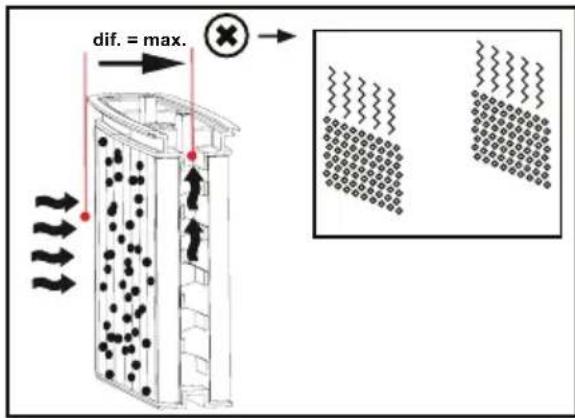
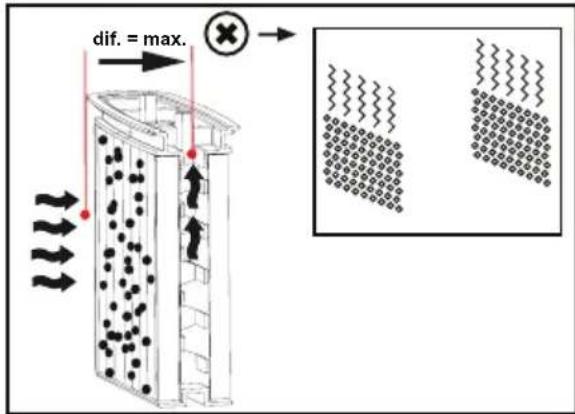
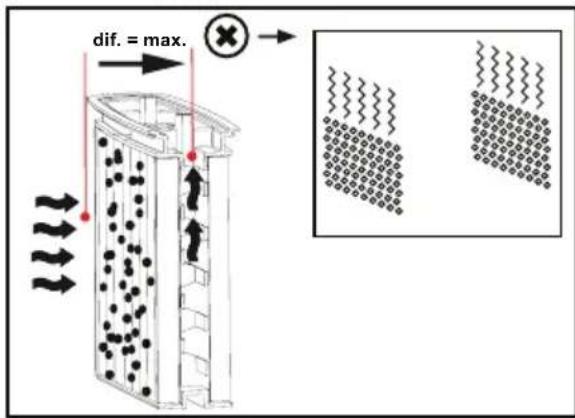
| Automatic filter cleaning function | - While the vacuum cleaner is running, the folded filter cartridges are cleaned alternately when a certain negative pressure value is reached, at which there is still sufficient air. | ||
| Fill level indicator* | - The fill level indicator lights up when the tank is full and/or the suction hose is blocked. On vacuum cleaners with dust class M and H, an acoustic signal is also emitted | ||
 | Drehzahlregulierung* | - Continuously adjust the suction power with the speed control | |
 | Setting the suction hose diameter* | - On M/H/H-asbestos vacuum cleaners for volume flow monitoring, when the minimum air speed drops below 20 m/s | |
4 Commissioning
4.1 Before every use
Make sure that the following conditions are met:
△ Vacuum cleaner, mains cable, suction hose and accessories are not damaged.
△ All filters have been inserted and are not damaged.
4.2 Switching on and off
The plug socket on the vacuum cleaner remains always under voltage, regardless of the main switch position.
WARNING!
Danger of injury by automatically starting power tool!
▶ Switch off power tool or pneumatic tool before connecting to the vacuum cleaner.
NOTE
With switch in position >0<, the plug socket on the vacuum cleaner can be used as an extension cable.
△ Power consumption: vacuum cleaner + connected power tool (max. 2000 W) max. 16 A.
4.2.2 Switching on the vacuum cleaner
Functions see „3 Display and control elements“ on page 24.
▶ Insert plug into plug socket.
▶ Set switch to position >IR<.
→ Vacuum cleaner starts immediately.
or:
▶ Set switch to position >A< or >AR<.
→ Vacuum cleaner is in standby mode for power tools.
4.2.3 Setting the motor speed\*
▶ Adjust motor speed at the switch.
4.2.4 Setting the suction hose diameter\*
▶ Set suction hose diameter at the switch.
⚠️ CAUTION!
Selector switch for minimum air volume flow signal (horn and light) on vacuum cleaners with dust classes „M“ and „H“ In the modes >AR< and >IR< the following setting is made, depending on the diameter of the hose:
| Selector switch for suction hose inner diameter | Volume air flow |
| ∅ 35 mm | 70 l/s |
| ∅ 27 mm | 41 l/s |
| ∅ 21 mm | 25 l/s |
| The speed can be adjusted individually after setting the hose diameter. | |
4.2.5 Switching off the vacuum cleaner
▶ Set switch to position >0<.
→ Vacuum cleaner is switched off.
▶ After switching off, pull the mains plug out.
▶ Roll up mains connection cable.
- Store the mains connection cable on the cable hook.
- Store the suction tube by inserting it into the accessories holder* on the container rear wall.
- Put the suction hose ends together so that no dirt particles leak out.
Remove Power tool.
5 Operating modes
- When using the handlebar, suction power can be set with the auxiliary air slide.
5.1 Sucking up dry materials
▶ Only use a dry filter, vacuum cleaner and accessories, so that the dust does not stick and or cake.
When vacuuming soot, cement, plaster or similar dusts: Insert a PE disposal bag in the dirt container. Always use PE disposal bags in combination with folded filter cartridges.
NOTE
M, H and H-asbestos class vacuum cleaners should be preferably used as vacuum cleaners for dry dusts.
5.2 Sucking up liquids
WARNING!
Electrical shock hazard!
If any foam or liquid is discharged, immediately switch off the vacuum cleaner.
▶ Empty dirt container and folded filter cartridge.
NOTE
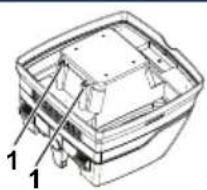
Regularly clean the water level sensors (1) and inspect for signs of damage.
▶ Vacuum cleaning without fleece filter bags.
The folded filter cartridge designed for wet vacuum cleaning.
The built-in sensor switches the motor off when the container is full. The handling of the vacuum cleaner can be compromised by a full container.
▶ Empty container (see „7 Emptying the container“ on page 26).
NOTE
If the vacuum cleaner is not switched off, the re-start protection remains effective. The vacuum cleaner is ready for operation only after the unit has been switched off and switched on again.
Remove the suction hose from the liquid before emptying.
▶ After switching off, a small quantity of water can flow back out of the hose, as a result of the high suction level and the favourable flow condition in the container.
▶ After wet vacuum cleaning insert dry filters for picking up dry dust.
NOTE
When changing frequently between dry and wet vacuum cleaning, use a second set of filters, preferably polyester folded filter cartridges.
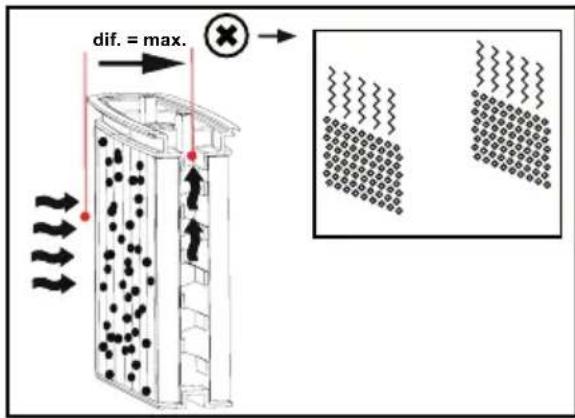
6 Permanent filter cleaning
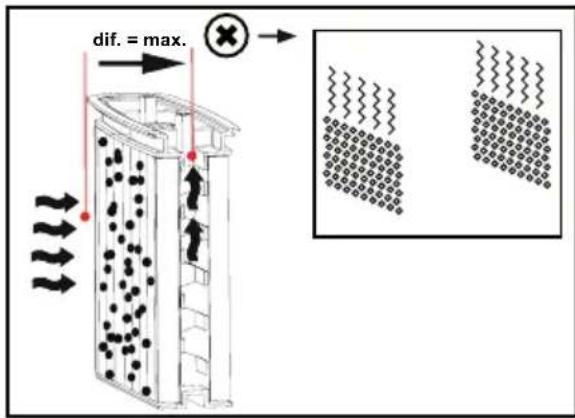
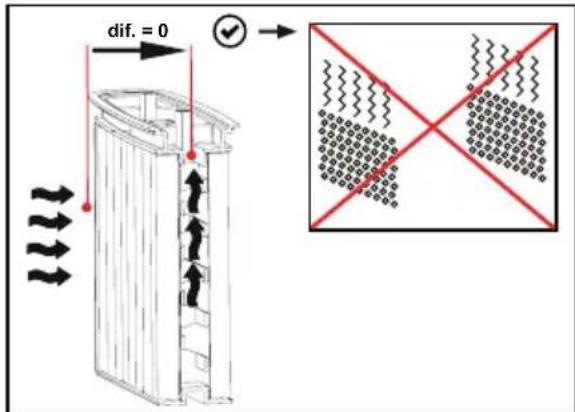
The vacuum cleaner is fitted with an electromagnetic filter cleaning system, which can be used to clean any attached dust from the filter cartridges.
The folded filter cartridges are cleaned alternately one after the other so that continuous work is guaranteed.

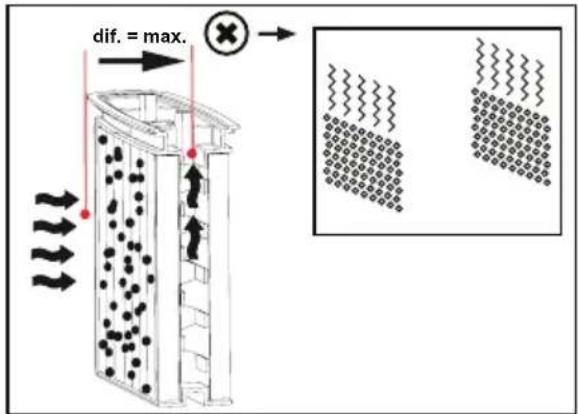
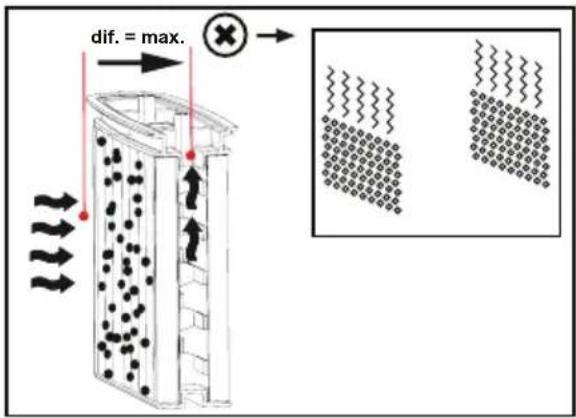
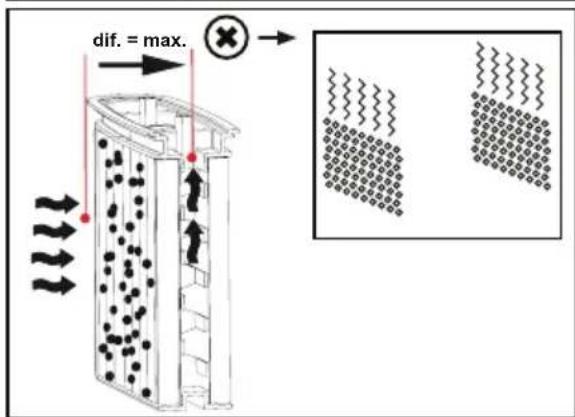
Continuous monitoring of the filter filling level through differential pressure measurement, for an absolutely precise on-demand filter cleaning during the operation.
Thereby constant high air flow cleaning guaranteed during the operation, even for critical types of dust.
7 Emptying the container
NOTE
Only permitted for dust with workplace exposure limits > 1 mg/m ^3 .
▶ Switch off the vacuum cleaner, pull out the mains plug.
▶ Open the latches.
Remove the cover and suction hose from the container.
▶ Empty the container by pouring out.
7.1 Dispose of the fleece filter bag
(see Quick Reference Guide

▶ Switch off vacuum cleaner.
▶ Disconnect mains plug.
▶ Wear appropriate breathing mask.
▶ Remove suction hose.
▶ Close off intake socket with cap.
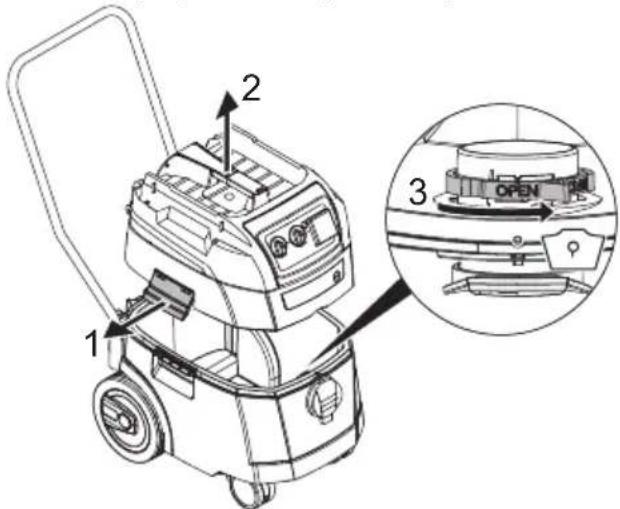
▶ Open side latches.
Remove top section.
- Carefully pull the flange off the intake socket and close off the flange.
- Dispose of gathered material in accordance with legal requirements.
7.2 Dispose of the PE emptying and disposal bag
(see Quick Reference Guide

▶ Set switch to position >AR<.
Folded filter cartridges are cleaned automatically.
↓ Residual dust in the filters falls into the bag.
▶ Switch off vacuum cleaner.
▶ Disconnect mains plug.
▶ Wear appropriate breathing mask.
Remove suction hose.
▶ Close off intake socket with cap.
▶ Open side latches.
- Carefully close the PE emptying and disposal bag with the enclosed sealing tape.
- Carefully pull the flange off the intake socket and close off the flange.
- Carefully remove the PE emptying and disposal bag from the container.
- Dispose of gathered material in accordance with legal requirements.
7.3 Insert fleece filter bag
NOTE
Only use fleece filter bags for dry vacuum cleaning.
▶ Slide the flange completely over the intake socket (see Quick Reference Guide 📄).
NOTE
Operating the rotary slide
▶ Turn the red rotary slide inside to position CLOSE to the stop on the marker ▲.
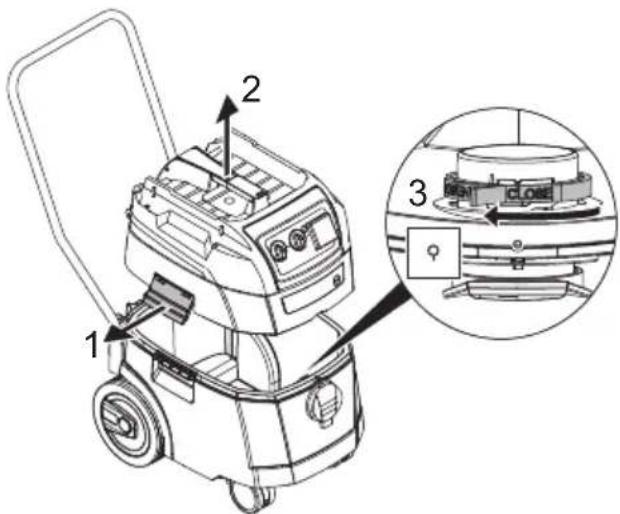
- Place top section on the container and close the side latches.
7.4 Insert PE emptying and disposal bag\*
NOTE
Only vacuum cleaners with dust class M and H with special containers and rotary slide in the intake socket of types iPulse M, iPulse H and iPulse tH-asbestos are suitable for the use of PE emptying and disposal bags.
NOTE
Operating the rotary slide
▶ Turn the red rotary slide inside to position OPEN to the stop on the marker ▲.
▶ Slide the flange completely over the intake socket.
Place the upper bag opening over the container rim.
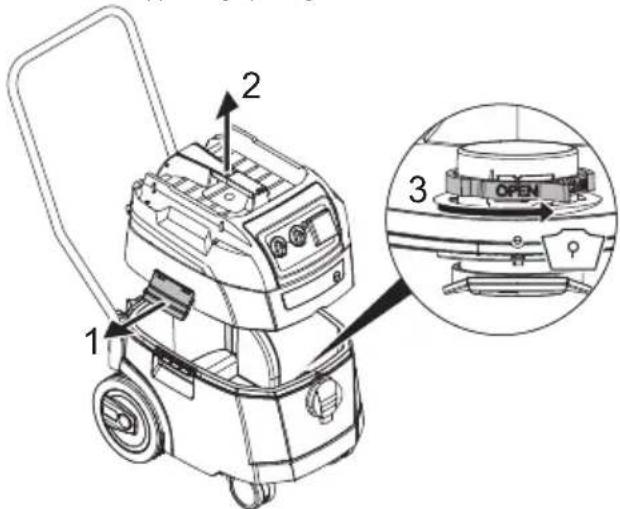
Place top section on the container and close the side latches.
8 Changing the filter
8.1 Changing the folded filter cartridges
(see Quick Reference Guide

▶ Clean the filter cartridges before changing them.
▶ Turn the lock on the latch through 90^ in a counter-clockwise direction with a coin or similar object and push the latch to the rear.
▶ Fold up the cover.
▶ Immediately isolate the folded filter cartridges that you have removed in a dust-tight plastic bag and dispose of properly in accordance with the requirements.
▶ Insert new folded filter cartridges.
▶ Lift the locking bracket up, fold down the cover and click in place with light pressure.
9 Changing the motor protection filter
(see Quick Reference Guide

NOTE
If motor protection filter is contaminated, this indicates defective filter cartridges.
▶ Replace folded filter cartridges.
- Replace motor protection filter or wash the motor protection filter under flowing water, dry and re-insert.
10 Transport
▶ Remove suction hose.
▶ Close off intake socket with cap.
- Securely fix the motor head to the container (close the side latches).
- Place the accessories in a suitable plastic bag and seal the plastic bag or place it in the tool storage compartment.
- Put the suction hose ends together so that no dirt particles leak out.
Place the hose around the vacuum cleaner and clamp onto the handle (see Quick Reference Guide).
11 Maintenance
NOTE
Switch off the vacuum cleaner and pull out the mains plug before carrying out any maintenance work.
For maintenance by the user, the vacuum cleaner must be
- dismantled,
- cleanded and
- maintained,
as far as possible without creating any danger to the maintenance personnel or other.
Precautionary measures
Suitable precautionary measures include:
- Cleaning before dismantling
- Provision of local filtered positive ventilation where the vacuum cleaner is to be dismantled
- Cleaning of the maintenance area
- Suitable personal protection equipment
Precautionary measures with vacuum cleaners class H and M
The outside of the vacuum cleaner should be cleaned by dust extraction procedures and wiped down, or should be treated with a sealing agent before being removed from the hazardous area. All parts of the vacuum cleaner must be considered to be contaminated when they are removed from the hazardous area, and suitable handling must be used to prevent dust distribution.
Contaminated items
When carrying out maintenance or repair work, all contaminated items which have not been adequately cleaned, must be disposed of. Such items must be disposed of in impermeable bags in accordance with the applicable regulations concerning the disposal of such waste.
11.1 Testing the effectiveness of the vacuum cleaner
At least once a year, the manufacturer or an instructed person must perform a technical inspection including filters, air tightness of the vacuum cleaner, and control mechanisms.
In addition, the effectiveness of the vacuum cleaners with dust class H and H-asbestos must be checked at least once a year or more frequently. The test method, which can be used for demonstrating the effectiveness of the device, is defined in EN 60335-2-69 AA.22.201.2. If the test is not passed, it must be repeated with a new main filter.
There must be an adequate air exchange rate L in the room if the exhaust air returns to the room. Observe national regulations.
If the suction power of the vacuum cleaner is reduced and the cleaning of the filter cartridges is no longer sufficient (assuming that tank is emptied and fleece filter bag is replaced), it is necessary to replace the folded filter cartridges (see Quick Reference Guide and „8.1 Changing the folded filter cartridges“ on page 27).
11.2 Cleaning
NOTE
Acids, acetone and solvents can damage parts of the vacuum cleaner.
▶ Clean container and accessories with water.
▶ Wipe the top section with a damp cloth.
▶ Allow the container and accessories to dry.
11.3 Repair
WARNING!
Improperly repaired vacuum cleaners pose a hazard for the user! ▶ Have repairs carried out by qualified personnel only, e.g. the customer service.
12 Troubleshooting and repair
| NOTE | ||
| Malfunctions cannot always be traced back to defects in the vacuum cleaner. | ||
| Fault Cause Remedy | ||
| Suction power drops Filter dirty Clean | ||
| Filter bag full Change | ||
| Container full Empty | ||
| Motor protection filter blocked Clean | ||
| Nozzle, tube or hose blocked Clean | ||
| Vacuum cleaner does not start Mains plug | not in socket Plug mains plug into socket | |
| No mains voltage Check fuse | ||
| Mains connection cable defective Replace | ||
| Cover not properly closed Close | ||
| Water sensor switched off Empty container | ||
| Vacuum cleaner in standby mode >A< or >AR< | Set switch to >IR< (see „3 Display and control elements“ on page 24) | |
| The vacuum cleaner does not start when the tool is switched on in the >A< or >AR< mode | Electrical tool not plugged into socket on the vacuum cleaner | Plug mains plug into socket on the vacuum cleaner |
| Solenoid valve of pneumatic on-off unit*contaminated | Rinse with alcohol | |
| PE emptying and disposal bag is sucked against the filter | Incorrect position of rotary slide | Set rotary slide to position OPEN ▲ (see „7.4 Insert PE emptying and disposal bag*“ on page 27) |
| Vacuum cleaner with dust classes M or H: with inserted filter bag, dust is accumulating in the container | Incorrect position of rotary slide | Set rotary slide to position CLOSE ▲ (see „7.3 Insert fleece filter bag“ on page 26) |
Do not try anything else, contact customer services.
13 Genuine accessories
| NOTE | ||
| Only use original accessories. | ||
| Article designation Properties/material | Order quantity (1 set) | |
| Fleece filter bag FBV 25/35 | for 25-litre- and 35-litre plastic container, BGIA class M approved | 5/10 pieces |
| Folded filter cartridge FK 4300 | Cellulose material, BGIA class M approved | 2 pieces |
| Folded filter cartridge FKP 4300 | Polyester material, BGIA class M approved | 2 pieces |
| Folded filter cartridge FKP 4300 HEPA (H 14) | 3 layer filter cartridge, BGIA class H approved | 2 pieces |
| Folded filter cartridge FKPN 4300 Nano | Folded filter cartridge with nano coating | 2 pieces |
| PE emptying and disposal bag | Only for ISP vacuum cleaners class M and H | 5 pieces |
| PE emptying and disposal bag ASBESTOS | Only for ISP vacuum cleaners class H ASBESTOS | 5 pieces |
Additional accessories can be found in the special accessory list which can be obtained on request from the Starmix Service Team on the internet: www.starmix.de, E-Mail: info@starmix.de.
14 Technical Data
| Type: ISP | Model:iPulse L-1635 | Model:iPulse M-1635 | Model:iPulse H-1635 | Model:iPulse H-1235 Asbest | |
| Voltage Volt 220-240 V~ 220 | -240 V~ 220 | -240 V~ 220-240 V~ | |||
| Frequency Hertz 50/60 Hz 50 | 0/60 Hz 50 | 60 Hz 50/60 Hz | |||
| Rated power Watt 1400 1400 | 1400 1000 | ||||
| Max. power Watt 1600 1600 | 1600 1200 | ||||
| Air flow* I/s 75 75 75 70 | |||||
| Negative pressure* | hPa/MG | 280 | 280 | 280 | 265 |
| Air flow** | I/s 45 45 45 | 45 40 | |||
| Negative pressure** | hPa/SE | 245 | 245 | 245 | 230 |
| Noise level | dB(A) | 69 | 69 | 69 | 69 |
| Weight | kg | 15,6 (16,7***) | 15,6 (16,7***) | 15,6 (16,7***) | 15,6 (16,7***) |
| Dimensions (I x w x h) | cm | 53 x 40 x 56 (92***) | 53 x 40 x 56 (92***) | 53 x 40 x 56 (92***) | 53 x 40 x 56 (92***) |
* at the fan
** at the hose
*** incl. push handle
Max. power on vacuum cleaners with plug socket: 2000 W
Mains connection cable on vacuum cleaners with plug socket: H05RR-F 3 x 1,5
Mains connection cable on ASBESTOS vacuum cleaners with plug socket: H07RR-F 3 x 1,5
15 Tests and approvals
Electro-technical tests must be carried out in accordance with the accident prevention regulations (BGV A3) and in accordance with DIN VDE 0701 Part 1 and Part 3. These tests are required in accordance with DIN VDE 0702 at regular intervals and after repair or modification.
The vacuum cleaners are successfully tested in accordance with IEC/EN 60335-2-69.
NOTE
Old equipment contains valuable materials which are designed for re-processing. The vacuum cleaners must not be thrown away in the normal household waste, but should be disposed of at a suitable proper collection system, e. g. via your communal disposal location.
16 Declaration of conformity
We hereby declare that the machine described below complies with the relevant basic safety and health requirements of the EC Directives, both in its basic design and construction as well as in the version put into circulation by us.
This declaration shall cease to be valid if the machine is modified without our prior approval.
Product: Vacuum cleaner for wet and dry operation
Type:
ISP
The design of the appliance corresponds to the following pertinent regulations:
EC Machinery Directive 2006/42/EU
EC Directive EMC 2014/30/EC
ROHS 2011/65/EU
EC Machinery Directive 2006/42/EU including amendments:
Category II requirements
The following institute has tested and certified the product:
Authorized documentation representative:
ELECTROSTAR GmbH, Stuttgarter Straße 36, 73262 Reichenbach/Fils, Germany
Candu Sore
01.08.2017
Carsten Gresser
Head of Quality Assurance
Français
natural_image
Illustration of a hand operating a portable vacuum cleaner with a close-up view showing the device's internal components (no text or symbols present)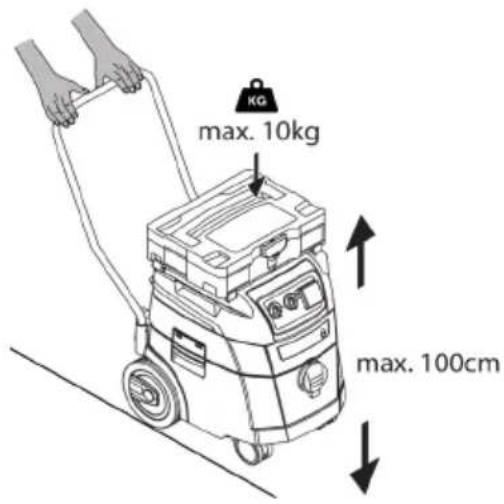
natural_image
Technical line drawing of a rectangular container with internal components and labeled parts (no text or symbols)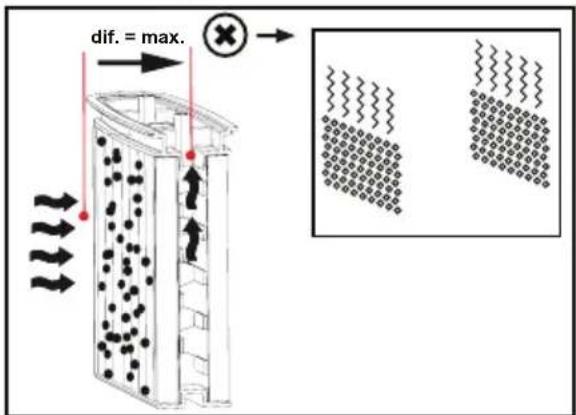
7 Vidage du bac
REMARQUE
Directive relative aux machines UE 2006/42/UE
Directive UE EMC 2014/30/UE
La directive ROHS 2011/65/UE
natural_image
Diagram of a hand operating a cleaning machine with a close-up view showing the device's handle and control panel (no text or symbols present)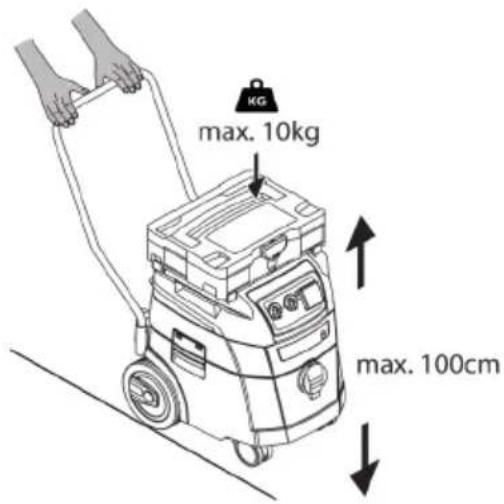
natural_image
Technical line drawing of a mechanical housing or enclosure with labeled components (no text or symbols present)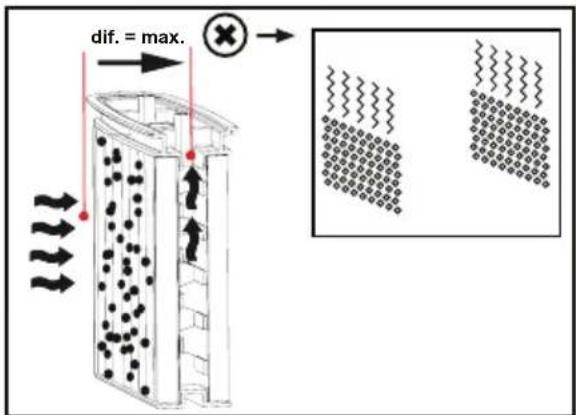
7 Vaciado del recipiente
NOTA
natural_image
Technical line drawing of a rectangular container with internal components and labeled parts (no text or symbols present)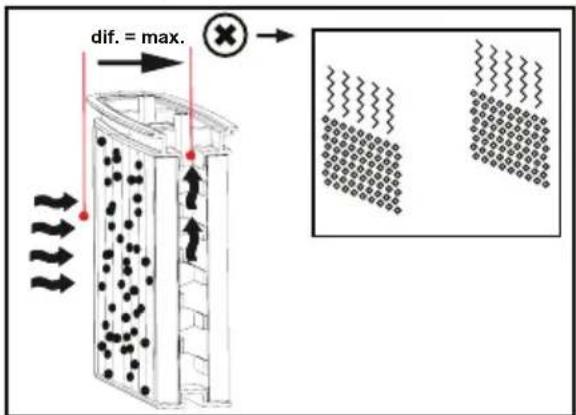
natural_image
Technical line drawing of a mechanical housing or enclosure with labeled components (no text or symbols present)
3 Display- en bedieningselementen
natural_image
Technical line drawing of a rectangular container with internal components and labeled parts (no text or symbols)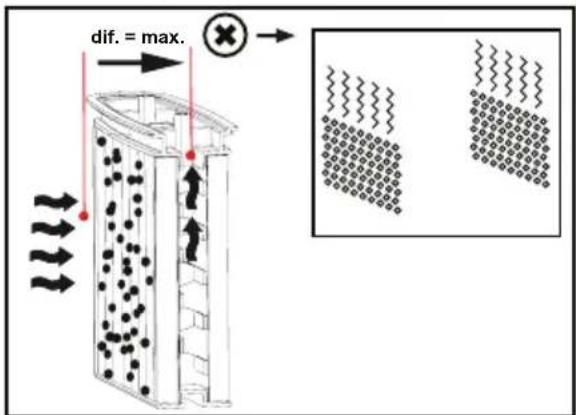
3 Display og kontrolelementer
7 Tömma behållaren
OBS
natural_image
Diagram of a hand operating a cleaning machine with a close-up view showing the internal components (no text or symbols present)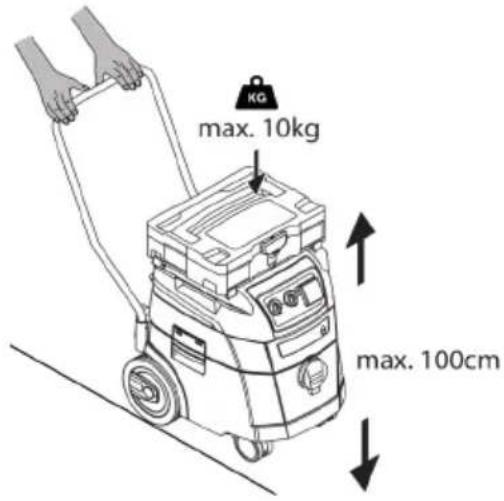
7.3 Sett inn fiberduk-filterpose
MERK
natural_image
Illustration of a hand operating a portable vacuum cleaner with a close-up view showing the device's internal components (no text or symbols present)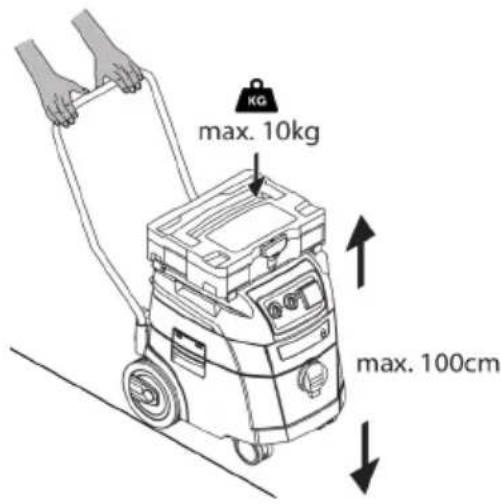
Lue
natural_image
Technical line drawing of a mechanical housing or enclosure with labeled components (no text or symbols present)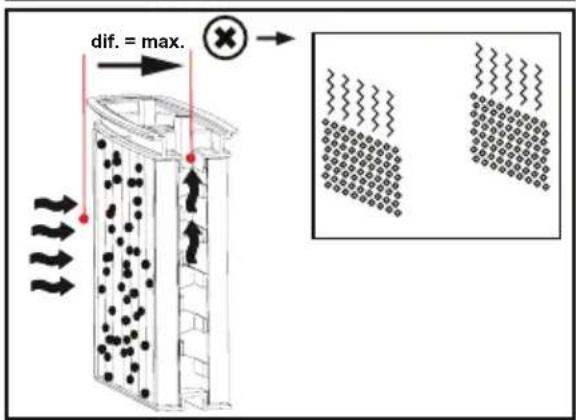
natural_image
Illustration of a hand operating a cleaning machine with a close-up view showing the device's internal components (no text or symbols present)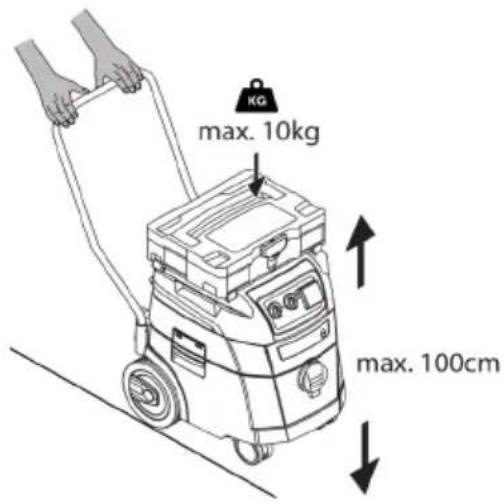
natural_image
Technical line drawing of a rectangular container with internal components and labeled parts (no text or symbols present)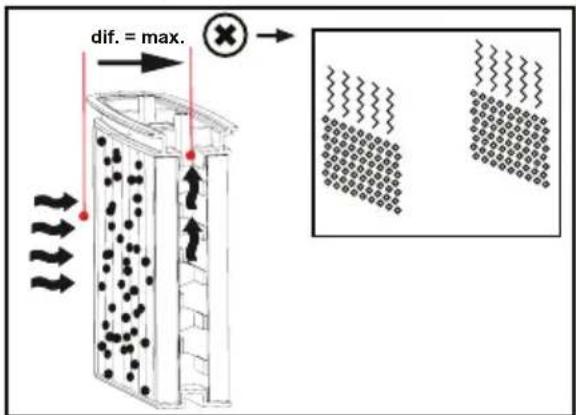
natural_image
Technical line drawing of a rectangular container with internal components and labeled parts (no text or symbols)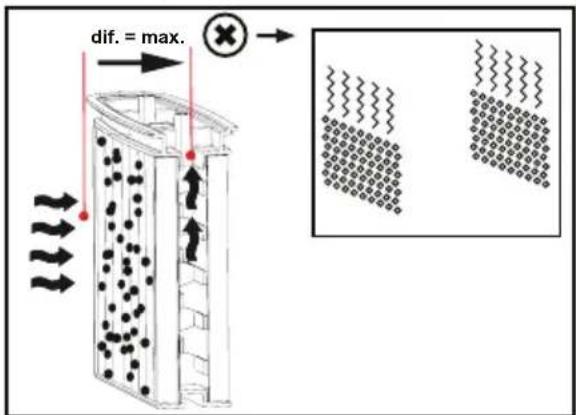
7 A tartály ürítése
MEGJEGYZÉS
3 Zaslonski in kontrolni elementi
3 Elementi prikaza i rukovanja
▶ Postavite gornji dio na spremnik.
Zatvorite bočne zasune.
7.4 Umetnite PE vrećicu za pražnjenje i odlaganje\*
NAPOMENA
Samo usisavači s razredom prašine M i H s posebnim spremnicima i rotirajućim kliznikom na usisnom priključku tipa iPulse M, iPulse H i iPulse tH-azbest prikladni su za korištenje PE vrećica za pražnjenje i odlaganje.
NAPOMENA
Upravljanje okretnim kliznikom
- Okrenite crveni okretni kliznik u položaj OPEN dok se ne zaustavi na oznaci ▲.
Gurnite u potpunosti prirubnicu preko usisnog priključka.
Postavite gornji otvor vrećice preko ruba spremnika.
▶ Postavite gornji dio na spremnik.
Zatvorite bočne zasune.
8 Promjena filtra
natural_image
Diagram of a hand using a manual presser to lift a device, with an inset showing the close-up of the component (no text or symbols present)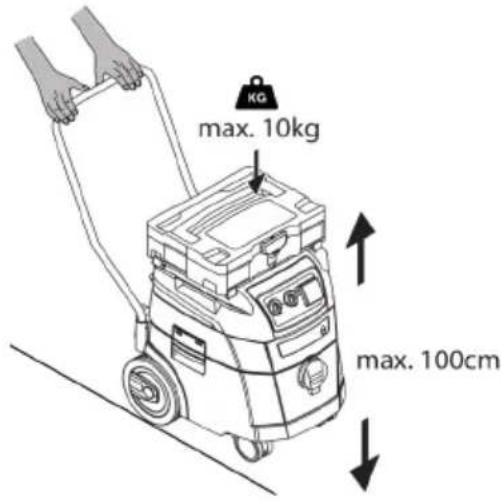
3 Elementi za prikaz i kontrolu
| Položaj prekidača Funkcija Opis | |||
| 0 |  | Usisivač je isključen. | - Utičnica je pod naponom |
| A |  | Usisivač je isključen. | - Utičnica je pod naponom- Rad sa električnim alatom, funkcija čišćenja filtera isključena- Kada se alat uključi, usisivač se automatski uključuje. Nakon što se isključi električni alat, usisivač nastavlja da radi približno 10 sekundi kako bi sprečio nakupljanje ostataka u crevu |
| AR |  | Režim pripravnosti | - Utičnica je pod naponom- Čišćenje filtera pri pokretanju i automatska funkcija čišćenja filtera nakon detekcije diferencijalnog pritiska- Kada se alat uključi, usisivač se automatski uključuje. Nakon što se isključi električni alat, usisivač nastavlja da radi približno 10 sekundi kako bi sprečio nakupljanje ostataka u crevu |
| IR |  | Usisivač se odmah pokreće | - Utičnica je pod naponom- Funkcija automatskog čišćenja filtera počinje nakon detekcije diferencijalnog pritiska |
| Automatska funkcija čišćenja filtera | - Dok je usisivač u funkciji, presavijeni filter kertridži se naizmenično čiste kada se dostigne određena vrednost negativnog pritiska, na kojoj još uvek ima dovoljno vazduha. | ||
| Indikator nivoa napunjenosti* | - Indikator nivoa napunjenosti se pali kad je rezervoar pun i/ili je usisno crevo blokirano. Na usisivačima sa klasom prašine M i H, emituje se i zvučni signal | ||
 | Kontrola brzine* | - Kontinuirano prilagođavajte snagu usisavanja pomoću kontrole brzine | |
 | Postavljanje prečnika usisnog creva* | - Na M/H/H-azbestnim usisivačima za praćenje zapreminskog protoka, kada minimalna brzina vazduha padne ispod 20 m/s | |
4 Puštanje u rad
4.1 Pre svake upotrebe
* u zavisnosti od varijante opreme
7 Pražnjenje kontejnera
BELEŠKA
Dozvoljeno samo za prašinu sa graničnim radnim vrijednostima > 1 mg/m³.
- Isključite usisivač, izvucite mrežni utikač.
▶ Otvorite zatvarače.
▶ Skinite poklopac i usisno crijevo sa posude.
▶ Prevrnite posudu.
7.1 Odložite vunenu filter vreću
▶ Postavite gornji deo na kontejner.
Zatvorite bočne reze.
▶ Postavite gornji deo na kontejner.
Zatvorite bočne reze.
8 Promena filtera
8.1 Promena presavijenih filter kertridža
natural_image
Diagram of a hand using a manual presser to lift a device, with an inset showing the close-up of the component (no text or symbols present)
natural_image
Technical line drawing of a mechanical housing or enclosure with labeled components (no text or symbols present)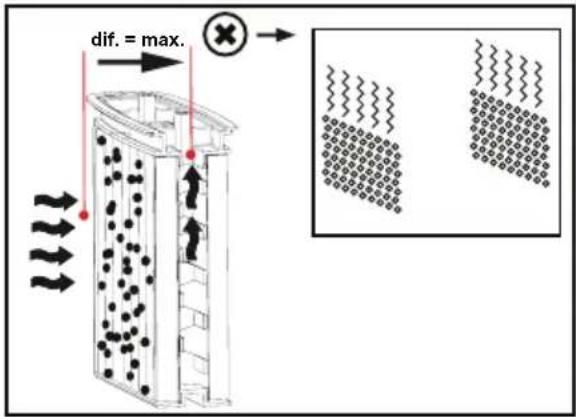
natural_image
Illustration of a hand operating a cleaning machine with a close-up view showing the device's internal components (no text or symbols present)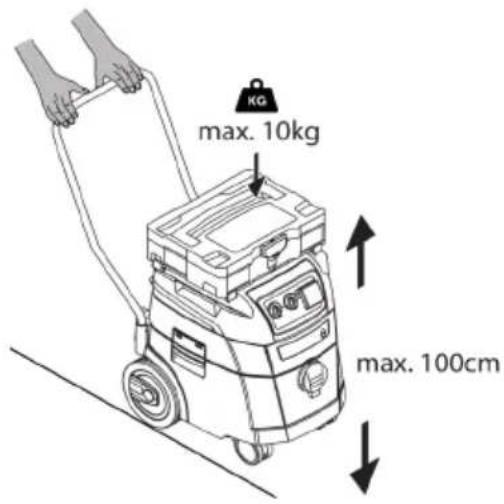
natural_image
Technical line drawing of a rectangular container with internal components and labeled parts (no text or symbols present)
▶ Novietojiet augšdalu uz tvertnes.
▶ Aizveriet sānu fiksatorus.
7.4 levietojiet PE vienreizlietojamo maisu\*
PIEZIME
natural_image
Illustration of a hand operating a cleaning machine with a close-up view showing the device's internal components (no text or symbols present)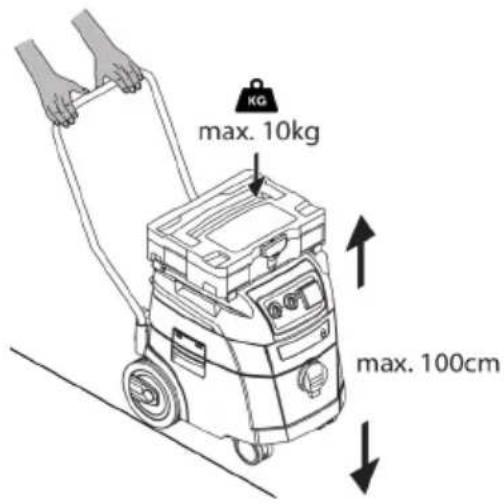
natural_image
Technical line drawing of a mechanical housing or enclosure with labeled components (no text or symbols present)
3 显示和控制元件
7 清空容器
注意
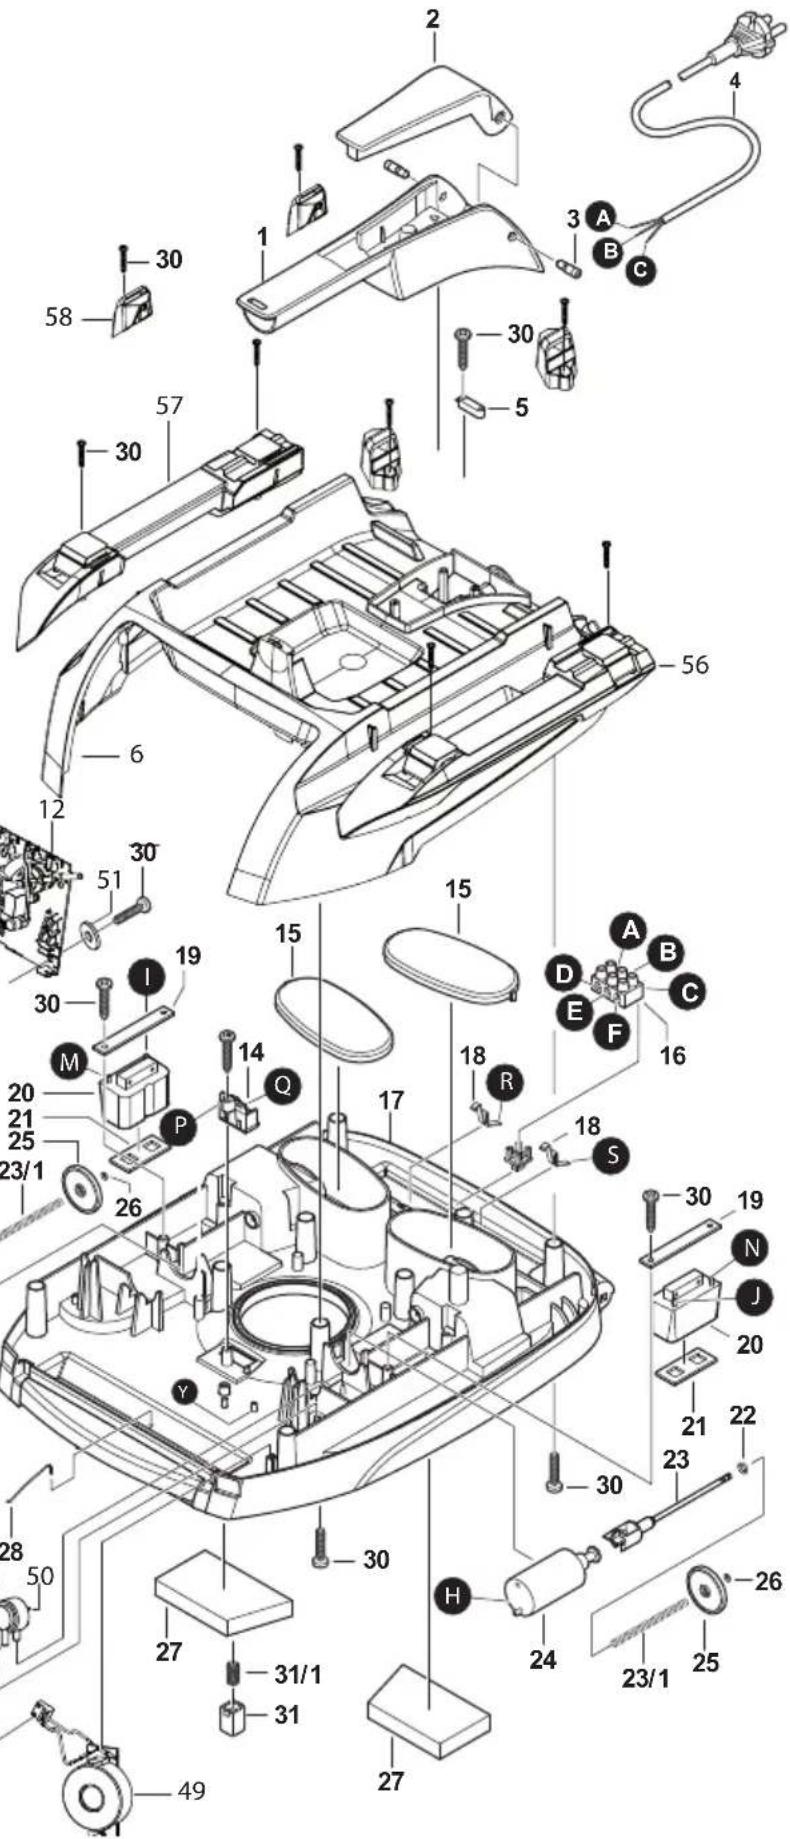
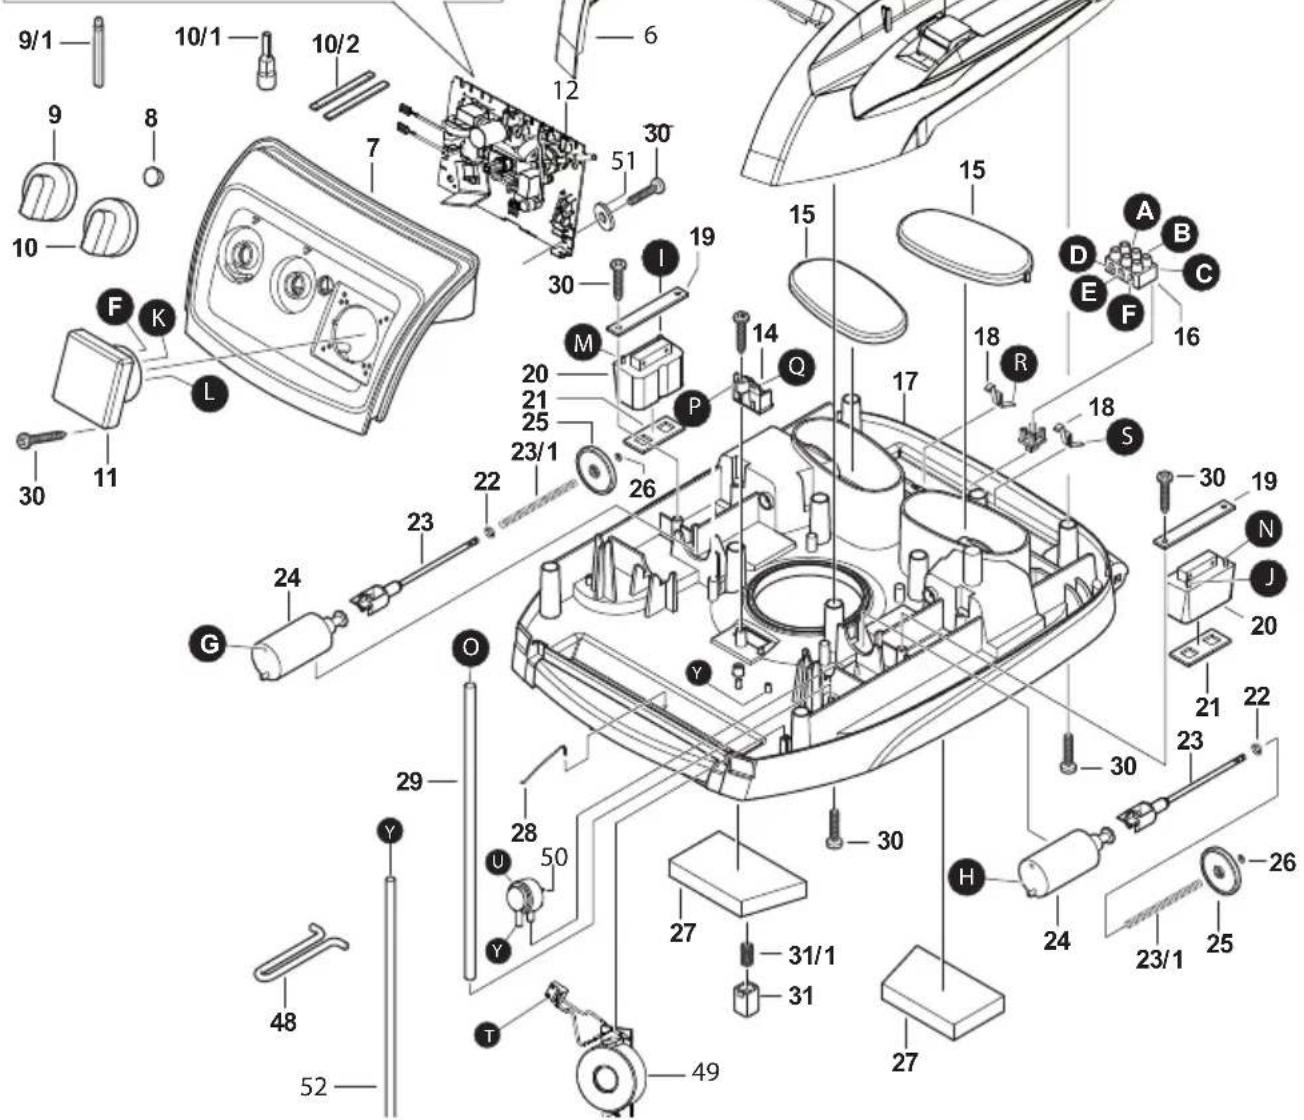
| Ersatzteile / Spare Parts Stand / Issue: 17-08 | ||
| A - iPusle L-1635 Premium (018652)B - iPusle L-1635 Top (018621)C - iPulse M-1635 Safe Plus (018638)D - iPulse H-1635 Safe Plus (018614)E - iPulse H-1235 Asbest Safe Plus (018645)F - iPulse L-1635 Basic (018539)G - iPulse M-1635 Safe (018935) | ||
| Pos.-Nr. / Item No. Bestell-Nr. / Order No. Typ / Type | ||
| 01+02+03 407937 A-G | ||
| 04+05+16+30 444666 A/B/F | ||
| 04+05+16+30 444819 C/D/E/G | ||
| 06 444673 A-G | ||
| 56+57+30 445106 A-E | ||
| 58+30 444697 F/G | ||
| 07+08 444703 A-G | ||
| "09+10+9/1+10/1+10/2" 444710 A-G | ||
| 11+30 444727 A-G | ||
| "12+29+30+50+51+52" 444734 A/B/F | ||
| "12+29+30+50+51+52" 444741 C/D/E/G | ||
| 14 417707 A-G | ||
| 17 444758 A-G | ||
| 18+28+44 444765 A-G | ||
| 19+20+21+30 444772 A-G | ||
| "15+22+23+23/1+25+26" 444789 A-G | ||
| 24 444796 A-G | ||
| 27+27/1 | 408200 A-G | |
| 30 408705 A-G | ||
| 31+31/1+48+30 | 444826 A-G | |
| 31/1+35+36+37 | 444833 A-G | |
| 38+38/1+38/2 | A-G | |
| 32 417714 A-G | ||
| 33 408224 A-G | ||
| 34 444802 A-G | ||
| 39+39/1 | 408767 A-G | |
| 42+30 444932 A-G | ||
| 43 408293 A-G | ||
| 45+45/1+46+53 | 444680 A-G | |
| 47 416069 A/B/C/F/G | ||
| 47 419190 D/E | ||
| 56 444901 E | ||
| 56 444918 A/B/C/D/F/G | ||
| 49 444840 C/D/E/G | ||
| Label iPulse L/M | 444857 A/B/C/F/G | |
| Label iPulse H | 444871 D/E | |
| Label Asbestos | 444864 E | |
Typ ISP iPulse 1200 - 1600W
Stand Issue 07-17
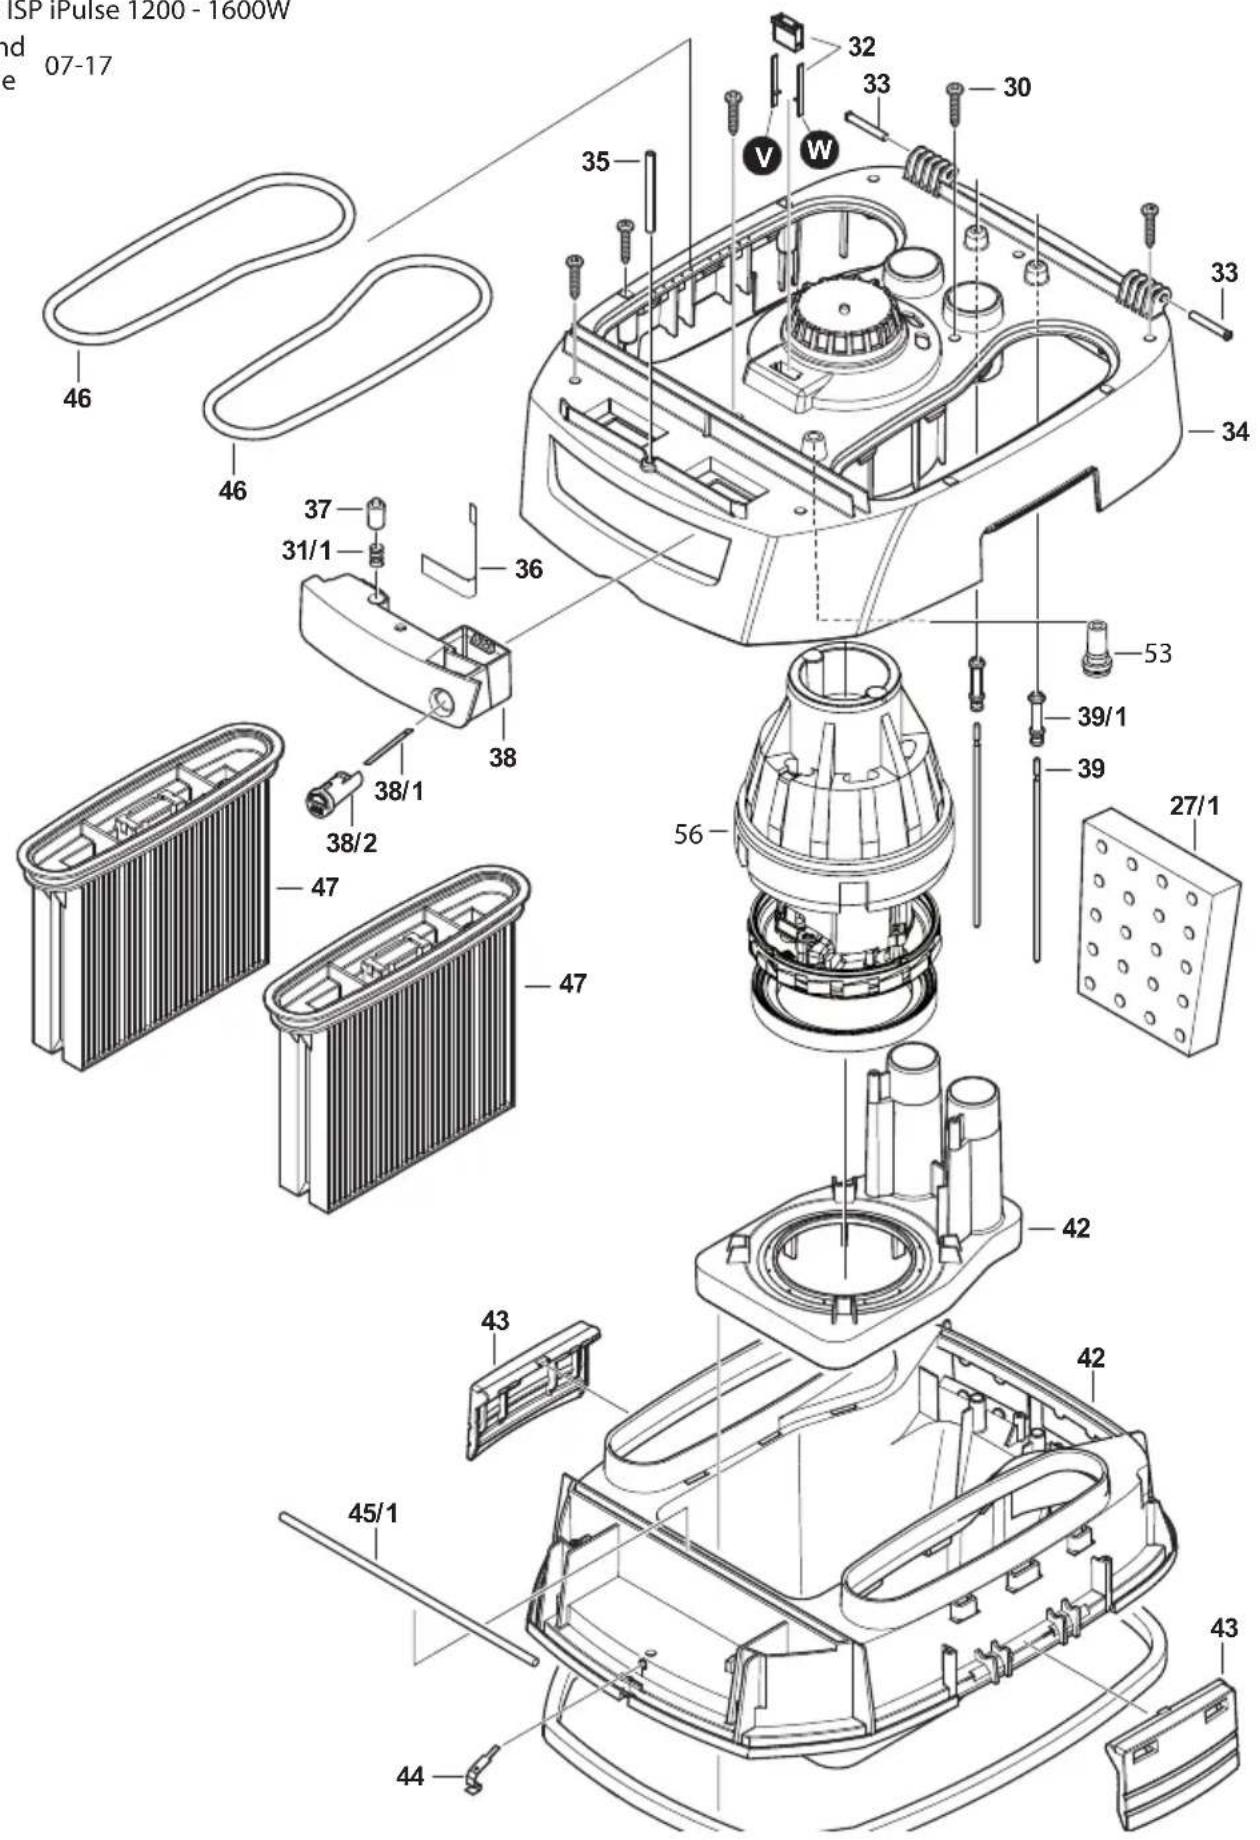
| Ersatzteile / Spare Parts Stand / Issue: 17-08 | ||
| A - iPusle L-1635 Premium (018652)B - iPusle L-1635 Top (018621)C - iPulse M-1635 Safe Plus (018638)D - iPulse H-1635 Safe Plus (018614)E - iPulse H-1235 Asbest Safe Plus (018645)F - iPulse L-1635 Basic (018539)G - iPulse M-1635 Safe (018935) | ||
| Pos.-Nr. / Item No. Bestell-Nr. / Order No. Typ / Type | ||
| 01+02+03 407937 A-G | ||
| 04+05+16+30 444666 A/B/F | ||
| 04+05+16+30 444819 C/D/E/G | ||
| 06 444673 A-G | ||
| 56+57+30 445106 A-E | ||
| 58+30 444697 F/G | ||
| 07+08 444703 A-G | ||
| "09+10+9/1+10/1+10/2" 444710 A-G | ||
| 11+30 444727 A-G | ||
| "12+29+30+50+51+52" 444734 A/B/F | ||
| "12+29+30+50+51+52" 444741 C/D/E/G | ||
| 14 417707 A-G | ||
| 17 444758 A-G | ||
| 18+28+44 444765 A-G | ||
| 19+20+21+30 444772 A-G | ||
| "15+22+23+23/1+25+26" 444789 A-G | ||
| 24 444796 A-G | ||
| 27+27/1 408200 A-G | ||
| 30 408705 A-G | ||
| 31+31/1+48+30 | 444826 A-G | |
| 31/1+35+36+37 | 444833 A-G | |
| 38+38/1+38/2 | A-G | |
| 32 417714 A-G | ||
| 33 408224 A-G | ||
| 34 444802 A-G | ||
| 39+39/1 408767 A-G | ||
| 42+30 444932 A-G | ||
| 43 408293 A-G | ||
| 45+45/1+46+53 | 444680 A-G | |
| 47 416069 A/B/C/F/G | ||
| 47 419190 D/E | ||
| 56 444901 E | ||
| 56 444918 A/B/C/D/F/G | ||
| 49 444840 C/D/E/G | ||
| Label iPulse L/M | 444857 A/B/C/F/G | |
| Label iPulse H | 444871 D/E | |
| Label Asbestos | 444864 E | |
Typ ISP iPulse 1200 - 1600W
Stand 07 17
Issue
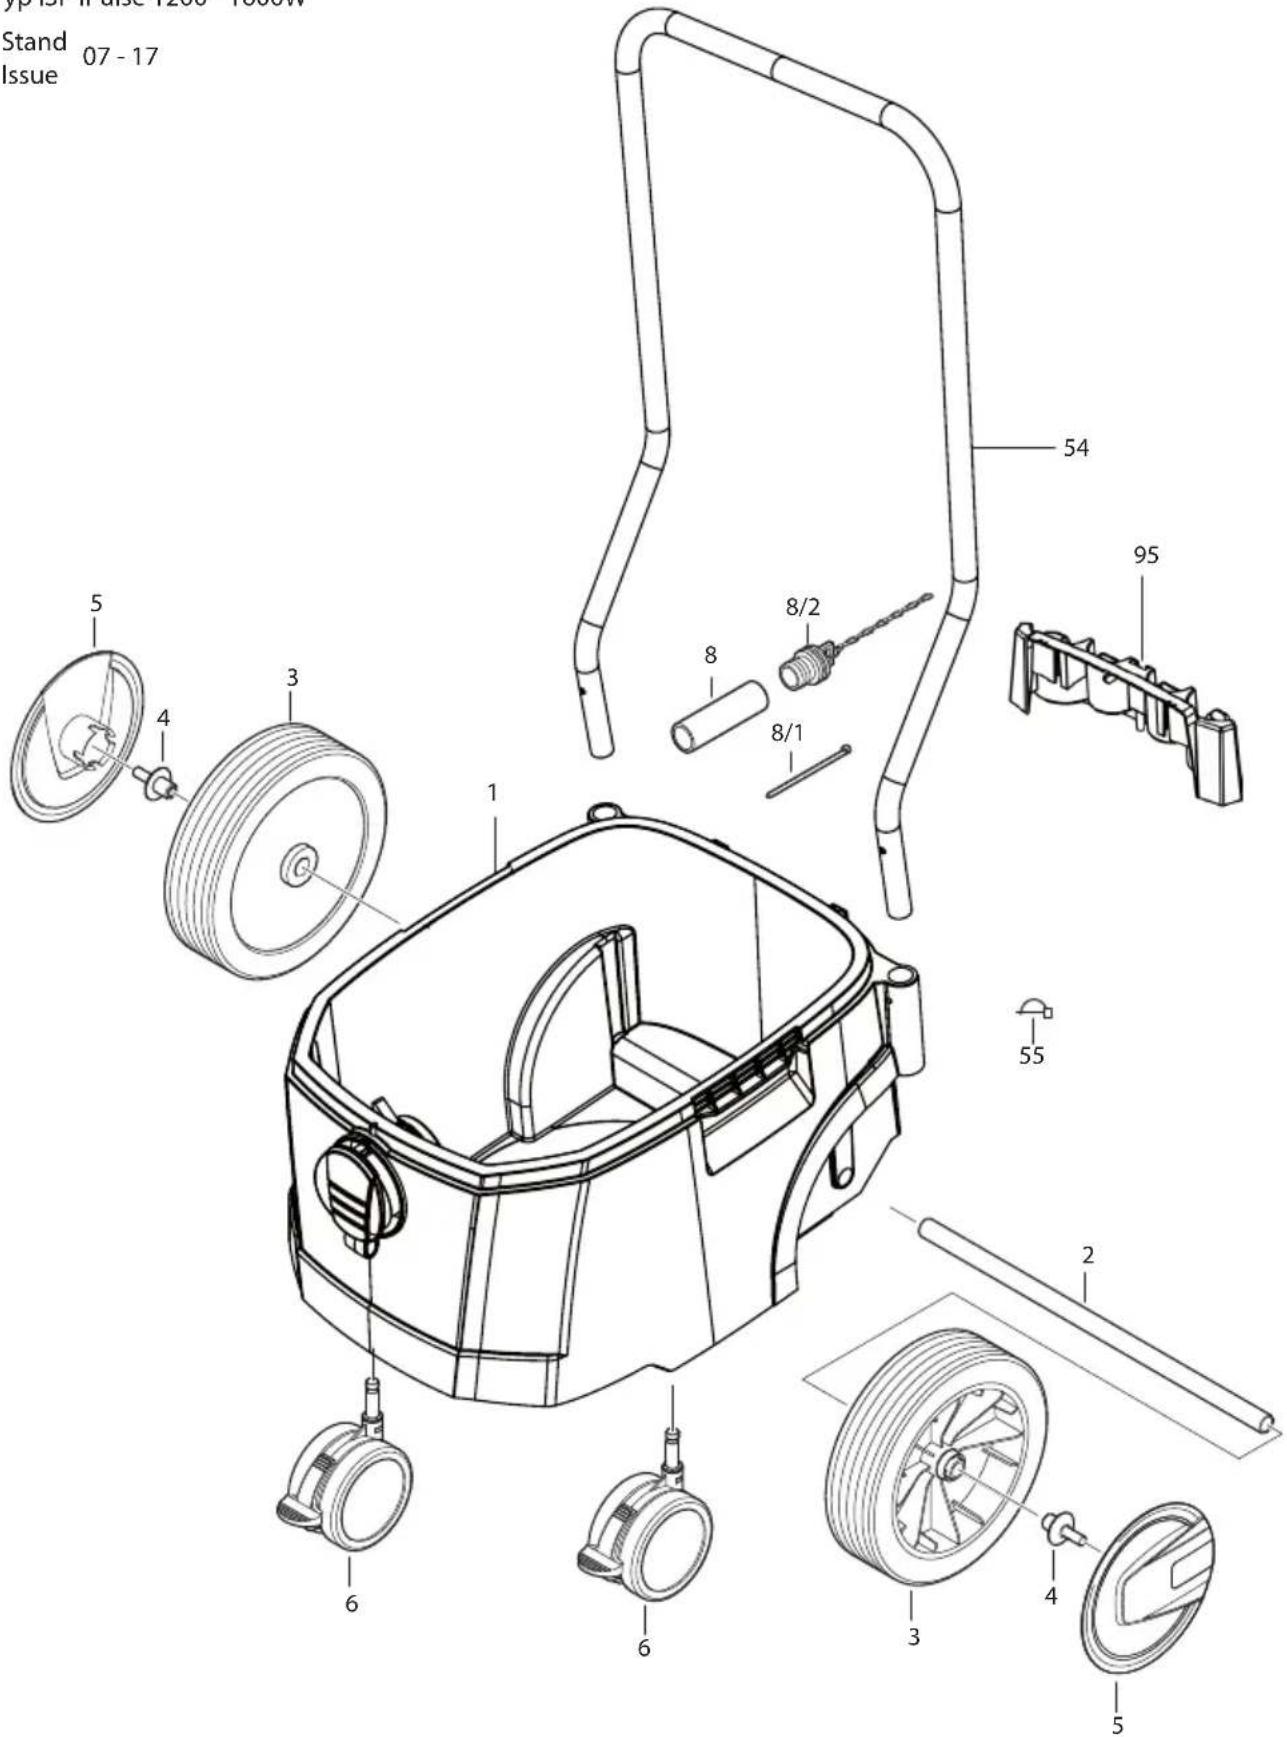
| Ersatzteile / Spare Parts Stand / Issue: 17-08 | ||
| A - iPusle L-1635 Premium (018652)B - iPusle L-1635 Top (018621)C - iPulse M-1635 Safe Plus (018638)D - iPulse H-1635 Safe Plus (018614)E - iPulse H-1235 Asbest Safe Plus (018645)F - iPulse L-1635 Basic (018539)G - iPulse M-1635 Safe (018935) | ||
| Pos.-Nr. / Item No. Bestell-Nr. / Order No. Typ / Type | ||
| "01+02+03+04+05+06" 444888 A-G | ||
| 02+03+04+05 444895 A-G | ||
| 06 408408 A-G | ||
| 08+08/1+08/2 408958 A-G | ||
| 95 445113 A-G | ||
| 54+55 445137 A-G | ||
Staubklassen / dust class

Class L vacuum devices are suitable for aspiration/clearing of dry, non-combustible dusts and hazardous dusts with occupational exposure limit values (AGW) > 1 mg/m ^3 .
Class M vacuum devices are suitable for aspiration/clearing of dry, non-combustible dusts, non-combustible liquids, wood dusts and hazardous dusts with workplace limit values of ≥ 0.1 mg/m ^3 .
- Deutsch (original)
- English
- ⚠️ DANGER!
- WARNING!
- Commissioning
- Before every use
- Switching on and off
- NOTE
- Switching on the vacuum cleaner
- Setting the motor speed\*
- Setting the suction hose diameter\*
- ⚠️ CAUTION!
- Switching off the vacuum cleaner
- Operating modes
- Sucking up dry materials
- Sucking up liquids
- Permanent filter cleaning
- Emptying the container
- Dispose of the fleece filter bag
- Dispose of the PE emptying and disposal bag
- Insert fleece filter bag
- Operating the rotary slide
- Insert PE emptying and disposal bag\*
- Changing the filter
- Changing the folded filter cartridges
- Changing the motor protection filter
- Transport
- Maintenance
- Precautionary measures
- Precautionary measures with vacuum cleaners class H and M
- Contaminated items
- Testing the effectiveness of the vacuum cleaner
- Cleaning
- Repair
- Troubleshooting and repair
- Genuine accessories
- Tests and approvals
- Declaration of conformity
- Français
- Vidage du bac
- REMARQUE
- Vaciado del recipiente
- NOTA
- Tömma behållaren
- OBS
- Sett inn fiberduk-filterpose
- MERK
- A tartály ürítése
- MEGJEGYZÉS
- Umetnite PE vrećicu za pražnjenje i odlaganje\*
- NAPOMENA
- Upravljanje okretnim kliznikom
- Promjena filtra
- Puštanje u rad
- Pre svake upotrebe
- Pražnjenje kontejnera
- BELEŠKA
- Odložite vunenu filter vreću
- Promena filtera
- Promena presavijenih filter kertridža
- levietojiet PE vienreizlietojamo maisu\*
- PIEZIME
- 清空容器
- 注意
- Staubklassen / dust class
Brand : Starmix
Model : ISP iPulse H-1635
Category : Vacuum Cleaner