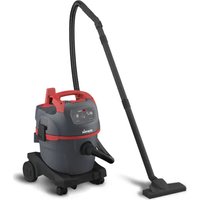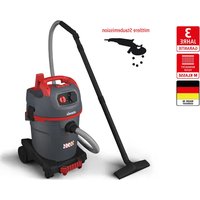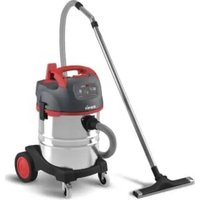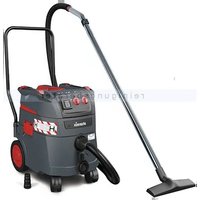
ISP iPulse H-1235 - Vacuum Cleaner Starmix - Free user manual and instructions
Find the device manual for free ISP iPulse H-1235 Starmix in PDF.


User questions about ISP iPulse H-1235 Starmix
0 question about this device. Answer the ones you know or ask your own.
Ask a new question about this device
Download the instructions for your Vacuum Cleaner in PDF format for free! Find your manual ISP iPulse H-1235 - Starmix and take your electronic device back in hand. On this page are published all the documents necessary for the use of your device. ISP iPulse H-1235 by Starmix.
USER MANUAL ISP iPulse H-1235 Starmix
natural_image
Exterior view of a small gas stationing machine (no signage or text visible on the device body)Bedienungsanleitung (original)
Operating instructions
text_image
Technical diagram of a washing machine with numbered parts for identification
text_image
Diagram showing three variations of a washing machine front panel with labeled buttons and switches, numbered 4 to 8.natural_image
Illustration of a hand operating a portable industrial machine with a close-up view showing the device's internal components (no text or symbols present)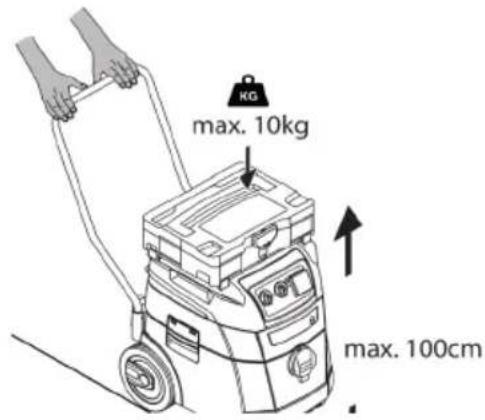
text_image
max. 10kg max. 100cmtext_image
Diagram showing a warning sign and a magnified view of a vehicle engine component with a warning symbol.text_image
dif. = 0 → → ← ← ← ← ← ← ← ← ← ← ← ← ← ← ← ← ← ← ← ← ← ← ← ← ← ← ← ← ← ← ← ← ← ← ← ← ← ← ← ← ← ← ← ← ← ← ← ← ← ← →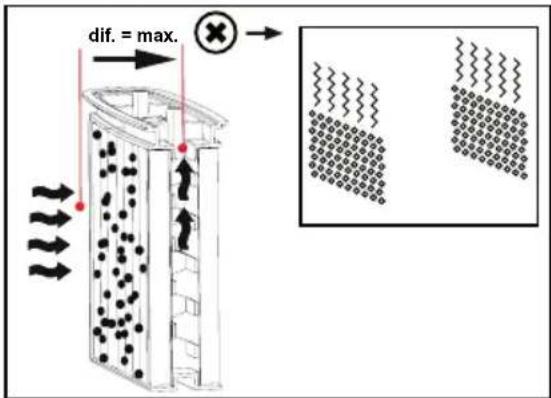
text_image
dif. = max. ×text_image
OPEN CLOSEHead of Quality Assurance
English
1 Explanation of symbols and signs used
| Symbol / Signal word Description | |
| ⚠️ | This is the warning symbol. It warns against possible risk of injury. Follow all instructions which are marked with this sign to avoid injury or death. The warning symbol always appears in association with the signal words DANGER, WARNING and CAUTION. |
| DANGER! | Identifies a hazard with a high degree of risk which will cause death or serious injury if not avoided. |
| WARNING! | Identifies a hazard with a medium degree of risk which could cause death or serious injury if not avoided. |
| CAUTION! | Identifies a hazard with a low degree of risk which could cause minor or moderate injury if not avoided. |
| NOTE | Identifies advice or instructions to simplify work and to ensure safe operation. |
| △ | Identifies a requirement which needs to be met before an action is taken. |
| ▶ | Identifies steps to be taken one after the other by the user. |
| ↳ Identifies the results of an action. | |
2 Important safety information
| ⚠ WARNING! |
| Danger of suffocation! Do not allow children to play with packaging material, e.g. plastic bags.Do not climb onto or sit on the vacuum cleaner.Risk of falling when working on stairs. Pay attention to standing safely.Do not pull the mains connection cable and suction hose over sharp edges, do not bend it or clamp it.The mains connection cable and suction hose always must be routed in such a way that no one can trip over it.If any foam or liquid is discharged, immediately switch off the vacuum cleaner.Always keep the inside of the lid dry.Do not use the vacuum cleaner including accessories in the following cases:Mains connection cable or extension cable is defective or showing cracksThere is visible damage to the vacuum cleaner, e.g. cracks in the housingIf you suspect an invisible defect, e.g. after a fall |
| ⚠ DANGER! |
| Risk of explosion and fire! Do not run the vacuum cleaner in a potentially explosive environment.Keep away the vacuum cleaner from flammable gases and substances. |
| ⚠ DANGER! |
| Risk of explosion and fire! Do not use the vacuum cleaner to vacuum up the following:flammable or explosive solventsmaterials soaked in solventspotentially explosive dustsliquids such as petrol, oil, alcohol, diluentsmaterials hotter then 60 °C |
WARNING!
Improperly repaired devices pose a hazard for the user. Only have repairs carried out by experts, e.g. the customer service. Only use original accessories and spare parts.
WARNING!
Only use the socket on the vacuum cleaner for the purposes specified in the operating instructions.
In case of any inappropriate usage, improper operation or repair, the producer shall be exempt from liability.
Do not use damaged extension cables.
If the mains connection cable of the vacuum cleaner is damaged, it must be replaced by a special mains connection cable, which is available from the manufacturer or its customer service.
Never allow electrical brushes to come into contact with the mains connection cable.
The voltage on the rating plate must match the mains voltage.
Switch off the vacuum cleaner and disconnect the mains plug after use and before maintenance.
When unplugging, only pull on the mains plug and not on the mains connection cable.
Never touch the mains plug with wet hands.
Only connect the vacuum cleaner to a sufficiently protected electric socket.
Do not open the vacuum cleaner outdoors in the rain or during a thunderstorm.
Store the vacuum cleaner dry and indoors, protected from frost.
WARNING!
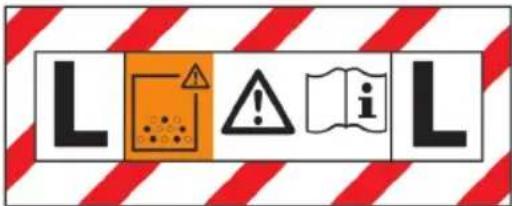
Dust-removing machines are tested according to DIN EN 60335-2-69 and divided into dust classes.
Vacuum cleaners for dust class L are suitable for vacuuming/sucking up dry, non flammable dusts that are hazardous to health with workplace exposure limits (OEL) > 1 mg/m ^3 .
Vacuum cleaners for dust class M are suitable for vacuuming/sucking up dry, non-flammable dusts, non-flammable liquids, wood dusts and hazardous dusts with workplace exposure limits ≥ 0.1 mg/m ^3 .
Vacuum cleaners for dust class H are suitable for vacuuming/sucking up dry, non-flammable dusts, carcinogenic and pathogenic particles as well as non-flammable liquids, wood dusts and toxic dusts with all workplace exposure limits.
WARNING!
Vacuum cleaners for dust class H-asbestos are suitable for vacuuming and extracting dust containing asbestos. Observe national regulations for operation and maintenance of asbestos removal tools.
WARNING!
The machine may not be used by persons (including children) who have reduced physical, sensory or metal capabilities or who are inexperienced or lack the knowledge of how to use the machine.
Children must be supervised to ensure that they do not play with the device.
Do not point nozzle, tube or hose at people or animals.
WARNING!
Only use the brushes supplied with the vacuum cleaner or those specified in the operating instructions.
Using other brushes can compromise safety.
When being used in food processing businesses: Immediately clean the vacuum cleaner after use and disinfect it to avoid microbial contamination.
Do not use any steam jets or high-pressure cleaners for cleaning.
Only operate the vacuum cleaner under supervision.
Disconnect the vacuum cleaner from the mains in the event of a longer work interruption.
Do not clean filter cartridges using compressed air.
WARNING!
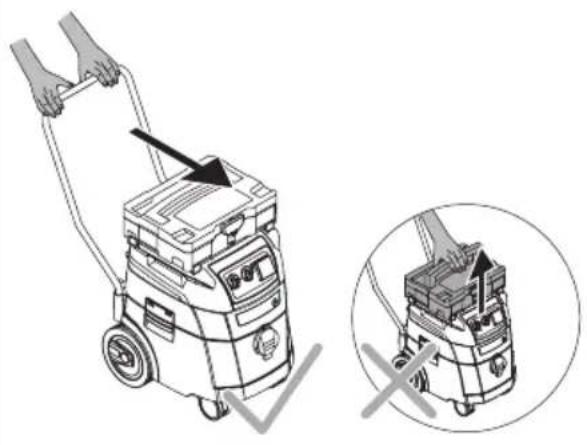
Do not lift the vacuum cleaner at the mounted toolbox.
Load the toolbox with a maximum weight of 10 kg.
Do not stack the toolboxes higher than 1.00 m (total height with vacuum cleaner).
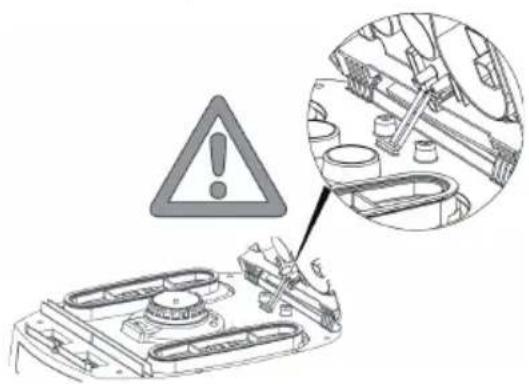
Before opening the cover, remove the toolbox.
natural_image
Line drawing of a small industrial machine with hands operating it, showing a close-up view of its internal components (no text or symbols present)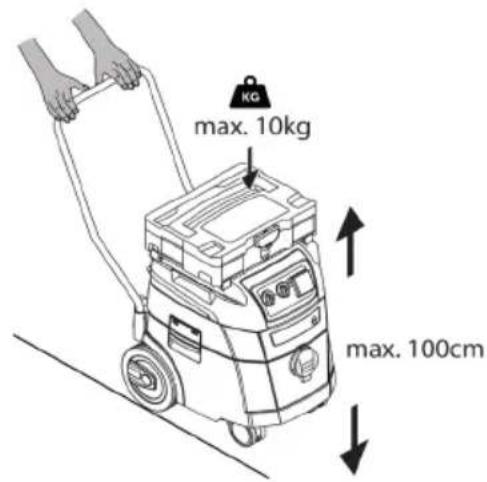
text_image
KG max. 10kg max. 100cmRead the operating manual carefully before starting to use the vacuum cleaner. The operating manual provides important instructions for safety, commissioning, operation, maintenance and care. Keep the operating manual in a safe place and, in case you sell the unit, hand it on to the next owner.
The manufacturer reserves the right to carry out modifications to the design and equipment.
Do not perform any other work than described in this manual.
This machine is intended for commercial use, for example, in hotels, schools, hospitals, factories, shops, offices and in the rental business.
When unpacking, check for completeness and transport damage.
Before use, the operators should be provided with information, instructions and training for the use of the vacuum cleaner and the
substances that it is to be used for, including the safe procedure for the removal of the gathered material.
text_image
Technical diagram showing a warning symbol and a close-up of mechanical components with an arrow pointing to a component.3 Display and control elements
| Switch position Function Description | |||
| 0 |  | Vacuum cleaner is switched off -Plug | socket under voltage |
| A |  | Vacuum cleaner is switched off | -Plug socket under voltage-Operation with power tool, fi lter cleaning function switched off-When the tool is switched on, the vacuum cleaner automatically switches on. After the power tool is switched off, the vacuum cleaner runs on for approx. 10 seconds to prevent any residue from collecting in the hose |
| AR | 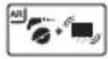 | Standby mode | -Plug socket under voltage-Filter cleaning at start-up and automatic fi lter cleaning function after differential pressure detection-When the tool is switched on, the vacuum cleaner automatically switches on. After the power tool is switched off, the vacuum cleaner runs on for approx. 10 seconds to prevent any residue from collecting in the hose |
| IR | 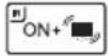 | Vacuum cleaner starts immediately | -Plug socket under voltage-Automatic fi lter cleaning function starts after differential pressure detection |
| Automatic fi lter cleaning function | -While the vacuum cleaner is running, the folded fi lter cartridges are cleaned alternately when a certain negative pressure value is reached, at which there is still suffi cient air | ||
| Fill level indicator* | -The fi ll level indicator lights up when the tank is full and/or the suction hose is blocked. On vacuum cleaners with dust class M and H, an acoustic signal is also emitted | ||
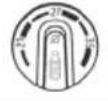 | Setting the suction hose diameter* | -On M-/H-/H-asbestos vacuum cleaners for volume flow monitoring, to trigger an audible warning signal if the air speed falls below 20 m/s | |
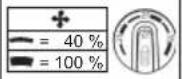
 | Setting the motor speed* -Adjust the suction power with the speed control | ||
 | |||
4 Commissioning
4.1 Before every use
Make sure that the following conditions are met:
△ Vacuum cleaner, mains cable, suction hose and accessories are not damaged.
△ All filters have been inserted and are not damaged.
4.2 Switching on and off
The plug socket on the vacuum cleaner remains always under voltage, regardless of the main switch position.
WARNING!
Danger of injury by automatically starting power tool!
- Switch off power tool or pneumatic tool before connecting to the vacuum cleaner.
NOTE
With switch in position >0<, the plug socket on the vacuum cleaner can be used as an extension cable.
⚠ Power consumption: vacuum cleaner + connected power tool (max. 2000 W) max. 16 A.
4.2.2 Switching on the vacuum cleaner
Functions see „3 Display and control elements“ on page 24.
▶ Insert plug into plug socket.
▶ Set switch to position >IR<.
→ Vacuum cleaner starts immediately.
or:
▶ Set switch to position >A< or >AR<.
→ Vacuum cleaner is in standby mode for power tools.
4.2.3 Setting the suction hose diameter\*
▶ Set suction hose diameter at the switch.
CAUTION!
Selector switch for minimum air volume flow signal (horn and light) on vacuum cleaners with dust classes „M“ and „H“ In the modes >AR< and >IR< the following setting is made, depending on the diameter of the hose:
| Selector switch for suction hose inner diameter | Volume air flow |
| ∅ 35 mm | 70 l/s |
| ∅ 27 mm | 41 l/s |
| ∅ 21 mm | 25 l/s |
| The speed can be adjusted individually after setting the hose diameter. | |
4.2.4 Adjusting the suction power\*
▶ Adjust motor speed on the switch.
or
▶ Set auxiliary air slide on the handle tube.
4.2.5 Switching off the vacuum cleaner
▶ Set switch to position >0<.
→ Vacuum cleaner is switched off.
▶ After switching off, pull the mains plug out.
▶ Roll up mains connection cable.
- Store the mains connection cable on the cable hook.
- Store the suction tube by inserting it into the accessories holder* on the container rear wall.
- Put the suction hose ends together so that no dirt particles leak out.
▶ Remove Power tool.
5 Operating modes
5.1 Sucking up dry materials
▶ Only use a dry filter, vacuum cleaner and accessories, so that the dust does not stick and or cake.
- When vacuuming soot, cement, plaster or similar dusts: Insert a PE disposal bag in the dirt container.
▶ Always use disposal bags in combination with folded filter cartridges.
NOTE
M, H and H-asbestos class vacuum cleaners should be preferably used as vacuum cleaners for dry dusts.
5.2 Sucking up liquids
WARNING!
Electrical shock hazard!
▶ If any foam or liquid is discharged, immediately switch off the vacuum cleaner.
▶ Empty dirt container and folded filter cartridge.
| NOTE | |
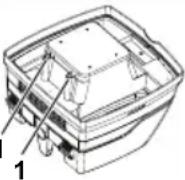 1 1 | Regularly clean the water level sensors (1) and inspect for signs of damage. |
▶ Vacuum cleaning without fleece filter bags.
The folded filter cartridge designed for wet vacuum cleaning.
The built-in sensor switches the motor off when the container is full. The handling of the vacuum cleaner can be compromised by a full container.
▶ Empty container (see „7 Emptying the container“ on page 26).
NOTE
If the vacuum cleaner is not switched off, the re-start protection remains effective. The vacuum cleaner is ready for operation only after the unit has been switched off and switched on again.
Remove the suction hose from the liquid before emptying.
▶ After switching off, a small quantity of water can flow back out of the hose, as a result of the high suction level and the favourable flow condition in the container.
▶ After wet vacuum cleaning insert dry filters for picking up dry dust.
NOTE
When changing frequently between dry and wet vacuum cleaning, use a second set of filters, preferably polyester folded filter cartridges.
5.3 Sucking up asbestos-containing substances
Only vacuum cleaners of dust class H-asbestos may be used for vacuuming asbestos-containing substances.
▶ Only work with a dry filter, vacuum cleaner and accessories to prevent dust from sticking and becoming incrusted.
For sucking up asbestos-containing substances: Insert the PE emptying bag into the dirt container.
▶ Always use filter bags in conjunction with folded filter cartridges.
NOTE
H-asbestos class vacuum cleaners should be preferably used as vacuum cleaners for dry dusts.
⚠ WARNING!
Health hazard!
Asbestos fibres in the air.
▶ Supply the work area with sufficient outside air (fresh air).
▶ Guide or clean extracted air in such a way that asbestos fibres do not get into the breathing air of other persons.
- When filtering the extracted air, transport any dust in dust-tight containers.
Do not decant dust.
If there is a possibility of asbestos fibres becoming free:
▶ Absorb asbestos fibres at the outlet or point of origin.
Then dispose of asbestos fibres in accordance with the state of the art without any danger to persons or the environment.
If complete absorption of asbestos fibres is not possible:
▶ Take additional ventilation measures in accordance with the state of the art.
After completion of the work:
- Carefully clean tools, including suction tubes and work equipment.
▶ Carefully clean the working area. - Moisten and properly remove objects contaminated with asbestos fibres that cannot be cleaned.
After cleaning:
▶ Ventilate the working area sufficiently.
6 Permanent filter cleaning
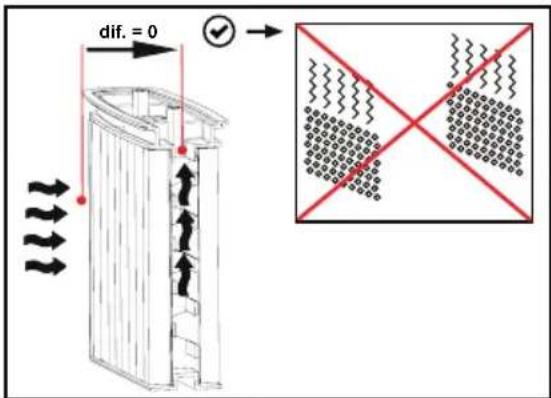
The vacuum cleaner is fitted with an electromagnetic filter cleaning system, which can be used to clean any attached dust from the filter cartridges.
The folded filter cartridges are cleaned alternately one after the other so that continuous work is guaranteed.

Continuous monitoring of the filter filling level through differential pressure measurement, for an absolutely precise on-demand filter cleaning during the operation.
Thereby constant high air flow cleaning guaranteed during the operation, even for critical types of dust.
text_image
dif. = 0 ✓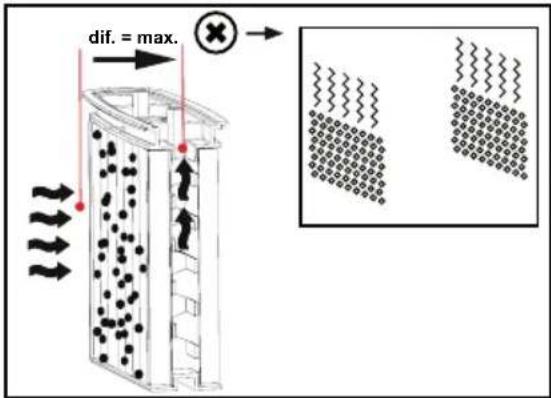
text_image
dif. = max. × → ↑ ↓ ↑ ↑ ↑ ← ← ← ← ← ← ← ← ← ← ← ← ← ← ← ← ← ← ← ← ← ← ← ← ← ← ← ← ← ← ← ← ← ← ← ← ← ← ← ← ← ← ← ← ← ← ← ← ← ← →7 Emptying the container
NOTE
Only permitted for dust with workplace exposure limits > 1 mg/m ^3 .
▶ Switch off the vacuum cleaner, pull out the mains plug.
▶ Open the latches.
Remove the cover and suction hose from the container.
▶ Empty the container by pouring out.
7.1 Dispose of the fleece filter bag
(see Quick Reference Guide)
▶ Switch off vacuum cleaner.
▶ Disconnect mains plug.
▶ Wear appropriate breathing mask.
▶ Remove suction hose.
▶ Close off intake socket with cap.
▶ Open side latches.
Remove top section.
- Carefully pull the flange off the intake socket and close off the flange.
- Dispose of gathered material in accordance with legal requirements.
7.2 Dispose of the PE emptying and disposal bag
(see Quick Reference Guide)
▶ Set switch to position >AR<.
Folded filter cartridges are cleaned automatically.
↓ Residual dust in the filters falls into the bag.
▶ Switch off vacuum cleaner.
▶ Disconnect mains plug.
▶ Wear appropriate breathing mask.
▶ Remove suction hose.
▶ Close off intake socket with cap.
▶ Open side latches.
- Carefully close the PE emptying and disposal bag with the enclosed sealing tape.
- Carefully pull the flange off the intake socket and close off the flange.
- Carefully remove the PE emptying and disposal bag from the container.
- Dispose of gathered material in accordance with legal requirements.
7.3 Insert fleece filter bag
NOTE
Only use fleece filter bags for dry vacuum cleaning.
▶ Slide the flange completely over the intake socket (see Quick Reference Guide 📄).
NOTE
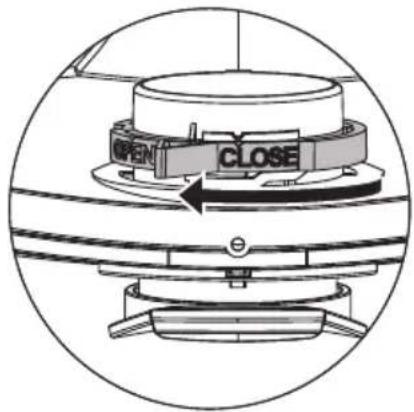
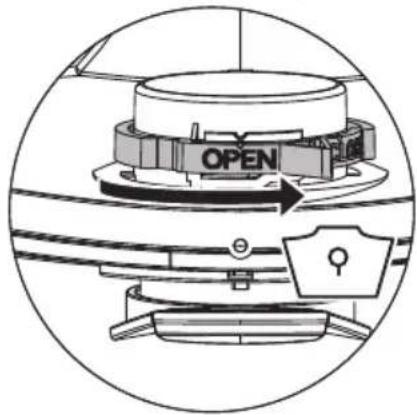
Operating the rotary slide
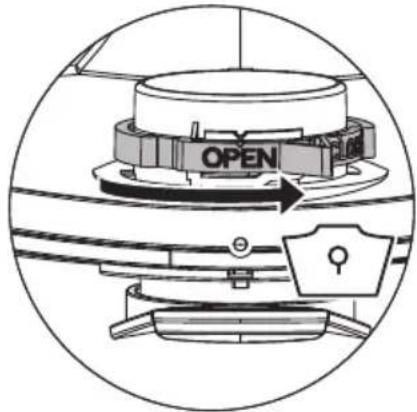
▶ Turn the red rotary slide inside to position CLOSE to the stop on the marker ▲.
text_image
OPEN CLOSE7.4 Insert PE emptying and disposal bag\*
NOTE
Only vacuum cleaners with dust class L, M and H with special containers and rotary slide in the intake socket of types iPulse L, M, iPulse H and iPulse H-asbestos are suitable for the use of PE emptying and disposal bags.
NOTE
Operating the rotary slide
▶ Turn the red rotary slide inside to position OPEN to the stop on the marker ▲.
▶ Slide the flange completely over the intake socket.
- Place the upper bag opening over the container rim.
text_image
OPEN8 Changing the filter
8.1 Changing the folded filter cartridges
(see Quick Reference Guide

▶ Clean the filter cartridges before changing them.
▶ Turn the lock on the latch through 90^ in a counter-clockwise direction with a coin or similar object and push the latch to the rear.
▶ Fold up the cover.
▶ Immediately isolate the folded filter cartridges that you have removed in a dust-tight plastic bag and dispose of properly in accordance with the requirements.
▶ Insert new folded filter cartridges.
▶ Lift the locking bracket up, fold down the cover and click in place with light pressure.
9 Changing the motor protection filter
(see Quick Reference Guide)

NOTE
If motor protection filter is contaminated, this indicates defective filter cartridges.
▶ Replace folded filter cartridges.
- Replace motor protection filter or wash the motor protection filter under flowing water, dry and re-insert.
10 Transport
▶ Remove suction hose.
▶ Close off intake socket with cap.
- Securely fix the motor head to the container.
▶ Close the side latches.
- Place the accessories in a suitable plastic bag and seal the plastic bag or place it in the tool storage compartment.
- Put the suction hose ends together so that no dirt particles leak out.
- Place the hose around the vacuum cleaner and clamp onto the handle (see Quick Reference Guide).
11 Maintenance
NOTE
Switch off the vacuum cleaner and pull out the mains plug before carrying out any maintenance work.
For maintenance by the user, the vacuum cleaner must be
-dismantled,
-cleaned and
-maintained,
as far as possible without creating any danger to the maintenance personnel or other.
Precautionary measures
Suitable precautionary measures include:
-Cleaning before dismantling
-Provision of local filtered positive ventilation where the vacuum cleaner is to be dismantled
-Cleaning of the maintenance area
-Suitable personal protection equipment
Precautionary measures with vacuum cleaners class H and M
The outside of the vacuum cleaner should be cleaned by dust extraction procedures and wiped down, or should be treated with a sealing agent before being removed from the hazardous area. All
parts of the vacuum cleaner must be considered to be contaminated when they are removed from the hazardous area, and suitable handling must be used to prevent dust distribution.
Contaminated items
When carrying out maintenance or repair work, all contaminated items which have not been adequately cleaned, must be disposed of. Such items must be disposed of in impermeable bags in accordance with the applicable regulations concerning the disposal of such waste.
11.1 Testing the effectiveness of the vacuum cleaner
At least once a year, the manufacturer or an instructed person must perform a technical inspection including filters, air tightness of the vacuum cleaner, and control mechanisms.
In addition, the effectiveness of the vacuum cleaners with dust class H and H-asbestos must be checked at least once a year or more frequently. The test method, which can be used for demonstrating the effectiveness of the device, is defined in EN 60335-2-69 AA.22.201.2. If the test is not passed, it must be repeated with a new main filter.
There must be an adequate air exchange rate L in the room if the exhaust air returns to the room. Observe national regulations. If the suction power of the vacuum cleaner is reduced and the cleaning of the filter cartridges is no longer sufficient (assuming that tank is emptied and fleece filter bag is replaced), it is necessary to replace the folded filter cartridges (see Quick Reference Guide) and "8.1 Changing the folded filter cartridges" on page 27).
12 Cleaning
NOTE
Acids, acetone and solvents can damage parts of the vacuum cleaner.
▶ Clean container and accessories with water.
▶ Wipe the top section with a damp cloth.
▶ Allow the container and accessories to dry.
13 Repair
WARNING!
Improperly repaired vacuum cleaners pose a hazard for the user!
▶ Have repairs carried out by qualified personnel only, e.g. the customer service.
14 Troubleshooting and repair
| NOTE | ||
| Malfunctions cannot always be traced back to defects in the vacuum cleaner. | ||
| Fault Cause Remedy | ||
| Suction power drops Filter dirty Clean | ||
| Filter bag full Change | ||
| Container full Empty | ||
| Motor protection filter blocked Clean | ||
| Nozzle, tube or hose blocked Clean | ||
| Vacuum cleaner does not start Mains plug | not in socket Plug mains plug into socket | |
| No mains voltage Check fuse | ||
| Mains connection cable defective | Replace | |
| Cover not properly closed | Close | |
| Water sensor switched off | Empty container | |
| Vacuum cleaner in standby mode >A< or >AR< | Set switch to >IR< (see „3 Display and control elements“ on page 24) | |
| The vacuum cleaner does not start when the tool is switched on in the >A< or >AR< mode | Electrical tool not plugged into socket on the vacuum cleaner | Plug mains plug into socket on the vacuum cleaner |
| Solenoid valve of pneumatic on-off unit* contaminated | Rinse with alcohol | |
| PE emptying and disposal bag is sucked against the filter | Incorrect position of rotary slide | Set rotary slide to position OPEN▲ (see „7.4 Insert PE emptying and disposal bag*“ on page 27) |
| Vacuum cleaner with dust classes M or H: with inserted filter bag, dust is accumulating in the container | Incorrect position of rotary slide | Set rotary slide to position CLOSE▲ (see „7.3 Insert fleece filter bag“ on page 27) |
| Fill level indicator lights up | filter blocked | clean or change |
| the suction hose is blocked | clean | |
| container is full | Empty | |
Do not try anything else, contact customer services.
15 Genuine accessories
| NOTE | ||
| Only use original accessories. | ||
| Article designation Properties/material | Order no. | |
| Folded filter cartridge FK 4300 | Polyester material, dust class M approved (Ti15) | 416069 |
| Folded filter cartridge FKP 4300 HEPA | Polyester, glass fibre and cellulose material, dust class H approved (Ti26) | 419190 |
| Article designation Properties/material Order no. | ||
| Folded filter cartridge FKPN 3000 NANO | Polyester material with nanofibre layer, dust class M approved (Ti201) | 425740 |
| Fleece filter bag FBV 25/35 (5 pcs.) | For 25-litre- and 35-litre plastic container, dust class M approved (VIT610/TMO908) | 411231 |
| PE emptying and disposal bag FBPE 25/35 (5 pcs.) | Only for vacuum cleaners dust class M and H | 425764 |
| PE emptying and disposal bag Asbestos FBPE 35 (5 pcs.) | Only for vacuum cleaners dust class H-Asbestos 425757 | |
| Fleece filter bag FBVPE 25/35 (5 pcs.) | Only for vacuum cleaners dust class M and H (VIT610/TMO908) | 445267 |
| Fleece filter bag FBVPE 25/35 (5 pcs.) | Only for vacuum cleaners dust class H-Asbestos (VIT610/TMO908) | 445755 |
Additional accessories can be found in the special accessory list which can be obtained on request from the starmix Service Team on the internet: www.starmix.de, E-Mail: info@starmix.de.
16 Technical Data
| Type: ISP iPulse L-1635 iPulse M-1635 | iPulse H-1635 iPulse | H-1235 Asbest | |||
| Voltage V 220-240 | |||||
| Frequency | Hz | 50/60 | |||
| Rated power | W | 1400 | 1000 | ||
| Max. power W | 1600 | 1200 | |||
| Air flow* | l/s (m3/h) | 75 (270) | 70 (252) | ||
| Negative pressure* | hPa/MG | 280 | 265 | ||
| Air flow** | l/s (m3/h) | 45 (162) | 40 (144) | ||
| Negative pressure** hPa/SE | 245 | 230 | |||
| Noise level | dB(A) | 69 | |||
| Weight | kg | 15,5 (16,7*** ) | |||
| Dimensions (l x w x h) | cm | 53 x 40 x 56 (92*** ) | |||
* at the fan
** at the hose
*** incl. push handle
Max. power on vacuum cleaners with plug socket: 2000 W
Mains connection cable on vacuum cleaners for dust class L with plug socket: H05RR-F 3G1,5
Mains connection cable on vacuum cleaners for dust class M, H and H Asbestos with plug socket: H07RN-F 3G1,5
17 Tests and approvals
Electro-technical tests must be carried out in accordance with the accident prevention regulations (DGUV V3) and in accordance with DIN VDE 0701 Part 1 and Part 3. These tests are required in accordance with DIN VDE 0702 at regular intervals and after repair or modification.
The vacuum cleaners are successfully tested in accordance with IEC/EN 60335-2-69.
NOTE
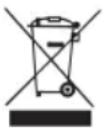
Old equipment contains valuable materials which are designed for re-processing. The vacuum cleaners must not be thrown away in the normal household waste, but should be disposed of at a suitable proper collection system, e. g. via your communal disposal location.
18 Declaration of conformity
We hereby declare that the machine described below complies with the relevant basic safety and health requirements of the EC Directives, both in its basic design and construction as well as in the version put into circulation by us.
This declaration shall cease to be valid if the machine is modified without our prior approval.
Product: Vacuum cleaner for wet and dry operation
Type:
ISP
The design of the appliance corresponds to the following pertinent regulations:
EC Machinery Directive 2006/42/EU
EC Directive ÉMC 2014/30/EC
ROHS 2011/65/EU
EC Machinery Directive 2006/42/EU including amendments:
Requirements of category II
DIN EN 61000-3-2 (VDE 0838-2):2015-03; EN 61000-3-2:2014
DIN EN 61000-3-3 (VDE 0838-3):2014-03; EN 61000-3-3:2013
The following institute has tested and certified the product:
Authorized documentation representative:
Head of Quality Assurance
Français
natural_image
Diagram of a hand operating a portable industrial machine with a close-up view showing the device's internal structure (no text or symbols present)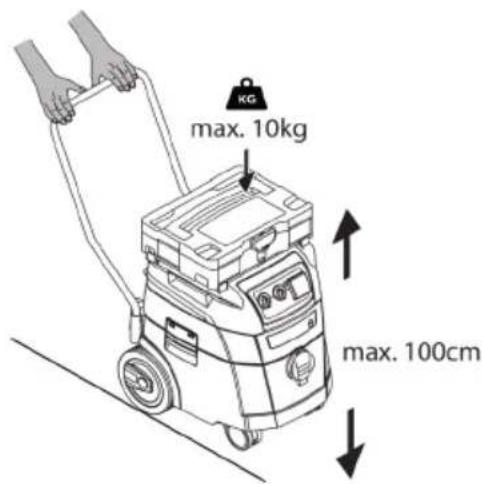
text_image
KG max. 10kg max. 100cmtext_image
Diagram showing a warning sign and a close-up of a mechanical component with a tool, likely illustrating safety or inspection.text_image
dif. = max. × → ↑ ↑ ↑ ↑ ↑ ↑ ↑ ↑ ↑ ↑ ↑ ↑ ↑ ↑ ↑ ↑ ↑ ↑ ↑ ↑ ↑ ↑ ↑ ↑ ↑ ↑ ↑ ↑ ↑ ↑ ↑ ↑ ↑ ↑ ↑ ↑ ↑ ↑ ↑ ↑ ↑ ↑ ↑ ↑ ↑ ↑ ↑ ↑ ↑ ↑ ↓ ↓ ↓ ↓ ↓ ↓ ↓ ↓ ↓ ↓ ↓ ↓ ↓ ↓ ↓ ↓ ↓ ↓ ↓ ↓ ↓ ↓ ↓ ↓ ↓ ↓ ↓ ↓ ↓ ↓ ↓ ↓ ↓ ↓ ↓7 Vidage du bac
REMARQUE
text_image
OPEN CLOSEDirective relative aux machines UE 2006/42/UE
Directive UE EMC 2014/30/UE
La directive ROHS 2011/65/UE
natural_image
Illustration of a hand operating a small industrial machine with a close-up view showing the device's internal structure (no text or symbols present)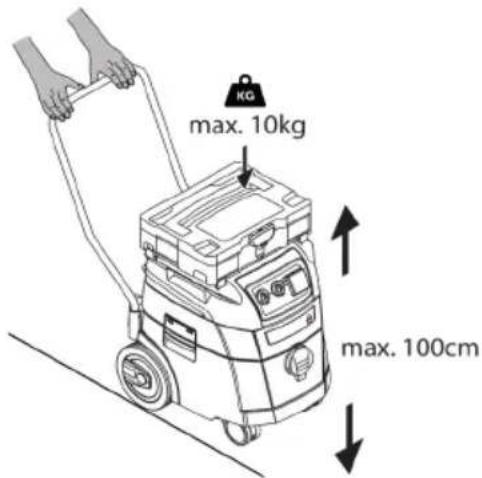
text_image
max. 10kg max. 100cmtext_image
Diagram showing a warning sign and a close-up of mechanical components with an arrow pointing to a tool or component.text_image
dif. = 0 → ← ← ← ← ← ← ← ← ← ← ← ← ← ← ← ← ← ← ← ← ← ← ← ← ← ← ← ← ← ← ← ← ← ← ← ← ← ← ← ← ← ← ← ← ← ← ← ← ← ← →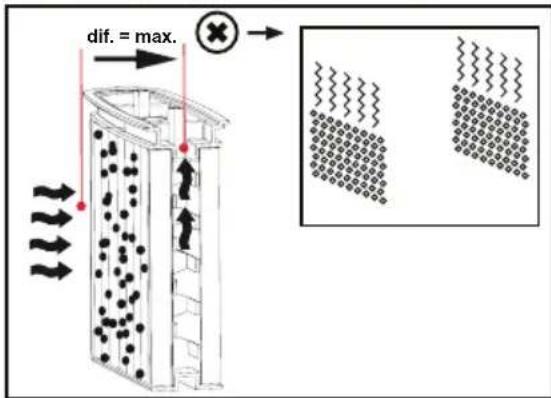
text_image
dif. = max. ×7 Vaciado del recipiente
NOTA
text_image
OPEN CLOSEnatural_image
Diagram of a portable air conditioner unit being adjusted for a hand, shown with magnified detail (no text or symbols)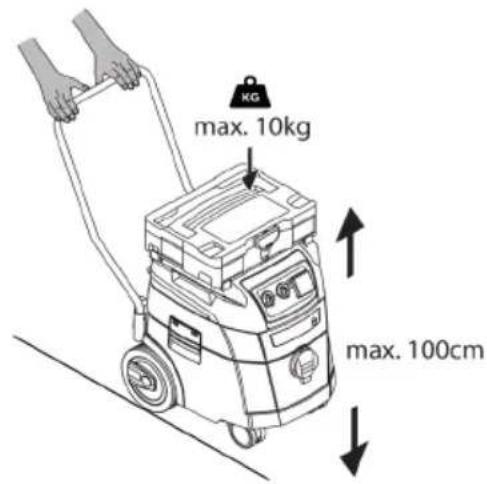
text_image
max. 10kg max. 100cmtext_image
Diagram showing a warning sign and a close-up of mechanical components with an arrow pointing to a tool or component.text_image
dif. = max. ×text_image
OPEN CLOSEtext_image
Diagram showing a warning sign and mechanical components with an inset close-up of a tool interacting with a component.text_image
dif. = 0 → ← ← ← ← ← ← ← ← ← ← ← ← ← ← ← ← ← ← ← ← ← ← ← ← ← ← ← ← ← ← ← ← ← ← ← ← ← ← ← ← ← ← ← ← ← ← ← ← ← ← →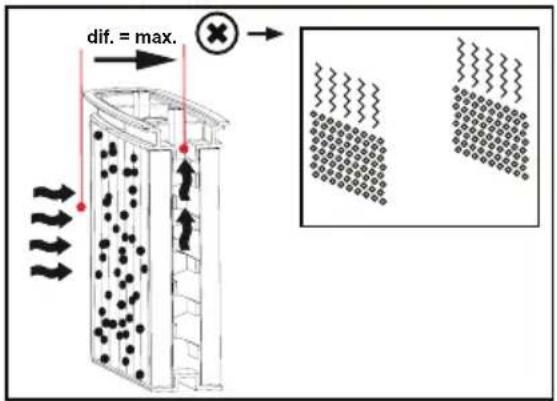
text_image
dif. = max. ×text_image
OPEN CLOSEtext_image
OPEN CLOSEnatural_image
Illustration of a hand operating a small industrial machine with a magnified inset showing the internal components (no text or symbols present)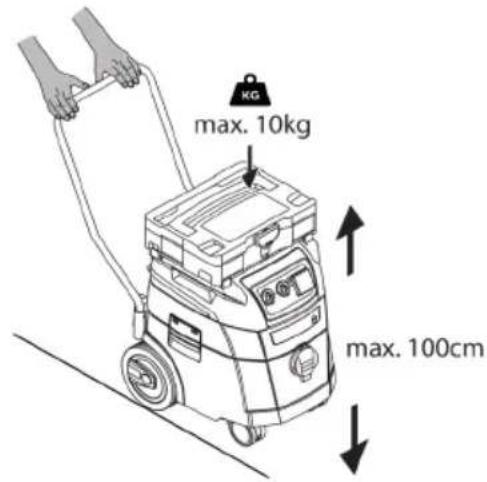
text_image
KG max. 10kg max. 100cmtext_image
Diagram showing a warning sign and a close-up of a mechanical device with a tool, likely illustrating safety or hazard detection.3 Display- en bedieningselementen
text_image
dif. = 0 → ← ← ← ← ← ← ← ← ← ← ← ← ← ← ← ← ← ← ← ← ← ← ← ← ← ← ← ← ← ← ← ← ← ← ← ← ← ← ← ← ← ← ← ← ← ← ← ← ← ← →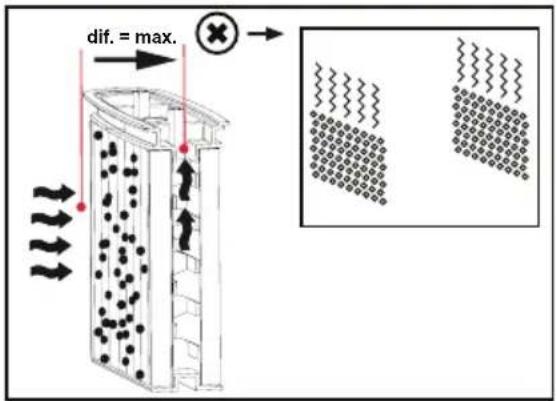
text_image
dif. = max. × → differentialtext_image
OPEN CLOSEtext_image
Diagram showing a warning sign and a close-up of mechanical components with an arrow pointing to a tool.3 Display og kontrolelementer
text_image
dif. = 0 ✓ → ↑ ↑ ↑ ↑ ↑ ↑ ↑ ↑ × × ×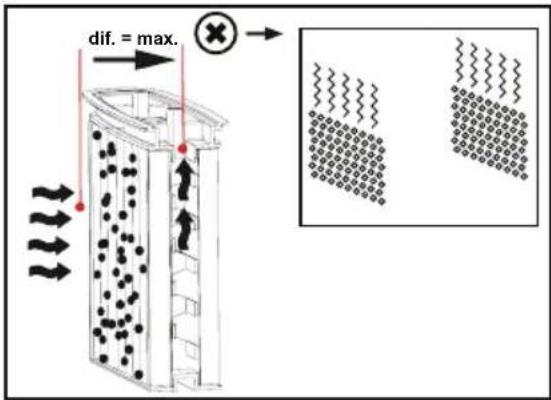
text_image
dif. = max. ×text_image
OPEN CLOSEnatural_image
Diagram of a hand operating a portable device with a close-up view showing the internal components (no text or symbols present)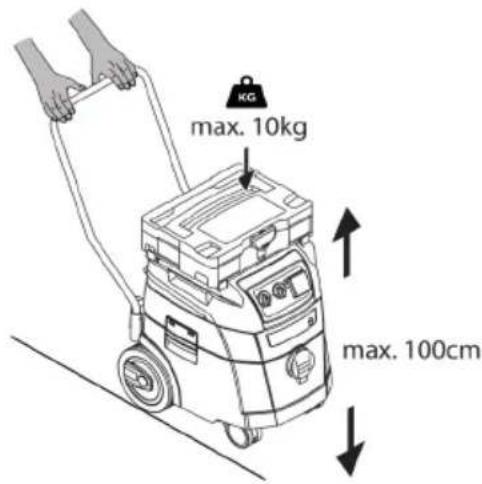
text_image
max. 10kg max. 100cmtext_image
Technical diagram showing a warning sign and mechanical assembly with magnified detail viewtext_image
dif. = 0 → ← ← ← ← ← ← ← ← ← ← ← ← ← ← ← ← ← ← ← ← ← ← ← ← ← ← ← ← ← ← ← ← ← ← ← ← ← ← ← ← ← ← ← ← ← ← ← ← ← ← →
text_image
dif. = max. × → ↑ ↓ ← ← ← ← ← ← ← ← ← ← ← ← ← ← ← ← ← ← ← ← ← ← ← ← ← ← ← ← ← ← ← ← ← ← ← ← ← ← ← ← ← ← ← ← ← ← ← ← ← ← →7 Tömma behållaren
OBS
text_image
OPEN CLOSEnatural_image
Diagram of a portable air purifier with hands operating it, showing internal components and a close-up view (no text or symbols)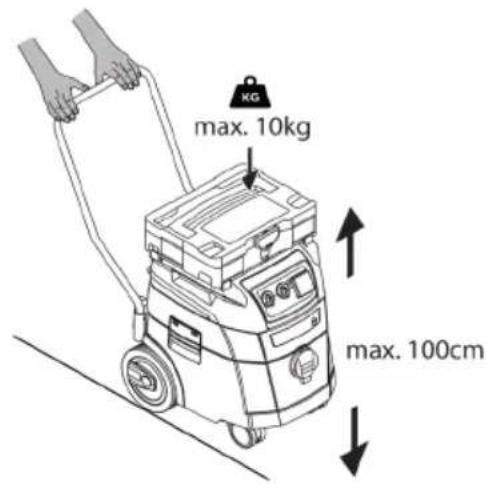
text_image
max. 10kg max. 100cmtext_image
Diagram showing a warning sign and a close-up of a mechanical component with a tool, likely illustrating safety or inspection.text_image
dif. = 0 → ← ← ← ← ← ← ← ← ← ← ← ← ← ← ← ← ← ← ← ← ← ← ← ← ← ← ← ← ← ← ← ← ← ← ← ← ← ← ← ← ← ← ← ← ← ← ← ← ← ← →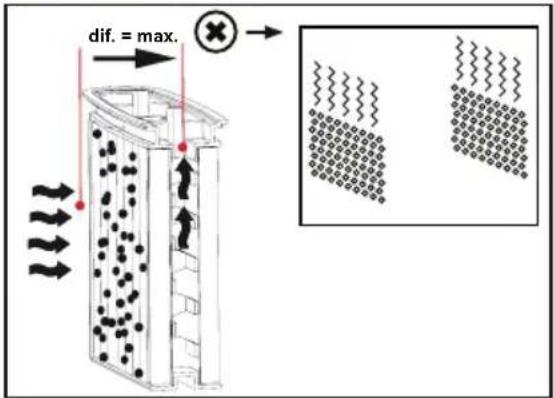
text_image
dif. = max. × → ↑ ↑ ← ← ← ← ← ← ← ← ← ← ← ← ← ← ← ← ← ← ← ← ← ← ← ← ← ← ← ← ← ← ← ← ← ← ← ← ← ← ← ← ← ← ← ← ← ← ← ← ← ← →7.3 Sett inn fiberduk-filterpose
MERK
text_image
OPEN CLOSEnatural_image
Diagram of a portable air purifier with hands operating it, showing internal components and a close-up view (no text or symbols)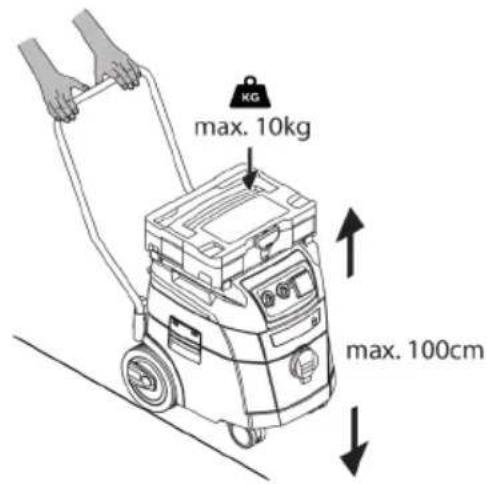
text_image
max. 10kg max. 100cmtext_image
Diagram showing a warning sign and mechanical components with an inset close-up highlighting a tool or component.text_image
dif. = 0 → → → → → → → → → → → → → → → → → → → → → → → → → → → → → → → → → → → → → → → → → → → → → → → → → → ← ←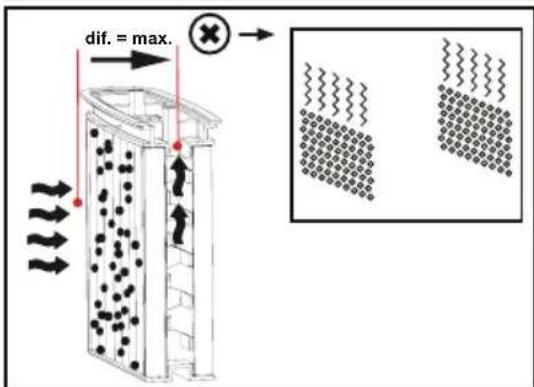
text_image
dif. = max. ×text_image
OPEN CLOSEnatural_image
Technical illustration of a portable industrial machine with a hand operating it, showing a close-up view of its internal components (no text or symbols present)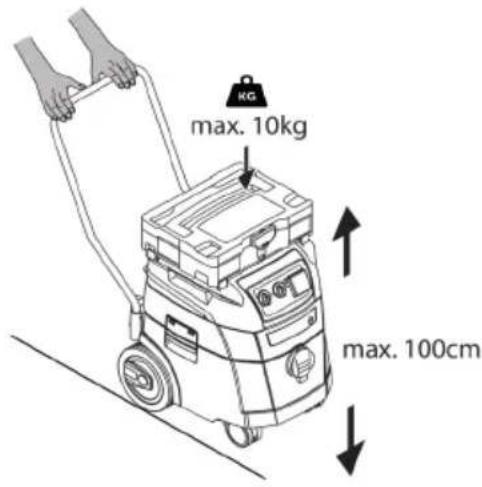
text_image
max. 10kg max. 100cmtext_image
Diagram showing a warning sign and mechanical components with an inset close-up of a component detailtext_image
dif. = 0 → → → → → → → → → → → → → → → → → → → → → → → → → → → → → → → → → → → → → → → → → → → → → → → → → → ← ← ← ← ← ← ← ← ← ← ← ← ← ← ← ← ← ← ← ← ← ← ← ← ← ← ← ← ← ← ← ←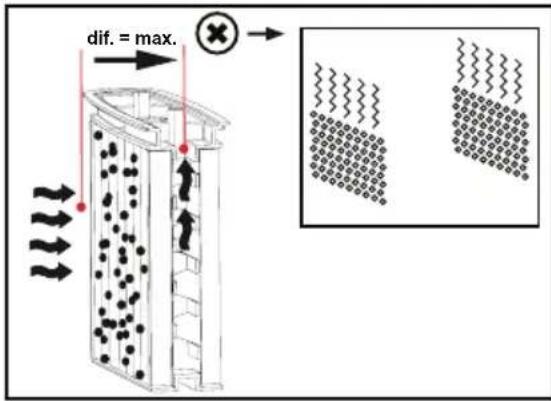
text_image
dif. = max. ×text_image
OPEN CLOSEnatural_image
Illustration of a hand operating a small industrial machine with a magnified inset showing internal components (no text or symbols)
text_image
max. 10kg max. 100cmtext_image
Diagram showing a warning sign and a close-up of mechanical components with an arrow pointing to a tool.text_image
dif. = max. × → ← ← ← ← ← ← ← ← ← ← ← ← ← ← ← ← ← ← ← ← ← ← ← ← ← ← ← ← ← ← ← ← ← ← ← ← ← ← ← ← ← ← ← ← ← ← ← ← ← ← →7 Kabı boşaltma
NOT
text_image
OPEN CLOSEnatural_image
Illustration of a hand operating a small industrial machine with a magnified inset showing internal components (no text or symbols)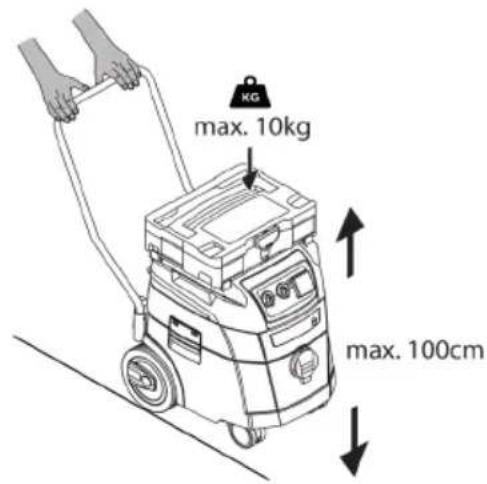
text_image
max. 10kg max. 100cmtext_image
Diagram showing a warning sign and mechanical assembly with magnified detail of internal componentstext_image
dif. = 0 → ← ← ← ← ← ← ← ← ← ← ← ← ← ← ← ← ← ← ← ← ← ← ← ← ← ← ← ← ← ← ← ← ← ← ← ← ← ← ← ← ← ← ← ← ← ← ← ← ← ← →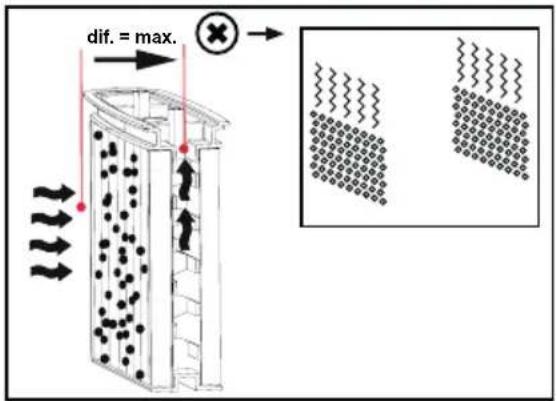
text_image
dif. = max. × → ← ← ← ← ← ← ← ← ← ← ← ← ← ← ← ← ← ← ← ← ← ← ← ← ← ← ← ← ← ← ← ← ← ← ← ← ← ← ← ← ← ← ← ← ← ← ← ← ← ← →text_image
OPEN CLOSEtext_image
OPEN FIRE8 Zmiana filtra
8.1 Wymiana filtrów
natural_image
Technical line drawing of a mechanical device with an arrow indicating assembly direction (no text or symbols)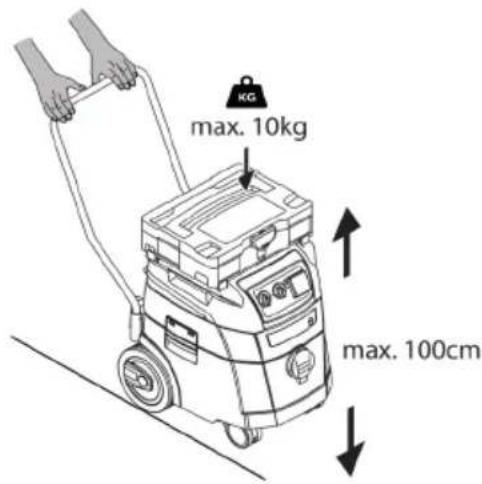
text_image
max. 10kg max. 100cmtext_image
Technical diagram showing a warning sign and mechanical assembly with magnified detail viewtext_image
dif. = 0 → ← ← ← ← ← ← ← ← ← ← ← ← ← ← ← ← ← ← ← ← ← ← ← ← ← ← ← ← ← ← ← ← ← ← ← ← ← ← ← ← ← ← ← ← ← ← ← ← ← ← →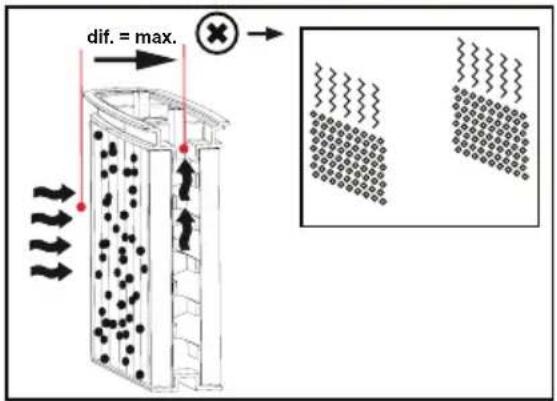
text_image
dif. = max. × → wavy particles wavy particles wavy particles wavy particles7 A tartály ürítése
MEGJEGYZÉS
text_image
OPEN CLOSEnatural_image
Technical line drawing of a mechanical device with an arrow indicating assembly direction (no text or symbols present)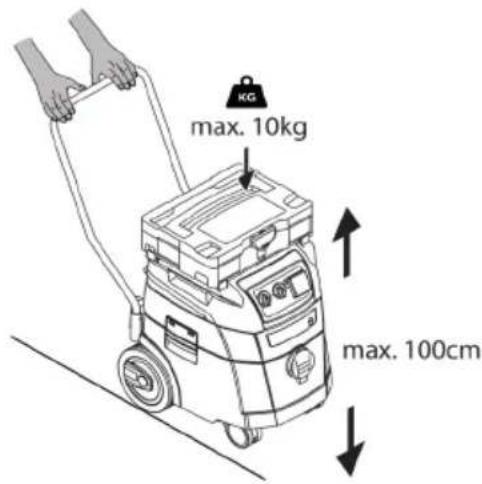
text_image
max. 10kg max. 100cmtext_image
Diagram showing a warning sign and mechanical assembly with magnified detail of componentstext_image
dif. = 0 ✓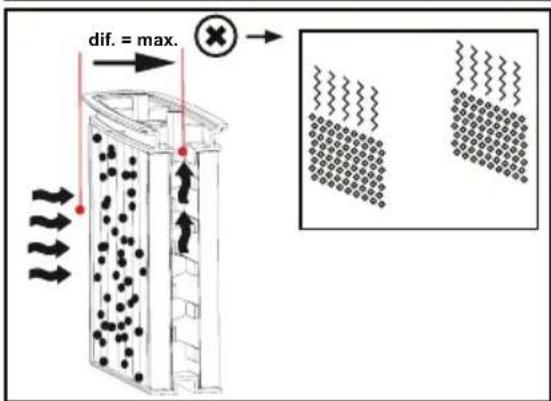
text_image
dif. = max. ×text_image
OPEN CLOSEtext_image
Technical diagram showing a warning symbol and a close-up of mechanical components with a tool, likely illustrating a hazard or failure in vehicle repair.text_image
dif. = max. ×text_image
OPEN CLOSEnatural_image
Technical line drawing of a mechanical device with an arrow pointing to the top component, shown in two views (no text or symbols present)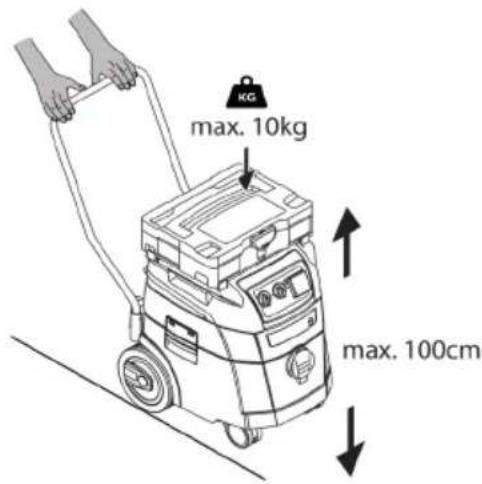
text_image
max. 10kg max. 100cmtext_image
Diagram showing a warning sign and a close-up of mechanical components with an arrow pointing to a tool.text_image
dif. = max. ×text_image
OPEN CLOSEnatural_image
Diagram of a portable air conditioner unit with hand and cable connections, showing internal components and a close-up view (no text or symbols)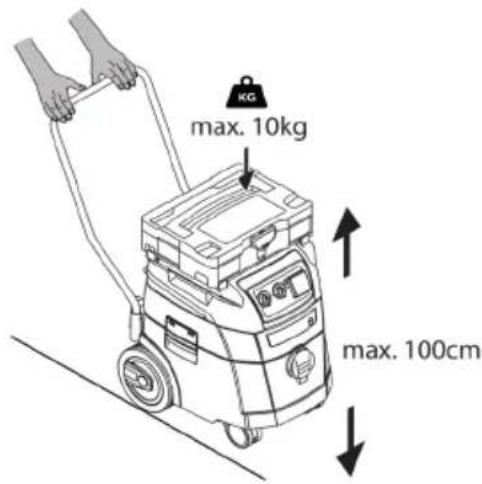
text_image
max. 10kg max. 100cmtext_image
Technical diagram showing a warning symbol and a close-up of a mechanical component with a tool, likely illustrating a safety or inspection process.3 Zaslonski in kontrolni elementi
text_image
dif. = 0 → ← ← ← ← ← ← ← ← ← ← ← ← ← ← ← ← ← ← ← ← ← ← ← ← ← ← ← ← ← ← ← ← ← ← ← ← ← ← ← ← ← ← ← ← ← ← ← ← ← ← →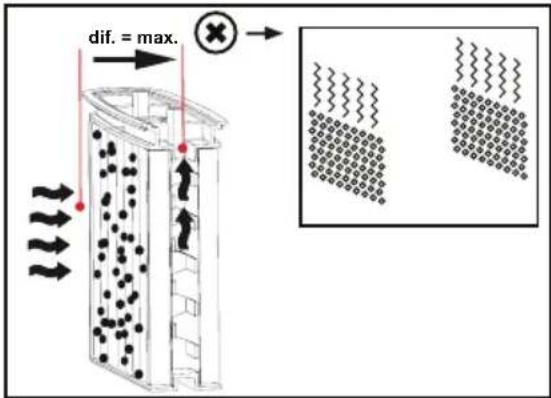
text_image
dif. = max. ×7 Praznjenje posode
OPOMBA
text_image
OPEN CLOSEnatural_image
Illustration of a hand operating a portable industrial machine with a close-up view showing the device's internal components (no text or symbols present)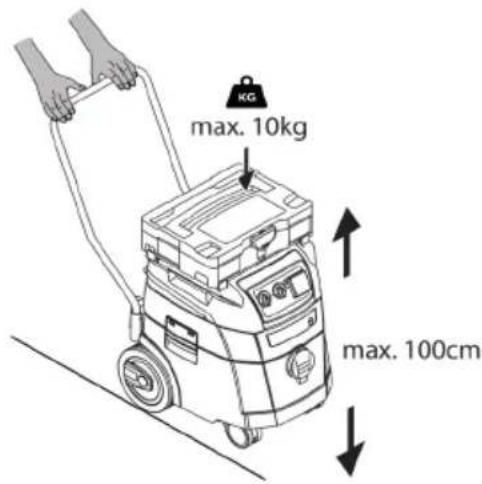
text_image
max. 10kg max. 100cmtext_image
Diagram showing a warning sign and a close-up of a mechanical device with a tool, likely illustrating safety or inspection.3 Elementi prikaza i rukovanja
| Položaj prekidača Funkcija Opis | |||
| 0 |  | Usisavač je isključen. -Utikač pod naponom | |
| A |  | Usisavač je isključen. | -Utikač pod naponom-Rad sa električnim alatom, funkcija čišćenja fi ltra je isključena-Kada je alat uključen, usisavač se automatski uključuje. Nakon isključivanja električnog alata, usisavač radi još oko 10 sekundi kako bi spriječili nakupljanje ostataka u crijevu |
| AR |  | Stanje pripravnosti | -Utikač pod naponom-Funkcija čišćenja fi ltra pri pokretanju i automatskog čišćenja fi ltra nakon otkrivanja diferencijalnog tlaka-Kada je alat uključen, usisavač se automatski uključuje. Nakon isključivanja električnog alata, usisavač radi još oko 10 sekundi kako bi spriječili nakupljanje ostataka u crijevu |
| IR |  | Usisavač se odmah uključuje | -Utikač pod naponom-Funkcija automatskog čišćenja fi ltra započinje nakon otkrivanja diferencijalnog tlaka |
| Funkcija automatskog čišćenja fi ltra | -Dok usisavač radi, fi ltarski ulošci čiste se naizmjenično kada se dosegne određena negativna vrijednost tlaka, pri kojoj još uvijek postoji dovoljno zraka. | ||
| Indikator razine punjenja* | -Indikator razine punjenja svijetli kada je spremnik pun i/ili je usisna cijev blokirana. Usisavači s klasama prašine M i H također emitiraju i zvučni signal | ||
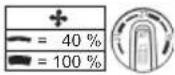
 | Postavljanje promjera usisnog crijeva * | -Na M/H/H-azbestnim usisavačima za praćenje volumena protoka, aktivira se zvučni signal upozorenja ako minimalna brzina zraka padne ispod 20 m/s | |
 | Podešavanje brzine motora* -Podešavanje usisne snage pomoću regulacije brzine | ||
 | |||
4 Puštanje u rad
4.1 Prije svake upotrebe
Uvjerite se da su ispunjeni sljedeći uvjeti:
△ Usisavač, mrežni kabel, usisno crijevo i pribor nisu oštećeni.
△ Svi filtri su postavljeni i nisu oštećeni.
text_image
dif. = 0 ↑ ↑ ↑ →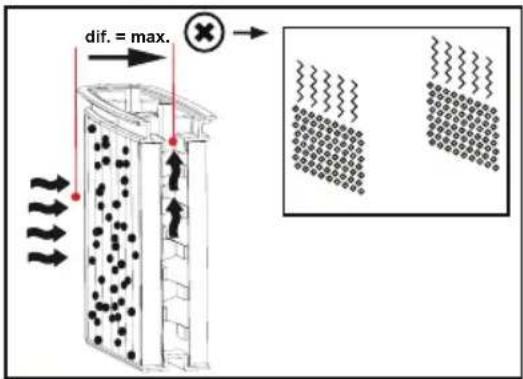
text_image
dif. = max. ×text_image
OPEN CLOSE7.4 Umetnite PE vrećicu za pražnjenje i odlaganje\*
NAPOMENA
Samo usisavači s razredom prašine L, M i H s posebnim spremnicima i rotirajućim kliznikom na usisnom priključku tipa iPulse L, M, iPulse H i iPulse H-azbest prikladni su za korištenje PE vrećica za pražnjenje i odlaganje.
NAPOMENA
Upravljanje okretnim kliznikom
- Okrenite crveni okretni kliznik u položaj OPEN dok se ne zaustavi na oznaci ▲.
Gurnite u potpunosti prirubnicu preko usisnog priključka.
Postavite gornji otvor vrećice preko ruba spremnika.
text_image
OPEN8 Promjena filtra
natural_image
Diagram of a mobile device with attached cable and a close-up view showing internal components (no text or symbols)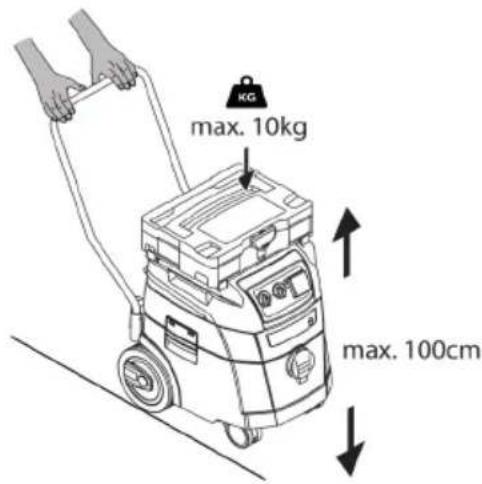
text_image
max. 10kg max. 100cmtext_image
Diagram showing a warning sign and mechanical component with magnified detail view3 Elementi za prikaz i kontrolu
| Položaj prekidača Funkcija Opis | |||
| 0 |  | Usisivač je isključen. -Utičnica je pod | naponom |
| A |  | Usisivač je isključen. | -Utičnica je pod naponom-Rad sa električnim alatom, funkcija čišćenja fi litera isključena-Kada se alat uključi, usisivač se automatski uključuje. Nakon što se isključi električni alat, usisivač nastavlja da radi približno 10 sekundi kako bi sprečio nakupljanje ostataka u crevu |
| AR |  | Režim pripravnosti | -Utičnica je pod naponom-Čišćenje fi litera pri pokretanju i automatska funkcija čišćenja fi litera nakon detekcije diferencijalnog pritiska-Kada se alat uključi, usisivač se automatski uključuje. Nakon što se isključi električni alat, usisivač nastavlja da radi približno 10 sekundi kako bi sprečio nakupljanje ostataka u crevu |
| IR |  | Usisivač se odmah pokreće | -Utičnica je pod naponom-Funkcija automatskog čišćenja fi litera počinje nakon detekcije diferencijalnog pritiska |
| Automatska funkcija čišćenja fi litera | -Dok je usisivač u funkciji, presavijeni fi liter kertridži se naizmenično čiste kada se dostigne određena vrednost negativnog pritiska, na kojoj još uvek ima dovoljno vazduha. | ||
| Indikator nivoa napunjenosti* | -Indikator nivoa napunjenosti se pali kad je rezervoar pun i/ili je usisno crevo blokirano. Na usisivačima sa klasom prašine M i H, emituje se i zvučni signal | ||
 | Postavljanje prečnika usisnog creva * | -Na M-/H-/H-azbest usisivačima za kontrolu količine protoka, za aktiviranje zvučnog signala ako brzina vazduha pada ispod 20 m/s | |
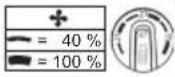
 | Podešavanje brzine motora* -Prilagodite snagu usisavanja pomoću kontrole brzine | ||
 | |||
4 Puštanje u rad
4.1 Pre svake upotrebe
natural_image
Technical line drawing of a rectangular container with internal compartments and labeled parts (no text or symbols)BELEŠKA
Senzore nivoa vode (1) redovno čistiti i kontrolisati da li postoje naznake oštećenja.
▶ Usisavanje bez vrećice filtra od flisa.
text_image
dif. = 0 → ← ← ← ← ← ← ← ← ← ← ← ← ← ← ← ← ← ← ← ← ← ← ← ← ← ← ← ← ← ← ← ← ← ← ← ← ← ← ← ← ← ← ← ← ← ← ← ← ← ← →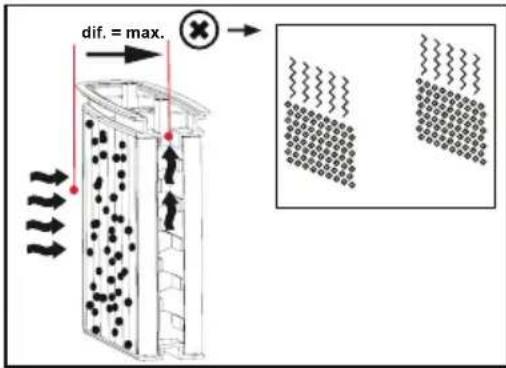
text_image
dif. = max. ×7 Pražnjenje kontejnera
BELEŠKA
Dozvoljeno samo za prašinu sa graničnim radnim vrijednostima > 1 mg/m ^3 .
▶ Isključite usisivač, izvucite mrežni utikač.
▶ Otvorite zatvarače.
▶ Skinite poklopac i usisno crijevo sa posude.
▶ Prevrnite posudu.
7.1 Odložite vunenu filter vreću
text_image
OPEN CLOSEtext_image
Technical diagram showing a warning sign and mechanical assembly with magnified detail viewtext_image
dif. = max. × → ↑ ↑ ↑ ↑ ↑ ↑ ↑ ↑ ↑ ↑ ↑ ↑ ↑ ↑ ↑ ↑ ↑ ↑ ↑ ↑ ↑ ↑ ↑ ↑ ↑ ↑ ↑ ↑ ↑ ↑ ↑ ↑ ↑ ↑ ↑ ↑ ↑ ↑ ↑ ↑ ↑ ↑ ↑ ↑ ↑ ↑ ↑ ↑ ↑ ↑ ↓ ↓ ↓ ↓ ↓ ↓ ↓ ↓ ↓ ↓ ↓ ↓ ↓ ↓ ↓ ↓ ↓ ↓ ↓ ↓ ↓ ↓ ↓ ↓ ↓ ↓ ↓ ↓ ↓ ↓ ↓ ↓ ↓ ↓ ↓text_image
OPEN CLOSEtext_image
OPEN FLOW8 Смяна на филтъра
natural_image
Illustration of a hand operating a small industrial machine with a magnified inset showing the internal components (no text or symbols present)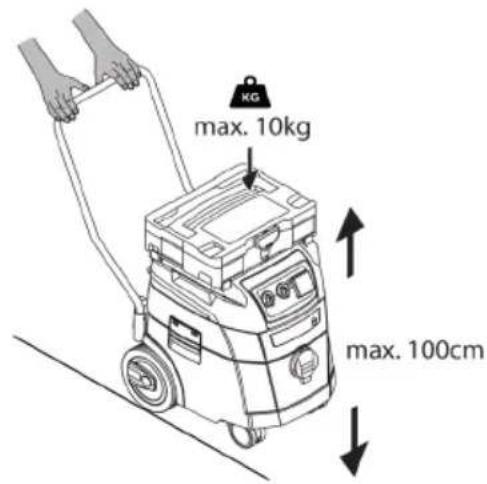
text_image
max. 10kg max. 100cmtext_image
Diagram showing a warning sign and a close-up of a mechanical component with a tool, likely illustrating safety or inspection.text_image
dif. = 0 → ← ← ← ← ← ← ← ← ← ← ← ← ← ← ← ← ← ← ← ← ← ← ← ← ← ← ← ← ← ← ← ← ← ← ← ← ← ← ← ← ← ← ← ← ← ← ← ← ← ← →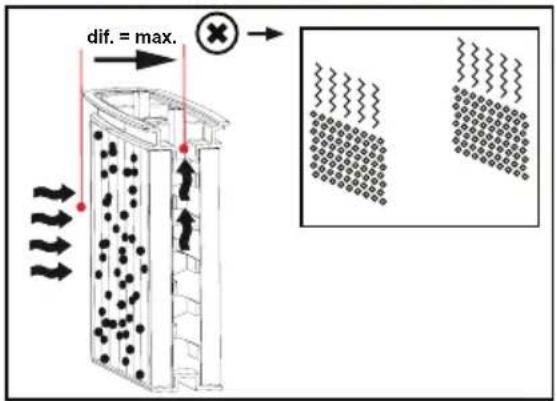
text_image
dif. = max. × → differential particle diffusiontext_image
OPEN CLOSEnatural_image
Illustration of a hand operating a small industrial machine with a magnified inset showing internal components (no text or symbols)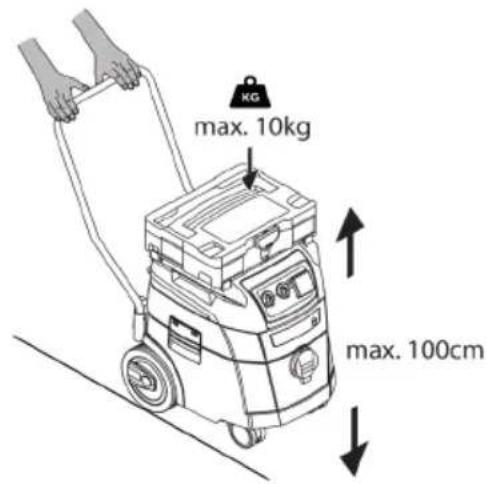
text_image
max. 10kg max. 100cmtext_image
Diagram showing a warning sign and a close-up of a mechanical component with a tool, likely illustrating safety or inspection.text_image
dif. = max. ×text_image
OPEN CLOSEnatural_image
Technical line drawing of a mechanical device with an arrow pointing to a component, shown in two views: one with a crosshair and another with a magnified inset (no text or symbols)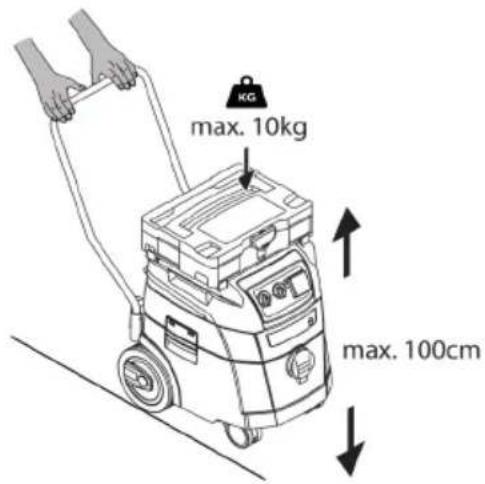
text_image
max. 10kg max. 100cmtext_image
Diagram showing a warning sign and a close-up of mechanical components with a tool, likely illustrating safety or inspection.text_image
dif. = 0 ✓ → ↑ ↑ ↑ ↑ → ↑ ↑ ↑ → ↑ ↑ ↑ → ↑ ↑ ↑ → ↑ ↑ ↑ → ↑ ↑ ↑ → ↑ ↑ ↑ → ↑ ↑ ↑ → ↑ ↑ ↑ → ↑ ↑ ↑ → ↑ ↑ ↑ → ↑ ↑ ↑ → ↑ ↑ ↑ → ↑ ↑ ↑ → ↑ ↑ ↑ → ↑ ↑ ↑ → ↑ ↑ ↑ → ↑ ↑ ↑ → ↑ ↑ ↑ → ↑ ↑ ↑ → ↑ ↑ ↑ ← → ← → ← → ← → ← → ← → ← → ← → ← → ← → ← → ← → ← → ← → ← → ← → ← → ← → ← → ← → ← → ← → ← → ← → ← → ← → ← → ← → ← → ← → ← → ← → ← → ← → ← → ← → ← → ← → ← → ← → ← → ← ↑ ← → ← ↓ ← → ← ↓ ← → ← ↓ ← → ← ↓ ← → ← ↓ ← → ← ↓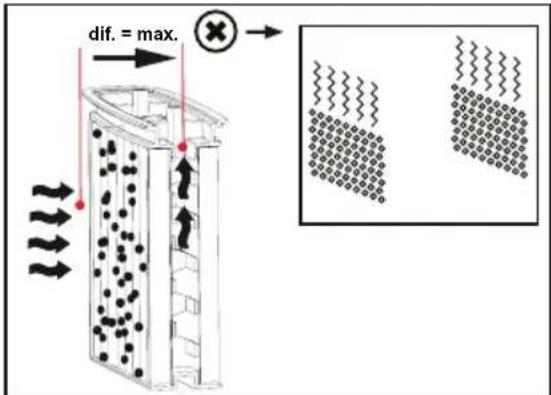
text_image
dif. = max. ×text_image
OPEN CLOSE7.4 levietojiet PE vienreizlietojamo maisu\*
PIEZIME
natural_image
Diagram showing a hand operating a portable air purifier with a close-up view of its internal components (no text or symbols present)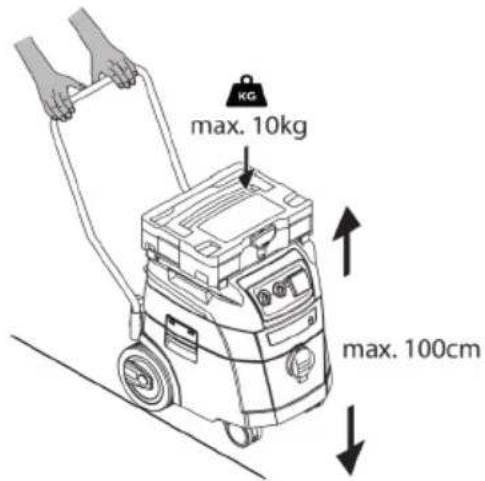
text_image
KG max. 10kg max. 100cmtext_image
Technical diagram showing a warning sign and mechanical assembly with magnified detail viewtext_image
dif. = 0 → ← ← ← ← ← ← ← ← ← ← ← ← ← ← ← ← ← ← ← ← ← ← ← ← ← ← ← ← ← ← ← ← ← ← ← ← ← ← ← ← ← ← ← ← ← ← ← ← ← ← →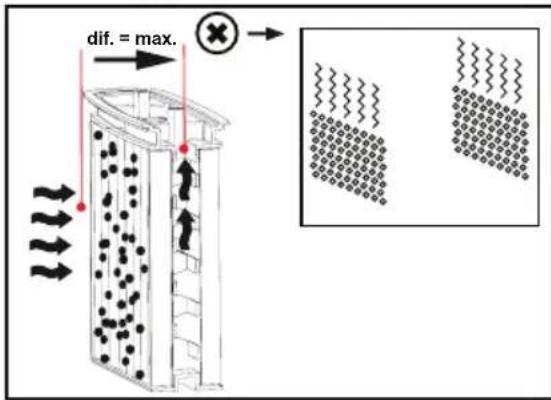
text_image
dif. = max. × → ↑ ↑ ↑ ↑ ↑ ← ← ← ← ← ← ← ← ← ← ← ← ← ← ← ← ← ← ← ← ← ← ← ← ← ← ← ← ← ← ← ← ← ← ← ← ← ← ← ← ← ← ← ← ← ← ← ← ← ← →text_image
OPEN CLOSEnatural_image
Illustration of a portable industrial machine with a hand operating it, showing a close-up view of its internal components (no text or symbols present)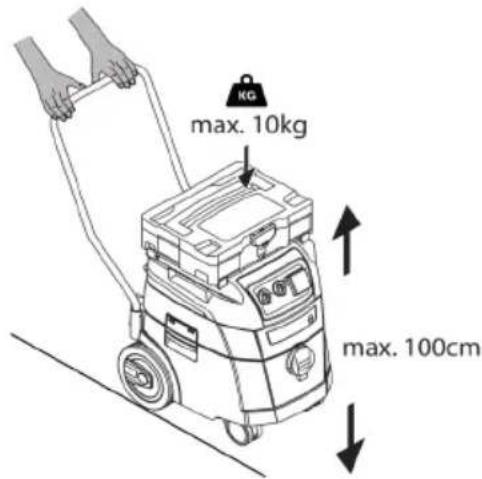
text_image
KG max. 10kg max. 100cm息、须知及培训。
text_image
Diagram showing a warning sign and mechanical assembly with magnified detail of components3 显示和控制元件
text_image
dif. = 0 → → → → → → → → → → → → → → → → → → → → → → → → → → → → → → → → → → → → → → → → → → → → → → → → → → ← ←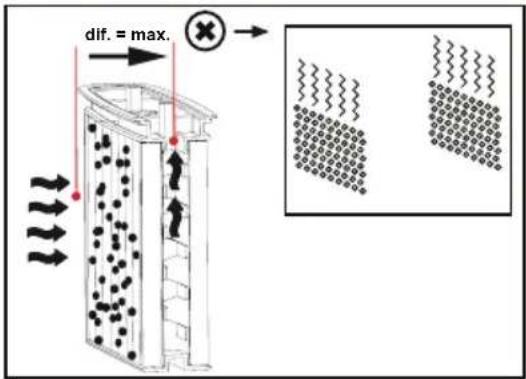
text_image
dif. = max. ×7 清空容器
注意注意
text_image
OPEN CLOSE7.4 插入聚乙烯废物清空清理袋\*
注意注意
text_image
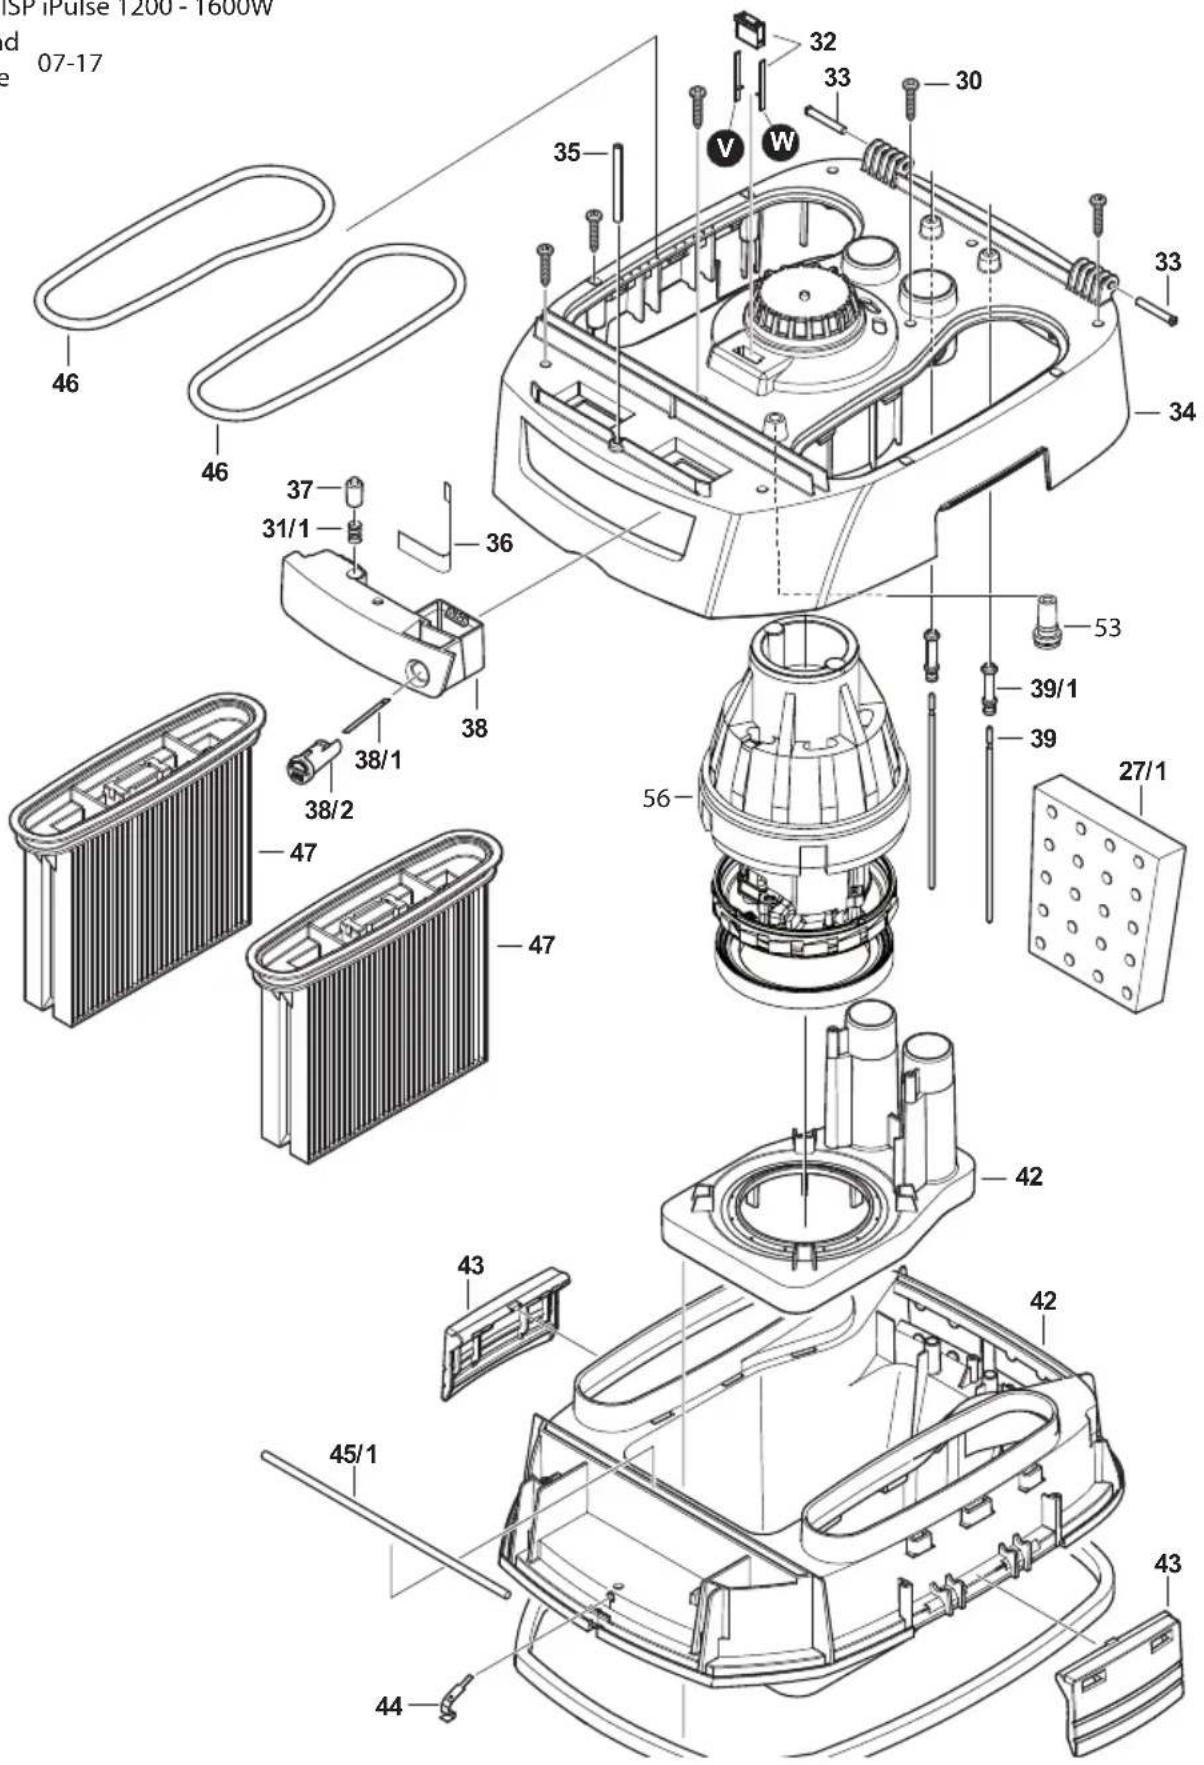
Exploded view diagram of a car's internal components with numbered parts and Chinese labels| Ersatzteile / Spare Parts Stand / Issue: 17-08 | ||
| A - iPusle L-1635 Premium (018652)B - iPusle L-1635 Top (018621)C - iPulse M-1635 Safe Plus (018638)D - iPulse H-1635 Safe Plus (018614)E - iPulse H-1235 Asbest Safe Plus (018645)F - iPulse L-1635 Basic (018539)G - iPulse M-1635 Safe (018935) | ||
| Pos.-Nr. / Item No. Bestell-Nr. / Order No. Typ / Type | ||
| 01+02+03 407937 A-G | ||
| 04+05+16+30 444666 A/B/F | ||
| 04+05+16+30 444819 C/D/E/G | ||
| 06 444673 A-G | ||
| 56+57+30 445106 A-E | ||
| 58+30 444697 F/G | ||
| 07+08 444703 A-G | ||
| "09+10+9/1+10/1+10/2" 444710 A-G | ||
| 11+30 444727 A-G | ||
| "12+29+30+50+51+52" 444734 A/B/F | ||
| "12+29+30+50+51+52" 444741 C/D/E/G | ||
| 14 417707 A-G | ||
| 17 444758 A-G | ||
| 18+28+44 444765 A-G | ||
| 19+20+21+30 444772 A-G | ||
| "15+22+23+23/1+25+26" 444789 A-G | ||
| 24 444796 A-G | ||
| 27+27/1 | 408200 A-G | |
| 30 408705 A-G | ||
| 31+31/1+48+30 | 444826 A-G | |
| 31/1+35+36+37 | 444833 A-G | |
| 38+38/1+38/2 | A-G | |
| 32 417714 A-G | ||
| 33 408224 A-G | ||
| 34 444802 A-G | ||
| 39+39/1 | 408767 A-G | |
| 42+30 444932 A-G | ||
| 43 408293 A-G | ||
| 45+45/1+46+53 | 444680 A-G | |
| 47 416069 A/B/C/F/G | ||
| 47 419190 D/E | ||
| 56 444901 E | ||
| 56 444918 A/B/C/D/F/G | ||
| 49 444840 C/D/E/G | ||
| Label iPulse L/M | 444857 A/B/C/F/G | |
| Label iPulse H | 444871 D/E | |
| Label Asbestos | 444864 E | |
Typ ISP iPulse 1200 - 1600W
Stand
Issue
07-17
text_image
ISP iPulse 1200 - 1600W d 07-17 46 46 37 31/1 36 38 38/1 38/2 47 47 56 32 33 30 33 34 53 39/1 39 27/1 42 43 45/1 42 44 43| Ersatzteile / Spare Parts Stand / Issue: 17-08 | ||
| A - iPusle L-1635 Premium (018652)B - iPusle L-1635 Top (018621)C - iPulse M-1635 Safe Plus (018638)D - iPulse H-1635 Safe Plus (018614)E - iPulse H-1235 Asbest Safe Plus (018645)F - iPulse L-1635 Basic (018539)G - iPulse M-1635 Safe (018935) | ||
| Pos.-Nr. / Item No. Bestell-Nr. / Order No. Typ / Type | ||
| 01+02+03 407937 A-G | ||
| 04+05+16+30 444666 A/B/F | ||
| 04+05+16+30 444819 C/D/E/G | ||
| 06 444673 A-G | ||
| 56+57+30 445106 A-E | ||
| 58+30 444697 F/G | ||
| 07+08 444703 A-G | ||
| "09+10+9/1+10/1+10/2" 444710 A-G | ||
| 11+30 444727 A-G | ||
| "12+29+30+50+51+52" 444734 A/B/F | ||
| "12+29+30+50+51+52" 444741 C/D/E/G | ||
| 14 417707 A-G | ||
| 17 444758 A-G | ||
| 18+28+44 444765 A-G | ||
| 19+20+21+30 444772 A-G | ||
| "15+22+23+23/1+25+26" 444789 A-G | ||
| 24 444796 A-G | ||
| 27+27/1 | 408200 A-G | |
| 30 408705 A-G | ||
| 31+31/1+48+30 | 444826 A-G | |
| 31/1+35+36+37 | 444833 A-G | |
| 38+38/1+38/2 | A-G | |
| 32 417714 A-G | ||
| 33 408224 A-G | ||
| 34 444802 A-G | ||
| 39+39/1 | 408767 A-G | |
| 42+30 444932 A-G | ||
| 43 408293 A-G | ||
| 45+45/1+46+53 | 444680 A-G | |
| 47 416069 A/B/C/F/G | ||
| 47 419190 D/E | ||
| 56 444901 E | ||
| 56 444918 A/B/C/D/F/G | ||
| 49 444840 C/D/E/G | ||
| Label iPulse L/M | 444857 A/B/C/F/G | |
| Label iPulse H | 444871 D/E | |
| Label Asbestos | 444864 E | |
Typ ISP iPulse 1200 - 1600W
Stand 07 - 17 Issue
text_image
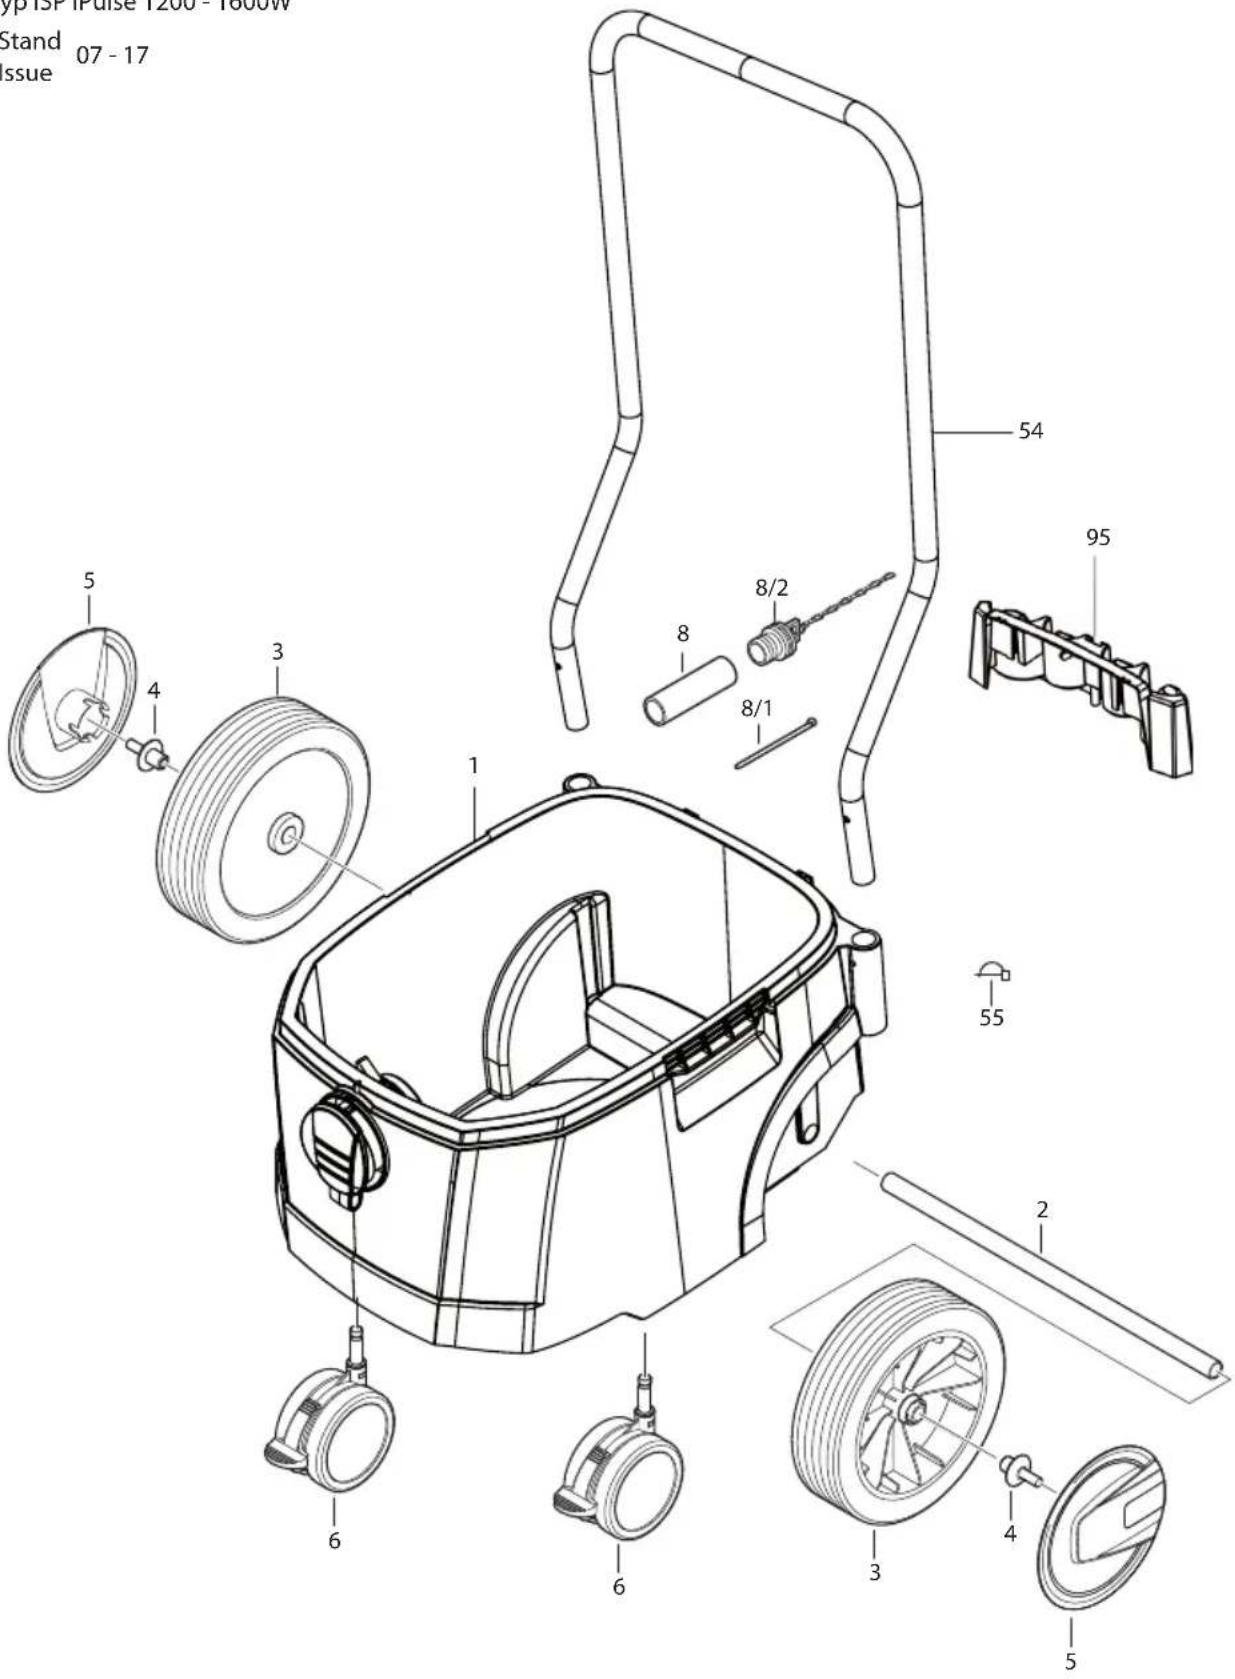
ypISP IPulse 1200 - 1800W Stand Issue 07 - 17 54 95 8/2 8/1 5 3 4 5 6 6 3 4 5 55| Ersatzteile / Spare Parts Stand / Issue: 17-08 | ||
| A - iPusle L-1635 Premium (018652)B - iPusle L-1635 Top (018621)C - iPulse M-1635 Safe Plus (018638)D - iPulse H-1635 Safe Plus (018614)E - iPulse H-1235 Asbest Safe Plus (018645)F - iPulse L-1635 Basic (018539)G - iPulse M-1635 Safe (018935) | ||
| Pos.-Nr. / Item No. Bestell-Nr. / Order No. Typ / Type | ||
| "01+02+03+04+05+06" 444888 A-G | ||
| 02+03+04+05 444895 A-G | ||
| 06 408408 A-G | ||
| 08+08/1+08/2 408958 A-G | ||
| 95 445113 A-G | ||
| 54+55 445137 A-G | ||
Staubklassen / dust class
text_image
L ! i LClass L vacuum devices are suitable for aspiration/clearing of dry, non-combustible dusts and hazardous dusts with occupational exposure limit values (AGW) > 1 mg/m ^3 .
Class M vacuum devices are suitable for aspiration/clearing of dry, non-combustible dusts, non-combustible liquids, wood dusts and hazardous dusts with workplace limit values of ≥ 0.1 mg/m ^3 .
Class H vacuum devices are suitable for aspiration/clearing of dry, non-combustible dusts, carcinogenic and pathogenic particles as well as non-combustible liquids, wood dusts and toxic dusts with all workplace limit values.
WARNING: This machine contains harmful dust. Emptying and maintenance, including removing the dust collection container, may only be performed by specialist staff who are wearing the appropriate personal protective equipment. Never operate without a complete filtration system.