Air Fresh 9 - Fan Sonnenkönig - Free user manual and instructions
Find the device manual for free Air Fresh 9 Sonnenkönig in PDF.


User questions about Air Fresh 9 Sonnenkönig
0 question about this device. Answer the ones you know or ask your own.
Ask a new question about this device
Download the instructions for your Fan in PDF format for free! Find your manual Air Fresh 9 - Sonnenkönig and take your electronic device back in hand. On this page are published all the documents necessary for the use of your device. Air Fresh 9 by Sonnenkönig.
USER MANUAL Air Fresh 9 Sonnenkönig
natural_image
Exterior view of a modern office building (no signage)INDEX
natural_image
Cross-sectional view of a circular mechanical component with internal fan-like structure (no text or symbols)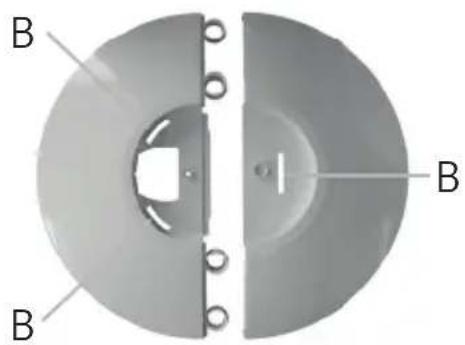
natural_image
Cross-sectional diagram of a mechanical component with labeled parts (B), showing two circular components and a central hole (no text or symbols beyond labels)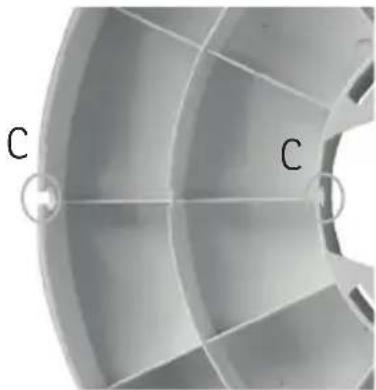
natural_image
Close-up of a curved metallic component with labeled points C (no text or symbols beyond labels)natural_image
Close-up of a digital temperature sensor device with '20°C' display (no readable text or symbols beyond the display)Abb. 2: Display
text_image
K2 K1 K5 K4 K3 K6 SINNERSHONG SINNERSHONGFestnetz 14 Cent/Minute
natural_image
Exterior view of a modern vertical electric vacuum tower (no signage)SOMMAIRE
natural_image
Cross-sectional view of a circular mechanical component with radial blades and mounting holes (no text or symbols)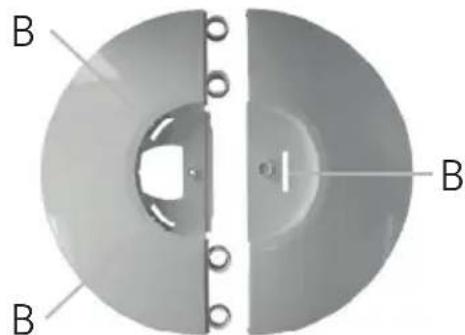
natural_image
Cross-sectional diagram of a mechanical component with labeled parts (B), showing internal structure and mounting holes (no text or symbols beyond labels)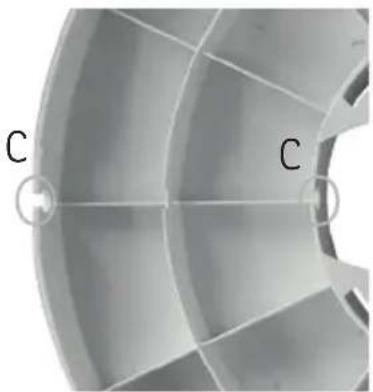
natural_image
Close-up of a curved metallic component with labeled points C and a small hole, no readable text or symbols present.Modifications techniques
natural_image
Exterior view of a modern office building (no signage)IT
INDICE
natural_image
Cross-sectional view of a dual-circular fan or turbine blade structure with internal blades and mounting holes (no text or symbols)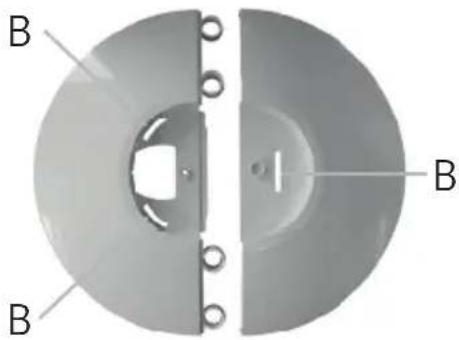
natural_image
Cross-sectional diagram of a mechanical component with labeled parts (B), showing internal structure and mounting holes (no text or symbols beyond labels)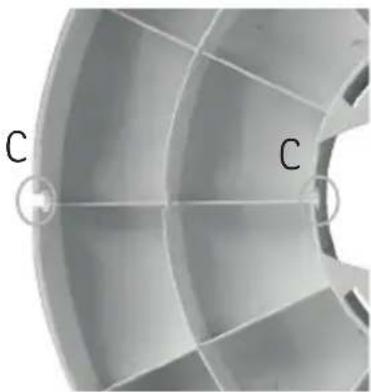
natural_image
Close-up of a curved metallic component with labeled points C (no text or symbols beyond labels)natural_image
Exterior view of a modern office building (no signage)INDEX
1 Safety Instructions....36
2 Single Parts....37
3 Technical Characteristics ...... 38
4 Assembly 38
5 Operation 39
6 Cleaning and Storage 40
7 Filling the Water Tank 40
8 Maintenance ....41
9 Warranty / Disposal / Technical Changes 42
1 Safety instructions
EN
Before use, please read the safety instructions carefully and observe the safety instructions to prevent damage due to misuse, improper operation, and improper environmental conditions. Keep this instruction for later reference.
Check the device after removing the packaging for damage. Do not put the unit in case of suspected corruption in operation and consult a specialist. The recyclable packaging material must not be stored or disposed accessible for young children, but must be disposed of properly.
This appliance is only for the purpose for which it was explicitly developed. Any other use is regarded as improper and therefore dangerous. The supplier is not liable for damage to persons and / or property damage due to an improper or incorrect use.
This appliance can be used by children aged from 8 years and above and persons with reduced physical, sensory or mental capabilities or lack of experience and knowledge if they have been given supervision or instruction concerning use of the appliance in a safe way and understand the hazards involved. Children shall not play with the appliance. Cleaning and user maintenance shall not be made by children without supervision. Please make sure to place the device on a suitable and waterproof surfaces, so that spilled liquids can not cause harm.
Repairs to electrical appliances must only be carried out by trained personnel only. Improperly performed repairs and alterations to the equipment can have dangerous consequences for the user according to what the warranty will be rejected.
- When using electrical appliances, basic safety precautions should always be followed to reduce the risk of fire, electrical shock and personal injury.
- Use this fan only as described in this manual. Any other use that is not recommended may cause fire, electric shock or personal injury.
- This product is intended for household use only and not for commercial, industrial or outdoor use.
- To protect against electric shock: Do not place the fan on window sills, immerse the unit, plug or cord in water or spray it with liquids.
- To reduce the risk of shock, this plug must properly fit the outlet. If the plug does not fully fit into the outlet, reverse the plug. If it still does not fit, contact a qualified electrician. DO NOT attempt to defeat this safety feature.
- To reduce the risk of fire or electric shock, do not use this fan with any solid-state speed control device.
- Children should be supervised to ensure that they do not play with the appliance.
- Turn the fan OFF and unplug the fan from the outlet when not in use, when moving the fan from one location to another and before cleaning.
- To disconnect the fan, first turn the unit OFF, grip the plug and pull it from the wall outlet. Never pull the cord to remove the plug.
- Do not operate the fan in the presence of explosive and/or flammable fumes.
-
Do not place the fan or any parts near an open flame, cooking or other heating appliances.
-
Do not operate the fan with a damaged cord or plug, if the product malfunctions or has been dropped or damaged in any way.
- Avoid contact with moving fan parts.
• The use of attachments not recommended by the manufacturer may be hazardous. - Place the fan on a dry level surface.
- Do not hang or mount the fan on a wall or ceiling.
- Do not operate if the fan housing is damaged.
- If the plug only loosely fi ts into the AC outlet (receptacle), it may cause overheating and a distortion of the plug. Contact a qualifi ed electrician to replace a loose or worn outlet.
- Only use a power supply that matches the one indicate on the rating label of the unit.
- If the supply cord is damaged, it must be replaced by the manufacturer, its service agent or similarly qualified persons in order to avoid a hazard.
2 Single Parts
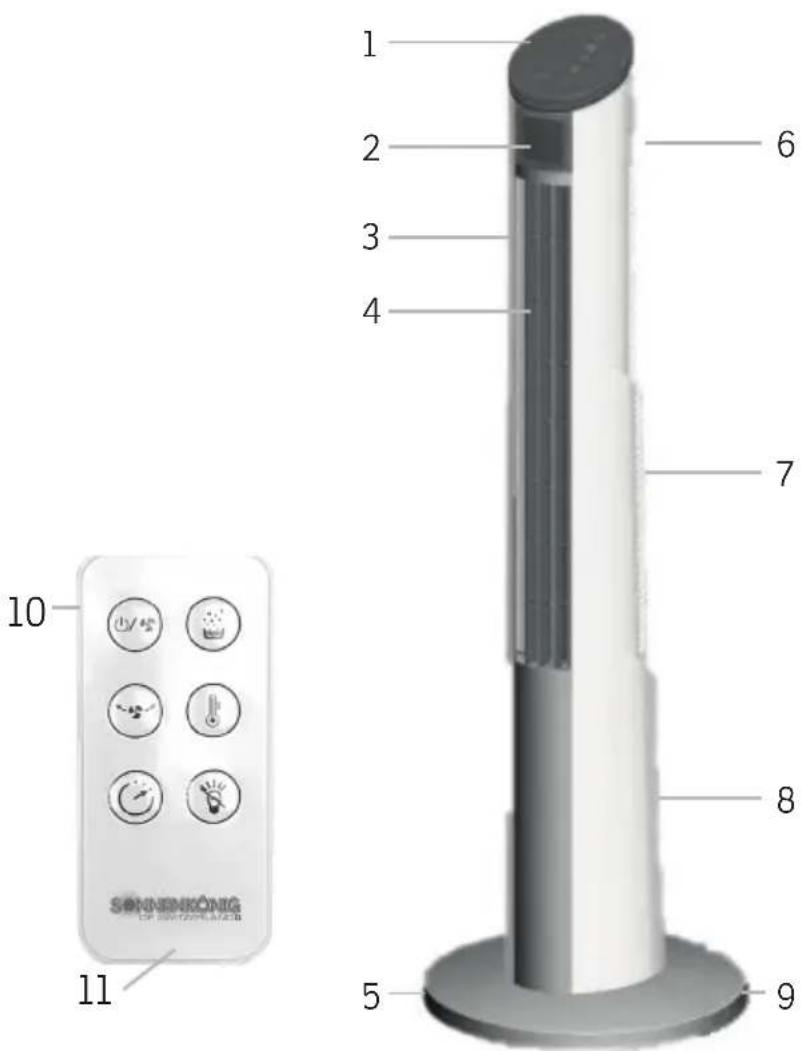
Designation of parts
- Control Panel
- Display
- Fog Outlet
- Air Outlet
- Foot
- Transport Handle
- Air Inlet
- Water tank
- Power Cord
- Remote
- Battery Compartment
text_image
1 2 3 4 5 6 7 8 9 10 SONNENKONG OP SINTUATION 113 Technical Characteristics
Model: Air Fresh 9
Voltage: 230 V
Frequency: 50 Hz
Power Consumption: 90 Watt
Maximum haze capacity: 0.16 L/hours
Water tank capacity: 1.35 l
4 Assembly
natural_image
Cross-sectional view of a circular mechanical component with internal fan-like structure (no text or symbols)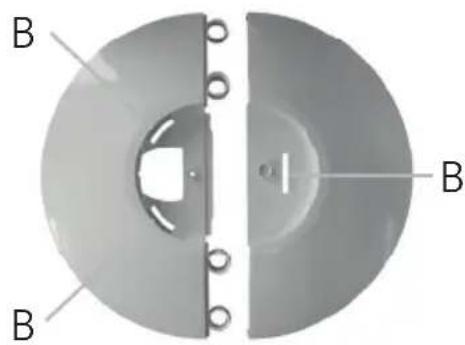
natural_image
Cross-sectional diagram of a mechanical component with labeled parts (B), showing internal structure and mounting holes (no text or symbols beyond labels)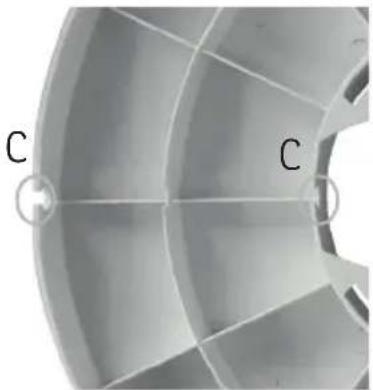
natural_image
Close-up of a curved metallic component with labeled points C (no text or symbols beyond labels)Fig. 7: Foot below Fig. 8: Foot above Fig. 9: Cable duct
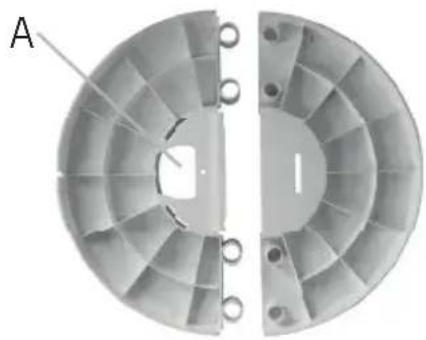
- Connect the two foot pieces.
- Lead the power cord through the hole (Fig. 7, A).
- Place the device on the foot
- Place the device on the foot so that the holes (Fig. 8, B) match the extensions.
- Press the device onto the foot until the three brackets click into the holes.
- Feed the power cable through the two holes (Fig. 9, C) in the cable duct and make sure that no part of the cable under the device can be squeezed.
5 Operation
- Place the device on a flat and even surface.
- Connecting too many devices with high wattage to a single socket would eventually cause a circuit overload and must be avoided.
natural_image
Close-up of a digital temperature sensor device with '20℃' visible on screen (no other text or symbols)Fig. 2: Display
text_image
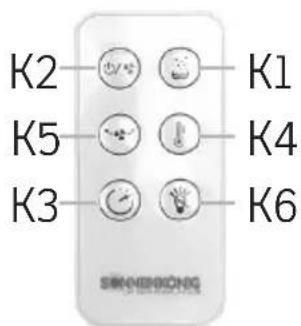
K2 K1 K5 K4 K3 K6 SNHENGKONGFig. 3: Remote
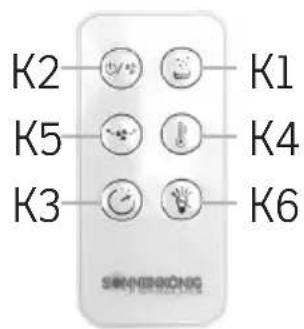
K1: Spray nebulisation On / Off; A1: Water level indicator
The fog control separates from the fan control. (Fog spraying alone, even when the fan is switched off).
If you press K1 once, the device switches to minimum spray nebulisation; if you press K1 a second time, the device switches to maximum spray nebulisation.
To turn off the spray, press K1 again.
When the water tank is empty, the water level indicator lights up and no spray nebulisation is performed.
After refi lling the tank, the indicator turns off and after 2 seconds, the nebulisation carries on.
K2: Fan on/off and speed controller

By pressing K2 the fan is switched on to level 4, by pressing it again you can navigate between the speed levels (4: very strong, 3: strong, 2: medium, 1: weak).
At level 1 (weak) the fan is switched off by pressing it again.
K3: Timer
The Timer controls the running time of either nebulisation and/or ventilation. All functions stop when set time has elapsed. There are four run times: 1h, 2h, 4h, 8h.
Note: the machine keeps functioning even when the control panel functions are disabled.
K4: Automatic Temperature Regulation On / Off
When the fan is running, press K4 to turn on the temperature detection function and the K4 indicator LED. A thermal sensor detects the ambient temperature. If the ambient temperature increases by 0.5^ C, the fan speed increases by 1 step upwards (i.e. from 2 to 3); if the ambient temperature decreases by 0.5^ C, the fan speed decreases by 1 step downwards (i.e. from 2 to 1). If you press K4 again, the automatic temperature control stops and the LED indicator goes out.
Note: this feature is subject to various conditions in the environment such as size of the room, ambient temperature and humidity, etc. It may not be a malfunction if the sensor does not respond to the temperature change instantly or proportionally.
K5: Oscillation On / Off
When the nebulisation and/or ventilation is running, press K5 to toggle the oscillation.
K6: Display dimming / switching off
By pressing K6 you can either dim the display or switch it off. When the display is switched off, the control panel functions are also disabled. These can be woken up via K1-K6 on the control panel or the remote control.
6 Cleaning and Storage
- Switch off all functions of the appliance before cleaning and unplug the cable from the power outlet. Wait until the appliance has cooled down.
- Wipe the dust off the unit with a soft cloth.
- Please clean the water tank every two or three weeks.
- Use a dry cloth and mild detergent to clean the unit.
- Store the unit in a cool, dry place when not in use for long periods of time.
- Avoid turning the device upside down, as even if the water tank is empty, residual water may escape from the pipes.
7 Refilling the Watertank
As soon as the water level indicator on the control panel lights up, the water tank has to be refi lled.
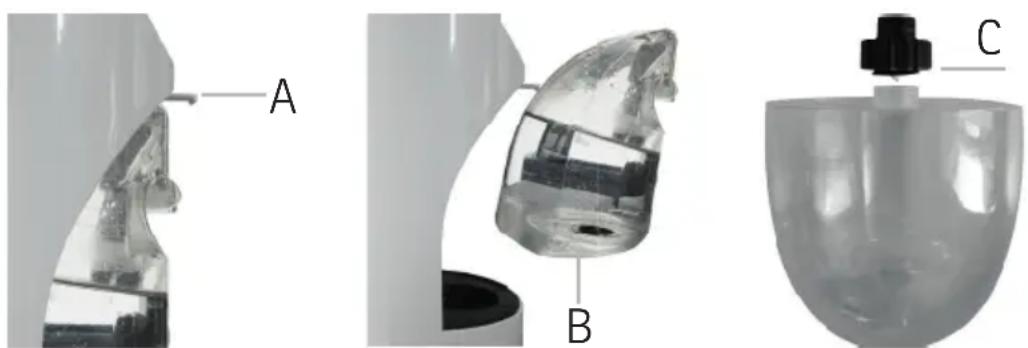
Fig. 4: Watertank Fig. 5: Watertank Fig. 6: Watertank
- Push the lever (Fig. 4, A) upwards until the water tank (Fig. 5, B) comes loose.
- Remove the water tank using the provided handle.
- Remove the screw cap (Fig. 6, C) and fill the tank with water.
WARNING: Do not add any aromas to the water tank as they may damage the unit. - Screw the lid back onto the tank.
- Clean the water tank with a dry cloth to remove any water residue.
- Replace the tank in the holder and press until the lever locks again.
8 Maintenance
EN
Have your product repaired by a specialist.
This electrical equipment has been manufactured in accordance with applicable safety requirements. Repairs may only be carried out by qualified personnel using original spare parts, otherwise it can lead to considerable hazards for the user.
Please contact the store where you purchased the product.
9 Warranty / Disposal / Technical change
Warranty
The Products are controlled just before delivery. If despite a lack of your product, try trustfully your seller. Please bring your receipt, as this is to be submitted for each warranty. The guarantee period is 24 months from date of purchase.
Disposal
The device must be disposed of properly. The device can be distributed free of charge for disposal at each dealer.
Technical changes
Reserving changes in technology and design
CE Declaration of Conformity
This device complies with the following standards
EN 55014-1:2017
EN 55014-2:2015
EN 60335-1:2012/A13:2017
EN 60335-2-98:2003 + A1:2005 + A2:2008
EN 61000-3-2:2014
EN 61000-3-3:2013
EN 62233:2008
2009/125/EG
2014/35/EU
2014/30/EU
DISPOSAL INSTRUCTIONS FOR THE ELECTRICAL PART OF THE PRODUCT
In accordance with Article 26 of the Decree-Law of 14 March 2014 implementing Directive 2012/19/EC and the Law of 4 March 2014 implementing Directive 2011/65/EC on the reduction of the use of hazardous substances in electrical and electronic equipment and on waste management.
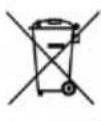
The crossed-out dustbin symbol on the machine or packaging indicates that the waste generated at the end of its useful life must be collected separately from other waste. The user must therefore take the device to the appropriate collection points at the end of its service life. Sort electronic and electrical waste or send the purchase of new, equivalent devices back to the dealer in a one-to-one process. L'adeguata separate collection for subsequent commissioning of the equipment to be recycled, treatment and environmentally sound disposal, helps to avoid possible adverse effects on the environment and health and promote the reuse and/or recycling of the materials to which they belong. composed the equipment. Misuse of this product by the user will result in the application of the administrative penalties provided for in the applicable legislation. Batteries contained in the device must be disposed of separately in the appropriate containers for the collection of used batteries.
DISPOSAL OF BATTERIES AND ACCUMULATORS
In accordance with Legislative Decree 188 of 20 November 2008 implementing Directive 2006/66/EC on batteries, accumulators and related waste, the symbol of the crossed-out waste bin on the battery indicates that it is prohibited to dispose of used batteries in household waste.
Batteries and batteries contain substances that are highly polluting for the environment. The user is obliged to dispose of used batteries at collection points in the municipality or in appropriate containers. The service is free. In this way, legal requirements will be respected and the environment will be protected. The symbols identifying hazardous materials that may be present in batteries and accumulators are as follows: Hg= Mercury, Cd= Cadmium, Pb= Lead.
Company
Armin Schmid
Olensbachstrasse 9-15
CH-9631 Ulisbach
Tel. Int. +41 71 987 60 60
Tel. Nat. 0848870850
www.sonnenkoenig.ch
Company
Armin Schmid
Landline 14 Cent/Minute
Mobile network 42 Cent/Minute