
DualFry Grill 10 AFG-10 - Deep fryer WILFA - Free user manual and instructions
Find the device manual for free DualFry Grill 10 AFG-10 WILFA in PDF.

| Product type | Air fryer |
| Brand | Wilfa |
| Model | DualFry Grill 10 AFG-10 |
| Usage | Indoor household use only |
| Power supply | 220-240 V ~ 50/60 Hz |
| Power | 1500 W |
| Temperature range | 80-200 °C (up to 230 °C for Steak program) |
| Timer | 1-60 minutes (programs), up to 24 hours in dehydration mode |
| Preset programs | 9 (fries, chicken, steak, pizza, fish, shrimp, keep warm, dehydration, customizable) |
| Display | Digital screen |
| Control | Touch keys |
| Automatic preheating | Yes |
| Shake reminder | Yes (for cooking time > 5 min) |
| Settings memory | Yes |
| Basket material | Non-stick coating |
| Safety | Automatic shut-off at end of cooking, cool-touch handle, overheat protection |
| Cleaning | Basket and tank dishwasher safe; exterior cleanable with damp cloth |
| Included accessories | Basket, frying rack, grill, pizza pan |
| Warranty | 5 years |
Frequently Asked Questions - DualFry Grill 10 AFG-10 WILFA
User questions about DualFry Grill 10 AFG-10 WILFA
0 question about this device. Answer the ones you know or ask your own.
Ask a new question about this device
Download the instructions for your Deep fryer in PDF format for free! Find your manual DualFry Grill 10 AFG-10 - WILFA and take your electronic device back in hand. On this page are published all the documents necessary for the use of your device. DualFry Grill 10 AFG-10 by WILFA.
USER MANUAL DualFry Grill 10 AFG-10 WILFA
natural_image
Top-down view of a white-walled smart TV with black and silver casing (no visible text or symbols)DUALFRY GRILL 10L
AIRFRYER AFG-10
EN · Instruction manual
NO · Bruksanvisning
SE · Bruksanvisning
IMPORTANT SAFETY INSTRUCTIONS
- Read this instruction manual thoroughly before use and save it for future reference. It is also available at our website; wilfa.com.
- This product is intended for indoor, non-industrial, non-commercial household use only.
- This appliance shall not be used by children from 0 year to 8 years. This appliance can be used by children aged from 8 years and above if they are continuously supervised. Keep the appliance and its cord out of reach of children less than 8 years. This appliance can be used by persons with reduced physical, sensory or mental capabilities or lack of experience and knowledge if they have been given supervision or instruction concerning use of the appliance in a safe way and understand the hazards involved. Cleaning and user maintenance shall not be made by children. Children shall not play with the appliance.
- If the supply cord is damaged, it must be replaced by the manufacturer, its service agent or similarly qualified persons in order to avoid a hazard.
- Please turn off and unplug the appliance before cleaning, maintenance or relocation and whenever it is not in use.
-
The surfaces are liable to get hot during use.
-
After being used for a long time, the corresponding heating zone of the induction hot plate is still hot. Never touch the ceramic surface to avoid burning.
- Do not immerse any part of the appliance in water or other liquid.
- Never immerse the housing, which contains electrical components and the heating elements, in water nor rinse under the tap.
- Do not let any water or other liquid enter the appliance to prevent electric shock.
- Do not cover the air inlet and the air outlet openings while the appliance is operating.
- Never touch the inside of the appliance while it is operating.
- Keep the main cord away from hot surfaces.
- Never connect this appliance to an external timer switch or separate remote-control system in order to avoid a hazardous situation.
- Immediately unplug the appliance if you see dark smoke coming out of the appliance. Wait for the smoke emission to stop before you remove the pan from the appliance.
- Please pay attention to scald where there is a high temperature symbol.
EN
SAFETY PRECAUTIONS FOR YOUR AIRFRYER
- Always put the ingredients to be fried in the basket, to prevent it from coming in contact with the heating elements.
- Do not fill the pan with oil as this may cause a fire hazard.
- During airfrying, hot steam is released through the air outlet. Keep your hands and face at a safe distance from the steam and from the air outlet openings. Also be careful of hot steam and air when you remove the pan from the appliance.
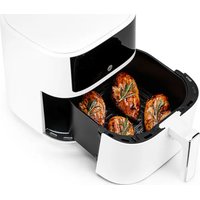
PRODUCT OVERVIEW
EN
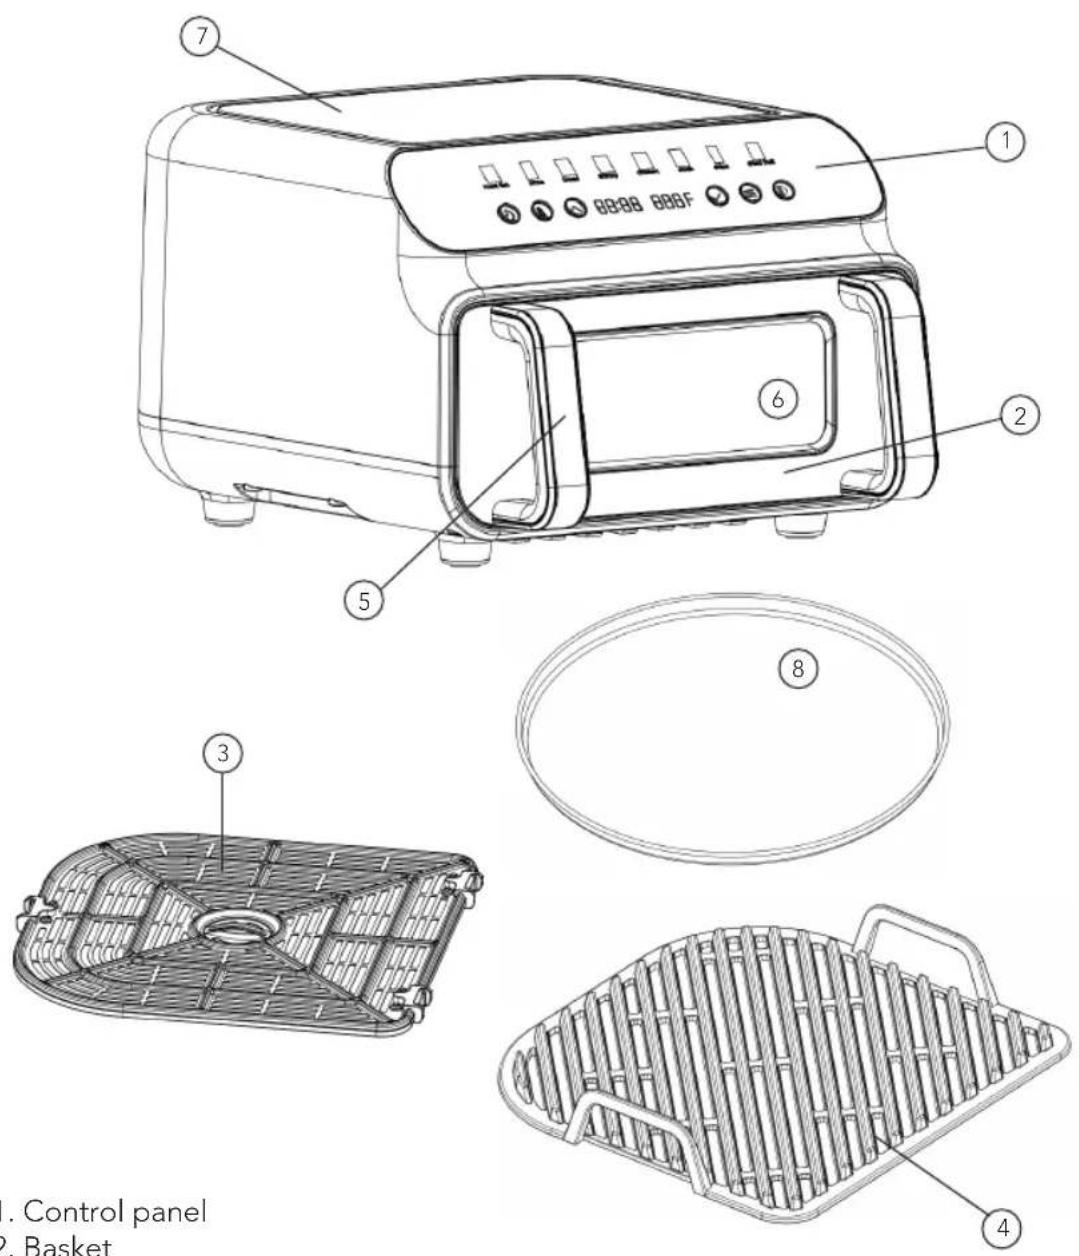
- Control panel
- Basket
- Frying rack
- Gridiron
- Handle
- Window
- Air inlet
- Pizza tray
EN
BEFORE FIRST USE
- Remove all packaging materials, stickers, and labels.
- Clean the basket and the accessory with hot water, soap, and a non-abrasive sponge.
- Wipe the inside and outside with a clean cloth.
- Place the appliance on a flat and even surface.
- The first use requires 10 minutes of dry heating. A small amount of smoke or odor may appear during the dry heating process, which is normal.
NOTE: There is no need to fill the pan with oil or fat because the appliance works on hot air.
HOW TO USE
- Plug in the unit, press button to start.
- To select a pre-set program, just press menu : , until the corresponding icon blinks, and press ▷ to let the machine run for preheating.
- After the preheating is completed the machine will beep and the display will show "Add food".
- Pull the basket out, put your food into the basket and push it back in.
- The program will start as soon as the basket is pushed back.
- Some programs have a shake/flip food reminder when 2/3 of the cooking time has passed. The airfryer beeps and display shows "trn Food".
- The machine beeps when the cooking time is finished. Unplug the unit, put the basket on a flat surface and take out the cooked food with a plastic or wooden tool.
To change the time or temperature settings, choose a program, press and use and to adjust time and temperature to preferred settings. Press to confirm.
The steak program has 2 different processes. To change each process the time and temperature, long press the up and down arrow buttons for 1s to switch between 2 processes.
To permanently change the time and temperature setting on a preset, choose your preset, adjust the time and temperature settings, press and hold
≡ + 🔊 buttons at the same time for 1 second to save the new settings. It will be confirmed with a short beep.
SHAKE REMINDER
When the cooking time is less than 5 minutes, the alert will not go off.
REFERENCE GUIDE
Results may vary, you can adjust temperature and time for your own recipe.
Function Temperature (°C) Time (Min)
| Preset | temp. | Adjust temp. range | Pre time | Adjust time range | |
| 1 | Fries 200 | 80-200205-230 | 18 | 1-601-20 | |
| 2 | Chicken 200 | 80-200205-230 | 20 | 1-601-20 | |
| 3 | Steek 230+180 | 80-200205-230 | 5+7 | 1-601-20 | |
| 4 | Pizza 200 | 80-200205-230 | 11 | 1-601-20 | |
| 5 | Fish 190 | 80-200205-230 | 10 | 1-601-20 | |
| 6 | Shrimp 180 | 80-200205-230 | 10 | 1-601-20 | |
| 7 | Keep warm 80 70-100 30 1-60 | ||||
| 8 | Dehydrate | 70 30-100 6H | 1-24 h | ||
| 9 | Decrease temp/time | ||||
| 10 | Increase temp/time | ||||
| 11 | Menu | ||||
| 12 | Light on/off | ||||
| 13 | Start/pause, On/Off | ||||
| 14 | Temp/time | ||||
EN
CLEANING
- Please clean the airfryer to prevent leftover food/food residue from being burned.
- After using, please clean the gridiron and pan in time to avoid the damage of the coating due to erosion of food residue or oil.
- Wipe the outside of the airfryer with a moist cloth
- Clean the pan and gridiron with hot water, soap and a non-abrasive sponge.
You can remove any remaining food debris by using degreasing liquid soap The gridiron and the pan can be washed in the dishwasher. Tip: If there is food debris stuck to the gridiron or bottom of the pan, soak it in hot water and soap for about 10 minutes. - Clean the inside of the appliance with hot water and a non-abrasive sponge.
NOTE: Be sure not to get too much water inside the appliance, you are just wiping it down to get rid of any food debris and grease. - Clean the heating element with a cleaning brush to remove any food debris.
- Do not use hard and sharp items (such as steel wool, sharp tools etc) to clean the gridiron and pan.
TIPS AND TRICKS
- Use your airfryer to reheat your leftovers, It will make them as crispy as they were fresh.
- Brush or spray some oil on the ingredients before or halfway through airfrying for an even crispier result. Spray or brush any dry flour spots that still appear halfway through airfrying.
- Small ingredients often require slightly shorter cooking time, and larger ingredients often require slightly longer cooking time. The time and temperature default settings might not suite the size of food you are cooking. It is easy to adjust the time and temperature manually so you can optimize the result based on your ingredients.
- To convert oven times and temperatures to the airfryer, reduce the temperature by 20°C, and reduce the cooking time by 20-25%. Example: If a recipe says 200°C for 10 minutes, try air frying your ingredients for 8 minutes on 180°C. You still need to keep an eye on your ingredients to get the best results.
TROUBLESHOOTING
| Problem Possible reasons Solutions | ||
| The fryer does not start | The airfryer is not plugged in. | Plug in the power cord. |
| The pan and basket is not fully inserted. | Make sure the pan and basket is correctly assembled and inserted in the main unit. | |
| The ingredients are not cooked properly | The basket is too full. | Use smaller batches of ingredients in the basket to fry them evenly |
| The temperature is too low | Increase the temperature | |
| The ingredients are fried unevenly | You did not flip or shake the ingredients halfway | Ingredients that lie across each other need to be shaken or turned halfway through. |
| The food is not crispy | The airfryer did not preheat | Preheat airfryer 3-5 minutes. |
| The type of ingredients is meant for frying in oil | Try to brush or spray oil onto the ingredients before airfrying. | |
| White smoke is coming out of the fryer | You are preparing greasy ingredients. | With greasy food, oil can leak into the pan. Oil makes the makes the white smoke, but it will not affect the appliance or the end result. |
| E1, E2, E3, E4, E5, E6 | Contact customer service | |
| The first use gives off un unpleasant odour | This is normal during the first times you are using the airfryer | Dry heat the airfryer for 10 minutes before using it the first time |
| The airfryer stops or will not heat up | If no alarms or error codes appear, check that the plug is plugged in correctly | Make sure the power cord is plugged in. If it's still not working, contact customer service |
EN

GUARANTEE
Wilfa issues a 5 year guarantee on this product from the day of purchase is done. The guarantee covers production failure or defects that arise during the guarantee period. Your purchase receipt works as proof towards retailer if claiming your guarantee.
The guarantee is valid only for products that are bought and used in private households. The guarantee is not valid if the product is used commercially. The guarantee is not valid if the product is misused, used by negligence, if not following instructions given by Wilfa, if modified or if unauthorized reparation is done. The guarantee is also not valid for normal wear of the product, misuse, lack of maintenance, use of wrong electrical voltage or:
• Overloading of product
• Parts which are normally worn down
- Parts you can expect being replaced regularly (e.g. filter, battery etc.)
Instructions manual is also available at our website wilfa.com
PRODUCT SPECIFICATIONS
220-240V\~ 50/60Hz, 2000W
SUPPORT AND SPARE PARTS
For support please visit us at wilfa.com, and see our customer service/support page. Here you will find frequently asked questions, spare parts, tips and tricks and all our contact information.
RECYCLABILITY
This marking indicates that this product should not be disposed with other household wastes throughout the EU. To prevent possible harm to the environment or human health from uncontrolled waste disposal, recycle it responsibly to promote the sustainable reuse of material resources. To return your used device, please use the return and collection systems or contact the retailer where the product was purchased. They can take this product for environmentally safe recycling free of charge.
NO
NO
INNHOLD
16 VIKTIGE SIKKERHETSINSTRUKSJONER
18 FORHOLDSREGLER VED BRUK AV AIRFRYER
19 PRODUKTOVERSIKT
20 F∅R F∅RSTE GANGS BRUK
20 BRUK
21 REFERANSEVEILEDNING
22 RENGJ∅RING
22 TIPS OG TRIKS
23 FEILS∅KING
24 GARANTI
25 PRODUKTSPESIFIKASJONER
25 SUPPORT OG RESERVEDELER
25 GJENVINNING
NO
VIKTIGE SIKKERHETSINSTRUKSJONER

- Betjeningspanel
- Skuff
- Stekerist
- Støpejernsrist
- Håndtak
- Vindu
- Luftinntak
- Pizzabrett
F∅R F∅RSTE GANGS BRUK
SE
- Kontrollpanel
- Korg
- Gjutjärnsfat
- Stekgaller
- Handtag
- Fönster
- Luftintag
- Pizzabricka
Fl
CARACTÉRISTIQUES DU PRODUIT
220-240V\~ 50/60Hz, 2000W
ASSISTANCE ET PIÈCES DÉTACHÉES
- Panel de control
- Cesta
- Recipiente
- Rejilla
- Asa
- Visor
- Entrada de aire
- Bandeja para pizza
AFG-10_20_02

- DUALFRY GRILL 10L
- IMPORTANT SAFETY INSTRUCTIONS
- EN
- SAFETY PRECAUTIONS FOR YOUR AIRFRYER
- PRODUCT OVERVIEW
- BEFORE FIRST USE
- HOW TO USE
- SHAKE REMINDER
- REFERENCE GUIDE
- CLEANING
- TIPS AND TRICKS
- GUARANTEE
- PRODUCT SPECIFICATIONS
- SUPPORT AND SPARE PARTS
- RECYCLABILITY
- INNHOLD
- NO
- VIKTIGE SIKKERHETSINSTRUKSJONER
- F∅R F∅RSTE GANGS BRUK
- CARACTÉRISTIQUES DU PRODUIT
- ASSISTANCE ET PIÈCES DÉTACHÉES
Brand : WILFA
Model : DualFry Grill 10 AFG-10
Category : Deep fryer