FX-MSP2.2 - Pest control Fuxtec - Free user manual and instructions
Find the device manual for free FX-MSP2.2 Fuxtec in PDF.

User questions about FX-MSP2.2 Fuxtec
0 question about this device. Answer the ones you know or ask your own.
Ask a new question about this device
Download the instructions for your Pest control in PDF format for free! Find your manual FX-MSP2.2 - Fuxtec and take your electronic device back in hand. On this page are published all the documents necessary for the use of your device. FX-MSP2.2 by Fuxtec.
USER MANUAL FX-MSP2.2 Fuxtec
natural_image
Illustration of a scuba device with orange neon outline, no visible text or symbols on the device itselfEnglish Version......Page 23
natural_image
Exterior view of a black FX-MSP 2.2 Motorsprayer industrial spray gun with orange and white casing (no text or symbols on main body)Abb. ähnlich
Abb. 3
natural_image
Close-up of an orange electric shock absorber with black insulation and a red warning label (no text or symbols on the device itself)4. Kaltstart
natural_image
Close-up of a black cylindrical object with a transparent tube and labeled parts (1 and 2), no readable text or symbols beyond labels.natural_image
Close-up of a black mechanical device with orange handle and saw tool, no visible text or symbolsFUXTEC Motor Sprayer Model FX-MSP2.2

natural_image
Exterior view of a black FX-MSP 2.2 Motorsprayer spray gun with orange and white casing (no text or symbols on the device itself)FUXTEC GmbH

Kappstrasse 69, 71083 Herrenberg-Gülstein, Germany
Table of contents
Introduction.... 25
Safety and Warning Instructions 26
Commissioning of the machine 29
Filling and starting 32
Nebulizing / Fogging 36
Malfunctions and troubleshooting 37
Technical maintenance and storage 39
Technical execution.... 41
EC Declaration of Conformity 42
Introduction
The FUXTEC FX-MSP2.2 motorized sprayer is portable, flexible, and made of high-quality / high-performance material for weed control and protection of plants in large areas and the protection of crops.
The device can also be used to remove weeds, leaves and fertilizers, and salt spraying.
Before using your machine for the first time, please read these operating instructions carefully.
Warning!
The machine is filled with a 2-stroke petrol mixture. The ratio between gasoline and oil is fixed with a mixing rate of 25:1. Use a 2-stroke oil for petrol engines. (It is generally forbidden to use another oil)
The machine should have been in operation for 3-5 minutes before the engine is stopped again. To avoid damages to the engine, it is generally not allowed to run the machine on the highest level before it has warmed up.
Among other things, it is strictly forbidden to stop the machine at maximum speed.
To prevent fire, the machine must be switched off when filling with gasoline. Smoking whilefillingthe tank is not allowed!
Functions / Basics
- The machine's main components are made of high quality plastic; therefore, the device has a lower weight.
- All parts are made of reinforced plastic; the steel and metal parts are rust-free, making the materials less sensitive and more durable.
- The tank opening is kept broad, making it easy to fill the gasoline directly from the canister.
- The processed components are of high quality and protected from heating.
Safety and Warning Instructions
- Read the instructions carefully. Be sure that you have understood the operating instructions precisely before you start working with the machine.
- Wear safety clothing / protective clothing such as:
1) Safety cap/protection cap
2) Safety glasses (fog)
3) Breathing mask
4) Long safety gloves
5) Safety clothing against toxic substances
6) Safety shoes
- The following persons must not work with the machine:
1) alcoholized persons.
2) minors and older people.
3) Persons who do not know the machine.
4) People who are excited, nervous, and overtired.
5) pregnant and breastfeeding women.
4. Prevention of fire
1) Do not light a fire or smoke near the machine.
2) Do not fill the fuel tank while the engine is still warm.
3) Never fill the machine after cleaning the machine.
4) Always close the tank cap tightly.
5. Starting the machine
1) Switch the dust nozzle to the lowest position before starting the machine. Otherwise, the chemical will be sprayed when you start the engine.
2) It is forbidden to stand at the front of the blow nozzle. Even if the spray nozzle is closed, residues of the residual dust may be deposited on the tube.
6. Nebulizing / Fogging
1) It is recommended to use the device in cold weather. For example: in the early morning or late afternoon. This can reduce the evaporation of the chemical and thus improve the effect.
2) If your mouth or eyes contact the chemical, wash them out immediately with water and see your doctor immediately.
3) If you have headaches or a dizzy spell, stop working with the machine and see a doctor for safety reasons.
4) When preparing the pesticides, the user should follow the instructions on the label.
5) It is forbidden to use special liquids, those with strong acids or lye, etc.
Safetysymbols on the machine
 | WARNING: Improper operation can lead to severe injuries! |
 | Read this manual carefully to understand how to use this device properly! |
 | Please wear hearing protection during work! |
 | Please wear a respirator and eye protection mask during work! |
 | Please wear protective gloves during work! |
 | Please wear a protective suit during work! |
 | Please wear safety shoes during work! |
 | WARNING: Spray materials must not be inhaled under any circumstances! |
 | WARNING:highly flammable petrol mixture; avoid fire! |
 | WARNING: Danger from hot components! |
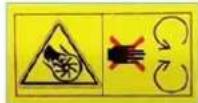 | WARNING: Do not reach into nozzle or spray openings during operation! |
 | WARNING: Never change the machine. Exhaust fumes of this product contain chemicals that can lead to cancer, congenital disabilities, and other diseases! |
Commissioning of the machine
1. Change from liquid to granulate sprayer (e.g., salt)
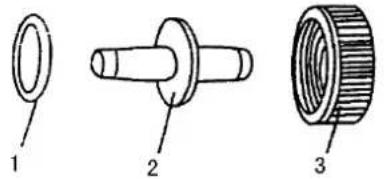
Remove the side safety nuts (1) of the chemical tank and disassemble the tank (see next step in fig.2. Remove the spray insert and insert the granule insert (2, Fig.1).
Fig.1
- Security screw
- Granulate insert
- Granule attachment
- Cover

Disassembly of the chemical tank
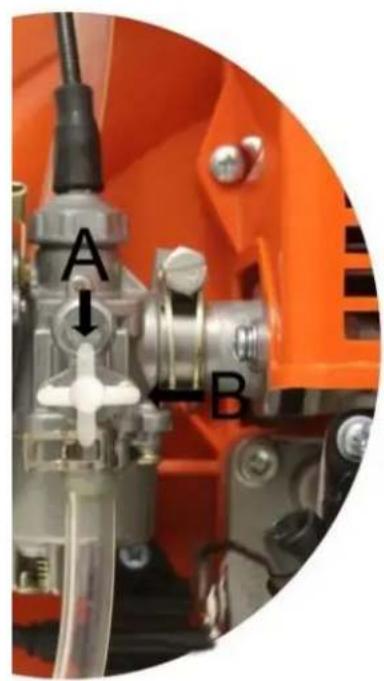
2) Remove the lower cover "A" of the chemical tank, change the spray nozzle connected to the rubber tube/hose, and screw on the cover "B." (Make sure that the sealing ring is present to prevent the granules from leaking) as shown in Fig. 3.
Screw on the cover. Loosen the hoses (2 + 3) and the filter (5).
Fig. 2
- Use of chemicals
4.Hose
3.hose - Filling filter
5.Cover
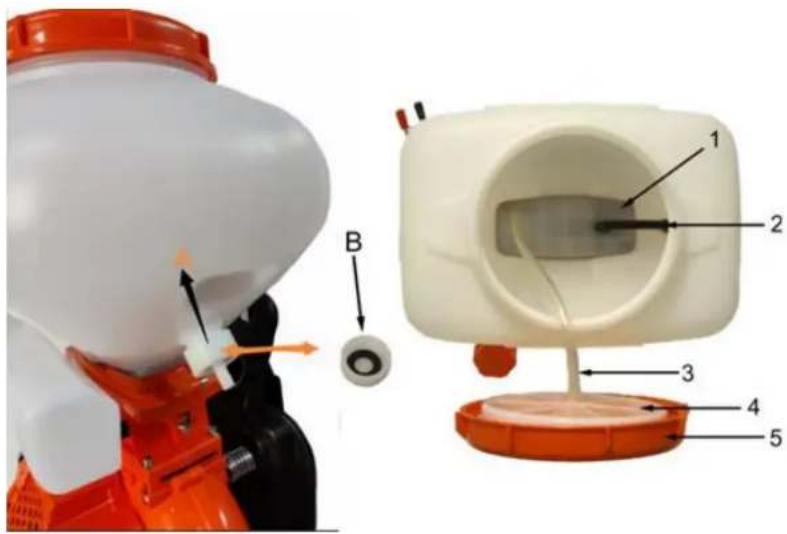
Fig. 3
1.sealing ring
2.connection
3. fixing screw
3) Connect the spray unit to the machine as shown in Fig. 4

2. Assembly of the spray nozzle
Fig. 5
- Flexible hose
- Spray pipe
- Handle/gas handle
- Pipe Elbow
- Spray attachment chemical
- Pipe clamps
- Hose

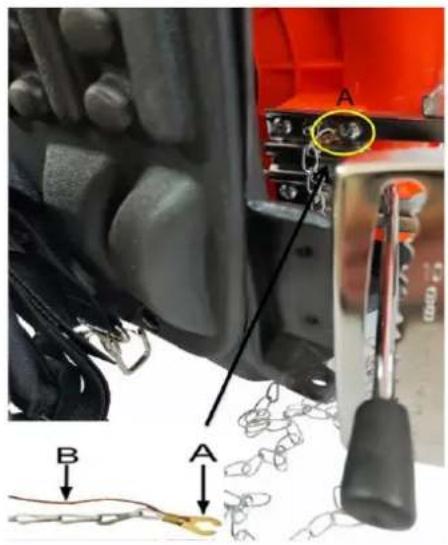
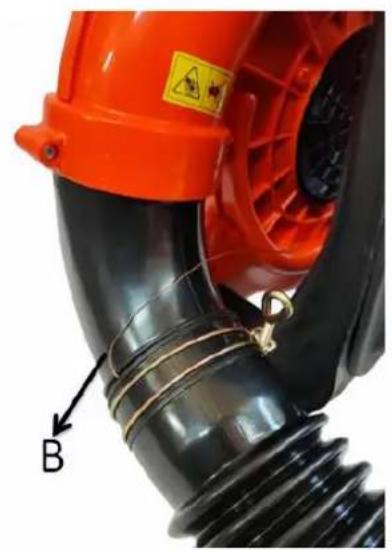
3. Anti- Electrostatic Installation
Dusting or spreading of the chemical granules can generate electrostatic charges. This is proven after the application of such chemicals under certain conditions of air temperature and humidity.
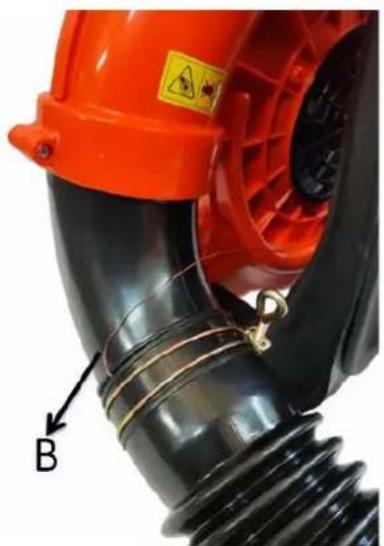
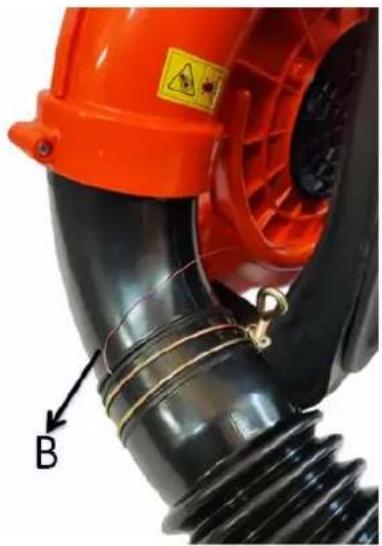
Please use the enclosed safety chain (C) to avoid electrostatic charges and mount the cable lug (A) on the pull starter. Please loosen one screw of the starter and push the cable lug (A) underneath. Then retighten the screw of the starter. When the air becomes humid, the electrostatic charge is high, especially if the tube's skin used to spray and distribute the granules is damp. Electrostatics often occur. Please pay attention to this.
Fig. 7
natural_image
Close-up of a red industrial exhaust pipe with black insulation and a yellow warning label (no readable text or symbols)The safety chain C should be freely suspended and touch the ground for grounding during work.
At the same time, please install the ground cable (B) under the hose clamp, as shown in Fig. 7.
Filling and starting
1. Testing before commissioning
1) Check if the spark plug etc. is loose.
2) Check if the air cooling opening is blocked to prevent overheating.
3) Check if the air filter is dirty.
4) Press the starter 2-3 times to see if the machine's operation is regular.
2. Refuelling
1) Switch off the engine before filling the tank.
2) We recommend a petrol mixture 25:1 - 40:1; the oil must be 2-stroke engine oil. For the first 4-5 hours of operation, a mixing ratio of 25:1 should be used. An incorrect mixing ratio can destroy the function of the motor. The unit is not designed for special fuels or ready-mixes.
3. Filling of chemicals
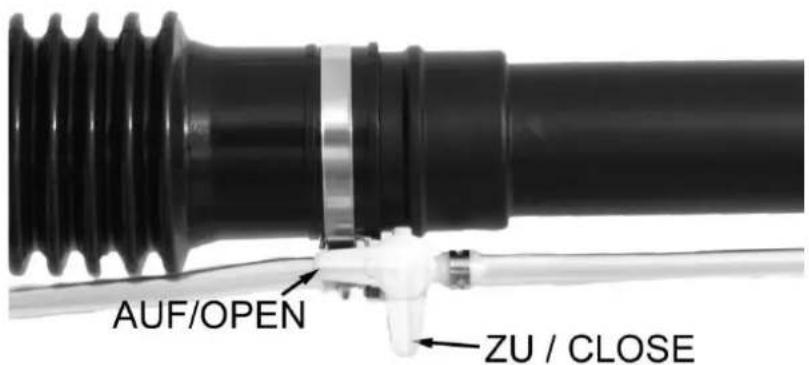
1) While filling the chemicals, the OPEN / CLOSE switch must be locked, as shown in Fig.8. While the spray tank is being filled with the chemical, the machine should be placed on the floor. Otherwise, chemicals may escape from the device.
2) Because the chemical powder can easily block the spray lines, the chemical should not be in the tank for long.
3) While spraying, the chemical tank cap should be tightly closed. After spraying the chemical, please clean the lid of the chemical tank cap and tighten the cap.
Fig. 8
4. Cold start
Please follow the instructions before operating the device:
1) move the fuel lever to the start position (Fig. 9).
2) Pull the choke lever to the ON position.
3) Slide the start/stop switch to the start position.

5) Pull the starter cable 2-3 times and release it slowly. To avoid damage to the engine, do not remove the handle quickly.
6) Close the choke and pull the starter cable until the machine ignites.
7) Let the machine run at low speed for 2-3 minutes, then you can activate the spraying system.
Fig. 9
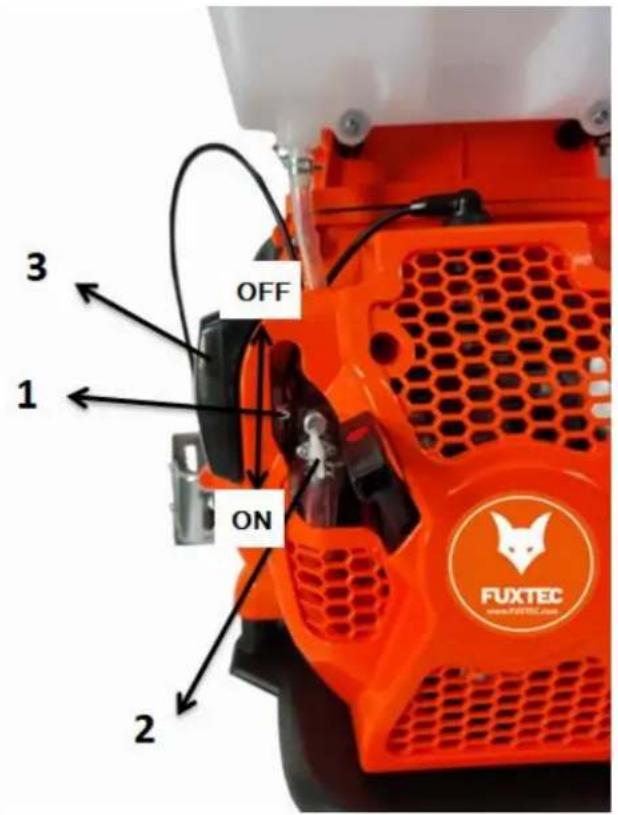
Petrol tap
- Chock lever
- Petrol tap Pos. A: OPEN
Pos. B: TO
- Air Filter
5. Warm start
1) Leave the choke in the OFF position.
2) Set the fuel lever to the ON position.
3) Pull the starter cord 2-3 and release it slowly.
Attention:
1) Do not pull the starter cable beyond the dead center. Otherwise, it may tear or damage the device.
2) The starter cable is not part of the warranty.
Switching off the machine
1) During operation, first switch off the chemical spray function and then stop the machine by moving the start/stop switch to the Stop position.
2) During the dusting function, push the fuel and dusting lever to the closed position. This leads to emptying of the spraying device.
3) After finishing work, close the fuel switch.
Please note: When the machine is running, your clothing must be tight and must not come into contact with the device. Otherwise, the appliance cannot suck in cooling air, thus reducing performance and damaging the machine.
Nebulizing / Fogging
1) Spray: Open the spray cover and adjust the spray nozzle's length to obtain the required quantity. Use the control to change the amount of atomization. Fig. 11
Fig. 11
| Opening | Filling (L/min) |
| 1 | 1 |
| 2 | 3 |
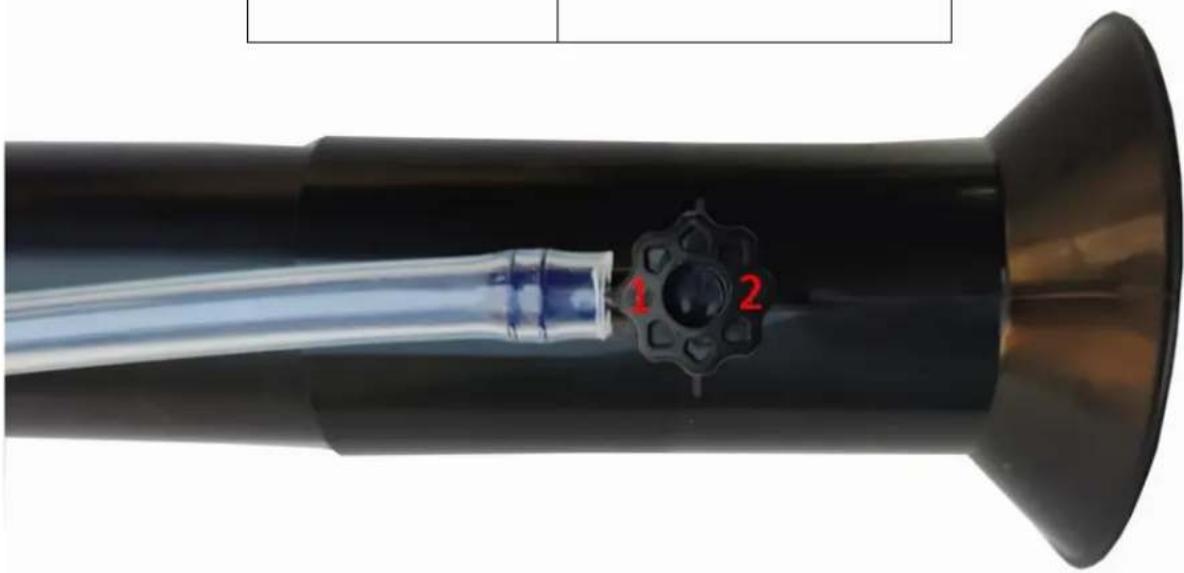
2) Fogging: Adjust the removal dosage during the spraying process on the boom (see Fig. 12) at one of the ten positioning holes on the adjustment arm.
Fig. 12

natural_image
Close-up of a mechanical device with black components and a metal clamp (no visible text or symbols)Malfunctions and troubleshooting
The machine starts badly or cannot be started at all:
Check whether the spark plug generates a spark. Unscrew the spark plug. Insert the spark plug back into the spark plug connector and ensure that the spark plug is grounded. Check the voltage and see if the spark plug has an ignition spark. Be careful with the starter motor; do not touch the metal on the spark plug for protection to prevent electric shock.
Fig. 15

Please note that the following maintenance intervals apply only under normal operating conditions. Longer working hours or extreme working conditions (too dusty working area, etc.) shorten the recommended intervals accordingly.
| Beforeuse | After use or every day | After eachfilling | monthly | annually | When problems occur | If damaged | On-demand |
| x | x | ||||||
| x | |||||||
| x | x |
| Complete device | Visual inspection(condition, fuel, and other leaks) | x | x | ||||||
| Cleaning | x | ||||||||
| Control handle | Check operation | x | x | ||||||
| Air Filter | Cleaning | x | x | ||||||
| Change by a service dealer 1) | x | ||||||||
| Housing | Check | x | |||||||
| Replace 1) | x | x | x | ||||||
| Fuel tank | Cleaning | x | x | ||||||
| Carburetor | Check idle speed setting - tools must not move 2) | x | x | ||||||
| Correct Idle Speed | x | ||||||||
| Spark plug | Correct electrode gap | x | |||||||
| Replace after approx. 100 operating hours | |||||||||
| Cooling airinlet | Inspection | x | |||||||
| Cleaning | x | ||||||||
| Spark arrester in exhaust silencer | Check | x | x | ||||||
| Have it cleaned or replaced 1) | x | x | |||||||
| Accessible screws and nuts (not set screws) | Tightening | x | |||||||
| Security stickers | Replace | x |
3) Please contact the service department of FUXTEC GmbH
4) Screw-in the carburetor screw completely, then turn it back on 1.5 turns.
Technical maintenance and storage
1. Technical supervision of the spray components
1) After spraying, clean all residues of the mixture from the chemical tank. Wash the tank and all other parts.
2) After spraying or granule distribution, clean the spray extension and chemical tank inside and outside.
3) After use, loosen the chemical tank cap.
4) After cleaning, let the machine run for 2-3 minutes.
2. Maintenance and care of the tank system
1) Do not leave the 2-stroke petrol mixture in the tank for a more extended time.
2) If a residual amount of the filling quantity remains in the fuel tank and evaporator for a more extended period, the tank residues would stick/settle and clog the lines, thus the machine will not run properly. If the device has been in operation for a week, all fillings must be removed.
3. Maintenance of air filter and spark plug
1) Immediately after use, wash down the chemicals with a sponge. Otherwise, the machine's performance could drop. Please pay special attention to this.
2) Please clean the air filter regularly.
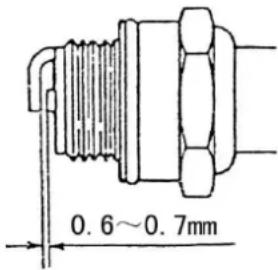
3) Adequate distance of the spark plug is 06.-0.7mm; please check the space more often; if it is too big or too small, determine the distance exactly as in Fig. 16.
Fig. 16
4. Storage for a longer time
1) External cleaning of the machine. Treat the outer metal surface with anti-rust oil.
2) Remove the spark plug. Pour 15-20g of engine oil into the cylinder; the engine oil should be a 2-stroke oil for gasoline engines. Then screw the spark plug back in.
3) Unscrew the two wing screws. Remove the tank from the machine. Clean the atomizer and the surface inside and outside the chemical tank. If chemical residues remain in the atomizer, the atomizer may stick and become defective.
4) Afterwards, put the chemical tank back in place and loosen the tank cap.
5) Remove the syringe element and clean it.
6) The whole gasoline mixture should be taken from the gas tank and carburetor.
7) Cover the machine with a plastic sheet and store the device dry and dust-free.
Technical execution
| Model | FX-MSP2.2 | |
| General dimensions (mm) | 420×500×800 | |
| Net weight (kg) | 11.5 | |
| Chemical tank capacity (L) | 26 | |
| Delivery Dimensions of the chemicals | Spray mixture (L/min) | ≥4 |
| Fog mixture (kg/min) | ≥6 | |
| Range (m) | ≥11 | |
| Quantity of fuel mixture between gasoline and motor oil | 25:1 | |
| Fuel mixture tank capacity (L) | 1.4 | |
| Blower speed (r/min) | 7.500 - 8.000 | |
| Engine type | 1E40FP-3Z | |
| Start procedure / ignition | CDI | |
EC Declaration of Conformity
according to the directive 2006/42/EC and the addendum2009/127/EC
FUXTEC GmbH
Kappstrasse 69, 71083 Herrenberg - Germany
declares in sole responsibility that the product
Model: Motor Sprayer FX-MSP2.2
to which this declaration refers, fully complies with the relevant essential health and safety requirements of Directives 2006/42/EC with the supplementary addendum 2009/127/EC and the needs of the other applicable directives.
EN ISO 28139:2009
Conformity assessment procedures: 2000/14/EC
Herrenberg, 30/11/2023
C. Jille
Leonhard Zirkler
(Manager)
natural_image
Exterior view of a black FX-MSP 2.2 Motorsprayer spray gun with orange and white casing (no text or symbols on main body)Fig. similaire
Fig. 3
natural_image
Close-up of a black mechanical device with orange clamping and a saw cutting tool inserted (no visible text or symbols)MOTEUR
4. Stockage
plus longue
natural_image
Exterior view of a Motorsprayer air purifier with black hose and orange spray bottle (no text or symbols on main body)
FUXTEC GmbH
Kappstraße 69, 71083Herrenberg-Gülstein, Germany
Fig. 3
natural_image
Close-up of an orange electric shaver with black insulation and a labeled component 'B' (no text or symbols on the device itself)natural_image
Close-up of a black mechanical device with orange handle and saw blade, no visible text or symbols4. Stoccagg
eriodi di tempo
natural_image
Exterior view of a black FX-MSP 2.2 Motorsprayer industrial spray gun with orange and white casing (no text or symbols on main body)FUXTEC GmbH
CE
Fig. 3

natural_image
Close-up of a red industrial exhaust pipe with black insulation and a yellow warning label, labeled 'B' pointing to a cable (no text or symbols on the pipe itself)natural_image
Close-up of a black cylindrical object with a transparent tube and labeled parts (1 and 2), no readable text or symbols beyond labels.natural_image
Close-up of a black mechanical device with orange handle and metal clip, showing internal components (no visible text or symbols)Datos técnicos