MO20IXD - Microwave Oven TAURUS - Free user manual and instructions
Find the device manual for free MO20IXD TAURUS in PDF.

| Product type | Built-in microwave oven |
| Brand | Taurus |
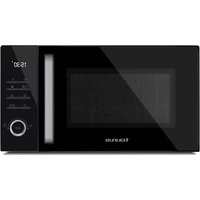
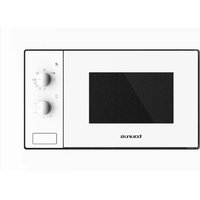
| Model | MO20IXD |
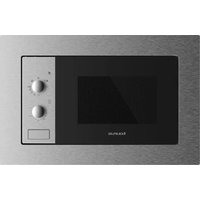
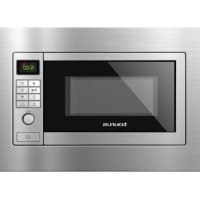
| Dimensions (W x H x D) | 595 x 385 x 400 mm |
| Net weight | 15 kg (approx.) |
| Power supply | 230 V / 50 Hz |
| Microwave power | 900 W (approx.) |
| Grill power | 1000 W (approx.) |
| Capacity | 20 liters (approx.) |
| Main functions | Microwave (5 levels), Grill, Combination (2 modes), Defrost by weight and time, Auto menu (8 programs), Quick start |
| Display | Digital LED |
| Timer | Up to 95 minutes |
| Clock | 24 hours |
| Child lock | Yes |
| Included accessories | Glass tray, Turntable ring, Grill rack, Instruction manual |
| Installation type | Built-in (rear opening required) |
| Care and cleaning | Clean with a damp cloth and mild detergent. Do not immerse. |
| Safety | Safety lock system, automatic stop if door is opened |
| Spare parts and repairability | Parts available through Taurus authorized service (http://taurus-home.com/) |
Frequently Asked Questions - MO20IXD TAURUS
User questions about MO20IXD TAURUS
0 question about this device. Answer the ones you know or ask your own.
Ask a new question about this device
Download the instructions for your Microwave Oven in PDF format for free! Find your manual MO20IXD - TAURUS and take your electronic device back in hand. On this page are published all the documents necessary for the use of your device. MO20IXD by TAURUS.
USER MANUAL MO20IXD TAURUS
natural_image
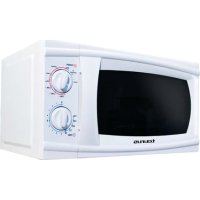
Line drawing of a tourus microwave oven with control panel and door (no text or symbols on the device itself)Español Microondas MO20IXD
natural_image
Line drawing of a microwave oven and its internal door panel (no text or symbols)Microwave oven MO20IXD
Dear customer,
Many thanks for choosing to purchase a Taurus brand product.
Thanks to its technology, design and operation and the fact that it exceeds the strictest quality standards, a fully satisfactory use and long product life can be assured.
Read these instructions carefully before switching on the appliance and keep them for future reference. Failure to follow and observe these instructions could lead to an accident.
SETTING UP YOUR OVEN
Names of Oven Parts and Accessories
Remove the oven and all materials from the carton and oven cavity. Your oven comes with the following accessories:
Glass tray (1)
Turntable ring assembly (1) Instruction manual (1)
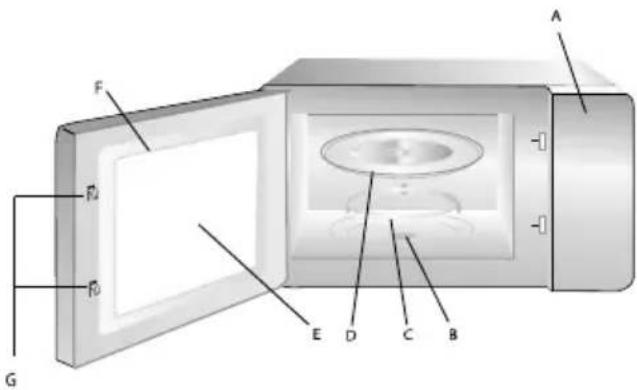
A - Control panel
B - Turntable shaft
C - Turntable ring assembly
D - Glass tray
E - Observation window
F - Door assembly
G - Safety interlock system

Grill rack (can not be used in microwave function and must be placed on the glass tray).
Turntable Installation
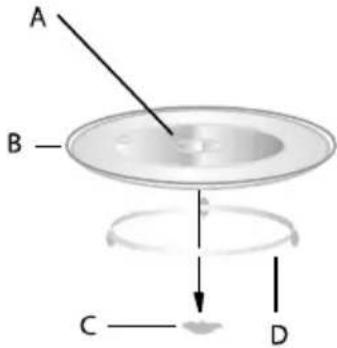
A - Hub (underside)
B - Glass tray
C - Turntable shaft
D - Turntable ring assembly
- Never place the glass tray upside down. The glass tray should never be restricted.
- Both glass tray and turntable ring assembly must always be used during cooking.
- All food and containers of food are always placed on the glass tray for cooking.
- If glass tray or turntable ring assembly cracks or breaks, contact your nearest authorized service center.
Installation and connection
- This appliance is only intended for domestic use.
- This oven is intended for built-in use only. It is not intended for counter-top use or for use inside a cupboard.
- Please observe the special installation instructions.
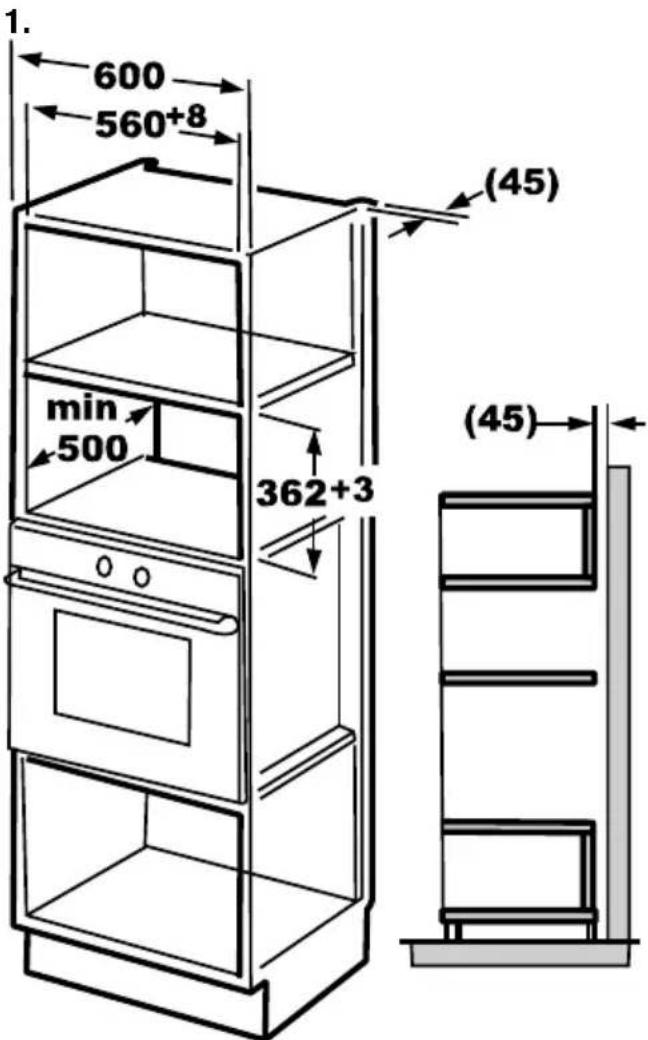
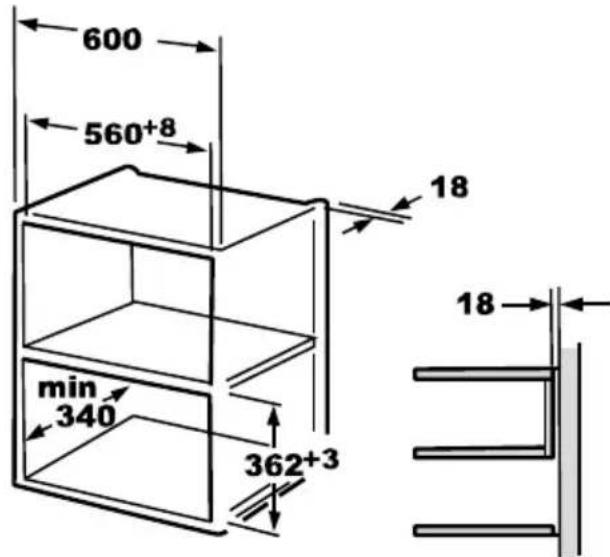
- The appliance can be installed in a 60cm wide wall-mounted cupboard.
- The appliance is fitted with a plug and must only be connected to a properly installed earthed socket.
- The mains voltage must correspond to the voltage specified on the rating plate.
- The socket must be installed and connecting cable must only be replaced by a qualified electrician. If the plug is no longer to accessible following installation, an all-pole disconnecting device must be present on the installation side with a contact gap of at least 3mm.
- Adapters, multi-way strips and extension leads must not be used. Overloading can result in a risk of fire.

The accessible surface may be hot during operation.
Installation Instructions
Please Read the Manual Carefully Before Installation
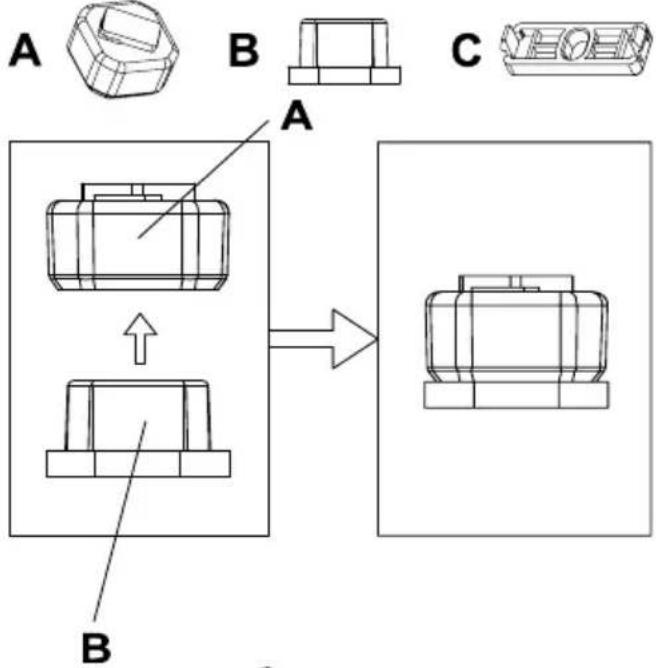
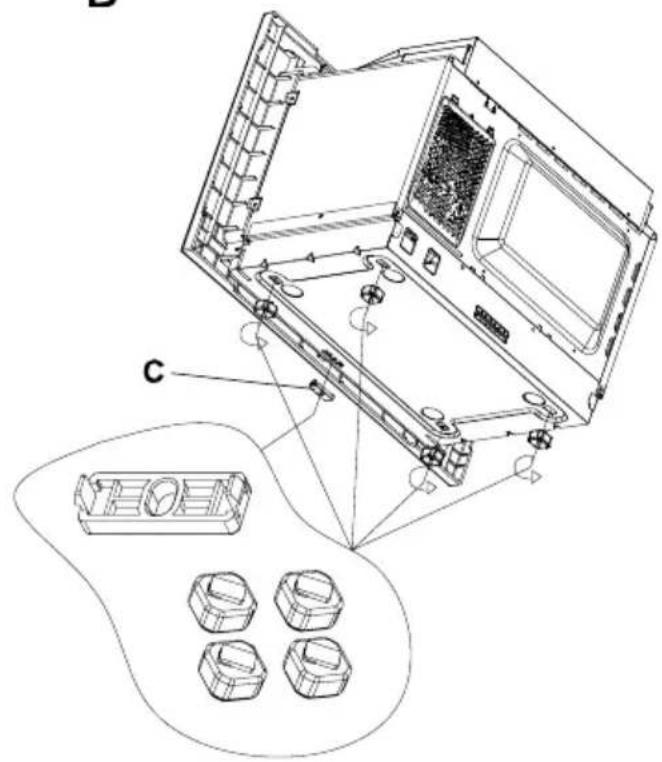
The microwave includes 3 accessories that must be fixed before installation:
A - Footpad block
B - Rubber mat
C - Bracket
Follow the instructions below for the assembly.
Accessories for installation:
- Adjusting screw A
- Screw B
- Trim-kit plastic cover


Electrical connection
The oven is fitted with a plug and must be only connected to a properly installed earthed socket. In accordance with the appropriate regulations, the socket must only be installed and the connecting cable must only be replaced by a qualified electrician.
If the plug is no longer accessible following installation and all-pole isolating switch must be present on the installation side with a contact gap of at least 3mm.
Built-in furniture
- The built-in cabinet shall not have a rear wall behind the appliance. Minimum installation height is 85cm.
- Do not cover ventilation slots and air intake points.
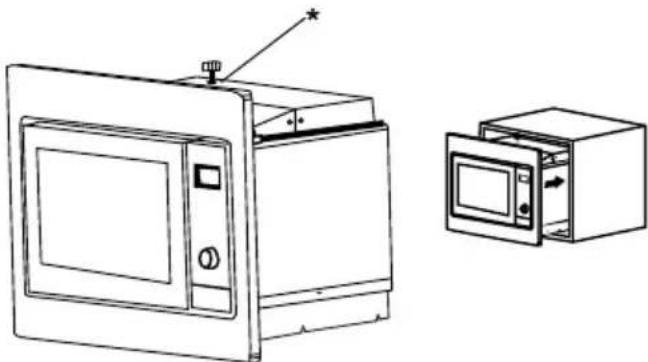
Install the oven
- Fix the adjusting screw A on the upper air tunnel (*) of the oven, and then install the oven into the cabinet.
-
Adjust the height of the adjusting screw A to keep 1mm gap between it and the top plane of cabinet.
-
Do not trap or kink the power cord.
- Make sure that the oven is installed in the center of the cabinet.
natural_image
Line drawing of a microwave oven with control panel and front view showing internal components (no text or symbols)- Open the door; fix the oven to the cabinet with screw B at the installation hole ( ^** ).
- Then fix the trim-kit plastic cover to the installation hole ( ^** ).
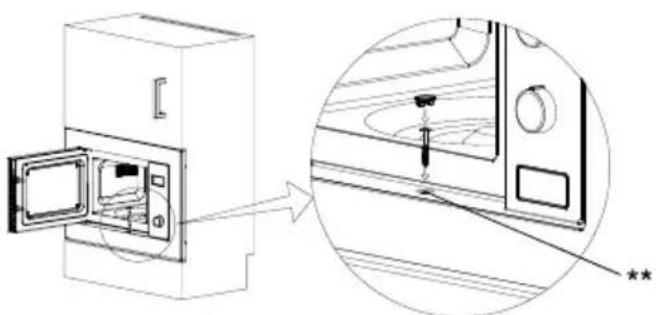
The installation is completed.
Operation Instructions
Clock Setting
When the microwave oven is electrified, the screen will display "0:00", buzzer will ring once.
1) Press "Kitchen Timer/Clock" twice to select clock function, the hour figures will flash.
2) Turn the knob to adjust the hour figures, the input time should be within 0--23.
3) Press "Kitchen Timer/Clock", the minute figures will flash.
4) Turn the knob to adjust the minute figures, the input time should be within 0--59.
5) Press " Kitchen Timer/Clock " to finish clock setting. ":" will flash, and the time will light.
NOTE:
- The clock will ont work if it'sit is not set when powered.
- During the process of clock setting, if you press "Stop/Clear", the oven will go back to the previous status automatically.
Clock Setting
Press "Microwave", screen will display "P100".
Press "Microwave" for times or turn the knob to choose the power you want, and "P100", "P80", "P50", "P30" or "P10" will display for each added press. Then press. The press
"Start/+30Sec./Confirm" to confirm, and turn the knob to set cooking time from 0:05 to 95:00.
Press again "Start/+30sec/Confirm" again to start cooking.
Example:
If you want to use 80% microwave power to cook for 20 minutes, you can operate the oven as the following steps.
1) Press " Microwave " once, the screen displays "P100".
2) Press "Microwave" once again or turn the knob to choose 80% microwave power.
3) Press "Start/+30sec/Confirm" to confirm, and the screem displays "P 80".
4) Turn the knob To adjust the cooking time until the oven displays "20:00".
5) Press " Start/+30Sec./Confirm " to start cooking.
NOTE: the step quantities for the adjustment time of the coding switch are as follow:
| 0 to 1 min | 5 seconds |
| 1 to 5 min | 10 seconds |
| 5 to 10 min | 30 seconds |
| 10 to 30 min | 1 minute |
| 30 to 95 min | 5 minutes |
Microwave pad instruction
| Order | Display | Microwave power |
| 1 | P100 | 100% |
| 2 | P80 | 80% |
| 3 | P50 | 50% |
| 4 | P30 | 30% |
| 5 | P10 | 10% |
Grill or combi cooking
Press "Grill/Combi", screen will display "G", and keep pressing "Grill/Combi" button to change to different modes or turn the knob.
Then press “Start/+30Sec/Confirm” to confirm, and turn the knob to set the cooking time from 0:05 to 95:00. Press “Start/+30Sec/Confirm” again to start cooking.
Example: If you want to use 55% microwave power and 45% grill power(C-1) to cook for 10 minutes, you can operate the oven as the following steps:
1) Press "Grill/Combi" once, the screen displays "G".
2) Press "Grill/Combi" once again or turn the knob to choose combi. 1 mode.
3) Press "Start/+30Sec/Confirm" to confirm, and the screen displays "C-1".
4) Turn the knob to adjust the cooking time until the oven displays "10:00".
5) Press "start/+30Sec/Confirm" to start cooking.
NOTE: If half the grill time passes, the oven sounds twice, and this is normal. In order to have a better effect of grilling food, you should turn the food over, close the door, and then press "Start/+30Sec/Confirm" to continue cooking. If no operation, the oven will continue working.
Grill/Combi pad instructions
| Order | Display | Microwave power (%) | Grill power (%) |
| 6 | G | 0 | 100 |
| 7 | C-1 | 55 | 45 |
| 8 | C-2 | 36 | 64 |
Quick start
1) In waiting state, press "Start/+30Sec/Confirm" to start cooking with 100% power for 30 seconds, each added press will increase 30 seconds cooking time up to 95 minutes.
2) In microwave, grill, combination cooking or time defrost state, each press of "Start/+30Sec/Confirm" can increase 30 seconds of cooking time.
3) In waiting state turn the knob left to set the cooking time with 100% microwave power, then press “Start/+30Sec/Confirm” to start cooking.
Defrost by weight
1) Press "Weight/Time defrost" once, and the oven will display "dEF1".
2) Turn the knob to select the weight of food from 100 to 2000g.
3) Press "Start/+30Sec/Confirm" to start defrosting.
Defrost by time
1) Press "Weight/Time defrost" twice, and the oven will display "Def2".
2) Turn the knob to select the defrost time. The maximum time is 95 minutes.
3) Press "Start/+30Sec/Confirm" to start defrosting. The defrost power is P30, and it cannot be changed.
Kitchen timer
1) Press "kitchen timer/clock" once, screen will display 00:00.
2) Turn the knob to enter the correct timer. (The maximum cooking time is 95 minutes).
3) Press "Start/+30Sec/Confirm" to confirm setting.
4. When the kitchen time is reached, timer indicator will go out. The buzzer will ring 5 times. If the clock has been set (24-hout system), screen will display the current time.
NOTE: The kitchen time is different from 24-hour system. Kitchen timer is a timer.
Automatic menu
1) Turn the knob right to choose the menu, and "A-1" to "A-8" will display.
2) Press "Start/+30Sec/Confirm" to confirm.
3) Turn the knob to choose the default weight as the menu chart.
4) Press "Start/+30Sec/Confirm" to start cooking. Example: If you want to use "Auto menu" to cook fish for 350g.
1) Turn the knob clockwise till "A-6" display.
2) Press "Start/+30Sec/Confirm" to confirm.
3) Turn the knob to select the weight of fish till "350" displays.
4) Press "Start/+30Sec/Confirm" to start cooking.
The menu chart:
| Menu | Weight | Display |
| A-1 Pizza | 200 g | 200 |
| 400 g | 400 | |
| A-2 Meat | 250 g | 250 |
| 350 g | 350 | |
| 450 g | 450 | |
| A-3 Vegetable | 200 g | 200 |
| 300 g | 300 | |
| 400 g | 400 | |
| A-4 Pasta | 50 g (with 450 ml cold water) | 50 |
| 100 g (with 800 ml cold water) | 100 | |
| A-5 Potato | 200 g | 200 |
| 400 g | 400 | |
| 600 g | 600 | |
| A-6 Fish | 250 g | 250 |
| 350 g | 350 | |
| 450 g | 450 | |
| A-7 Beverage | 1 cup (120 ml) | 1 |
| 2 cups (240 ml) | 2 | |
| 3 cups (360 ml) | 3 | |
| A-8 Popcorn | 50 g | 50 |
| 100 g | 100 |
Multi-section cooking
At most 2 sections can be set for cooking. In multi-section cooking, if one section is defrosting, then defrosting will be placed in the first section automatically.
Example: If you want to defrost food for 5 minutes and then cook with 80% microwave power for 7 minutes, operate it as the following:
1) Press "Weight/Time defrost" twice, and the oven will display "Def2".
2) Turn the knob to select the defrost time till "5:00" displays.
3) Press "Microwave" once, the screen displays "P 100".
4) Press "Microwave" once again or turn the knob to choose 80% microwave power.
5) Press "Start/+30Sec/Confirm" to confirm, and the screen displays "P 80".
6) Turn the knob to adjust the cooking time till the oven displays "7:00".
7) Press "Start/+30Sec/Confirm" to start cooking, and buzzer will sound once for the first section, defrosting time counts down; buzzer will sound once again entering the second cooking. When cooking finishes, buzzer sounds five times.
Inquiring functions
- In states of microwave, grill and combination cooking, press "Microwave", the current power will be displayed for 3 seconds. After 3 seconds, the oven will turn back to the former state.
- In cooking state, press "Kitchen Timer/Clock" to inquire the time and the time will display for 3 seconds.
Lock-out Function for Children
Lock:
In waiting state, press "Stop/Clear" for 3 seconds, there will be a long beep denoting entering the children-lock state and the current time will display if the time has been set, otherwise, screen will display "[." And lock indicator lights.
Lock quitting:
In locked state, press "Stop/Clear" for 3 seconds, there will be a long "beep" denoting that the lock is released.
Français
Micro-ondes MO20IXD
Cher Client,
natural_image
Simple line drawing of a circular object with diagonal hatching and two protruding legs (no text or symbols)Installation et raccordement
natural_image
Line drawing of a microwave oven with control panel and front view showing internal components (no text or symbols)Cuisson multi-sections
natural_image
Line drawing of a microwave oven with control panel and front view showing internal components (no text or symbols)natural_image
Technical diagram showing a device with an open door and a close-up view of its internal components (no text or symbols)natural_image
Simple line drawing of a round object with diagonal hatching and two legs (no text or symbols)natural_image
Line drawing of a microwave oven and its open door, showing internal components and airflow direction (no text or symbols)A - Контролно табло
В - Въртяща се ос
natural_image
Line drawing of a microwave oven and its internal door, showing front and side views (no text or symbols)This product enjoys the recognition and protection of the legal guarantee in accordance with current legislation. To enforce your rights or interests you must go to any of our official technical assistance services.
You can find the closest one by accessing the following web link: http://taurus-home.com/
You can also request related information by contacting us.
You can download this instruction manual and its updates at http://taurus-home.com/
Français
GARANTIE ET ASSISTANCE TECHNIQUE
COUNTRY ADDRESS PHONE
| Algeria Zone d'Activite, N° 62, Constantine 213770777756 | ||
| Argentina Av. del Libertador 1298,(B1638BEY), Vicente López (Pcia. Buenos Aires) | 541153685223 | |
| Belgium Mariëndonkstraat 5, 5154 EG, Elshout 31620401500 | ||
| Benin 359 Av. Steinmetz, 1930, Cotonou 0299-21313798 | ||
| Bulgaria | 265,Okolovrasten Pat, Mladost 4, 1766, Sofia | 35929211120 / 35929211193 |
| Burkina Faso Avenue Bassawarga, 01 BP915, Ouagadougou 226 25301038 | ||
| Congo (Republic of) 98 Blvd General Charles de Gaulle, Pointe Noire 242066776656 | ||
| Cyprus | 20, Bethlehem Str. / P.O.Box 20430, 2033, Strovolos | 35722711300 |
| Czech Republic | Milady Horakove 357/4, 568 02, Svitavy | 420 461 540 130 |
| Democratic Republic of the Congo | AV. Pont Canale N° 3440, Kinshasa | 00243-991223232 |
| Equatorial Guinea | SN Av Patricio Lumumba y C/ Jesus B, Bata | 00240 333 082958 / 00240 333 082453 |
| Equatorial Guinea | Calle de las Naciones Unidas, PO box 762, Malabo | 240333082958 / 240333082453 |
| España Avda Barcelona, S/N, 25790 Oliana (Lleida) atencioncliente@taurus.es | 902 118 050 | |
| Ethiopia Lideta Sub City Kebele 10 H.NO 124, Addis Ababa | +251 11 5518300 | |
| France | Za les bas musats 18, 89100, Malay-le-Grand | 03 86 83 90 90 |
| Gabon | BP 574, Port-Gentil Centre-ville | 24101552689 / 24101560698 |
| Ghana | Ederick Place, Accra-Ghana | 302682448 / 302682404 |
| Gibraltar 11 Horse Barrack Lane, 54000, Gibraltar 00350 200 75397 / 00350 200 | ||
| 41023 | ||
| Greece Sapfous 7-9, 10553, Athens +30 21 0373 7000 | ||
| Guinea BP 206, GN, Conakry (224) 622204545 | ||
| Hong Kong Unit H,13/F., World Tech Centre, Hong kong (852) 2448 0116 / 9197 3519 | ||
| Hungary Késmárk utca 11-13, 1158, Budapest +36 1 370 4519 | ||
| India C-175, Sector-63, Noida, Gautam Budh Nagar - 201301, Delhi | (+91) 120 4016200 | |
| Ivory Coast 01 Rue Des Carrossiers-Zone 3, B.P 3747, Abidjan 01 (RCI) | 22521251820 / 225 21 353494 | |
| Jordan 28 Basman St Down town, Amman +962 6 46 222 68 | ||
| Kuwait | P.O. BOX 3379 hawally, 32034, Hawally | +965 2200 1010 |
| Lebanon Damascus Highway; Sciale Building, Jamhour | 9615922963 | |
| Luxembourg | Mariëndonkstraat 5, 5154 EG, Elshout 31620401500 | |
| Mali | BP E2900, Dravela Bolibana | 223227216 / 223227259 |
| Marruecos | Avenue 2 Mars, Résidence Nassrallah, Appt n° 2 1er, Casablanca | (+212) 522 86 30 95 |
| Mauritania | 134 Avenue Gamal Abdener Ilot D, Nouakchott | 2225254469 / 2225251258 |
| Mexico Rosas Moreno N° 4-203 Colonia de San Rafael C.P. 06470 – Delegación Cuauhtémoc, Ciudad de México | (+52) 55 55468162 | |
| Montenegro | Rastovac bb, 81400, Niksic | +382 40 217 055 |
| Netherlands | Mariëndonkstraat 5, 5154 EG, Elshout 31620401500 | |
| Nigeria 8, Isaac; John Str,G.R.A Ikeja Lagos | 23408023360099 | |
| Paraguay | Denis Roa 155 c/ Guido Spano, Asunción | 21665100 |
| Peru | Calle los Negocios 428, Surquillo, Lima | (511) 421 6047 |
| Portugal Avenida Rainha D. Amélia, n°12-B, 1600-677, Lisboa | +351 210966324 | |
| Romania | Dudesti Pantelimon 23, 410554, Bucharest | 031.805.49.58 |
| Serbia | Rastovac bb, 81400, Niksic | +382 40 217 055 |
| Slovakia Milady Horakove 357/4, 568 02, Svitavy | 420 461 540 130 | |
| Southafrica | Unit 25 & 26, San Croy Office Park, Die Agora Road, Croydon, Kempton Park, 1619, Johannesburg | (+27) 011 392 5652 |
| Tunisia | 2, Rue de Turquie, Tunis | 21671333066 |
| Ukraine | Block 6, Ap Housing Estate Topol-2, B, 49000, Dnepropetrovsk | 380563704161 / 380563704161 |
| United Arab Emirates | P.O.BOX 8543, Dubai | 14506246200 |
| Uruguay | Luis Alberto de Herrera 3468, 11600, Montevideo | 598 2209 28 00 |
| Vietnam Lot 7 Ind. Zone for, Ha Noi | 84437658111 / 84437658110 | |