Decotech RL998 - Radio LEXIBOOK - Free user manual and instructions
Find the device manual for free Decotech RL998 LEXIBOOK in PDF.

| Product type | Color dawn simulation alarm clock radio |
| Brand | Lexibook |
| Model | Decotech RL998 |
| Main power supply | 5V 1A mains adapter (included) |
| Backup power supply | 2 AAA/LR03 1.5V batteries (not included) |
| FM band | 87.5 - 108 MHz |
| Radio station memory | Up to 40 stations (P01-P40) |
| Number of alarm sounds | 6 nature sounds + radio |
| Dawn simulator | Yes, progressive light intensity 30 min before alarm |
| Sunset simulator | Yes, decreasing light intensity over 30 min |
| Night light | Yes, with intensity adjustment (1-10) and color choice (green, red, blue, purple, orange, turquoise) |
| Time format | 12H / 24H (selectable on back) |
| Alarm snooze | Yes, every 5 minutes |
| Volume adjustment | Levels 1 to 15 |
| Screen | Digital display with adjustable brightness |
| Luminous power | 70 lumens |
| Sound power | 5 W |
| Maintenance and cleaning | Unplug before cleaning, wipe with a soft cloth |
| Safety | Do not expose to water, do not block ventilation openings, use only specified accessories |
| Included spare parts | Mains adapter, micro USB cable, user manual |
| Warranty | 2 years |
| Certification | Compliant with directive 2014/53/EU |
| Manufacturing | Designed in Europe, made in China |
Frequently Asked Questions - Decotech RL998 LEXIBOOK
User questions about Decotech RL998 LEXIBOOK
0 question about this device. Answer the ones you know or ask your own.
Ask a new question about this device
Download the instructions for your Radio in PDF format for free! Find your manual Decotech RL998 - LEXIBOOK and take your electronic device back in hand. On this page are published all the documents necessary for the use of your device. Decotech RL998 by LEXIBOOK.
USER MANUAL Decotech RL998 LEXIBOOK
natural_image
Color bar with grayscale gradient and a crosshair symbol at the bottom (no text or labels)DÉBALLAGE DU PRODUIT
natural_image
Diagram showing a device with an electrical outlet connected to a plug, illustrating the connection (no text or symbols present)
Piles de sauvegarde
INSTRUCTIONS RELATIVES A LA SÉCURITÉ
LIRE LES INSTRUCTIONS SUIVANTES AVANT TOUTE UTILISATION DE L'APPAREIL.
UNPACKING YOUR DEVICE
When unpacking, ensure that the following elements are included:
1 x Sunrise Colour Alarm Clock 1 x micro USB cable
1 x Power adapter 1 x Instruction manual
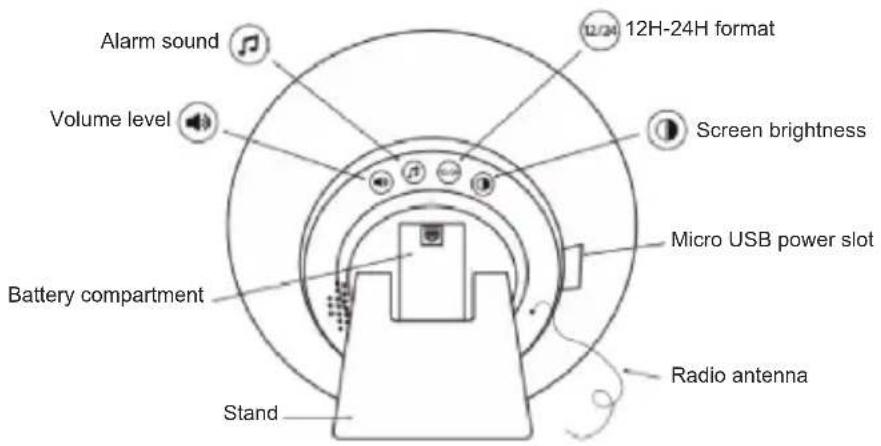
PRODUCT DESCRIPTION


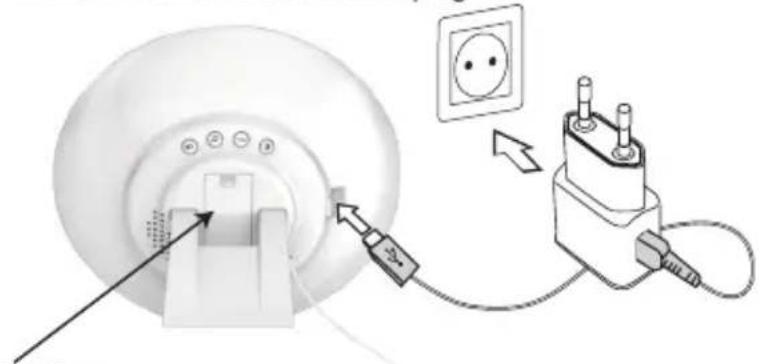
SET UP
Your alarm clock operates on DC 5.0V=1.0A power.
- Insert one end of the micro USB cable into the micro USB port of the alarm clock. Connect the other end to the DC 5V power adapter (included).
- Plug the power adapter to a power outlet.
WARNING: Malfunction or loss of memory may be caused by strong frequency interference or electrostatic discharge. Should any abnormal function occur, unplug the unit from the mains socket and plug it back in.
natural_image
Diagram showing a device connected to an electrical outlet with a plug, illustrating the connection (no text or symbols present)Backup batteries
Your alarm clock can also operate with 2 x AAA/LR03 1.5V — batteries (not included), which will save and retain all your settings in the event of a power outage.
To install the batteries:
- Open the battery compartment by pressing and sliding down the cover.
- Install 2 x AAA/LR03 1.5V batteries observing the polarity markings inside the battery compartment.
- Close the battery compartment by replacing the cover.
Note: When the device operates on batteries, all functions are available except lighting features. The time display will also turn off after a few seconds to save energy. Press any button to switch it on.
Non-rechargeable batteries are not to be recharged. Rechargeable batteries are to be removed from the product before being charged. Rechargeable batteries are only to be charged under adult supervision. Different types of batteries or new and used batteries are not to be mixed. Only batteries of the same or equivalent type as recommended are to be used. Batteries are to be inserted with the correct polarity. Exhausted batteries are to be removed from the product. The supply terminals are not to be short-circuited. Do not throw batteries into a fire. Remove the batteries if you are not going to use the product for a long period of time. Batteries shall not be exposed to excessive heat such as sunshine, fire or the like.
WARNING: Malfunction or loss of memory may be caused by strong frequency interference or electrostatic discharge. Should any abnormal function occur, remove the batteries and insert them again.


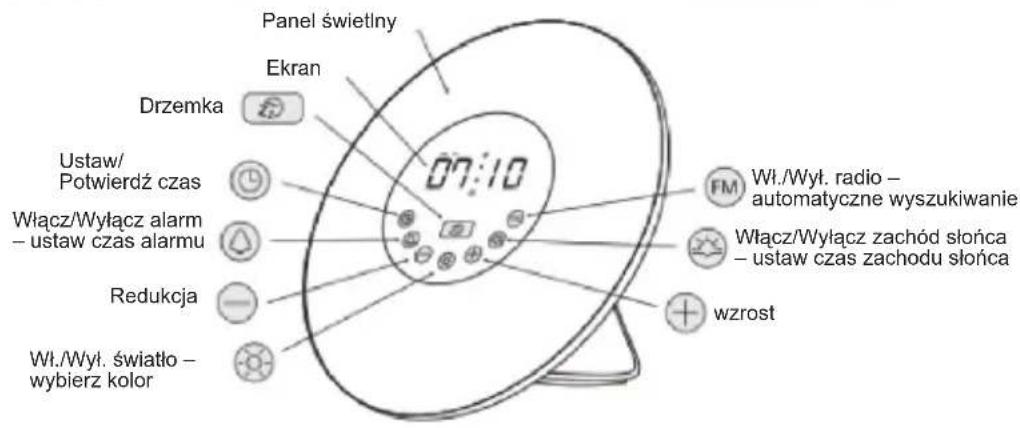
TIME AND ALARM SET UP
Time setting
Once the device is connected to power, the time starts blinking on the screen.
Press ⊕ to adjust the hours and press Ⓒ to confirm.
Press ⊕ to adjust the minutes and press Ⓤ to confirm.
Note: After 10 seconds without any operation, the numbers will stop blinking. To resume the time setting mode, press ⓞ.
12H / 24H format
On the back of the alarm clock, press 23 to switch the time to 12H or 24H format. In 12H format, AM or PM will appear on screen.
Screen brightness
On the back of the alarm clock, press ⏻ to select your time display brightness or turn it off.
Alarm setting
- Press Ⓐ to activate or deactivate the alarm. △▲ will be displayed on screen accordingly. When the alarm is activated, the alarm time will be displayed shortly.
- Press and hold Ⓐ to set the alarm time. The hours will start blinking.
- Press ⏻ to adjust the hours and press ⏱ to confirm. Press ⏻ to adjust the minutes and press ⏱ to confirm.
Note: If the hours or minutes stop blinking press Ⓞ again to resume the set up.

- When the alarm goes off, press any button except ☐ to stop the alarm.
Alarm sound selection
On the back of your device, press Ⓜ to select the alarm sound and press + or – to switch sounds among 6 nature sounds. You can also choose the radio alarm (7). If sound 7 is selected, the last played radio station will be automatically set as the alarm sound.
Volume level
On the back of your device, press 📋 repeatedly to select the volume level on a scale of 1 to 15.
Snooze function
Once the alarm rings, press Ⓐ to repeat the alarm after 5 minutes. The alarm will repeat every time you press the snooze button.
RADIO SET UP
Before using the radio function for the first time, the alarm clock must scan the available radio stations on the frequency range 88-108MHz. Press and hold during 3 seconds to start scanning and search for active channels. Once channels are located, they will be saved as P01, P02, up to P40.
After auto scan has completed and channels saved, press FM to turn the radio on/off. Press + to navigate between the saved stations and select your desired station.


LIGHT OPTIONS SET UP
Sunrise light simulation
The sunrise light simulation helps you start the day relaxed by simulating the morning sunlight. It wakes you in a natural way by increasing gradually the light intensity for around 30 minutes as your chosen wake-up time gets closer. The nature sound or radio will also be played for 2 minutes at the alarm time. When the sunrise light simulation is on, press and hold ⚙ to switch it off.
Sunset light simulation
The sunset light simulation helps you end the day peacefully by simulating the evening sunlight. It naturally brings you to sleep with a light that decreases gradually for around 30 minutes as your chosen sleeping time gets closer.
- Press ☺ to activate or deactivate the sunset simulation. ⚙️ will be displayed on screen accordingly.
- Press and hold 🔗 to set the sunset time. When the hours start blinking use ⏻ to adjust the hours and press 🔗 to confirm.
- Use ⏻ to adjust the minutes and press ⚙ to confirm.
- When the sunset light simulation is on, press and hold ⚙ to switch it off.
Bedside light
Your alarm clock can operate as a cozy bedside lamp with adjustable colour and intensity.
- Press once to switch on the light.
- Use ⊕⊖ to adjust the brightness level (1 to 10).
- Press again to select the light colour. Then press to choose among green, red, blue, purple, orange and indigo.
- Press ⚙ a third time to switch off the light.
SPECIFICATIONS
- AC/DC Adaptor Input 100-240V \~ 50/60Hz 0.3A; Output 5.0V=1.0A
• Average active efficiency 74,13%
• Efficiency at low load N/A - No load condition power consumption 0.05W
- Model GQ06-050100-CG
- Wattage: 5W
• Lumen: 70lm
• FM Frequency band: 87.5 - 108MHz
• Transmission power N/A
SAFETY INSTRUCTIONS
PLEASE READ BEFORE OPERATING THIS EQUIPMENT.
Before using the unit, be sure to read all operating instructions carefully. Please note that these are general precautions and may not pertain to your unit.
- Read these instructions.
- Keep these instructions.
- Hee'd all warnings.
- Follow all instructions.
-
Do not use this product near water and moisture, for example: near a bathtub, washbowl, kitchen sink or laundry tub; in a wet basement; or near a swimming pool. No objects such as vases should be placed on the unit.
-
Unplug this product from the wall outlet before cleaning. Do not use liquid cleaners or aerosol cleaners. It may damage the screen. Use a dry cloth for cleaning only.
-
Do not install near any heat sources such as radiators, heat registers, stoves, or other apparatus (including amplifiers) that produce heat.
-
Do not defeat the safety purpose of the polarized or grounding type plug. A polarized plug has two blades with one wider than the other. A grounding type plug has two blades and a third grounding prong. The wide blade or the third prong is provided for your safety. If the provided plug does not fit into your outlet, consult an electrician for replacement of the obsolete outlet.
-
Protect the power cord from being walked on or pinched particularly at plugs, convenience receptacles, and the point where they exit from the apparatus.
-
Only use attachments/accessories specified by the manufacturer.
-
Unplug this apparatus during lightning storms or when unused for long periods of time.
-
Refer all servicing to qualified service personnel. Servicing is required when the apparatus has been damaged in any way, such as power-supply cord or plug is damaged, liquid has been spilled or objects have fallen into the apparatus; and/or the apparatus has been exposed to rain or moisture and does not operate normally, or has been dropped.
-
This product should be operated only from the type of power source indicated on the marking label. If you are not sure of the type of power supply to your home, consult your appliance dealer or local power company. For products intended to operate from battery power, or other sources, refer to the operating instructions.
-
Do not overload wall outlets and extension cords as this can result in a risk of fire or electric shock. Use only power source as indicated.
-
Never push objects of any kind into this product through openings as they may touch dangerous voltage points or short out parts that could result in fire or electric shock. Never spill or spray any type of liquid on the product.
-
Do not attempt to service this product yourself as opening or removing covers may expose you to dangerous voltage or other hazards. Refer all servicing to qualified service personnel.
-
Upon completion of any service or repairs to this product, ask the service technician to perform safety checks to determine that the product is in proper operating condition.
-
Batteries shall not be exposed to excessive heat such as sunshine, fire or the like.
-
The socket-outlet shall be installed near the equipment and must be easily accessible.
-
The AC/DC adaptor should not be obstructed OR should be easily accessed during intended use.
-
To completely disconnect the power input, the AC/DC adaptor shall be disconnected from the mains, as the disconnecting part is the AC/DC adaptor.
-
The apparatus and AC/DC adaptor shall not be exposed to dripping or splashing and no objects filled with liquids, such as vases, shall be placed near them.
-
At full power, listening to a music player for prolonged periods can damage the user's hearing.
-
Keep a minimum distance around the device for sufficient ventilation:
-
The ventilation should not be impeded by covering the ventilation openings with items, such as newspapers, table-cloths, curtains, etc.:
-
No naked flame sources, such as lighted candles, should be placed on the apparatus;
-
The use of apparatus in tropical and/or moderate climates.
-
Attention should be drawn to the environment aspects of battery disposal.
SIMPLIFIED EU DECLARATION OF CONFORMITY
Lexibook® S.A.
EX32 2JW, United Kingdom
Kind of product: Sunrise Color Alarm Clock
Type designation: RL998
Hereby, Lexibook Limited declares that the radio equipment type RL998 is in compliance with Directive 2014/53/EU and Radio Equipment Regulation 2017.
The full text of the EU declaration of conformity is available at the following internet address:
http://www.lexibook.com/doc/rl998/rl998_2.pdf

Yiu Wai Man
Product Development Manager
Hong Kong
UK CA CE
MAINTENANCE
To prevent fire or shock hazard, disconnect your unit from the power source when cleaning. The finish on your unit may be cleaned with a dust cloth and cared for as other furniture. Use a soft, clean cloth moistened with plain, lukewarm water to clean the exterior of the unit. Use caution when cleaning and wiping the plastic parts.
WARRANTY
This product is covered by our 2-year warranty.
For any claim under the warranty or after sale service, please contact your distributor and present a valid proof of purchase. Our warranty covers any manufacturing material and workmanship defect, with the exception of any deterioration arising from the non-observance of the instruction manual or from any careless action implemented on this item (such as dismantling, exposition to heat and humidity, etc.). It is recommended to keep the packaging for any further reference.
NOTE: In a bid to keep improving our services, we could implement modification on the colours and the details of the product shown on the packaging.
Reference: RL998
Designed and developed in Europe – Made in China
© Lexibook®

Lexibook S.A.
United Kingdom & Ireland
For after-sales service, please contact us at savcomfr@lexibook.com
www.decotech-lights.com

Decorative Lighting purpose only Unit not suitable for household room illumination

This product is not a toy.
Environmental Protection
Unwanted electrical appliances can be recycled and should not be discarded along with regular household waste! Please actively support the conservation of resources and help protect the environment by returning this appliance to collection centre (if available).
DESEMBALAJE DEL PRODUCTO
natural_image
Diagram showing a device with an electrical outlet connected to a plug, illustrating the connection (no text or symbols present)Pilas de respaldo
natural_image
Color bar with grayscale gradient and a crosshair symbol at the bottom (no text or labels)http://www.lexibook.com/doc/rl998/rl998_2.pdf

Yiu Wai Man
natural_image
Diagram showing a medical imaging device connected to an electrical outlet with a plug, illustrating electrical connection (no text or symbols present)ITALIANO

natural_image
Color bar with grayscale gradient and a crosshair symbol at the bottom (no text or labels)http://www.lexibook.com/doc/rl998/rl998_2.pdf

Yiu Wai Man
natural_image
Diagram showing a device with an electrical outlet connected to a plug, illustrating the connection (no text or symbols present)Pilhas de apoio
Para instalar as pilhas:
http://www.lexibook.com/doc/rl998/rl998_2.pdf

Yiu Wai Man
natural_image
Diagram showing a medical device connected to an electrical outlet with a plug, illustrating electrical connection (no text or symbols present)Notstrombatterien
http://www.lexibook.com/doc/rl998/rl998_2.pdf


Yiu Wai Man
natural_image
Color bar with grayscale gradient and a crosshair symbol at the bottom (no text or labels)HET APPARAAT UITPAKKEN
natural_image
Diagram showing a device with an electrical outlet connected to a plug, illustrating the connection (no text or symbols present)Back-upbatterijen
natural_image
Color bar with grayscale gradient and a crosshair symbol at the bottom (no text or labels)VEREENVOUDIGDE EU-CONFORMITEITSVERKLARING
Lexibook® S.A.
Type benaming: RL998
http://www.lexibook.com/doc/rl998/rl998_2.pdf

Yiu Wai Man
DESCRIPTION OF THE APPLIANCE
natural_image
Diagram showing a device connected to an electrical outlet with wires, no text or symbols presentUPROSZCZONA DEKLARACJA ZGODNOŚCI UE
Lexibook® S.A.
http://www.lexibook.com/doc/rl998/rl998_2.pdf

Yiu Wai Man
natural_image
Diagram showing a device with an electrical outlet connected to a plug, illustrating the connection (no text or symbols present)Tartalék elemek
natural_image
Diagram showing a device with an electrical outlet connected to a plug, illustrating the connection (no text or symbols present)Záložní baterie
natural_image
Color bar with grayscale gradient and a crosshair symbol at the bottom (no text or labels)ZJEDNODUŠENÉ PROHLÁŠENÍ O SHODĚ EU
Lexibook® S.A.
natural_image
Diagram showing a device with an electrical outlet connected to a plug, illustrating the connection (no text or symbols present)Backupbatterier
natural_image
Color bar with grayscale gradient and a crosshair symbol at the bottom (no text or labels)FORENKLET EU-OVERENSSTEMMELSESERKLÆRING
Lexibook® S.A.
http://www.lexibook.com/doc/rl998/rl998_2.pdf

Yiu Wai Man