
CEP5152B - Coffee machine GRUNDIG - Free user manual and instructions
Find the device manual for free CEP5152B GRUNDIG in PDF.

User questions about CEP5152B GRUNDIG
0 question about this device. Answer the ones you know or ask your own.
Ask a new question about this device
Download the instructions for your Coffee machine in PDF format for free! Find your manual CEP5152B - GRUNDIG and take your electronic device back in hand. On this page are published all the documents necessary for the use of your device. CEP5152B by GRUNDIG.
USER MANUAL CEP5152B GRUNDIG
Manual Espresso Machine
User Manual
natural_image
Technical line drawing of a mechanical device with no visible text or symbolsCEP5152B
EN FR DE CS SK IT PL RO
01M-8839933200-4217-01
beko
Please read this user manual first!
Dear Customer,
Thank you for preferring a Beko product. We hope that you get the best results from your product which has been manufactured with high quality and state-of-the-art technology. Therefore, please read this entire user manual and all other accompanying documents carefully before using the product and keep it as a reference for future use. If you handover the product to someone else, give the user manual as well. Follow all warnings and information in the user manual.
Explanation of symbols
Throughout this user manual the following symbols are used:

Important information or useful hints about usage.

DANGER: Warning for hazardous situations with regard to life and property.

WARNING: Warning indicates a potentially dangerous situation.

CAUTION: Warning indicates potential material damage.

This product has been produced in environmentally friendly, modern facilities
Complies with the WEEE Regulation.

Does not contain PCB.
Made in: P.R.C.
CONTENTS
| ENGLISH | 4-34 |
| FRANÇAIS | 35-60 |
| DEUTSCH | 61-85 |
| ČESKY | 86-109 |
| SLOVENSKÝ | 110-134 |
| ITALIANO | 135-160 |
| POLSKI | 161-185 |
| ROMÂN | 186-219 |
1 Important instructions for safety and environment
This section includes the safety instructions that will help providing protection against personal injury and material loss risks. Failure to follow these instructions invalidates the granted warranty.
1.1 Danger of electric current
Danger to life by electric current!
Contact with live wires or components could lead to serious injury or even death!
Observe the following safety precautions to avoid electric shocks:
- Do not use the coffee machine if the connecting cable or mains plug are damaged.
- Before reusing the coffee machine, the mains cable must be renewed by a qualified electrician.
- Do not open the housing of the coffee machine. Danger of electric shock if live connections are touched and/or the electrical and mechanical configuration is changed.
- Before cleaning the bean container, pull the mains plug of the appliance out of the socket. Danger from rotating coffee mill!
1 Important instructions for safety and environment
1.2 Danger of burning or scalding
Parts of the coffee machine can become very hot during operation! Dispensed drinks and escaping steam are very hot!
Observe the following safety precautions to avoid burning/scalding yourself and/or others:
- Do not touch either of the metal sleeves on both coffee spouts.
- Avoid direct contact of the skin with escaping steam or hot rinsing, cleaning and descaling water.
1.3 Fundamental safety precautions
Observe the following safety precautions to ensure safe handling of the coffee machine:
- Never play with packaging material. Risk of suffocation.
- Inspect the coffee machine for visible signs of damage before use. Do not use a damaged coffee machine.
1 Important instructions for safety and environment
- If the connecting cable is damaged, it should only be replaced by a service agent recommended by the manufacturer in order to prevent any danger! Please contact the manufacturer or his customer service.
- Repairs to the coffee machine must only be carried out by an authorised specialist or by the works customer service. Unqualified repairs can lead to considerable danger for the user. They will also void the warranty.
•Repairs to the coffee machine during the warranty period may only be carried out by service centres authorised by the manufacturer, otherwise the warranty will become void in the event of subsequent damage.
- Defective parts may only be replaced with original spare parts. Only original spare parts guarantee that the safety requirements are met.
1 Important instructions for safety and environment
•This appliance can be used by children from the age of 8 up as well as by persons with reduced physical, sensory or mental abilities or with lacking experience and/or knowledge, if these persons are supervised or have been instructed how to use the appliance in a safe way and have understood the hazards which could arise from using it. Children must not play with the appliance. Cleaning and user maintenance shall not be made by children unless they are older than 8 and supervised.
• This appliance is intended to be used in household and similar applications such as:
- staff kitchen areas in shops, offices and other working environments,
- farm houses,
- by clients in hotels, motels and other residential type environments,
- bed and breakfast type environments.
- Protect the coffee machine against the effects of weather such as rain, frost and direct sunlight. Do not use the coffee machine outdoors.
1 Important instructions for safety and environment
- Never immerse the coffee machine itself, the mains cable or the mains plug into water or other liquids.
- Do not clean the coffee machine or accessories in a dish washer.
- Do not pour any other liquids apart from water or place foodstuffs into the water tank.
- Do not fill the water tank beyond the maximum mark (lower edge of the filling hole) (1.4 litres).
- Only operate the machine when the waste container, drip tray and the cup grate are fitted.
- Do not pull the cable to remove the plug from the mains socket or touch with wet hands.
- Do not hold the coffee machine with the mains cable.
- Keep the appliance and its cord out of reach of children aged less than 8 years.
1
Important instructions for safety and environment
1.4 Intended use
The manual espresso machine Beko is intended for use in homes and similar applications, for instance in staff kitchens, shops, offices and similar areas or by customers in bed & breakfast, hotels, motels and other living accommodation. This coffee machine is not intended for commercial use. The machine is only intended for preparing coffee and heating milk and water. Any other use other than previously stated is considered as improper use.
Danger resulting from improper use!
If not used for its intended purpose or used in any other way, the coffee machine may be or become a source of danger.

WARNING:
Therefore, the coffee machine may only be used for its intended purpose.

WARNING:
Observe the procedures described in this user manual.
No claims of any kind will be accepted for damage or injury resulting from use of the coffee machine for other than its intended purpose.
The risk has to be borne solely by the machine owner.
1.5 Limitation of liability
All technical information, data and instructions on installation, operation and maintenance of the coffee machine contained in these operating instructions represent the current status at the time of printing and are based on the best possible knowledge gained by experience and knowhow.
No claims can be derived from the information, illustrations and descriptions in this user manual.
1
Important instructions for safety and environment
The manufacturer assumes no liability for damage or injury resulting from failure to observe the user manual, use for other than the intended purpose, unprofessional repairs, unauthorised modifications or use of non-approved spare parts.
1.6 Compliance with the WEEE Directive and Disposing of the Waste Product:
This product complies with EU WEEE Directive (2012/19/EU). This product bears a classification symbol for waste electrical and electronic equipment (WEEE).

This product has been manufactured with high quality parts and materials which can be reused and are suitable for recycling. Do not dispose of the waste product with normal domestic and other wastes at the end of its service life. Take it to the collection center for the recycling of electrical and electronic equipment.
Please consult your local authorities to learn about these collection centers.
1.7 Compliance with RoHS Directive
The product you have purchased complies with EU RoHS Directive (2011/65/EU). It does not contain harmful and prohibited materials specified in the Directive.
1.8 Package information

Packaging materials of the product are manufactured from recyclable materials in accordance with our National Environment Regulations. Do not dispose of the packaging materials together with the domestic or other wastes. Take them to the packaging material collection points designated by the local authorities.
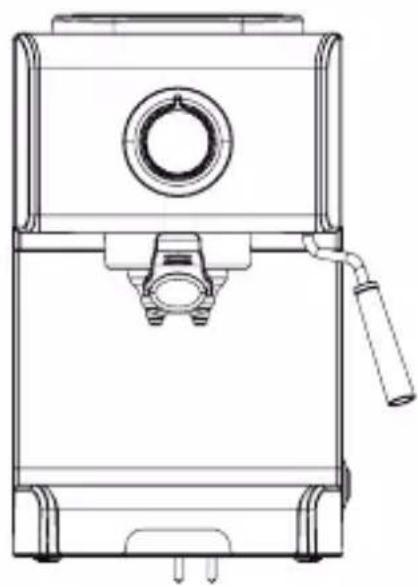
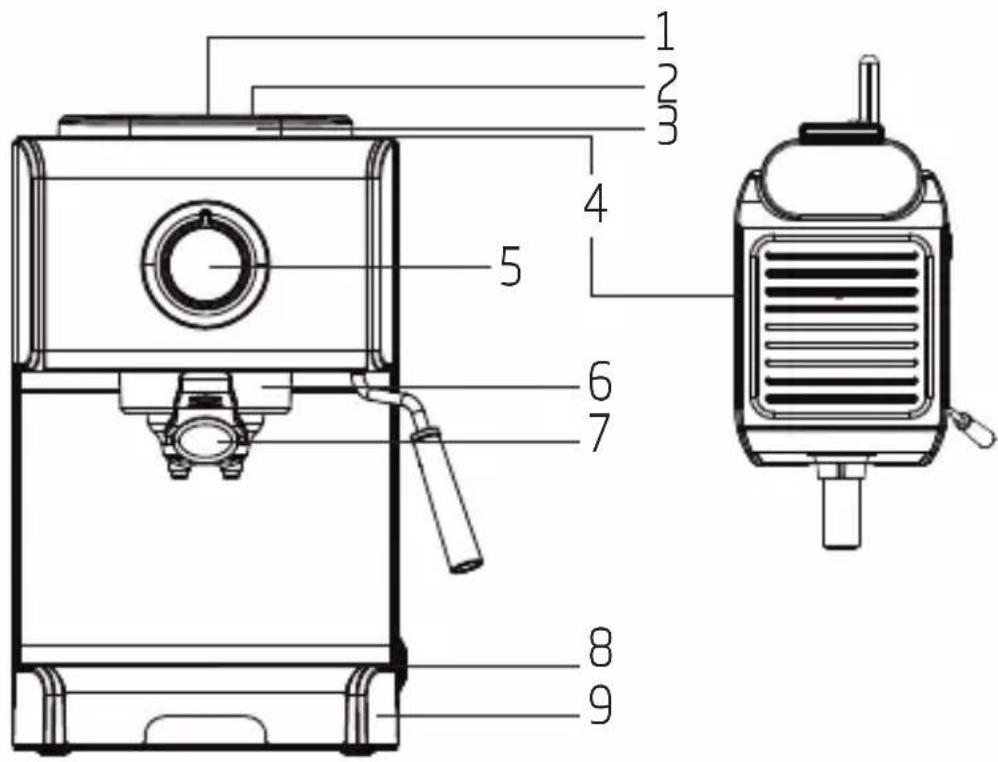
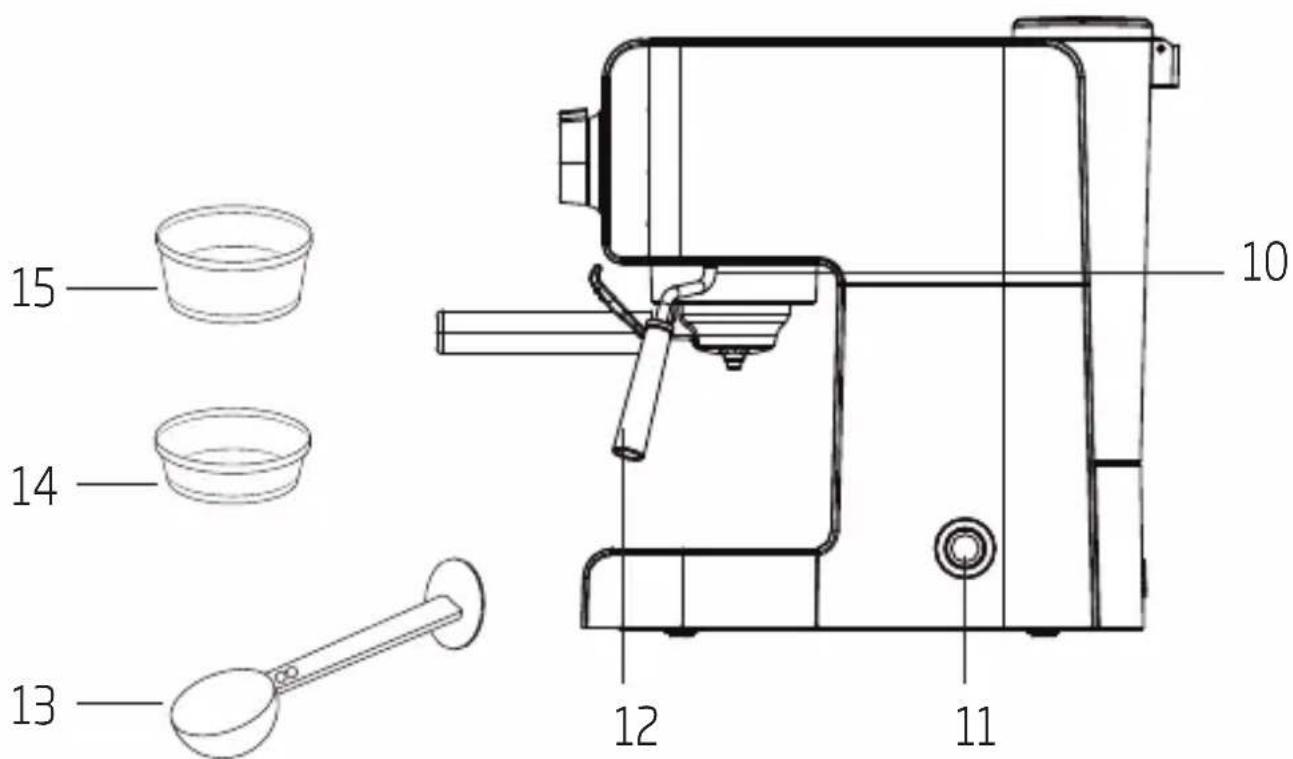
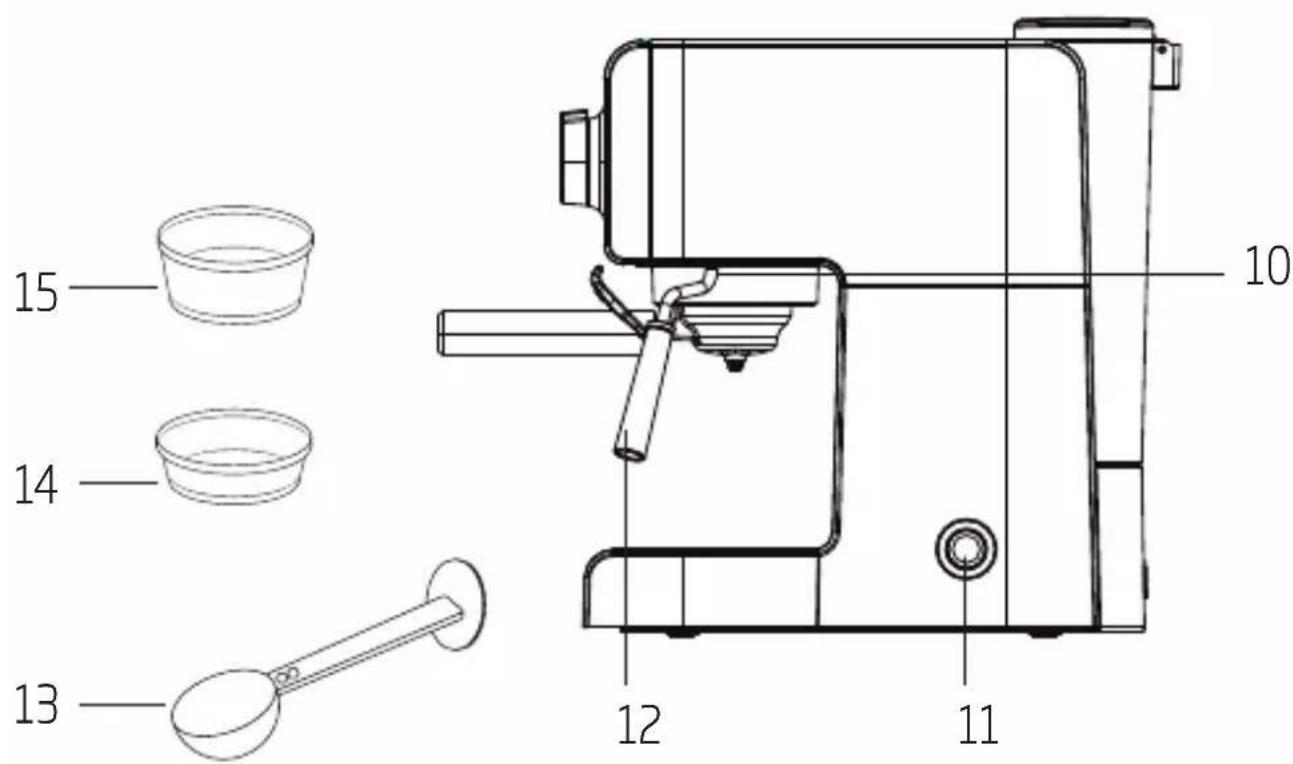
2 Your coffee machine
2.1 Overview
All declared values on the product and on the printed leaflets are picked up after laboratory measurements performed according to related standards. These values may differ upon usage and ambient conditions.
2 Your Coffee machine
- Water Tank Lid
- Water Tank Handle
- Removable Water Tank
- Warming Platform
- Control Knob
- Brew Head
- Filter Holder
- Drip Tray Grid
- Drip Tray
- Frothing Wand
- Power Button
- Frothing Sleeve
- Coffee Scoop / Tamper
- 2-Cup Sieve
- 1-Cup Sieve
2.2 Technical data
Power supply:
220-240 V\~, 50-60 Hz
Power: 1200 W
Water Tank: 1.2 Litre
Technical and design modifications reserved.
3 Tips for Brewing
- To extract the fullest flavor from your coffee beans, we recommend using whole coffee beans that have been freshly ground each time espresso is prepared.
- In addition to the coffee used, using fresh cold water that is free of chlorine, odors and other impurities will help ensure the perfect espresso.
- Store your espresso grounds in an airtight container, and in a cool, dry place to retain the flavor. Grounds should not be kept for long periods of time as the flavor will be reduced.
- Do not fill your portafilter (7) and selected sieve to the brim. Using the coffee scoop included, use 1 level spoon (13) of grounds per shot of espresso.
- If you do not use the machine for more than 5 consecutive days, rinse and drain the water tank (3).
-
Before removing the water tank (3) to fill or empty it, always turn the machine off.
• Always place the unit on a flat, stable, heat-resistant work surface. -
To ensure your espresso stays at optimum temperature, we recommend that you preheat your cups.
- Before brewing, the portafilter (7) must be turned to the right as tight as possible to prevent the portafilter from loosening due to high pressure.

CAUTION: In order to avoid possible burns to body parts and/or other injury from hot steam and water or damages to the machine.
- Never remove the water tank
(3) or the portafilter (7) while your machine is brewing espresso or frothing milk. The Control Knob (5) should be in the "O" position before you remove the portafilter (7) to make additional cups of espresso. If you need to add more water to the tank, turn the Control Knob to the "O" position and power off the machine by pressing the Power Button (11) on the side of the machine so that the blue light is turned off.
3 Tips for Brewing
- If espresso does not flow from the portafilter (7) (only drips very slowly), the sieve is blocked. Turn off the appliance and allow it to cool down. Check that the coffee is not too finely ground, chapter 5a.
- Use caution when removing the portafilter (7). The metal parts may still be very hot. There may also be hot water floating on the top of the ground coffee. Hold the portafilter only by its handle and dispose of the brewed coffee grounds by using the thumb guard.
- If steam is not released from the frothing wand (10), the frother is blocked. Turn off the appliance and allow it to cool down. Clean the frothing wand as described in chapter 8b.
- In order for your machine to work properly time after time, clean the frothing sleeve (12), frothing wand (10), and frothing tip after each use.
4 Operation and use
4.1 Before First Use
After carefully unpacking your espresso machine, wash all removable parts with warm soapy water and rinse thoroughly. Familiarize yourself with the appliance and read the instruction manual. Plug the power cord into a grounded wall outlet according to the safety instructions. Turn the machine on by pressing the Power Button (11) on the side of the appliance.
The Power Button will light solid blue while the indicator light on the Control Knob (5) will start to blink, indicating the machine is heating up.
Rinse the internal components before making espresso. Fill the water tank and pump a few ounces of water through the brew head (6) and the frothing wand (10). Follow the procedure in chapter 4 for "Warming Internal Components & Cups" to rinse the machine before first use.
4.2 Filling the Water Tank
Remove the water tank (3) by lifting up on the handle (2). Open the lid (1) and fill the water tank with fresh cold water between the MIN and MAX markings.
Close the lid (1) and replace the water tank by pushing down firmly, to ensure the tank is properly engaged.
4 Operation and use
4.3 Control Panel
4.3.1 The Power Button
The Power Button (11) on the side of the machine turns the machine on and off. When the machine is turned on, the indicator light on the Control Knob (5) will start to blink red, signifying that the machine is warming up the heating system. The initial heat-up time is under one minute at normal room temperature. When the indicator light illuminates solid blue, the internal components are heated and ready to brew coffee. To turn the machine off, ensure the Control Knob is in the "O" position and press the Power Button on the side of the machine to turn it off.
4.3.2 The Control Knob
The Control Knob (5) has three positions:
| Position | Symbol | Explanation |
Left brewin  | coffee | |
| Middle |  | standby, cup warming, preparedness |
Right steam  | production through the frothing spout | |

During brewing or steaming, the indicator light inside the Control Knob (5) may start to blink or change color, specifying the heating system is on, maintaining the proper temperature for brewing or steaming.
4 Operation and use

Always turn the Control Knob (5) to the "O" position before turning off the machine.
4.3.3 Warming Internal Components & Cups
Before making espresso, it is important to pre-warm all the internal components in the appliance and the cups. This short procedure will add 10° to 15° F to the first cup of espresso.
- Fill the water tank (3) with fresh cold water as described in chapter.
- Make sure the Control Knob (5) is in the "O" position.
- Turn on the machine by pressing the Power Button (11) located on the side of the machine. The indicator light on the Control Knob (5) begins to blink red as the machine begins to heat.
- Place the sieve inside the portafilter (7) (without coffee) 3 for proper sieve placement.
-
Make sure the thumb guard does not cover the sieve.
-
Align the portafilter (7) to the "INSERT" on the left side of the brew head (6), while pushing the portafilter up. Turn the portafilter firmly to the right towards the "LOCK" on the middle of the brew head, until it feels tight.

In the beginning it might not be possible to turn the portafilter all the way to the "LOCK" position. Just make sure the portafilter is firmly placed. Over time the portafilter can be moved closer to the "LOCK" position.
- Place one or two espresso cups underneath the portafilter. Once the indicator light illuminates solid blue, the machine is ready for coffee brewing.
- Turn the Control Knob (5) to the left towards the "Cup icon". Hot water will be pumped through the portafilter (7) into the cups.
- Turn the Control Knob (5) back to the center towards the "O" to stop the flow of hot water.
4 Operation and use

CAUTION: Never leave the machine unattended during brewing or steaming. You always must turn the Control Knob (5) back to the center position towards the "O" position to stop brewing.
- Empty the cups and remove the portafilter (7). All parts are now pre-warmed. TIP! Place espresso cups upside down on the warming platform (4) on top of the machine. When the machine has been turned on for approximately 15 minutes, the warming platform will be heated and can be used to pre-warm cups instead of using hot water from the machine.
5 Preparing
5.1 Preparing Espresso
5.1.1 Selecting the Coffee Grind
This is an important step in the espresso making process as the finely ground coffee must have uniform consistency.
- The correct grind should look like salt.
- If the grind is too fine, the water will not flow through the coffee and cause too much pressure to build up in the machine. These grinds look like powder and feel like flour when rubbed between fingers.
- If the grind is too coarse, the water flows through the coffee too quickly, preventing a full-flavored extraction. Tip! Be sure to use a quality burr grinder for uniform consistency. Blade coffee grinders are not recommended for espresso brewing because the grind is not as consistent.
- If you are experiencing problems with taste (bitter, sour, under extracted, etc.) adjust the grind size of the coffee and/or switch the brand or roast of whole bean coffee.
5.1.2 Preparing the Machine for Brewing
- Make sure the indicator light is illuminated solid blue and the Control Knob (5) is in the "O" position.
- Make sure there is water in the water tank (3) and your cup(s) are prewarmed as described in earlier chapters.
- Make sure the drip tray (9) and drip tray grid (8) are placed correctly on the unit.
5.1.3 Filling and Inserting the Portafilter
- Select from the two sieves (14-15) that come with your machine depending on the amount of cups you wish to prepare (1 or 2 cups).
5 Preparing
- Place the sieve in the portafilter (7) and ensure it sits level.
- Fill the selected sieve with fresh, finely ground coffee. Clean any excess coffee from the rim of the portafilter (7). This will assure proper fit under the brew head (6).
- Tamp or compress coffee using the flat side of the coffee scoop/tamper (13). Do not overfill the sieve. This might cause clogging or overflow.
- Position portafilter (7) underneath the brew head (6) and align the portafilter to "INSERT" while pushing the portafilter up. Turn the portafilter firmly to the right towards "LOCK" until it feels tight.
5.1.4 Brewing Espresso

If you are planning to make cappuccino, please refer to the next section "Making Cappuccino" after reading "Brewing Espresso."
- After you prepare the machine and ground coffee as described in the previous sections you are ready to start brewing your espresso.
- Place 1 or 2 small cups under the portafilter (7). For brewing two cups at a time, you can place the cups under the portafilter ensuring each one of them is directly under one of the two spouts.
-
Once the indicator light in the center of the Control Knob (5) illuminates solid blue, the machine is heated to the proper temperature. Rotate the Control Knob to the left towards the "Cup icon", to start brewing. The pump is audible for a short moment as the grounds are pre-infused with water. Then, after a short pause, the espresso will begin to flow into the cup(s).
-
When the cup is filled to the desired level, turn the Control Knob (7) back to the "O" position. Keep cup(s) under the spouts for an additional few seconds to be sure all of the espresso has dripped out.
5 Preparing

CAUTION: The machine must be turned off manually. Do not leave machine unattended while brewing. You must manually stop the brewing process. This will avoid overflow, spillage and potential hazards and damages.

After the espresso is brewed, the machine automatically creates a bit of steam and pushes the remaining water from the pump into the drip tray (9). This ensures that there will be no rest-water in the heating system. After preparing a few cups of espresso, carefully pull the drip tray out of the machine, empty and replace.
-
After the machine has cooled down, carefully remove the portafilter from the brew head (6) by holding it by the handle and pulling it towards the left. Using the thumb guard to secure the sieve in the portafilter, turn the portafilter (7) upside down to empty. Rinse the sieve and portafilter with water.
-
If you wish to brew additional espresso, repeat the process above. Add freshly ground coffee into the sieve as described in chapter 5c, "Filling and Inserting the Portafilter," lock the portafilter (7) back underneath the brew head (6) and follow the instructions to brew espresso again (items 2-5 from this section).
-
Once you have prepared the desired amount of espresso, make sure the Control Knob (5) is in the "O" position and turn off the machine by pressing the Power Button (11) on the side of the machine. Allow the machine to cool down before removing parts and accessories prior to cleaning.
5 Preparing
- For cleaning instructions, refer to chapter 8.

CAUTION: The metal parts of the portafilter (7) might still be very hot. Always use caution when handling the machine and the removable parts. Make sure to use the thumb guard when discarding the grounds. Cool these parts by running under cold water.
5.1.5 Making Cappuccino
Cappuccino is the combination of one or two shots of espresso with an equal or larger amount of hot milk and milk froth.

When frothing the sieve and portafilter (7) should be assembled in the "LOCK" position. For best results always start with fresh, cold milk (about 34°F).
5 Preparing

Do not use a pitcher which has just been washed in warm water. We also recommend a beverage thermometer for preparing the best frothed and steamed milk. The ideal end temperature for frothed or steamed milk is between 140°F - 165°F. Any type of milk can be used when frothing. Whole milk will produce good microfoam (small bubbles) while low-fat and fat-free milk will produce large, airy bubbles in the froth. Non-dairy milks will not hold the froth as well but can be steamed and heated for lattes.
5.1.6 Frothing Milk
- First prepare espresso into a large, pre-heated cup as described in chapter 5d, "Brewing Espresso".
- Fill a small stainless steel or ceramic pitcher 1/2 full with cold milk and set aside.
- Before frothing, it is recommended to purge the frothing wand (10) of any hot water. Place a cup under the frothing wand (or turn the frothing wand directly into the drip tray (9)). Once the indicator light is solid blue, turn the Control Knob (5) to the right towards the "Steam icon". The indicator light blinks red for 5-8 seconds while the water is purged from the wand. Once the water is purged, the indicator light will turn blue, and steam is produced from the frothing wand. Turn the Control Knob back to the "O" position. The indicator light is now illuminated red indicating the machine is ready to froth/steam milk.
5 Preparing
- Take the cold pitcher of milk and submerge the frothing wand (10) (with frothing sleeve (12) assembled) about two thirds into the milk inside the pitcher. Make sure the frothing sleeve does not hit the bottom of the pitcher during frothing.
- With the frothing wand (10) submerged into the milk, turn the Control Knob (5) to the right towards the "Steam icon".
- Steam will start to exit the frothing wand (10) releasing hot steam into the milk. During frothing, the machine's pump will make intermittent noise indicating that water is being pumped through the heating system to be converted into steam.

CAUTION: To avoid splattering of hot milk, do not let the opening of the frothing wand (10) go above the surface of the milk. Keep the frothing wand submerged in the milk during the entire frothing process.

CAUTION: Never remove the frothing wand (10) from the milk while the Control Knob (5) is still in the steam position. Always turn the Control Knob to the "O" position before removing the frothing wand from the milk or it could cause hot milk to splatter.

During brewing or steaming, the indicator light may turn off, change color, or blink, specifying the heating system is active and maintaining the proper temperature for brewing or steaming.
- When the milk has doubled in volume, or, if you are using a beverage thermometer, when the milk has reached 165°F (68°C), turn the Control Knob (5) back to the "O" position.
5 Preparing

Carefully clean the frothing wand (10) and frothing sleeve (12) with a wet cloth immediately after steaming to avoid milk build up. Take care to avoid contact with hot parts.
- Pour the frothed milk into the prepared espresso, now the cappuccino is ready. Sweeten to taste and add any ingredients you desire such as flavored syrups, extracts or cocoa powder/spices.

After frothing, we recommended you allow the machine to cool down for at least 5 minutes before making espresso again. This allows the machine to cool down from steaming temperature to the proper espresso brewing temperature. If indicator light is red, you may turn Control Knob (5) to the left to run water through the portafilter (7). This will cool down the system so espresso can be made after steaming. If multiple cappuccinos will be made, prepare all the es-pressos first into hot cups and then froth the milk after.
5 Preparing
-
Follow the instructions in point 3 above to purge the frothing wand (10) and to flush out any residual milk from the frothing wand and frothing tip. It is important to properly clean your frothing wand and frothing tip and wash the frothing sleeve (12) after each use to ensure the frother continues to work properly.
-
Turn the machine off by pressing the Power Button (11) on the side of the machine. Unplug the power cord and allow the machine to cool.

CAUTION: After frothing or steaming milk, the frothing wand (10), frothing tip, and frothing sleeve (12) will be VERY HOT! Do not contact metal parts! To avoid potential injury, always make sure that all parts have cooled down completely before handling.
5.1.7 Making Latte
Latte is the combination of one or two shots of espresso with an equal or larger amount of hot steamed milk with very little or no froth. Without the frothing sleeve (12), the frothing wand (10) will steam, not froth the milk. Remove the frothing sleeve then proceed with steaming the milk as described in chapter 6. Pour hot, steamed milk over espresso. Follow steps 9 & 10 above in chapter 6, "Making Cappuccino" to clean and power down the machine.

CAUTION: After frothing or steaming milk, the frothing wand (10) and frothing tip will be VERY HOT! Do not contact metal parts! To avoid potential injury, always make sure that all parts have cooled down completely before handling.
6 Cleaning and Maintaining Your Machine
6.1 Daily Cleaning
- Always make sure the Control Knob (5) is in the ""O"" position and the machine is powered off by pressing the Power Button (11) on the side of the machine so that the blue light is turned off. Unplug the cord from the outlet and allow all of the parts to cool before cleaning.
- Remove and wash the frothing sleeve (12) and wipe the frothing wand (10) with a damp cloth.
- The water tank (3), sieves and drip tray (9) can be washed in a solution of hot water and mild liquid soap.

CAUTION: Do not immerse appliance in water, in any other liquid or place in the dishwasher.

Never use abrasive cleansers, steel wool pads or other abrasive materials to clean the machine.
6.2 Cleaning the Frothing Wand
It is recommended to purge (chapter 6, point 3) and wipe the frothing wand (10) clean with a damp cloth each and every time immediately after frothing or steaming milk to prevent build up. Thoroughly clean the frothing wand before turning off the machine to ensure cleanliness.
- Pull the black frothing sleeve (12) down and off the frothing wand (10) and clean under warm running water.
- Fill a cup with a bit of water and immerse the frothing wand (10).
- Turn the Control Knob (5) to the right towards the "Steam icon" and let steam push into the water for a few seconds.
- Turn the Control Knob (5) back towards the center to the OFF position "O".
- Use a cloth to dry the frothing wand (10) and replace the black frothing sleeve (12), ensuring it is firmly pushed up onto the frothing wand.
6 Cleaning and Maintaining Your Machine
- If extremely clogged, the frothing tip can be unscrewed, and soaked in warm soapy water for approximately 30 minutes. Once soaking is complete, thoroughly rinse the tip under running water.

CAUTION: The frothing wand (10), frothing tip, and frothing sleeve (12) may be VERY HOT! To avoid potential injury, always make sure that all parts have cooled down completely before handling.

If no steam comes out of the frothing wand (10), hardened milk blocks its path. Turn the Control Knob (5) back to the "O" position. Remove the black frothing sleeve (12) and carefully use a needle to loosen the milk residue from the opening of the frothing tip to remove any blockage, then steam again.

In order for your machine to work properly time after time, clean the frothing wand (10), sleeve and tip after each use as described above.
6 Cleaning and Maintaining Your Machine
6.3 Decalcifying
When making espresso always use cold, clean water. Using spring water or filtered water will slow down calcium build up. We recommend decalcifying the machine after 100-200 uses or at least every 2-3 months.
- When using commercial decalcifying agents it is important to follow their instructions. You can also use Capresso Cleaning Solution, available at www.capresso.com. Dissolve 1 packet of Capresso Cleaning Solution with 30 oz. of water and add to the water tank (3).

Do not use vinegar as this will considerably shorten the life of the seal inside the brew head (6).
6.3.1 Decalcifying the Brew Head
- Remove the portafilter (7).
-
For best results unscrew the screen inside the brew head (6). Wipe off any coffee residue with a damp cloth.
-
Fill the water tank (3) with the decalcifying solution.
- Place a large bowl beneath the brew head (6).
- Push the Power Button (11) on the side of the machine and turn the Control Knob (5) to the left towards the "Cup icon". Allow 1/3 to 1/2 of the solution to be pumped through the system and the brew head.
- Turn the Control Knob (5) back towards "O" position to stop the process.
- Let the machine sit for approximately 10 minutes.
6.3.2 Decalcifying the frothing wand
- Remove the black frothing sleeve (12).
- Fill a pitcher with 6 to 8 oz. of cold water and immerse the frothing wand (10) into the cold water.
- Turn the Control Knob (5) to the right towards the "Steam icon" and let the steam pass through for about 30 seconds. Repeat this process three or four times.
6 Cleaning and Maintaining Your Machine
- Now process the remaining decalcifying solution through the brew head (6) as described above.
6.3.3 Rinsing the system
- Remove the water tank (3) and rinse thoroughly, then fill with fresh cold water.
- Repeat above steps (4 through 6) with fresh cold water.
- Replace screen in the brew head (6) and tighten the screw securely.
7 Troubleshooting
7.1 Problems, possible causes and remedies
| Problem Cause | Remedy | |
| Coffee runs down the side of the portafilter. | Portafilter (7) is not properly inserted. | Turn the handle of the portafilter (7) further to the right. |
| Edge of sieve is not free of ground coffee | Turn off the machine, remove the portafilter (7) holder and clean the edges of the sieve. | |
| Screen inside brew head (6) is dirty. | Remove the screen in the brew head (6) by removing the two screws that hold the screen in place. Clean thoroughly with warm water, dry and replace the screen. Ensure the screws are tightly fixed back on. CAUTION! HOT. |
7 Troubleshooting
| Problem Cause Remedy | ||
| Very little or no coffee flows through the portafilter. | No water in tank. Fill the | tank with water. |
| The screen inside the brew head (6) is blocked. | Brew water through the screen without the portafilter (7) inserted. If no water comes through, unscrew the screen, clean and replace. | |
| The sieve is blocked. | Correction: Clean the sieve, insert into the portafilter (7) and pump water through without coffee. If no water comes through the sieve call Customer Service to order a replacement sieve. | |
| Espresso brews out only as drops. | Coffee grounds are too fine or packed down too firmly. | Do not tamp coffee grounds so firmly. Use a coarser grind of coffee. |
| Machine blocked by calcium deposits. | Decalcify the appliance. See chapter 8c. | |
| Espresso brews too quickly. | Ground coffee is too coarse. | Use a finer grind. |
| Not enough coffee in the sieve. | Use more ground coffee. |
7 Troubleshooting
| Problem Cause Remedy | ||
| No crema. | Coffee old or too dry. Use fresh coffee. | |
| Coffee not pushed down firmly enough. Water pushes through the coffee too fast. | Tamp coffee grounds more firmly. Use a finer grind. | |
| Coffee too coarse. Use a conical burr grinder to obtain a finer and more consistent grind. | ||
| Coffee blend not suited to espresso coffee. | Change brand of espresso. | |
| No steam from the frothing wand. | Tip of frothing wand (10) is blocked. | See chapter 8b, “Cleaning the Frothing Wand”. If frothing wand (10) is clear of dried milk deposits, but no steam comes out of the frothing wand, then decalcify the frothing wand as described in chapter 8c. If the appliance is still blocked, call Customer Service, see chapter 11. |
7 Troubleshooting
| Problem Cause Remedy | |
| Not enough froth when frothing milk. | Milk not fresh. Use fresh milk. |
| Milk not suitable. Use lower fat content dairy milk. Non-dairy milk won't froth as well. | |
| Milk was too warm from the start. Use milk straight from the refrigerator (34°F). | |
| Not enough milk to froth. Use more cold milk. |
2 Votre cafetière
2.1 Vue d'ensemble


- Manual Espresso Machine
- Please read this user manual first!
- Explanation of symbols
- CONTENTS
- Important instructions for safety and environment
- Danger of electric current
- Danger of burning or scalding
- Fundamental safety precautions
- 1
- Important instructions for safety and environment
- Intended use
- Danger resulting from improper use!
- WARNING:
- Limitation of liability
- Compliance with the WEEE Directive and Disposing of the Waste Product:
- Compliance with RoHS Directive
- Package information
- Your coffee machine
- Overview
- Technical data
- Power supply:
- Tips for Brewing
- Operation and use
- Before First Use
- Filling the Water Tank
- Control Panel
- The Power Button
- The Control Knob
- Warming Internal Components & Cups
- Preparing
- Preparing Espresso
- Selecting the Coffee Grind
- Preparing the Machine for Brewing
- Filling and Inserting the Portafilter
- Brewing Espresso
- Making Cappuccino
- Frothing Milk
- Making Latte
- Cleaning and Maintaining Your Machine
- Daily Cleaning
- Cleaning the Frothing Wand
- Decalcifying
- Decalcifying the Brew Head
- Decalcifying the frothing wand
- Rinsing the system
- Troubleshooting
- Problems, possible causes and remedies
- Votre cafetière
- Vue d'ensemble
Brand : GRUNDIG
Model : CEP5152B
Category : Coffee machine