K710 - Musical instrument LEXIBOOK - Free user manual and instructions
Find the device manual for free K710 LEXIBOOK in PDF.

User questions about K710 LEXIBOOK
0 question about this device. Answer the ones you know or ask your own.
Ask a new question about this device
Download the instructions for your Musical instrument in PDF format for free! Find your manual K710 - LEXIBOOK and take your electronic device back in hand. On this page are published all the documents necessary for the use of your device. K710 by LEXIBOOK.
USER MANUAL K710 LEXIBOOK
natural_image
Black and white photo of a modern mini keyboard with a microphone on top (no text or symbols visible)MODE D'EMPLOI INSTRUCTION MANUAL MANUAL DE INSTRUCCIONES MANUAL DE INSTRUÇÕES MANUALE DI ISTRUZIONI BEDIENUNGSANLEITUNG GEBRUIKSAANWIJZING
www.lexibook.com
K710 series
Booklet size: 105(W) x 148(H)mm
natural_image
Line drawing of a person using an old typewriter at a table (no text or symbols)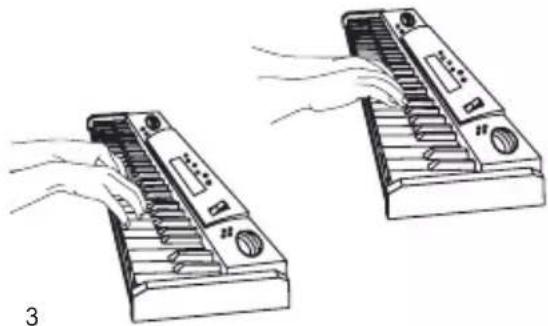
natural_image
Line drawing of two electronic devices with hands operating them, no text or symbols present
Schéma du clavier
supporttechnique@support.lexibook.com.
Discovering Your Keyboard
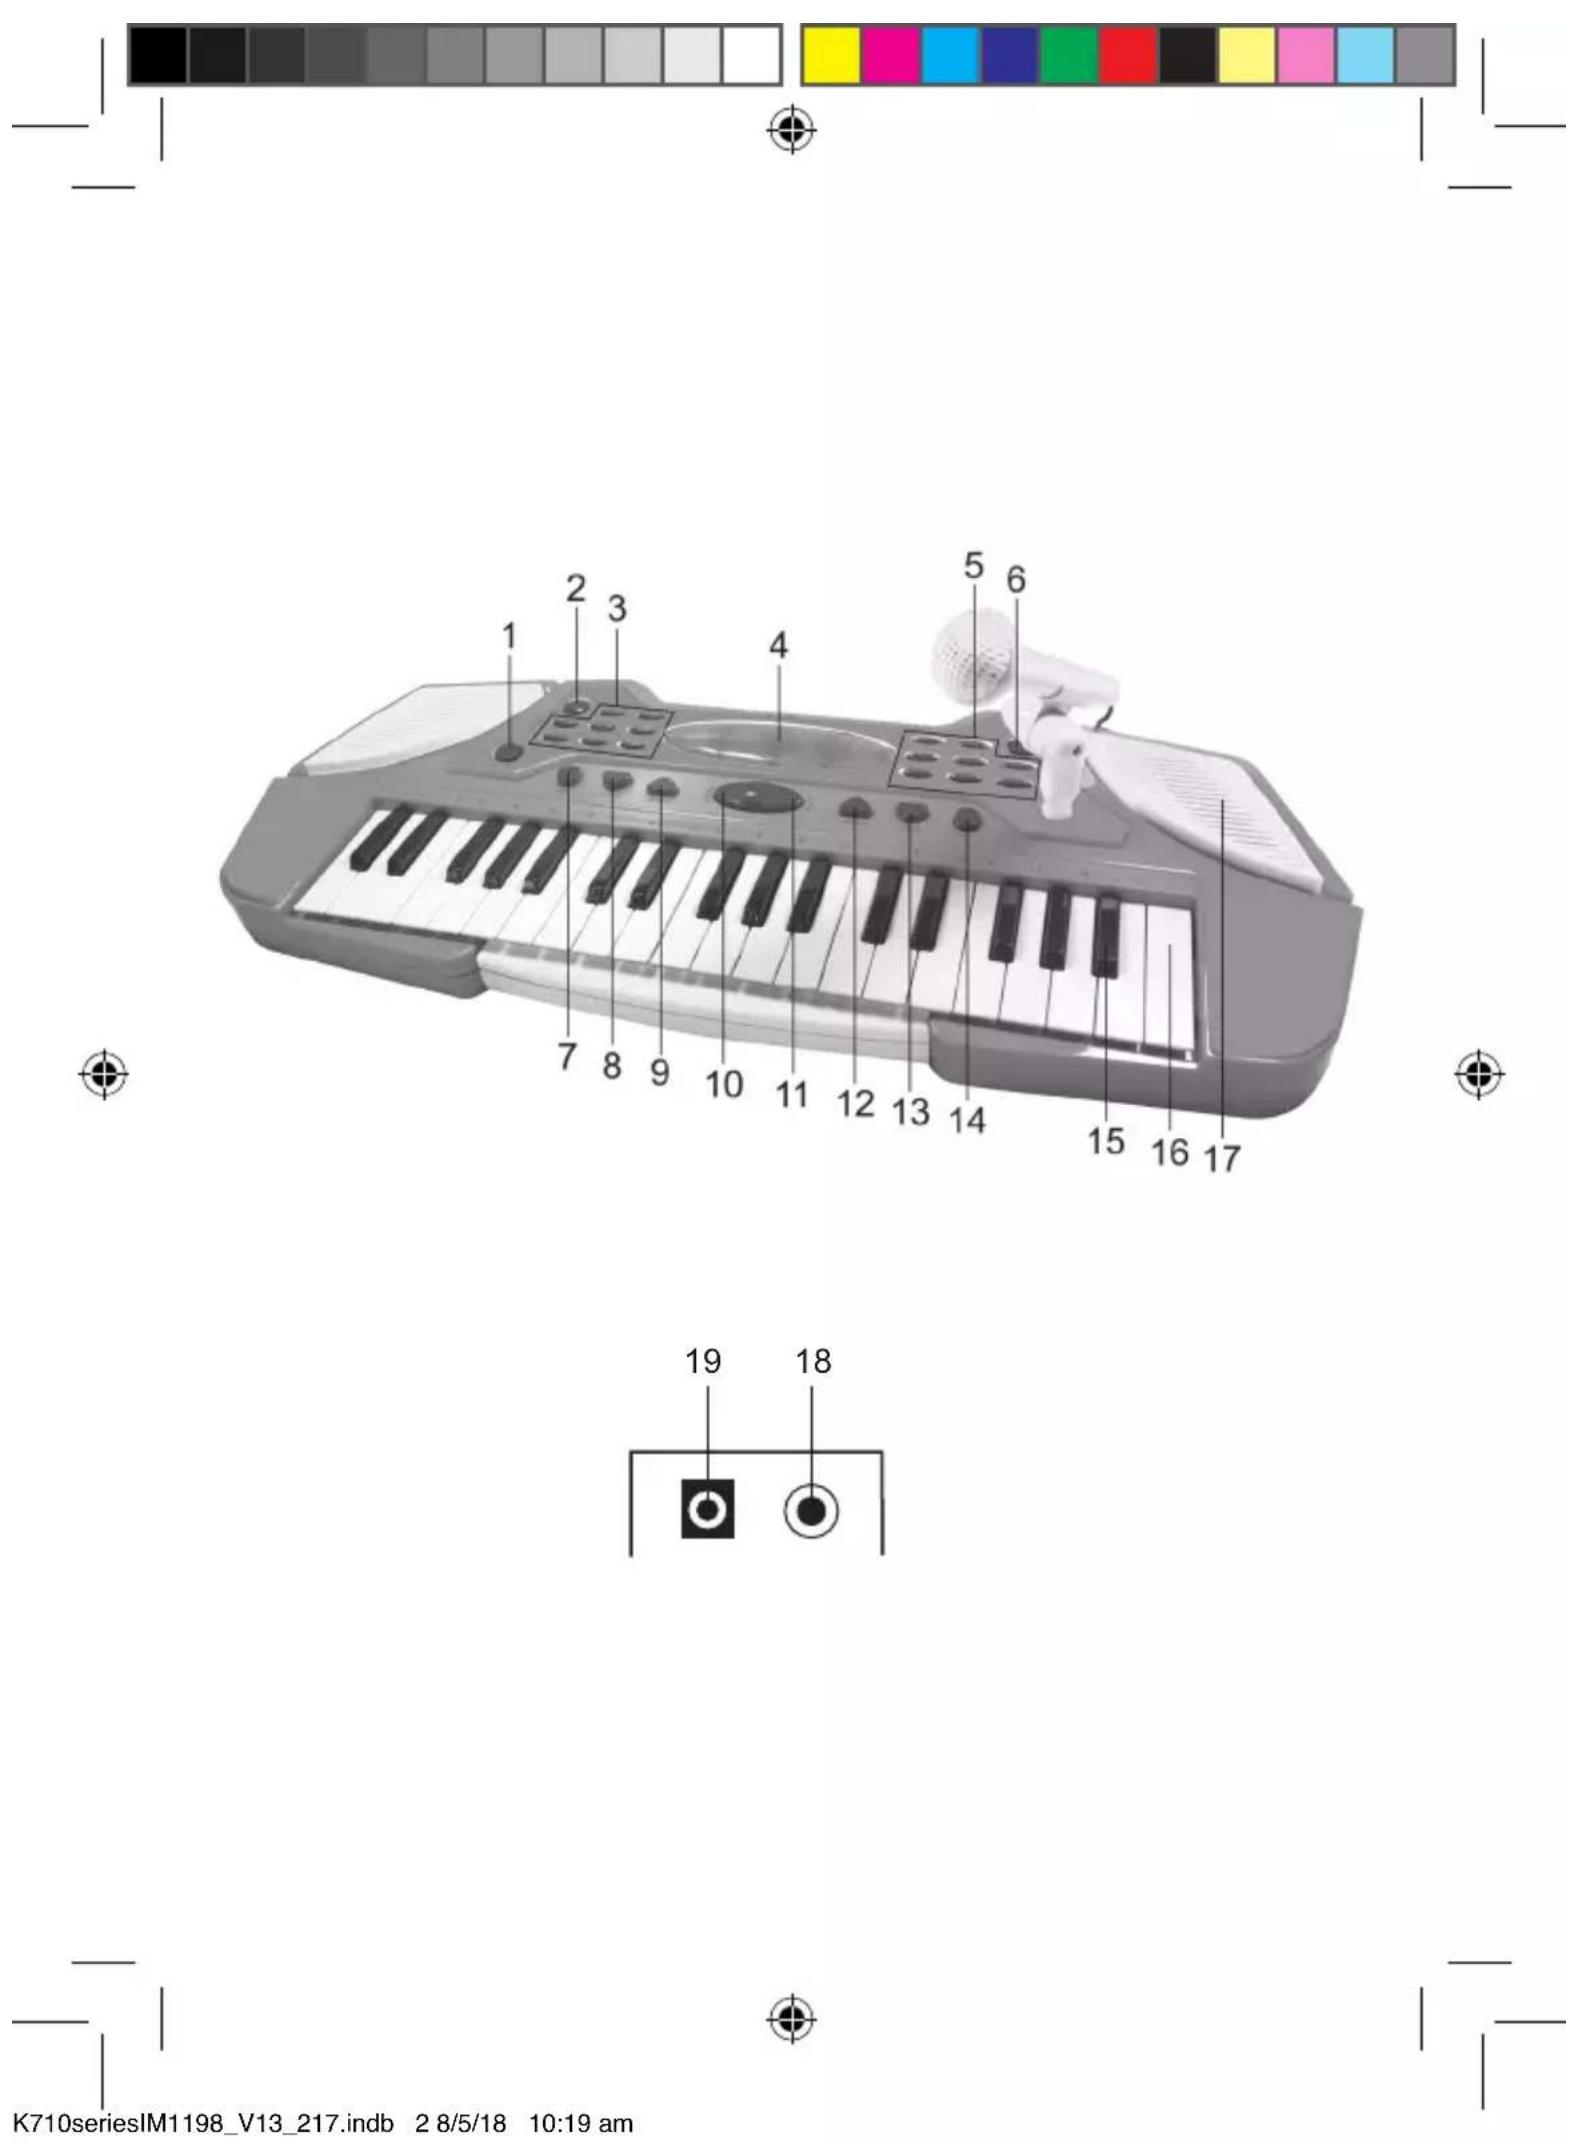
Discover your new keyboard and learn to identify the various parts of your instrument using the diagram on the first page of the booklet.
-
On/Off Switch
-
VOLUME - button
-
Black key (x 15)
-
RHYTHM switch
-
VOLUME + button
-
White key (x 22)
-
16 Rhythms
-
RECORD button
-
SPEAKER
-
DRUM/LIGHT button
-
REPLAY button
-
MICROPHONE input (3.5mm)
-
16 instruments
-
TEMPO + button
-
Power supply
-
INST switch
-
TEMPO - button
-
DEMO SOUNDS button
-
STOP button
When unpacking, ensure that the following elements are included:
1 x 37-key keyboard / 1 x mic / 1 x mic stand / 1 x pole holder/ 1 x instruction manual
WARNING: All packaging materials, such as tape, plastic sheets, wire ties and tags are not part of this product and should be discarded for your child's safety.
Power sources
The keyboard operates with 4 x AA/LR6 1.5V type batteries (not included) or a 5V 500mA adaptor with positive centre (not included).

Input: 100-240V \~ 50/60Hz, 0.3A Output: 5V 500mA

AC operation
- Check that the unit is switched off.
- Insert the AC/DC adaptor's plug into the device's DC jack at the back.
- Then plug the adaptor in an outlet.
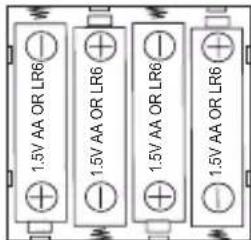
Batteries installation
- To install the battery, open the battery compartment located at the bottom of the keyboard.
- Insert 4 x AA/LR6 type 1.5V batteries (sold separately) observing the polarity indicated in the battery compartment, and as per the diagram shown.
- Replace the battery compartment cover.
Note: The AC adapter must be disconnected from the DC socket at the bottom of the unit in order for the product to operate on battery power.
Non-rechargeable batteries are not to be recharged. Rechargeable batteries are to be removed from the product before being charged. Rechargeable batteries are only to be charged under adult supervision. Different types of batteries or new and used batteries are not to be mixed. Only batteries of the same or equivalent type as recommended are to be used. Batteries are to be inserted with the correct polarity. Exhausted batteries are to be removed from the product. The supply terminals are not to be short circuited. Do not throw batteries into a fire. Remove the batteries if you are not going to use the unit for a long period of time. Battery shall not be exposed to excessive heat such as sunshine, fire or the like.
WARNING: Malfunction or loss of memory may be caused by strong frequency interference or electrostatic discharge. Should any abnormal function occur, remove the batteries and insert them again, or unplug the AC adapter from the mains socket and plug it back in.
Warning: Disconnect the adapter if the game is not used for a long period of time to prevent overheating. When the Keyboard is powered by an adapter, do not play outside. Check the state of the adapter and the connection cords regularly. If their condition is deteriorating, do not use the adapter until it has been repaired. The toy shall only be used with a transformer for toys. The adapter is not a toy. The Keyboard should be disconnected from the power supply to be cleaned if liquids are used for cleaning. The toy is not intended for children under 3 years old. Misuse of transformer can cause electrical shock.
Parental advisory: transformer and adaptor for toys are not intended to be used as a toy. The usage must be under parental advice.
The toy is only to be connected to Class II equipment bearing the following symbol.

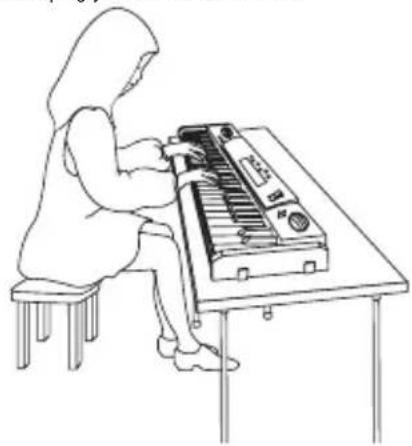
Posture and Hand Position
To play the keyboard correctly, you must maintain a proper posture and properly place your hands on the keyboard. The quality and ease of play depend on this.
Sit down with your legs in front on a bench or stool. Keep your back straight, facing the centre of the keyboard, and then lean slightly forward while keeping your shoulders relaxed.
When you place your hands on the keys, your elbows must be slightly in front of you. Your forearm and hands draw a horizontal line when your fingers are resting on the keyboard. Your fingers must be slightly curved.
natural_image
Line drawing of a person sitting at a desk using an early electronic keyboard (no text or symbols present)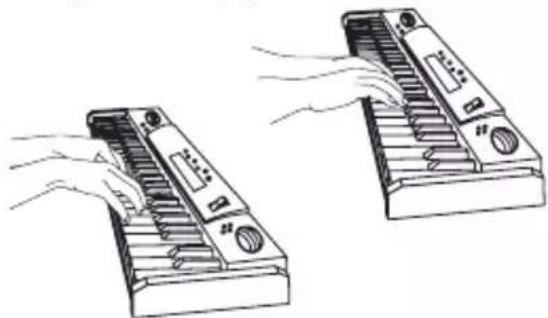
natural_image
Illustration of two hand-drawn views of a handheld electronic device with no visible text or symbols7


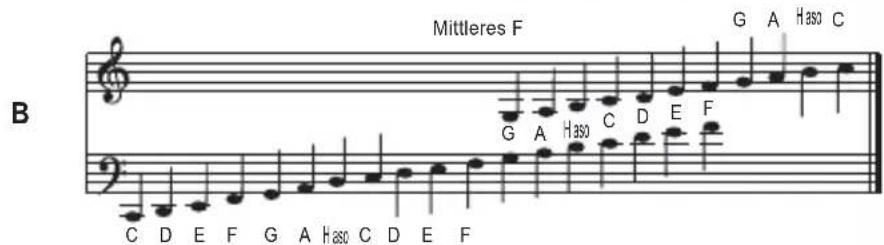
Keyboard Diagram
The first and last key of the 37-key keyboard are C notes. The K710 series is comprised of white keys and black keys. The black keys are divided into groups of two and three.
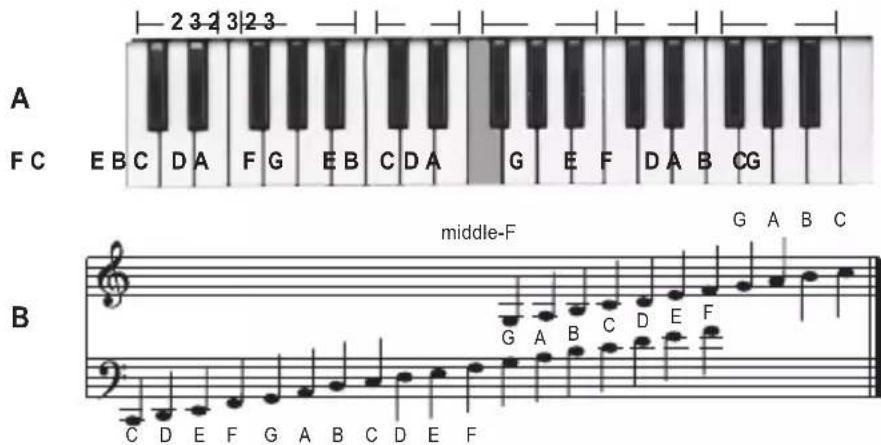
Notes: the greyed note indicates middle F. The C notes are located to the left of the groups of two black keys.
Fingering
The finger numbering system helps you determine where to place your fingers on the keyboard. Each finger is assigned a number.
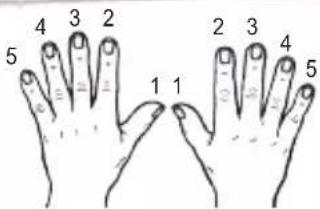
Let's start with an easy exercise.
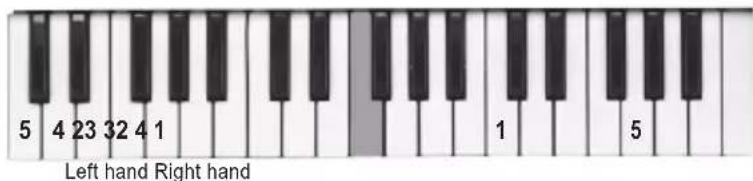
LEFT HAND
| Finger | 5 | 4 | 3 | 2 | 1 |
| Key | C | D | E | F | G |
RIGHT HAND
| Finger | 1 | 2 | 3 | 4 | 5 |
| Key | C | D | E | F | G |
Note: Play with the tips of your fingers.
You can press the black keys with the finger corresponding to the white key.
Music set up
How to turn the instrument On/Off
- To turn on your Electronic Keyboard with Microphone push the On/Off switch to the right.
- To turn it off, push the switch to the left.
How to use the volume buttons
Press volume buttons to define the level of volume you want to set for the opening music when turning on the device, your keyboard, the tones and demo songs.
There are 14 levels and the volume set by default when powering on the keyboard is level 8.
CAUTION: Too high volume, can damage your hearing. For this reason, please turn the volume down.
How to use the tempo buttons
Press tempo buttons to speed up or slow down your music. It works not only for the music you play but also for the rhythm you choose and the demo songs you can listen to.
Set up the tone
| Tone A | |||||||
| 01 | PIANO | 03 | HARMONICA | 05 | A-STEEL GUITAR | 07 | HAMMOND |
| 02 | ELECTRIC BASS | 04 | ELECTRIC GUITAR | 06 | ACCORDION | 08 | VIBRAPHONE |
| Tone B | |||||||
| 09 | SYNTH BASS | 11 | FRENCH HORN | 13 | SAXOPHONE | 15 | HARP |
| 10 | CLARINET | 12 | OBOE | 14 | TUBA | 16 | VIOLIN |
- The tone setup allows you to select different instruments. To select one tone among the 16 tones shown in the table above, press INST switch one time for Tones A and select the tone by pressing one of the 8 buttons (no 5 shown on the diagram) from 01 to 08.
- To access Tones B, press INST switch again and select the tone you wish to play from 09 to 16.
Set up the rhythm
| Rythmes A | |||||||
| 01 | MARCH | 03 | SLOW ROCK | 05 | DISCO | 07 | SHUFFLE |
| 02 | CHA CHA | 04 | NEW NEW | 06 | ROCK | 08 | RUMBA |
| Rythmes B | |||||||
| 09 | SOKA | 11 | WALTZ | 13 | POP | 15 | SAMBA |
| 10 | SLOW SOUL | 12 | TANGO | 14 | SOUL | 16 | BLUES |
- To select the rhythm among the 16 rhythms shown in the table above press RHYTHM switch one time for Rhythm A then select the rhythm by pressing one of the 8 buttons (no 3 on the diagram) from 01 to 08.
- To access Rhythm B, press RHYTHM switch again and select the rhythm for your music from 09 to 16.
- To stop press STOP button.
Get into beat of drums
Press DRUM/LIGHT button to select the percussion sound you want among (from left to right button): BASS DRUM, SNARE DRUM, CYMBAL and HI-HAT.
Practice with the demonstration music
- Press DEMO button to hear the demo music listed in the following order:
· Little Star · Salut d'amour
· For Elise · The Little Donkey
· Dog Waltz · Ode To Joy
- Beethoven symphony no 5 - If You're Happy Clap
2. To play the next track press DEMO button once to stop the music and once again to play the next music.
3. To stop the music press STOP button.
Record your music
- To record your music, press RECORD button and play your own music up to 54 notes.
- When you are finished, to playback the notes press REPLAY button.
- To stop press STOP button.
Note: Under record mode, please avoid pressing buttons or the record will automatically be cancelled.
The record feature cannot record demo songs, drum sounds or rhythms but records the music played on the keyboard under the tone selected. The device does not record the voice on the microphone.
How to use your removable Microphone
- Assemble the microphone stand and pole holder together. Then fit them into the base located on the keyboard.
- Connect the microphone cable to its input at the back of the keyboard (18).
- Place the removable microphone on the pole holder or just start singing!
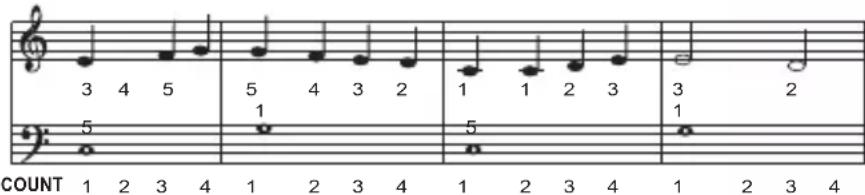
Practice music
ODE TO JOY by Beethoven
RIGHT HAND
LEFT HAND
ENGLISH
RIGHT HAND
LEFT HAND
RIGHT HAND
LEFT HAND
RIGHT HAND
LEFT HAND
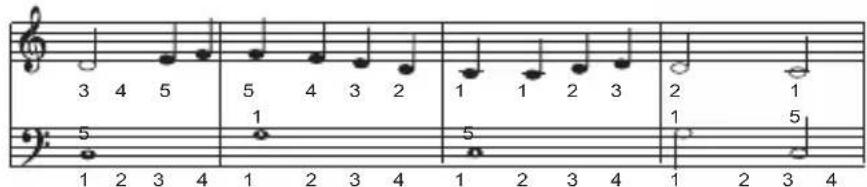
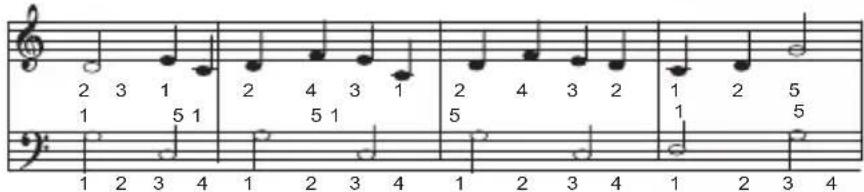

Note: the double bar || indicates the end of the piece.
Maintenance
To prevent fire or shock hazard, disconnect your unit from the power source when cleaning. The finish on your unit may be cleaned with a dust cloth and cared for as other furniture. Use a soft, clean and dry cloth to clean the exterior of the unit. Use caution when cleaning and wiping the plastic parts.
Precautions
· Handle with care. Do not drop or subject the keyboard to excessive force or shock.
· Do not expose the keyboard to high humidity or dusty environments.
· Do not expose the keyboard to extreme temperatures from any source.
· Do not use liquid or aerosol cleansers.
· Do not use attachments not recommended by the manufacturer.
- Do not use the keyboard near water, a bathtub, wash bowl, kitchen sink or laundry tub; in a wet basement or near a swimming pool.
- Never put objects of any kind into the keyboard through its openings as they may touch dangerous voltage points or short-out parts and could result in fire or electric shock. Never spill liquid of any kind onto the keyboard.
Warranty
This product is covered by our 2-years warranty.
For any claim under the warranty or after sale service, please contact your distributor and present a valid proof of purchase. Our warranty covers any manufacturing material and workmanship defect, with the exception of any deterioration arising from the non-observance of the instruction manual or from any careless action implemented on this item (such as dismantling, exposition to heat and humidity, etc.). It is recommended to keep the packaging for any further reference.
In a bid to keep improving our services, we could implement modification on the colours and the details of the product shown on the packaging.
NOTE: Please keep this instruction manual, it contains important information.
WARNING! Not suitable for children under 3 years. Choking Hazard-Small parts.
Reference: K710 series
Designed and developed in Europe – Made in China
© LEXIBOOK®
www.lexibook.com
United Kingdom & Ireland
For after-sales service, please contact us at
customerservice@support.lexibook.com or
+33 1 84 88 58 59.

Environmental Protection
Unwanted electrical appliances can be recycled and should not be discarded along with regular household waste! Please actively support the conservation of resources and help protect the environment by returning this appliance to a collection centre (if available).

natural_image
Line drawing of two hand-drawn views of a piano keyboard, showing press and mode controls (no text or symbols)
Schema des Klaviers
natural_image
Line drawing of a person using a vintage typewriter at a table (no text or symbols)
natural_image
Illustration of two electronic devices with hands operating them, no text or symbols present23

natural_image
Line drawing of a person using a vintage typewriter at a table (no text or symbols)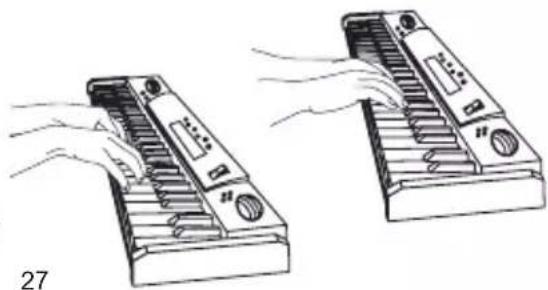
natural_image
Illustration of two hand presses with keys and buttons, no text or symbols present
IM code: K710seriesIM1198