K7000 - Musical instrument LEXIBOOK - Free user manual and instructions
Find the device manual for free K7000 LEXIBOOK in PDF.

User questions about K7000 LEXIBOOK
0 question about this device. Answer the ones you know or ask your own.
Ask a new question about this device
Download the instructions for your Musical instrument in PDF format for free! Find your manual K7000 - LEXIBOOK and take your electronic device back in hand. On this page are published all the documents necessary for the use of your device. K7000 by LEXIBOOK.
USER MANUAL K7000 LEXIBOOK
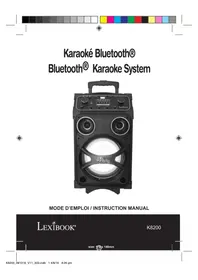
Lexibook® CD+G Karaoke Player with Docking Station

natural_image
Gray portable radio with digital display and control knobs (no visible text or symbols)LEXIBOOK
K7000series
FRANGALS
MESURES DE SECURITE
natural_image
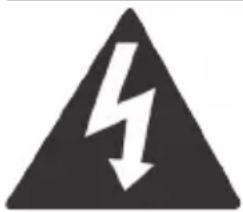
Black triangular warning symbol with white lightning bolt symbol (no text)MISE EN GARDE
RISQUE D'ÉLECTROCUTION
NE PAS OUVRIR

natural_image
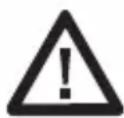
Black triangular warning symbol with exclamation mark (no text or numbers)MISE EN GARDE : AFIN DE RÉDUIRE LES RISQUES D'ÉLECTROCUTION, NE PAS ENLEVER LE COUVERCLE (NI L'ARRIÈRE). NE CONTIENT AUCUNE PIÈCE POUVANT ÊTRE RÉPARÉE NI REMPLACÉE PAR L'UTILISATEUR. CONFIER TOUTE RÉPARATION À UN TECHNICIEN QUALIFIÉ.
text_image
Warning sign depicting a lightning bolt symbol inside a triangletext_image
Warning symbol with exclamation mark inside triangle, commonly used for safety alertsnatural_image
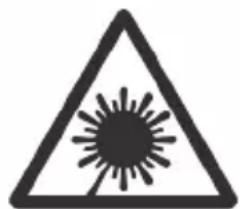
Warning symbol with a triangular triangle containing a black-and-white graphic of a sunburst or explosion (no text or numbers)CLASS 1 LASER PRODUCT
CLASSE 1 – PRODUIT LASER
CE PRODUIT LASER EST DE CLASSE 1. L'UTILISATION DE COMMANDES OU DE REGLAGES AINSI QUE L'EXECUTION DE PROCEDURES AUTRES QUE CELLES SPECIFIEES DANS CE DOCUMENT PEUVENT ENTRAINER UNE EXPOSITION A DES RADIATIONS DANGEREUSES.
MESURES IMPORTANTES DE SECURITE
LIRE LES INSTRUCTIONS SUIVANTES AVANT TOUTE UTILISATION DE L'APPAREIL.
natural_image
Diagram of a battery pack with six cells and two batteries, no text or symbols presenttext_image
Diagram illustrating cleaning and disinfection steps with labeled components and directional arrows
text_image
COMPACT DISC DIGITAL AUDIO
FRANGALS
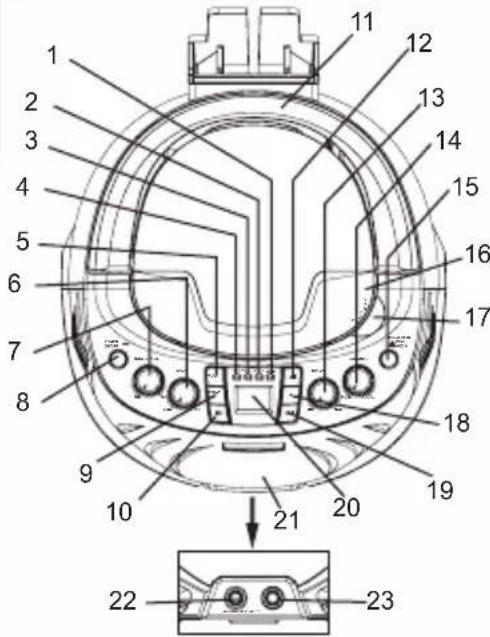
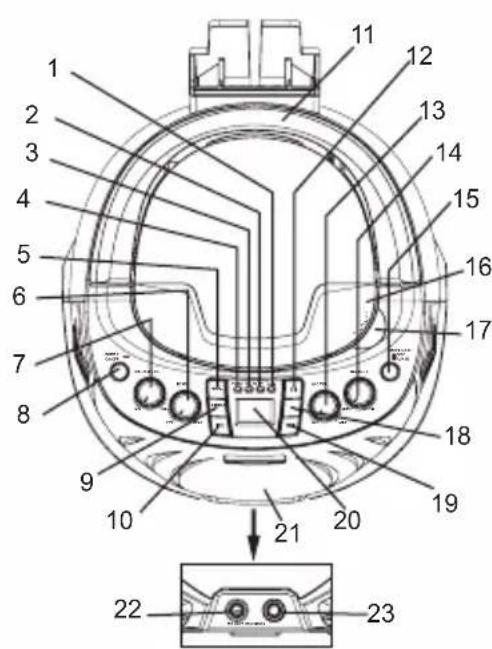
EMPLACEMENT DES TOUCHES
text_image
Technical diagram of a mechanical component with numbered parts and a zoomed-in detail view labeled 21-23.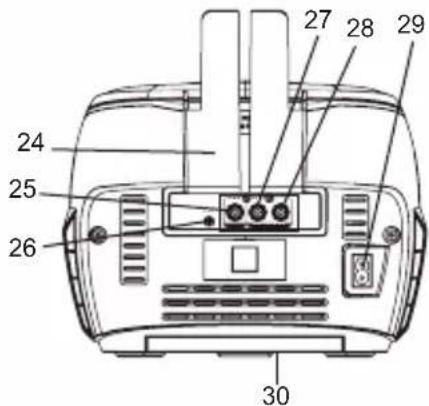
text_image
24 25 26 27 28 29 30Avant
natural_image
Top-down technical diagram of a car dashboard with control knobs and a black arrow pointing to the dashboard (no text or symbols present)natural_image
Front view of a car dashboard with control knobs and a directional arrow indicator (no text or symbols)natural_image
Top-down schematic of a car dashboard with control knobs and a black arrow pointing to the dashboard (no text or symbols present)text_image
Diagram of a car dashboard with numbered control buttons and labeled partsnatural_image
Top-down line drawing of a car dashboard with control knobs and a black arrow pointing to the dashboard (no text or symbols)natural_image
Top-down line drawing of a car dashboard with control knobs and a directional arrow (no text or symbols)natural_image
Diagram of a flashlight with a button and arrow indicating insertion or positioning (no text or symbols)natural_image
Top-down schematic of a car dashboard with control knobs and a black arrow pointing to the dashboard (no text or symbols present)natural_image
Top-down technical diagram of a car dashboard with control knobs and gauges (no text or symbols)natural_image
Diagram of a flashlight with a button and arrow indicating motion (no text or symbols)text_image
Diagram showing connection between a device and a portable electronic device, with an arrow indicating the process.natural_image
Black triangular warning symbol with white lightning bolt symbol (no text)CAUTION
RISK OF ELECTRIC SHOCK
DO NOT OPEN
natural_image
Black triangular warning symbol with exclamation mark (no text or numbers)ENGLISH
CAUTION: TO REDUCE THE RISK OF ELECTRIC SHOCK, DO NOT REMOVE COVER (OR BACK). NO USER-SERVICEABLE PARTS INSIDE. REFER SERVICING TO QUALIFIED SERVICE PERSONNEL.
The graphic symbols at the bottom of the set mean the following:
text_image
Warning sign depicting a lightning bolt symbol inside a triangleDANGEROUS VOLTAGE:
The lightning flash with arrowhead symbol within an equilateral triangle is intended to alert the user to the presence of uninsulated dangerous voltage within the product's enclosure that may be of sufficient magnitude to constitute a risk of electric shock to persons.
text_image
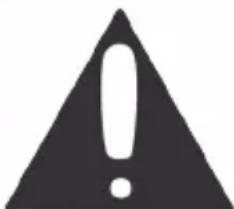
Warning symbol with exclamation mark inside triangle, commonly used for safety alertsATTENTION :
The exclamation point within an equilateral triangle is intended to alert the user to the presence of important operating and maintenance (servicing) instructions in the literature accompanying the appliance.
natural_image
Warning symbol with a triangular triangle containing a black-and-white graphic of a sunburst or explosion (no text or numbers)DANGER :
Invisible and hazardous laser radiation when open and interlock failed or defeated. Avoid direct exposure to beam.
WARNING:
- To reduce the risk of fire or electric shock, do not expose this appliance to rain or moisture.
- The apparatus shall not be exposed to dripping or splashing and that no objects filled with liquids, such as vases, shall be placed on the apparatus.
- The mains plug is used as the disconnect device, the disconnect device shall remain readily operable.
- In order to disconnect the apparatus from the mains completely, the mains plug should be disconnected from the mains socket outlet completely.
SURGE PROTECTORS:
It is recommended to use a surge protector for AC connection. Lightning and power surges ARE NOT covered under warranty for this product.
LASER SAFETY:
This unit employs an optical laser beam system in the CD mechanism, designed with built in safeguards. Do not attempt to disassemble, refer to qualified service personnel. Exposure to this invisible laser light beam may be harmful to the human eye.
CLASS 1 LASER PRODUCT
THIS IS A CLASS-1 LASER PRODUCT. USE OF CONTROLS, OR ADJUSTMENTS OR PROCEDURES OTHER THAN THOSE SPECIFIED HEREIN, MAY RESULT IN HAZARDOUS LASER LIGHT BEAM EXPOSURE.
Invisible laser radiation when open and interlock failed or defeated. Avoid direct exposure to laser beam.
IMPORTANT SAFETY INSTRUCTIONS
PLEASE READ BEFORE OPERATING THIS EQUIPMENT.
Before using the unit, be sure to read all operating instructions carefully. Please note that these are general precautions and may not pertain to your unit.
- Read these instructions.
- Keep these instructions.
- Heed all warnings.
- Follow all instructions
- Do not use this product near water and moisture, for example: near a bathtub, washbowl, kitchen sink or laundry tub; in a wet basement; or near a swimming pool.
- Clean only with a dry cloth. Unplug this product from the wall outlet before cleaning. Do not use liquid cleaners or aerosol cleaners. It may damage the screen.
- Do not block any ventilation openings. Install in accordance with manufacturer's instructions.
- Do not install near any heat sources such as radiators, heat registers, stoves, or other apparatus (including amplifiers) that produce heat.
- Do not defeat the safety purpose of the polarized or grounding type plug. A polarized plug has two blades with one wider than the other. A grounding type plug has two blades and a third grounding prong. The wide blade or the third prong is provided for your safety. If the provided plug does not fit into your outlet, consult an electrician for replacement of the obsolete outlet.
- The socket-outlet shall be installed near the equipment and shall be easily accessible.
-
Protect the power cord from being walked on or pinched particularly at plugs, convenience receptacles, and the point where they exit from the apparatus.
-
Only use attachments/accessories specified by the manufacturer.
- Unplug this apparatus during lightning storms or when unused for long periods of time.
- Refer all servicing to qualified service personnel. Servicing is required when the apparatus has been damaged in any way, such as power-supply cord or plug is damaged, liquid has been spilled or objects have fallen into the apparatus, the apparatus has been exposed to rain or moisture does not operate normally, or has been dropped.
- Do not overload wall outlet. Use only power source as indicated.
- Use replacement parts as specified by the manufacturer.
- Never push objects of any kind into this product through openings as they may touch dangerous voltage points or short out parts that could result in fire or electric shock. Never spill or spray any type of liquid on the product.
- The product may be mounted to a wall only if recommended by the manufacturer.
- Upon completion of any service or repairs to this product, ask the service technician to perform safety checks.
- Only use with the cart, stand, tripod, bracket or table specified by the manufacturer or sold with the apparatus. When a cart is used, use caution when moving the cart/ apparatus combination to avoid injury from tip-over.
- The apparatus should be operated only from the type of power source indicated on the marking label. If you are not sure of the type of power supply to your home, consult your appliance dealer or local power company. For apparatus intended to operate from battery power, or other sources, refer to the operating instructions.
- Do not attempt to service the apparatus yourself as opening or removing covers may expose you to dangerous voltage or other hazards. Refer all servicing to qualified service personnel.
- The apparatus shall not be exposed to dripping or splashing and no object filled with liquids, such as vases, shall be placed on the apparatus.
- Mains plug is used as disconnect device and it should remain readily accessible during intended use. In order to disconnect the apparatus from the mains completely, the mains plug should be disconnected from the main socket outlet completely.
- Minimum distance 10 cm around the apparatus for sufficient ventilation.
- No naked flame sources such as lighted candles should be placed on the apparatus.
- Attention should be drawn to the environmental aspects of battery disposal.
- Use the apparatus in moderate climates.
- Excessive sound pressure from earphones and headphones can cause hearing loss.
- Maximum output voltage: ≤ 150mV.
- Batteries shall not be exposed to excessive heat such as sunshine, fire or the like.
- Caution marking is located at the bottom of the apparatus.
- The marking information is located on the back cover of the apparatus.
UNPACKING THE DEVICE
When unpacking, ensure that the following elements are included:
1 x portable karaoke CD player
1 x microphone
1 x AC cable
1 x AV cable
1 x instruction manual
Note: Remove the shipping protector located inside the CD door before using the unit.
WARNING: All packaging materials, such as tape, plastic sheets, wire ties and tags are not part of this product and should be discarded.
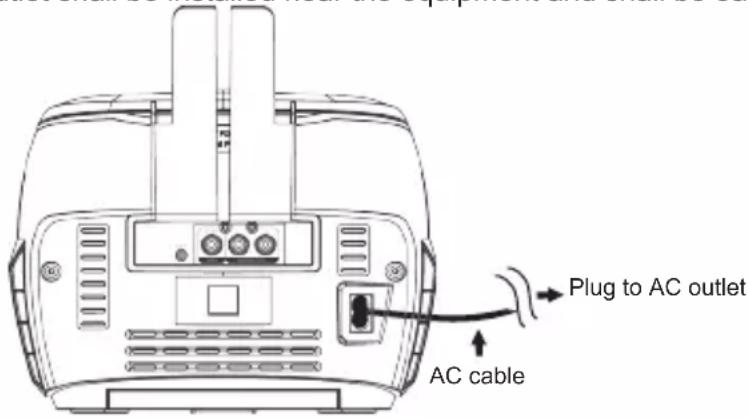
POWER SOURCES
The portable karaoke CD player operates on AC\~230-240V, 50Hz or with 8 x LR14/C size batteries (not included).

AC operation
- Check that the unit is switched off.
- Insert the small end of the AC cord into the AC IN socket at the back of the unit.
- Plug the other end of the AC cord into any convenient AC\~230-240V, 50Hz power outlet.
POWER SOURCES (CONTINUED)
NOTE:
- Only use the adapter supplied with the product. Do not use other adapter.
- The socket-outlet shall be installed near the equipment and shall be easily accessible.
text_image
Plug to AC outlet AC cable23
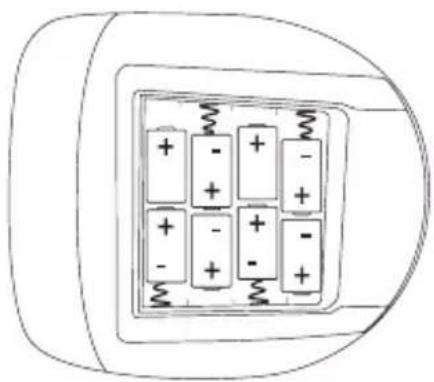
Batteries installation
-
To install the batteries, open the battery compartment located at the bottom of the unit by pressing on the arrows and then sliding it off in the direction indicated.
-
Insert 8 × LR14/C = size batteries (not included) observing the polarity indicated in the battery compartment, and as per the diagram shown below.
ENGLISH
natural_image
Diagram of a battery pack with multiple batteries and coil, no text or symbols present- Replace the battery compartment cover.
Note: The AC adapter must be disconnected from the DC socket on the rear of the unit in order for the product to operate on battery power.
Non-rechargeable batteries are not to be recharged. Rechargeable batteries are to be removed from the product before being charged. Rechargeable batteries are only to be charged under adult supervision. Different types of batteries or new and used batteries are not to be mixed. Only batteries of the same or equivalent type as recommended are to be used. Batteries are to be inserted with the correct polarity. Exhausted batteries are to be removed from the product. The supply terminals are not to be short circuited. Do not throw batteries into a fire. Remove the batteries if you are not going to use the unit for a long period of time.
WARNING: Malfunction or loss of memory may be caused by strong frequency interference or electrostatic discharge. Should any abnormal function occur, remove the batteries and insert them again, or unplug the AC cable from the mains socket and re-plug it again.
CARE AND MAINTENANCE
Caring for discs
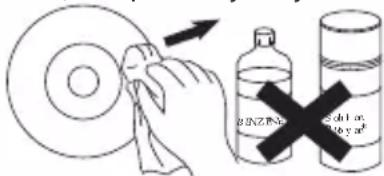
- Treat the disc carefully. Handle the disc only by its edges. Never allow your fingers to come in contact with the shiny, unprinted side of the disc.
- Do not attach adhesive tape, stickers, etc. to the disc label.
- Clean the disc periodically with a soft, lint-free, dry cloth. Never use detergents or abrasive cleaners to clean the disc. If necessary, use a CD cleaning kit.
- If a disc skips or gets stuck on a section of the disc, it is probably dirty or damaged (scratched).
- When cleaning the disc, wipe in straight lines from the centre of the disc to the outer edge of the disc. Never wipe in circular motions.
- This unit is designed to play only compact discs bearing the identification logo as shown here. Other discs may not conform to the CD standard and may not play properly.
- Discs should be stored in their cases after each use to avoid damage.
- Do not expose discs to direct sunlight, high temperatures or dust, etc.
- Prolonged exposure or extreme temperatures can warp the disc.
- Do not stick or write anything on either side of the disc. Sharp writing instruments, or ink, may damage the surface.
Cleaning the unit
- To prevent fire or shock hazard, disconnect your unit from the power source when cleaning.
- If the cabinet becomes dusty, wipe it with a soft, dry dust cloth. Do not use any wax, polish sprays or abrasive cleaners on the cabinet.
- Never allow any water or other liquids to get inside the unit while cleaning.

text_image
BUNZEN Sed on Baby's
text_image
COMPACT DISC DIGITAL AUDIO
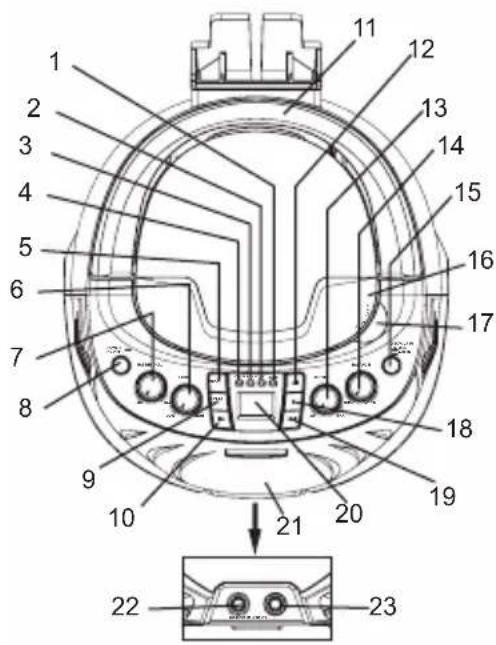
LOCATION OF CONTROLS
ENGLISH
text_image
Technical diagram of a mechanical component with numbered parts and a magnified inset showing internal structure.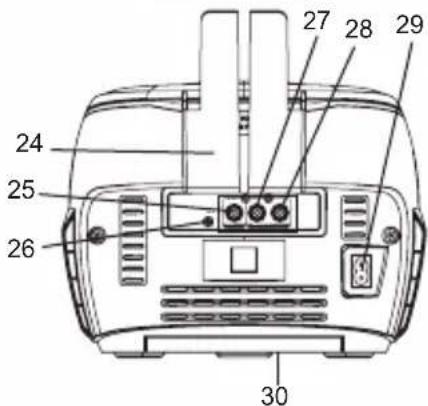
text_image
24 25 26 27 28 29 30Front
- PLAY/PAUSE button
- REPEAT indicator
- PROGRAM indicator
- POWER indicator
- PROGRAM button
- ECHO control knob
- MASTER VOLUME control knob
- POWER button
- REPEAT button
- REWIND/SKIP button
- Carrying handle
- PLAY/PAUSE button▶II
- MICROPHONE VOLUME control knob
- BALANCE control knob
- DISC/AUX IN button
- CD door
- CD OPEN tab
- STOP button
- F.FWD/SKIP button
- LCD display
- Speaker
- MICROPHONE INPUT 1 jack
- MICROPHONE INPUT 2 jack
Back
- Docking station
- VIDEO out jack
- AUX IN jack
- AUDIO OUTPUT (right) jack
- AUDIO OUTPUT (left) jack
- AC-IN jack
- Battery compartment (bottom of unit)
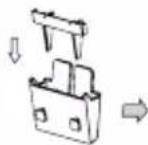
USING THE DOCKING STATION
Fix the docking station to the back of the unit where two holes are located.
A. Place your device in the docking station.
B. Make sure the rectangular part faces the back of the unit when inserting the docking insert. Push the insert down to lock it and then place your device in the docking station.
For ROUND bottom devices
For FLAT bottom devices
A
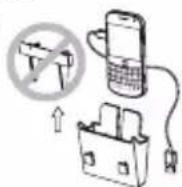
B
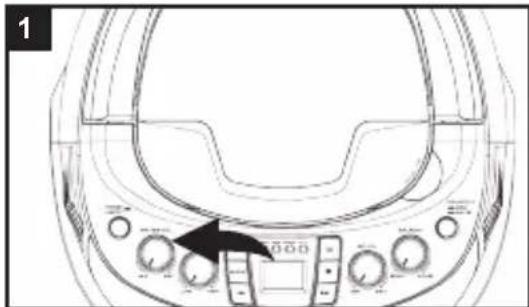
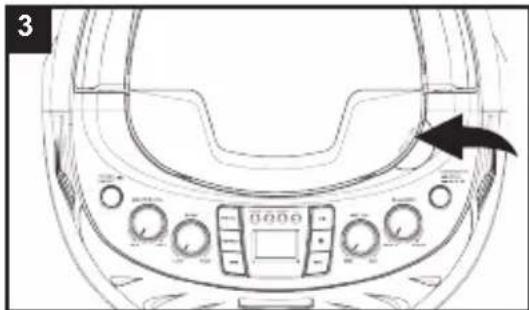
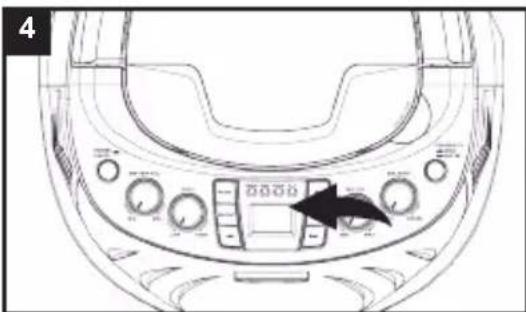
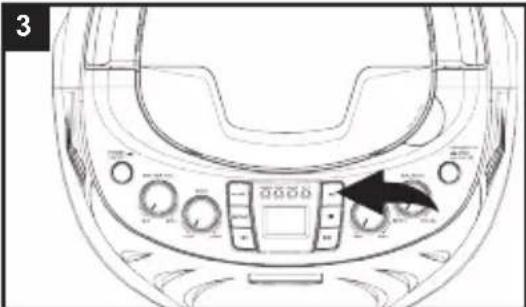
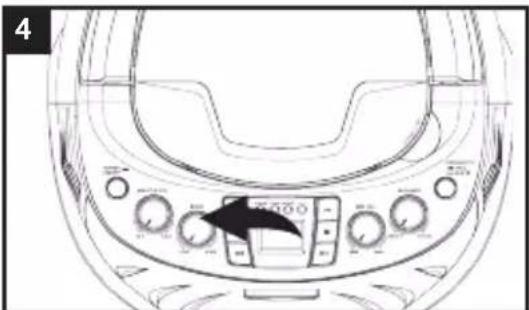
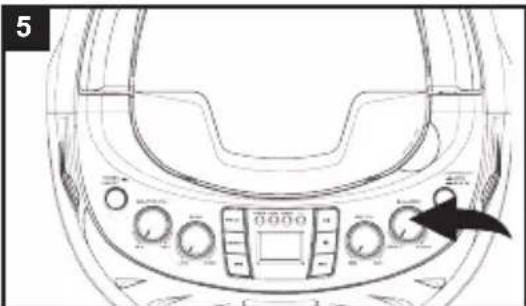
CD OPERATION
To insert and play a CD
natural_image
Top-down line drawing of a car dashboard with control knobs and buttons (no text or symbols)Set the VOLUME control to a low setting.

natural_image
Top-down schematic of a car dashboard with control knobs and a black arrow pointing to the dashboard (no text or symbols)Press the POWER button to turn the unit on.
natural_image
Top-down line drawing of a car dashboard with control knobs and a black arrow pointing to the side panel (no text or symbols)Lift up the CD OPEN tab to open the CD door. Insert a disc onto the centre spindle (label side up) and push down gently to make sure it is securely on the spindle. Close the CD door.
natural_image
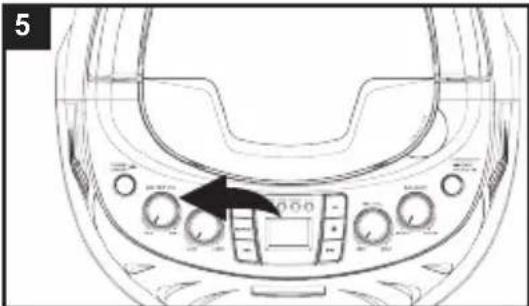
Top-down technical diagram of a car dashboard with control knobs and a central touchscreen display (no text or symbols)The unit displays the total number of tracks. Press the PLAY/PAUSE button to play the first track. The Play icon will light and steady.
text_image
5 0.00Adjust the MASTER VOL. control as desired.
ENGLISH
text_image
6 2 1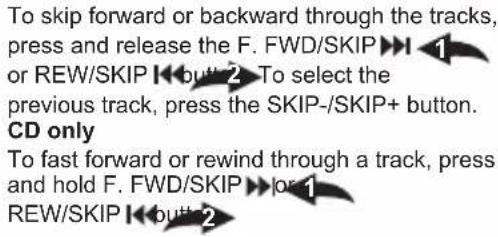
text_image
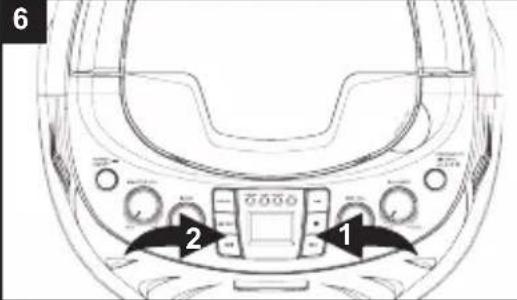
To skip forward or backward through the tracks, press and release the F. FWD/SKIP ➕ I 1 or REW/SKIP ➕ butt 2 To select the previous track, press the SKIP-/SKIP+ button. CD only To fast forward or rewind through a track, press and hold F. FWD/SKIP ➕ or 1 REW/SKIP ➕ butt 2
natural_image
Top-down line drawing of a car dashboard with control knobs and gauges (no text or symbols)Press the PLAY/PAUSE button to pause play at any time. Press it again to continue playing. The PLAY/PAUSE indicator blinks during pause mode.

natural_image
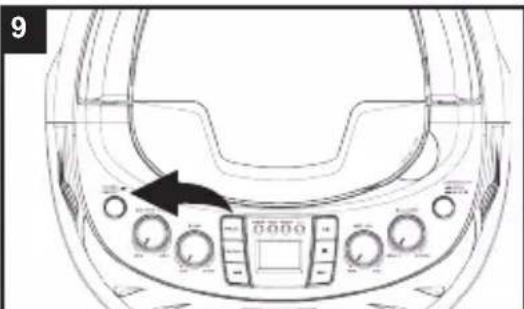
Front view of a car dashboard with control knobs and a black arrow pointing to the dashboard (no text or symbols visible)Press the STOP button ■ to stop the disc at any time.
natural_image
Top-down line drawing of a car dashboard with control knobs and a black arrow pointing to the dashboard (no text or symbols)To turn the unit off, press the POWER button.

CD playback notes:
- The unit can play standard CDs or 3" singles.
- If a disc is inserted incorrectly, dirty or damaged, it will not play.
- As each track is played, the track number is shown on the display.
- To prevent damage to the disc, never open the CD door while the disc is rotating. Wait for the disc to stop before opening the CD door. Never touch the lens when the CD door is open.
- Do not use the carrying handle when playing a CD. The CD should only be used on a steady surface.
- Although this unit can read CD-R and CD-RW discs, in addition to normal CDs, the playability of those discs may be affected by the type of software that was used to create the discs, as well as the blank media you are using. 100% playability cannot be guaranteed. This is not an indication of a problem with this unit.

natural_image
Color bar with grayscale gradient and a central crosshair symbol (no text or labels)To repeatedly play 1 or all tracks
text_image
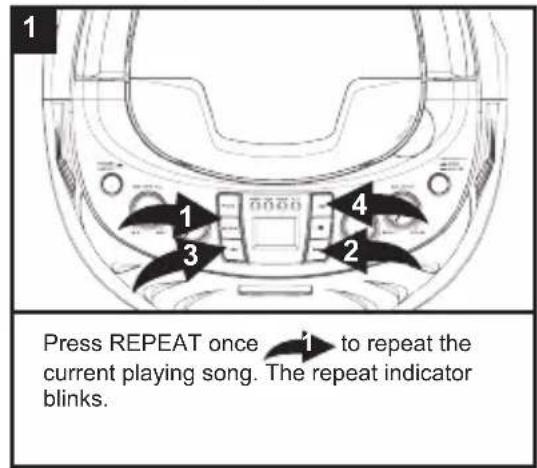
1 Press REPEAT once 1 to repeat the current playing song. The repeat indicator blinks.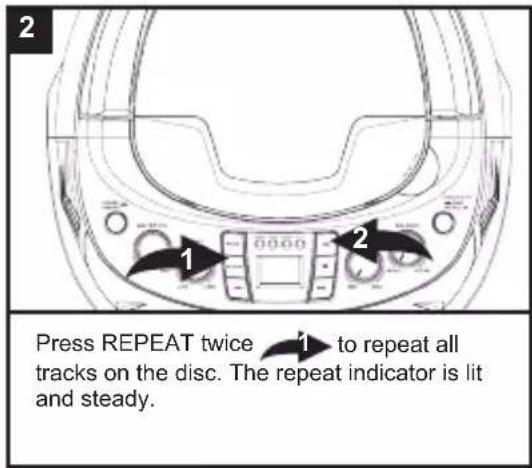
text_image
2 1 2 Press REPEAT twice 1 to repeat all tracks on the disc. The repeat indicator is lit and steady.HSIT9NE
text_image
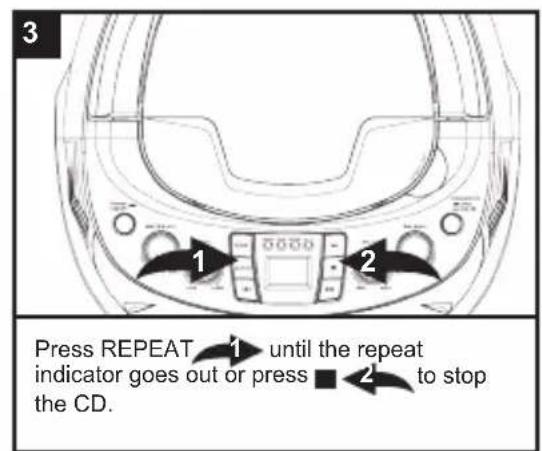
Press REPEAT until the repeat indicator goes out or press to stop the CD.CD PROGRAMMED PLAY
To programme the memory (up to 20 tracks)

text_image
1 2 3 1Press SKIP ▶ 1 or 2 to select a track and then press PROG 3. Repeat this step to programme up to 20 tracks.
natural_image
Top-down schematic of a car dashboard with control knobs and a black arrow pointing to the dashboard (no text or symbols present)Press ▶to play the programmed list.
You can use ▶ or to skip through your programmed tracks.
You can press REPEAT twice during play to repeat all of your programmed tracks. The unit will keep playing until you press ■
In Programmed mode, the unit will keep playing until you press the STOP button.
natural_image
Top-down schematic of a car dashboard with control knobs and a black arrow pointing to the dashboard (no text or symbols)Press ■ to stop the disc at any time.
Press ■ while in the Stop mode to clear the programmed tracks.
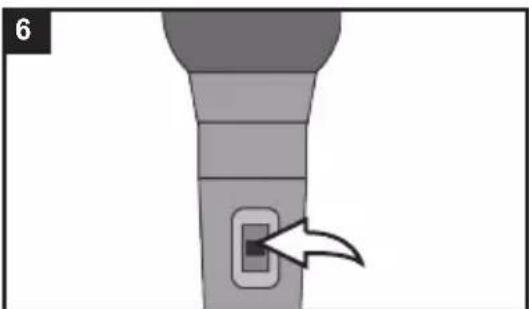
KARAOKE FUNCTION
natural_image
Diagram of a device with a connector and cable, no text or symbols presentConnect the microphone jack to the microphone 1 or 2 socket on the karaoke player. Make sure the VOLUME control is turned to a low setting.
natural_image
Diagram of a flashlight with a button and arrow indicating insertion or positioning (no text or symbols)Slide the microphone switch to the ON position. To turn the microphone off, simply slide the switch to the OFF position.
natural_image
Top-down view of a car dashboard with control knobs and a black arrow pointing to the dashboard (no text or symbols visible)Press ▶to start playing the CD. Note: All CD functions such as fast forward, rewind, pause, repeat and programming work as normal when using the karaoke function.
natural_image
Top-down schematic of a car dashboard with control knobs and a central touchscreen display (no text or symbols)Rotate the ECHO control left to decrease the echo and right to increase it.

natural_image
Top-down schematic of a car dashboard with control knobs and a black arrow pointing to the dashboard (no text or symbols present)If you are using a multiplex CD you can adjust the balance by turning the BALANCE control to change the volume level of the singer. If you turn the control to the left, you can mute the CD singer so that when you start singing only your voice can be heard. If you turn it to the right, the vocal tracks will play at the normal volume.
natural_image
Diagram of a flashlight with a button and arrow indicating insertion or movement (no text or symbols)When you have finished using the karaoke, remember to turn the microphone off by sliding the switch to the OFF position.
Note:
• To avoid feedback noise such as a screeching sound, keep the microphone away from the speaker or reduce the volume level until the noise disappears.
- If you are using a multiplex CD, make sure the BALANCE control is set to the centre position so you can hear both the vocal and music tracks at an equal level.
CONNECTING TO YOUR TV AND OTHER SPEAKERS
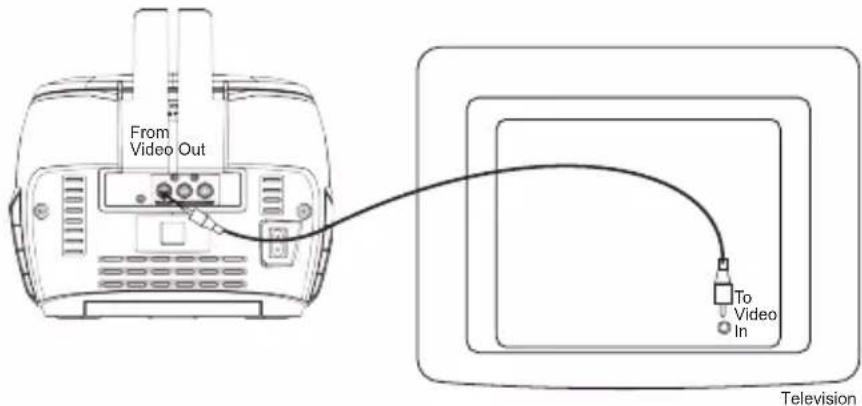
You can connect your karaoke machine to the TV and play special CD+G (Graphics) discs so you read the lyrics onscreen. You can also connect your karaoke player to other types of speakers.
Check your special karaoke compact disc has the CD+G mark on it.

Using your TV screen and karaoke machine speakers

text_image
From Video Out To Video In TelevisionConnect the video jacks (yellow RCA plugs) to the karaoke player and TV. Note: Your TV player must have an RCA type Video Input jack. You cannot connect it to the TV's aerial terminal.

natural_image
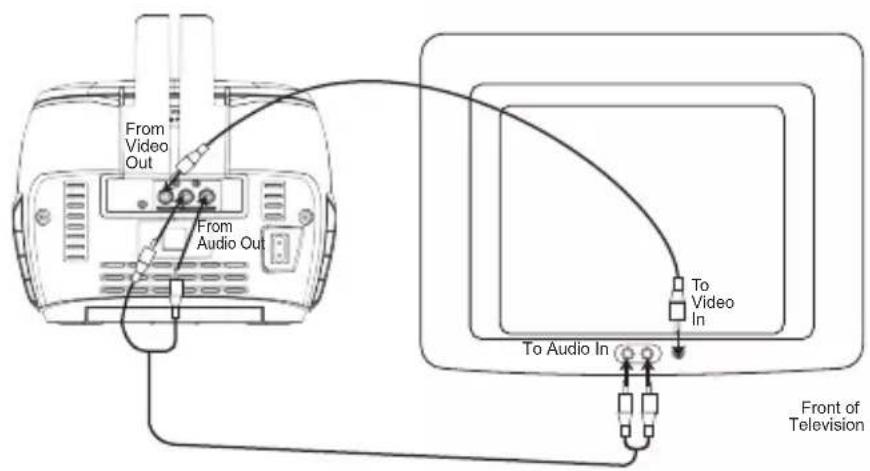
Color bar with grayscale gradient and a central crosshair symbol (no text or labels)Using your TV screen and speakers
text_image
From Video Out From Audio Out To Video In To Audio In Front of TelevisionHSIT9NE
To use the speakers on your TV instead of your karaoke machine, connect the audio jacks (red and white RCA plugs) to your karaoke player and TV.
Note: If you have a mono TV set with only one audio in jack, you may need to buy a 'Y' adapter (stereo to mono) from your local electronics accessories store to combine the left and right stereo channels into a mono channel.
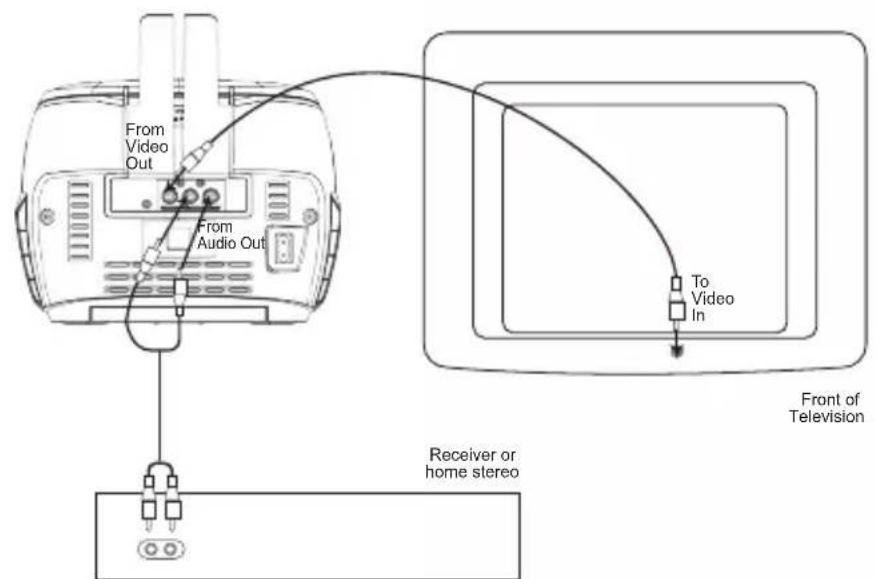
Using your TV screen and home stereo speakers
text_image
From Video Out From Audio Out To Video In Front of Television Receiver or home stereoNote: The use of smart devices or MP3/MP4 players disables the video function.
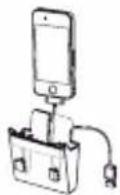
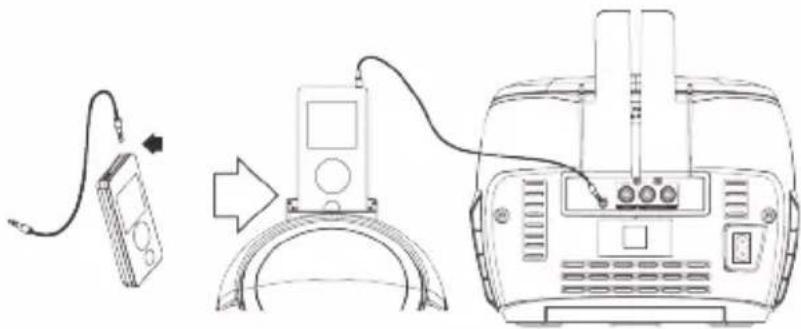
CONNECTING YOUR PERSONAL DEVICE TO THE KARAOKE PLAYER
natural_image
Diagram showing a device connected to an electronic device via cable, with no visible text or symbols.ENGLISH
Connect one end of an AUX cable (not included) to your personal electronic device. Steady your personal device on top of the docking station and plug the other end of the AUX cable to the AUX IN jack located at the back of the Karaoke player.
Turn the karaoke on, then press the DISC/AUX IN button to select the AUX IN mode. Access the music folder of the personal device and press PLAY to play audio files through the Karaoke's speaker.
Note: Please refer to the manual of your electronic device for more information on how to play audio files.
TROUBLESHOOTING GUIDE
| SYMPTOM CAUSE | SOLUTION | |
| Compact Disc Player | ||
| CD will not play. Disc | inserted incorrectly. Insert disc with label side up. | |
| Disc is dirty, scratched or has moisture on it. | Wipe disc with a soft, clean cloth. | |
| AC adapter not connected or batteries are low. | Check the AC adapter connection or insert new batteries. | |
| CD skips while playing. | CD compartment not closed. Close | CD compartment. |
| Disc inserted incorrectly. Insert disc with label side up. | ||
| Disc is dirty, scratched or has moisture on it. | Wipe disc with a soft, clean cloth. | |
| No sound. AC adapter not connected or batteries are low. | Check the AC adapter connection or insert new batteries. | |
| Volume is too low. Turn up the volume. | ||
| Karaoke | ||
| Some vocals can be heard when Auto Voice Control is muted. | You can hear the backup vocals. | This is normal, only the main vocal(s) are to be reduced. |
| Feedback happens when singing. | The microphone(s) are too close to the unit or the microphone volume is too high. | Move the microphone(s) away from the unit or decrease the microphone volume. |
| I cannot hear myself on the microphone. | The microphone is not securely plugged in or turned on. | Check the microphone cable is plugged in correctly and that the switch on the microphone is turned to ON. |
| The volume is too low. Turn up the | MICROPHONE VOLUME control. | |
| Words do not appear on the TV screen. | Using a non-CD+G disc. Check the logo matches the CD+G disc displayed in this manual. If it doesn't have the logo, change to a CD that has the CD+G logo. | |
| Video cable is incorrectly connected to TV. | Check connection. | |
| Source is not selected on TV. Change TV source to match the location of the karaoke connection (i.e. VIDEO 1). | ||
SPECIFICATIONS
General
AC/DC Adaptor ...... Input AC\~230-240V, 50Hz
(1.5V LR4/C size batteries x 8, not included)
Speaker 2 x 2W, 8 Ohms
Output power 2 x 1W
Dimensions 22.4 (W) x 23.8 (L) x 16.7 (H) cm
Weight 1.65kg (microphone + docking station included)
CD section
Disc diameter.... 4.72" (120mm) 3.15" (80mm) Single CD
Optical source...... Semiconductor laser
MAINTENANCE
To prevent fire or shock hazard, disconnect your unit from the power source when cleaning. The finish on your unit may be cleaned with a dust cloth and cared for as other furniture. Use a soft, clean cloth moistened with plain, lukewarm water to clean the exterior of the unit. Use caution when cleaning and wiping the plastic parts. Mild soap and a damp cloth may be used on the front panel.
WARRANTY
ENGLISH
This product is covered by our 2-years warranty.
For any claim under the warranty or after sale service, please contact your distributor and present a valid proof of purchase. Our warranty covers any manufacturing material and workmanship defect, with the exception of any deterioration arising from the non-observance of the instruction manual or from any careless action implemented on this item (such as dismantling, exposition to heat and humidity, etc.). It is recommended to keep the packaging for any further reference.
In a bid to keep improving our services, we could implement modification on the colours and the details of the product shown on the packaging.
NOTE: Please keep this instruction manual, it contains important information.

Reference: K7000series
Designed and developed in Europe – Made in China
© 2014 LEXIBOOK®
United Kingdom & Ireland
For any further information, please call Helpline: 0808 1003015
www.lexibook.com
This product is not a toy.

Environmental Protection
Unwanted electrical appliances can be recycled and should not be discarded along with regular household waste! Please actively support the conservation of resources and help protect the environment by returning this appliance to a collection centre (if available).

natural_image
Black triangular warning sign with white lightning bolt symbol (no text)PRECAUCIÓN
RIESGO DE DESCARGA ELÉCTRICA NO ABRIR
natural_image
Black triangular warning symbol with exclamation mark (no text or numbers)text_image
Warning sign depicting a lightning bolt symbol in a triangular warning triangletext_image
Warning symbol with exclamation mark inside triangle, commonly used for safety alertsnatural_image
Warning symbol with a triangular triangle containing a black-and-white graphic of a sunburst or explosion (no text or numbers)CLASS 1 LASER PRODUCT
ESTE ES UN PRODUCTO LÁSER DE CLASE 1. EL USO DE CONTROLES, AJUSTES O PROCEDIMIENTOS DISTINTOS DE LOS QUE SE DESCRIBEN EN ESTE MANUAL, PUEDEN SER CAUSA DE EXPOSICIÓN PELIGROSA AL RAYO LÁSER.
natural_image
Diagram of a battery pack with six cells and four batteries, no text or symbols presenttext_image
COMPACT DISC DIGITAL AUDIO
text_image
Technical diagram of a mechanical component with numbered parts and a zoomed-in view for detail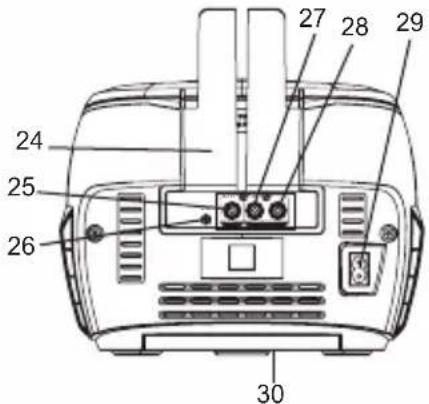
text_image
24 25 26 27 28 29 30natural_image
Top-down technical line drawing of a car dashboard with control knobs and gauges (no text or symbols)natural_image
Top-down technical diagram of a car dashboard with control knobs and a directional arrow indicator (no text or symbols)natural_image
Top-down view of a car dashboard with control knobs and a black arrow pointing to the dashboard (no text or symbols visible)text_image
Diagram of a car dashboard with numbered control buttons labeled 1, 2, and 3natural_image
Top-down technical line drawing of a car dashboard with control knobs and a black arrow pointing to the dashboard (no text or symbols)natural_image
Top-down technical diagram of a car dashboard with control knobs and a central touchscreen (no text or symbols)natural_image
Diagram of a device with a connector and cable, no text or symbols presentnatural_image
Diagram of a flashlight with a button and arrow indicating motion (no text or symbols)natural_image
Top-down schematic of a car dashboard with control knobs and a central touchscreen display (no text or symbols)natural_image
Top-down line drawing of a car dashboard with control knobs and a black arrow pointing to the dashboard (no text or symbols)natural_image
Illustration of a flashlight with a button and an arrow pointing to it (no text or symbols)text_image
Diagram showing a device connected to an electronic device via cable, with an arrow indicating the process.natural_image
Black triangular warning sign with white lightning bolt symbol (no text)CUIDADO
RISCO DE CHOQUE
ELÉCTRICO NÃO ABRIR
natural_image
Black triangular warning symbol with exclamation mark (no text or numbers)CUIDADO: PARA REDUZIR O RISCO DE CHOQUE ELÉCTRICO, NÃO RETIRE A COBERTURA DIANTEIRA OU TRASEIRA. NÃO EXISTEM PEÇAS QUE POSSAM SER REPARADAS PELO UTILIZADOR NO INTERIOR. A REPARAÇÃO DEVERÁ SER FEITA POR PESSOAL QUALIFICADO.
text_image
Warning sign depicting a lightning bolt symbol in a triangular hazard triangletext_image
Warning symbol image with exclamation mark inside trianglenatural_image
Warning symbol with a triangular triangle containing a central sunburst pattern (no text or numbers)CLASS 1 LASER PRODUCT
ESTE É UM PRODUTO A LASER DE CLASSE 1. A UTILIZAÇÃO DE CONTROLOS, AJUSTES OU PROCEDIMENTOS PARA ALÉM DOS AQUI ESPECIFICADOS PODE DAR ORIGEM A UMA EXPOSIÇÃO PERIGOSA AO RAIO LASER.
INSTRUÇÕES IMPORTANTES DE SEGURANÇA
PORTUGUES
POR FAVOR, LEIA ANTES DE UTILIZAR ESTE EQUIPAMENTO.
text_image
PORTUGUÊSFuncionamento AC
natural_image
Diagram of a battery pack with multiple cells and two batteries, no text or symbols presenttext_image
SENZIN Sed in Baby'stext_image
COMPACT DISC DIGITAL AUDIOtext_image
Technical diagram of a mechanical component with numbered parts and a zoomed-in view labeled 21-23.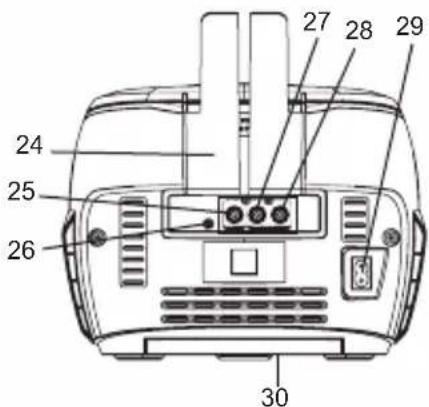
text_image
24 25 26 27 28 29 30natural_image
Top-down technical line drawing of a car dashboard with control knobs and gauges (no text or symbols)natural_image
Top-down schematic of a car dashboard with control knobs and a black arrow pointing to the dashboard (no text or symbols present)natural_image
Top-down schematic of a car dashboard with control knobs and a black arrow pointing to the dashboard (no text or symbols)natural_image
Top-down line drawing of a car dashboard with control knobs and a black arrow pointing to the dashboard (no text or symbols)natural_image
Top-down technical diagram of a car dashboard with control knobs and a directional arrow indicator (no text or symbols)natural_image
Diagram showing a device with a connector and directional arrow, no text or symbols presentnatural_image
Diagram of a flashlight with a button and arrow indicating direction (no text or symbols)natural_image
Top-down schematic of a car dashboard with control knobs and a directional arrow (no text or symbols)natural_image
Top-down technical diagram of a car dashboard with control knobs and gauges (no text or symbols)natural_image
Diagram of a flashlight with a button and arrow pointing to it (no text or symbols)text_image
PORTUGUÊStext_image
PORTUGUÊS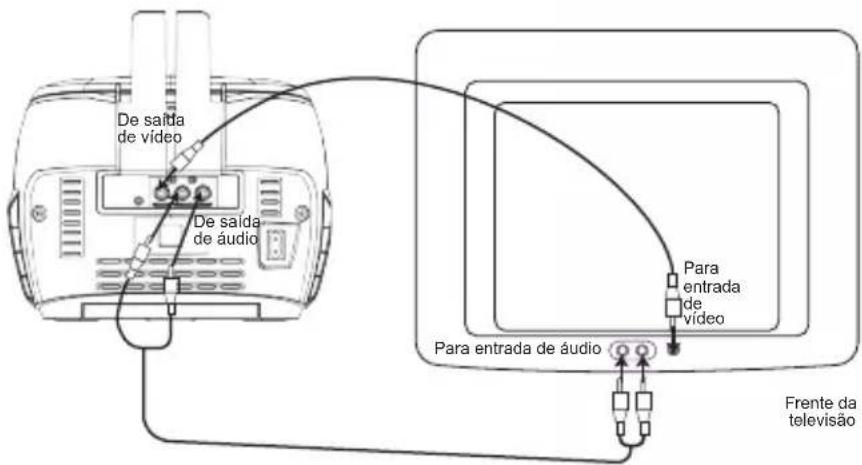
text_image
Diagram showing a device connected to an electronic device via cable, with an arrow indicating the process.natural_image
Black triangular warning sign with a lightning bolt symbol (no text)ATTENZION
PERICOLO DI SCOSSA ELETTRICA NON APRIRE

natural_image
Black triangular warning symbol with exclamation mark (no text or numbers)ATTENZIONE: PER RIDURRE IL RISCHIO DI SCOSSA ELETTRICA: NON RIMUOVERE IL COPERCHIO (O LA PARTE POSTERIORE). ALL'INTERNO NON SONO PRESENTI PARTI SOSTITUIBILI DALL'UTENTE. PER EVENTUALI MANUTENZIONI, RIVOLGERSI A PERSONALE DI ASSISTENZA QUALIFICATO.
text_image
Warning sign depicting a lightning bolt symbol inside a triangletext_image
Warning symbol image with exclamation mark inside trianglenatural_image
Warning symbol with a triangular triangle containing a central explosion or virus-like pattern (no text or numbers)CLASS 1 LASER PRODUCT
PRODOTTO LASER CLASSE 1
SI TRATTA DI UN PRODOTTO LASER DI CLASSE 1. L'UTILIZZO DI
CONTROLLI O REGOLAZIONI O PROCEDURE DIVERSE DA QUELLE QUI SPECIFICATE PUÒ PROVOCARE ESPOSIZIONE PERICOLOSA AI RAGGI LASER.
IMPORTANTI ISTRUZIONI DI SICUREZZA
LEGGERE PRIMA DI UTILIZZARE L'APPARECCHIO.
natural_image
Diagram of a battery pack with six cells, each containing a battery and two connected by a resistor (no text or symbols)text_image
BUNZIN Sed in Baby's
text_image
COMPACT DISC DIGITAL AUDIOPulizia dell'unità
text_image
Technical diagram of a mechanical component with numbered parts and a magnified inset showing internal structure.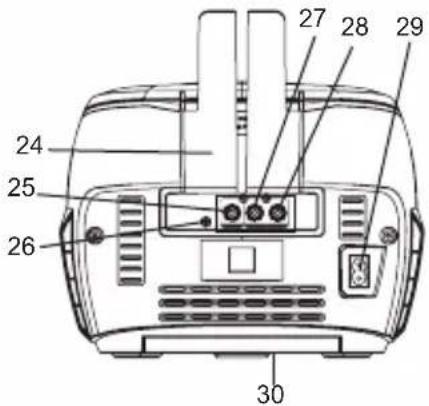
text_image
24 25 26 27 28 29 30Parte anteriore
natural_image
Top-down technical diagram of a car dashboard with control knobs and buttons (no text or labels)natural_image
Top-down schematic of a car dashboard with control knobs and a black arrow pointing to the dashboard (no text or symbols present)natural_image
Top-down technical diagram of a car dashboard with control knobs and a black arrow pointing to the side panel (no text or symbols present)natural_image
Top-down technical diagram of a robotic car dashboard with control knobs and a central touchscreen display (no text or symbols)natural_image
Top-down technical diagram of a car dashboard with control knobs and a black arrow pointing to the dashboard (no text or symbols present)natural_image
Top-down technical line drawing of a car dashboard with control knobs and a central touchscreen (no text or symbols)natural_image
Top-down schematic of a car dashboard with control knobs and a black arrow pointing to the dashboard (no text or symbols present)natural_image
Top-down view of a car dashboard with control knobs and a black arrow pointing to the dashboard (no text or symbols visible)natural_image
Color bar with grayscale gradient and a central crosshair symbol (no text or labels)ASCOLTO PROGRAMMATO DEL CD
text_image
Diagram of a car dashboard with numbered parts labeled 1, 2, and 3 pointing to key controls.natural_image
Top-down line drawing of a car dashboard with control knobs and a black arrow pointing to the dashboard (no text or symbols)natural_image
Top-down schematic of a car dashboard with control knobs and a central touchscreen display (no text or symbols)natural_image
Diagram showing a device connected to a control panel with an arrow indicating direction (no text or symbols present)natural_image
Diagram of a flashlight with a button and arrow indicating action (no text or symbols)natural_image
Top-down schematic of a car dashboard with control knobs and a central touchscreen display (no text or symbols)natural_image
Top-down line drawing of a car dashboard with control knobs and a black arrow pointing to the dashboard (no text or symbols)natural_image
Illustration of a flashlight with a button and an arrow pointing to it (no text or symbols)text_image
Diagram showing a device connected to an electronic device via cable, with an arrow indicating the process.ITALANO
natural_image
Black triangular warning sign with a lightning bolt symbol (no text)CAUTION
natural_image
Black triangular warning symbol with exclamation mark (no text or numbers)text_image
Warning sign depicting a lightning bolt symbol inside a triangletext_image
Warning symbol with exclamation mark inside triangle, commonly used for safety alertsnatural_image
Warning symbol with a triangular triangle containing a black-and-white graphic of a sunburst or explosion (no text or numbers)CLASS 1 LASER PRODUCT
natural_image
Diagram of a battery pack with multiple cells and two batteries, no text or symbols presenttext_image
Diagram illustrating a cleaning or disinfection procedure with labeled components and a crossed-out bottle marked 'Soll on Baby's'
text_image
COMPACT DISC DIGITAL AUDIOPOSITIONEN DER BEDIENELEMENTE
Vorderseite
text_image
Technical diagram of a mechanical component with numbered parts and a zoomed-in view labeled 21-23.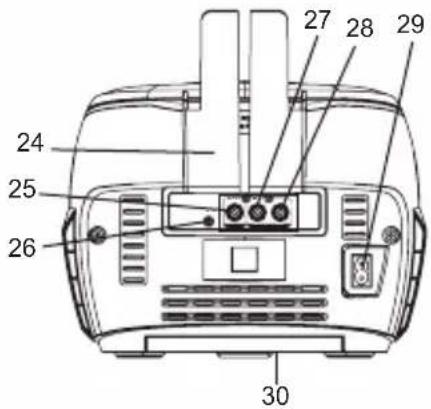
text_image
24 25 26 27 28 29 30natural_image
Top-down technical diagram of a car dashboard with control knobs and a black arrow pointing to the dashboard (no text or symbols present)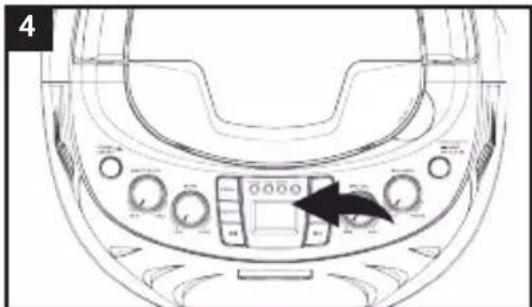
natural_image
Top-down technical diagram of a car dashboard with control knobs and a black arrow pointing to the dashboard (no text or symbols present)natural_image
Top-down technical line drawing of a car dashboard with control knobs and gauges (no text or symbols)natural_image
Top-down schematic of a car dashboard with control knobs and a black arrow pointing to the dashboard (no text or symbols)natural_image
Top-down technical diagram of a car dashboard with control knobs and a black arrow pointing to the dashboard panel (no text or symbols present)natural_image
Top-down view of a car dashboard with control knobs and a rotary dial (no text or symbols visible)natural_image
Diagram of a device with a connector and cable, no text or symbols presentnatural_image
Diagram of a flashlight with a button and arrow indicating motion (no text or symbols)natural_image
Top-down line drawing of a car dashboard with control knobs and a black arrow pointing to the dashboard (no text or symbols)natural_image
Top-down technical diagram of a car dashboard with control knobs and a directional arrow (no text or symbols)natural_image
Top-down line drawing of a car dashboard with control knobs and a black arrow pointing to the dashboard (no text or symbols)natural_image
Illustration of a flashlight with a button and an arrow pointing to it (no text or symbols)text_image
Diagram showing a device connected to an electronic device via cable, with an arrow indicating the connection point.natural_image
Black triangular warning sign with white lightning bolt symbol (no text)CAUTION
RISK OF ELECTRIC SHOCK DO NOT OPEN

natural_image
Black triangular warning symbol with exclamation mark (no text or numbers)NEDERLANDS
LET OP: OM HET RISICO VAN EEN ELEKTRISCHE SCHOK TE VERMINDEREN, VERWIJDER DE BEHUIZING (ACHTERKANT) NIET. IN HET APPARAAT ZITTEN GEEN ONDERDELEN DIE DOOR DE GEBRUIKER GEREPAREERD ZOUDEN KUNNEN WORDEN. LAAT REPARATIES UITVOEREN DOOR GEKWALIFICEERD PERSONEEL.
text_image
Warning sign depicting a lightning bolt symbol inside a triangletext_image
Warning symbol with exclamation mark inside triangle, commonly used for safety alertsnatural_image
Warning symbol with a triangular triangle containing a central sunburst pattern (no text or numbers)CLASS 1 LASER PRODUCT
KLASSE 1 LASERPRODUCT
DIT IS EEN KLASSE-1 LASERPRODUCT. ANDERE BEDIENINGEN, AANPASSINGEN OF WERKWIJZEN DAN HIERIN BESCHREVEN, KAN BLOOTSTELLING AAN DE SCHADELIJKE LASERSTRAAL TOT GEVOLG HEBBEN.
BELANGRIJKE VEILIGHEIDSINSTRUCTIES
GELIEVE TE LEZEN ALVORENS DIT APPARAAT TE GEBRUIKEN.
natural_image
Diagram of a battery pack with multiple cells and two batteries, no text or symbols presenttext_image
BUNZIN Sed in Baby's
text_image
COMPACT DISC DIGITAL AUDIOtext_image
Technical diagram of a device with numbered components and labeled parts, including top and side views.Voorzijde
- AFSPELEN/PAUZE controlelampje
- REPEAT (HERHALEN) controlelampje
- PROGRAM (PROGRAMMA) controlelampje
- AAN/UIT controlelampje
- PROGRAM (PROGRAMMA) knop
- ECHO regelaar
- MASTER VOLUME regelaar
- STROOM knop
- REPEAT (HERHALEN) knop
- TERUGSPOELEN/OVERSLAAN knop
- Transporthandvat
- AFSPELEN/PAUZE knop
- MICROFOONVOLUME regelaar
- BALANCE (BALANS) regelaar
- DISC/AUX IN knop
- CD-klepje
- CD OPEN lipje
- STOP knop ■
- DOORSPOELEN/OVERSLAAN) knop
- Scherm
- Luidspreker
- Microfoonaansluiting 1
- Microfoonaansluiting 2
Achterzijde
natural_image
Top-down line drawing of a car dashboard with control knobs and a black arrow pointing to the dashboard (no text or symbols)natural_image
Top-down technical diagram of a car dashboard with control knobs and a black arrow pointing to the dashboard (no text or symbols present)natural_image
Top-down technical diagram of a car dashboard with control knobs and a directional arrow (no text or symbols)natural_image
Top-down technical diagram of a car dashboard with control knobs and a black arrow pointing to the dashboard (no text or symbols present)natural_image
Top-down schematic of a car dashboard with control knobs and a black arrow pointing to the dashboard (no text or symbols present)natural_image
Top-down technical line drawing of a car dashboard with control knobs and gauges (no text or symbols)natural_image
Front view of a car dashboard with control knobs and a black arrow pointing to the dashboard (no text or symbols visible)natural_image
Top-down schematic of a car dashboard with control knobs and a black arrow pointing to the dashboard (no text or symbols)natural_image
Top-down schematic of a car dashboard with control knobs and a black arrow pointing to the dashboard (no text or symbols present)natural_image
Top-down view of a car dashboard with control knobs and a directional arrow indicator (no text or symbols)natural_image
Diagram of a device with a connector and control panel, no text or symbols presentnatural_image
Diagram of a flashlight with a button and arrow indicating action (no text or symbols)natural_image
Top-down schematic of a car dashboard with control knobs and a directional arrow (no text or symbols)natural_image
Top-down technical diagram of a car dashboard with control knobs and a black arrow pointing to the dashboard (no text or symbols present)natural_image
Illustration of a flashlight with a button and an arrow pointing to it (no text or symbols)text_image
Diagram showing connection between a multimeter and an electronic device with labeled ports and wiringIM Code: K7000seriesIM1284