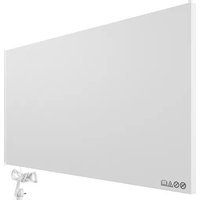
Reykjavik 700 - Pan Fuave - Free user manual and instructions
Find the device manual for free Reykjavik 700 Fuave in PDF.

User questions about Reykjavik 700 Fuave
0 question about this device. Answer the ones you know or ask your own.
Ask a new question about this device
Download the instructions for your Pan in PDF format for free! Find your manual Reykjavik 700 - Fuave and take your electronic device back in hand. On this page are published all the documents necessary for the use of your device. Reykjavik 700 by Fuave.
USER MANUAL Reykjavik 700 Fuave
This device is only suitable for well insulated spaces or occasional use.
Power of Heat output: 700W
Maximum electrical power: 3.1A
Power supply: 230V 50Hz
Protection Standard: IP44
Weight: 9.24kg
Product ID: 925121
Fuave is a registered trademark of Coolblue B.V.
Weena 664
3012 CN, Rotterdam
Netherlands
Serial Number:
Batch code: B0000


FUAVE
Model: Fuave Reykjavik 900
Power of Heat output: 900W
Maximum electrical power: 3.93A
Power supply: 230V 50Hz
Protection Standard: IP44
Weight: 11.39kg
Product ID: 925122
Fuave is a registered trademark of Coolblue B.V.
Weena 664
3012 CN, Rotterdam
Netherlands
Serial Number:
Batch code: B0000


VOORWOORD
Over dit document
This manual contains all information for the correct, efficient and safe use of the appliance. This manual is intended for the end user and/or buyer of this appliance.
Installation of the appliance, use and all cleaning and maintenance activities as described in the instructions may be carried out by the end user, unless clearly indicated to the contrary.
Make sure you have read and understood the safety instructions fully before installing, using or maintaining the appliance. In this way you avoid possible material damage and immaterial damage to you or to others, the appliance, your other property or other people's property.
Please retain this document for future use as long as you use and/or own the appliance and pass it on to subsequent users of the appliance.
Coolblue B.V. cannot in any way be held liable for material or immaterial damage to you or to others, the appliance, your other belongings or belongings of others caused by not following the instructions in this manual.
The warnings and safety instructions in this manual do not cover all possible circumstances and situations.
The infrared panel is also referred to in this manual as an appliance or product.
If you contact our customer service, make sure you have the model number at hand. The information can be found on the type plate or on the front of this manual.
Original instructions
This manual was originally written in Dutch. All other languages are translated documents. In the case of translation errors, the Dutch version takes precedence.
Used symbols
| Symbol Description | |
| DANGER! | Indicates fire hazard and/or flammable materials. |
| WARNING! | Indicates a hazardous situation which, if not avoided, could result in serious immaterial damage to you or others. |
| CAUTION! | Indicates a hazardous situation which, if not avoided, could result in light immaterial damage to you or others. |
| ATTENTION! | Indicates a situation related to material damage. |
| NOTE | Indicates useful, additional information. |
Copyright
The data depicted in this manual, including texts, photographs, graphic drawings, trademarks, (trade) names and logos, are the property of Coolblue B.V. and are protected by copyright, trademark law and/or any other intellectual property right, unless these data belong to a third party. You are never allowed to reproduce, transfer, distribute, store or make the contents of the manual available to third parties, in whole or in part, without the prior written consent of Coolblue B.V. and/or the third party to whom the data belong.

NOTE
You can also find the latest version of this manual online, at www.coolblue.nl if you search for the article number.
FUAVE contact details
FUAVE is a registered brand of Coolblue B.V.
Customer service can be reached at:
https://www.coolblue.nl/klantenservice
Coolblue B.V.
Weena 664
3012 CN Rotterdam
Netherlands
TABLE OF CONTENTS
- SAFETY 34
1.1. Safety warnings and regulations 34
1.2. Safety instructions: installation 35
1.3. Safety instructions: use 35
1.3.1 Safety of persons 35
1.3.2 Safety in use 36
1.4. Safety instructions: batteries 36
1.5. Safety instructions: electrical safety 37
1.6. Safety instructions: cleaning 38
1.7. Safely instructions: repairs 39
1.8. Explanation of the graphic symbols on the product and packaging 39
2.PRODUCT FEATURES 40
2.1. System overview 40
2.2.Guarantee 40
2.3. Technical data 40
2.4. Safety functions 41
2.5. Simplified declaration of conformity (700/900) 42
- INSTALLATION 42
3.1.Unpacking the appliance 42
3.2.Key components 42
3.2.1. Infrared panel 42
3.2.2. Accessories 43
3.3. Installing the appliance in a suitable place 43
3.3.1. Installation of the appliance: free-standing installation 43
3.3.2.Installation of the appliance: fixation to the wall 45
3.4. Fixing the wall holder for the remote control (optional) 48
- USE 49
4.1. Important information 49
4.2.To effectively use the appliance 49
4.3. Main components of the control panel 49
4.4. Turning the appliance on and off 50
4.5. Setting the appliance to continuous heating or manual operation 50
4.6. Continuous heating 50
4.7. Manual remote control operation 51
4.7.1.Key components of the remote control 51
4.7.2. Indications on the screen 52
4.7.3. Connecting the remote control to the appliance 52
4.7.4. Turning the appliance on and off with the remote control 53
4.7.5.Setting the desired temperature using the remote control 53
4.7.6.Using the child safety lock 53
4.7.7.Calibrating the room temperature measurement 53
4.7.8. Turning the sudden drop temperature protection on and off 54
4.7.9.Turning the tilt sensor on and off 54
- MAINTENANCE AND CLEANING 55
5.1.Cleaning 55
5.2. Replacing the battery in the remote control 55
6. FAULTS AND SOLUTIONS 56
7. TAKING OUT OF SERVICE 57
8.SAFE DISPOSAL 57
8.1. Safe removal of the appliance 57
8.2. Dispos of the appliance as waste 57
8.3. Dispos of the packaging material as waste 57
8.4. Dispose of the batteries as waste 57
1. SAFETY
WARNING!
Read this manual and safety instructions carefully and make sure you understand the contents before using the appliance with the appropriate parts. Failure to comply with all instructions can cause material damage and/or serious injury.
1.1. Safety warnings and regulations
WARNING!
- This appliance may be used by children from eight years of age and above and by persons with reduced physical, sensory or mental capabilities or lack of experience and knowledge, provided that they are under supervision or have been trained in the safe use of the appliance and that they understand the associated dangers.
- This appliance must not be used by children under eight years of age.
-
This appliance and its components are not toys, so children should not play with the appliance or its components.
Children, legally incompetent persons and domestic animals must be supervised while using the appliance. -
The appliance contains small parts.
- The surface of the appliance can get hot and cause burns.
Children must be supervised to ensure that they do not play with the appliance.
- Cleaning and user maintenance must not be carried out by children without supervision.
- RISK OF SUFFOCATION! Never let children play with the packaging material. Keep the packaging material out of reach of children.
-
Use the appliance only in accordance with intended use.
-
This appliance is intended for domestic use and similar applications, such as: - staff kitchens in shops, offices and other work environments;
-
farms and guests in hotels, motels, B&B and other residential environments; - catering and similar non-retail applications.
-
This appliance is only suitable for heating in well-insulated areas or for occasional use.
This appliance should not be used for other applications such as heating vehicles. -
This appliance is only intended to be used as a heating element for standing placement on a horizontal and stable surface, or attachment to the wall, as applicable.
-
The appliance is intended for wall mounting.
-
This appliance is not intended for use as a built-in appliance.
-
This appliance is for indoor use only. Therefore, this appliance should not be used outdoors.
-
The appliance must be stored in a room free of naked flames, gas-powered appliances or electric heaters.
- The appliance must be stored in such a way so as to prevent mechanical failure.
- Store the appliance out of reach of unauthorised persons and do not allow anyone unfamiliar with the appliance and this instruction manual to use it.
- Any use of the appliance other than as described in this manual is considered to be unintended use and can result in property and immaterial damage to you or to others, the appliance, your other property or other people's property and the expiry of the warranty.
1.2. Safety instructions: installation
WARNING!
-
Install the appliance in accordance with the installation instructions. Incorrect installation can cause electric shocks, fire and/or property damage.
-
This appliance is only suitable for free-standing installation and mounting on the wall, according to the instructions in these instructions for use.
-
Use only the original accessories provided for the installation.
-
Ensure that the plug and socket are clearly visible and accessible at all times.
-
Do not install the appliance in direct sunlight or heat sources such as radiators, heating grids and hobs.
-
Do not install the appliance in a cabinet.
-
Never place the appliance directly under a power socket. The power cable can come up against the heating element, allowing the plastic insulation to melt.
-
RISK OF ELECTRIC SHOCK! Do not install the appliance in damp or wet environments, such as the bathroom and laundry area, or near a bath, shower or pool, or in shower cubicles.
-
Always place the appliance on a dry and moisture-resistant surface.
-
Always place the appliance on a moisture-resistant surface.
-
Install the appliance so that the control panel and other controls of the appliance cannot be reached from the bath or shower.
-
Do not install the appliance under a worktop or in a cabinet. This appliance is not intended as a built-in appliance.
-
Do not expose the appliance to steam.
-
Never remove the safety warnings, stickers and safety labels from the appliance. Keep all safety warnings, stickers and safety labels in good, legible condition.
1.3. Safety instructions: use
WARNING!
1.3.1 Safety of persons
-
Always be alert and act with caution. Do not use electrical appliances if you suffer from impaired concentration or lack of awareness, or if you are under the influence of drugs, alcohol or medications. Even the slightest distraction can lead to serious accidents and injuries when using electrical appliances.
-
Always operate and use the appliance as described in these instructions for use. Assume that what is not specified here is also not possible. If in doubt, always contact Fuave.
1.3.2 Safety in use
-
RISK OF BURNING! The surface of the infrared panel can become hot. Allow the appliance to cool completely after use before touching it. Do not move the appliance when it is in use or still hot.
-
RISK OF FIRE! In the continuous heating position, there is no provision that controls room temperature and continuously heats the appliance.
-
The appliance must not be used in a small room if there are people in the room who cannot leave the room on their own and who are not under continuous supervision.
-
RISK OF INJURY, IGNITION OR FIRE! Do not use the appliance for drying e.g. towels and clothing, or for similar applications.
-
RISK OF FIRE! Do not place objects on the appliance and never cover the appliance. Never block the grilles for incoming and outgoing air, not even partially. This can cause fire!
-
RISK OF FIRE! Ensure that the appliance cannot be knocked over when installed upright.
-
RISK OF FIRE! Do not use the appliance in the vicinity (at least one metre away) of highly flammable or explosive substances or fuels.
-
RISK OF FIRE! Keep textiles, curtains and other flammable materials at a distance of at least one metre from the appliance or air outlets.
-
Do not use the appliance when wet.
- Never expose the appliance to a naked flame.
-
Do not expose the appliance to direct sunlight.
-
Do not use paint, cleaning sprays, anti-insect sprays, etc. on or near the appliance. This can cause deformation of the housing or electrical damage.
-
Do not use in damp or wet environments, such as the bathroom and laundry area, or near a bath, shower or pool.
-
Do not use near sources of fire, splashing oil or water.
- Only use the appliance in a well-ventilated area.
- Do not spill water, oil or any liquid on or in the appliance.
-
Do not pour water or other liquids over the appliance.
-
Do not operate the appliance if you notice damage to the appliance, the power cable or the plug, or if does not work properly, has fallen or otherwise malfunctions. Please contact customer service for further information. See Foreword for the contact details.
- Unplug the appliance if you hear strange noises, smell an odour or see smoke.
- Do not insert fingers or objects such as pens through the grilles in the appliance and especially warn children of these dangers.
- Do not climb or stand on the appliance.
- If the appliance is not in use, or when cleaning it, carrying out maintenance or moving it, first switch it off and then remove the plug from the socket.
- Never leave the appliance unattended while in use. Turn off the appliance and unplug the plug when leaving the room.
- Never place the appliance on a carpet to prevent the air vents from being blocked.
1.4. Safety instructions: batteries
WARNING!
-
KEEP OUT OF REACH OF CHILDREN. Ingestion can lead to chemical burns, perforation of soft tissue and death. Serious burns can occur within two hours after ingestion. Seek immediate medical attention.
-
Only use the type of battery indicated in the battery compartment.
-
Different types of batteries or new and used batteries may not be used together or mixed.
- Never use batteries if they are dented, leaking or damaged.
- Remove leaking, deformed or corroded batteries from the appliance and dispose of them properly with appropriate protective equipment. If a battery is leaking: avoid contact with skin, eyes and mucous membranes. If necessary, rinse affected areas with water and seek immediate medical attention.
- Depleted batteries should be immediately removed from the appliance and disposed of properly. Depleted batteries can corrode, releasing chemicals that damage your health and the appliance. If you do not use it for a long time, remove the batteries from the appliance to prevent them from leaking.
- Keep new and used batteries away from children. If you think that batteries have been swallowed or placed in a part of the body, seek medical attention immediately.
- Clean the battery contacts and also those of the appliance before installing the battery.
- When installing the batteries, pay attention to the correct polarity. The orientation of the positive (+) and negative (-) terminals of the battery must correspond to the + and - on the battery compartment.
- WARNING! RISK OF EXPLOSION. Do not short-circuit batteries and do not immerse them in liquids. This causes a risk of explosion, fire, heat, smoke and/or gas development. Non-rechargeable batteries should not be recharged.
- Do not deform, burn or disassemble batteries and never drill with a sharp object. Extreme heat can lead to explosion and/or leakage of corrosive fluid. Mechanical damage can result in the release of gaseous substances, which can be highly irritating, flammable or toxic.
- Do not allow children to replace batteries without adult supervision.
- Store unused batteries in their original packaging, away from metal objects. If already unpacked, do not mix batteries.
- If the battery has accidentally fallen into the water, remove it immediately. Put the battery in a safe, open spot and stay away from it until it is completely dry. Do not reuse the dried battery, but dispose of it as instructed in 8.4 Disposal of the batteries as waste.
1.5. Safety instructions: electrical safety
DANGER!
If there are any questions regarding the instructions for electrical safety, contact a qualified electrician.
- RISK OF FIRE! The appliance has thermal protection to prevent fire. To prevent accidental resetting of this thermal protection, this appliance must not be connected to an external switching appliance, such as a timer, or be connected to a circuit that is regularly switched on and off by the energy supplier. There is a risk of fire if the appliance is covered or not positioned correctly.
- RISK OF FIRE! Before use, check that the socket you want to use has no defects, that it has earthing and an earth leakage circuit breaker connected in accordance with the legal regulations. If this is not clear, contact a qualified electrician.
-
Before use, check that the voltage on the socket you want to use matches that on the type plate of the appliance (230V~50Hz). Damage caused by faulty voltage is not covered by the guarantee.
-
RISK OF ELECTRIC SHOCK! Only use the appliance's factory-fitted plug and never change it. The plug must match the type of socket used to reduce the risk of electric shocks.
- RISK OF ELECTRIC SHOCK! The connector has an earth connection. Do not remove the earth contacts from the plug. Improper use of the earthing can result in an electric shock.
- RISK OF FIRE! Only connect the appliance to a fixed, earthed socket. Do not use a plug adapter, junction box or table socket etc.
- Never leave the power cable in such a way that someone could trip over it or accidentally pull it.
-
The appliance has a short power cable to reduce the risk of entanglement or tripping over a longer power cable. Avoid using extension cables as much as possible. If this is unavoidable:
-
use an extension cable with at least the same or higher electrical capacity as stated on the appliance;
-
use a three-wire grounded extension cable;
-
lay the extension cable so that children cannot pull on it or trip over it.
-
RISK OF ELECTRIC SHOCK! Never pull the power cable to carry or move the appliance or to disconnect the plug. Keep the power cable away from heat, oil, sharp edges and moving parts. Do not make any changes to the power cable or submerge it in water or other liquids. Do not twist or kink the power cable. Do not roll up the power cable too tightly after use and do not wind it up around the unit; this can damage the insulation layer! Damaged or tangled power cables increase the risk of electric shocks.
- RISK OF ELECTRIC SHOCK! Do not touch the appliance, plug or mains cable with wet or damp hands. Only use the appliance with clean, dry hands.
- RISK OF ELECTRIC SHOCK! Do not use the appliance barefoot.
- Fully unroll the appliance's power cable before plugging it into the socket. This is to prevent heat generation in the cable.
- Do not pass the power cable under a carpet or cover it with mats, runners and the like. This can lead to unforeseen heat generation.
- Switch off the appliance and remove the plug from the socket when the appliance is not in use.
- Regularly check the appliance for damage to the power cable and plug. If there is visible damage, a strong smell, or parts become excessively hot, stop using it immediately and remove the plug from the socket.
- The appliance, plug and/or power cable must be repaired and/or replaced by an electrician or an equivalent qualified person. Repairs by amateurs invalidate the guarantee and can cause dangerous situations!
1.6. Safety instructions: cleaning
- RISK OF BURNING! Allow the appliance to cool completely after use before touching it. The surface of the infrared panel can become hot.
Always remove the plug from the socket before cleaning the appliance. - Never use aggressive or abrasive cleaners, white spirit, detergents, chemically impregnated wipes, alcohol-based cleaners or other cleaning solutions. These can damage the housing and appliance.
-
Never spray the appliance and make sure no water gets into it. Never immerse the appliance in water or other liquids.
-
Clean the air vents regularly to avoid dust accumulation.
- Do not use steam cleaner to clean the appliance.
1.7. Safety instructions: repairs
DANGER!
- It is not permitted to open, change or repair the appliance yourself. Do not drill holes into the appliance anywhere to avoid dangerous situations. The appliance, plug and/or cable must be repaired and/or replaced by an electrician or an equivalent qualified person. Always remove the plug from the socket and allow the appliance to cool completely before carrying out any repairs. Repairs by amateurs invalidate the guarantee and can cause dangerous situations!
- RISK OF INJURY OR DEATH! Never touch the internal components. This can cause serious injury and even death.
- Repairs, maintenance and all other possible work on the appliance not described in these instructions for use may not be carried out by the end user. Contact customer service for more information. See Foreword for the contact details.
1.8. Explanation of the graphic symbols on the product and packaging
| SymbolMeaning | |
| CE | The CE marking on this appliance indicates that Fuave declares that this appliance meets the requirements of the relevant European legislation relating to health, safety and environmental protection. The declaration of conformity is available upon request from Fuave. See Foreword for the contact details. |
| Read the instructions before continuing to use the product. | |
| Do not spray water on the product. | |
| The accessible surfaces can be hot during or after use. | |
| Do not cover the appliance with clothing or other objects to prevent overheating. | |
| This is a class 1 appliance. This type of electrical equipment only has basic insulation and relies on earthing for protection. | |
| ~ | This symbol indicates alternating current. |
| = | This symbol indicates direct current. |
| This symbol on the appliance, accessories or packaging indicates that this appliance must not be disposed of with ordinary household waste, but must be returned to a collection point. | |
2.PRODUCT FEATURES
2.1. System overview
Infrared panels emit radiant heat to a particular spot in the room, heating up people and objects in the path of the heat. This is in contrast to 'ordinary' heating, which uses convection to heat the air throughout the room. The radiant heat of an infrared panel feels comfortable even though the air temperature is lower. Outside the area of radiant heat, the heat is not felt.
Infrared panels heat up very quickly and are therefore suitable as additional heating in a particular room, such as heating the workplace or sitting area, for a shorter period of time.
2.2.Guarantee
This appliance comes with a warranty period of two years after purchase. For more information on guarantee conditions, please visit www.coolblue.nl/klantenservice. In any case, you must have the purchase order with purchase and/or delivery date in order to be able to claim the guarantee.
2.3. Technical data
The technical data are indicated on the type plate on the appliance (also printed on page 2).
| Reykjavik 700 Reykjavik 900 | ||
| Class I or II Class I Class I | ||
| Weight Net 9.24 kg | Gross 10.98 kg | Net 11.39 kg Gross 13.43 kg |
| Size (H x B x D) 60 cm x 90 cm x 2.5 cm 60 cm x 120 cm x 2.5 cm | ||
| Power supply 230V~50Hz 230V~50Hz | ||
| Maximum electrical power 3.1 A 3.9 A | ||
| Nominal input power elmax | 715 W | 905 W |
| Heat output | ||
| - Nominal heat output Pnom | 700 W | 900 W |
| - Minimum heat output (indicative) Pmin | Not applicable | Not applicable |
| - Maximum continuous heat output Pmax,c | 700 W | 900 W |
| Additional electricity consumption | ||
| - At nominal heat output elmax | 715 W | 905 W |
| - At minimum heat output elmin | 715 W | 905 W |
| - In standby mode elsb | 0.04 W | 0.04 W |
| Efficiency | 98% | 98% |
| Surface temperature during use | 85°C to 115°C | 85°C to 115°C |
| Type of heat output/room temperature control | ||
| - With electronic room temperature control* | Yes | Yes |
| Other control options | ||
| - Room temperature control with open window detection* | Yes | Yes |
| - With working time restriction* | Yes | Yes |
| Length of the power cable | 1.9 m | 1.9 m |
| Frequency band | 433 MHz | 433 MHz |
| Maximum broadcast radio frequency power in the frequency band(s) in which the radio equipment operates | -112 dBm | -112 dBm |
| Temperature range during use | -5°C tot +80°C | -5°C tot +80°C |
| Relative humidity | 45% ± 10% | 45% ± 10% |
| IP class | IP44 | IP44 |
- Only when operating in the manual remote control setting (see Manual remote control operation).
| Remote control | |
| Model RMT-10 / T1 | |
| Battery voltage required 2V tot 3V DC | |
| Power consumption 0.2 mA | |
| Battery type and number AAA x2 | |
| Temperature display accuracy 0.5°C | |
| Temperature measurement accuracy 0.1°C | |
| Frequency band 433 MHz | |
| Maximum broadcast radio frequency power in the frequency band(s) in which the radio equipment operates | Maximum 15 dBm |
| Temperature range during use -5°C tot +80°C |
2.4. Safety functions
The safety functions in the table are part of the remote control of the appliance.
ATTENTION!
The safety functions are only active when the appliance is set to manual control via the remote control (see Manual remote control operation).
| Protocols | Remote control |
| Protection in the case of a sudden drop in temperature (only when the appliance is set to remote control operation) | When room temperature drops suddenly 3°C or more, the appliance is automatically turned off. After 15 minutes, the appliance is switched on and heats up again. If the room temperature does not rise, the appliance is automatically switched off again. This cycle is repeated five times. The appliance is then automatically switched off. |
| Frost protection (only when the appliance is set to remote control operation) | When room temperature drops to 5°C or below, the appliance is automatically turned on by the remote control. Even if the appliance is already turned off with the remote control! The appliance continues to heat the room until a room temperature of 10°C is reached and then switches off automatically. |
| Automatic shutoff (only when the appliance is set to remote control operation) | When the appliance is set to remote control operation and does not receive a signal from the remote control for a period of five hours, the appliance will switch off automatically. |
| Tilt sensor When the appliance tilts, for example when knocked over, the tilt sensor automatically switches off the appliance when it tilts between 45° and 60° or more. When the appliance is turned upright, the tilt sensor turns the appliance on automatically. See Turning the tilt sensor on and off for more information. | |
| Thermal protection When the appliance falls over or another object hits the front of the infrared panel and the surface reaches a temperature of 130°C, the thermal protection disables the appliance. See Faults and Solutions for more information. | |
2.5. Simplified declaration of conformity (700/900)
The manufacturer, FUAVE, hereby declares that the type of radio equipment FUAVE Reykjavik 700 and Fuave Reykjavik 900 complies with Directive 2014/53/EU. The full text of the EU declaration of conformity can be consulted at the following internet address: http://www.coolblue.nl/product/925123
3. INSTALLATION
Read and follow all instructions in the Safety section.
3.1. Unpacking the appliance
RISK OF SUFFOCATION!
Keep packaging materials out of reach of children. Packaging materials are not toys.
To unpack the appliance:
-
Remove all packaging material and any transport attachments present (e.g. tape that holds parts in place during transport).
-
Remove any protective films on the outside of the housing.
-
Check that all accessories are present and that the appliance and accessories do not present any damage. See Key components for more information.
WARNING!
Do not use a damaged appliance but contact customer service. See Foreword for the contact details. In that case, keep the packaging.
3.2.Key components
3.2.1. Infrared panel
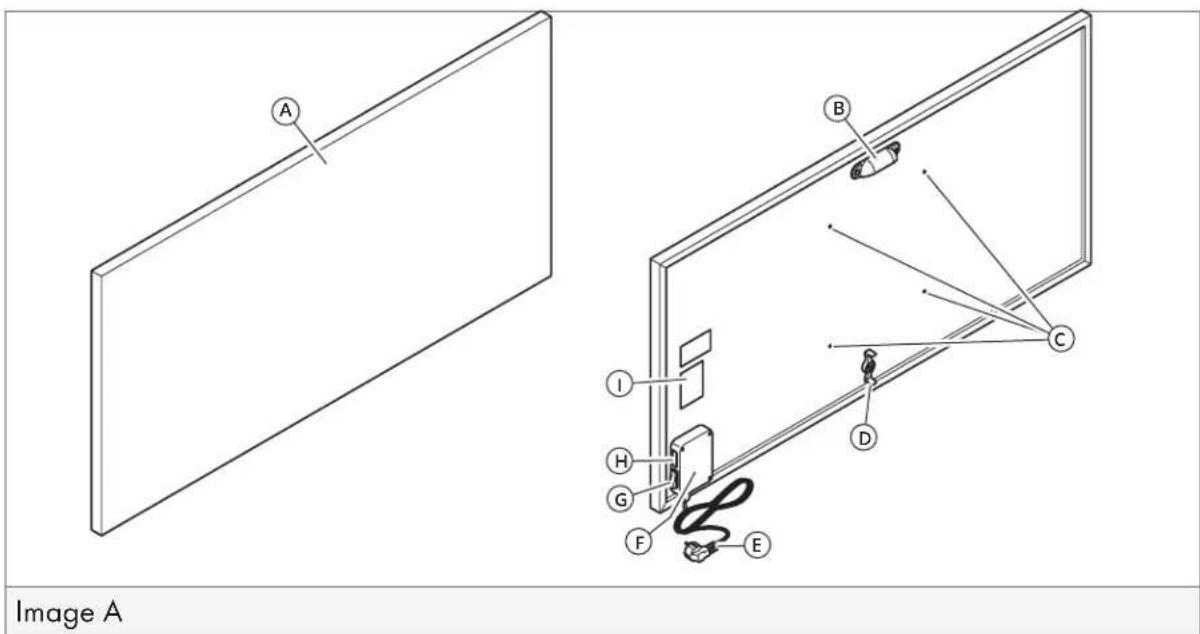
A Infrared panel
B Handle
Fixing screws (for wall mounting)
D Lock
E Mains plug
F Wireless receiver
G Power button
H Control panel
Type plate
3.2.2. Accessories
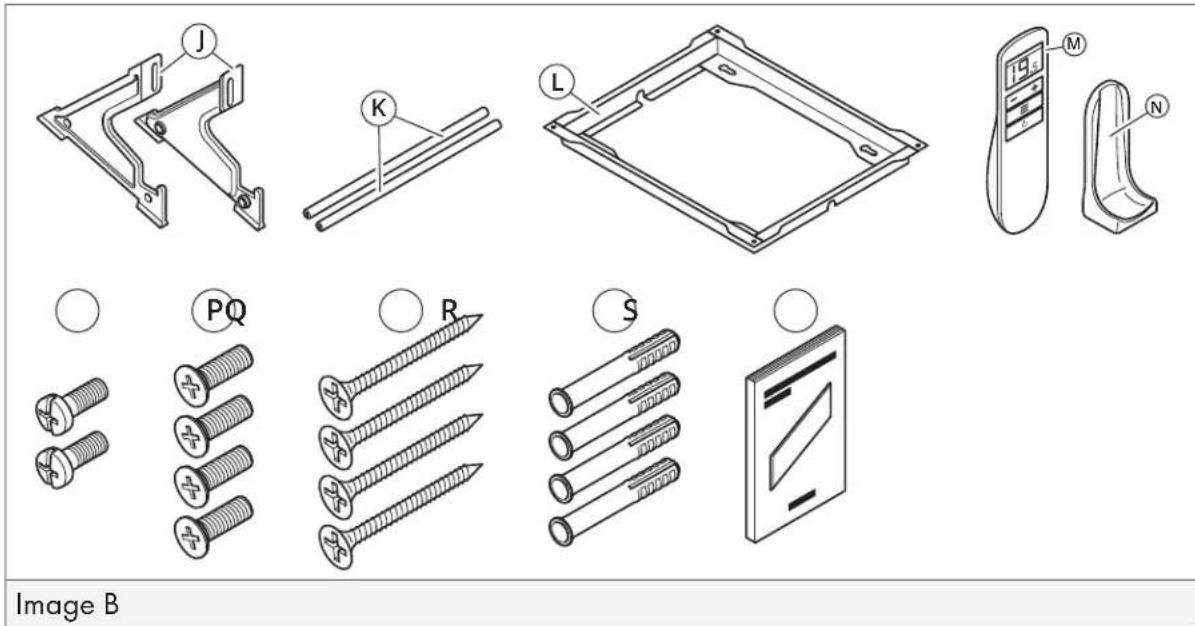
Supports (for standing position)
K Spacers (for the supports)
L Wall bracket
M Remote control
N Wall holder for the remote control
Screws for the supports (M6x15)
P Screws for the spacers (M5× 16)
Screws for the wall bracket (M6×50)
R Wall plugs (10 mm)
5 Instructions for use
3.3. Installing the appliance in a suitable place
WARNING!
Do not connect the appliance to the power supply until it is installed as instructed.
The appliance can be installed as a free-standing appliance or attached to the wall.
3.3.1. Installation of the appliance: free-standing installation
Tools required:
Crosshead screwdriver
To install the appliance free-standing:
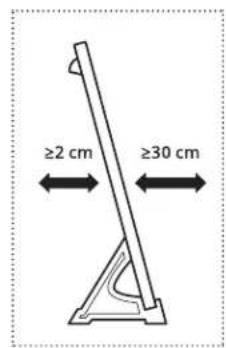
- Select a suitable place for use that satisfies the following points:
A firm, flat, dry and horizontal surface.
-
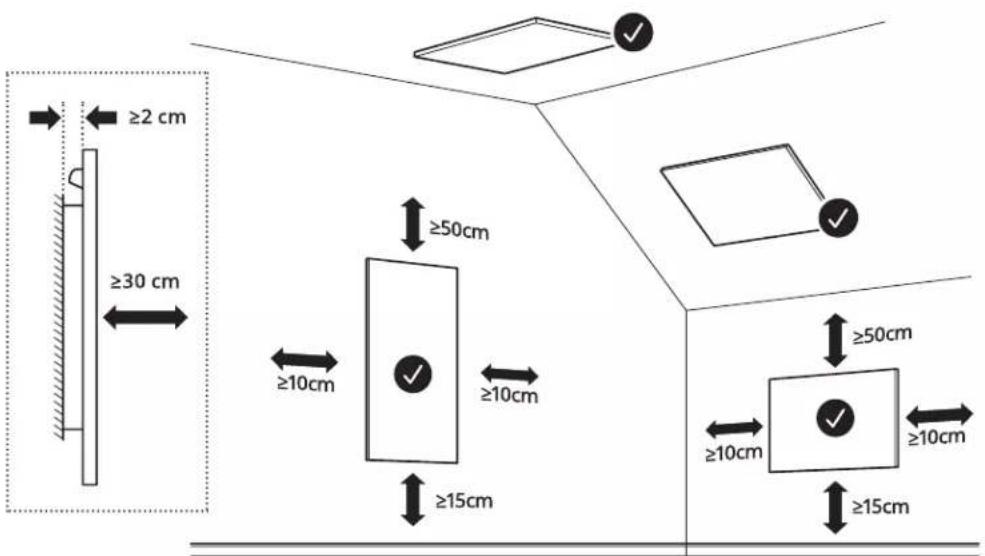
Sufficient space around the infrared panel in connection with ventilation:
-
Left and right at least 10cm free space.
-
At the top, at least 50 cm free space
-
At the rear, at least 2 cm free space.
-
At the front, at least 50 cm free space.
The ventilation openings are not blocked.
- At least 60~cm away from water sources.
Not near:
- Curtains
Hobs or other heat sources - Flammable materials
- Shower cubicle, bath or sink
Make sure the control panel and other controls of the appliance cannot be reached from the bath or shower.
The socket to be used supplies the voltage on the appliance's type plate (230V 50Hz)
- The power socket can be reached with the plug and the power cable is not stretched.
- Mount the appliance to the standard:
A. Place the spacers K in the supports J.
NOTE
Note the position of the supports: the vertical holes are located on the inside.
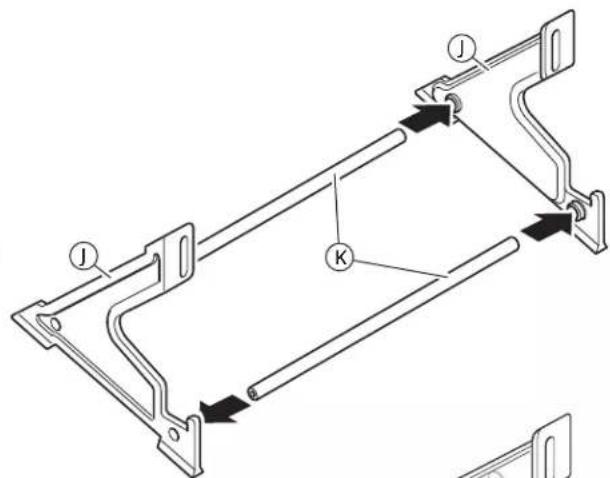
B. Secure the spacers K with the four supplied screws for the spacers P.
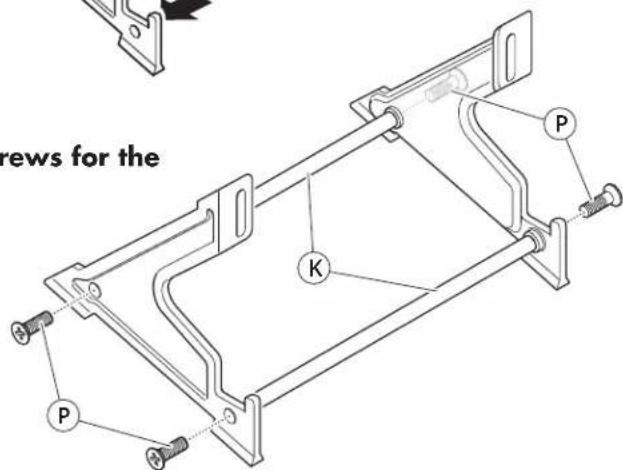
C. Remove the lower two fixing screws C from the infrared panel A.

ATTENTION!
Keep the fixing screws on a wall for the possible installation of the infrared panel to a wall.
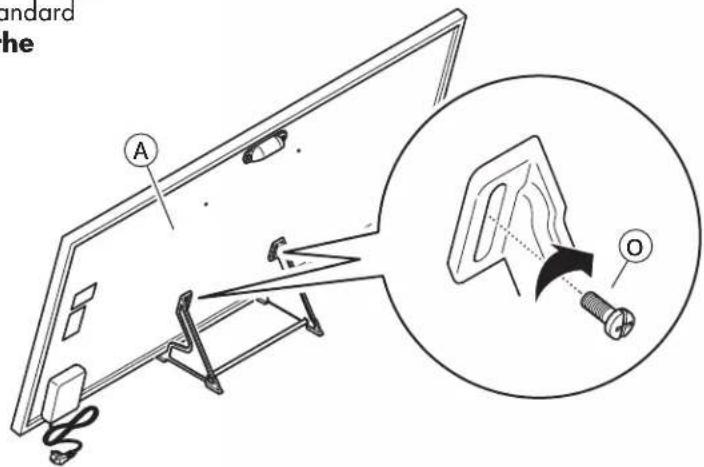
D. Place the infrared panel A in the standard.
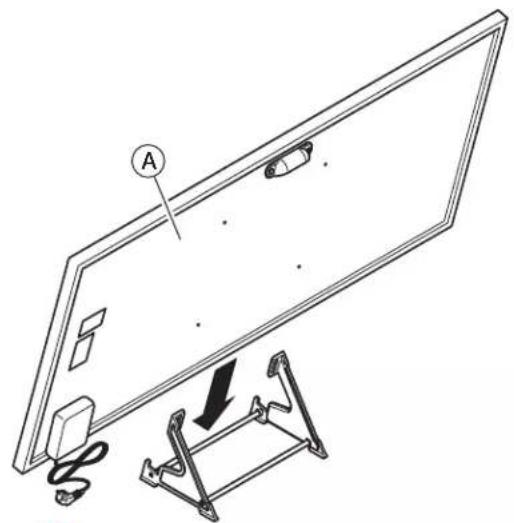
E. Align the bottom two holes in the infrared panel A with the two holes of the standard. Attach the standard to the infrared panel with the two screws for the supports O.

ATTENTION!
Do not over-tighten the screws for the supports.
- Place the batteries in the remote control (see 'Replacing the batteries in the remote control').
- Fully roll off the power cable of the appliance and lay the power cable so that it cannot touch hot parts of the appliance.
The appliance is now ready for use. Insert the plug in the socket. Continue with the 'Connecting the remote control to the appliance' section.
RISK OF TRIPPING!
Lay the power cable outside the walking route. Make sure that the power cable cannot be stepped on and that no furniture or other items are placed on it.
RISK OF FIRE! Always place the power cable along the back of the appliance and never along the front.
3.3.2. Installation of the appliance: fixation to the wall
Tools required:
Level
- Drill with 8 mm drill
Crosshead screwdriver
Pencil
To mount the appliance onto the wall:
-
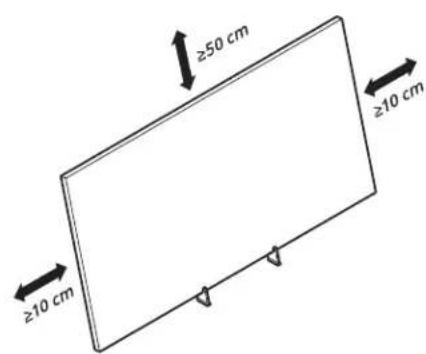
Select a suitable place for use that satisfies the following points:
-
Sufficient space around the infrared panel in connection with ventilation:
-
Left and right at least 10cm free space.
-
At the top, at least 50 cm free space
-
At the bottom, at least 15cm or more free space.
-
At the rear, at least 2 cm free space.
-
At the front, at least 50 cm free space.
The ventilation openings are not blocked.
- At least 60~cm away from water sources.
Not near:
- Curtains
Hobs or other heat sources
-
Flammable materials
-
Shower cubicle, bath or sink
Make sure the control panel and other controls of the appliance cannot be reached from the bath or shower.
- Hang as far away as possible from television and radio equipment.
- The socket to be used supplies the voltage on the appliance's type plate (230V~50Hz).
- The power socket can be reached with the plug and the power cable is not stretched.
- Mark off the four mounting holes for the wall bracket L on the wall:
A. Place the wall bracket on the wall and use a spirit level to check that the wall bracket is horizontal.
B. Mark off the holes on the wall with a pencil.
- Drill the holes with the 8 mm drill.

ATTENTION!
Do not drill the holes through the wall bracket. This damages the wall bracket.
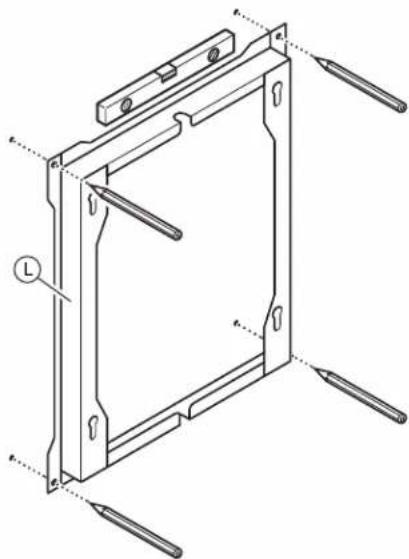
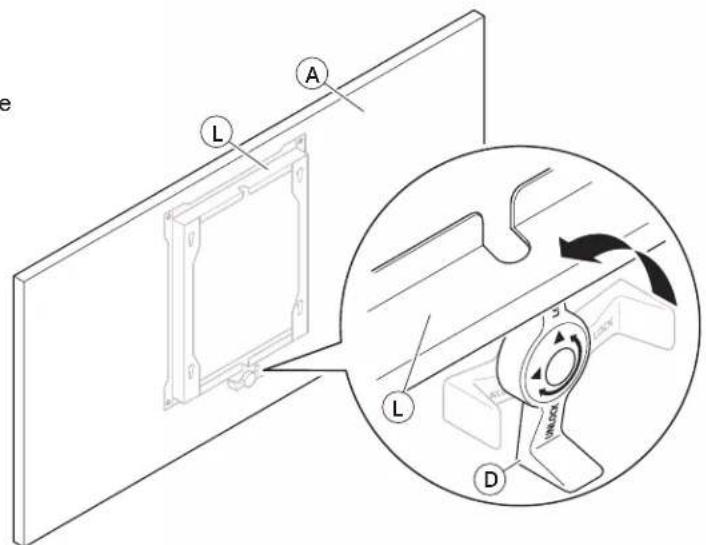
- Place the wall plugs R in the drill holes and attach the wall bracket L with the screws for the wall bracket Q.
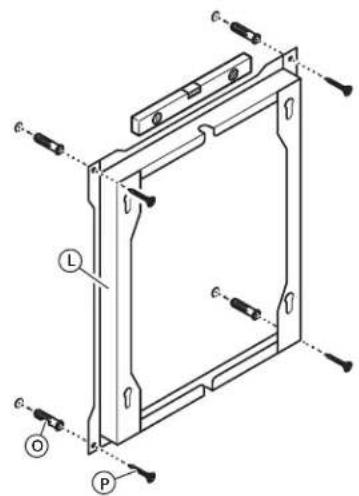

- Hang the infrared panel A with the fixing screws C in the holes of the wall bracket L.

ATTENTION!
The fixing screws should protrude approximately 0.5cm from the infrared panel. Make sure that the heads of the fixing screws are completely flush in the wall bracket.

- Turn the lock D into a vertical position so that the infrared panel A is clamped onto the wall bracket L.
-
Place the batteries in the remote control (see 'Replacing the batteries in the remote control').
-
Fully roll off the power cable of the appliance and lay the power cable so that it cannot touch hot parts of the appliance.
The appliance is now ready for use. Insert the plug in the socket. Continue with the 'Connecting the remote control to the appliance' section.
RISK OF TRIPPING!
Lay the power cable outside the walking route. Make sure that the power cable cannot be stepped on and that no furniture or other items are placed on it.
RISK OF FIRE! Always place the power cable along the back of the appliance and never along the front.
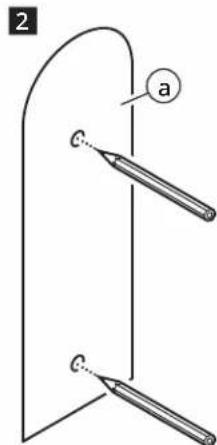
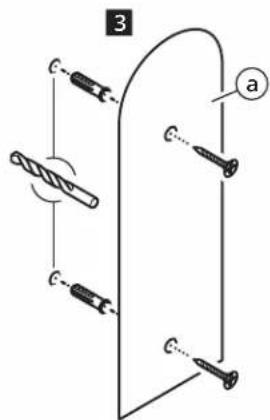
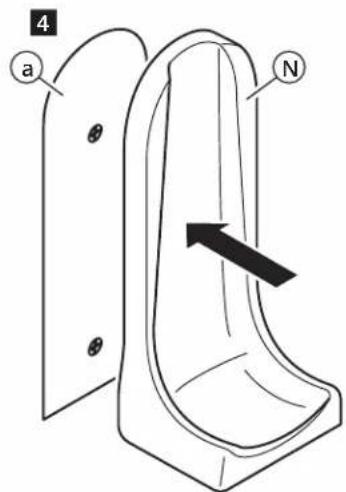
3.4. Fixing the wall holder for the remote control (optional)
Tools required:
- Two screws and two plugs (not supplied)
2.Drill - Drill bit with the correct size for the plugs
- Flat head screwdriver
5.Crosshead screwdriver - Pencil
To secure the wall mount:
- Insert a flat head screwdriver into the recesses of the back plate and carefully click it out of the wall holder
- Keep the back plate at the desired height on the wall and mark off the two holes on the wall with a pencil
- Drill the holes in the wall and secure the back plate a to the wall with the plugs and the screws.
- Click the wall holder N on the back plate a.

4. USE
4.1.Important information
- Read and follow all instructions in the Safety section.
- Do not use the appliance until installed as instructed!
- Do not leave a working appliance unattended, even for a moment!

ATTENTION!
When the appliance is first used, or if it has not been used for a long period of time, odour can form. This is not a defect and the odour formation stops after some time.
4.2. To effectively use the appliance
Factors that cause the unit to heat less well include, for example:
a low outside temperature.
the presence of many and/or large windows.
- poor insulation of the room.
- draught, open windows and open doors.
To use the appliance as effectively as possible:
Use the appliance with the remote control provided to set the desired room temperature and not unnecessarily heat it for long.
Temper the temperature setting when the room has reached the desired conditions.
- Close windows and doors and avoid draught.
- Use the appliance in a well-insulated area.
4.3. Main components of the control panel
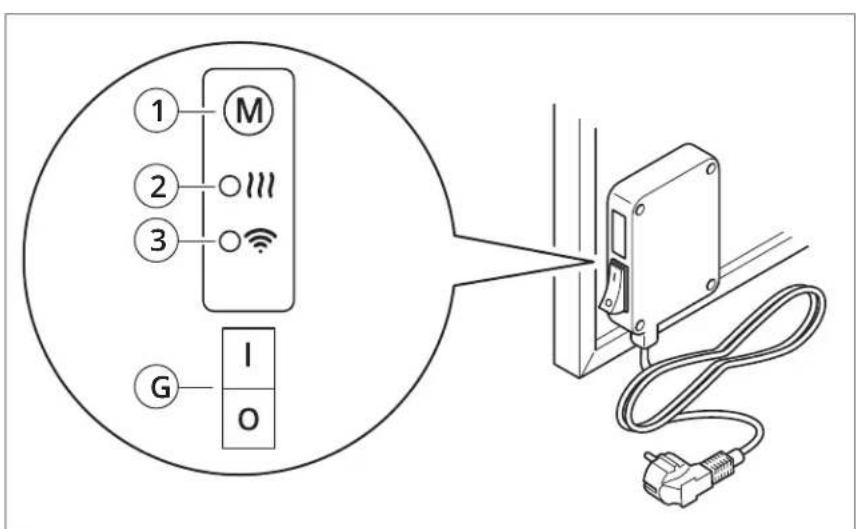
Image C
1 M button (to switch between automatic and manual operation)
G Power button
2 Heating indicator
3 Wireless connection indicator
4.4. Turning the appliance on and off
To turn the appliance on:
- Insert the appliance's plug E into the socket.
- Set the ON/OFF switch G to I to turn the appliance on.

ATTENTION!
If the appliance is set to continuous heating, the heating indicator turns on immediately and the appliance heats continuously. For more information, see 'Setting the appliance to continuous heating or manual operation'.
To turn the appliance off:
- Set the power button G to 0 turn off the appliance.
- Remove the appliance's plug E from the socket.
4.5. Setting the appliance to continuous heating or manual operation
WARNING! RISK OF OVERHEATING!
In the continuous heating position, the appliance continues to heat continuously and does not turn off automatically. It is strongly recommended to set the appliance to manual operation in order to use it as effectively as possible.
The appliance can be set to continuous heating or manual operation via the remote control.
To switch between continuous heating and manual remote control operation:
- Insert the appliance's plug E into the socket.
- Turn the appliance on with the power button G.
- Press the M button on the control panel H for three seconds. Each time the M button is pressed for three seconds, the appliance switches between continuous heating and manual operation.
| Mode Indicators | |
| Continuous heating: · The heating indicator is continuously on and the appliance is continuously heating. · The wireless connection indicator is off. The appliance cannot be operated with the remote control. | ●●● ○●● |
| Manual operation: · The heating indicator is only on when the appliance is heating. · The wireless connection indicator is on. The appliance is controlled by the remote control. | ○●● ●●● |
4.6. Continuous heating
WARNING! RISK OF OVERHEATING!
In the continuous heating position, the appliance continues to heat continuously and does not turn off automatically. It is strongly recommended to set the appliance to manual control in order to use it as effectively as possible (see 'Setting the appliance to continuous heating or manual control').
For continuous heating:
- Turn the appliance on (see 'Turning the appliance on and off').
- Make sure the appliance is set to continuous heating (see 'Setting the appliance to continuous heating or manual operation'). The appliance is heating continuously.
To stop continuous heating:
- Turn the appliance off (see 'Turning the appliance on and off').
4.7. Manual remote control operation
WARNING! RISK OF OVERHEATING!
-
The remote control measures the room temperature. Place the remote control in the room where the infrared panel is located or suspended. Do not place the remote control in a drawer or another room when the appliance is turned on. This means that room temperature cannot be measured and there is a risk of overheating!
-
Make sure the appliance is set to manual operation (see 'Setting the appliance to continuous heating or manual operation').
4.7.1. Key components of the remote control
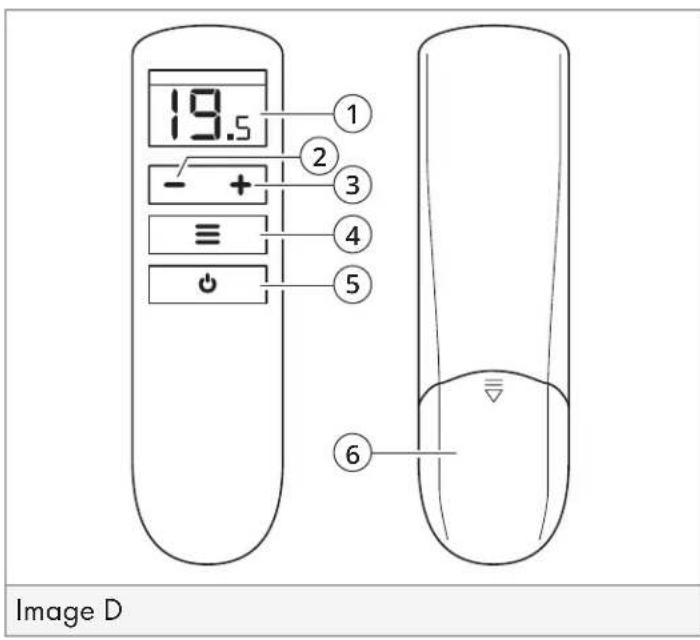
1 Screen
2 + button
3 - button
4 Menu button
5 Power button
6 Battery cover
4.7.2. Indications on the screen
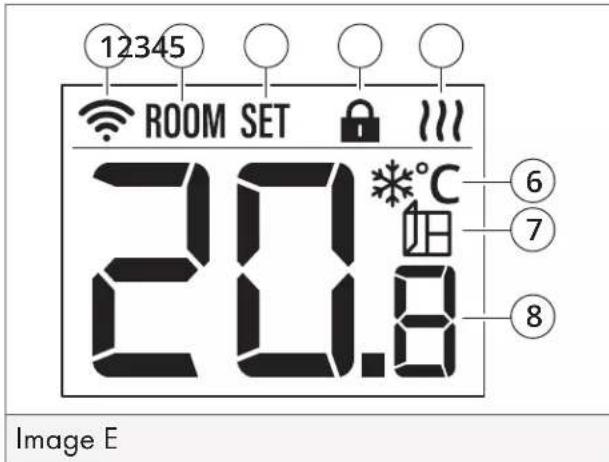
1 Wireless connection indicator (to indicate a connection to the infrared panel).
2 ROOM indicator (to indicate that room temperature is displayed).
3 SET indicator (to indicate that the set temperature is shown).
4 Child lock indicator
5 Heating indicator
6 Frost protection indicator
7 Sudden drop in temperature indicator
8 Temperature indication
4.7.3. Connecting the remote control to the appliance
To operate the appliance via the remote control, the remote control provided must be connected to the wireless receiver.
To connect the remote control to the appliance:
- Insert the appliance's plug into the socket.
- Turn the appliance on with the power button G.
- Press the M button on the control panel H twice. The wireless connection indicator is flashing and the appliance is in connection mode.

NOTE
- If no connection is made within ten minutes, the wireless connection indicator stops flashing and the connection mode is no longer active. In that case, follow step 3 to try to connect again.
-
It is possible to connect a remote control to multiple infrared panels equipped with a wireless receiver. To do this, put all infrared panels that need to be connected in the connection mode.
-
Press the power button of the remote control to set it to OFF. The screen displays OFF.
- At the same time, press the power button and the + button of the remote control and hold down the buttons for three seconds. The screen shows PAr and the wireless connection indicator flashes. The remote control is in connection mode. The appliance and remote control connect automatically.

NOTE
When the appliance is connected to the remote control, the wireless connection indicator lights up continuously and the remote control screen shows OFF.
- If desired, turn the appliance off (see 'Turning the appliance on and off').
NOTE
The connection to the remote control is remembered, even when the plug is removed from the socket.
4.7.4. Turning the appliance on and off with the remote control

ATTENTION!
The appliance will remain in standby mode when turned off using the remote control. To turn the appliance off completely, see 'Turning the appliance on and off'.
To turn the appliance on and off with the remote control:
-
To turn the appliance on, press the power button for one second. The ROOM indicator is on and the temperature indication shows room temperature. If the desired set temperature is higher than the room temperature, the appliance will start heating.
-
To turn the appliance off, press the power button for one second. The screen displays OFF. The appliance stops heating and is in standby mode.

ATTENTION!
Frost protection remains active in standby mode.
4.7.5. Setting the desired temperature using the remote control
The desired temperature can be set between 5^ and 30^ . When the infrared panel heats, the screen shows the heating indicator.
To set the desired temperature:
- When the screen shows OFF, press the power button for one second. The ROOM indicator is on and the temperature indication shows room temperature.
- To increase the desired temperature, press the + button one or more times. The SET indicator flashes and the temperature indication shows the temperature to be set. Each time the + button is pressed, the desired temperature increases by 0.5^ .
- To lower the desired temperature, press the button one or more times. The SET indicator flashes and the temperature indication shows the temperature to be set. Each time the button is pressed, the temperature to be set decreases by 0.5^ .
- Wait ten seconds after setting the temperature. The ROOM indicator is on. The temperature indication stops flashing and shows the room temperature. The desired temperature has been set.
4.7.6. Using the child safety lock
The child safety lock can prevent children from accidentally turning on the appliance with the remote control.
To use the child safety lock:
- To turn on the child safety lock, simultaneously press the + button and the - button and hold the buttons for two seconds. The child safety lock indicator is on.
- To turn the child safety lock off, simultaneously press the + button and the - button and hold the buttons for two seconds. The child safety lock indicator is off.
4.7.7. Calibrating the room temperature measurement
If it appears that the room temperature on the screen differs from the actual room temperature, then the room temperature is not measured correctly. The room temperature measurement can then be calibrated manually.
To manually calibrate the room temperature measurement:
- When the screen shows OFF, press the power button on the remote control for one second. The ROOM indicator is on and the temperature indication shows room temperature.
- Press the Menu button for two seconds. The temperature indication flashes and shows the set calibration value.
- Press the + button or the - button to adjust the room temperature calibration value.

NOTE
The room temperature measurement can be adjusted down to 5^ and up to 5^ by calibration, in steps of 0.5^ .
- Wait ten seconds or press the Menu button for two seconds. The menu closes and the room temperature has been adjusted.
4.7.8. Turning the sudden drop temperature protection on and off
When the sudden drop temperature protection is on, the screen displays the sudden drop temperature indicator and the appliance stops heating. For more information, see 'Safety Functions'.
- When the screen shows OFF, press the power button for one second. The ROOM indicator is on and the temperature indication shows room temperature.
- Press the Menu button for two seconds. The room temperature calibration setting is active.
- Press the Menu button.
The setting for the sudden drop temperature protection is active. The screen displays the sudden drop temperature indicator and, depending on the setting, flashes On or Off in the screen.
4. Press the + button or - button to turn the temperature drop protection on (On) or off (Off).
5. Wait ten seconds or press the Menu button for two seconds. The menu closes and the sudden temperature drop protection is adjusted.
4.7.9. Turning the tilt sensor on and off

WARNING!
- RISK OF OVERHEATING! It is strongly recommended to turn on the tilt sensor when the unit is installed standing. The tilt sensor automatically shuts down the unit when tilting between 45^ and 60^ or more to prevent overheating.
- The tilt sensor is automatically turned on when first used.
To switch between tilt sensor on and off:
- Turn the appliance off with the power button G.
- Press and hold the M button on the control panel H and turn the appliance on with the power button G: a. The tilt sensor is ON when only the wireless connection indicator lights up. b. The tilt sensor is OFF when the wireless connection indicator and the heating indicator blink three times.

NOTE
Repeat steps 1 through 3 to switch between tilt sensor on or off.
5. MAINTENANCE AND CLEANING

WARNING!
- RISK OF BURNING! Allow the appliance to cool completely after use before touching it. The surface of the infrared panel can become hot.
- Never use aggressive or abrasive cleaners, white spirit, detergents, chemically impregnated wipes, alcohol-based cleaners or other cleaning solutions. These can damage the housing and appliance.
- Never spray the appliance and make sure no water gets into it. Do not use steam cleaner to clean the appliance.
- Never immerse the appliance in water or other liquids.
5.1.Cleaning
Clean and dry the appliance if necessary. The frequency of cleaning depends on the use and environment in which the appliance is used.
To clean the appliance after use:
- Switch the appliance off with the power button and remove the plug E from the socket.
- Allow the appliance to cool down completely.
- Clean the appliance with a clean, slightly damp and lint-free cloth.
ATTENTION! Make sure that no water enters the appliance.
- Dry the appliance with a dry, lint-free cloth.
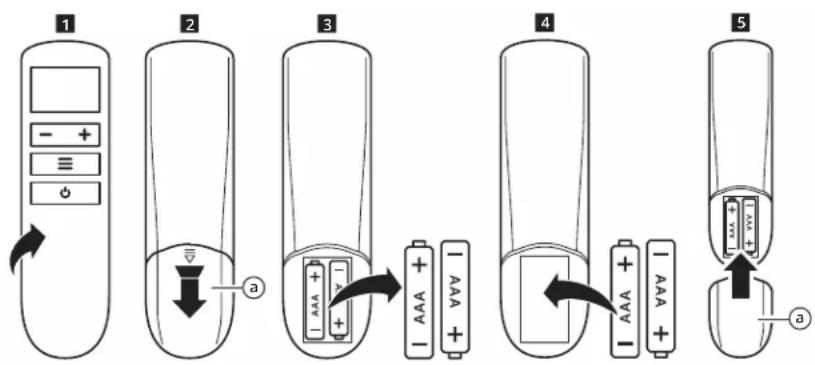
5.2. Replacing the battery in the remote control
The remote control uses two AAA batteries. Do not use any other batteries.
To replace the batteries:
- Hold the remote control so that the buttons face downwards.
- Lightly press the pipe indication and slide the battery cover a in the direction indicated by the arrow.
- Remove the old batteries
- Insert the new batteries into the battery compartment recess.

ATTENTION!
The orientation of the positive (+) and negative (-) terminals of the battery must correspond to the + and - on the battery compartment.
- Slide the battery cover a back into the remote control.

ATTENTION!
If the remote control is not used for a long time, remove the batteries to prevent leakage and damage.
6. FAULTS AND SOLUTIONS
The following cases are not always a fault. See the possible solutions before asking for service.
| Problem Cause Solution | ||
| The infrared panel does not turn on. | - The appliance is not powered. | 1. Check that the plug is in the socket and that the cable or plug is not damaged. 2. Check that the RCD is switched on. 3. Check that there is no power failure. 4. Wait ten minutes and turn the appliance back on. ATTENTION! Do not start the appliance yet, unplug it and contact Customer Service. See Foreword for the contact details. - Unplug the plug and allow the appliance to cool down. The appliance can be switched on again if it has cooled down sufficiently. |
| - The thermal protection has turned off the appliance because it has fallen over, or another object hits the front of the appliance causing the surface temperature to rise to 130°C or more. | ||
| The surface of the infrared panel expands forward. | ATTENTION! This is normal and not a fault or defect. The material of the infrared panel expands through the heat. During cooling, the appliance returns to its original form. | |
| The surface of the infrared panel only warms up a little. | - The power supply does not meet the requirements. - The ambient temperature is low. ATTENTION! This is normal and not a fault or defect. | - Check that the power supply meets the requirements (see 'Technical Data'). |
| The infrared panel makes a sound after turning on. | - The material of the infrared panel and the insulation expands through the heat. ATTENTION! This is normal and not a fault or defect. Always wait at least three minutes after maintenance and/or repair before turning on the appliance. |
7. TAKING OUT OF SERVICE
WARNING!
The appliance in storage must not be accessible to children playing. Do not place heavy objects on the appliance. This can cause deformations and damage to the appliance.
If the appliance is stored for a longer period, the following measures must be taken:
- Turn the appliance off with the power button.
- Remove the plug E from the socket and wait for the infrared panel to cool down completely.
- Clean the appliance according to the instructions in 'Maintenance and cleaning'.
- Remove the batteries from the remote control. See 'Replacing the batteries in the remote control' for more information.
- If possible, pack the appliance in its original packaging or in a plastic bag and place the appliance in an upright position in accordance with the following points:
a. A dry, ventilated place.
b. Away from a heat source and not in direct sunlight.
c. Not exposed to high temperatures or frost.
d. A dust-free environment.
8. SAFE DISPOSAL
8.1. Safe removal of the appliance
- Remove the mains plug from the socket.
- Remove the appliance from the wall.
- Cut off the power cable as close to the appliance housing as possible.
8.2. Dispose of the appliance as waste
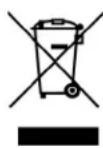
The materials used in this appliance marked with this symbol are recyclable. This marking indicates that this product should not be disposed of via household waste throughout the EU. In order to prevent damage to the environment or human health as a result of uncontrolled waste, it must be processed responsibly so that raw materials can be reused sustainably. Use the existing collection systems or contact the shop where you purchased the product if you want to dispose of the used product. There, the product is recycled in an environmentally friendly way.
8.3. Dispose of the packaging material as waste
Dispos of the packaging material through your local recycling facility. By properly dising of packaging material and packaging waste, you help prevent potential risks to the environment and public health. The symbols on the packaging indicate that the packaging is made of cellulose, polyethylene and polystyrene (EPS).
8.4. Dispose of the batteries as waste
The remote control contains batteries. Batteries may not be disposed of in ordinary household waste. The batteries can contain toxic substances and are subject to specific regulations. Always return batteries to a designated collection point.
VORWORT
Uber这意味着 Dokument
2. PROPRIÉTÉS DU PRODUIT
6. DYSFONCTIONNEMENTS ET SOLUTIONS
7. MISE HORS SERVICE
8. MISE AU REBUT SÜRE
2. PROPRIÉTÉS DU PRODUIT
Supports (pour pose verticale)