
AVerVision A30 - Document camera AVer - Free user manual and instructions
Find the device manual for free AVerVision A30 AVer in PDF.

| Product Type | Document Camera |
| Brand | AVer |
| Model | AVerVision A30 |
| Dimensions (in use) | 96.9 x 239.04 x 348.4 mm |
| Dimensions (folded) | 96.9 x 98.1 x 184.5 mm |
| Net weight | 737 g ± 50 g |
| Power supply | 100-240 V AC, 50-60 Hz; 12 V DC, 2 A adapter |
| Power consumption | 15 W max. (lamp on); 14.5 W max. (lamp off) |
| Sensor | CMOS 1/3.06", 13 megapixels |
| HDMI output resolution | 3840x2160 (4K), 1920x1080, 1280x720, 1024x768 |
| USB streaming resolution | Up to 4K (MJPEG) or 1080p (YUV) |
| Digital zoom | 23x |
| Focus | Automatic and manual (via software) |
| Field of view | A3 or larger |
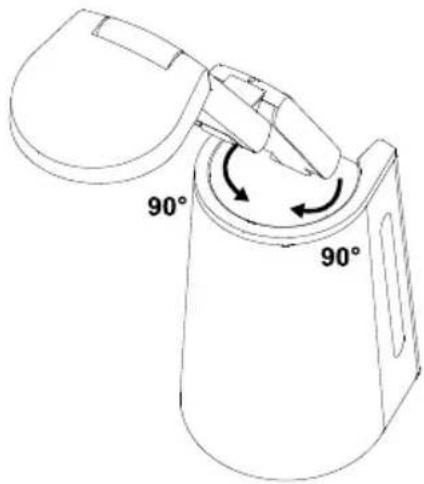
| Lens rotation | 90° left and right (with rotating base) |
| Main functions | Auto rotate, PIP, spotlight, viewfinder, split screen, video and photo recording, timer |
| Built-in LED lamp | Yes, 0.5 W |
| Internal storage | Up to 200 images (XGA) |
| External storage | USB flash drive up to 32 GB (FAT32) |
| Audio input | 3.5 mm jack (line or microphone) |
| Built-in speaker | 6 W, 6x6 meter range |
| Built-in microphone | Yes, 5 meter range |
| Security | Kensington security slot |
| Maintenance and cleaning | Do not twist the arm; clean the lens with a soft cloth; use the correct voltage |
| Spare parts and repairability | Power adapter, remote control, USB cable, HDMI cable (not included) – contact AVer support |
| General information | Use as webcam or document camera; multilingual OSD; firmware update via software |
Frequently Asked Questions - AVerVision A30 AVer
User questions about AVerVision A30 AVer
0 question about this device. Answer the ones you know or ask your own.
Ask a new question about this device
Download the instructions for your Document camera in PDF format for free! Find your manual AVerVision A30 - AVer and take your electronic device back in hand. On this page are published all the documents necessary for the use of your device. AVerVision A30 by AVer.
USER MANUAL AVerVision A30 AVer
natural_image
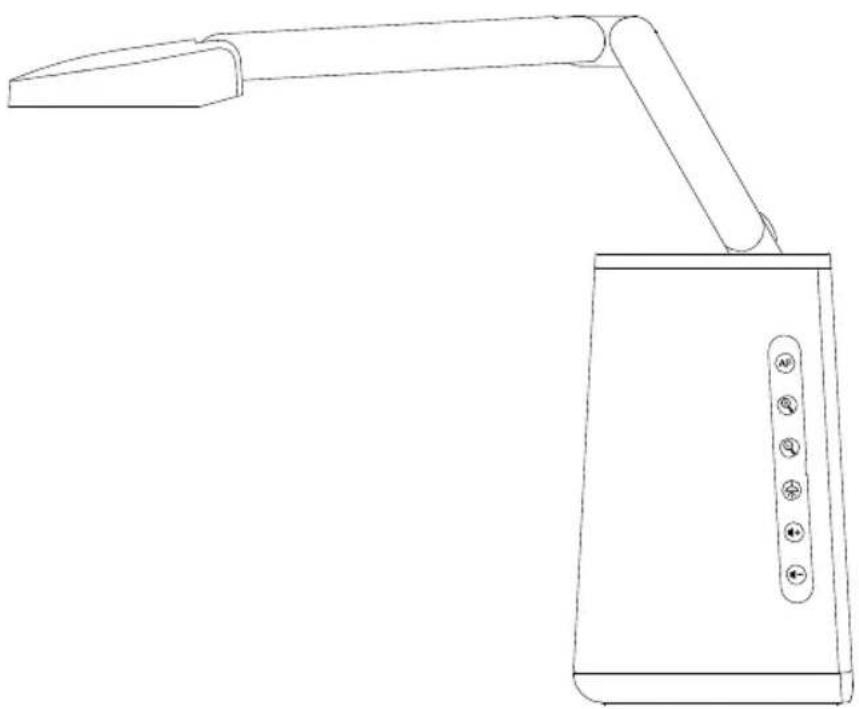
Line drawing of a desk lamp with adjustable arm and control panel (no text or symbols)AVerVision A30 Universal Camera
— User Manual —
Warning

- Do not twist the camera arm while folding it.
- Adjust the angles of the adjustable arm as illustrated.
- Do not drop the camera or subject it to physical shock.
- Ensure the power supply voltage is correct before using the camera.
- Do not place the camera where the cord can be stepped on as this may result in fraying or damage to the lead or the plug.
- To reduce the risk of fire or electric shock, do not expose the camera to rain or moisture. Warranty will be voided if any unauthorized modifications are done to the camera.
Federal Communications Commission Statement
NOTE: This equipment has been tested and found to comply with the limits for a Class A digital device, pursuant to part 15 of the FCC Rules. These limits are designed to provide reasonable protection against harmful interference when the equipment is operated in a commercial environment. This equipment generates, uses, and can radiate radiofrequency energy and, if not installed and used in accordance with the instruction manual, may cause harmful interference to radio communications. Operation of this equipment in a residential area is likely to cause harmful interference in which case the user will be required to correct the interference at his own expense.
FCC Caution: Any changes or modifications not expressly approved by the party responsible for compliance could void the user's authority to operate this equipment.
This device complies with part 15 of the FCC Rules.
Operation is subject to the following two conditions:
(1) This device may not cause harmful interference, and
(2) this device must accept any interference received, including interference that may cause undesired operation.
This is a class A product. In a domestic environment, this product may cause radio interference in which case the user may be required to take adequate measures.
Caution
Risk of explosion if battery is replaced by an incorrect type. Dispose of used batteries in a safe and proper manner.
No warranty or representation, either expressed or implied, is made with respect to the contents of this documentation, its quality, performance, merchantability, or fitness for a particular purpose. Information presented in this documentation has been carefully checked for reliability; however, no responsibility is assumed for inaccuracies. The information contained in this documentation is subject to change without notice.
In no event will AVer Information Inc. be liable for direct, indirect, special, incidental, or consequential damages arising out of the use or inability to use this product or documentation, even if advised of the possibility of such damages.
TRADEMARKS
“AVer” is a trademark owned by AVer Information Inc. Other trademarks used herein for description purpose only belong to each of their companies.
COPYRIGHT
© 2024 AVer Information Inc. All rights reserved. | April 09, 2024
All rights of this object belong to AVer Information Inc. Reproduced or transmitted in any form or by any means without the prior written permission of AVer Information Inc. is prohibited. All information or specifications are subject to change without prior notice.
More Help
For FAQs, technical support, software and user manual download, please visit:
Non-USA
Download Center: https://www.aver.com/download-center
Technical Support: https://www.aver.com/technical-support
USA
Download Center: https://www.averusa.com/business/support
Technical Support: https://averusa.force.com/support/s/contactsupport
Contact Information
Headquarters
AVer Information Inc.
8F, No.157, Da-An Rd., Tucheng Dist.,
New Taipei City 23673, Taiwan
Tel: +886 (2) 2269 8535
USA Branch Office
AVer Information Inc., Americas
44061 Nobel Drive, Fremont, CA 94538, USA
Tel: +1 (408) 263 3828
Toll-free: +1 (877) 528 7824
Europe Branch Office
AVer Information Europe B.V.
Westblaak 134, 3012 KM, Rotterdam,
The Netherlands
Tel: +31 (0) 10 7600 550
Japan Branch Office
アバー・インフォメーション株式会社
Vietnam Branch Office
Công ty TNHH AVer Information (Việt Nam)
Power Connection....7
HDMI Connection....8
Audio Input Connection....8
USB Device Connection....8
Bluetooth Connection (US Only) 8
Set Up Your Camera 9
Open the OSD Menu....9
Remote control Operation 9
Function Buttons Operation....9
OSD Menu 10
Image 10
Picture In Picture....12
Presentation 13
Audio 14
Setting....15
System 16
OSD Menu Tree 17
Specification 19
Troubleshooting....21
Overview
Package Contents

A30
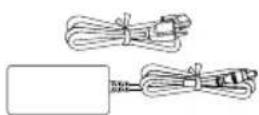
Power Adapter & Power Cord*
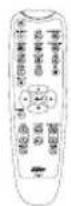
Remote Control
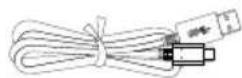
USB 2.0 Type-C to Type-A Cable (1.8m) (outside US)

Bluetooth Dongle (US only)
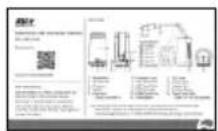
QR Code Card
Warranty Card (Japan only)
*The power cord will vary depending on the standard power outlet of the country where it is sold.
Parts Info
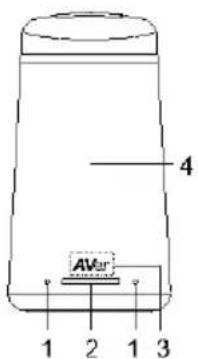
- Microphones
- LED Indicator
Solid blue: Normal
Solid red: Standby
(connected to power but not turned on)
Flashing red: Start-up
- IR Sensor
- Speaker (up to 6x6m)
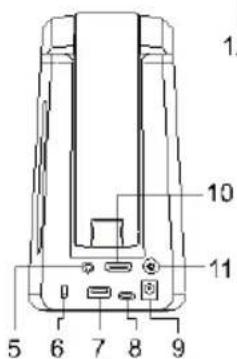
- Audio Input
- 3.5mm Line in / Mic in
- Kensington Lock
- USB Type-A Port
- USB Type-C Port
- DC Power Jack
- HDMI Output Port
- Power Button

- LED Lamp
- Camera Lens
- Foldable Arm
- Function Buttons
- Tripod Screw Hole
- Screw: 1/4"-20 (not included)
Function Buttons
| Press | To |
 | Autofocus once. |
 | Zoom in. Press and hold to zoom in continuously. |
 | Zoom out. Press and hold to zoom out continuously. |
 | Turn LED lamp on or off. Press and hold for 3 seconds to flip the live view. |
 | Increase volume. Press and hold to increase volume continuously. |
 | Decrease volume. Press and hold to decrease volume continuously. |
 + +  | Turn Auto Rotate on or off. Auto Rotate automatically flips images in the correct orientation. |
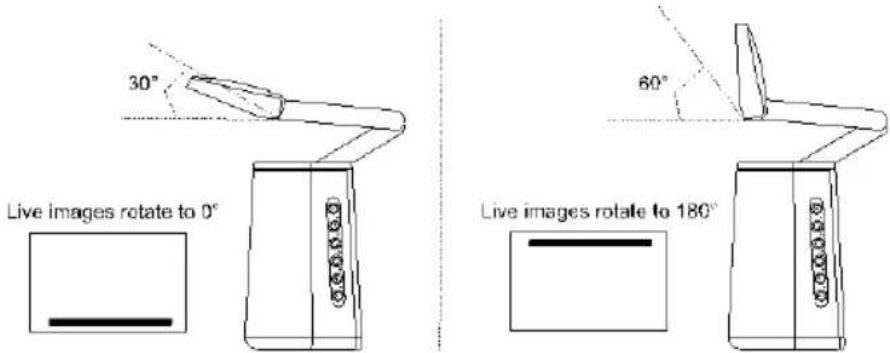
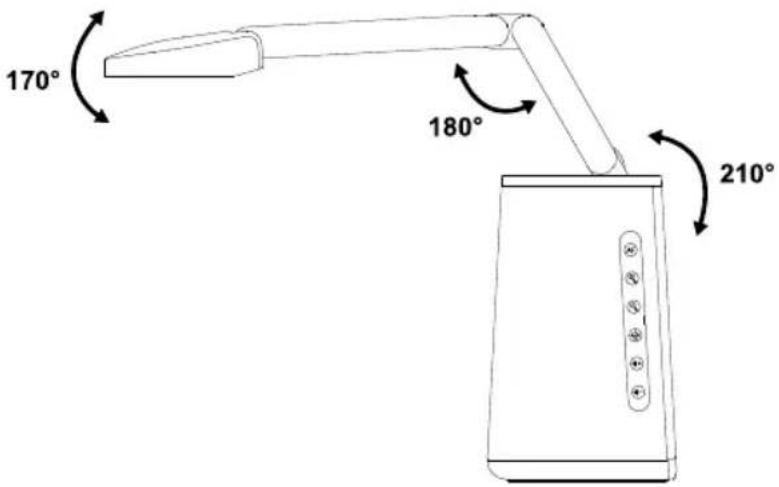
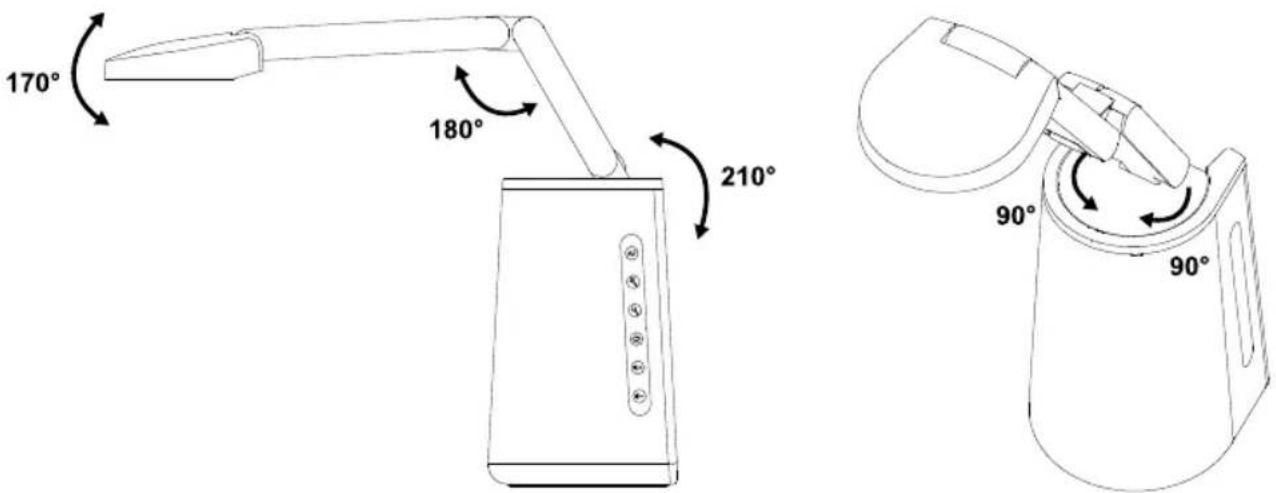
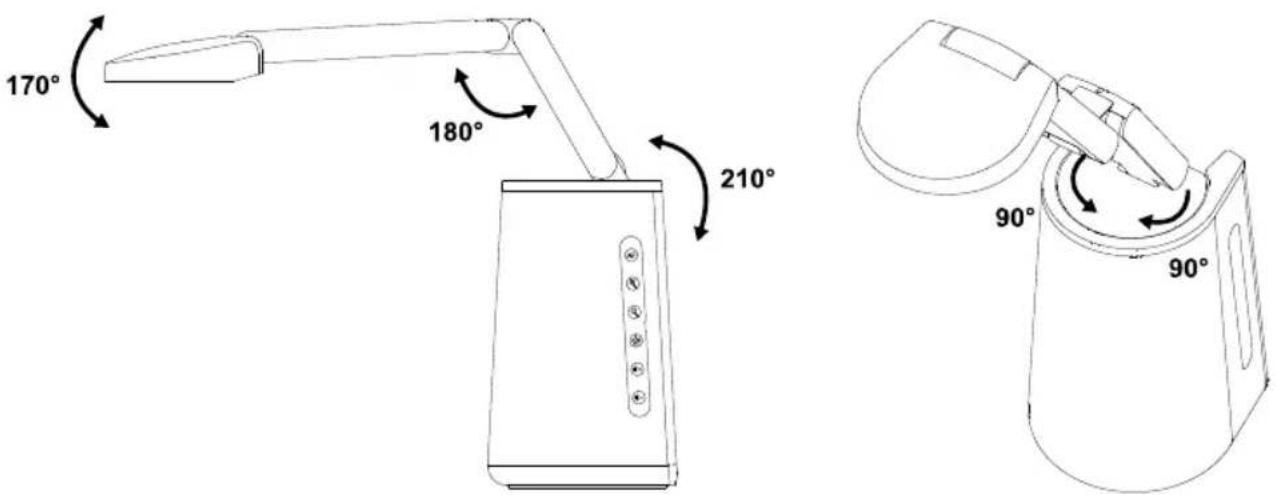
Operation Angles

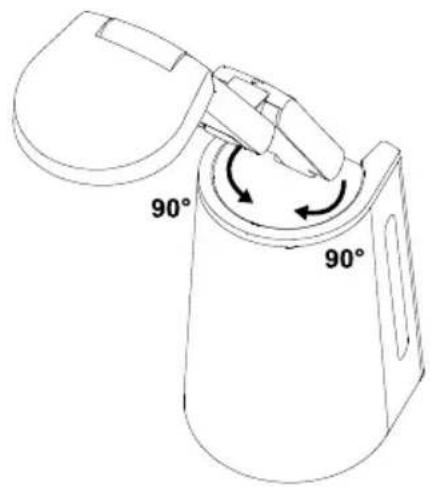
Auto Rotate
You can enable the Auto Rotate function for the unit to automatically flip 0/180° of the live images when turning the Camera Head upward or downward.
For the Auto Rotate function to work, enable the Auto Rotate function in advance. Please refer to Auto Rotate in the
- When the angle of the Camera Head is less than 30^ , the live images will rotate to 0^ .
- When the angle of the Camera Head is more than 60^ , the live images will rotate to 180^ .
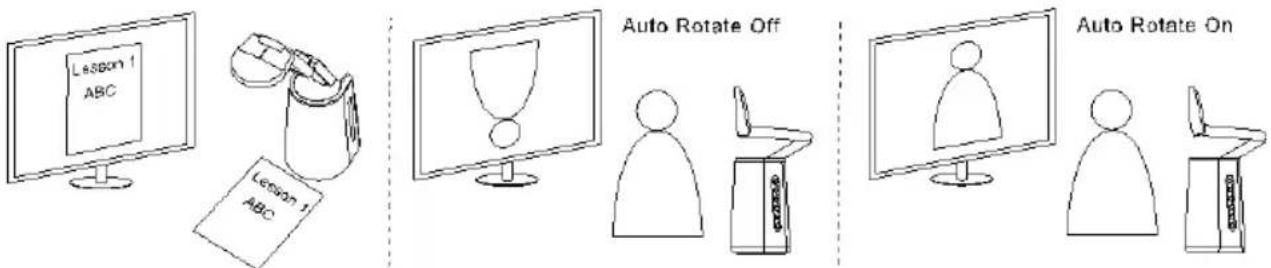
Since A30 Universal Camera can be used as a document camera or a Webcam, the Auto Rotate function is able to ensure the live images to be displayed with the right orientation, which will automatically flip the images when they appear upside-down. Below are 2 scenarios for your reference.
Scenario 1: When a presenter is shooting on a document at the beginning, and then turn the Camera Head upward to shoot him/herself, the live images will automatically flip if the Auto Rotate function is turned on.
flowchart
graph LR
    A["Lesson 1 ABC"] --> B["Device Setup"]
    B --> C["Auto Rotate Off"]
    C --> D["Person with Board"]
    D --> E["Auto Rotate On"]
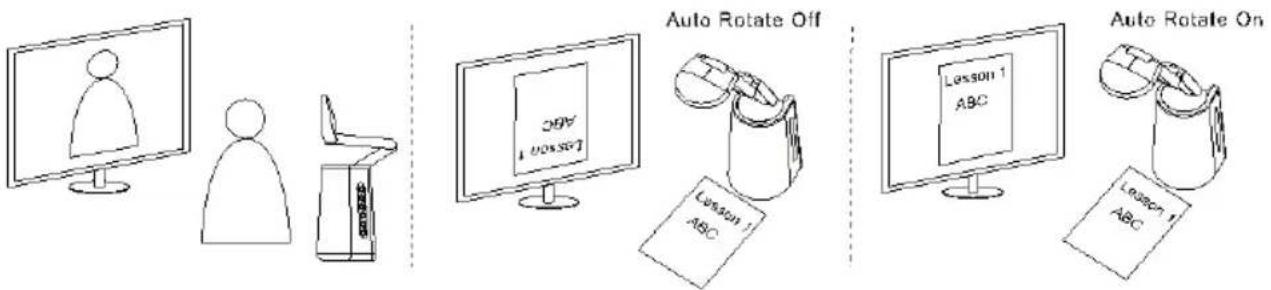
Scenario 2: When a presenter is shooting him/herself at the beginning, and then turn the Camera Head downward to shoot on a document, the live images will automatically flip if the Auto Rotate function is turned on.
flowchart
graph LR
    A["Person - User"] --> B["User - Chair"]
    B --> C["Computer with Board 1"]
    D["Auto Rotate Off"] --> E["Class 1: Lesson 1 ABC"]
    F["Auto Rotate On"] --> G["Class 1: Lesson 1 ABC"]
    H["Computer with Board 1"] --> I["Class 1: Lesson 1 ABC"]
Remote Control
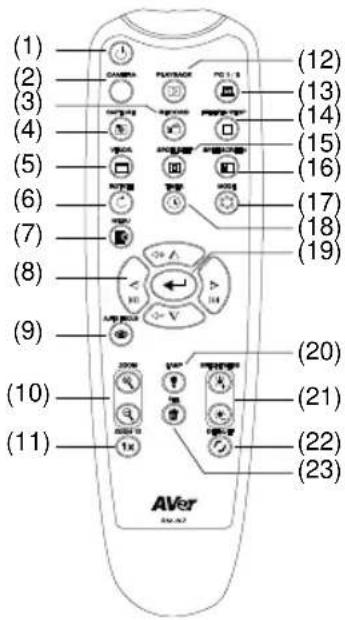
AAA battery x2 (not included)
| Name | Function |
| 1. Power | Turn the camera on or off. |
| 2. Camera | Enter the Camera mode (live view). |
| 3. Record | Start/stop audio/video recording. The recordings will be saved in a USB flash drive. |
| 4. Capture | Capture still image. In continuous capture mode, press this button again to stop. The images will be saved in the selected storage. |
| 5. Visor | Visor covers part of the camera view and allows the presenter to reveal the desired part of the camera view.To enable Visor:1. Press the Visor button to enter the Visor setup page in OSD menu.2. Select On and press to enable Visor, the upper-left part of the camera view will be exposed.3. Use the ▲,▼,◀, & ▶ buttons to reveal more of the covered camera view.4. To exit Visor mode, press the Visor button again. |
| 6. Rotate | Rotate the image by 0/180°. |
| 7. Menu | Open or close the OSD menu. |
| 8. ▲,▼,◀, & ▶ | - Select options in OSD menu. Enter the previous/next level page in OSD menu.- In Zoom mode, use ▲,▼,◀, & ▶ to navigate the live view.- In Playback mode, use ▲&▼ to increase and decrease the volume.- In Playback mode, use ◀&▶ to play the video backward and forward. |
| 9. Auto Focus | Adjust the focus automatically. |
| 10. Zoom +/- | In Camera Live mode or Split Screen (live) and Playback (image) mode, use Zoom +/- to zoom in or zoom out the images. |
| 11. Zoom 1x | Reset zoom level to 100%. |
| 12. Playback | Playback the captured pictures/videos from the USB flash drive.- Use ▲,▼,◀, & ▶ to select an image or video.- Press to display the image or playback the video. Press again to pause playback.- Press the Freeze/Stop button to stop playing back. |
| 13. PC 1/2 | In PIP mode, press this button to switch the video source displayed on the Main View. |
| 14. Freeze / Stop | - In Live mode, freeze live images.- In Playback mode, stop video playback. |
| 15. Spotlight | Spotlight will focus on the central area of the camera view and cover all of the rest areas.To enable Spotlight:1. Press the Spotlight button to enter Spotlight setup page in OSD menu.2. Select On and press to enable Spotlight, the central area of the camera view will be displayed.3. Optionally use ▲,▼,◀, & ▶ to adjust the revealed area.4. To exit Spotlight mode, press the Spotlight button again. |
| 16. Split Screen | Divide the screen into two. One side displays the camera live view and the other side displays the captured image or recorded video thumbnails from the USB flash drive.The split options include Left, Right, Top and Bottom.After selecting a split option, use ▲,▼,◀, & ▶ to select a capture image or video. Press to display the image or playback the video. |
| 17. Mode | Press to switch among Normal, High Quality and Motion modes. |
| 18. Timer | Press the Timer button to enter Presentation Timer setup page in OSD menu. Select to Start/Pause/Stop the timer countdown.Select Timer Interval to set the timer duration. |
| 19. ← | - Confirm a selection.- Enter the submenu in the OSD menu.- Play/Pause video playback.- Display the captured images. |
| 20. Lamp | Turn LED lamp on or off. |
| 21. Brightness +/- | Adjust the brightness. |
| 22. Default | Reset to factory default settings. |
| 23. DEL | Delete the selected picture/video in Playback mode. |
Connections
Power Connection
- Connect to a power outlet using the included power adapter and cord.
- Press the power button to turn on your camera.
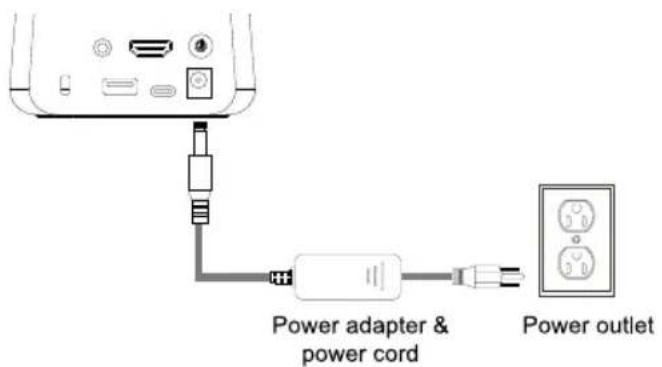
You can also use the USB Type-C port to power your camera by connect it to a computer using the included USB Type-C cable.
Note:
- We recommend using a USB Type-C to Type-C cable. Using the USB Type-C to Type-A cable may provide limited functions.
-
When switching between DC power jack and USB Type-C port, your camera goes into Standby mode. Press the power button to turn on your camera.
● Video and volume limits: -
The maximum HDMI resolution is 1080p.
- When you use the included USB Type-C to Type-A cable (1.8m), the maximum volume level decreases from 15 to 5.
- LED lamp, USB flash drive and upgrade firmware are unavailable.
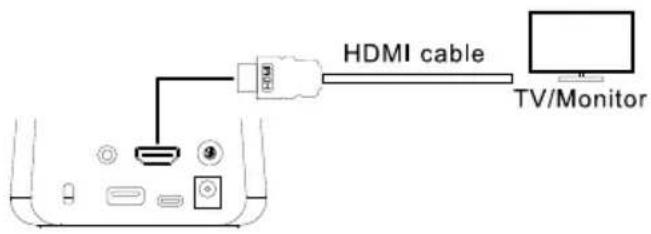
HDMI Connection
Connect to a TV or Monitor using an HDMI cable to stream video or configure settings on the OSD menu.
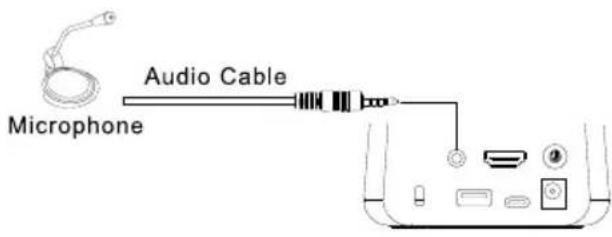
Audio Input Connection
Connect to an external microphone using an audio cable and deliver audio from your camera's built-in speaker.
● Line input level: 1Vrms (max.)
● Mic input level: 50mVrms (max.); supplied voltage: 2.5 +/- 0.5 (V)
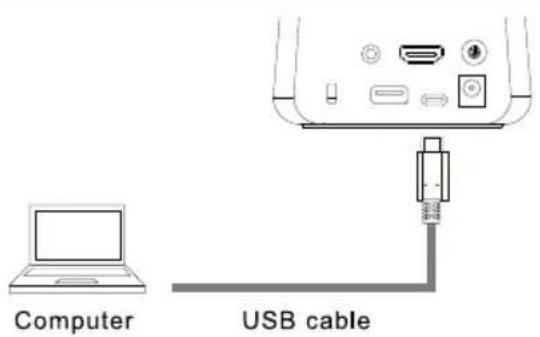
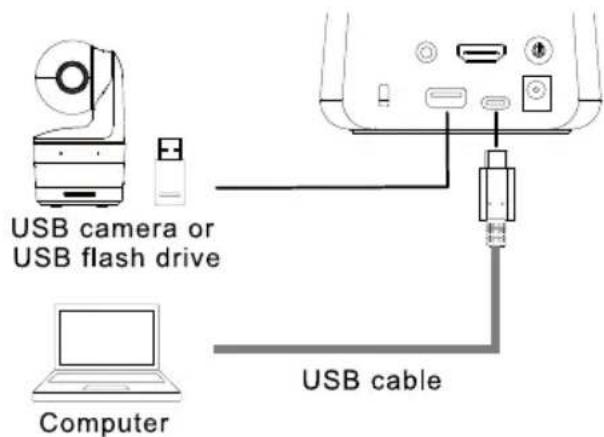
USB Device Connection
- USB Type-A port: Connect to a USB camera for picture-in-picture or an external storage of up to 32GB (FAT32) for images and videos.
- USB Type-C port: Connect to a computer using the included USB cable to work with your video conferencing software.
Bluetooth Connection (Optional accessory)
Connect your camera as a Bluetooth speaker via the Bluetooth dongle.
- Plug the included Bluetooth dongle into the USB Type-A port on your camera. Do not connect through a USB hub.
- Open the Bluetooth settings on your computer, smartphone or tablet and select A30 to connect your camera.

natural_image
Diagram of a device rear panel with ports and an internal connector (no text or symbols)Set Up Your Camera
Open the OSD Menu
You can open the on-screen display (OSD) menu to configure camera settings using the remote control or function buttons. Make sure you have connect the camera to a monitor or TV using an HDMI cable.
Remote control Operation
Press the Menu button on the remote control to open the OSD menu. Press again to close the menu.
| Button | Function |
| ◀ | Exit the selection or go back to the previous selection. |
| ▶ | Enter or confirm a selection. |
| ▲ | Move through the menu. |
| ▼ | Move through the menu. |
| ←J | Enter or confirm a selection. |
Function Buttons Operation
Press and hold the autofocus button AF for 3 seconds to open the OSD menu. Press again to close the menu.
| Button | Function | |
 | Back | |
 | Up | |
 | Down | |
 | Left | |
 | Right | |
 | Enter | |
OSD Menu
Image
| IMAGE | Brightness | + |
| PICTURE IN PICTURE | Contrast | 128 |
| PRESENTATION | Saturation | - |
| AUDIO | Preview Mode | |
| SETTING | Effect | |
| SYSTEM | Mirror | |
| Auto Rotate | ||
| Exposure Setup | ||
| Manual Exposure | ||
| White Balance Setup | ||
| Manual W.B Blue | ||
| Manual W.B Red | ||
| Focus |
■ Brightness: Adjust the brightness level (0-255).
■ Contrast: Adjust the contrast level (0-255).
■ Saturation: Adjust the saturation level (0-255).
■ Preview Mode: Select a mode.
● Normal: Adjust the gradient of image.
● Motion: High refresh rate upon motion images.
● High Quality: High resolution with the best quality.
■ Effect: Select an effect.
● Color: Convert the images into positive (true color).
● B/W: Convert the images into monochrome (black and white).
● Negative: Convert the images into negative.
■ Mirror: Enable or disable the function to flip left or right of the images.
■ Auto Rotate: Enable or disable the function to automatically rotate 0/180° of the images.
■ Exposure Setup: Select an option.
● Auto: Select to automatically adjust the exposure setting.
- Manual: Select to manually adjust the exposure setting. Adjust the Manual Exposure below.
■ Manual Exposure: This function only appears when Manual is selected in Exposure Setup. Adjust the exposure value (0-99).
■ White Balance Setup: Select an option.
● Auto: Select to automatically adjust the white balance setting.
- Manual: Select to manually adjust the white balance. Adjust the blue and red color below.
■ Manual W.B Blue: This function only appears when Manual is selected in White Balance Setup. Adjust the value (0-255).
■ Manual W.B Red: This function only appears when Manual is selected in White Balance Setup. Adjust the value (0-255).
■ Focus: Adjust the focus value (0-1023).
Picture In Picture
The Picture In Picture (PIP) function allows you to display two camera streams, one from the A30 and the other from an USB camera, on a screen. It's useful for a presenter to display the content of the materials and the presenter/audience simultaneously.
| IMAGE | PIP Mode | ON |
| PICTURE IN PICTURE | Main Screen Switch | OFF |
| PRESENTATION | Position | |
| AUDIO | Size | |
| SETTING | Start PIP Automatically | |
| SYSTEM |
■ PIP Mode: Manually enable or disable the PIP mode. To manually display the PIP mode:
- Connect an USB camera to the USB Type-A port of A30.
- Go to OSD menu > Picture In Picture > PIP Mode and select On. You should see the PIP mode displayed on the screen.
- Optionally switch the main view, or adjust the position or size of the sub view.
- To turn off the PIP mode, go to OSD menu > Picture In Picture > PIP Mode and select Off.
■ Main Screen Switch: Select a video source to be displayed on the Main View. Options include A30 and External Source (camera connected to the USB Type-A port of A30).
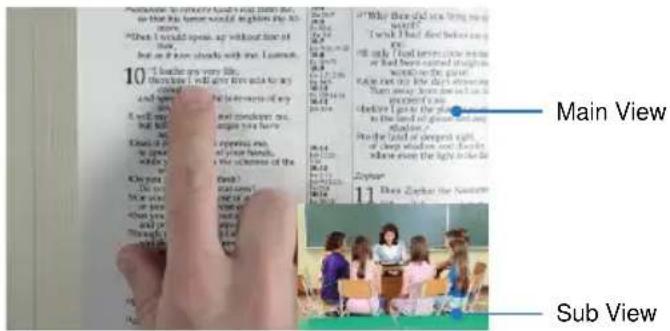
■ Position: Select a position for the Sub View. Options include Bottom Left, Top Left, Top Right, Bottom Right and Manual. If Manual is selected, you can position the Sub View manually. Use the ▲, ▼, , buttons on the Remote Control to select a position.
■ Size: Select a size for the Sub View. Options include Large and Small.
■ Start PIP Automatically: Turn on this function if you want A30 to automatically display PIP Mode when an USB camera is connected to A30. For this function to work:
-
Go to OSD menu > Picture In Picture > PIP Mode and select On.
-
Go to OSD menu > Picture In Picture > Start PIP Automatically and select On.
-
Connect an USB camera to the USB Type-A port of A30. You should see the PIP mode displayed on the screen.
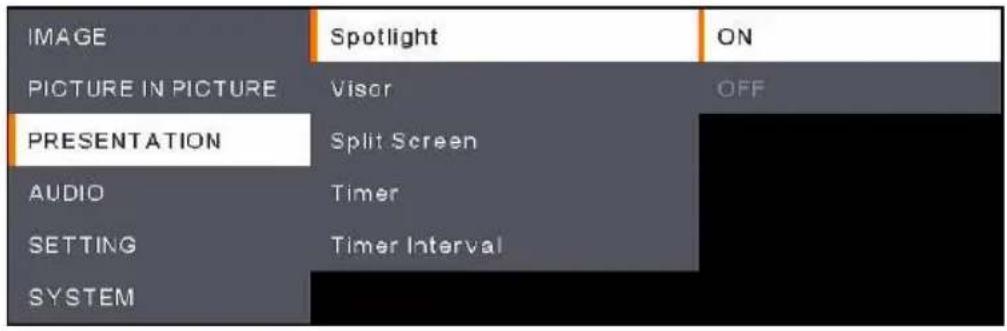
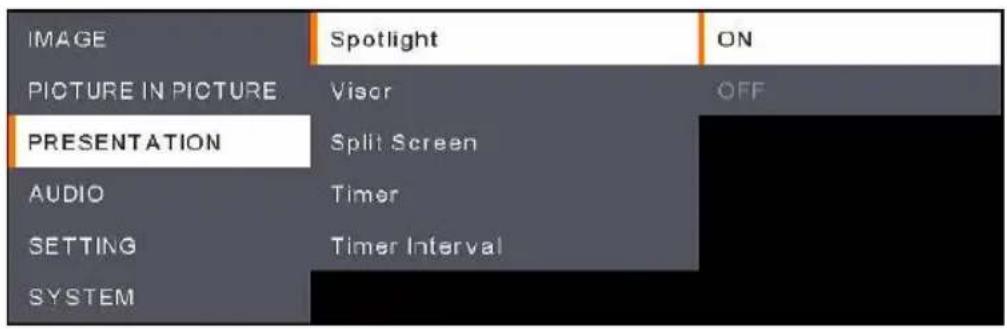
Presentation
| IMAGE | Spotlight | ON |
| PICTURE IN PICTURE | Viscr | OFF |
| PRESENTATION | Split Screen | |
| AUDIO | Timer | |
| SETTING | Timer Interval | |
| SYSTEM |
■ Spotlight: Enable or disable the function. Spotlight will focus on the central area of the camera view and cover all of the rest areas. To enable Spotlight:
- Go to OSD menu > Presentation > Spotlight and select On, the central area of the camera view will be displayed.
- Optionally use the ▲,▼,◀, &▶ buttons on the Remote Control to adjust the revealed area.
- To disable the Spotlight function, press the Spotlight button on the Remote Control.
■ Visor: Enable or disable the function. Visor covers part of the camera view and allows the presenter to reveal the desired part of the camera view. To enable Visor:
- Go to OSD menu > Presentation > Visor and select On, the upper-left part of the camera view will be exposed.
- Use the ▲,▼,◀, &▶ buttons on the Remote Control to reveal more of the covered part.
- To disable the Visor function, press the Visor button on the Remote Control.
Split Screen: Divide the screen into two. One side displays the camera live view and the other side displays the captured image or recorded video thumbnails from the USB flash drive. The split options include Left, Right, Top and Bottom.
After selecting a split option, use the ▲,▼,◀, &▶ buttons on the Remote Control to select a capture image or video. Press 📄 to display the image or playback the video.
Timer: Select to Start, Pause or Stop the timer countdown. You can optionally set up the Timer Interval below. When Start is selected, a timer will be displayed on the top-center of the live view. To pause or stop Timer, press the Timer button on the Remote Control and select Pause or Stop on the OSD menu.
■ Timer Interval: Set up an interval for the Timer above.
Audio
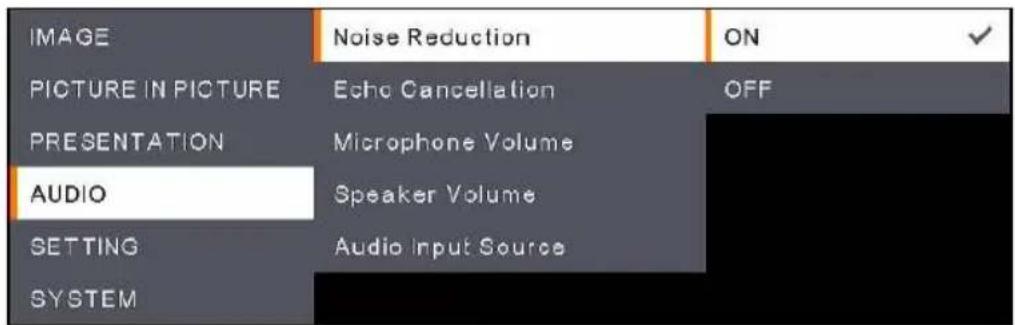
■ Noise Reduction: Enable or disable the Noise Reduction function.
■ Echo Cancellation: Enable or disable the Echo Cancellation function.
■ Microphone Volume: Adjust the microphone volume (0-32).
■ Speaker Volume: Adjust the speaker volume (0-15).
■ Audio Input Source: Select an audio input source. Options include MIC In and LINE In.
■ Bluetooth Speaker (Optional accessory): Turn Bluetooth on or off.
Setting
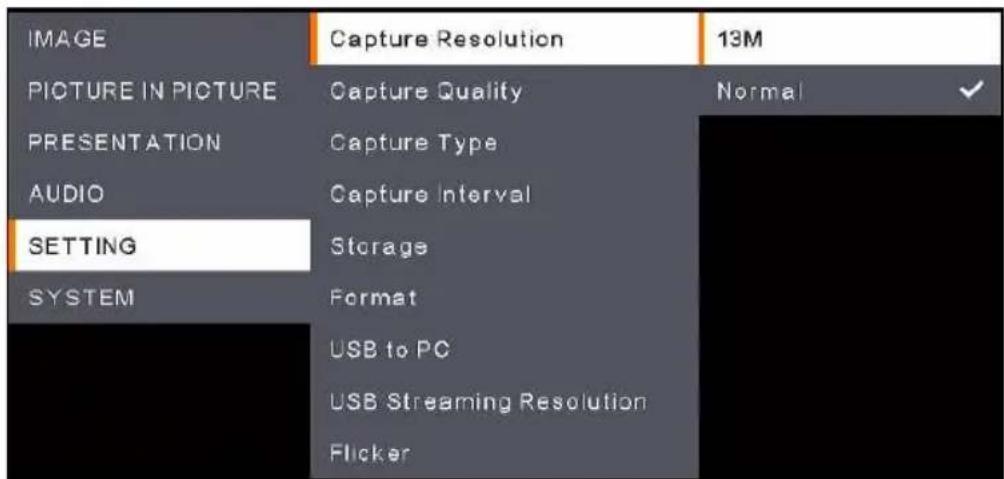
■ Capture Resolution: Select a resolution for the captured images.
● 13M: Apply the 4208x3120 resolution to the captured images.
- Normal: The resolution of the captured images will be based on the selected resolution in the Output Display (System > Output Display).
■ Capture Quality: Select a quality for the captured images.
■ Capture Type: Select Single to manually capture one image at a time. Select Continuous to continuously capture images based on the setup Capture Interval. To stop continuously capturing images, press the Capture button on the Remote Control.
■ Capture Interval: If Continuous is selected in the Capture Type above, you can further set up an interval.
■ Storage: To set up this function, remove the USB cable from the unit first. Select a storage to store the capture images or recording videos. Options include Embedded or USB Drive.
[Note]
- The unit will automatically detect whether an USB drive has been connected. If an USB drive is connected, the unit will automatically assign USB Drive to store data.
- The internal Embedded storage can only store images with a maximum of 200 frames. If you want to store videos, please connect an USB drive to the unit.
■ Format: To set up this function, remove the USB cable from the unit first. You can format the Embedded or USB Drive storage to erase all the data permanently.
USB to PC: To set up this function, remove the USB cable from the unit first. When connecting the unit to PC through the USB cable, you can either select Camera to use it as a Webcam, or select Storage if you want to transfer the images or recordings from the unit to your PC.
■ USB Streaming Resolution: To set up this function, remove the USB cable from the unit first. Select a streaming resolution. Options include Max to 4K and Max to 1080P.
■ Flicker: Select 50Hz or 60Hz. Some display devices cannot handle high refresh rates. The image will flicker a couple of times as the output is switched to another refresh rate.
System
| IMAGE | Language | English |
| PICTURE IN PICTURE | Output Display | 繁體中文 |
| PRESENTATION | Backup | 日本語 |
| AUDIO | Save Setting | Deutsch |
| SETTING | Recall Setting | Français |
| SYSTEM | Information | Español |
| Default | 简体中文 | |
| Italiano | ||
| Русский | ||
| Indonesia | ||
| Suomi | ||
| Poleki |
■ Language: Select a language.
■ Output Display: Select a resolution for the output display. The unit will automatically detect the output device resolution and configure to the highest resolution.
■ Backup: Select a storage to backup the images from the internal Embedded storage to the selected storage.
■ Save Setting: Save the current settings, such as Brightness, Preview Mode, Contrast and etc., as a profile. Up to 3 profiles can be configured. To do this, after configuring all the settings, select a profile and then press the button on the Remote Control to save the settings as a profile. To clear a setup profile, refer to Recall Setting below.
■ Recall Setting: You can erase the settings of the setup profiles in the Save Setting above. To do this, select a profile and then press the button on the Remote Control, the selected profile settings will be cleared.
■ Information: Display the unit's information.
■ Default: Restore all the settings to factory default settings.
OSD Menu Tree
| 1^st Level | 2^nd Level | 3^rd Level |
| Image | Brightness | 0~255 |
| Contrast | 0~255 | |
| Saturation | 0~255 | |
| Preview Mode | Normal/Motion/High Quality | |
| Effect | Color/B/W/Negative | |
| Mirror | On/Off | |
| Auto Rotate | On/Off | |
| Exposure Setup | Auto/Manual | |
| Manual Exposure* This function only appears when “Manual” is selected in Exposure Setup. | 0~99 | |
| White Balance Setup | Auto/Manual | |
| Manual W.B Blue* This function only appears when “Manual” is selected in White Balance Setup. | 0~255 | |
| Manual W.B Red* This function only appears when “Manual” is selected in White Balance Setup. | 0~255 | |
| Focus | 0~1023 | |
| Picture In Picture | PIP Mode | On/Off |
| Main Screen Switch | A30/External Source | |
| Position | Bottom Left/Top Left/Top Right/Bottom Right/Manual | |
| Size | Large/Small | |
| Start PIP Automatically | On/Off | |
| Presentation | Spotlight | On/Off |
| Visor | On/Off | |
| Split Screen | Left/Top/Right/Bottom | |
| Timer | Start/Pause/Stop | |
| Timer Interval | 1~120 min. | |
| Audio | Noise Reduction | On/Off |
| Echo Cancellation | On/Off | |
| Microphone Volume | 0~32 | |
| Speaker Volume | 0~15 | |
| Audio Input Source | Mic In/Line In | |
| Setting | Capture Resolution | 13M/Normal |
| Capture Quality | Finest/High/Normal | |
| Capture Type | Single/Continuous | |
| Capture Interval* This function only appears when “Continuous” is selected in Capture Type. | 1~600 sec. | |
| Storage | Embedded/USB Drive | |
| Format | Embedded/USB Drive | |
| USB to PC | Camera/Storage | |
| USB Streaming Resolution | Max to 4K/Max to 1080P | |
| Flicker | 50Hz/60Hz | |
| System | Language | English/Traditional Chinese/Japanese/German/French/Spanish/Simplified Chinese/Italian/Russian/Indonesia/Finland/Polish |
| Output Display | 3840x2160 @603840x2160 @301920x10801280x7201024x768 | |
| Backup | USB Drive | |
| Save Setting | Profile 1/Profile 2/Profile 3 | |
| Recall Setting | Profile 1/Profile 2/Profile 3 | |
| Information | Camera information | |
| Default | No/Yes |
Specifications
| Camera | |
| Sensor | 1/3.06" CMOS |
| Pixel Count | 13 Megapixels |
| Frame Rate | 3840x2160 (4K): Up to 30fps1080p or lower: Up to 60fps |
| White Balance | Auto / Manual |
| Exposure | Auto / Manual |
| Preview Mode | Normal / Motion / High Quality |
| Effect | Color / B/W / Negative |
| Output Resolutions(USB-UVC) | MJPEG: 3840x2160, 1920x1080, 1280x720, 640x360, 2560x1920, 2048x1536, 1600x1200, 1280x960, 1024x768, 640x480, 1280x1024, 1280x800YUV: 640x360, 640x480, 320x180, 320x240 |
| Display Output (HDMI) | 3840x2160, 1920x1080, 1280x720, 1024x768 |
| Optical Mechanism | |
| Lens Rotation (mechanical) | Right: 90° (with rotation base), Left: 90° (with rotation base) |
| Shooting Area | A3 or above |
| Zoom | 23x digital zoom |
| Focus | Auto focus, manual via software |
| Interface | |
| HDMI Output | 1 (support up to 4K display output) |
| USB Type-A Port | 1 (for USB flash drive and USB camera streaming input) |
| USB Type-C Port | 1 (connect to PC for USB camera streaming output) |
| Audio Input | 1 (Line-in/Mic-in, 3.5mm stereo)Line input level: 1Vrms (max.)Mic input level: 50mVrms (max.); supplied voltage: 2.5 +/- 0.5 (V) |
| Speaker | 6W speaker, support 6x6 meters |
| Built-in Microphone | Yes, support 5 meters pickup range |
| DC 12V Input | Power Jack |
| Functions | |
| OSD | Supported |
| Firmware Update | Update firmware using AVerTouch software |
| LED Lamp | Yes, embedded LED lamp 0.5W |
| Internal Storage | Image capture up to 200 frames (XGA: 1024x768) |
| External Storage | Support FAT32, 32GB USB storage |
| Auto Rotation | Yes |
| Audio Function | AEC, background noise suppression technology.AI noise reduction. |
| General | |
| Power Source | 100-240VAC, 50~60Hz; 12VDC, 2A |
| Power Input | Lamp on: 12VDC, 1.25A, 15W max.Lamp off: 12VDC, 1.21A, 14.5W max. |
| Dimensions (W x D x H) | Operating: 96.9 x 239.04 x 348.4mmFolded: 96.9 x 98.1 x 184.5mm |
| Net Weight | 737g ± 50g |
Troubleshooting
There is no picture on the presentation screen.
- Check all the connectors again as shown in this manual.
- Verify the setting of the display output device.
- For HDMI display output, a delay occurs while waiting for both the display device and the unit to sync up. Wait for around 4 to 7 seconds until you see the camera image on the screen.
The picture on the presentation screen is distorted or the image is blurry.
- Reset all changed settings, if any, to the original manufacturer default setting. Press MENU then go to SYSTEM > Default and select YES in the OSD menu.
- Use the Brightness and Contrast menu functions to reduce the distortion if applicable.
- If you discover that the image is blurry or out of focus, press the Auto Focus button on the remote control.
natural_image
Line drawing of a desk lamp with adjustable arm and control panel (no text or symbols)AVerVision A30
多功能攝影機
— 使用手册 —
警告
限用物質及其化學符號
Restricted substances and its chemical symbols
備考1. “○”係指該項限用物質之百分比含量未超出百分比含量基準值。
Note 1: “○” indicates that the percentage content of the restricted substance does not exceed the percentage of reference value of presence.
備考2. “-”係指該項限用物質為排除項目。
Note 2 : The “-” indicates that the restricted substance corresponds to the exemption.
免責聲明
https://www.aver.com/download-center
常見問題、技術支援,請到下面網址:
https://www.aver.com/technical-support
連絡資訊
圓展科技股份有限公司
| IMAGE | PIP Mode | ON |
| PICTURE IN PICTURE | Main Screen Switch | OFF |
| PRESENTATION | Position | |
| AUDIO | Size | |
| SETTING | Start PIP Automatically | |
| SYSTEM |
簡報 (Presentation)
natural_image
Line drawing of a desk lamp with adjustable arm and control panel (no text or symbols)AVerVision A30
ユニバーサルカメラ
- ユーザーマニュアル -
取り扱い上の注意
natural_image
Line drawing of a desk lamp with adjustable arm and control panel (no text or symbols)AVerVision A30 Universelle Kamera
https://www.avereurope.com/download-center
https://www.avereurope.com/technical-support
| IMAGE | PIP Mode | ON |
| PICTURE IN PICTURE | Main Screen Switch | OFF |
| PRESENTATION | Position | |
| AUDIO | Size | |
| SETTING | Start PIP Automatically | |
| SYSTEM |
| 1^rd Ebene | 2^rd Ebene | 3^rd Ebene |
| Image | Brightness | 0~255 |
| Contrast | 0~255 | |
| Saturation | 0~255 | |
| Preview Mode | Normal/Motion/High Quality | |
| Effect | Color/B/W/Negative | |
| Mirror | On/Off | |
| Auto Rotate | On/Off | |
| Exposure Setup | Auto/Manual | |
| Manual Exposure* This function only appears when “Manual” is selected in Exposure Setup. | 0~99 | |
| White Balance Setup | Auto/Manual | |
| Manual W.B Blue* This function only appears when “Manual” is selected in White Balance Setup. | 0~255 | |
| Manual W.B Red* This function only appears when “Manual” is selected in White Balance Setup. | 0~255 | |
| Focus | 0~1023 | |
| Picture In Picture | PIP Mode | On/Off |
| Main Screen Switch | A30/External Source | |
| Position | Bottom Left/Top Left/Top Right/Bottom Right/Manual | |
| Size | Large/Small | |
| Start PIP Automatically | On/Off | |
| Presentation | Spotlight | On/Off |
| Visor | On/Off | |
| Split Screen | Left/Top/Right/Bottom | |
| Timer | Start/Pause/Stop | |
| Timer Interval | 1~120 min. | |
| Audio | Noise Reduction | On/Off |
| Echo Cancellation | On/Off | |
| Microphone Volume | 0~32 | |
| Speaker Volume | 0~15 | |
| Audio Input Source | Mic In/Line In | |
| Setting | Capture Resolution | 13M/Normal |
| Capture Quality | Finest/High/Normal | |
| Capture Type | Single/Continuous | |
| Capture Interval* This function only appears when “Continuous” is selected in Capture Type. | 1~600 sec. | |
| Storage | Embedded/USB Drive | |
| Format | Embedded/USB Drive | |
| USB to PC | Camera/Storage | |
| USB Streaming Resolution | Max to 4K/Max to 1080P | |
| Flicker | 50Hz/60Hz | |
| System | Language | English/Traditional Chinese/Japanese/German/French/Spanish/Simplified Chinese/Italian/Russian/Indonesia/Finland/Polish |
| Output Display | 3840x2160 @603840x2160 @301920x10801280x7201024x768 | |
| Backup | USB Drive | |
| Save Setting | Profile 1/Profile 2/Profile 3 | |
| Recall Setting | Profile 1/Profile 2/Profile 3 | |
| Information | Camera information | |
| Default | No/Yes |
Technische Daten
natural_image
Line drawing of a desk lamp with adjustable arm and control panel (no text or symbols)AVerVision A30 Caméra Universelle
— Mode d'emploi —
Avertissement
https://www.avereurope.com/download-center
Assistance Technique:
https://www.avereurope.com/technical-support
Incrustation (Picture In Picture) 13
Presentation (Presentation).... 15
Son (Audio) 16
Parametres (Setting) 17
Pile AAA x2 (non includes)
Incrustation (Picture In Picture)
| IMAGE | PIP Mode | ON |
| PICTURE IN PICTURE | Main Screen Switch | OFF |
| PRESENTATION | Position | |
| AUDIO | Size | |
| SETTING | Start PIP Automatically | |
| SYSTEM |
■ PIP Mode: activation/désactivation manuelles du mode PIP. Pour activer manuellement le mode PIP:
Presentation (Presentation)
| 1^e couche | 2^e couche | 3^e couche |
| Image | Brightness | 0~255 |
| Contrast | 0~255 | |
| Saturation | 0~255 | |
| Preview Mode | Normal/Motion/High Quality | |
| Effect | Color/B/W/Negative | |
| Mirror | On/Off | |
| Auto Rotate | On/Off | |
| Exposure Setup | Auto/Manual | |
| Manual Exposure* This function only appears when “Manual” is selected in Exposure Setup. | 0~99 | |
| White Balance Setup | Auto/Manual | |
| Manual W.B Blue* This function only appears when “Manual” is selected in White Balance Setup. | 0~255 | |
| Manual W.B Red* This function only appears when “Manual” is selected in White Balance Setup. | 0~255 | |
| Focus | 0~1023 | |
| Picture In Picture | PIP Mode | On/Off |
| Main Screen Switch | A30/External Source | |
| Position | Bottom Left/Top Left/Top Right/Bottom Right/Manual | |
| Size | Large/Small | |
| Start PIP Automatically | On/Off | |
| Presentation | Spotlight | On/Off |
| Visor | On/Off | |
| Split Screen | Left/Top/Right/Bottom | |
| Timer | Start/Pause/Stop | |
| Timer Interval | 1~120 min. | |
| Audio | Noise Reduction | On/Off |
| Echo Cancellation | On/Off | |
| Microphone Volume | 0~32 | |
| Speaker Volume | 0~15 | |
| Audio Input Source | Mic In/Line In | |
| Setting | Capture Resolution | 13M/Normal |
| Capture Quality | Finest/High/Normal | |
| Capture Type | Single/Continuous | |
| Capture Interval* This function only appears when “Continuous” is selected in Capture Type. | 1~600 sec. | |
| Storage | Embedded/USB Drive | |
| Format | Embedded/USB Drive | |
| USB to PC | Camera/Storage | |
| USB Streaming Resolution | Max to 4K/Max to 1080P | |
| Flicker | 50Hz/60Hz | |
| System | Language | English/Traditional Chinese/Japanese/German/French/Spanish/Simplified Chinese/Italian/Russian/Indonesia/Finland/Polish |
| Output Display | 3840x2160 @603840x2160 @301920x10801280x7201024x768 | |
| Backup | USB Drive | |
| Save Setting | Profile 1/Profile 2/Profile 3 | |
| Recall Setting | Profile 1/Profile 2/Profile 3 | |
| Information | Camera information | |
| Default | No/Yes |
Spé cifications
natural_image
Line drawing of a desk lamp with adjustable arm and control panel (no text or symbols)AVerVision A30 Telecamera Universale
https://www.avereurope.com/download-center
Assistenza tecnica:
https://www.avereurope.com/technical-support
Picture In Picture (Picture In Picture) 13
Setting (Setting) 17
System (System)....19
- Vite: 1/4"-20 (non fornita
in dotazione)
Pulsanti funzione
Picture In Picture (Picture In Picture)
| IMAGE | PIP Mode | ON |
| PICTURE IN PICTURE | Main Screen Switch | OFF |
| PRESENTATION | Position | |
| AUDIO | Size | |
| SETTING | Start PIP Automatically | |
| SYSTEM |
| 1° livello | 2° livello | 3° livello |
| Image | Brightness | 0~255 |
| Contrast | 0~255 | |
| Saturation | 0~255 | |
| Preview Mode | Normal/Motion/High Quality | |
| Effect | Color/B/W/Negative | |
| Mirror | On/Off | |
| Auto Rotate | On/Off | |
| Exposure Setup | Auto/Manual | |
| Manual Exposure* This function only appears when “Manual” is selected in Exposure Setup. | 0~99 | |
| White Balance Setup | Auto/Manual | |
| Manual W.B Blue* This function only appears when “Manual” is selected in White Balance Setup. | 0~255 | |
| Manual W.B Red* This function only appears when “Manual” is selected in White Balance Setup. | 0~255 | |
| Focus | 0~1023 | |
| Picture In Picture | PIP Mode | On/Off |
| Main Screen Switch | A30/External Source | |
| Position | Bottom Left/Top Left/Top Right/Bottom Right/Manual | |
| Size | Large/Small | |
| Start PIP Automatically | On/Off | |
| Presentation | Spotlight | On/Off |
| Visor | On/Off | |
| Split Screen | Left/Top/Right/Bottom | |
| Timer | Start/Pause/Stop | |
| Timer Interval | 1~120 min. | |
| Audio | Noise Reduction | On/Off |
| Echo Cancellation | On/Off | |
| Microphone Volume | 0~32 | |
| Speaker Volume | 0~15 | |
| Audio Input Source | Mic In/Line In | |
| Setting | Capture Resolution | 13M/Normal |
| Capture Quality | Finest/High/Normal | |
| Capture Type | Single/Continuous | |
| Capture Interval | 1~600 sec. | |
| * This function only appears when “Continuous” is selected in Capture Type. | ||
| Storage | Embedded/USB Drive | |
| Format | Embedded/USB Drive | |
| USB to PC | Camera/Storage | |
| USB Streaming Resolution | Max to 4K/Max to 1080P | |
| Flicker | 50Hz/60Hz | |
| System | Language | English/Traditional Chinese/Japanese/German/French/Spanish/Simplified Chinese/Italian/Russian/Indonesia/Finland/Polish |
| Output Display | 3840x2160 @603840x2160 @301920x10801280x7201024x768 | |
| Backup | USB Drive | |
| Save Setting | Profile 1/Profile 2/Profile 3 | |
| Recall Setting | Profile 1/Profile 2/Profile 3 | |
| Information | Camera information | |
| Default | No/Yes |
Specifiche
natural_image
Line drawing of a desk lamp with adjustable arm and control panel (no text or symbols)AVerVision A30 Cámara Universal
https://www.avereurope.com/download-center
Soporte técnico:
https://www.avereurope.com/technical-support
Imagen (Image)....11
Imagen En Imagen (Picture In Picture) 13
Presentación (Presentation).... 15
Audio (Audio) 16
Ajuste (Setting).... 17
Sistema (System)....19
| IMAGE | PIP Mode | ON |
| PICTURE IN PICTURE | Main Screen Switch | OFF |
| PRESENTATION | Position | |
| AUDIO | Size | |
| SETTING | Start PIP Automatically | |
| SYSTEM |
| Nivel 1 | Nivel 2 | Nivel 3 |
| Image | Brightness | 0~255 |
| Contrast | 0~255 | |
| Saturation | 0~255 | |
| Preview Mode | Normal/Motion/High Quality | |
| Effect | Color/B/W/Negative | |
| Mirror | On/Off | |
| Auto Rotate | On/Off | |
| Exposure Setup | Auto/Manual | |
| Manual Exposure* This function only appears when “Manual” is selected in Exposure Setup. | 0~99 | |
| White Balance Setup | Auto/Manual | |
| Manual W.B Blue* This function only appears when “Manual” is selected in White Balance Setup. | 0~255 | |
| Manual W.B Red* This function only appears when “Manual” is selected in White Balance Setup. | 0~255 | |
| Focus | 0~1023 | |
| Picture In Picture | PIP Mode | On/Off |
| Main Screen Switch | A30/External Source | |
| Position | Bottom Left/Top Left/Top Right/Bottom Right/Manual | |
| Size | Large/Small | |
| Start PIP Automatically | On/Off | |
| Presentation | Spotlight | On/Off |
| Visor | On/Off | |
| Split Screen | Left/Top/Right/Bottom | |
| Timer | Start/Pause/Stop | |
| Timer Interval | 1~120 min. | |
| Audio | Noise Reduction | On/Off |
| Echo Cancellation | On/Off | |
| Microphone Volume | 0~32 | |
| Speaker Volume | 0~15 | |
| Audio Input Source | Mic In/Line In | |
| Setting | Capture Resolution | 13M/Normal |
| Capture Quality | Finest/High/Normal | |
| Capture Type | Single/Continuous | |
| Capture Interval | 1~600 sec. | |
| * This function only appears when “Continuous” is selected in Capture Type. | ||
| Storage | Embedded/USB Drive | |
| Format | Embedded/USB Drive | |
| USB to PC | Camera/Storage | |
| USB Streaming Resolution | Max to 4K/Max to 1080P | |
| Flicker | 50Hz/60Hz | |
| System | Language | English/Traditional Chinese/Japanese/German/French/Spanish/Simplified Chinese/Italian/Russian/Indonesia/Finland/Polish |
| Output Display | 3840x2160 @603840x2160 @301920x10801280x7201024x768 | |
| Backup | USB Drive | |
| Save Setting | Profile 1/Profile 2/Profile 3 | |
| Recall Setting | Profile 1/Profile 2/Profile 3 | |
| Information | Camera information | |
| Default | No/Yes |
Especificaciones
- AVerVision A30 Universal Camera
- Warning
- Federal Communications Commission Statement
- Caution
- TRADEMARKS
- COPYRIGHT
- More Help
- Non-USA
- USA
- Contact Information
- Headquarters
- USA Branch Office
- Europe Branch Office
- Japan Branch Office
- Vietnam Branch Office
- Set Up Your Camera 9
- Specification 19
- Troubleshooting....21
- Overview
- Package Contents
- Parts Info
- Function Buttons
- Auto Rotate
- Remote Control
- Connections
- Power Connection
- Note:
- HDMI Connection
- Audio Input Connection
- USB Device Connection
- Bluetooth Connection (Optional accessory)
- Set Up Your Camera
- Open the OSD Menu
- Remote control Operation
- Function Buttons Operation
- OSD Menu
- Image
- Picture In Picture
- Presentation
- Audio
- Setting
- System
- Troubleshooting
- There is no picture on the presentation screen.
- The picture on the presentation screen is distorted or the image is blurry.
- AVerVision A30
- 多功能攝影機
- 警告
- 免責聲明
- 連絡資訊
- 簡報 (Presentation)
- ユニバーサルカメラ
- 取り扱い上の注意
- AVerVision A30 Universelle Kamera
- Technische Daten
- AVerVision A30 Caméra Universelle
- Avertissement
- Incrustation (Picture In Picture)
- Presentation (Presentation)
- AVerVision A30 Telecamera Universale
- Assistenza tecnica:
- Pulsanti funzione
- Picture In Picture (Picture In Picture)
- AVerVision A30 Cámara Universal
Brand : AVer
Model : AVerVision A30
Category : Document camera