
AVerVision M90UHD - Document camera AVer - Free user manual and instructions
Find the device manual for free AVerVision M90UHD AVer in PDF.

| Product Type | Document Camera |
| Brand | AVer |
| Model | AVerVision M90UHD |
| Sensor | 1/3.06" CMOS, 13 Megapixels |
| Maximum Image Frame Rate | 60 frames per second |
| Total Zoom | 322x (14x optical zoom + 23x digital zoom) |
| Maximum Shooting Area | 420 x 315 mm (A3 size) |
| Focus | Automatic and manual |
| White Balance | Automatic and manual |
| Exposure | Automatic and manual |
| Image Modes | Normal, Video, High Quality, Microscope, Macro, Infinity |
| Image Effects | Color, Black & White, Negative |
| Video Outputs | HDMI (4K, 1080p, 720p) and VGA (1280x720, 1024x768, 1080P) |
| Video Inputs | HDMI and VGA (pass-through) |
| USB Ports | 1 x USB-A (USB stick), 1 x Mini-B (computer) |
| External Storage | micro SD card (max 32 GB) and USB stick (max 32 GB) |
| Built-in Microphone | Yes |
| Top Light | LED, on/off switchable |
| Power Supply | DC 5V/3A, AC 100-240V, 50/60Hz |
| Power Consumption | 10 W (light on), 9 W (light off) |
| Dimensions (in use) | 481.3 x 159 x 469.9 mm |
| Dimensions (folded) | 319.0 x 176 x 112 mm |
| Weight | 2.2 kg ± 0.5 kg |
| Included Accessories | Power adapter, power cable, quick installation guide, remote control, anti-glare sheet |
| Remote Control | Infrared remote control, RS-232, IP, CGI |
Frequently Asked Questions - AVerVision M90UHD AVer
User questions about AVerVision M90UHD AVer
0 question about this device. Answer the ones you know or ask your own.
Ask a new question about this device
Download the instructions for your Document camera in PDF format for free! Find your manual AVerVision M90UHD - AVer and take your electronic device back in hand. On this page are published all the documents necessary for the use of your device. AVerVision M90UHD by AVer.
USER MANUAL AVerVision M90UHD AVer
natural_image
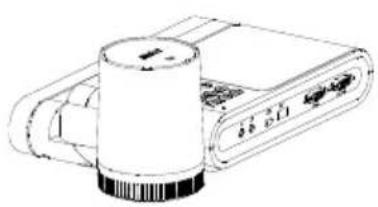
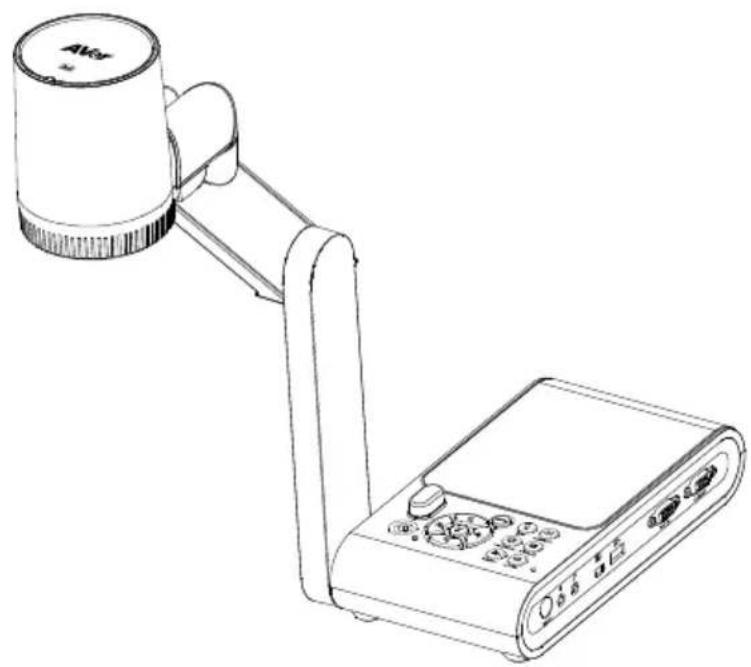
Line drawing of a portable electronic device with a cylindrical top and connected arm, next to a control panel (no text or symbols visible)AverVision M90UHD
— User Manual —
WARNING
- To reduce the risk of fire or electric shock, do not expose this appliance to rain or moisture. Warranty will be void if any unauthorized modifications are done to the product.
- Do not drop the camera or subject it to physical shock.
- Use the correct power supply voltage to avoid the damaging camera.
- Do not place the camera where the cord can be stepped on as this may result in fraying or damage to the lead or the plug.
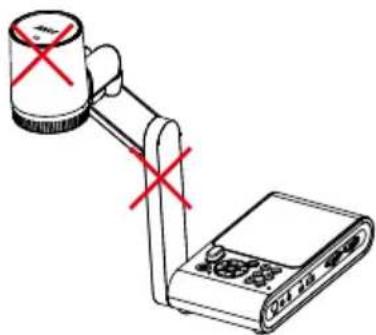
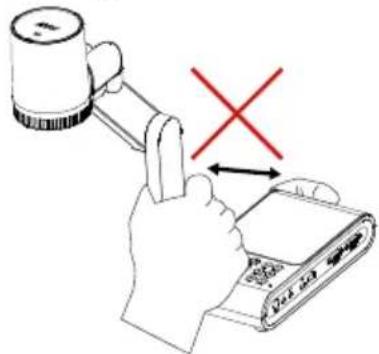
- Hold the bottom of the camera with both hands to move the camera. Do not grab the lens or flexible arm to move the camera.
- Do not pull the mechanical arm and camera part in the opposite direction.
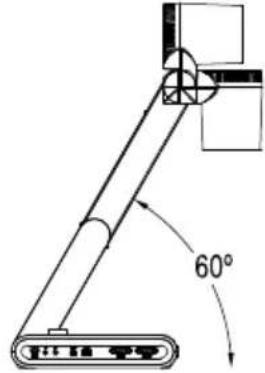
- Do not move the camera head over 110° to avoid camera head wear.

- Do not pull the mechanical arm lower than 60° to avoid camera wear.
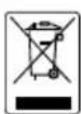
The mark of crossed-out wheeled bin indicates that this product must not be disposed of with your other household waste. Instead, you need to dispose of the waste equipment by handing it over to a designated collection point for the recycling of waste electrical and electronic equipment. For more information about where to drop off your waste equipment for recycling, please contact your household waste disposal service or the shop where you purchased the product.
Federal Communications Commission
NOTE: This equipment has been tested and found to comply with the limits for a Class A digital device, pursuant to part 15 of the FCC Rules. These limits are designed to provide reasonable protection against harmful interference when the equipment is operate in a commercial environment. This equipment generates, uses, and can radiate radiofrequency energy and, if not installed and used in accordance with the instruction manual, may cause harmful interference to radio communications. Operation of this equipment in a residential area is likely to cause harmful interference in which case the user will be required to correct the interference at his own expense.
FCC Caution: Any changes or modifications not expressly approved by the party responsible for compliance could void the user's authority to operate this equipment.
This device complies with part 15 of the FCC Rules.
Operation is subject to the following two conditions:
(1) This device may not cause harmful interference, and
(2) this device must accept any interference received, including interference that may cause undesired operation.
Warning
This is a class A product. In a domestic environment this product may cause radio interference in which case the user may be required to take adequate measures.
DISCLAIMER
No warranty or representation, either expressed or implied, is made with respect to the contents of this documentation, its quality, performance, merchantability, or fitness for a particular purpose. Information presented in this documentation has been carefully checked for reliability; however, no responsibility is assumed for inaccuracies. The information contained in this documentation is subject to change without notice.
In no event will AVer Information Inc. be liable for direct, indirect, special, incidental, or consequential damages arising out of the use or inability to use this product or documentation, even if advised of the possibility of such damages.
TRADEMARKS
“AVer” is a trademark owned by AVer Information Inc. Other trademarks used herein for description purpose only belong to each of their companies.
COPYRIGHT
© 2024 AVer Information Inc. All rights reserved. | April 30, 2024
All rights of this object belong to AVer Information Inc. Reproduced or transmitted in any form or by any means without the prior written permission of AVer Information Inc. is prohibited. All information or specifications are subject to change without prior notice.
Notice
Specifications Are Subject to Change without Prior Notice.
The Information Contained Herein Is to Be Considered for Reference Only
More Help
For FAQs, technical support, software and user manual download, please visit:
Headquarters
Download Center:
https://www.aver.com/download-center
Technical Support:
https://www.aver.com/technical-support
Europe Branch Office
Download Center:
https://www.avereurope.com/download-center
Technical Support:
https://www.avereurope.com/technical-support


Contact Information
Headquarters
AVer Information Inc.
8F, No.157, Da-An Rd., Tucheng Dist.,
New Taipei City 23673, Taiwan
Tel: +886 (2) 2269 8535
USA Branch Office
AVer Information Inc., Americas
44061 Nobel Drive, Fremont, CA 94538, USA
Tel: +1 (408) 263 3828
Toll-free: +1 (877) 528 7824
Europe Branch Office
AVer Information Europe B.V.
Westblaak 134, 3012 KM, Rotterdam, The
Netherlands
Tel: +31 (0) 10 7600 550
Japan Branch Office
アバー・インフォメーション株式会社
Vietnam Branch Office
Công ty TNHH AVer Information (Việt Nam)
Package Contents ....1
Optional Accessories....1
Parts Info 2
Control Panel....5
Remote Control 6
Connection 8
Power Connection 8
USB Connection....8
HDMI Out and In Connection....9
VGA Out and In Connection .... 10
USB to Ethernet Adapter Connection 11
Amplified Speaker Connection ....12
Connect a Microphone ....12
Microscope Connection....13
Get Started....15
Dimension....15
Shooting Area....16
Overhead Light....17
Infrared Sensor....18
Mounting the M90UHD on a Flat Surface....18
Anti-glare Sheet....19
External Memory Storage....19
Insert a Micro SD Card ....19
Insert a USB Flash Drive ....19
RS232 Diagram Connection....20
OSD MENU 21
Transfer Captured Images/Videos to a computer....32
Appendix....33
IP Command Protocol....33
CGI Command....36
RS-232 Send Command List....37
RS-232 Receive Command List 41
Technical Specifications 42
Troubleshooting....44
Overview
Package Contents
natural_image
Line drawing of a cylindrical device with a base, connected to a rectangular electronic device (no text or symbols visible)M90UHD
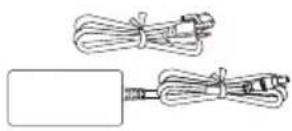
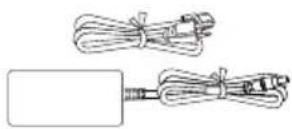
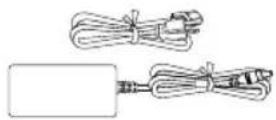
Power Adapter
Power Cord*
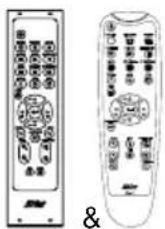
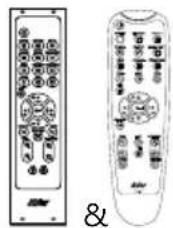
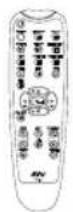
Remote Control**
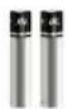
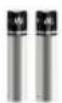
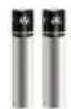
AAA Battery (x2)

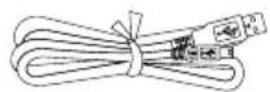
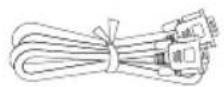
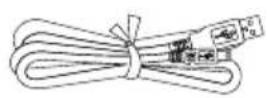
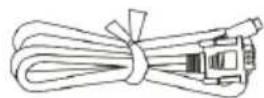
USB Cable
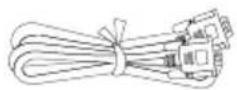
VGA Cable
Warranty Card
Quick Start Guide
*The power cord will vary depending on the standard power outlet of the country where it is sold.
**Your device may come with one of the two remote controls.
Optional Accessories

Carrying Bag
natural_image
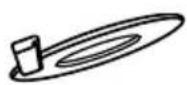
Simple line drawing of a folded paper or document (no text or symbols)Anti-glare Sheet
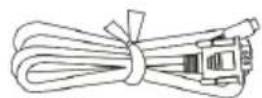
RS-232 Cable
Connecting Plate
Microscope Adapter
(28mm and 34mm Rubber Coupler are included)
Parts Info
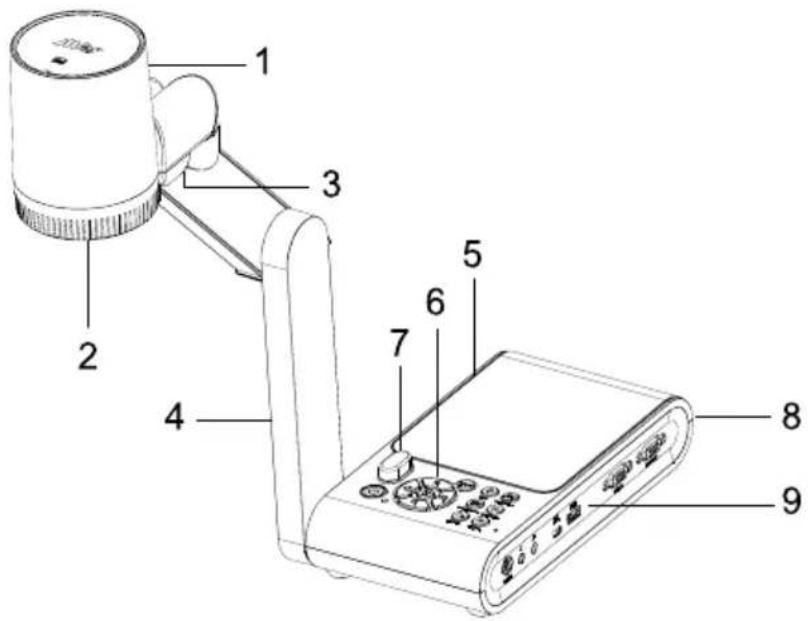
| Name | Function |
| 1. Camera head | Contain the camera sensor. |
| 2. Camera lens | Focus the image in the camera. |
| 3. LED light | Provide light to enhance the lighting condition. |
| 4. Mechanical arm | Provide adjustable viewing coverage. |
| 5. Left panel | Micro SD card slot. |
| 6. Control panel | Easy access to various functions. |
| 7. IR sensor | Receive remote control commands. |
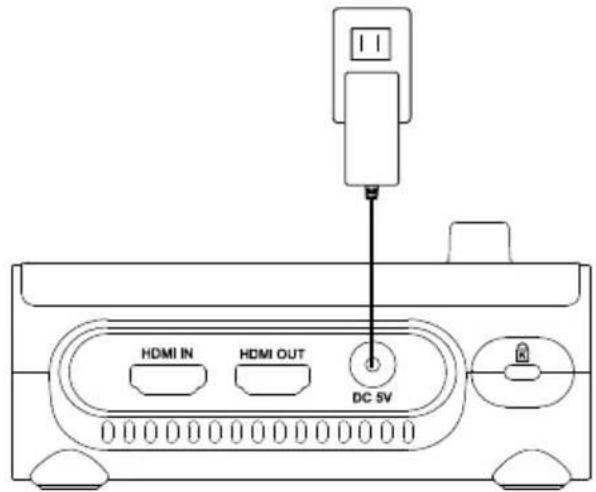
| 8. Rear panel | Connections for power, HDMI output/input external display device, and Kensington security lock compatible slot. |
| 9. Right panel | Connections for computer, VGA input/output external display device, and USB Port, Mini USB, MIC in, Line out and RS232 (Optional). |
- Right Panel
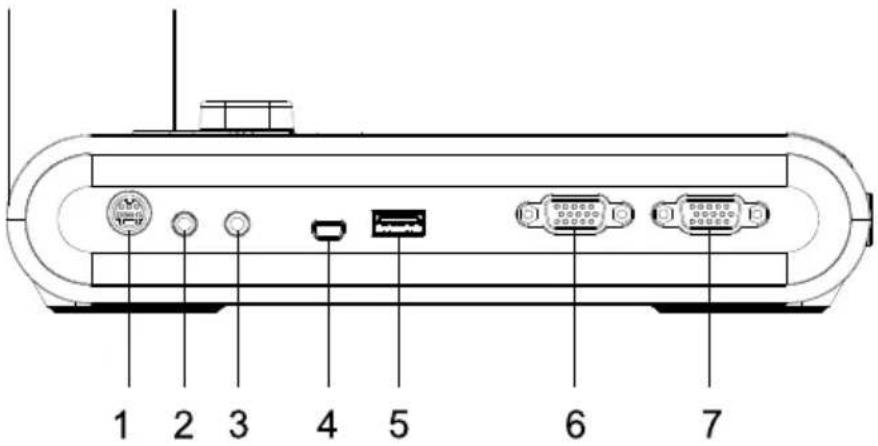
| Name | Function |
| 1. RS232 port | Connect this port to a computer by using RS232 cable. For more details, see.(Optional) |
| 2. Line Out port | Connect to an amplified speaker to playback recorded audio & video clip. |
| 3. MIC in port | Connect to an external microphone. |
| 4. USB mini port | Connect to a USB port of a computer with a USB cable and use AVerVision M90UHD as a USB camera or transfer the captured images/videos from the memory source to the computer. |
| 5. USB port | Insert a USB flash drive to save the images/video directly from the USB flash drive. |
| 6. VGA IN port | Input the signal from a computer or other sources and pass it through to the VGA OUT port only. Connect this port to the VGA output port of a computer. |
| 7. VGA OUT port | Connect the AVerVision M90UHD to any display device with VGA cable. |
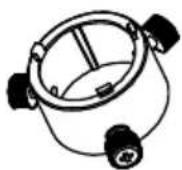
- Left Panel
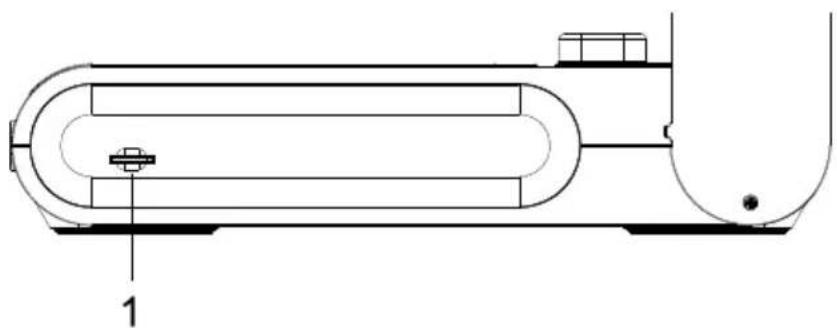
natural_image
Technical line drawing of a cylindrical industrial vessel with internal components and a labeled part (1), no text or symbols present.| Name | Function |
| 1. Micro SD card slot | Insert the Micro SD card with the label facing up. Micro SD card can save capture image and record video file. |
- Rear Panel
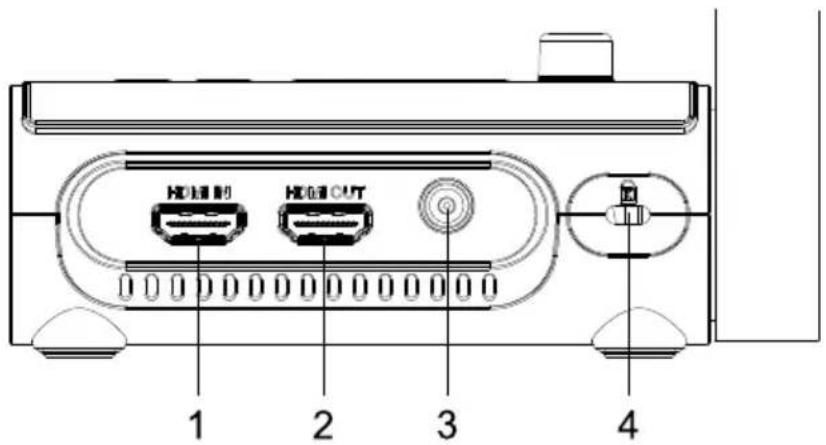
| Name | Function |
| 1. HDMI IN port | Connect an external HDMI source as an input via this port. Connect this port to the HDMI output port of a computer. |
| 2. HDMI OUT port | Output the video signal from the main system on an interactive flat panel, an LCD monitor or LCD/DLP projector with HDMI interface using HDMI cable. |
| 3. DC 5V | Connect the power adapter into this port. |
| 4. Kensington Lock | Attach a Kensington compatible security lock or anti-theft device. |
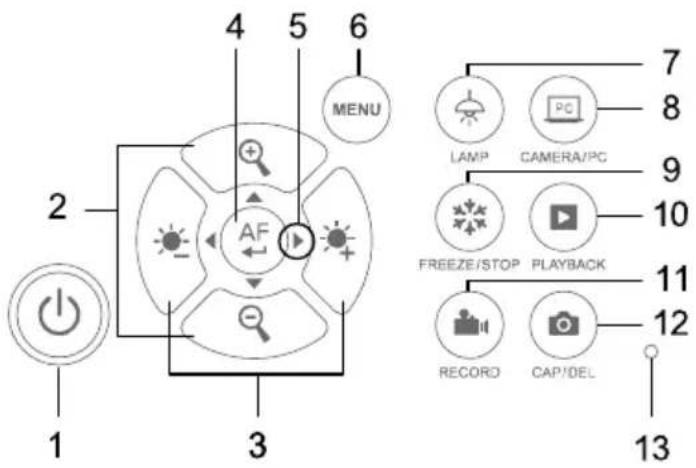
Control Panel
flowchart
graph TD
    A["1"] --> B["2"]
    B --> C["3"]
    C --> D["4"]
    D --> E["5"]
    E --> F["6"]
    F --> G["MENU"]
    H["AF"] --> I["Sunlight Icon"]
    J["LAMP"] --> K["PC"]
    L["CAMERA/PC"] --> M["Camera Icon"]
    N["FREEZE/STOP"] --> O["Playback Icon"]
    P["RECORD"] --> Q["Camera Icon"]
    R["CAP/DEL"] --> S["Camera Icon"]
    T["7"] --> U["8"]
    V["9"] --> W["10"]
    X["11"] --> Y["12"]
    Z["13"] --> AA["Circle with Dot"]
| Name | Function |
| 1. POWER | Turn on your device or enter standby mode. |
2.   | Adjust the brightness. |
3.   | Zoom in or out. |
4.   | Confirm a selection in Playback mode and OSD menu.Start/Pause video playback.Adjust the focus automatically. |
5.   | Pan and tilt control for digital zoom%. Navigate the menu.Adjust volume.Fast forward or rewind the video. |
6. N   | Enter and exit the OSD menu and submenu. |
7.   | Turn the lamp on or off. |
| 8. CAMERA / PC | Switch between the camera live view and the external VGA/HDMI source. |
9.   STOP STOP | Pause or resume image display in Camera mode.Stop audio & video playback in Playback mode. |
| 10. PLAYBACK | View images and videos from gallery. |
11.   | Start and stop audio and video recording. Store your recordings on an SD card or a USB Flash drive. For more information, please refer to |
12.   | Take snapshots and store them on an SD card or a USB flash drive.Delete the selected picture/video in Playback mode. |
| 13. Built-in MIC | Record audio when recording a video clip. The recorded sound will be in monophonic. |
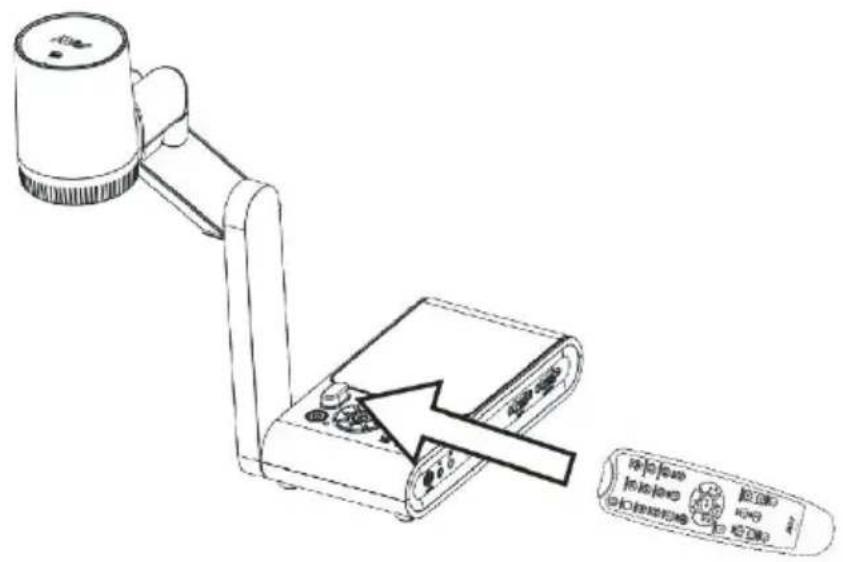
Remote Control
Your device may come with one of the two remote controls.
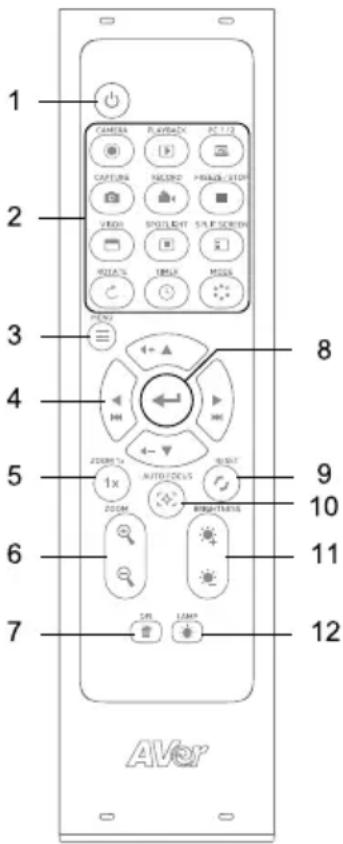 | Name | Function |
| 1. Power | Turn you camera on or off, or enter standby mode. | |
| 2. Camera | View camera live view. | |
| ▶ Playback | View images and videos from gallery. | |
| PC 1/2 | Switch to external VGA/HDMI source. Press the Camera button ●to switch back to camera live view. | |
| Capture | Take snapshots and store them on an SD card or a USB flash drive.Open the OSD menu > Settings > Capture Type to switch between Single capture and Continuous capture.Single Capture:Press once to take a snapshot.Continuous capture:Press to start and pause capturing. You may also set up capture interval. | |
| Record | Start and stop audio and video recording. Store your recordings on an SD card or a USB Flash drive. | |
| ■ Freeze/Stop | Freeze the camera live view, or stop video playback. | |
| □ Visor | N/A | |
| ■ Spotlight | N/A | |
| ☐ Split Screen | N/A | |
| ○ Rotate | Flip the camera view. | |
| L Timer | • Start, pause or stop the timer.• Set the timer interval in OSD menu. | |
| Mode | Switch among Normal, High frame, High quality, Microscope, Infinity, and Marco mode. | |
| 3. ☐ Menu | Open and close the OSD menu. | |
| ▲◀ ▶4. | • Pan and tilt control for digital zoom.• Navigate the menu.• Adjust volume.• Fast forward or rewind the video. | |
| 5. ZOOM 1x | Reset zoom ratio to 1x. | |
6.  | Zoom in or out. | |
7.  | Delete the selected images or videos. | |
8.  | • Confirm a selection on the OSD menu.• Play and pause the video. | |
9.  | Reset to factory default settings. | |
10.   Auto Focus Auto Focus | Focus automatically. | |
11.  Brightness Brightness | Adjust the brightness. | |
12.  | Turn the lamp on or off. |
Connection
Before making the connection, make sure the power of all devices are turned off. If you are not sure where to connect, simply follow the illustrated connections below and refer to the user manual of the device you are connecting to the AVerVision M90UHD.
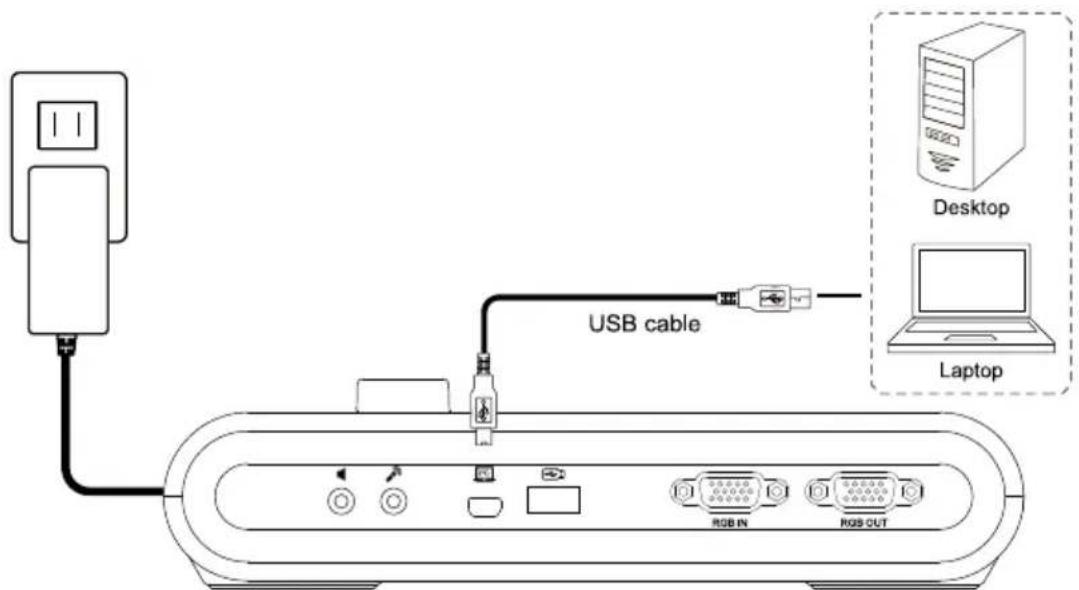
Power Connection
Plug in power adapter and press "Power" button on control panel to turn on the M90UHD.
* Wall outlet varies according to your regions
USB Connection
Connect M90UHD with the included USB cable to laptop/PC USB port, and use your device as a USB camera. You may select it as your camera when turning on software like Skype, Teams, Zoom and more.
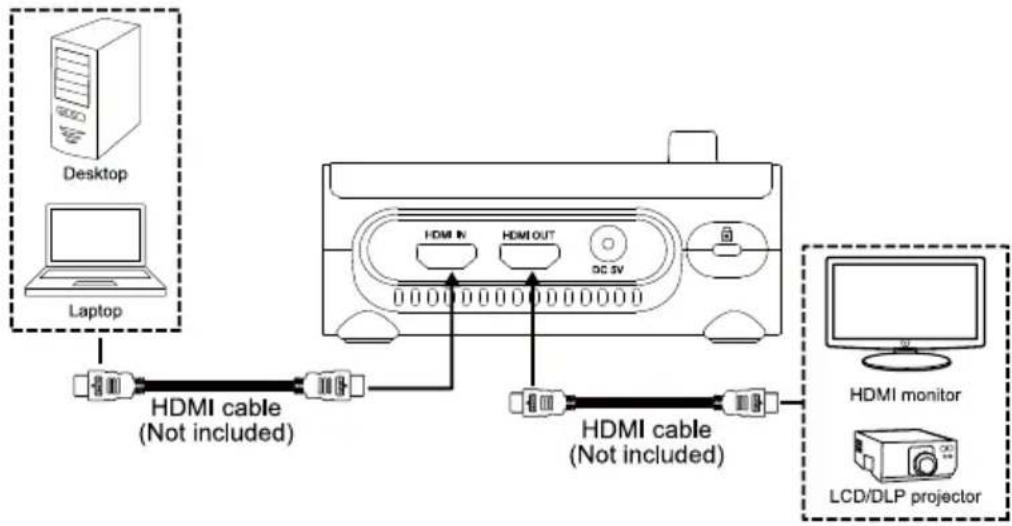
HDMI Out and In Connection
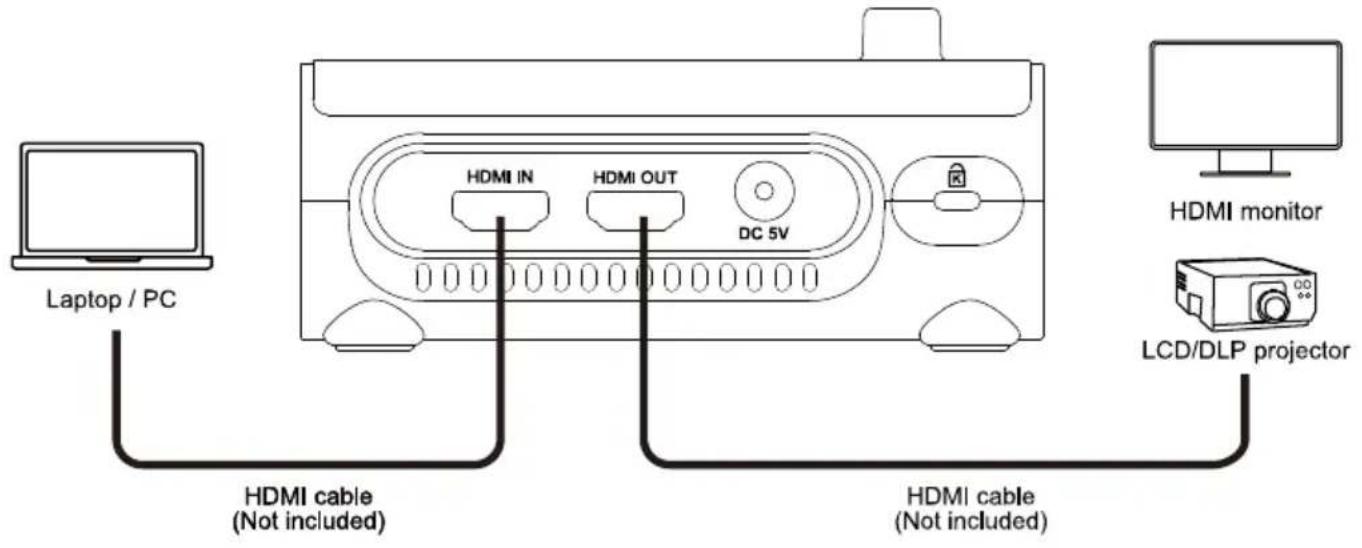
To import or export HDMI source:
- Connect your computer to the M90UHD HDMI In port.
- Connect the HDMI monitor or LCD/DLP projector to the M90UHD HDMI output.
* HDMI cables are not included.
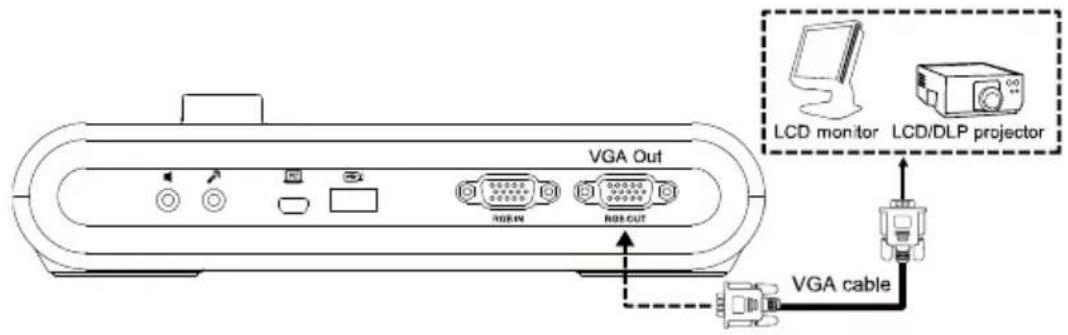
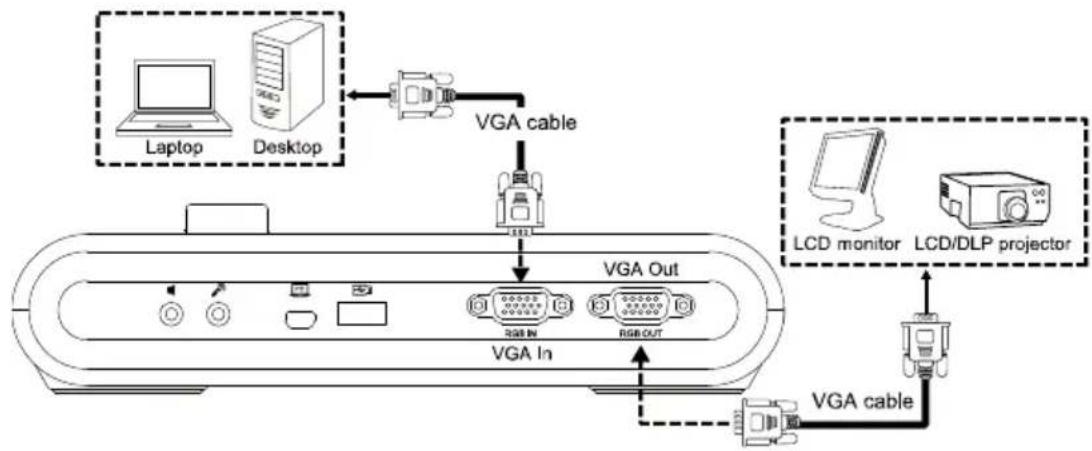
VGA Out and In Connection
- Connect M90UHD to VGA display with VGA output port.
- Connect M90UHD to VGA display with VGA output port and VGA input source device with VGA input port.
flowchart
graph TD
    A["Laptop"] -->|VGA cable| B["Analog PC"]
    C["Desktop"] -->|VGA cable| B
    D["LCD monitor"] -->|VGA cable| E["Analog PC"]
    F["LCD/DLP projector"] -->|VGA cable| E
    B --> G["VGA Out"]
    E --> H["VGA In"]
    G --> I["Analog PC"]
    H --> J["Analog PC"]
- Press the Camera/PC button on the control panel or the remote control to display the computer screen.
- To display the camera live view on your computer, press Fn+F5 on your keyboard to switch output source.
flowchart
graph TD
    A["Desktop"] -->|HDMI cable (Not included)| B["Laptop"]
    B --> C["HDMI IN"]
    B --> D["HDMI OUT"]
    B --> E["DC SV"]
    C --> F["HDMI cable (Not included)"]
    D --> F
    E --> F
    G["HDMI monitor"] --> F
    H["LCD/DLP projector"] --> F
USB to Ethernet Adapter Connection
Connect your M90UHD to your laptop or desktop with a USB to Ethernet adapter (self-purchased accessory) for online control.
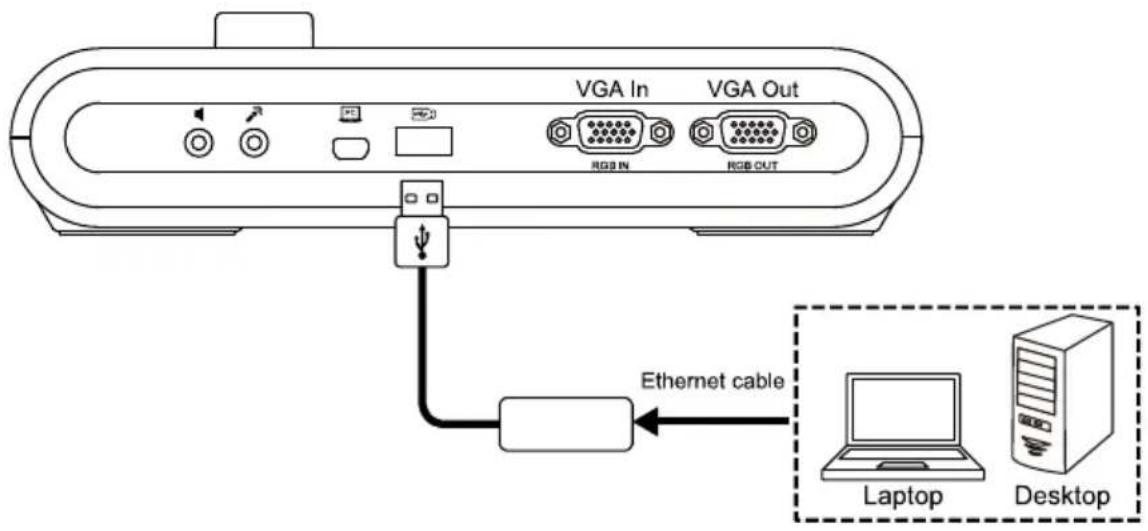
- Connect the Ethernet cable from your computer to the USB to Ethernet adapter, then insert the adapter to your M90UHD.
- Press MENU button on the control panel to call out the OSD menu.
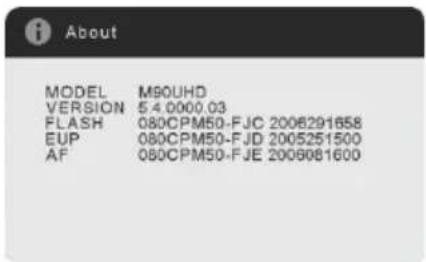
- Go to System > Information to check your Mac ID and IP Info when successfully connected to the Internet.
-
You may control your device by:
-
Entering IP control commands on a third-party Pocket Sender application;
-
Entering CGI Commands in your web browser.
-
Please refer to
for IP control protocol and CGI command lists.
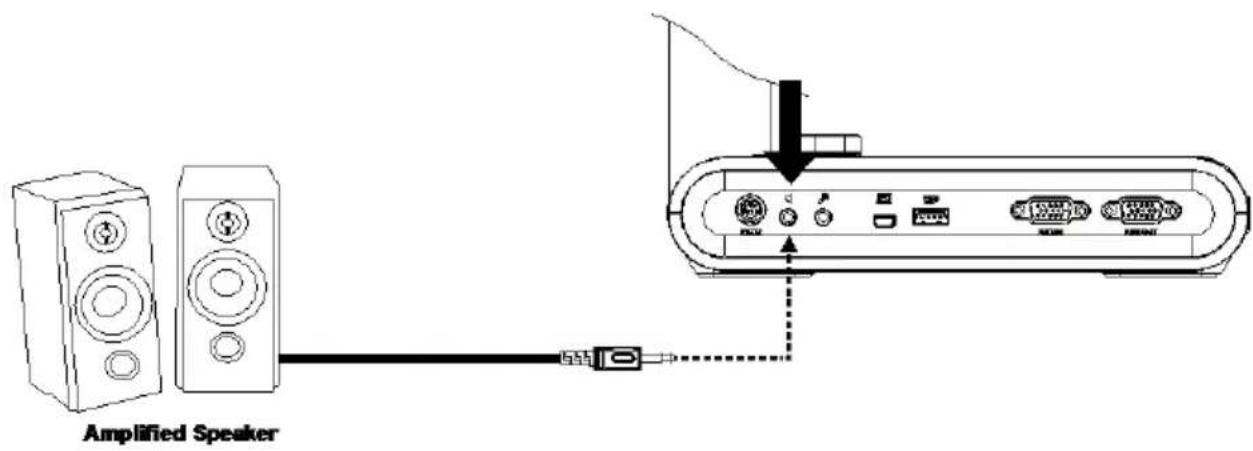
Amplified Speaker Connection
Plug a 3.5mm amplified speaker to Line Out ( ) port. Only the audio from the video playback is supported.
[Note]
We recommend connecting an amplified speaker to the Line out port. Take caution when using earphones. Adjust the volume down on the remote to prevent hearing damage due to loudness.
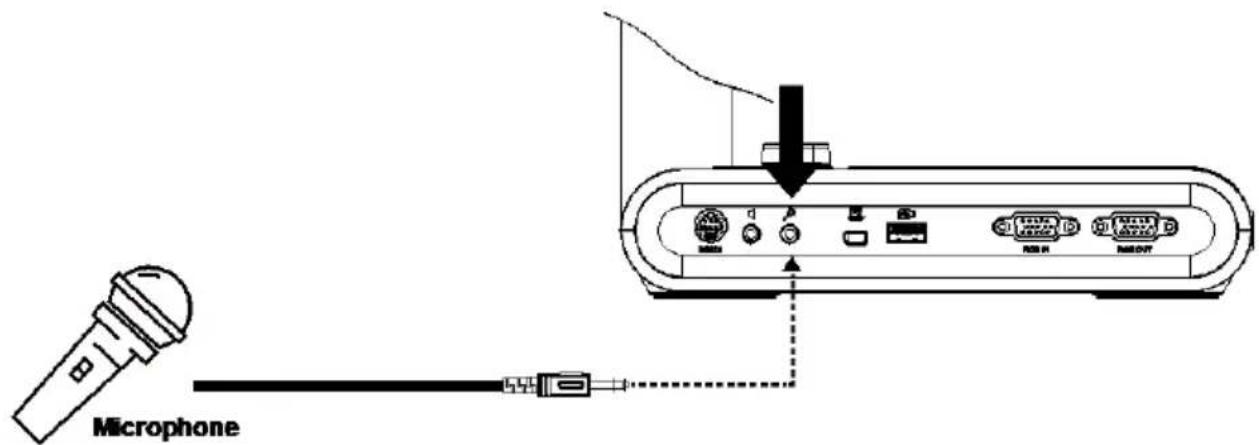
Connect a Microphone
Plug a 3.5mm microphone to MIC In (☐) port.
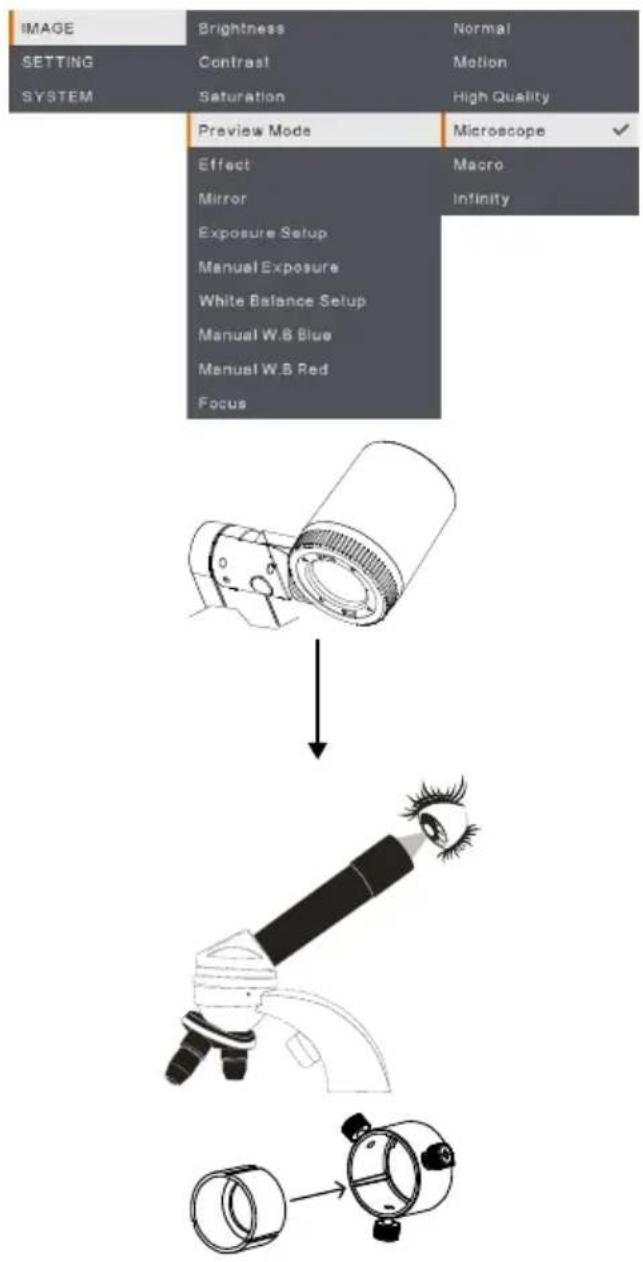
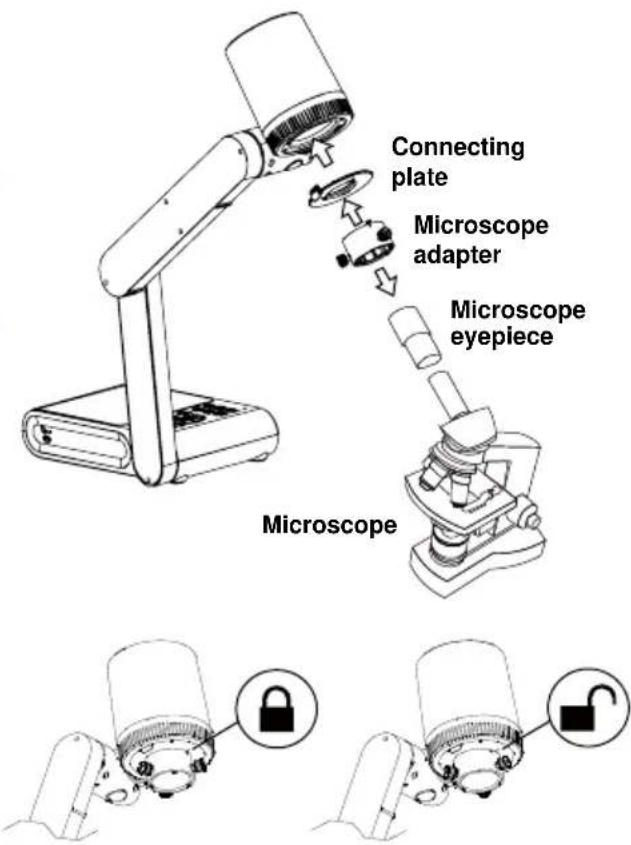
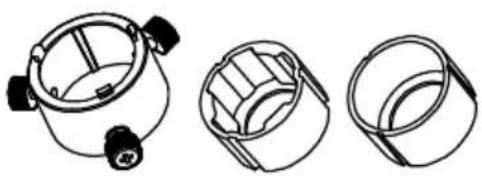
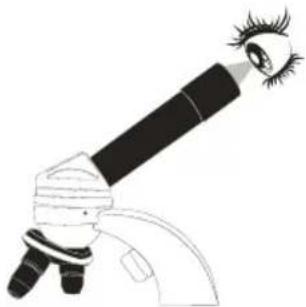
Microscope Connection
Connect the AVerVision M90UHD to a microscope enables you to examine microscopic objects on a big screen.
- Change the image display mode to Microscope. Select IMAGE tab > select Preview Mode > select Microscope and
press

-
Aim the camera head at the farthest point and press AUTO FOCUS.
-
Adjust the focus of the microscope.
-
Select the appropriate rubber coupler size for the microscope eyepiece and insert it in the microscope adapter.
- Remove the microscope eyepiece from the microscope and connect it to the microscope adapter with the rubber coupler inserted. Fasten the 3 bolts until the adapter secures the eyepiece.

- For the eyepiece, we suggest using 33mm eye relief or higher.
-
Do the adjustment manually to get better image view.
-
Attach the microscope adapter to the AVerVision camera head with a connecting plate. Then connect it to the AVerVision and microscope.
Make sure the arrows on the camera and microscope adapter are aligned and rotated to the left and locked.
Get Started
This section provides useful tips on how to adjust the AVerVision M90UHD to meet your needs.
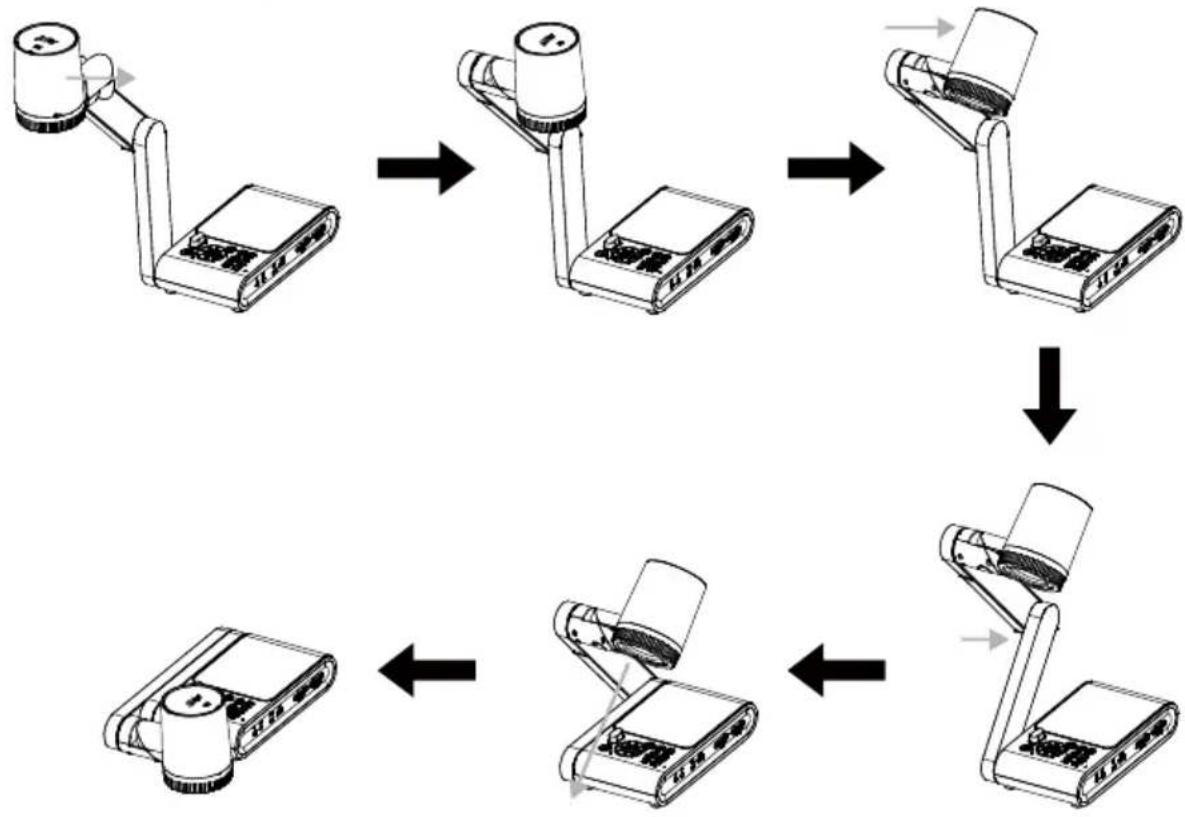
Dimension
Please follow the below figure to store the document camera.
flowchart
graph TD
    A["Device with base and upper arm"] --> B["Device with top-mounted sensor"]
    B --> C["Device with internal ports"]
    C --> D["Device with external ports"]
    D --> E["Device with internal ports"]
    E --> F["Device with external ports"]
Shooting Area
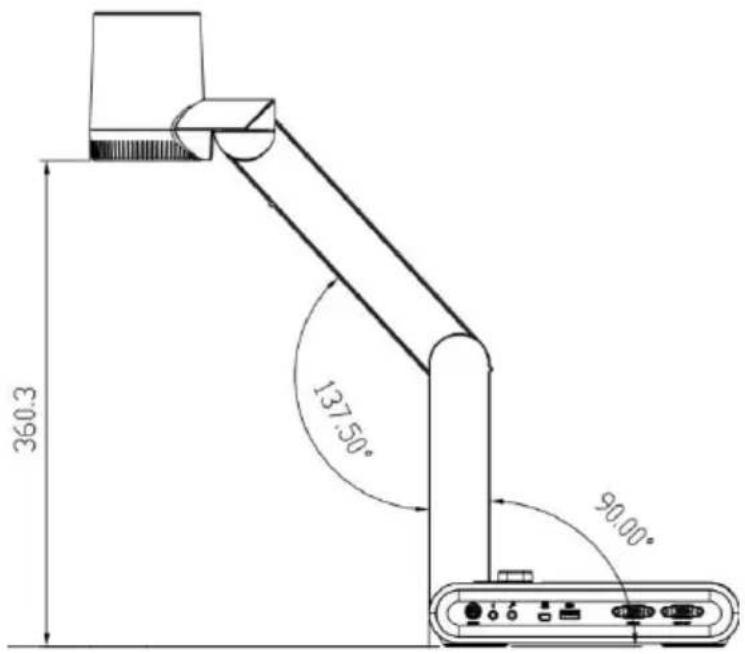
The shooting area can be viewed an area of 420 × 315mm at High Definition preview mode.
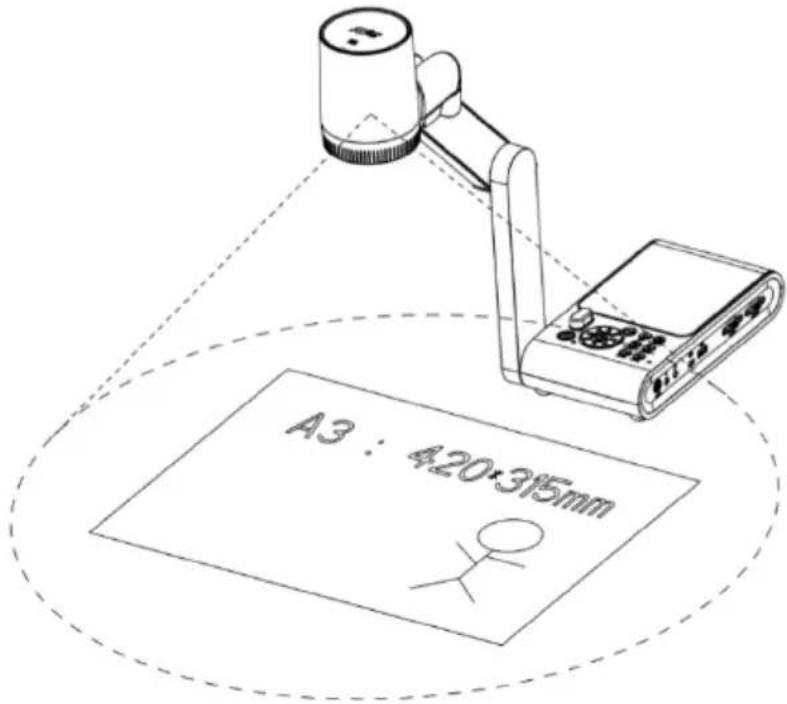
When camera position is 360.3mm high, the shooting area will be A3 size.
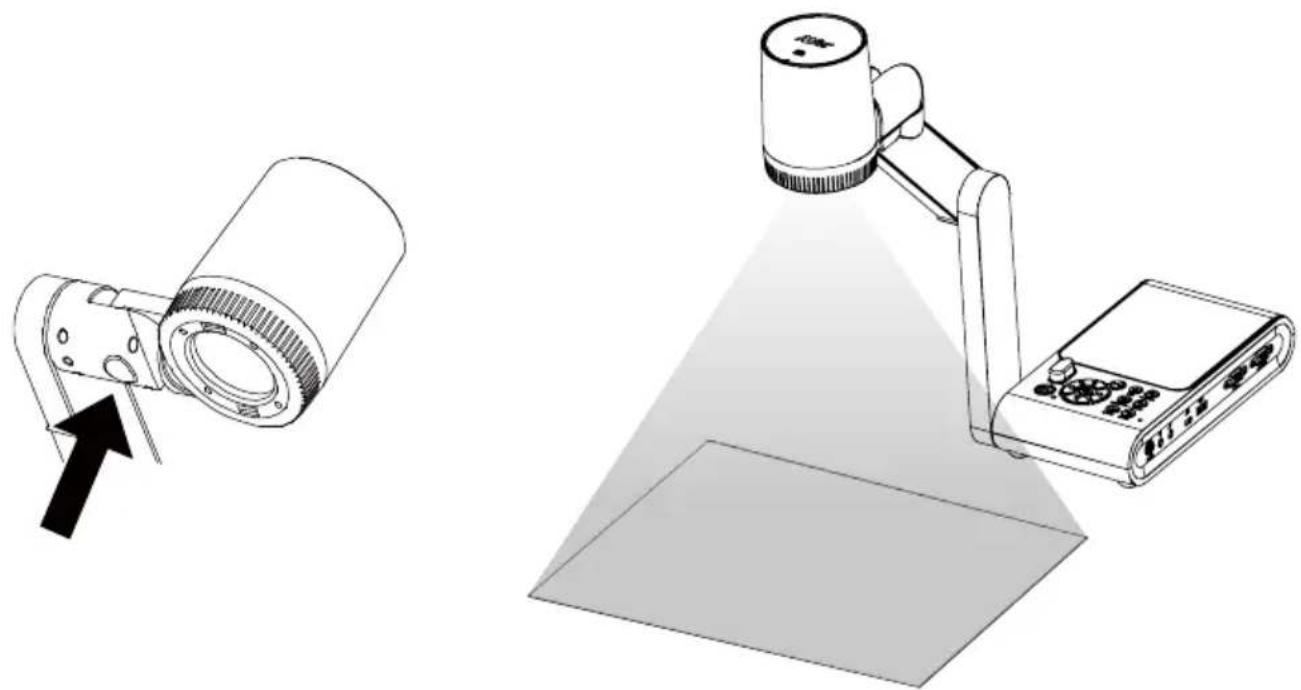
The Camera head can be rotated 90^ as below figure shown.

To mirror the image, press MENU on the control panel > select Mirror, press ←, and select "On".
Overhead Light
Press LAMP button on the control panel or remote control to turn on and off light.
natural_image
Illustration of a projector with a light beam and a base, showing no text or symbols.Infrared Sensor
Aim the remote control at the infrared sensor to operate the unit.
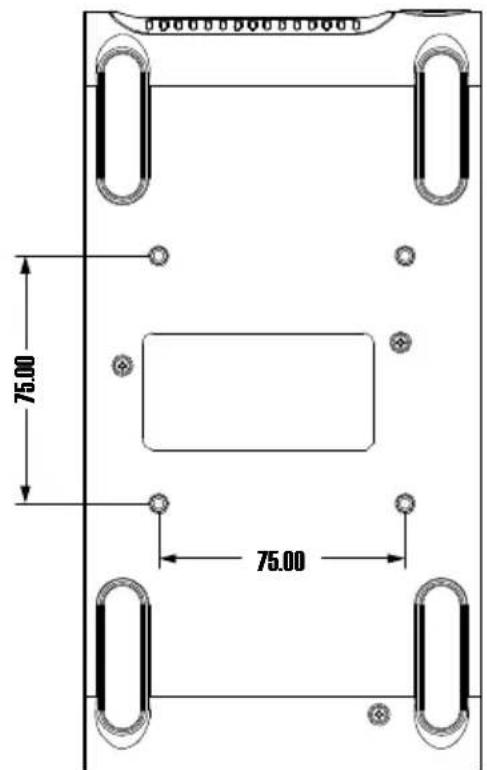
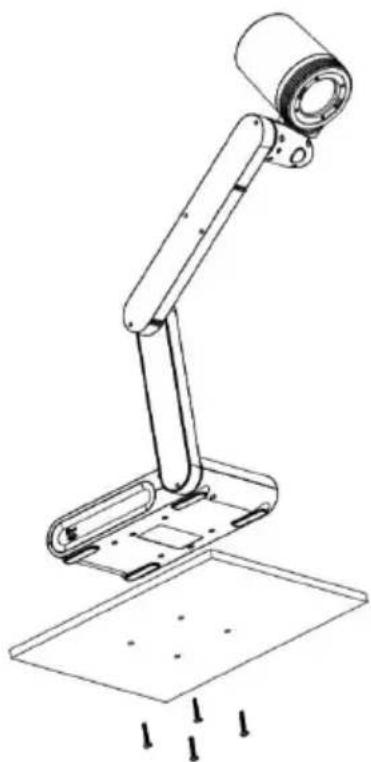
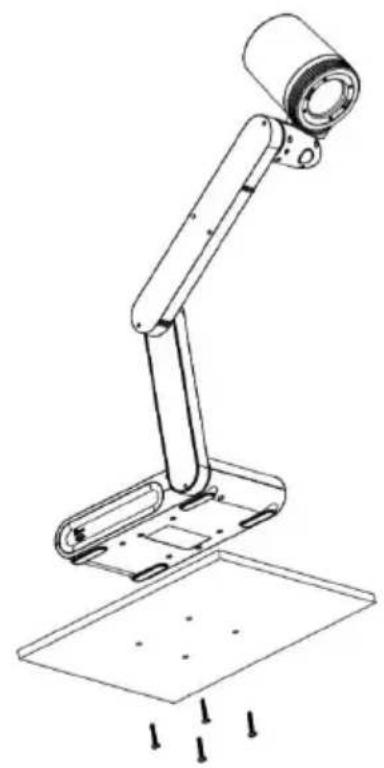
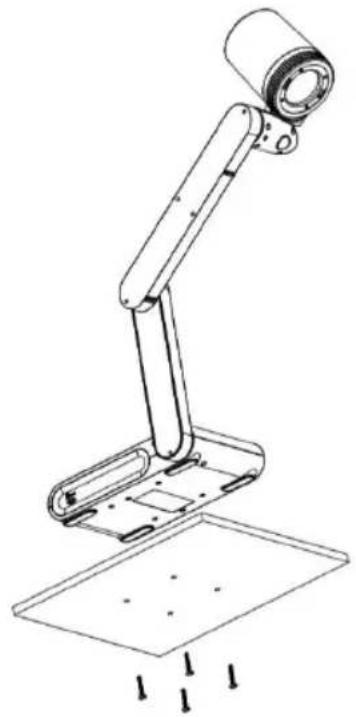
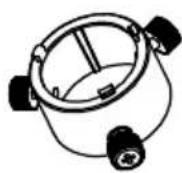
Mounting the M90UHD on a Flat Surface
Measure and mark the horizontal of 75 mm from the center line distance between the holes on the flat surface as describe in the illustration below. Use 2 or 4 pieces of M4.0 screws for 6 mm holes and secure the M90UHD on the flat surface.
natural_image
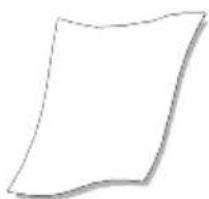
Line drawing of a mechanical arm with a cylindrical head and base plate, showing mounting holes and a floor (no text or symbols)Anti-glare Sheet
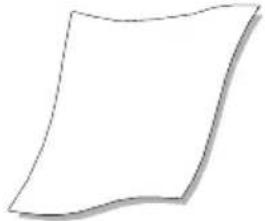
The anti-glare sheet is a special coated film that helps eliminate any glare that maybe encountered while displaying very shiny objects or glossy surfaces such as magazines and
pictures. To use, simply place the anti-glare sheet on top of the shiny document to reduce reflected light.
natural_image
Simple line drawing of a folded paper or document (no text or symbols)External Memory Storage
AVerVision M90UHD supports both Micro SD memory card and USB flash drive for more image capture and audio & video recordings. AVerVision M90UHD can detect when there is an external storage media and automatically switch to the last detected storage. If no external storage is connected, all captured still images will be saved in the built-in memory.
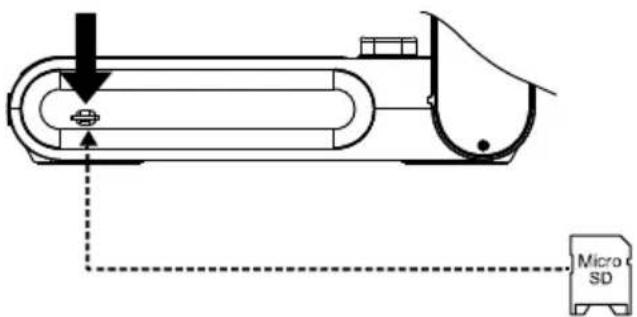
Insert a Micro SD Card
Insert the card with the contact facing down until it reaches the end. To remove the card, push to eject and pull the card out. The supported Micro SD card capacity is from 1GB to 32GB (FAT32).
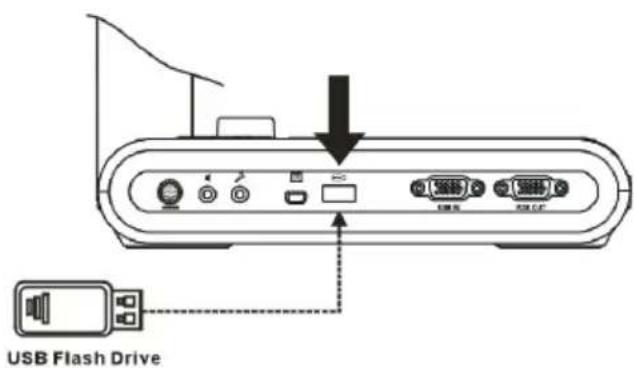
Insert a USB Flash Drive
Connect the USB flash drive in the USB slot. AVerVision M90UHD can support USB flash drive maximum 32GB. Best to format the USB flash drive using AVerVision M90UHD for better video recording.
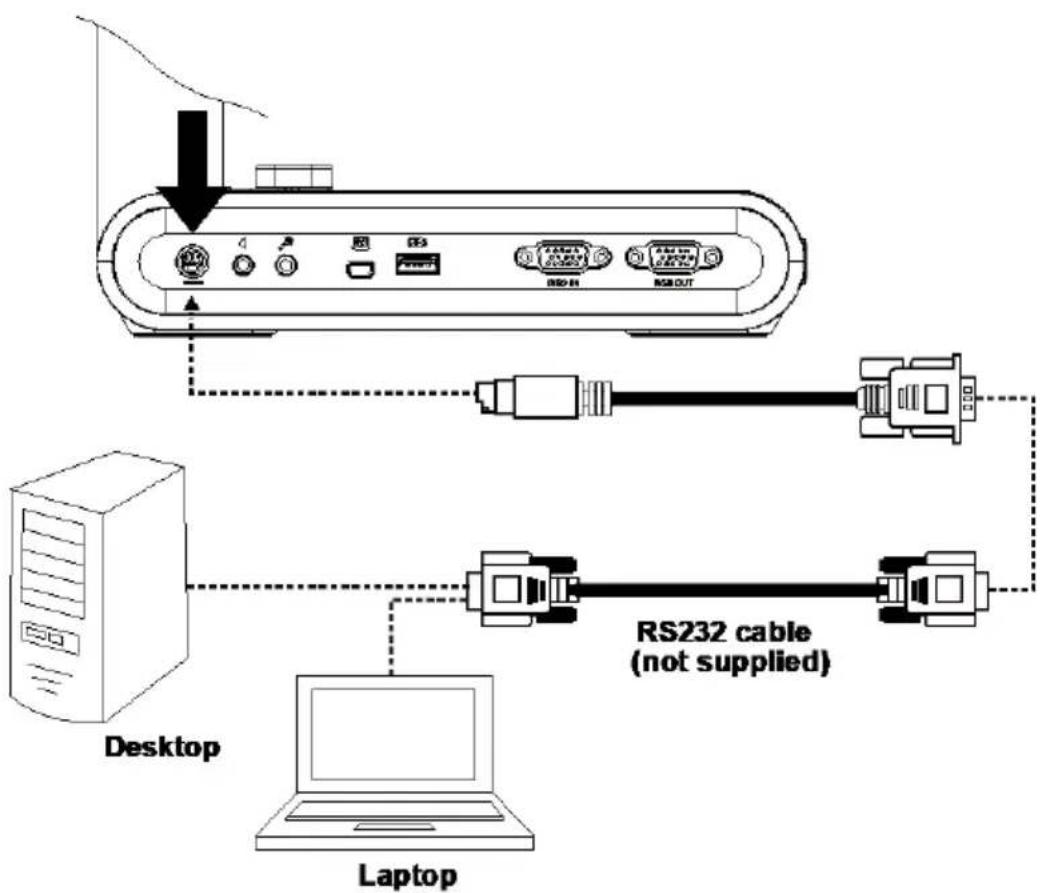
RS232 Diagram Connection
AVerVision M90UHD can be controlled using a computer or any centralized control panel through RS232 connection.
flowchart
graph TD
    A["Desktop"] --> B["Laptop"]
    B --> C["RS232 cable (not supplied)"]
    C --> D["Server Interface"]
    D --> E["RS10"]
    D --> F["RS11"]
    D --> G["RS12"]
    D --> H["RS13"]
    D --> I["RS14"]
For RS-232 Command list, please refer to
OSD MENU
There are 3 main options on the OSD menu: IMAGE, SETTING and SYSTEM.
| IMAGE | Brightness |
| SETTING | Contrast |
| SYSTEM | Saturation |
| Preview Mode | |
| Effect | |
| Mirror | |
| Exposure Setup | |
| Manual Exposure | |
| White Balance Setup | |
| Manual W.B Blue | |
| Manual W.B Red | |
| Focus |
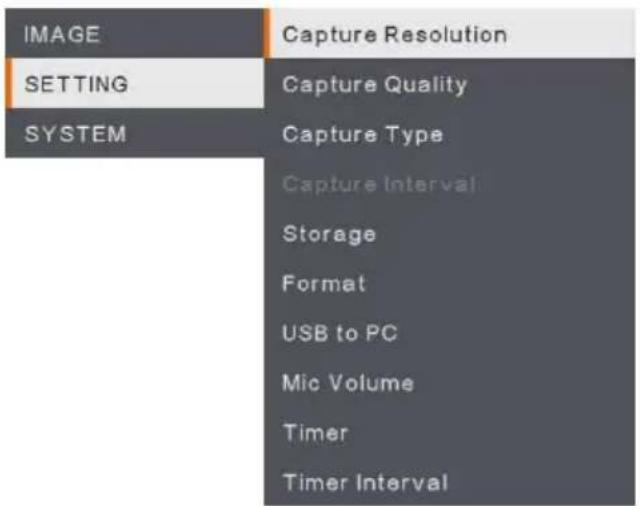
SETTING
IMAGE
SYSTEM
Navigate the Menu and Submenu
- Press MENU button on the remote or control panel.
- Press ▶, ◀, ▲ and ▼ to choose a selection in the menu list.
- Press to make a selection.
- Use ▲ and ▼ to adjust the setting or make a selection.
- Press to enter submenu.
Image
| Menu Screen | Function | ||
| BrightnessAdjust brightness level manually between 0 and 255. | |||
| IMAGE | Brightness | + | |
| SETTING | Contrast | 125 | |
| SYSTEM | Saturation | - | |
| Preview Mode | |||
| Effect | |||
| Mirror | |||
| Exposure Setup | |||
| Manual Exposure | |||
| White Balance Setup | |||
| Manual W.B Blue | |||
| Manual W.B Red | |||
| Focus | |||
| ContrastAdjust the contrast level manually between 0 and 255 under bright and dark environments. | |||
| IMAGE | Brightness | + | |
| SETTING | Contrast | 128 | |
| SYSTEM | Saturation | - | |
| Preview Mode | |||
| Effect | |||
| Mirror | |||
| Exposure Setup | |||
| Manual Exposure | |||
| White Balance Setup | |||
| Manual W.B Blue | |||
| Manual W.B Red | |||
| Focus | |||
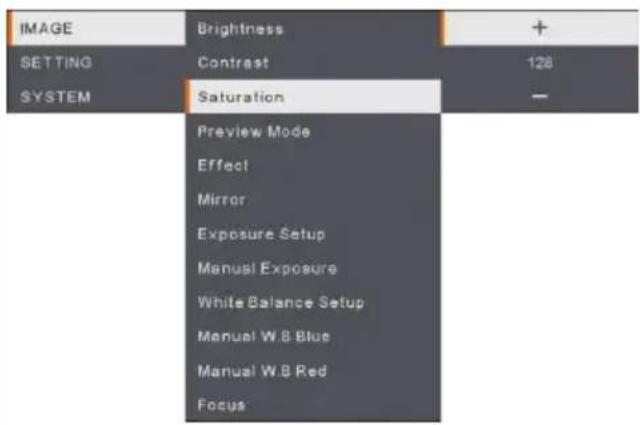 | SaturationAdjust the saturation level manually between 0 and 255. |
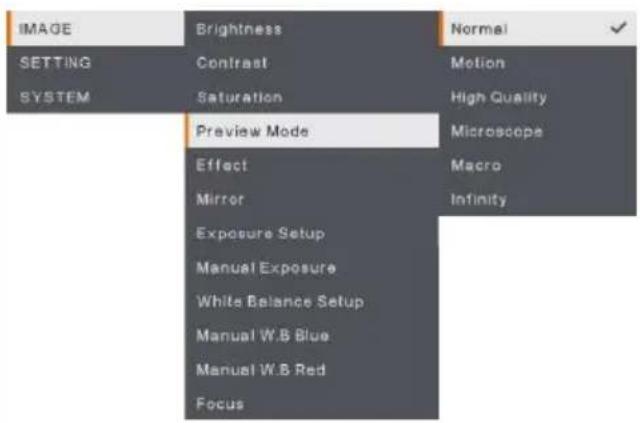 | Preview ModeSelect from the various image display settings.Normal - adjust the gradient of image.Motion – high refresh rate upon a motion image.High Quality - high resolution with the best quality.Microscope - automatically adjust optical zoom for microscopic viewing.Macro – use for a closer image.Infinity – use for a farther image. |
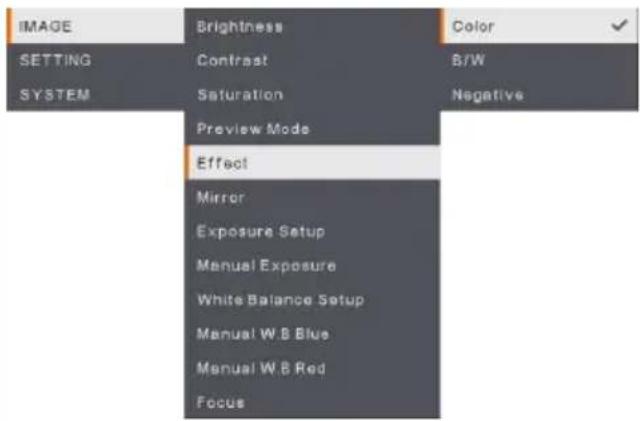 | EffectConvert the image into positive (true color), monochrome (black and white) or negative. |
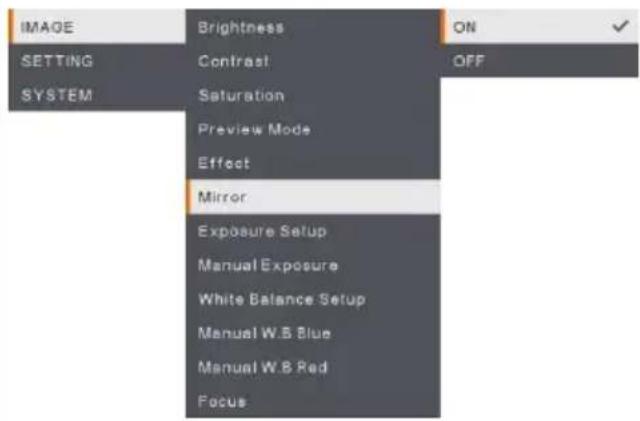 | MirrorSelect to flip left and right of the image. |
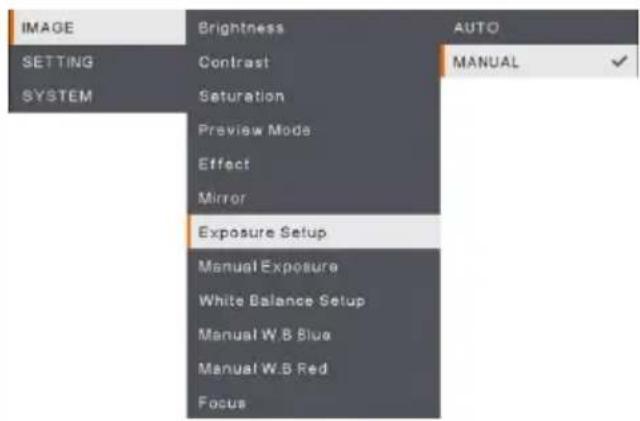 | Exposure SetupSelect AUTO to automatically adjust the white balance and exposure setting and correct the color and exposure compensation.Select MANUAL to enable advanced settings for manual exposure and WB. |
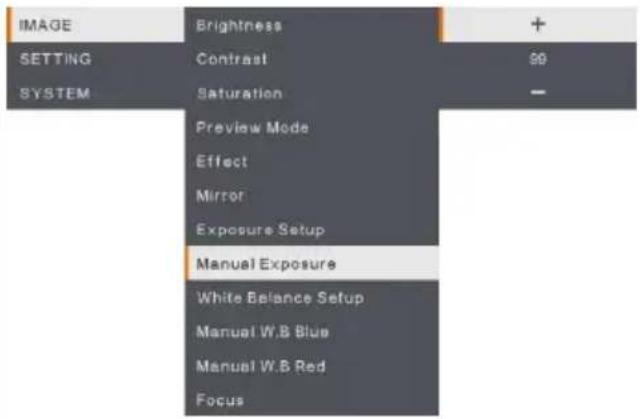 | Manual ExposureMANUAL - manually adjust the exposure level.The exposure can be adjusted between 0 and 99. |
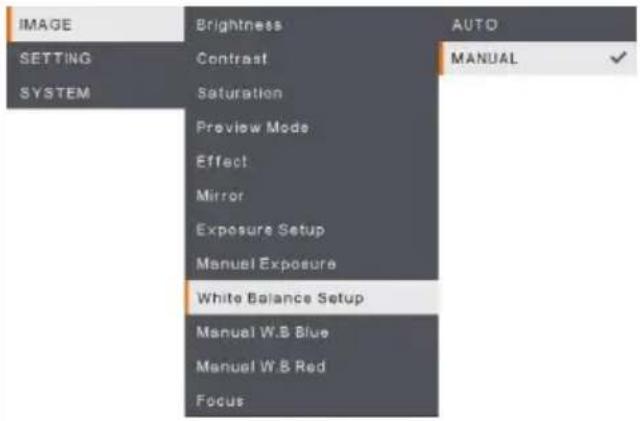 | White Balance SetupSelect the White Balance setting for various light conditions or color temperature.AUTO - automatically adjust the white balance.MANUAL - manually adjust the color level. Select Manual to enable advanced WB setup. |
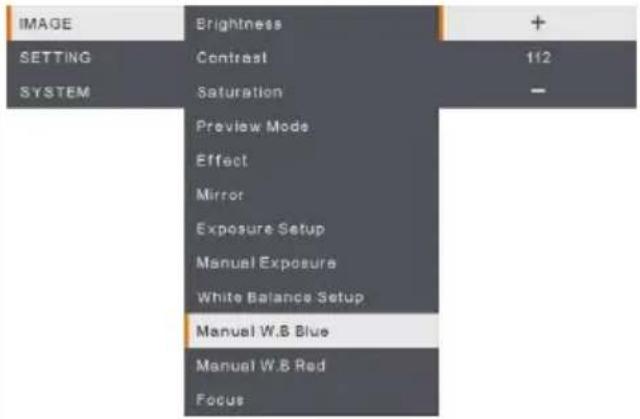 | Manual WB BlueManually adjust the blue color level. The color level can be adjusted up to 255. |
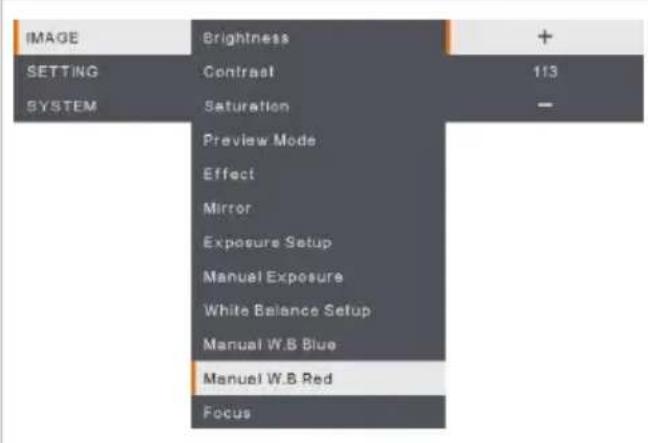
Manual WB Red
Manually adjust the red color level. The color level can be adjusted up to 255.
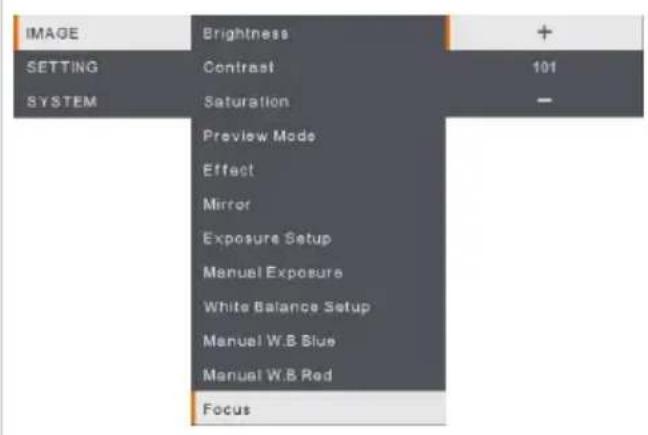
Focus
Manually fine-tune the image.
Setting
| Menu Screen | Function |
 | Capture ResolutionSelect the capture size. In 13M setting, the capture resolution size is 4208 x 3120.Select Normal, the capture size is based on the resolution settings. |
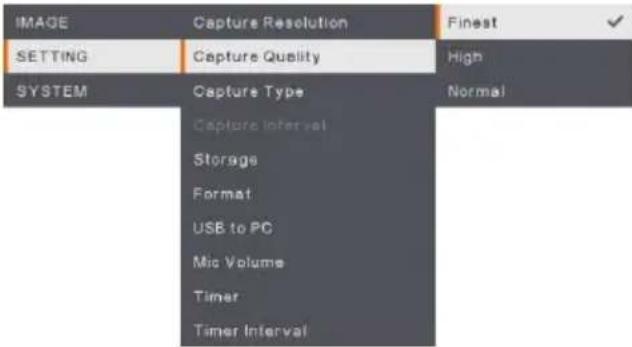 | Capture QualitySelect the capture compression setting.Select the Finest to get the best quality capture compression. |
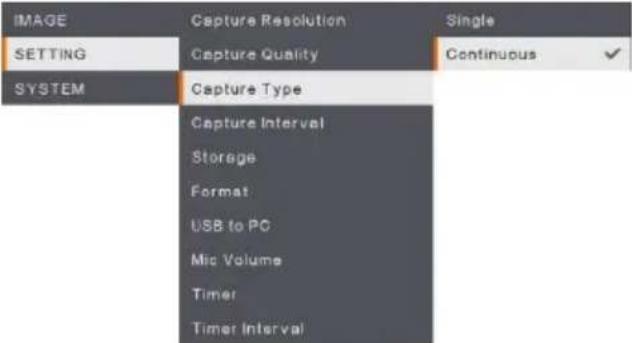 | Capture TypeSelect the capture type.Single - capture one image only.Continuous - capture successive images and press any key to stop continuous capture. Select Continuous to enable Capture Interval setting. |
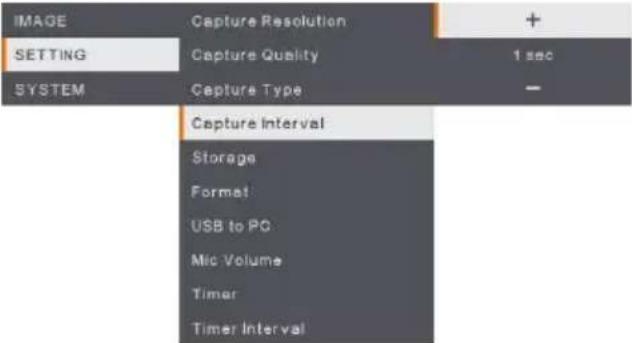 | Capture IntervalSet the time interval for continuous capture. The length can be set up to 600 sec (10 min). |
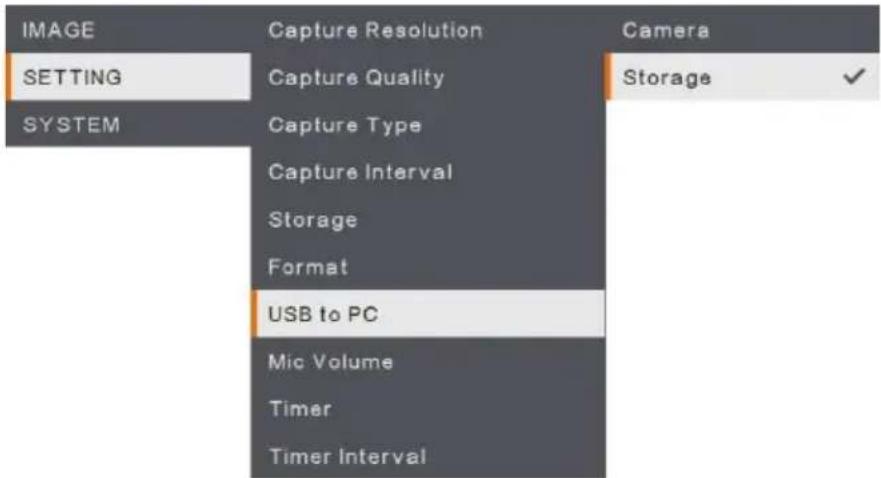
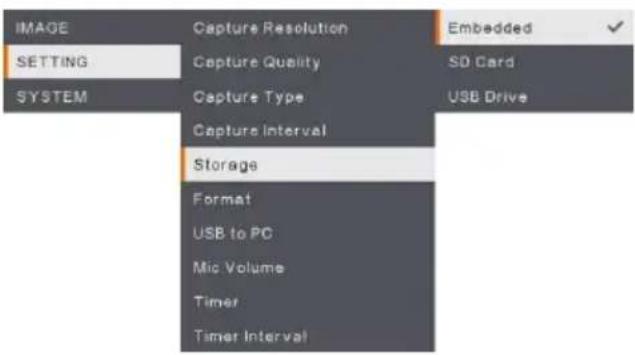 | StorageChange the storage location. Audio & video recording can only be saved in build-in memory, SD Card or USB Drive. |
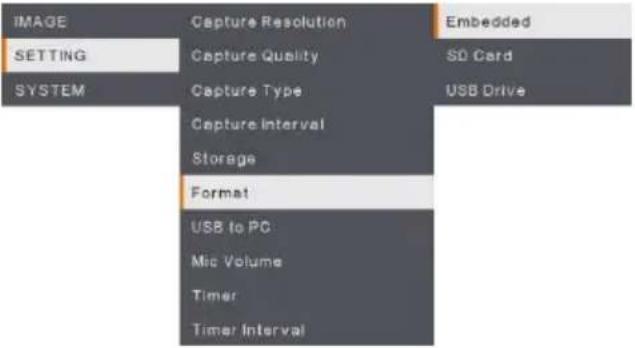 | FormatFormat to delete all the data in the selected memory. |
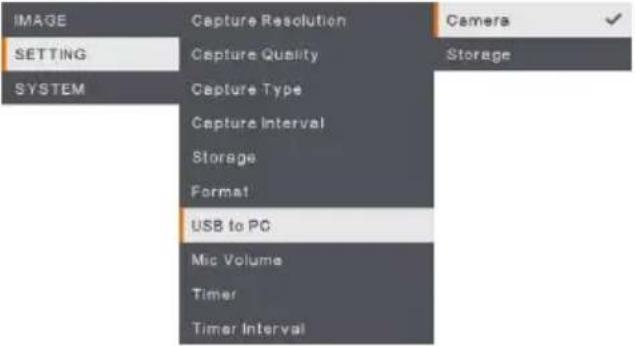 | USB to PCSelect status of the AVerVision M90UHD when it is connected to the computer via USB cable.Camera - can be used as a computer webcam or with our bundled software to record video and capture still image.Storage - transfer the captured pictures/videos from the memory to computer hard disk. |
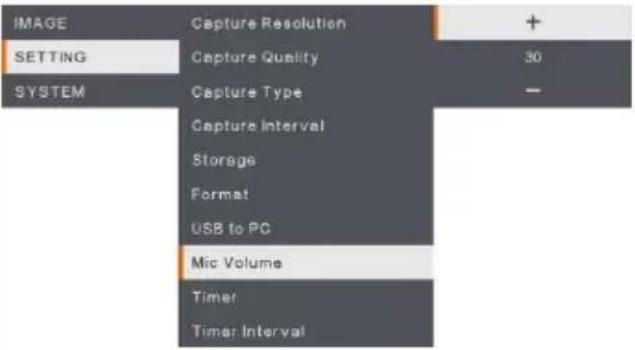 | MIC VolumeAdjust volume input of recording or USB audio input. |
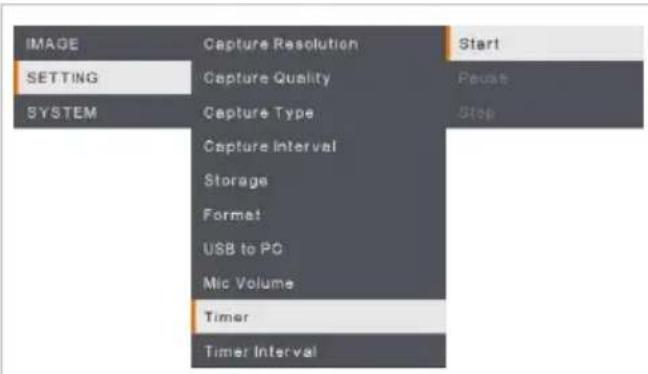
Start Timer
Start the timer. The timer automatically counts up after the countdown reaches zero to show the elapsed time.
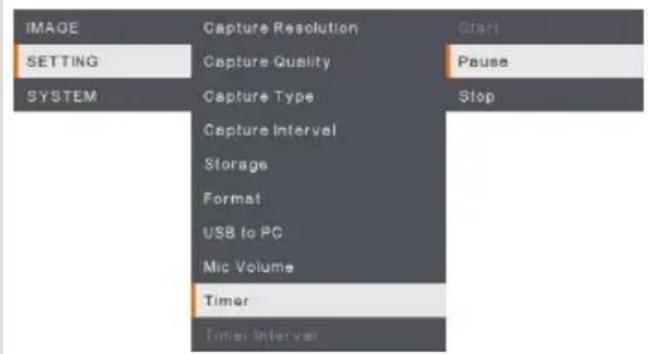
Pause/Stop Timer
Press Menu button during timing to pause or stop timing.
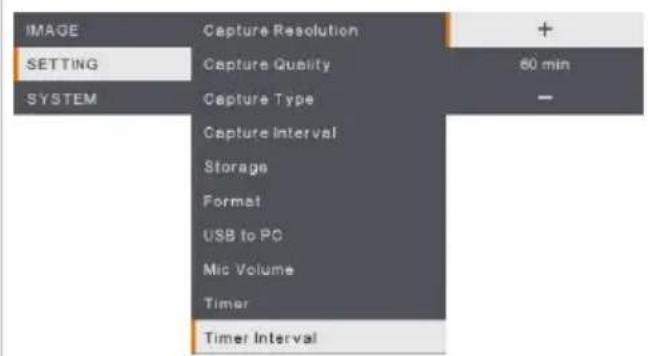
Timer Interval
Set the timer duration up to 2 hours.
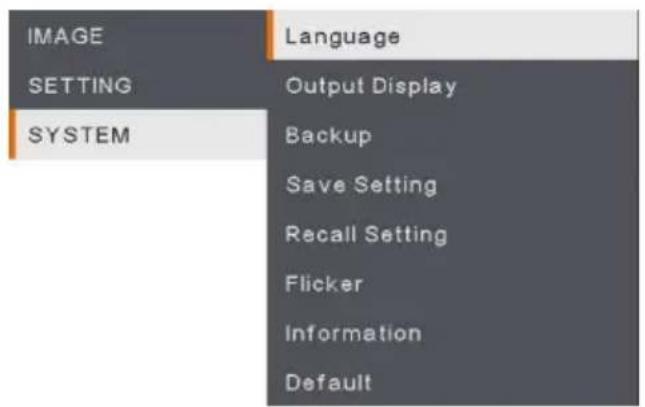
System
| Menu Screen | Function |
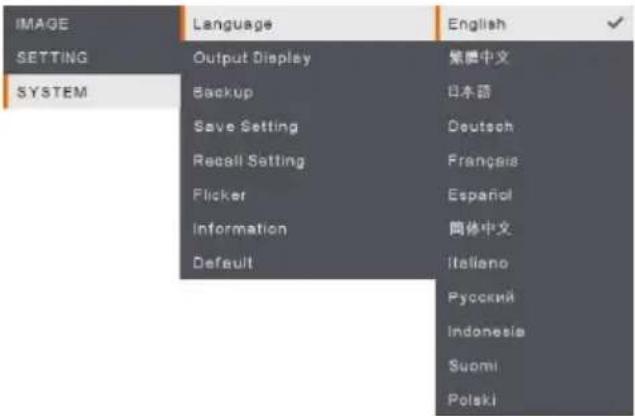 | LanguageChange and select a different language. M90UHD supports up to 12 languages. |
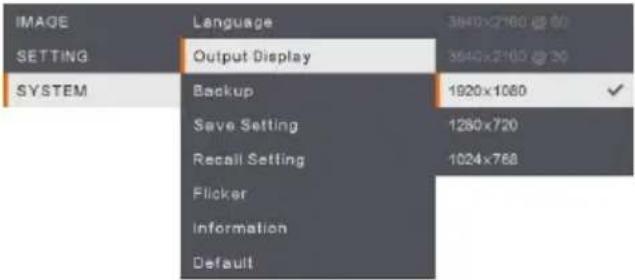 | Output DisplaySet the resolution to display the image on screen.The output device resolution detected automatically and configured to the highest resolution. |
 | BackupCopy the image from the built-in memory to SD card or USB flash drive. |
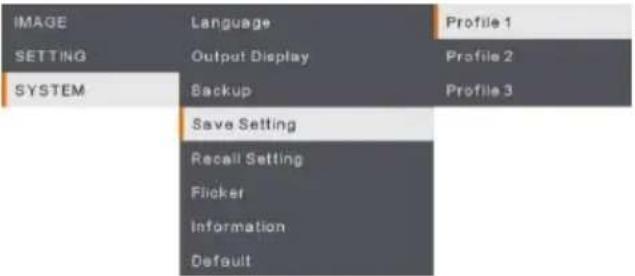 | Save SettingSave current settings (Brightness, contrast,saturation, preview mode and etc.) in the selected profile number. |
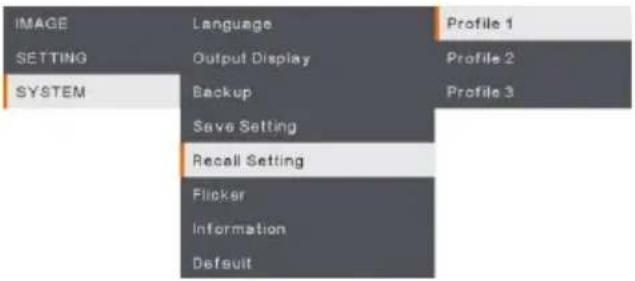 | Recall SettingRestore the setting back to the selected profile number. |
Flicker
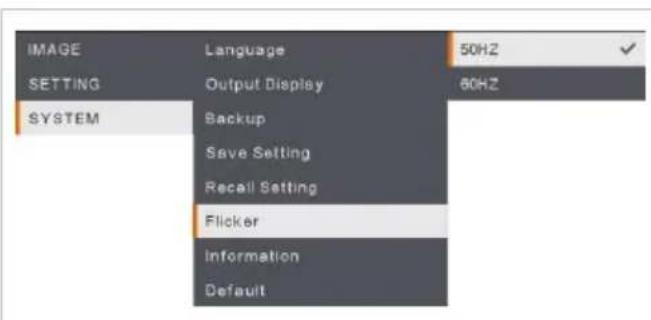
Select between 50Hz or 60Hz. Some display devices cannot handle high refresh rates. The image will flicker a couple of times as the output is switched to another refresh rate.
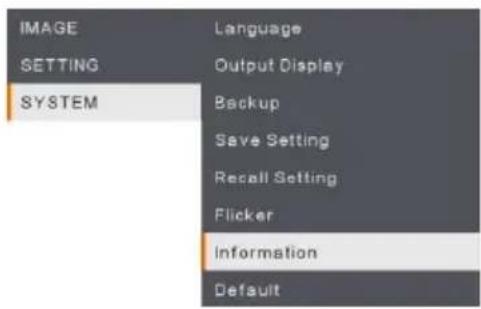
Information
Display the product information.
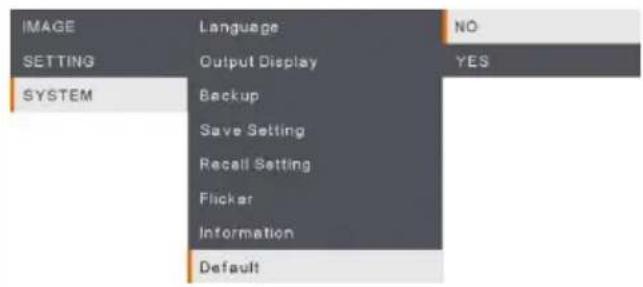
Default
Restore all the settings into original factory default setting. All saving configurations will be deleted.
Playback
You can use the playback feature to configure the saved images or videos.
| Menu Screen | Function |
 | Slide ShowStart or Stop the Slide Show. |
 | IntervalSet the interval between playing images or videos. |
 | StorageChoose the images or videos from Storage, including Embedded, SD Card or USB Drive. |
 | Delete AllSelect this option to delete all saved images or videos. |
Transfer Captured Images/Videos to a computer
This enables you to transfer the captured image from the built-in memory, SD or USB drive to a computer.
Two ways to save images/videos:
a. Built-in memory+SD card
b. Built-in memory+USB drive

The instruction below MUST be read and followed BEFORE connecting the USB cable.
- MUST set the USB to PC as STORAGE before connecting the USB cable.
- When "Mass Storage" appears at the lower right corner of the presentation screen, you may now connect the USB cable.
- Upon connecting the USB cable, the system automatically detects the new removable disk. You can now transfer the captured image(s) or videos from the M90UHD built-in memory, SD card or USB drive to the computer hard disk.
Appendix
IP Command Protocol
- Port
| Internet protocol | IPv4 |
| Transport protocol | TCP |
| Port address | 9528 |
- Format
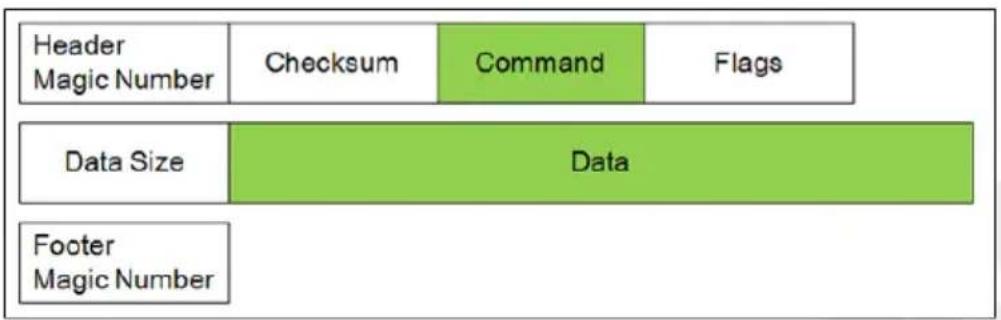
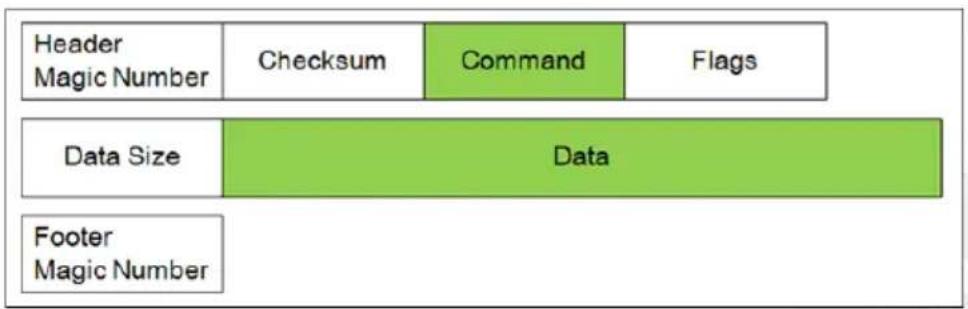
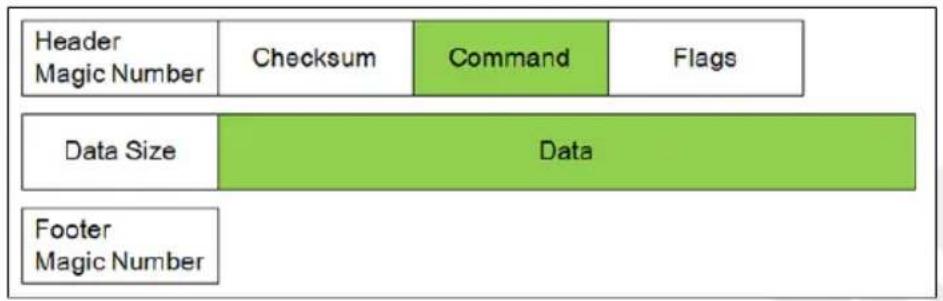
The data sent between device control and camera consists of multiple fields. The data in each field are placed in little-endian.
| Header Magic Number | 4-byte field with the value 0xABCD1234. |
| Checksum | 4-byte field. The value is calculated from the data after the checksum field to the footer. |
| Command | 4-byte field, indicating what to do |
| Flags | 4-byte field, indicating if the command should be replied or not. This field could be either 0x00000000 or 0x00000001. 0x00000001 means it should be acknowledged. The default acknowledgement is just to echo the Command field and set Data Size to 0. |
| Data size | 4-byte field, the length must be an integer multiple of 4 |
| Footer Magic Number | 4-byte field with the value 0x5678EF09. |
flowchart
graph TD
    A["Header Magic Number"] --> B["Checksum"]
    A --> C["Command"]
    A --> D["Flags"]
    E["Data Size"] --> F["Data"]
    G["Footer Magic Number"] --> H["Data"]
* Example for Set Brightness (0x80000207) Value to 100 (0x64)


- Command and Data
| Function | Command | Data Byte [0-N] | Description |
| SET BRIGHTNESS | 0x80000207 | [0-3] 0x00 ~ 0xFF | Setup value from 0 to 255 |
| SET CONTRAST | 0x8000020A | [0-3] 0x00 ~ 0xFF (0~255) | Setup value from 0 to 255 |
| SET EFFECT | 0x8000020D | [0-3] 0x00 ~ 0x02 | 0x00: Color Mode0x01: White & Black Mode.0x02: Negative Mode. |
| SET FOCUS | 0x80000211 | [0-3] 0x00 ~ 0x02[4-7] 0x00 ~ Max Step / Address | [0-3] Action Behavior0x00: Auto Focus (don't need Step)0x01: Close to Near0x02: Close to Far0x03: Set Focus Address[4-7] Step/Address Value0x00 ~ Max Step / Address |
| SET ZOOM | 0x80000212 | [0-3] 0x00 ~ 0x03 | 0x00 Zoom In0x01 Zoom Out0x02 Zoom Max0x03 Zoom Reset |
| SET EXPOSURE MODE | 0x80000215 | [0-3] 0x00 ~ 0x01 | 0x00 Manual Mode0x01 Auto Mode |
| SET EXPOSURE VALUE | 0x80000216 | [0-3] 0x00 ~ 0x63 | Setup value from 0 to 99 |
| SET WITE BALANCE MODE | 0x80000217 | [0-3] 0x00 ~ 0x01 | 0x00 Manual Mode0x01 Auto Mode |
| SET WITE BALANCE VALUE (BLUE) | 0x80000218 | [0-3] 0x00 ~ 0xFF | Setup value from 0 to 255 |
| SET WITE BALANCE VALUE (RED) | 0x80000219 | [0-3] 0x00 ~ 0xFF | Setup value from 0 to 255 |
| SET CAPTURE | 0x8000021A | /*Don't need*/ | Trigger action |
| SET FLICKER | 0x8000021B | [0-3] 0x01 ~ 0x02 | 0x00: Reserved0x01: 50 Hz0x02: 60 Hz |
| SET FREEZE | 0x8000021D | [0-3] 0x00 ~ 0x01 | 0x00 Freeze OFF0x01 Freeze ON |
| SET ROTATE | 0x80000300 | [0-3] 0x00 ~ 0x01 | 0x00 Rotate 0 degree.0x01 Rotate 180 degree |
| SET LAMP | 0x80000301 | [0-3] 0x00 ~ 0x01 | 0x00 Lamp OFF0x01 Lamp ON |
| SET SATURATION | 0x80000302 | [0-3] 0x00 ~ 0xFF(0~255) | Setup value from 0 to 255 |
| SET PC PASS | 0x80000303 | [0-3] 0x00 ~ 0x01 | 0x00 PC Pass OFF0x01 PC Pass ON |
- Example for packet data via internet protocol sender tool.
| Header | Checksum | Command | Flags | Data Size | Data | Footer | Action Description |
| 34 12 cd ab | 6F 02 00 80 | 07 02 00 80 | 00 00 00 00 | 04 00 00 00 | 64 00 00 00 | 09 ef 78 56 | BRIGHTNESS 100 |
| 34 12 cd ab | 72 02 00 80 | 0A 02 00 80 | 00 00 00 00 | 04 00 00 00 | 64 00 00 00 | 09 ef 78 56 | CONTRAST 100 |
| 34 12 cd ab | 11 02 00 80 | 0D 02 00 80 | 00 00 00 00 | 04 00 00 00 | 00 00 00 00 | 09 ef 78 56 | EFFECT COLOR |
| 34 12 cd ab | 12 02 00 80 | 0D 02 00 80 | 00 00 00 00 | 04 00 00 00 | 01 00 00 00 | 09 ef 78 56 | EFFECT B/W |
| 34 12 cd ab | 13 02 00 80 | 0D 02 00 80 | 00 00 00 00 | 04 00 00 00 | 02 00 00 00 | 09 ef 78 56 | EFFECT NEGATIVE |
| 34 12 cd ab | 15 02 00 80 | 11 02 00 80 | 00 00 00 00 | 04 00 00 00 | 00 00 00 00 | 09 ef 78 56 | AUTO FOCUS |
| 34 12 cd ab | 16 02 00 80 | 12 02 00 80 | 00 00 00 00 | 04 00 00 00 | 00 00 00 00 | 09 ef 78 56 | ZOOM IN |
| 34 12 cd ab | 17 02 00 80 | 12 02 00 80 | 00 00 00 00 | 04 00 00 00 | 01 00 00 00 | 09 ef 78 56 | ZOOM OUT |
| 34 12 cd ab | 1A 02 00 80 | 15 02 00 80 | 00 00 00 00 | 04 00 00 00 | 01 00 00 00 | 09 ef 78 56 | EXPOSURE AUTO |
| 34 12 cd ab | 4C 02 00 80 | 16 02 00 80 | 00 00 00 00 | 04 00 00 00 | 32 00 00 00 | 09 ef 78 56 | EXPOSURE 50 |
| 34 12 cd ab | 1C 02 00 80 | 17 02 00 80 | 00 00 00 00 | 04 00 00 00 | 01 00 00 00 | 09 ef 78 56 | W/B AUTO |
| 34 12 cd ab | 1B 03 00 80 | 18 02 00 80 | 00 00 00 00 | 04 00 00 00 | FF 00 00 00 | 09 ef 78 56 | W/B BLUE 255 |
| 34 12 cd ab | 1C 03 00 80 | 19 02 00 80 | 00 00 00 00 | 04 00 00 00 | FF 00 00 00 | 09 ef 78 56 | W/B RED 255 |
| 34 12 cd ab | 1A 02 00 80 | 1A 02 00 80 | 00 00 00 00 | 00 00 00 00 | 09 ef 78 56 | CAPTURE | |
| 34 12 cd ab | 20 02 00 80 | 1B 02 00 80 | 00 00 00 00 | 04 00 00 00 | 01 00 00 00 | 09 ef 78 56 | FLICKER 50Hz |
| 34 12 cd ab | 21 02 00 80 | 1B 02 00 80 | 00 00 00 00 | 04 00 00 00 | 02 00 00 00 | 09 ef 78 56 | FLICKER 60Hz |
| 34 12 cd ab | 21 02 00 80 | 1D 02 00 80 | 00 00 00 00 | 04 00 00 00 | 00 00 00 00 | 09 ef 78 56 | FREEZE OFF |
| 34 12 cd ab | 22 02 00 80 | 1D 02 00 80 | 00 00 00 00 | 04 00 00 00 | 01 00 00 00 | 09 ef 78 56 | FREEZE ON |
| 34 12 cd ab | 04 03 00 80 | 00 03 00 80 | 00 00 00 00 | 04 00 00 00 | 00 00 00 00 | 09 ef 78 56 | ROTATE 0 |
| 34 12 cd ab | 05 03 00 80 | 00 03 00 80 | 00 00 00 00 | 04 00 00 00 | 01 00 00 00 | 09 ef 78 56 | ROTATE 180 |
| 34 12 cd ab | 05 03 00 80 | 01 03 00 80 | 00 00 00 00 | 04 00 00 00 | 00 00 00 00 | 09 ef 78 56 | LAMP OFF |
| 34 12 cd ab | 06 03 00 80 | 01 03 00 80 | 00 00 00 00 | 04 00 00 00 | 01 00 00 00 | 09 ef 78 56 | LAMP ON |
| 34 12 cd ab | 07 03 00 80 | 03 03 00 80 | 00 00 00 00 | 04 00 00 00 | 00 00 00 00 | 09 ef 78 56 | PCPASS OFF |
| 34 12 cd ab | 08 03 00 80 | 03 03 00 80 | 00 00 00 00 | 04 00 00 00 | 01 00 00 00 | 09 ef 78 56 | PCPASS ON |
CGI Command
Enter the following URL into your web browser to view the CGI command list. To access a control command, follow the following CGI command format.
- URL: http://IPv4 Address/cgi-bin/NetApi?
- Format: http://IPv4 Address/cgi-bin/NetApi?setCmd=ParamCmd&setValue=ParamValue
| Description | ParamCmd | ParamValue |
| Set Brightness Value | img_brightness | 0 ~ 255 |
| Set Contrast Value | img_contrast | 0 ~ 255 |
| Set Saturation Value | img_saturation | 0 ~ 255 |
| Set Effect Mode | img_effect | 0, 1, 2 |
| Set Freeze Mode | img_freeze | 0, 1 |
| Set Exposure Mode | img_exposureMode | 0, 1 |
| Set Exposure Value | img_exposure | 0 ~ 99 |
| Set White Balance Mode | img_whitebalanceMode | 0, 1 |
| Set White Balance Red | img_whitebalanceRed | 0 ~ 255 |
| Set White Balance Blue | img_whitebalanceBlue | 0 ~ 255 |
| Set Rotate Mode | img_rotate | 0, 1 |
| Set Zoom Mode | set_zoom | 0, 1, 2, 3 |
| Set Flicker Mode | set_flicker | 0, 1 |
| Set Lamp Value | set_lamp | 0, 1 |
| Set PC Pass Mode | set_pcpass | 0, 1 |
| Trigger Capture | trigger_capture | /*don't care*/ |
| Trigger Focus | trigger_focus | /*don't care*/ |
RS-232 Send Command List
Send Format : 0x52 + 0x0B + 0x03 + Data[0] + Data[1] + Data[2] + 0x53 + Checksum ^4
Success Receive Format : 0x53 + 0x00 + 0x02+ *2 + 0x00 + 0x52 + Checksum *4
Abnormal Receive Format : 0x53 + 0x00 + 0x01 + *3 + 0x52 + Checksum*5
*1 : Checksum = 0x0B xor 0x03 xor Data[0] xor Data[1] xor Data[2] xor 0x53
*2 : Receive data ok : 0x0B, Not Command : 0x03
*3 : ID error: 0x01, Checksum error: 0x02, Function fail = 0x04
*4 : Checksum = 0x00 xor 0x02 xor *2 xor 0x00 xor 0x52
*5 : Checksum = 0x00 xor 0x01 xor *3 xor 0x52
*6 : Standby Mode Receive Data = 0x51 + 0xFF + 0x01 + 0x0B + 0x51 + 0xA4
Power On Mode Recevice Data = No Data Return
*7 : Standby Mode Recevice Data = 0x51 + 0x00 + 0x01 + 0x0B + 0x51 + 0x5B
Power On Mode Receive Data = 0x53 + 0x00 + 0x02 + 0x0B + 0x00 + 0x52 + 0x5B
| Function | Data[0] | Data[1] | Data[2] | Checksum |
| POWER OFF*6 | 0x01 | 0x00 | 0x00 | 0x5a |
| POWER ON *7 | 0x01 | 0x01 | 0x00 | 0x5b |
| CAMERA MODE | 0x02 | 0x00 | 0x00 | 0x59 |
| PLAYBACK MODE | 0x03 | 0x00 | 0x00 | 0x58 |
| PC 1/2 | 0x04 | 0x00 | 0x00 | 0x5f |
| IMAGE CAPTURE TYPE: SINGLE | 0x05 | 0x00 | 0x00 | 0x5e |
| IMAGE CAPTURE TYPE: CONTINUOUS | 0x05 | 0x01 | 0x00 | 0x5f |
| CONT. CAPTURE INTERVAL + | 0x06 | 0x00 | 0x00 | 0x5d |
| CONT. CAPTURE INTERVAL - | 0x06 | 0x01 | 0x00 | 0x5c |
| IMAGE CAPTURE RESOLUTION: NORMAL | 0x07 | 0x00 | 0x00 | 0x5c |
| IMAGE CAPTURE RESOLUTION: 13M | 0x07 | 0x01 | 0x00 | 0x5d |
| TIMER START | 0x08 | 0x00 | 0x00 | 0x53 |
| TIMER PAUSE | 0x08 | 0x01 | 0x00 | 0x52 |
| TIMER STOP | 0x08 | 0x02 | 0x00 | 0x51 |
| TIMER SET TIME | 0x08 | 0x03 | Value[ 1 ~ 120 ] | *1 |
| PREVIEW MODE: MOTION | 0x0A | 0x02 | 0x00 | 0x53 |
| PREVIEW MODE: MICROSCOPE | 0x0A | 0x03 | 0x00 | 0x52 |
| PREVIEW MODE: MACRO | 0x0A | 0x04 | 0x00 | 0x55 |
| PREVIEW MODE: INFINITE | 0x0A | 0x05 | 0x00 | 0x54 |
| PREVIEW MODE: NORMAL | 0x0A | 0x06 | 0x00 | 0x57 |
| PREVIEW MODE: HIGH QUALITY | 0x0A | 0x07 | 0x00 | 0x56 |
| PREVIEW CAPTURE | 0x0B | 0x00 | 0x00 | 0x50 |
| PLAYBACK DELETE | 0x0C | 0x00 | 0x00 | 0x57 |
| PLAYBACK FULL SCREEN | 0x0D | 0x00 | 0x00 | 0x56 |
| MIRROR OFF | 0x0E | 0x00 | 0x00 | 0x55 |
| MIRROR ON | 0x0E | 0x01 | 0x00 | 0x54 |
| ROTATE OFF | 0x0F | 0x00 | 0x00 | 0x54 |
| ROTATE ON | 0x0F | 0x02 | 0x00 | 0x56 |
| EFFECT: COLOR | 0x10 | 0x00 | 0x00 | 0x4b |
| EFFECT: B/W | 0x10 | 0x01 | 0x00 | 0x4a |
| EFFECT: NEGATIVE | 0x10 | 0x02 | 0x00 | 0x49 |
| CONTRAST INCREASE | 0x11 | 0x00 | 0x00 | 0x4a |
| CONTRAST DECREASE | 0x11 | 0x01 | 0x00 | 0x4b |
| CONTRAST VALUE | 0x11 | 0x02 | Value[ 1 ~ 255 ] | *1 |
| BRIGHTNESS INCREASE | 0x12 | 0x00 | 0x00 | 0x49 |
| BRIGHTNESS DECREASE | 0x12 | 0x01 | 0x00 | 0x48 |
| BRIGHTNESS VALUE | 0x12 | 0x02 | Value[ 1 ~ 255 ] | *1 |
| EXPOSURE: AUTO | 0x13 | 0x00 | 0x00 | 0x48 |
| EXPOSURE: MANUAL | 0x13 | 0x01 | 0x00 | 0x49 |
| EXPOSURE MANUAL INCREASE | 0x14 | 0x00 | 0x00 | 0x4f |
| EXPOSURE MANUAL DECREASE | 0x14 | 0x01 | 0x00 | 0x4e |
| WHITE BALANCE: AUTO | 0x15 | 0x00 | 0x00 | 0x4e |
| WHITE BALANCE: MANUAL | 0x15 | 0x01 | 0x00 | 0x4f |
| WHITE BALANCE BLUE INCREASE | 0x16 | 0x00 | 0x00 | 0x4d |
| WHITE BALANCE BLUE DECREASE | 0x16 | 0x01 | 0x00 | 0x4c |
| WHITE BALANCE RED INCREASE | 0x17 | 0x00 | 0x00 | 0x4c |
| WHITE BALANCE RED DECREASE | 0x17 | 0x01 | 0x00 | 0x4d |
| FLICKER: 50Hz | 0x18 | 0x00 | 0x00 | 0x43 |
| FLICKER: 60Hz | 0x18 | 0x01 | 0x00 | 0x42 |
| RECORD: OFF | 0x23 | 0x00 | 0x00 | 0x78 |
| RECORD: ON | 0x23 | 0x01 | 0x00 | 0x79 |
| MOVIE FAST REWIND | 0x25 | 0x00 | 0x00 | 0x7e |
| MOVIE FAST FORWARD | 0x25 | 0x01 | 0x00 | 0x7f |
| MOVIE VOL INC | 0x26 | 0x00 | 0x00 | 0x7d |
| MOVIE VOL DEC | 0x26 | 0x01 | 0x00 | 0x7c |
| STORAGE: EMBEDDED | 0x28 | 0x00 | 0x00 | 0x73 |
| STORAGE: SD CARD | 0x28 | 0x01 | 0x00 | 0x72 |
| STORAGE: THUMB DRIVE | 0x28 | 0x02 | 0x00 | 0x71 |
| FORMAT: EMBEDDED | 0x29 | 0x00 | 0x00 | 0x72 |
| FORMAT: SD CARD | 0x29 | 0x01 | 0x00 | 0x73 |
| FORMAT: THUMB DRIVE | 0x29 | 0x02 | 0x00 | 0x70 |
| OUTPUT RESOLUTION: 1024x768 | 0x2F | 0x01 | 0x00 | 0x75 |
| OUTPUT RESOLUTION: 1280x720 | 0x2F | 0x02 | 0x00 | 0x76 |
| OUTPUT RESOLUTION: 1920x1080 | 0x2F | 0x03 | 0x00 | 0x77 |
| OUTPUT RESOLUTION: 3840x2160@30 | 0x2F | 0x08 | 0x00 | 0x7c |
| OUTPUT RESOLUTION: 3840x2160@60 | 0x2F | 0x09 | 0x00 | 0x7d |
| USB CONNECT: USB CAMERA | 0x30 | 0x00 | 0x00 | 0x6b |
| USB CONNECT: MASS STORAGE | 0x30 | 0x01 | 0x00 | 0x6a |
| BACKUP TO SD CARD | 0x31 | 0x00 | 0x00 | 0x6a |
| BACKUP TO THUMBDRIVE | 0x31 | 0x01 | 0x00 | 0x6b |
| PROFILE SAVE: PROFILE 1 | 0x32 | 0x00 | 0x00 | 0x69 |
| PROFILE SAVE: PROFILE 2 | 0x32 | 0x01 | 0x00 | 0x68 |
| PROFILE SAVE: PROFILE 3 | 0x32 | 0x02 | 0x00 | 0x6b |
| PROFILE RECALL: PROFILE 1 | 0x33 | 0x00 | 0x00 | 0x68 |
| PROFILE RECALL: PROFILE 2 | 0x33 | 0x01 | 0x00 | 0x69 |
| PROFILE RECALL: PROFILE 3 | 0x33 | 0x02 | 0x00 | 0x6a |
| SLIDESHOW: OFF | 0x34 | 0x00 | 0x00 | 0x6f |
| SLIDESHOW: ON | 0x34 | 0x01 | 0x00 | 0x6e |
| CAPTURE QUALITY: NORMAL | 0x37 | 0x00 | 0x00 | 0x6c |
| CAPTURE QUALITY: HIGH | 0x37 | 0x01 | 0x00 | 0x6d |
| CAPTURE QUALITY: FINEST | 0x37 | 0x02 | 0x00 | 0x6e |
| AUTO FOCUS | 0x40 | 0x00 | 0x00 | 0x1b |
| MENU | 0x41 | 0x00 | 0x00 | 0x1a |
| ARROW - DOWN | 0x42 | 0x00 | 0x00 | 0x19 |
| ARROW - UP | 0x42 | 0x01 | 0x00 | 0x18 |
| ARROW - LEFT | 0x42 | 0x02 | 0x00 | 0x1b |
| ARROW - RIGHT | 0x42 | 0x03 | 0x00 | 0x1a |
| ENTER | 0x43 | 0x00 | 0x00 | 0x18 |
| FREEZE/STOP | 0x44 | 0x00 | 0x00 | 0x1f |
| DEFAULT | 0x45 | 0x00 | 0x00 | 0x1e |
| ZOOM - | 0x46 | 0x00 | 0x00 | 0x1d |
| ZOOM + | 0x46 | 0x01 | 0x00 | 0x1c |
| ZOOM RESET | 0x47 | 0x00 | 0x00 | 0x1c |
| FOCUS TO NEAR | 0x48 | 0x00 | 0x00 | 0x13 |
| FOCUS TO FAR | 0x48 | 0x01 | 0x00 | 0x12 |
| LAMP OFF | 0x49 | 0x00 | 0x00 | 0x12 |
| LAMP ON | 0x49 | 0x01 | 0x00 | 0x13 |
| SATURATION INCREASE | 0x4B | 0x00 | 0x00 | 0x10 |
| SATURATION DECREASE | 0x4B | 0x01 | 0x00 | 0x11 |
| SATURATION VALUE | 0x4B | 0x02 | Value[ 1 ~ 255 ] | *1 |
| MUTE OFF | 0x4C | 0x00 | 0x00 | 0x17 |
| MUTE ON | 0x4C | 0x01 | 0x00 | 0x16 |
RS-232 Receive Command List
Send Format : 0x52 + 0x0A + 0x01 + Data[0] + 0x53 + Checksum
Receive Format : 0x53 + 0x0C + 0x01 + ReData[0] + 0x52 + ReChecksum ^4
*1 : ReChecksum = 0x0C xor 0x01 xor ReData[0] xor 0x52
*2 : Power Status Receive Data = 0x51 + 0xFF + 0x01 + 0x0A + 0x51 + 0xA5
| Function | Data[0] | Checksum | ReData[0] |
| Red Value | 0x02 | 0x5A | Value[ 0 ~ 255 ] |
| Blue Value | 0x03 | 0x5B | Value[ 0 ~ 255 ] |
| Power Status | 0x04 | 0x5C | OFF [*2] |
| 1: ON | |||
| Lamp Status | 0x05 | 0x5D | 0: OFF 1: ON |
| Display Status | 0x06 | 0x5E | 0: Camera Mode |
| 1: Playback Mode | |||
| 2: PC-1 Pass Through | |||
| Freeze Status | 0x08 | 0x50 | 0: OFF 1: ON |
| Brightness Value | 0x0A | 0x52 | Value[ 1 ~ 64 ] |
| Contrast Value | 0x0B | 0x53 | Value[ 1 ~ 32 ] |
| Saturation Value | 0x0D | 0x55 | Value[ 1 ~ 32 ] |
Technical Specifications
- Image
| Sensor | 1/3.06" CMOS |
| Pixel Count | 13 megapixels |
| Frame Rate | 60 fps (max.) |
| White Balance | Auto/Manual |
| Exposure | Auto/Manual |
| Image mode | Normal, High Frame, High Quality, Microscope, Infinity, Marco |
| Effect | Color/B/W/Negative |
| RGB output | 1280×720, 1024×768, 1080P |
| HDMI Output | 4K, 1080p, 720p |
| Image Capture | 200 Frames |
- Optics
| Focusing | Auto/Manual |
| Shooting Area | 420 x 315mm |
| Zooming | Total Zoom 322x zoom (14x optical zoom + 23x digital zoom) |
- Power
| Power Source | DC 5V/3A, AC 100-240V, 50-60Hz |
| Consumption | 10 Watts(lamp on); 9 Watts(lamp off) |
- Lightning
| Lamp Type | LED light |
- Input / Output
| HDMI Input | YES (HDMI, pass through) |
| HDMI Output | YES (HDMI, pass through) |
| VGA Input | YES (15-pins D-sub, pass through) |
| VGA Output | YES (15-pins D-sub, pass through) |
| USB-A Port | 1 (Type A for USB flash drive) |
| USB-B Port | 1 Mini-B Receptacle |
| MIC | Built-in |
| SD Card Slot | 1 (micro SD card, 32GB) |
| Line Out | Phone Jack |
| Microphone | MIC in |
| DC 5V Input | Power Jack |
| Kensington Lock | YES |
| *RS 232(Optional) | Mini-DIN Jack (Use RS 232 Adapter Cable optional) |
- Dimension
| Operating | 481.3mm(L) x 159mm(W) x 469.9mm(H) |
| Folded | 319.0mm(L) x 176mm(W) x 112mm(H) |
| Weight | 2.2 +/-0.5Kg (about 5.732 lbs) |
- External Storage
| Micro SD Card | Max 32GB (FAT32) |
| USB Flash Drive | Max 32GB (FAT32) |
*please note that this specification depends on certain order.
Troubleshooting
This section provides many useful tips on how to solve common problems while using the AVerVision M90UHD.
There is no picture on the presentation screen.
- Check all the connectors again as shown in this manual.
- Verify the setting of the display output device.
- If you are presenting from a notebook or computer through the display output device, check the cable connection from computer RGB (VGA) output to RGB input of AVerVision M90UHD and make sure AVerVision M90UHD is in PC Mode.
- For HDMI display output, a delay occurs while waiting for both the display device and M90UHD to sync up. Wait for around 4 to 7 seconds until you see the camera image on the screen.
The picture on the presentation screen is distorted or the image is blurry.
- Reset all changed settings, if any, to the original manufacturer default setting. Press DEFAULT on the remote or select Default in Basic tab OSD menu.
- Use the Brightness and Contrast menu functions to reduce the distortion if applicable.
- If you discover that the image is blurry or out of focus, press the Auto Focus button on the control panel or remote control.
There is no computer signal on presentation screen.
- Check all the cable connections among the display device, AVerVision M90UHD and your PC.
- Connect your PC to the AVerVision M90UHD first before you power on your computer.
- For notebook, repeatedly press FN+F5 to toggles between display modes and display the computer image on the presentation screen. For different command, please refer to your laptop manual.
The presentation screen does not show the exact desktop image on my PC or Notebook after I toggle from Camera to PC mode.
- Return to your PC or Notebook, place the mouse on the desktop and right click, choose "Properties", choose "Setting" tab, click on "2" monitor and check the box "Extend my Windows desktop onto this monitor".
- Then go back one more time to your PC or Notebook and place the mouse on the desktop and right click again.
- This time choose "Graphics Options", then "Output To", then "Intel® Dual Display Clone", and then choose "Monitor + Notebook".
- After you follow these steps, you should be able to see the same desktop image on your PC or Notebook as well as on the presentation screen.
AVerVision M90UHD can't detect the inserted USB flash drive.
Make sure the USB flash drive is properly inserted and in correct format. Only FAT32 is supported.
Limited Warranty
For a period of time beginning on the date of purchase of the applicable product and extending as set forth in the "Warranty Period of AVer Product Purchased" section of the warranty card, AVer Information, Inc. ("AVer") warrants that the applicable product ("Product") substantially conforms to AVer's documentation for the product and that its manufacture and components are free of defects in material and workmanship under normal use. "You" as used in this agreement means you individually or the business entity on whose behalf you use or install the product, as applicable. This limited warranty extends only to You as the original purchaser. Except for the foregoing, the Product is provided "AS IS." In no event does AVer warrant that You will be able to operate the Product without problems or interruptions, or that the Product is suitable for your purposes. Your exclusive remedy and the entire liability of AVer under this paragraph shall be, at AVer's option, the repair or replacement of the Product with the same or a comparable product. This warranty does not apply to (a) any Product on which the serial number has been defaced, modified, or removed, or (b) cartons, cases, batteries, cabinets, tapes, or accessories used with this product. This warranty does not apply to any Product that has suffered damage, deterioration or malfunction due to (a) accident, abuse, misuse, neglect, fire, water, lightning, or other acts of nature, commercial or industrial use, unauthorized product modification or failure to follow instructions included with the Product, (b) misapplication of service by someone other than the manufacturer's representative, (c) any shipment damages (such claims must be made with the carrier), or (d) any other causes that do not relate to a Product defect. The Warranty Period of any repaired or replaced Product shall be the longer of (a) the original Warranty Period or (b) thirty (30) days from the date of delivery of the repaired or replaced product.
Limitations of Warranty
AVer makes no warranties to any third party. You are responsible for all claims, damages, settlements, expenses, and attorneys' fees with respect to claims made against You as a result of Your use or misuse of the Product. This warranty applies only if the Product is installed, operated, maintained, and used in accordance with AVer specifications. Specifically, the warranties do not extend to any failure caused by (i) accident, unusual physical, electrical, or electromagnetic stress, neglect or misuse, (ii) fluctuations in electrical power beyond AVer specifications, (iii) use of the Product with any accessories or options not furnished by AVer or its authorized agents, or (iv) installation, alteration, or repair of the Product by anyone other than AVer or its authorized agents.
Disclaimer of Warranty
EXCEPT AS EXPRESSLY PROVIDED OTHERWISE HEREIN AND TO THE MAXIMUM EXTENT PERMITTED BY APPLICABLE LAW, AVER DISCLAIMS ALL OTHER WARRANTIES WITH RESPECT TO THE PRODUCT, WHETHER EXPRESS, IMPLIED, STATUTORY OR OTHERWISE, INCLUDING WITHOUT LIMITATION, SATISFACTORY QUALITY, COURSE OF DEALING, TRADE USAGE OR PRACTICE OR THE IMPLIED WARRANTIES OF MERCHANTABILITY, FITNESS FOR A PARTICULAR PURPOSE OR NONINFRINGEMENT OF THIRD PARTY RIGHTS.
Limitation of Liability
IN NO EVENT SHALL AVER BE LIABLE FOR INDIRECT, INCIDENTAL, SPECIAL, EXEMPLARY, PUNITIVE, OR CONSEQUENTIAL DAMAGES OF ANY NATURE INCLUDING, BUT NOT LIMITED TO, LOSS OF PROFITS, DATA, REVENUE, PRODUCTION, OR USE, BUSINESS INTERRUPTION, OR PROCUREMENT OF SUBSTITUTE GOODS OR SERVICES ARISING OUT OF OR IN CONNECTION WITH THIS LIMITED WARRANTY, OR THE USE OR PERFORMANCE OF ANY PRODUCT, WHETHER BASED ON CONTRACT OR TORT, INCLUDING NEGLIGENCE, OR ANY OTHER LEGAL THEORY, EVEN IF AVER HAS ADVISED OF THE POSSIBILITY OF SUCH DAMAGES. AVER'S TOTAL, AGGREGATE LIABILITY FOR DAMAGES OF ANY NATURE, REGARDLESS OF FORM OF ACTION, SHALL IN NO EVENT EXCEED THE AMOUNT PAID BY YOU TO AVER FOR THE SPECIFIC PRODUCT UPON WHICH LIABILITY IS BASED.
Governing Law and Your Rights
This warranty gives you specific legal rights; You may also have other rights granted under state law. These rights vary from state to state.

For warranty period, please refer to the warranty card.
natural_image
Line drawing of a device with a cylindrical container and a rectangular device with ports (no text or symbols)AverVision M90UHD
— 使用手册 —
警告
https://www.aver.com/download-center
常見問題、技術支援,請到下面網址:
https://www.aver.com/technical-support

連絡資訊
圓展科技股份有限公司
natural_image
Line drawing of a cylindrical device with a base, connected to a rectangular electronic device (no text or symbols visible)M90UHD
電源變壓器及電源線*
natural_image
Two remote control panels with various buttons and icons, no visible text or symbols遙控器**
AAA 電池 (x2)
USB 連接線

VGA 連接線
保固卡

快速安装指南
natural_image
Simple line drawing of a folded paper or document (no text or symbols)防眩光保護膜
RS-232 連接線

連接盤
natural_image
Three technical line drawings of a mechanical component with no visible text or symbols顯微鏡轉接頭
(包含 28mm 及 34mm 橡膠聯軸器)
部位名稱

natural_image
Technical line drawing of a cylindrical mechanical component with internal channels and a labeled part (1), no text or symbols present.natural_image
Diagram showing two mechanical components with a lock and padlock, no text or symbols present開始使用
flowchart
graph TD
    A["Sensor with ports"] --> B["Switch"]
    B --> C["Device with ports"]
    C --> D["Device with ports"]
    D --> E["Device with ports"]
    E --> F["Device with ports"]
攝影範圍
natural_image
Illustration of a projector with a light beam and a base, showing mechanical components (no text or symbols)紅外線感應器
將遙控器對準紅外線感應器即可操作裝置。
水平安装
natural_image
Line drawing of a mechanical arm with a cylindrical head and base, showing a mounting base and supporting legs (no text or symbols)防眩光片
natural_image
Simple line drawing of a folded paper or document (no text or symbols)外部記憶體儲存
| Header Magic Number | 4-byte field with the value 0xABCD1234. |
| Checksum | 4-byte field. The value is calculated from the data after the checksum field to the footer. |
| Command | 4-byte field, indicating what to do |
| Flags | 4-byte field, indicating if the command should be replied or not. This field could be either 0x00000000 or 0x00000001. 0x00000001 means it should be acknowledged. The default acknowledgement is just to echo the Command field and set Data Size to 0. |
| Data size | 4-byte field, the length must be an integer multiple of 4 |
| Footer Magic Number | 4-byte field with the value 0x5678EF09. |

- Command and Data
| Function | Command | Data Byte [0-N] | Description |
| SET BRIGHTNESS | 0x80000207 | [0-3] 0x00 ~ 0xFF | Setup value from 0 to 255 |
| SET CONTRAST | 0x8000020A | [0-3] 0x00 ~ 0xFF(0~255) | Setup value from 0 to 255 |
| SET EFFECT | 0x8000020D | [0-3] 0x00 ~ 0x02 | 0x00: Color Mode0x01: White & Black Mode.0x02: Negative Mode. |
| SET FOCUS | 0x80000211 | [0-3] 0x00 ~ 0x02[4-7] 0x00 ~ Max Step / Address | [0-3] Action Behavior0x00: Auto Focus (don't need Step)0x01: Close to Near0x02: Close to Far0x03: Set Focus Address[4-7] Step/Address Value0x00 ~ Max Step / Address |
| SET ZOOM | 0x80000212 | [0-3] 0x00 ~ 0x03 | 0x00 Zoom In0x01 Zoom Out0x02 Zoom Max0x03 Zoom Reset |
| SET EXPOSURE MODE | 0x80000215 | [0-3] 0x00 ~ 0x01 | 0x00 Manual Mode0x01 Auto Mode |
| SET EXPOSURE VALUE | 0x80000216 | [0-3] 0x00 ~ 0x63 | Setup value from 0 to 99 |
| SET WITE BALANCE MODE | 0x80000217 | [0-3] 0x00 ~ 0x01 | 0x00 Manual Mode0x01 Auto Mode |
| SET WITE BALANCE VALUE (BLUE) | 0x80000218 | [0-3] 0x00 ~ 0xFF | Setup value from 0 to 255 |
| SET WITE BALANCE VALUE (RED) | 0x80000219 | [0-3] 0x00 ~ 0xFF | Setup value from 0 to 255 |
| SET CAPTURE | 0x8000021A | /*Don't need*/ | Trigger action |
| SET FLICKER | 0x8000021B | [0-3] 0x01 ~ 0x02 | 0x00: Reserved0x01: 50 Hz0x02: 60 Hz |
| SET FREEZE | 0x8000021D | [0-3] 0x00 ~ 0x01 | 0x00 Freeze OFF0x01 Freeze ON |
| SET ROTATE | 0x80000300 | [0-3] 0x00 ~ 0x01 | 0x00 Rotate 0 degree.0x01 Rotate 180 degree |
| SET LAMP | 0x80000301 | [0-3] 0x00 ~ 0x01 | 0x00 Lamp OFF0x01 Lamp ON |
| SET SATURATION | 0x80000302 | [0-3] 0x00 ~ 0xFF(0~255) | Setup value from 0 to 255 |
| SET PC PASS | 0x80000303 | [0-3] 0x00 ~ 0x01 | 0x00 PC Pass OFF0x01 PC Pass ON |
- Example for packet data via internet protocol sender tool:
| Header | Checksum | Command | Flags | Data Size | Data | Footer | Action Description |
| 34 12 cd ab | 6F 02 00 80 | 07 02 00 80 | 00 00 00 00 | 04 00 00 00 | 64 00 00 00 | 09 ef 78 56 | BRIGHTNESS 100 |
| 34 12 cd ab | 72 02 00 80 | 0A 02 00 80 | 00 00 00 00 | 04 00 00 00 | 64 00 00 00 | 09 ef 78 56 | CONTRAST 100 |
| 34 12 cd ab | 11 02 00 80 | 0D 02 00 80 | 00 00 00 00 | 04 00 00 00 | 00 00 00 00 | 09 ef 78 56 | EFFECT COLOR |
| 34 12 cd ab | 12 02 00 80 | 0D 02 00 80 | 00 00 00 00 | 04 00 00 00 | 01 00 00 00 | 09 ef 78 56 | EFFECT B/W |
| 34 12 cd ab | 13 02 00 80 | 0D 02 00 80 | 00 00 00 00 | 04 00 00 00 | 02 00 00 00 | 09 ef 78 56 | EFFECT NEGATIVE |
| 34 12 cd ab | 15 02 00 80 | 11 02 00 80 | 00 00 00 00 | 04 00 00 00 | 00 00 00 00 | 09 ef 78 56 | AUTO FOCUS |
| 34 12 cd ab | 16 02 00 80 | 12 02 00 80 | 00 00 00 00 | 04 00 00 00 | 00 00 00 00 | 09 ef 78 56 | ZOOM IN |
| 34 12 cd ab | 17 02 00 80 | 12 02 00 80 | 00 00 00 00 | 04 00 00 00 | 01 00 00 00 | 09 ef 78 56 | ZOOM OUT |
| 34 12 cd ab | 1A 02 00 80 | 15 02 00 80 | 00 00 00 00 | 04 00 00 00 | 01 00 00 00 | 09 ef 78 56 | EXPOSURE AUTO |
| 34 12 cd ab | 4C 02 00 80 | 16 02 00 80 | 00 00 00 00 | 04 00 00 00 | 32 00 00 00 | 09 ef 78 56 | EXPOSURE 50 |
| 34 12 cd ab | 1C 02 00 80 | 17 02 00 80 | 00 00 00 00 | 04 00 00 00 | 01 00 00 00 | 09 ef 78 56 | W/B AUTO |
| 34 12 cd ab | 1B 03 00 80 | 18 02 00 80 | 00 00 00 00 | 04 00 00 00 | FF 00 00 00 | 09 ef 78 56 | W/B BLUE 255 |
| 34 12 cd ab | 1C 03 00 80 | 19 02 00 80 | 00 00 00 00 | 04 00 00 00 | FF 00 00 00 | 09 ef 78 56 | W/B RED 255 |
| 34 12 cd ab | 1A 02 00 80 | 1A 02 00 80 | 00 00 00 00 | 00 00 00 00 | 09 ef 78 56 | CAPTURE | |
| 34 12 cd ab | 20 02 00 80 | 1B 02 00 80 | 00 00 00 00 | 04 00 00 00 | 01 00 00 00 | 09 ef 78 56 | FLICKER 50Hz |
| 34 12 cd ab | 21 02 00 80 | 1B 02 00 80 | 00 00 00 00 | 04 00 00 00 | 02 00 00 00 | 09 ef 78 56 | FLICKER 60Hz |
| 34 12 cd ab | 21 02 00 80 | 1D 02 00 80 | 00 00 00 00 | 04 00 00 00 | 00 00 00 00 | 09 ef 78 56 | FREEZE OFF |
| 34 12 cd ab | 22 02 00 80 | 1D 02 00 80 | 00 00 00 00 | 04 00 00 00 | 01 00 00 00 | 09 ef 78 56 | FREEZE ON |
| 34 12 cd ab | 04 03 00 80 | 00 03 00 80 | 00 00 00 00 | 04 00 00 00 | 00 00 00 00 | 09 ef 78 56 | ROTATE 0 |
| 34 12 cd ab | 05 03 00 80 | 00 03 00 80 | 00 00 00 00 | 04 00 00 00 | 01 00 00 00 | 09 ef 78 56 | ROTATE 180 |
| 34 12 cd ab | 05 03 00 80 | 01 03 00 80 | 00 00 00 00 | 04 00 00 00 | 00 00 00 00 | 09 ef 78 56 | LAMP OFF |
| 34 12 cd ab | 06 03 00 80 | 01 03 00 80 | 00 00 00 00 | 04 00 00 00 | 01 00 00 00 | 09 ef 78 56 | LAMP ON |
| 34 12 cd ab | 07 03 00 80 | 03 03 00 80 | 00 00 00 00 | 04 00 00 00 | 00 00 00 00 | 09 ef 78 56 | PCPASS OFF |
| 34 12 cd ab | 08 03 00 80 | 03 03 00 80 | 00 00 00 00 | 04 00 00 00 | 01 00 00 00 | 09 ef 78 56 | PCPASS ON |
CGI Command
natural_image
Line drawing of a device with a cylindrical container connected to a rectangular electronic device (no text or symbols visible)AVerVision M90UHD
ユーザーマニュアル
https://jp.aver.com/download-center
ヘルプセンター
https://jp.aver.com/helpcenter


お問い合わせ先
アバー・インフォメーション株式会社
natural_image
Line drawing of a cylindrical device with a base and connector (no text or symbols)M90UHD
電源アダプタと
電源コード*
リモコン
单 4 形電池 (x2)

USB ケーブル
VGA ケーブル
保証書
クイックガイド
natural_image
Technical line drawing of a cylindrical industrial vessel with internal components and a labeled component (no text or symbols present)flowchart
graph TD
    A["Laptop"] -->|VGA cable| B["PC"]
    C["Desktop"] -->|VGA cable| B
    D["LCD monitor"] --> E["PC"]
    F["LCD/DLP projector"] --> G["PC"]
    B --> H["VGA In"]
    B --> I["VGA Out"]
    H --> J["Analog port with RGB_IN and RGB_OUT"]
    I --> K["Analog port with VGA cable"]
flowchart
graph TD
    A["Desktop"] -->|HDMI cable (Not included)| B["Laptop"]
    B --> C["HDMI IN"]
    B --> D["HDMI OUT"]
    B --> E["DC 5V"]
    C --> F["HDMI cable (Not included)"]
    D --> F
    E --> F
    G["LCD/DLP projector"] --> H["HDMI monitor"]
    H --> I["Output"]
USB-LAN変換アダプターの接続
natural_image
Mechanical component diagram showing a cylindrical shaft with internal gear and a downward arrow indicating force or direction (no text or symbols)- 顕微鏡の焦点を調節します。
natural_image
Illustration of a microscope with an eye and eyelashes, no text or symbols present使い始める
natural_image
Illustration of a projector with a light beam and a screen, showing mechanical components (no text or symbols)リモコン受光部
M90UHD を平面に取り付け
natural_image
Technical line drawing of a mechanical arm with a cylindrical head and base plate, showing mounting holes (no text or symbols)反射防止シート
natural_image
Simple line drawing of a folded paper or document (no text or symbols)外部メモリ・ストレージ
The data sent between device control and camera consists of multiple fields. The data in each field are placed in little-endian.
| Header Magic Number | 4-byte field with the value 0xABCD1234. |
| Checksum | 4-byte field. The value is calculated from the data after the checksum field to the footer. |
| Command | 4-byte field, indicating what to do |
| Flags | 4-byte field, indicating if the command should be replied or not. This field could be either 0x00000000 or 0x00000001. 0x00000001 means it should be acknowledged. The default acknowledgement is just to echo the Command field and set Data Size to 0. |
| Data size | 4-byte field, the length must be an integer multiple of 4 |
| Footer Magic Number | 4-byte field with the value 0x5678EF09. |
* Example for Set Brightness (0x80000207) Value to 100 (0x64)


- Command and Data
| Function | Command | Data Byte [0-N] | Description |
| SET BRIGHTNESS | 0x80000207 | [0-3] 0x00 ~ 0xFF | Setup value from 0 to 255 |
| SET CONTRAST | 0x8000020A | [0-3] 0x00 ~ 0xFF(0~255) | Setup value from 0 to 255 |
| SET EFFECT | 0x8000020D | [0-3] 0x00 ~ 0x02 | 0x00: Color Mode0x01: White & Black Mode.0x02: Negative Mode. |
| SET FOCUS | 0x80000211 | [0-3] 0x00 ~ 0x02[4-7] 0x00 ~ Max Step / Address | [0-3] Action Behavior0x00: Auto Focus (don't need Step)0x01: Close to Near0x02: Close to Far0x03: Set Focus Address[4-7] Step/Address Value0x00 ~ Max Step / Address |
| SET ZOOM | 0x80000212 | [0-3] 0x00 ~ 0x03 | 0x00 Zoom In0x01 Zoom Out0x02 Zoom Max0x03 Zoom Reset |
| SET EXPOSURE MODE | 0x80000215 | [0-3] 0x00 ~ 0x01 | 0x00 Manual Mode0x01 Auto Mode |
| SET EXPOSURE VALUE | 0x80000216 | [0-3] 0x00 ~ 0x63 | Setup value from 0 to 99 |
| SET WITE BALANCE MODE | 0x80000217 | [0-3] 0x00 ~ 0x01 | 0x00 Manual Mode0x01 Auto Mode |
| SET WITE BALANCE VALUE (BLUE) | 0x80000218 | [0-3] 0x00 ~ 0xFF | Setup value from 0 to 255 |
| SET WITE BALANCE VALUE (RED) | 0x80000219 | [0-3] 0x00 ~ 0xFF | Setup value from 0 to 255 |
| SET CAPTURE | 0x8000021A | /*Don't need*/ | Trigger action |
| SET FLICKER | 0x8000021B | [0-3] 0x01 ~ 0x02 | 0x00: Reserved0x01: 50 Hz0x02: 60 Hz |
| SET FREEZE | 0x8000021D | [0-3] 0x00 ~ 0x01 | 0x00 Freeze OFF0x01 Freeze ON |
| SET ROTATE | 0x80000300 | [0-3] 0x00 ~ 0x01 | 0x00 Rotate 0 degree.0x01 Rotate 180 degree |
| SET LAMP | 0x80000301 | [0-3] 0x00 ~ 0x01 | 0x00 Lamp OFF0x01 Lamp ON |
| SET SATURATION | 0x80000302 | [0-3] 0x00 ~ 0xFF(0~255) | Setup value from 0 to 255 |
| SET PC PASS | 0x80000303 | [0-3] 0x00 ~ 0x01 | 0x00 PC Pass OFF0x01 PC Pass ON |
Example for packet data via internet protocol sender tool.
| Header | Checksum | Command | Flags | Data Size | Data | Footer | Action Description |
| 34 12 cd ab | 6F 02 00 80 | 07 02 00 80 | 00 0000 00 | 04 0000 00 | 64 0000 00 | 09 ef 7856 | BRIGHTNESS 100 |
| 34 12 cd ab | 72 02 00 80 | 0A 02 00 80 | 00 0000 00 | 04 0000 00 | 64 0000 00 | 09 ef 7856 | CONTRAST 100 |
| 34 12 cd ab | 11 02 00 80 | 0D 02 00 80 | 00 0000 00 | 04 0000 00 | 00 0000 00 | 09 ef 7856 | EFFECT COLOR |
| 34 12 cd ab | 12 02 00 80 | 0D 02 00 80 | 00 0000 00 | 04 0000 00 | 01 0000 00 | 09 ef 7856 | EFFECT B/W |
| 34 12 cd ab | 13 02 00 80 | 0D 02 00 80 | 00 0000 00 | 04 0000 00 | 02 0000 00 | 09 ef 7856 | EFFECT NEGATIVE |
| 34 12 cd ab | 15 02 00 80 | 11 02 00 80 | 00 0000 00 | 04 0000 00 | 00 0000 00 | 09 ef 7856 | AUTO FOCUS |
| 34 12 cd ab | 16 02 00 80 | 12 02 00 80 | 00 0000 00 | 04 0000 00 | 00 0000 00 | 09 ef 7856 | ZOOM IN |
| 34 12 cd ab | 17 02 00 80 | 12 02 00 80 | 00 0000 00 | 04 0000 00 | 01 0000 00 | 09 ef 7856 | ZOOM OUT |
| 34 12 cd ab | 1A 02 00 80 | 15 02 00 80 | 00 0000 00 | 04 0000 00 | 01 0000 00 | 09 ef 7856 | EXPOSURE AUTO |
| 34 12 cd ab | 4C 02 00 80 | 16 02 00 80 | 00 0000 00 | 04 0000 00 | 32 0000 00 | 09 ef 7856 | EXPOSURE 50 |
| 34 12 cd ab | 1C 02 00 80 | 17 02 00 80 | 00 0000 00 | 04 0000 00 | 01 0000 00 | 09 ef 7856 | W/B AUTO |
| 34 12 cd ab | 1B 03 00 80 | 18 02 00 80 | 00 0000 00 | 04 0000 00 | FF 0000 00 | 09 ef 7856 | W/B BLUE 255 |
| 34 12 cd ab | 1C 03 00 80 | 19 02 00 80 | 00 0000 00 | 04 0000 00 | FF 0000 00 | 09 ef 7856 | W/B RED 255 |
| 34 12 cd ab | 1A 02 00 80 | 1A 02 00 80 | 00 0000 00 | 00 0000 00 | 09 ef 7856 | CAPTURE | |
| 34 12 cd ab | 20 02 00 80 | 1B 02 00 80 | 00 0000 00 | 04 0000 00 | 01 0000 00 | 09 ef 7856 | FLICKER 50Hz |
| 34 12 cd ab | 21 02 00 80 | 1B 02 00 80 | 00 0000 00 | 04 0000 00 | 02 0000 00 | 09 ef 7856 | FLICKER 60Hz |
| 34 12 cd ab | 21 02 00 80 | 1D 02 00 80 | 00 0000 00 | 04 0000 00 | 00 0000 00 | 09 ef 7856 | FREEZE OFF |
| 34 12 cd ab | 22 02 00 80 | 1D 02 00 80 | 00 0000 00 | 04 0000 00 | 01 0000 00 | 09 ef 7856 | FREEZE ON |
| 34 12 cd ab | 04 03 00 80 | 00 03 00 80 | 00 0000 00 | 04 0000 00 | 00 0000 00 | 09 ef 7856 | ROTATE 0 |
| 34 12 cd ab | 05 03 00 80 | 00 03 00 80 | 00 0000 00 | 04 0000 00 | 01 0000 00 | 09 ef 7856 | ROTATE 180 |
| 34 12 cd ab | 05 03 00 80 | 01 03 00 80 | 00 0000 00 | 04 0000 00 | 00 0000 00 | 09 ef 7856 | LAMP OFF |
| 34 12 cd ab | 06 03 00 80 | 01 03 00 80 | 00 0000 00 | 04 0000 00 | 01 0000 00 | 09 ef 7856 | LAMP ON |
| 34 12 cd ab | 07 03 00 80 | 03 03 00 80 | 00 0000 00 | 04 0000 00 | 00 0000 00 | 09 ef 7856 | PCPASS OFF |
| 34 12 cd ab | 08 03 00 80 | 03 03 00 80 | 00 0000 00 | 04 0000 00 | 01 0000 00 | 09 ef 7856 | PCPASS ON |
CGI Command
Enter the following URL into your web browser to view the CGI command list. To access a control command, follow the following CGI command format.
- URL: http://IPv4 Address/cgi-bin/NetApi?
- Format: http://IPv4 Address/cgi-bin/NetApi?setCmd=ParamCmd&setValue=ParamValue
| Description | ParamCmd | ParamValue |
| Set Brightness Value | img_brightness | 0 ~ 255 |
| Set Contrast Value | img_contrast | 0 ~ 255 |
| Set Saturation Value | img_saturation | 0 ~ 255 |
| Set Effect Mode | img_effect | 0, 1, 2 |
| Set Freeze Mode | img_freeze | 0, 1 |
| Set Exposure Mode | img_exposureMode | 0, 1 |
| Set Exposure Value | img_exposure | 0 ~ 99 |
| Set White Balance Mode | img_whitebalanceMode | 0, 1 |
| Set White Balance Red | img_whitebalanceRed | 0 ~ 255 |
| Set White Balance Blue | img_whitebalanceBlue | 0 ~ 255 |
| Set Rotate Mode | img_rotate | 0, 1 |
| Set Zoom Mode | set_zoom | 0, 1, 2, 3 |
| Set Flicker Mode | set_flicker | 0, 1 |
| Set Lamp Value | set_lamp | 0, 1 |
| Set PC Pass Mode | set_pcpass | 0, 1 |
| Trigger Capture | trigger_capture | /*don't care*/ |
| Trigger Focus | trigger_focus | /*don't care*/ |
RS-232 送信コマンド表
送信フォーマット:0x52 + 0x0B + 0x03 + Data[0] + Data[1] + Data[2] + 0x53 + Checksum ^*1
*2: Receive data ok = 0x0B, Not Command = 0x03
*3: ID error = 0x01, Checksum error = 0x02, Function fail = 0x04
*4: Checksum = 0x00 xor 0x02 xor *2 xor 0x00 xor 0x52
*5: Checksum = 0x00 xor 0x01 xor *3 xor 0x52
*6: Standby Mode Receive Data = 0x51 + 0xFF + 0x01 + 0x0B + 0x51 + 0xA4
Power On Mode Receive Data = No Data Return
*7: Standby Mode Receive Data = 0x51 + 0x00 + 0x01 + 0x0B + 0x51 + 0x5B
Power On Mode Receive Data = 0x53 + 0x00 + 0x02 + 0x0B + 0x00 + 0x52 + 0x5B
| 機能 | Data[0] | Data[1] | Data[2] | Checksum |
| POWER OFF ^6 | 0x01 | 0x00 | 0x00 | 0x5a |
| POWER ON ^7 | 0x01 | 0x01 | 0x00 | 0x5b |
| CAMERA MODE | 0x02 | 0x00 | 0x00 | 0x59 |
| PLAYBACK MODE | 0x03 | 0x00 | 0x00 | 0x58 |
| PC 1/2 | 0x04 | 0x00 | 0x00 | 0x5f |
| IMAGE CAPTURE TYPE: SINGLE | 0x05 | 0x00 | 0x00 | 0x5e |
| IMAGE CAPTURE TYPE: CONTINUOUS | 0x05 | 0x01 | 0x00 | 0x5f |
| CONT. CAPTURE INTERVAL + | 0x06 | 0x00 | 0x00 | 0x5d |
| CONT. CAPTURE INTERVAL - | 0x06 | 0x01 | 0x00 | 0x5c |
| IMAGE CAPTURE RESOLUTION: NORMAL | 0x07 | 0x00 | 0x00 | 0x5c |
| IMAGE CAPTURE RESOLUTION: 13M | 0x07 | 0x01 | 0x00 | 0x5d |
| TIMER START | 0x08 | 0x00 | 0x00 | 0x53 |
| TIMER PAUSE | 0x08 | 0x01 | 0x00 | 0x52 |
| TIMER STOP | 0x08 | 0x02 | 0x00 | 0x51 |
| TIMER SET TIME | 0x08 | 0x03 | Value[1 ~ 120] | ^*1 |
| PREVIEW MODE: MOTION | 0x0A | 0x02 | 0x00 | 0x53 |
| PREVIEW MODE: MICROSCOPE | 0x0A | 0x03 | 0x00 | 0x52 |
| PREVIEW MODE: MACRO | 0x0A | 0x04 | 0x00 | 0x55 |
| PREVIEW MODE: INFINITE | 0x0A | 0x05 | 0x00 | 0x54 |
| PREVIEW MODE: NORMAL | 0x0A | 0x06 | 0x00 | 0x57 |
| PREVIEW MODE: HIGH QUALITY | 0x0A | 0x07 | 0x00 | 0x56 |
| PREVIEW CAPTURE | 0x0B | 0x00 | 0x00 | 0x50 |
| PLAYBACK DELETE | 0x0C | 0x00 | 0x00 | 0x57 |
| PLAYBACK FULL SCREEN | 0x0D | 0x00 | 0x00 | 0x56 |
| MIRROR OFF | 0x0E | 0x00 | 0x00 | 0x55 |
| MIRROR ON | 0x0E | 0x01 | 0x00 | 0x54 |
| ROTATE OFF | 0x0F | 0x00 | 0x00 | 0x54 |
| ROTATE ON | 0x0F | 0x02 | 0x00 | 0x56 |
| EFFECT: COLOR | 0x10 | 0x00 | 0x00 | 0x4b |
| EFFECT: B/W | 0x10 | 0x01 | 0x00 | 0x4a |
| EFFECT: NEGATIVE | 0x10 | 0x02 | 0x00 | 0x49 |
| CONTRAST INCREASE | 0x11 | 0x00 | 0x00 | 0x4a |
| CONTRAST DECREASE | 0x11 | 0x01 | 0x00 | 0x4b |
| CONTRAST VALUE | 0x11 | 0x02 | Value[ 1 ~ 255 ] | *1 |
| BRIGHTNESS INCREASE | 0x12 | 0x00 | 0x00 | 0x49 |
| BRIGHTNESS DECREASE | 0x12 | 0x01 | 0x00 | 0x48 |
| BRIGHTNESS VALUE | 0x12 | 0x02 | Value[ 1 ~ 255 ] | *1 |
| EXPOSURE: AUTO | 0x13 | 0x00 | 0x00 | 0x48 |
| EXPOSURE: MANUAL | 0x13 | 0x01 | 0x00 | 0x49 |
| EXPOSURE MANUAL INCREASE | 0x14 | 0x00 | 0x00 | 0x4f |
| EXPOSURE MANUAL DECREASE | 0x14 | 0x01 | 0x00 | 0x4e |
| WHITE BALANCE: AUTO | 0x15 | 0x00 | 0x00 | 0x4e |
| WHITE BALANCE: MANUAL | 0x15 | 0x01 | 0x00 | 0x4f |
| WHITE BALANCE BLUE INCREASE | 0x16 | 0x00 | 0x00 | 0x4d |
| WHITE BALANCE BLUE DECREASE | 0x16 | 0x01 | 0x00 | 0x4c |
| WHITE BALANCE RED INCREASE | 0x17 | 0x00 | 0x00 | 0x4c |
| WHITE BALANCE RED DECREASE | 0x17 | 0x01 | 0x00 | 0x4d |
| FLICKER: 50Hz | 0x18 | 0x00 | 0x00 | 0x43 |
| FLICKER: 60Hz | 0x18 | 0x01 | 0x00 | 0x42 |
| RECORD: OFF | 0x23 | 0x00 | 0x00 | 0x78 |
| RECORD: ON | 0x23 | 0x01 | 0x00 | 0x79 |
| MOVIE FAST REWIND | 0x25 | 0x00 | 0x00 | 0x7e |
| MOVIE FAST FORWARD | 0x25 | 0x01 | 0x00 | 0x7f |
| MOVIE VOL INC | 0x26 | 0x00 | 0x00 | 0x7d |
| MOVIE VOL DEC | 0x26 | 0x01 | 0x00 | 0x7c |
| STORAGE: EMBEDDED | 0x28 | 0x00 | 0x00 | 0x73 |
| STORAGE: SD CARD | 0x28 | 0x01 | 0x00 | 0x72 |
| STORAGE: THUMB DRIVE | 0x28 | 0x02 | 0x00 | 0x71 |
| FORMAT: EMBEDDED | 0x29 | 0x00 | 0x00 | 0x72 |
| FORMAT: SD CARD | 0x29 | 0x01 | 0x00 | 0x73 |
| FORMAT: THUMB DRIVE | 0x29 | 0x02 | 0x00 | 0x70 |
| OUTPUT RESOLUTION: 1024x768 | 0x2F | 0x01 | 0x00 | 0x75 |
| OUTPUT RESOLUTION: 1280x720 | 0x2F | 0x02 | 0x00 | 0x76 |
| OUTPUT RESOLUTION: 1920x1080 | 0x2F | 0x03 | 0x00 | 0x77 |
| OUTPUT RESOLUTION: 3840x2160@30 | 0x2F | 0x08 | 0x00 | 0x7c |
| OUTPUT RESOLUTION: 3840x2160@60 | 0x2F | 0x09 | 0x00 | 0x7d |
| USB CONNECT: USB CAMERA | 0x30 | 0x00 | 0x00 | 0x6b |
| USB CONNECT: MASS STORAGE | 0x30 | 0x01 | 0x00 | 0x6a |
| BACKUP TO SD CARD | 0x31 | 0x00 | 0x00 | 0x6a |
| BACKUP TO THUMBDRIVE | 0x31 | 0x01 | 0x00 | 0x6b |
| PROFILE SAVE: PROFILE 1 | 0x32 | 0x00 | 0x00 | 0x69 |
| PROFILE SAVE: PROFILE 2 | 0x32 | 0x01 | 0x00 | 0x68 |
| PROFILE SAVE: PROFILE 3 | 0x32 | 0x02 | 0x00 | 0x6b |
| PROFILE RECALL: PROFILE 1 | 0x33 | 0x00 | 0x00 | 0x68 |
| PROFILE RECALL: PROFILE 2 | 0x33 | 0x01 | 0x00 | 0x69 |
| PROFILE RECALL: PROFILE 3 | 0x33 | 0x02 | 0x00 | 0x6a |
| SLIDESHOW: OFF | 0x34 | 0x00 | 0x00 | 0x6f |
| SLIDESHOW: ON | 0x34 | 0x01 | 0x00 | 0x6e |
| CAPTURE QUALITY: NORMAL | 0x37 | 0x00 | 0x00 | 0x6c |
| CAPTURE QUALITY: HIGH | 0x37 | 0x01 | 0x00 | 0x6d |
| CAPTURE QUALITY: FINEST | 0x37 | 0x02 | 0x00 | 0x6e |
| AUTO FOCUS | 0x40 | 0x00 | 0x00 | 0x1b |
| MENU | 0x41 | 0x00 | 0x00 | 0x1a |
| ARROW - DOWN | 0x42 | 0x00 | 0x00 | 0x19 |
| ARROW - UP | 0x42 | 0x01 | 0x00 | 0x18 |
| ARROW - LEFT | 0x42 | 0x02 | 0x00 | 0x1b |
| ARROW - RIGHT | 0x42 | 0x03 | 0x00 | 0x1a |
| ENTER | 0x43 | 0x00 | 0x00 | 0x18 |
| FREEZE/STOP | 0x44 | 0x00 | 0x00 | 0x1f |
| DEFAULT | 0x45 | 0x00 | 0x00 | 0x1e |
| ZOOM - | 0x46 | 0x00 | 0x00 | 0x1d |
| ZOOM + | 0x46 | 0x01 | 0x00 | 0x1c |
| ZOOM RESET | 0x47 | 0x00 | 0x00 | 0x1c |
| FOCUS TO NEAR | 0x48 | 0x00 | 0x00 | 0x13 |
| FOCUS TO FAR | 0x48 | 0x01 | 0x00 | 0x12 |
| LAMP OFF | 0x49 | 0x00 | 0x00 | 0x12 |
| LAMP ON | 0x49 | 0x01 | 0x00 | 0x13 |
| SATURATION INCREASE | 0x4B | 0x00 | 0x00 | 0x10 |
| SATURATION DECREASE | 0x4B | 0x01 | 0x00 | 0x11 |
| SATURATION VALUE | 0x4B | 0x02 | Value[ 1 ~ 255 ] | *1 |
| MUTE OFF | 0x4C | 0x00 | 0x00 | 0x17 |
| MUTE ON | 0x4C | 0x01 | 0x00 | 0x16 |
RS-232 受信コマンド表
送信フォーマット:0x52 + 0x0A + 0x01 + Data[0] + 0x53 + Checksum
受信フォーマット:0x53 + 0x0C + 0x01 + ReData[0] + 0x52 + ReChecksum ^4
*1: ReChecksum = 0x0C xor 0x01 xor ReData[0] xor 0x52
*2: Power Status Receive Data = 0x51 + 0xFF + 0x01 + 0x0A + 0x51 + 0xA5
| 機能 | Data[0] | Checksum | ReData[0] |
| Red Value | 0x02 | 0x5A | Value[ 0 ~ 255 ] |
| Blue Value | 0x03 | 0x5B | Value[ 0 ~ 255 ] |
| Power Status | 0x04 | 0x5C | OFF [°2] |
| 1: ON | |||
| Lamp Status | 0x05 | 0x5D | 0: OFF 1: ON |
| Display Status | 0x06 | 0x5E | 0: Camera Mode |
| 1: Playback Mode | |||
| 2: PC-1 Pass Through | |||
| Freeze Status | 0x08 | 0x50 | 0: OFF 1: ON |
| Brightness Value | 0x0A | 0x52 | Value[ 1 ~ 64 ] |
| Contrast Value | 0x0B | 0x53 | Value[ 1 ~ 32 ] |
| Saturation Value | 0x0D | 0x55 | Value[ 1 ~ 32 ] |
トラブルシューティング
natural_image
Line drawing of a portable electronic device with a cylindrical top and connected arm, showing front panel and control buttons (no text or symbols)AverVision M90UHD
https://www.avereurope.com/download-center
https://www.avereurope.com/technical-support


Westblaak 134, 3012 KM, Rotterdam, The Netherlands
Tel: +31 (0) 10 7600 550
Inhaltsverzeichnis
natural_image
Line drawing of a cylindrical device with a base, connected to a rectangular housing (no text or symbols)M90UHD
Fernbedienung**
AAA-Batterie (x2)
USB-Kabel
VGA-Kabel
Garantiekarte
Kurzanleitung
natural_image
Simple line drawing of a folded paper or document (no text or symbols)Blendschutz
RS-232-Kabel
Anschlussplatte
natural_image
Technical line drawing of a cylindrical industrial vessel or reactor with labeled component 1 (no text or symbols beyond label)Loslegen
flowchart
graph TD
    A["11.2A Device"] --> B["11.2A Module"]
    B --> C["11.2A Switch"]
    C --> D["11.2A Module with Internal Components"]
    D --> E["11.2A Switch with Internal Components"]
    E --> F["11.2A Module with Internal Components"]
    F --> G["Final Device with Internal Components"]
Aufnahmebereich
natural_image
Illustration of a projector with a light beam and a screen, showing mechanical components (no text or symbols)Infrarotsensor
Blendschutz
natural_image
Simple line drawing of a folded paper or sheet (no text or symbols)Externer Speicher
The data sent between device control and camera consists of multiple fields. The data in each field are placed in little-endian.
| Header Magic Number | 4-byte field with the value 0xABCD1234. |
| Checksum | 4-byte field. The value is calculated from the data after the checksum field to the footer. |
| Command | 4-byte field, indicating what to do |
| Flags | 4-byte field, indicating if the command should be replied or not. This field could be either 0x00000000 or 0x00000001. 0x00000001 means it should be acknowledged. The default acknowledgement is just to echo the Command field and set Data Size to 0. |
| Data size | 4-byte field, the length must be an integer multiple of 4 |
| Footer Magic Number | 4-byte field with the value 0x5678EF09. |

* Example for Set Brightness (0x80000207) Value to 100 (0x64)


- Command and Data
| Function | Command | Data Byte [0-N] | Description |
| SET BRIGHTNESS | 0x80000207 | [0-3] 0x00 ~ 0xFF | Setup value from 0 to 255 |
| SET CONTRAST | 0x8000020A | [0-3] 0x00 ~ 0xFF(0~255) | Setup value from 0 to 255 |
| SET EFFECT | 0x8000020D | [0-3] 0x00 ~ 0x02 | 0x00: Color Mode0x01: White & Black Mode.0x02: Negative Mode. |
| SET FOCUS | 0x80000211 | [0-3] 0x00 ~ 0x02[4-7] 0x00 ~ Max Step / Address | [0-3] Action Behavior0x00: Auto Focus (don't need Step)0x01: Close to Near0x02: Close to Far0x03: Set Focus Address[4-7] Step/Address Value0x00 ~ Max Step / Address |
| SET ZOOM | 0x80000212 | [0-3] 0x00 ~ 0x03 | 0x00 Zoom In0x01 Zoom Out0x02 Zoom Max0x03 Zoom Reset |
| SET EXPOSURE MODE | 0x80000215 | [0-3] 0x00 ~ 0x01 | 0x00 Manual Mode0x01 Auto Mode |
| SET EXPOSURE VALUE | 0x80000216 | [0-3] 0x00 ~ 0x63 | Setup value from 0 to 99 |
| SET WITE BALANCE MODE | 0x80000217 | [0-3] 0x00 ~ 0x01 | 0x00 Manual Mode0x01 Auto Mode |
| SET WITE BALANCE VALUE (BLUE) | 0x80000218 | [0-3] 0x00 ~ 0xFF | Setup value from 0 to 255 |
| SET WITE BALANCE VALUE (RED) | 0x80000219 | [0-3] 0x00 ~ 0xFF | Setup value from 0 to 255 |
| SET CAPTURE | 0x8000021A | /*Don't need*/ | Trigger action |
| SET FLICKER | 0x8000021B | [0-3] 0x01 ~ 0x02 | 0x00: Reserved0x01: 50 Hz0x02: 60 Hz |
| SET FREEZE | 0x8000021D | [0-3] 0x00 ~ 0x01 | 0x00 Freeze OFF0x01 Freeze ON |
| SET ROTATE | 0x80000300 | [0-3] 0x00 ~ 0x01 | 0x00 Rotate 0 degree.0x01 Rotate 180 degree |
| SET LAMP | 0x80000301 | [0-3] 0x00 ~ 0x01 | 0x00 Lamp OFF0x01 Lamp ON |
| SET SATURATION | 0x80000302 | [0-3] 0x00 ~ 0xFF(0~255) | Setup value from 0 to 255 |
| SET PC PASS | 0x80000303 | [0-3] 0x00 ~ 0x01 | 0x00 PC Pass OFF0x01 PC Pass ON |
- Example for packet data via internet protocol sender tool.
| Header | Checksum | Command | Flags | Data Size | Data | Footer | Action Description |
| 34 12 cd ab | 6F 02 00 80 | 07 02 00 80 | 00 00 00 00 | 04 00 00 00 | 64 00 00 00 | 09 ef 78 56 | BRIGHTNESS 100 |
| 34 12 cd ab | 72 02 00 80 | 0A 02 00 80 | 00 00 00 00 | 04 00 00 00 | 64 00 00 00 | 09 ef 78 56 | CONTRAST 100 |
| 34 12 cd ab | 11 02 00 80 | 0D 02 00 80 | 00 00 00 00 | 04 00 00 00 | 00 00 00 00 | 09 ef 78 56 | EFFECT COLOR |
| 34 12 cd ab | 12 02 00 80 | 0D 02 00 80 | 00 00 00 00 | 04 00 00 00 | 01 00 00 00 | 09 ef 78 56 | EFFECT B/W |
| 34 12 cd ab | 13 02 00 80 | 0D 02 00 80 | 00 00 00 00 | 04 00 00 00 | 02 00 00 00 | 09 ef 78 56 | EFFECT NEGATIVE |
| 34 12 cd ab | 15 02 00 80 | 11 02 00 80 | 00 00 00 00 | 04 00 00 00 | 00 00 00 00 | 09 ef 78 56 | AUTO FOCUS |
| 34 12 cd ab | 16 02 00 80 | 12 02 00 80 | 00 00 00 00 | 04 00 00 00 | 00 00 00 00 | 09 ef 78 56 | ZOOM IN |
| 34 12 cd ab | 17 02 00 80 | 12 02 00 80 | 00 00 00 00 | 04 00 00 00 | 01 00 00 00 | 09 ef 78 56 | ZOOM OUT |
| 34 12 cd ab | 1A 02 00 80 | 15 02 00 80 | 00 00 00 00 | 04 00 00 00 | 01 00 00 00 | 09 ef 78 56 | EXPOSURE AUTO |
| 34 12 cd ab | 4C 02 00 80 | 16 02 00 80 | 00 00 00 00 | 04 00 00 00 | 32 00 00 00 | 09 ef 78 56 | EXPOSURE 50 |
| 34 12 cd ab | 1C 02 00 80 | 17 02 00 80 | 00 00 00 00 | 04 00 00 00 | 01 00 00 00 | 09 ef 78 56 | W/B AUTO |
| 34 12 cd ab | 1B 03 00 80 | 18 02 00 80 | 00 00 00 00 | 04 00 00 00 | FF 00 00 00 | 09 ef 78 56 | W/B BLUE 255 |
| 34 12 cd ab | 1C 03 00 80 | 19 02 00 80 | 00 00 00 00 | 04 00 00 00 | FF 00 00 00 | 09 ef 78 56 | W/B RED 255 |
| 34 12 cd ab | 1A 02 00 80 | 1A 02 00 80 | 00 00 00 00 | 00 00 00 00 | 09 ef 78 56 | CAPTURE | |
| 34 12 cd ab | 20 02 00 80 | 1B 02 00 80 | 00 00 00 00 | 04 00 00 00 | 01 00 00 00 | 09 ef 78 56 | FLICKER 50Hz |
| 34 12 cd ab | 21 02 00 80 | 1B 02 00 80 | 00 00 00 00 | 04 00 00 00 | 02 00 00 00 | 09 ef 78 56 | FLICKER 60Hz |
| 34 12 cd ab | 21 02 00 80 | 1D 02 00 80 | 00 00 00 00 | 04 00 00 00 | 00 00 00 00 | 09 ef 78 56 | FREEZE OFF |
| 34 12 cd ab | 22 02 00 80 | 1D 02 00 80 | 00 00 00 00 | 04 00 00 00 | 01 00 00 00 | 09 ef 78 56 | FREEZE ON |
| 34 12 cd ab | 04 03 00 80 | 00 03 00 80 | 00 00 00 00 | 04 00 00 00 | 00 00 00 00 | 09 ef 78 56 | ROTATE 0 |
| 34 12 cd ab | 05 03 00 80 | 00 03 00 80 | 00 00 00 00 | 04 00 00 00 | 01 00 00 00 | 09 ef 78 56 | ROTATE 180 |
| 34 12 cd ab | 05 03 00 80 | 01 03 00 80 | 00 00 00 00 | 04 00 00 00 | 00 00 00 00 | 09 ef 78 56 | LAMP OFF |
| 34 12 cd ab | 06 03 00 80 | 01 03 00 80 | 00 00 00 00 | 04 00 00 00 | 01 00 00 00 | 09 ef 78 56 | LAMP ON |
| 34 12 cd ab | 07 03 00 80 | 03 03 00 80 | 00 00 00 00 | 04 00 00 00 | 00 00 00 00 | 09 ef 78 56 | PCPASS OFF |
| 34 12 cd ab | 08 03 00 80 | 03 03 00 80 | 00 00 00 00 | 04 00 00 00 | 01 00 00 00 | 09 ef 78 56 | PCPASS ON |
CGI Command
Enter the following URL into your web browser to view the CGI command list. To access a control command, follow the following CGI command format.
- URL: http://IPv4 Address/cgi-bin/NetApi?
- Format: http://IPv4 Address/cgi-bin/NetApi?setCmd=ParamCmd&setValue=ParamValue
| Description | ParamCmd | ParamValue |
| Set Brightness Value | img_brightness | 0 ~ 255 |
| Set Contrast Value | img_contrast | 0 ~ 255 |
| Set Saturation Value | img_saturation | 0 ~ 255 |
| Set Effect Mode | img_effect | 0, 1, 2 |
| Set Freeze Mode | img_freeze | 0, 1 |
| Set Exposure Mode | img_exposureMode | 0, 1 |
| Set Exposure Value | img_exposure | 0 ~ 99 |
| Set White Balance Mode | img_whitebalanceMode | 0, 1 |
| Set White Balance Red | img_whitebalanceRed | 0 ~ 255 |
| Set White Balance Blue | img_whitebalanceBlue | 0 ~ 255 |
| Set Rotate Mode | img_rotate | 0, 1 |
| Set Zoom Mode | set_zoom | 0, 1, 2, 3 |
| Set Flicker Mode | set_flicker | 0, 1 |
| Set Lamp Value | set_lamp | 0, 1 |
| Set PC Pass Mode | set_pcpass | 0, 1 |
| Trigger Capture | trigger_capture | /*don't care*/ |
| Trigger Focus | trigger_focus | /*don't care*/ |
natural_image
Line drawing of a portable electronic device with a cylindrical top and connected arm, next to a control panel (no text or symbols visible)AVerVision M90UHD
—Mode d'emploi —
AVERTISSEMENT
https://www.avereurope.com/download-center
Assistance Technique:
https://www.avereurope.com/technical-support


Westblaak 134, 3012 KM, Rotterdam, The Netherlands
Tel: +31 (0) 10 7600 550
Table des matières
Aperçu....1
natural_image
Line drawing of a handheld electronic device with a cylindrical component and attached ports (no text or symbols)M90UHD
natural_image
Two remote control panels with various function buttons and icons, no visible text or symbolsTélécommande**
Pile AAA (x2)

Câble USB
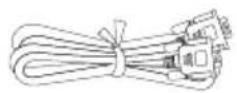
Câble VGA
Carte de garantie
natural_image
Simple line drawing of a folded paper or document (no text or symbols)Feuille anti-reflet
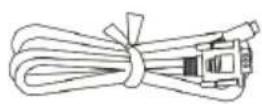
Câble RS-232
Plaque de jonction

natural_image
Three technical line drawings of a mechanical device with no visible text or symbolsnatural_image
Technical line drawing of a cylindrical mechanical component with internal components and mounting base (no text or symbols)Dé marrer
flowchart
graph TD
    A["Device with ports"] --> B["Assembly"]
    B --> C["Device with ports"]
    C --> D["Assembly"]
    D --> E["Device with ports"]
    E --> F["Final Device"]
Champ de la camé ra
natural_image
Illustration of a projector with a camera and its projection screen, showing mechanical components (no text or symbols)Capteur infrarouge

natural_image
Line drawing of a mechanical arm with a cylindrical head and base, showing mounting holes and a floor (no text or symbols)Feuille antireflet
natural_image
Simple line drawing of a folded paper or document (no text or symbols)Stockage en mé moire externe
The data sent between device control and camera consists of multiple fields. The data in each field are placed in little-endian.
| Header Magic Number | 4-byte field with the value 0xABCD1234. |
| Checksum | 4-byte field. The value is calculated from the data after the checksum field to the footer. |
| Command | 4-byte field, indicating what to do |
| Flags | 4-byte field, indicating if the command should be replied or not. This field could be either 0x00000000 or 0x00000001. 0x00000001 means it should be acknowledged. The default acknowledgement is just to echo the Command field and set Data Size to 0. |
| Data size | 4-byte field, the length must be an integer multiple of 4 |
| Footer Magic Number | 4-byte field with the value 0x5678EF09. |
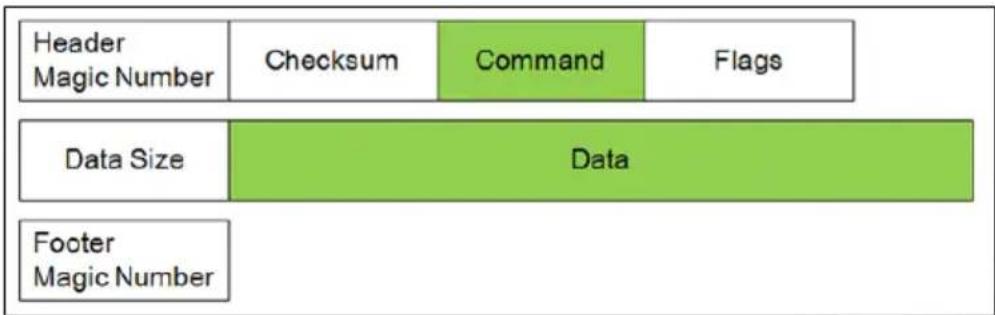
* Example for Set Brightness (0x80000207) Value to 100 (0x64)


- Command and Data
| Function | Command | Data Byte [0-N] | Description |
| SET BRIGHTNESS | 0x80000207 | [0-3] 0x00 ~ 0xFF | Setup value from 0 to 255 |
| SET CONTRAST | 0x8000020A | [0-3] 0x00 ~ 0xFF(0~255) | Setup value from 0 to 255 |
| SET EFFECT | 0x8000020D | [0-3] 0x00 ~ 0x02 | 0x00: Color Mode0x01: White & Black Mode.0x02: Negative Mode. |
| SET FOCUS | 0x80000211 | [0-3] 0x00 ~ 0x02[4-7] 0x00 ~ Max Step / Address | [0-3] Action Behavior0x00: Auto Focus (don't need Step)0x01: Close to Near0x02: Close to Far0x03: Set Focus Address[4-7] Step/Address Value0x00 ~ Max Step / Address |
| SET ZOOM | 0x80000212 | [0-3] 0x00 ~ 0x03 | 0x00 Zoom In0x01 Zoom Out0x02 Zoom Max0x03 Zoom Reset |
| SET EXPOSURE MODE | 0x80000215 | [0-3] 0x00 ~ 0x01 | 0x00 Manual Mode0x01 Auto Mode |
| SET EXPOSURE VALUE | 0x80000216 | [0-3] 0x00 ~ 0x63 | Setup value from 0 to 99 |
| SET WITE BALANCE MODE | 0x80000217 | [0-3] 0x00 ~ 0x01 | 0x00 Manual Mode0x01 Auto Mode |
| SET WITE BALANCE VALUE (BLUE) | 0x80000218 | [0-3] 0x00 ~ 0xFF | Setup value from 0 to 255 |
| SET WITE BALANCE VALUE (RED) | 0x80000219 | [0-3] 0x00 ~ 0xFF | Setup value from 0 to 255 |
| SET CAPTURE | 0x8000021A | /*Don't need*/ | Trigger action |
| SET FLICKER | 0x8000021B | [0-3] 0x01 ~ 0x02 | 0x00: Reserved0x01: 50 Hz0x02: 60 Hz |
| SET FREEZE | 0x8000021D | [0-3] 0x00 ~ 0x01 | 0x00 Freeze OFF0x01 Freeze ON |
| SET ROTATE | 0x80000300 | [0-3] 0x00 ~ 0x01 | 0x00 Rotate 0 degree.0x01 Rotate 180 degree |
| SET LAMP | 0x80000301 | [0-3] 0x00 ~ 0x01 | 0x00 Lamp OFF0x01 Lamp ON |
| SET SATURATION | 0x80000302 | [0-3] 0x00 ~ 0xFF(0~255) | Setup value from 0 to 255 |
| SET PC PASS | 0x80000303 | [0-3] 0x00 ~ 0x01 | 0x00 PC Pass OFF0x01 PC Pass ON |
- Example for packet data via internet protocol sender tool.
| Header | Checksum | Command | Flags | Data Size | Data | Footer | Action Description |
| 34 12 cd ab | 6F 02 00 80 | 07 02 00 80 | 00 00 00 00 | 04 00 00 00 | 64 00 00 00 | 09 ef 78 56 | BRIGHTNESS 100 |
| 34 12 cd ab | 72 02 00 80 | 0A 02 00 80 | 00 00 00 00 | 04 00 00 00 | 64 00 00 00 | 09 ef 78 56 | CONTRAST 100 |
| 34 12 cd ab | 11 02 00 80 | 0D 02 00 80 | 00 00 00 00 | 04 00 00 00 | 00 00 00 00 | 09 ef 78 56 | EFFECT COLOR |
| 34 12 cd ab | 12 02 00 80 | 0D 02 00 80 | 00 00 00 00 | 04 00 00 00 | 01 00 00 00 | 09 ef 78 56 | EFFECT B/W |
| 34 12 cd ab | 13 02 00 80 | 0D 02 00 80 | 00 00 00 00 | 04 00 00 00 | 02 00 00 00 | 09 ef 78 56 | EFFECT NEGATIVE |
| 34 12 cd ab | 15 02 00 80 | 11 02 00 80 | 00 00 00 00 | 04 00 00 00 | 00 00 00 00 | 09 ef 78 56 | AUTO FOCUS |
| 34 12 cd ab | 16 02 00 80 | 12 02 00 80 | 00 00 00 00 | 04 00 00 00 | 00 00 00 00 | 09 ef 78 56 | ZOOM IN |
| 34 12 cd ab | 17 02 00 80 | 12 02 00 80 | 00 00 00 00 | 04 00 00 00 | 01 00 00 00 | 09 ef 78 56 | ZOOM OUT |
| 34 12 cd ab | 1A 02 00 80 | 15 02 00 80 | 00 00 00 00 | 04 00 00 00 | 01 00 00 00 | 09 ef 78 56 | EXPOSURE AUTO |
| 34 12 cd ab | 4C 02 00 80 | 16 02 00 80 | 00 00 00 00 | 04 00 00 00 | 32 00 00 00 | 09 ef 78 56 | EXPOSURE 50 |
| 34 12 cd ab | 1C 02 00 80 | 17 02 00 80 | 00 00 00 00 | 04 00 00 00 | 01 00 00 00 | 09 ef 78 56 | W/B AUTO |
| 34 12 cd ab | 1B 03 00 80 | 18 02 00 80 | 00 00 00 00 | 04 00 00 00 | FF 00 00 00 | 09 ef 78 56 | W/B BLUE 255 |
| 34 12 cd ab | 1C 03 00 80 | 19 02 00 80 | 00 00 00 00 | 04 00 00 00 | FF 00 00 00 | 09 ef 78 56 | W/B RED 255 |
| 34 12 cd ab | 1A 02 00 80 | 1A 02 00 80 | 00 00 00 00 | 00 00 00 00 | 09 ef 78 56 | CAPTURE | |
| 34 12 cd ab | 20 02 00 80 | 1B 02 00 80 | 00 00 00 00 | 04 00 00 00 | 01 00 00 00 | 09 ef 78 56 | FLICKER 50Hz |
| 34 12 cd ab | 21 02 00 80 | 1B 02 00 80 | 00 00 00 00 | 04 00 00 00 | 02 00 00 00 | 09 ef 78 56 | FLICKER 60Hz |
| 34 12 cd ab | 21 02 00 80 | 1D 02 00 80 | 00 00 00 00 | 04 00 00 00 | 00 00 00 00 | 09 ef 78 56 | FREEZE OFF |
| 34 12 cd ab | 22 02 00 80 | 1D 02 00 80 | 00 00 00 00 | 04 00 00 00 | 01 00 00 00 | 09 ef 78 56 | FREEZE ON |
| 34 12 cd ab | 04 03 00 80 | 00 03 00 80 | 00 00 00 00 | 04 00 00 00 | 00 00 00 00 | 09 ef 78 56 | ROTATE 0 |
| 34 12 cd ab | 05 03 00 80 | 00 03 00 80 | 00 00 00 00 | 04 00 00 00 | 01 00 00 00 | 09 ef 78 56 | ROTATE 180 |
| 34 12 cd ab | 05 03 00 80 | 01 03 00 80 | 00 00 00 00 | 04 00 00 00 | 00 00 00 00 | 09 ef 78 56 | LAMP OFF |
| 34 12 cd ab | 06 03 00 80 | 01 03 00 80 | 00 00 00 00 | 04 00 00 00 | 01 00 00 00 | 09 ef 78 56 | LAMP ON |
| 34 12 cd ab | 07 03 00 80 | 03 03 00 80 | 00 00 00 00 | 04 00 00 00 | 00 00 00 00 | 09 ef 78 56 | PCPASS OFF |
| 34 12 cd ab | 08 03 00 80 | 03 03 00 80 | 00 00 00 00 | 04 00 00 00 | 01 00 00 00 | 09 ef 78 56 | PCPASS ON |
CGI Command
Enter the following URL into your web browser to view the CGI command list. To access a control command, follow the following CGI command format.
- URL: http://IPv4 Address/cgi-bin/NetApi?
- Format: http://IPv4 Address/cgi-bin/NetApi?setCmd=ParamCmd&setValue=ParamValue
| Description | ParamCmd | ParamValue |
| Set Brightness Value | img_brightness | 0 ~ 255 |
| Set Contrast Value | img_contrast | 0 ~ 255 |
| Set Saturation Value | img_saturation | 0 ~ 255 |
| Set Effect Mode | img_effect | 0, 1, 2 |
| Set Freeze Mode | img_freeze | 0, 1 |
| Set Exposure Mode | img_exposureMode | 0, 1 |
| Set Exposure Value | img_exposure | 0 ~ 99 |
| Set White Balance Mode | img_whitebalanceMode | 0, 1 |
| Set White Balance Red | img_whitebalanceRed | 0 ~ 255 |
| Set White Balance Blue | img_whitebalanceBlue | 0 ~ 255 |
| Set Rotate Mode | img_rotate | 0, 1 |
| Set Zoom Mode | set_zoom | 0, 1, 2, 3 |
| Set Flicker Mode | set_flicker | 0, 1 |
| Set Lamp Value | set_lamp | 0, 1 |
| Set PC Pass Mode | set_pcpass | 0, 1 |
| Trigger Capture | trigger_capture | /*don't care*/ |
| Trigger Focus | trigger_focus | /*don't care*/ |
natural_image
Line drawing of a portable electronic device with a cylindrical top and connected arm, next to a control panel (no text or symbols visible)AVerVision M90UHD
https://www.avereurope.com/download-center
Assistenza tecnica:
https://www.avereurope.com/technical-support


Westblaak 134, 3012 KM, Rotterdam, The Netherlands
Tel: +31 (0) 10 7600 550
Contenuti
Panoramica....1
natural_image
Line drawing of a handheld electronic device with a cylindrical component and attached ports (no text or symbols)M90UHD
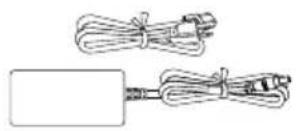
natural_image
Illustration of two types of cable or wire connectors, one with a rectangular body and the other with coiled wires (no text or symbols)natural_image
Technical line drawing of a cylindrical industrial vessel with internal components and a labeled component (no text or symbols present)natural_image
Technical diagram of a mechanical component with a downward arrow indicating force or direction (no text or symbols present)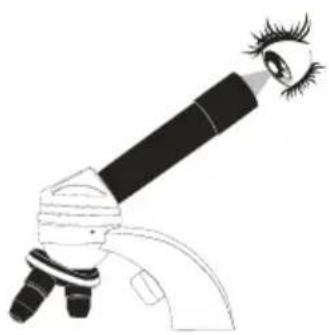
natural_image
Line drawing of a microscope with an eye and eyelashes (no text or symbols)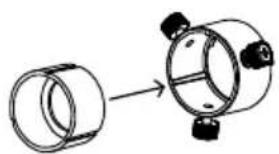
natural_image
Diagram showing a cylindrical component being processed into a larger cylindrical housing (no text or symbols present)natural_image
Diagram showing two identical mechanical components with lock and unlock symbols, no text or labels presentIniziare
flowchart
graph TD
    A["Device with ports"] --> B["Assembly"]
    B --> C["Device with ports"]
    C --> D["Assembly"]
    D --> E["Device with ports"]
    E --> F["Assembly"]
    F --> G["Device with ports"]
Area di ripresa
natural_image
Illustration of a projector with a light source and a device, showing no text or symbols.
natural_image
Line drawing of a mechanical arm with a cylindrical head and base, showing mounting holes and a flat base (no text or symbols)natural_image
Simple line drawing of a folded paper or document (no text or symbols)The data sent between device control and camera consists of multiple fields. The data in each field are placed in little-endian.
| Header Magic Number | 4-byte field with the value 0xABCD1234. |
| Checksum | 4-byte field. The value is calculated from the data after the checksum field to the footer. |
| Command | 4-byte field, indicating what to do |
| Flags | 4-byte field, indicating if the command should be replied or not. This field could be either 0x00000000 or 0x00000001. 0x00000001 means it should be acknowledged. The default acknowledgement is just to echo the Command field and set Data Size to 0. |
| Data size | 4-byte field, the length must be an integer multiple of 4 |
| Footer Magic Number | 4-byte field with the value 0x5678EF09. |
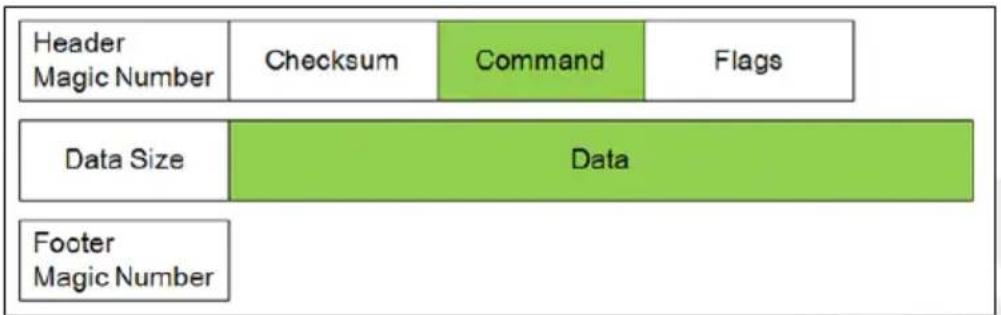
flowchart
graph TD
    A["Header Magic Number"] --> B["Checksum"]
    B --> C["Command"]
    C --> D["Flags"]
    E["Data Size"] --> F["Data"]
    G["Footer Magic Number"] --> H["Data"]
* Example for Set Brightness (0x80000207) Value to 100 (0x64)

- Command and Data
| Function | Command | Data Byte [0-N] | Description |
| SET BRIGHTNESS | 0x80000207 | [0-3] 0x00 ~ 0xFF | Setup value from 0 to 255 |
| SET CONTRAST | 0x8000020A | [0-3] 0x00 ~ 0xFF(0~255) | Setup value from 0 to 255 |
| SET EFFECT | 0x8000020D | [0-3] 0x00 ~ 0x02 | 0x00: Color Mode0x01: White & Black Mode.0x02: Negative Mode. |
| SET FOCUS | 0x80000211 | [0-3] 0x00 ~ 0x02[4-7] 0x00 ~ Max Step / Address | [0-3] Action Behavior0x00: Auto Focus (don't need Step)0x01: Close to Near0x02: Close to Far0x03: Set Focus Address[4-7] Step/Address Value0x00 ~ Max Step / Address |
| SET ZOOM | 0x80000212 | [0-3] 0x00 ~ 0x03 | 0x00 Zoom In0x01 Zoom Out0x02 Zoom Max0x03 Zoom Reset |
| SET EXPOSURE MODE | 0x80000215 | [0-3] 0x00 ~ 0x01 | 0x00 Manual Mode0x01 Auto Mode |
| SET EXPOSURE VALUE | 0x80000216 | [0-3] 0x00 ~ 0x63 | Setup value from 0 to 99 |
| SET WITE BALANCE MODE | 0x80000217 | [0-3] 0x00 ~ 0x01 | 0x00 Manual Mode0x01 Auto Mode |
| SET WITE BALANCE VALUE (BLUE) | 0x80000218 | [0-3] 0x00 ~ 0xFF | Setup value from 0 to 255 |
| SET WITE BALANCE VALUE (RED) | 0x80000219 | [0-3] 0x00 ~ 0xFF | Setup value from 0 to 255 |
| SET CAPTURE | 0x8000021A | /*Don't need*/ | Trigger action |
| SET FLICKER | 0x8000021B | [0-3] 0x01 ~ 0x02 | 0x00: Reserved0x01: 50 Hz0x02: 60 Hz |
| SET FREEZE | 0x8000021D | [0-3] 0x00 ~ 0x01 | 0x00 Freeze OFF0x01 Freeze ON |
| SET ROTATE | 0x80000300 | [0-3] 0x00 ~ 0x01 | 0x00 Rotate 0 degree.0x01 Rotate 180 degree |
| SET LAMP | 0x80000301 | [0-3] 0x00 ~ 0x01 | 0x00 Lamp OFF0x01 Lamp ON |
| SET SATURATION | 0x80000302 | [0-3] 0x00 ~ 0xFF(0~255) | Setup value from 0 to 255 |
| SET PC PASS | 0x80000303 | [0-3] 0x00 ~ 0x01 | 0x00 PC Pass OFF0x01 PC Pass ON |
- Example for packet data via internet protocol sender tool.
| Header | Checksum | Command | Flags | Data Size | Data | Footer | Action Description |
| 34 12 cd ab | 6F 02 00 80 | 07 02 00 80 | 00 00 00 00 | 04 00 00 00 | 64 00 00 00 | 09 ef 78 56 | BRIGHTNESS 100 |
| 34 12 cd ab | 72 02 00 80 | 0A 02 00 80 | 00 00 00 00 | 04 00 00 00 | 64 00 00 00 | 09 ef 78 56 | CONTRAST 100 |
| 34 12 cd ab | 11 02 00 80 | 0D 02 00 80 | 00 00 00 00 | 04 00 00 00 | 00 00 00 00 | 09 ef 78 56 | EFFECT COLOR |
| 34 12 cd ab | 12 02 00 80 | 0D 02 00 80 | 00 00 00 00 | 04 00 00 00 | 01 00 00 00 | 09 ef 78 56 | EFFECT B/W |
| 34 12 cd ab | 13 02 00 80 | 0D 02 00 80 | 00 00 00 00 | 04 00 00 00 | 02 00 00 00 | 09 ef 78 56 | EFFECT NEGATIVE |
| 34 12 cd ab | 15 02 00 80 | 11 02 00 80 | 00 00 00 00 | 04 00 00 00 | 00 00 00 00 | 09 ef 78 56 | AUTO FOCUS |
| 34 12 cd ab | 16 02 00 80 | 12 02 00 80 | 00 00 00 00 | 04 00 00 00 | 00 00 00 00 | 09 ef 78 56 | ZOOM IN |
| 34 12 cd ab | 17 02 00 80 | 12 02 00 80 | 00 00 00 00 | 04 00 00 00 | 01 00 00 00 | 09 ef 78 56 | ZOOM OUT |
| 34 12 cd ab | 1A 02 00 80 | 15 02 00 80 | 00 00 00 00 | 04 00 00 00 | 01 00 00 00 | 09 ef 78 56 | EXPOSURE AUTO |
| 34 12 cd ab | 4C 02 00 80 | 16 02 00 80 | 00 00 00 00 | 04 00 00 00 | 32 00 00 00 | 09 ef 78 56 | EXPOSURE 50 |
| 34 12 cd ab | 1C 02 00 80 | 17 02 00 80 | 00 00 00 00 | 04 00 00 00 | 01 00 00 00 | 09 ef 78 56 | W/B AUTO |
| 34 12 cd ab | 1B 03 00 80 | 18 02 00 80 | 00 00 00 00 | 04 00 00 00 | FF 00 00 00 | 09 ef 78 56 | W/B BLUE 255 |
| 34 12 cd ab | 1C 03 00 80 | 19 02 00 80 | 00 00 00 00 | 04 00 00 00 | FF 00 00 00 | 09 ef 78 56 | W/B RED 255 |
| 34 12 cd ab | 1A 02 00 80 | 1A 02 00 80 | 00 00 00 00 | 00 00 00 00 | 09 ef 78 56 | CAPTURE | |
| 34 12 cd ab | 20 02 00 80 | 1B 02 00 80 | 00 00 00 00 | 04 00 00 00 | 01 00 00 00 | 09 ef 78 56 | FLICKER 50Hz |
| 34 12 cd ab | 21 02 00 80 | 1B 02 00 80 | 00 00 00 00 | 04 00 00 00 | 02 00 00 00 | 09 ef 78 56 | FLICKER 60Hz |
| 34 12 cd ab | 21 02 00 80 | 1D 02 00 80 | 00 00 00 00 | 04 00 00 00 | 00 00 00 00 | 09 ef 78 56 | FREEZE OFF |
| 34 12 cd ab | 22 02 00 80 | 1D 02 00 80 | 00 00 00 00 | 04 00 00 00 | 01 00 00 00 | 09 ef 78 56 | FREEZE ON |
| 34 12 cd ab | 04 03 00 80 | 00 03 00 80 | 00 00 00 00 | 04 00 00 00 | 00 00 00 00 | 09 ef 78 56 | ROTATE 0 |
| 34 12 cd ab | 05 03 00 80 | 00 03 00 80 | 00 00 00 00 | 04 00 00 00 | 01 00 00 00 | 09 ef 78 56 | ROTATE 180 |
| 34 12 cd ab | 05 03 00 80 | 01 03 00 80 | 00 00 00 00 | 04 00 00 00 | 00 00 00 00 | 09 ef 78 56 | LAMP OFF |
| 34 12 cd ab | 06 03 00 80 | 01 03 00 80 | 00 00 00 00 | 04 00 00 00 | 01 00 00 00 | 09 ef 78 56 | LAMP ON |
| 34 12 cd ab | 07 03 00 80 | 03 03 00 80 | 00 00 00 00 | 04 00 00 00 | 00 00 00 00 | 09 ef 78 56 | PCPASS OFF |
| 34 12 cd ab | 08 03 00 80 | 03 03 00 80 | 00 00 00 00 | 04 00 00 00 | 01 00 00 00 | 09 ef 78 56 | PCPASS ON |
CGI Command
Enter the following URL into your web browser to view the CGI command list. To access a control command, follow the following CGI command format.
- URL: http://IPv4 Address/cgi-bin/NetApi?
- Format: http://IPv4 Address/cgi-bin/NetApi?setCmd=ParamCmd&setValue=ParamValue
| Description | ParamCmd | ParamValue |
| Set Brightness Value | img_brightness | 0 ~ 255 |
| Set Contrast Value | img_contrast | 0 ~ 255 |
| Set Saturation Value | img_saturation | 0 ~ 255 |
| Set Effect Mode | img_effect | 0, 1, 2 |
| Set Freeze Mode | img_freeze | 0, 1 |
| Set Exposure Mode | img_exposureMode | 0, 1 |
| Set Exposure Value | img_exposure | 0 ~ 99 |
| Set White Balance Mode | img_whitebalanceMode | 0, 1 |
| Set White Balance Red | img_whitebalanceRed | 0 ~ 255 |
| Set White Balance Blue | img_whitebalanceBlue | 0 ~ 255 |
| Set Rotate Mode | img_rotate | 0, 1 |
| Set Zoom Mode | set_zoom | 0, 1, 2, 3 |
| Set Flicker Mode | set_flicker | 0, 1 |
| Set Lamp Value | set_lamp | 0, 1 |
| Set PC Pass Mode | set_pcpass | 0, 1 |
| Trigger Capture | trigger_capture | /*don't care*/ |
| Trigger Focus | trigger_focus | /*don't care*/ |
natural_image
Line drawing of a handheld device connected to a cylindrical device (no text or symbols visible)AVerVision M90UHD
natural_image
Diagram showing a device connected to a cylindrical component with red X marks, no text or symbols present.https://www.avereurope.com/download-center
Soporte técnico:
https://www.avereurope.com/technical-support

Westblaak 134, 3012 KM, Rotterdam, The Netherlands
Tel: +31 (0) 10 7600 550
Í ndice
Vista general....1
natural_image
Line drawing of a cylindrical device with a base, connected to a rectangular device (no text or symbols visible)M90UHD
natural_image
Two remote control panels with various buttons and dials, one showing a plus button and the other a standard icon (no text or symbols)Mando a distancia**
Pilas AAA (x2)
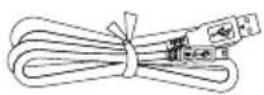
Cable USB
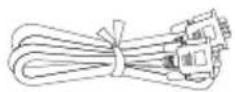
Cable VGA
Tarjeta de garantí a
natural_image
Simple line drawing of a folded paper or sheet (no text or symbols)Lámina antirreflectante
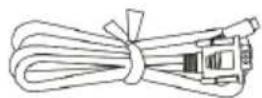
Cable RS-232
Placa de conexión
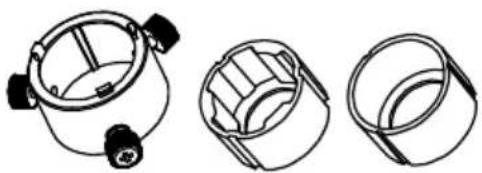
natural_image
Three technical line drawings of a mechanical component with no visible text or symbolsnatural_image
Technical line drawing of a cylindrical industrial vessel or reactor with internal components and a labeled part (1), no text or symbols present.Comenzar
flowchart
graph TD
    A["Device with ports"] --> B["Assembly"]
    B --> C["Device with ports"]
    C --> D["Assembly"]
    D --> E["Device with ports"]
    E --> F["Assembly"]
    F --> G["Device with ports"]
Á rea de disparo
natural_image
Illustration of a projector with a cylindrical lens and a tripod-mounted device, both without any text or symbols.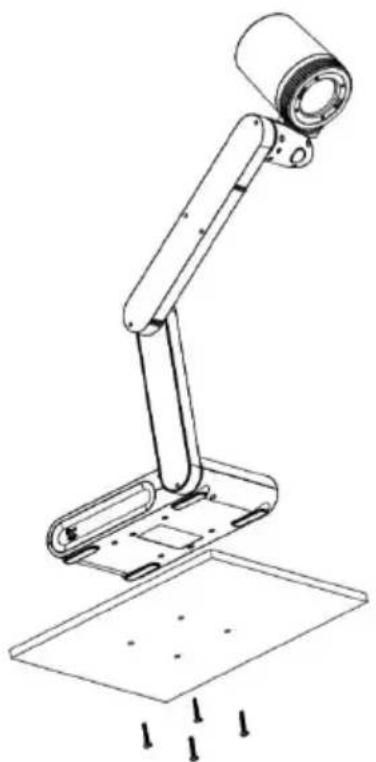
natural_image
Line drawing of a mechanical arm with a cylindrical head and base, showing a drop in force (no text or symbols)Lá mina antirreflectante
natural_image
Simple line drawing of a folded paper or document (no text or symbols)The data sent between device control and camera consists of multiple fields. The data in each field are placed in little-endian.
| Header Magic Number | 4-byte field with the value 0xABCD1234. |
| Checksum | 4-byte field. The value is calculated from the data after the checksum field to the footer. |
| Command | 4-byte field, indicating what to do |
| Flags | 4-byte field, indicating if the command should be replied or not. This field could be either 0x00000000 or 0x00000001. 0x00000001 means it should be acknowledged. The default acknowledgement is just to echo the Command field and set Data Size to 0. |
| Data size | 4-byte field, the length must be an integer multiple of 4 |
| Footer Magic Number | 4-byte field with the value 0x5678EF09. |

* Example for Set Brightness (0x80000207) Value to 100 (0x64)

- Command and Data
| Function | Command | Data Byte [0-N] | Description |
| SET BRIGHTNESS | 0x80000207 | [0-3] 0x00 ~ 0xFF | Setup value from 0 to 255 |
| SET CONTRAST | 0x8000020A | [0-3] 0x00 ~ 0xFF(0~255) | Setup value from 0 to 255 |
| SET EFFECT | 0x8000020D | [0-3] 0x00 ~ 0x02 | 0x00: Color Mode0x01: White & Black Mode.0x02: Negative Mode. |
| SET FOCUS | 0x80000211 | [0-3] 0x00 ~ 0x02[4-7] 0x00 ~ Max Step / Address | [0-3] Action Behavior0x00: Auto Focus (don't need Step)0x01: Close to Near0x02: Close to Far0x03: Set Focus Address[4-7] Step/Address Value0x00 ~ Max Step / Address |
| SET ZOOM | 0x80000212 | [0-3] 0x00 ~ 0x03 | 0x00 Zoom In0x01 Zoom Out0x02 Zoom Max0x03 Zoom Reset |
| SET EXPOSURE MODE | 0x80000215 | [0-3] 0x00 ~ 0x01 | 0x00 Manual Mode0x01 Auto Mode |
| SET EXPOSURE VALUE | 0x80000216 | [0-3] 0x00 ~ 0x63 | Setup value from 0 to 99 |
| SET WITE BALANCE MODE | 0x80000217 | [0-3] 0x00 ~ 0x01 | 0x00 Manual Mode0x01 Auto Mode |
| SET WITE BALANCE VALUE (BLUE) | 0x80000218 | [0-3] 0x00 ~ 0xFF | Setup value from 0 to 255 |
| SET WITE BALANCE VALUE (RED) | 0x80000219 | [0-3] 0x00 ~ 0xFF | Setup value from 0 to 255 |
| SET CAPTURE | 0x8000021A | /*Don't need*/ | Trigger action |
| SET FLICKER | 0x8000021B | [0-3] 0x01 ~ 0x02 | 0x00: Reserved0x01: 50 Hz0x02: 60 Hz |
| SET FREEZE | 0x8000021D | [0-3] 0x00 ~ 0x01 | 0x00 Freeze OFF0x01 Freeze ON |
| SET ROTATE | 0x80000300 | [0-3] 0x00 ~ 0x01 | 0x00 Rotate 0 degree.0x01 Rotate 180 degree |
| SET LAMP | 0x80000301 | [0-3] 0x00 ~ 0x01 | 0x00 Lamp OFF0x01 Lamp ON |
| SET SATURATION | 0x80000302 | [0-3] 0x00 ~ 0xFF(0~255) | Setup value from 0 to 255 |
| SET PC PASS | 0x80000303 | [0-3] 0x00 ~ 0x01 | 0x00 PC Pass OFF0x01 PC Pass ON |
- Example for packet data via internet protocol sender tool.
| Header | Checksum | Command | Flags | Data Size | Data | Footer | Action Description |
| 34 12 cd ab | 6F 02 00 80 | 07 02 00 80 | 00 00 00 00 | 04 00 00 00 | 64 00 00 00 | 09 ef 78 56 | BRIGHTNESS 100 |
| 34 12 cd ab | 72 02 00 80 | 0A 02 00 80 | 00 00 00 00 | 04 00 00 00 | 64 00 00 00 | 09 ef 78 56 | CONTRAST 100 |
| 34 12 cd ab | 11 02 00 80 | 0D 02 00 80 | 00 00 00 00 | 04 00 00 00 | 00 00 00 00 | 09 ef 78 56 | EFFECT COLOR |
| 34 12 cd ab | 12 02 00 80 | 0D 02 00 80 | 00 00 00 00 | 04 00 00 00 | 01 00 00 00 | 09 ef 78 56 | EFFECT B/W |
| 34 12 cd ab | 13 02 00 80 | 0D 02 00 80 | 00 00 00 00 | 04 00 00 00 | 02 00 00 00 | 09 ef 78 56 | EFFECT NEGATIVE |
| 34 12 cd ab | 15 02 00 80 | 11 02 00 80 | 00 00 00 00 | 04 00 00 00 | 00 00 00 00 | 09 ef 78 56 | AUTO FOCUS |
| 34 12 cd ab | 16 02 00 80 | 12 02 00 80 | 00 00 00 00 | 04 00 00 00 | 00 00 00 00 | 09 ef 78 56 | ZOOM IN |
| 34 12 cd ab | 17 02 00 80 | 12 02 00 80 | 00 00 00 00 | 04 00 00 00 | 01 00 00 00 | 09 ef 78 56 | ZOOM OUT |
| 34 12 cd ab | 1A 02 00 80 | 15 02 00 80 | 00 00 00 00 | 04 00 00 00 | 01 00 00 00 | 09 ef 78 56 | EXPOSURE AUTO |
| 34 12 cd ab | 4C 02 00 80 | 16 02 00 80 | 00 00 00 00 | 04 00 00 00 | 32 00 00 00 | 09 ef 78 56 | EXPOSURE 50 |
| 34 12 cd ab | 1C 02 00 80 | 17 02 00 80 | 00 00 00 00 | 04 00 00 00 | 01 00 00 00 | 09 ef 78 56 | W/B AUTO |
| 34 12 cd ab | 1B 03 00 80 | 18 02 00 80 | 00 00 00 00 | 04 00 00 00 | FF 00 00 00 | 09 ef 78 56 | W/B BLUE 255 |
| 34 12 cd ab | 1C 03 00 80 | 19 02 00 80 | 00 00 00 00 | 04 00 00 00 | FF 00 00 00 | 09 ef 78 56 | W/B RED 255 |
| 34 12 cd ab | 1A 02 00 80 | 1A 02 00 80 | 00 00 00 00 | 00 00 00 00 | 09 ef 78 56 | CAPTURE | |
| 34 12 cd ab | 20 02 00 80 | 1B 02 00 80 | 00 00 00 00 | 04 00 00 00 | 01 00 00 00 | 09 ef 78 56 | FLICKER 50Hz |
| 34 12 cd ab | 21 02 00 80 | 1B 02 00 80 | 00 00 00 00 | 04 00 00 00 | 02 00 00 00 | 09 ef 78 56 | FLICKER 60Hz |
| 34 12 cd ab | 21 02 00 80 | 1D 02 00 80 | 00 00 00 00 | 04 00 00 00 | 00 00 00 00 | 09 ef 78 56 | FREEZE OFF |
| 34 12 cd ab | 22 02 00 80 | 1D 02 00 80 | 00 00 00 00 | 04 00 00 00 | 01 00 00 00 | 09 ef 78 56 | FREEZE ON |
| 34 12 cd ab | 04 03 00 80 | 00 03 00 80 | 00 00 00 00 | 04 00 00 00 | 00 00 00 00 | 09 ef 78 56 | ROTATE 0 |
| 34 12 cd ab | 05 03 00 80 | 00 03 00 80 | 00 00 00 00 | 04 00 00 00 | 01 00 00 00 | 09 ef 78 56 | ROTATE 180 |
| 34 12 cd ab | 05 03 00 80 | 01 03 00 80 | 00 00 00 00 | 04 00 00 00 | 00 00 00 00 | 09 ef 78 56 | LAMP OFF |
| 34 12 cd ab | 06 03 00 80 | 01 03 00 80 | 00 00 00 00 | 04 00 00 00 | 01 00 00 00 | 09 ef 78 56 | LAMP ON |
| 34 12 cd ab | 07 03 00 80 | 03 03 00 80 | 00 00 00 00 | 04 00 00 00 | 00 00 00 00 | 09 ef 78 56 | PCPASS OFF |
| 34 12 cd ab | 08 03 00 80 | 03 03 00 80 | 00 00 00 00 | 04 00 00 00 | 01 00 00 00 | 09 ef 78 56 | PCPASS ON |
CGI Command
Enter the following URL into your web browser to view the CGI command list. To access a control command, follow the following CGI command format.
- URL: http://IPv4 Address/cgi-bin/NetApi?
- Format: http://IPv4 Address/cgi-bin/NetApi?setCmd=ParamCmd&setValue=ParamValue
| Description | ParamCmd | ParamValue |
| Set Brightness Value | img_brightness | 0 ~ 255 |
| Set Contrast Value | img_contrast | 0 ~ 255 |
| Set Saturation Value | img_saturation | 0 ~ 255 |
| Set Effect Mode | img_effect | 0, 1, 2 |
| Set Freeze Mode | img_freeze | 0, 1 |
| Set Exposure Mode | img_exposureMode | 0, 1 |
| Set Exposure Value | img_exposure | 0 ~ 99 |
| Set White Balance Mode | img_whitebalanceMode | 0, 1 |
| Set White Balance Red | img_whitebalanceRed | 0 ~ 255 |
| Set White Balance Blue | img_whitebalanceBlue | 0 ~ 255 |
| Set Rotate Mode | img_rotate | 0, 1 |
| Set Zoom Mode | set_zoom | 0, 1, 2, 3 |
| Set Flicker Mode | set_flicker | 0, 1 |
| Set Lamp Value | set_lamp | 0, 1 |
| Set PC Pass Mode | set_pcpass | 0, 1 |
| Trigger Capture | trigger_capture | /*don't care*/ |
| Trigger Focus | trigger_focus | /*don't care*/ |
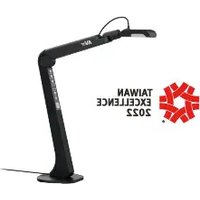
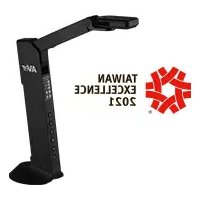
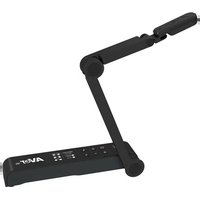
- AverVision M90UHD
- WARNING
- Federal Communications Commission
- DISCLAIMER
- TRADEMARKS
- COPYRIGHT
- Notice
- More Help
- Headquarters
- Europe Branch Office
- Contact Information
- USA Branch Office
- Japan Branch Office
- Vietnam Branch Office
- Parts Info 2
- Connection 8
- Get Started....15
- Transfer Captured Images/Videos to a computer....32
- Appendix....33
- Troubleshooting....44
- Overview
- Package Contents
- Optional Accessories
- Parts Info
- - Rear Panel
- Control Panel
- Remote Control
- Connection
- Power Connection
- USB Connection
- To import or export HDMI source:
- VGA Out and In Connection
- USB to Ethernet Adapter Connection
- Amplified Speaker Connection
- [Note]
- Connect a Microphone
- Microscope Connection
- Get Started
- Shooting Area
- Overhead Light
- Infrared Sensor
- Mounting the M90UHD on a Flat Surface
- Anti-glare Sheet
- External Memory Storage
- Insert a Micro SD Card
- Insert a USB Flash Drive
- RS232 Diagram Connection
- OSD MENU
- Navigate the Menu and Submenu
- Manual WB Red
- Focus
- Start Timer
- Pause/Stop Timer
- Timer Interval
- Flicker
- Information
- Default
- Playback
- Transfer Captured Images/Videos to a computer
- Appendix
- IP Command Protocol
- - Format
- CGI Command
- RS-232 Send Command List
- RS-232 Receive Command List
- Technical Specifications
- - Image
- - Optics
- - Power
- - Lightning
- - Input / Output
- - Dimension
- - External Storage
- Troubleshooting
- There is no picture on the presentation screen.
- The picture on the presentation screen is distorted or the image is blurry.
- There is no computer signal on presentation screen.
- The presentation screen does not show the exact desktop image on my PC or Notebook after I toggle from Camera to PC mode.
- AVerVision M90UHD can't detect the inserted USB flash drive.
- Limited Warranty
- Limitations of Warranty
- Disclaimer of Warranty
- Limitation of Liability
- Governing Law and Your Rights
- 警告
- 連絡資訊
- 部位名稱
- 開始使用
- 攝影範圍
- 紅外線感應器
- 水平安装
- 防眩光片
- 外部記憶體儲存
- お問い合わせ先
- USB-LAN変換アダプターの接続
- 使い始める
- リモコン受光部
- M90UHD を平面に取り付け
- 反射防止シート
- 外部メモリ・ストレージ
- RS-232 送信コマンド表
- RS-232 受信コマンド表
- トラブルシューティング
- Inhaltsverzeichnis
- Loslegen
- Aufnahmebereich
- Infrarotsensor
- Blendschutz
- Externer Speicher
- AVERTISSEMENT
- Table des matières
- Aperçu....1
- Dé marrer
- Champ de la camé ra
- Capteur infrarouge
- Feuille antireflet
- Stockage en mé moire externe
- Contenuti
- Panoramica....1
- Iniziare
- Area di ripresa
- Í ndice
- Vista general....1
- Comenzar
- Á rea de disparo
- Lá mina antirreflectante
Brand : AVer
Model : AVerVision M90UHD
Category : Document camera