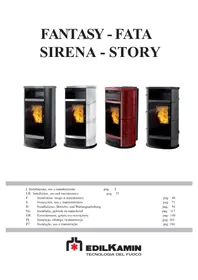
FATA - Oven EDILKAMIN - Free user manual and instructions
Find the device manual for free FATA EDILKAMIN in PDF.


| Product type | Pellet stove |
| Brand | Edilkamin |
| Model | FATA |
| Coating material | Ceramic (cream white, red, leather) |
| Weight (with packaging) | 248 kg |
| Hopper capacity | 23.5 kg |
| Autonomy | 7 to 19 hours |
| Nominal thermal power | 13.2 kW |
| Reduced thermal power | 5.1 kW |
| Nominal/reduced efficiency | 92.5% / 93.3% |
| Nominal/reduced fuel consumption | 3 kg/h / 1.1 kg/h |
| Flue pipe diameter | 80 mm |
| External air intake pipe diameter | 40 mm |
| Power supply | 230 Vac ±10%, 50 Hz |
| Average absorbed electrical power | 100 W |
| Protection fuse | 2AT, 250 Vac 5x20 |
| Control system | Leonardo® with pressure and temperature sensors |
| Safety devices | Thermocouple, vacuum gauge, safety thermostat |
| Daily maintenance | Emptying ash drawer, cleaning crucible |
| Weekly maintenance | Cleaning the combustion chamber and vacuuming the hopper |
| Seasonal maintenance | By authorized dealer (general cleaning, flue pipe, etc.) |
| Available options | KIT 11 (hot air duct to adjacent room), KIT 11 BIS (non-adjacent room), telephone dialer for remote ignition |
| Warranty | Subject to commissioning by an Edilkamin authorized service center |
Frequently Asked Questions - FATA EDILKAMIN
User questions about FATA EDILKAMIN
0 question about this device. Answer the ones you know or ask your own.
Ask a new question about this device
Download the instructions for your Oven in PDF format for free! Find your manual FATA - EDILKAMIN and take your electronic device back in hand. On this page are published all the documents necessary for the use of your device. FATA by EDILKAMIN.
USER MANUAL FATA EDILKAMIN
UK Installation, use and maintenance
pag. 25
F Installation, usage et maintenance
pag. 48
Congratulations and thank you for choosing our product.
Please read this document carefully before you use this product in order to obtain the best performance in complete safety.
For further details or assistance, please contact the DEALER where you purchased the product or visit our website www.edilkamin.com. and click on DEALERS.
NOTE
- After having unpacked the stove, ensure that its contents are complete and intact (cladding, remote control with display, cold hand) handle for opening door, guarantee booklet, glove, CD/technical data sheet, spatula, dehumidifying salt, allen wrench).
In case of anomalies please contact the dealer where you purchased the product immediately.
You will need to present a copy of the warranty booklet and valid proof of purchase.
- Commissioning/ testing
Commissioning and testing must be performed by the DEALER. Failure to do so will void the warranty.
Commissioning, as specified in standard UNI 10683 consists in a series inspections to be performed with the insert installed in order to ascertain the correct operation of the system and its compliance to applicable regulations
-
Incorrect installation, incorrect maintenance, or improper use of the product, shall relieve the manufacturer from any damage resulting from the use of this product.
-
the proof of purchase tag, necessary for identifying the insert, is located:
-
on the top of the package
-
in the warranty booklet found inside the firebox
-
on the ID plate affixed to the back side of the unit;
This documentation must be saved for identification together with the valid proof of purchase receipt. The data contained therein must be reported when requesting information and made available should servicing be required;
- All images are for illustration purposes only; actual products may vary.
The undersigned EDILKAMIN S.p.a. with head offi ce headquarters at Via Vincenzo Monti 47 - 20123 Milan - Italy - VAT T00192220192
Declares under its own responsibility as follows:
The pellet stove illustrated below conforms to Regulation EU 305/2011 (CPR) and to the harmonised European Standard EN 14785:2006
WOOD PELLET STOVES, trademark EDILKAMIN, called FANTASY - FATA - SIRENA - STORY
Year of manufacture: Ref. Data nameplate Declaration of performance (DoP - EK 083): Ref. data tag plate
In addition, it is hereby declared that:
the wood pellet stove FANTASY - FATA - SIRENA - STORY is in compliance with the requirements of the European directives:
2006/95/EC - Low voltage directive
2004/108/EC - Electromagnetic compatibility directive
EDILKAMIN S.p.a. will decline all responsibility of malfunctioning or damage to the equipment in case of unauthorized substitution, assembly or modifi cations of any sort on the said equipment on the part of non-EDILKAMIN personnel.
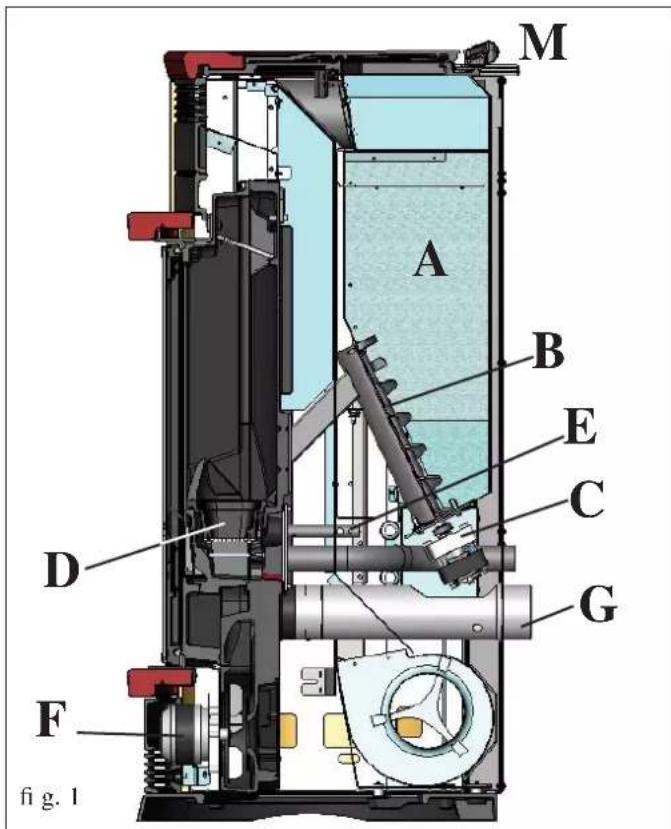
The stoves heat the air using wood pellets as fuel, with electronically controlled combustion. Hereunder is the explanation of its functions (the letters refer to figure 1).
The fuel (pellets) is transferred from the storage hopper (A) to the combustion chamber (D) by means of a feed screw (B), which is driven by a gear motor (C).
The pellets are ignited by the air that is heated by an electrical resistance (E) and drawn into the combustion chamber by a smoke extractor (F).
The fumes produced during the combustion process are extracted from the hearth by the same centrifugal fan (F) and expelled through the outlet (G) located on the lower part at the back of the stove.
The stoves allow for hot air channelling to to convey the air to heat adjacent rooms.
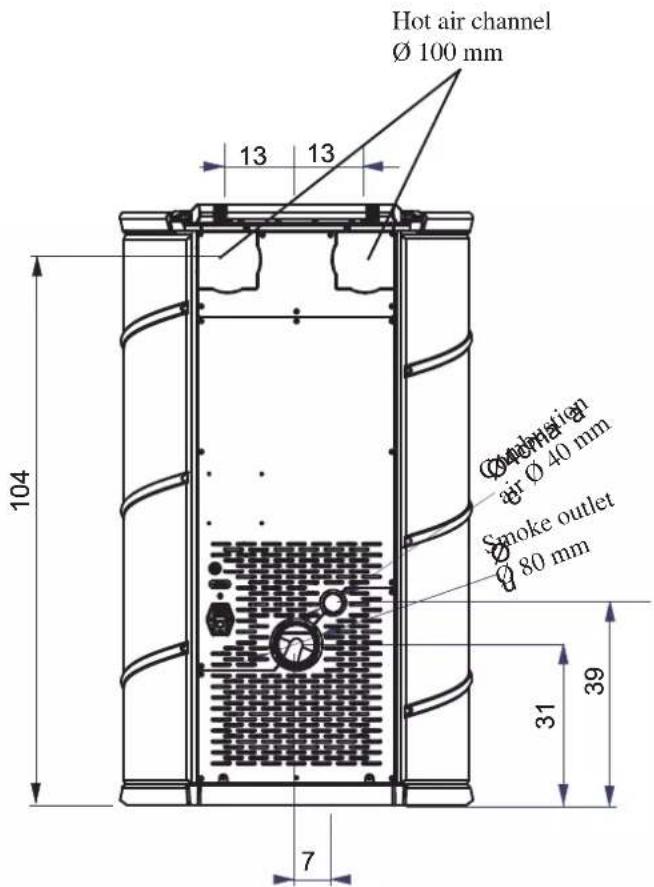
Two male pipes of a 010cm for hot air channelling connection are found on the back part.
To channel the hot air in one or two adjoining rooms, the stove is equipped with two pipes on the back, to which special aluminium pipes must be connected.
KIT 11 and KIT 11 BIS optional are available to facilitate air distribution (see page 34-35-36).
Fuel quantity, smoke extraction and combustion air supply are all controlled by an electronic control board, which is equipped with Leonardo software to achieve high combustion efficiency and low emissions.
The synoptic panel (M) is installed on the top, through which all phases of operation can be displayed and controlled. The main functions can also be controlled by remote control.
A serial port is found at the back of the stove (optional cable: code 640560) to be connected to devices that allow remote ignition (e.g. remote telephone, local thermostat).
The stoves have an internal structure that is made entirely of cast iron.
SAFETY INFORMATION
The stove is designed to heat, through automatic pellet combustion in the hearth, the room where it is installed, both by radiation and the air that comes out of the front grille.
-
The appliance is not designed to be used by people, including children, with reduced physical, sensorial or mental abilities. Children must be supervised to ensure they do not play with the appliance.
-
The only risks that may derive from using the stove pertain to non-compliance with installation instructions, direct contact with live electrical parts (internal), contact with the fire or hot parts (glass, pipes, hot air output), when extraneous substances or non-recommended fuel are introduced, or due to incorrect maintenance.
-
Only use certified, high quality, 6mm diameter wooden pellets for fuel.
-
Should components fail, the stoves are equipped with safety devices that guarantee automatic shutdown. These are activated without any intervention required.
-
In order to function correctly, the stove must be installed in accordance with the instructions given herein and the door must not be opened during operation: combustion is fully automatic and requires no intervention.
-
Under no circumstances should any foreign substances be entered into the hearth or hopper.
-
Do not use flammable products to clean the smoke channel (the flue section connecting the stove smoke outlet to the chimney flue).
-
The hearth and hopper parts must only be cleaned when COLD.
-
The glass can be cleaned when COLD with a suitable product (e.g. GlassKamin Edilkamin) and a cloth.
-
Do not clean when hot.
-
Make sure the stove is installed and ignited the first time by Edilkamin-qualified CAT personnel (technical assistance centre) in accordance with the instructions provided here within; this is an essential requirement for the validation of the guarantee.
-
When the stove is in operation, the exhaust pipes and door become very hot (do not touch without wearing the thermal glove).
-
Do not place anything, which is not heat resistant near the stove.
-
NEVER use liquid fuel to ignite the stove or rekindle the embers.
-
Do not obstruct the ventilation apertures in the room where the stove is installed, nor the air inlets of the stove itself.
-
Do not wet the stove and do not go near electrical parts with wet hands.
-
Do not use reducers on the smoke exhaust pipes.
-
The stove must be installed in a room that is suitable for fire prevention and equipped with all that is required (power and air supply and outlets) for the stove to function correctly and safely.
-
Should ignition fail, DO NOT re-ignite until you have emptied the combustion chamber.
-
ATTENTION: THE PELLET EMPTIED FROM THE COMBUSTION CHAMBER MUST NOT BE DEPOSITED INSIDE THE HOPPER.TED INSIDE THE HOPPER.
DIMENSIONS AND FINISHINGS
FANTASY: soapstone.
-FATA: ceramic cream white, rossa, leather.
- SIRENA: ceramic cream white, rossa, leather.
STORY: grey painted steel.
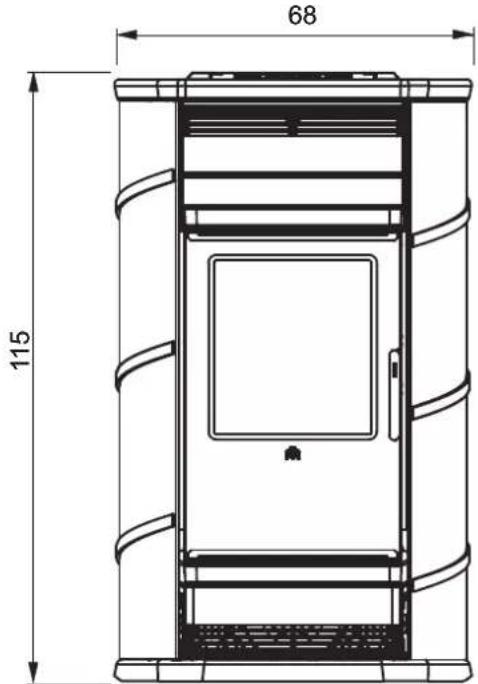
FRONT BACK
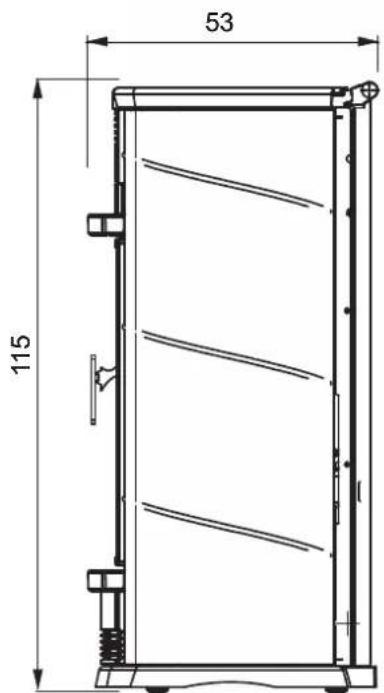
SIDE
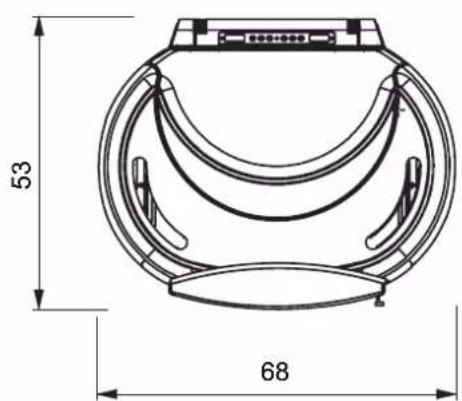
SYSTEM
MEASUREMENTS VALID FOR THE 4 MODELS
CHARACTERISTICS
ELECTRONIC EQUIPMENT
LEONARDO® is a combustion safety and control system which allows optimal performance in all conditions thanks to two sensors measuring the pressure level in the combustion chamber and smoke temperature.
The detection of and subsequent optimisation of these two parameters is continuous in order to correct operation anomalies in real time.
The LEONARDO® system offers constant combustion, automatically regulating the draft based on the characteristics of the chimney flue (bends, length, shape, diameter, etc.) and environmental conditions (wind, humidity, atmospheric pressure, installations at high altitude, etc.).
The standards for installation must be respected.
LEONARDO® system is also able to recognise the type of pellets and automatically djust the flow moment by moment to ensure the required level of combustion.
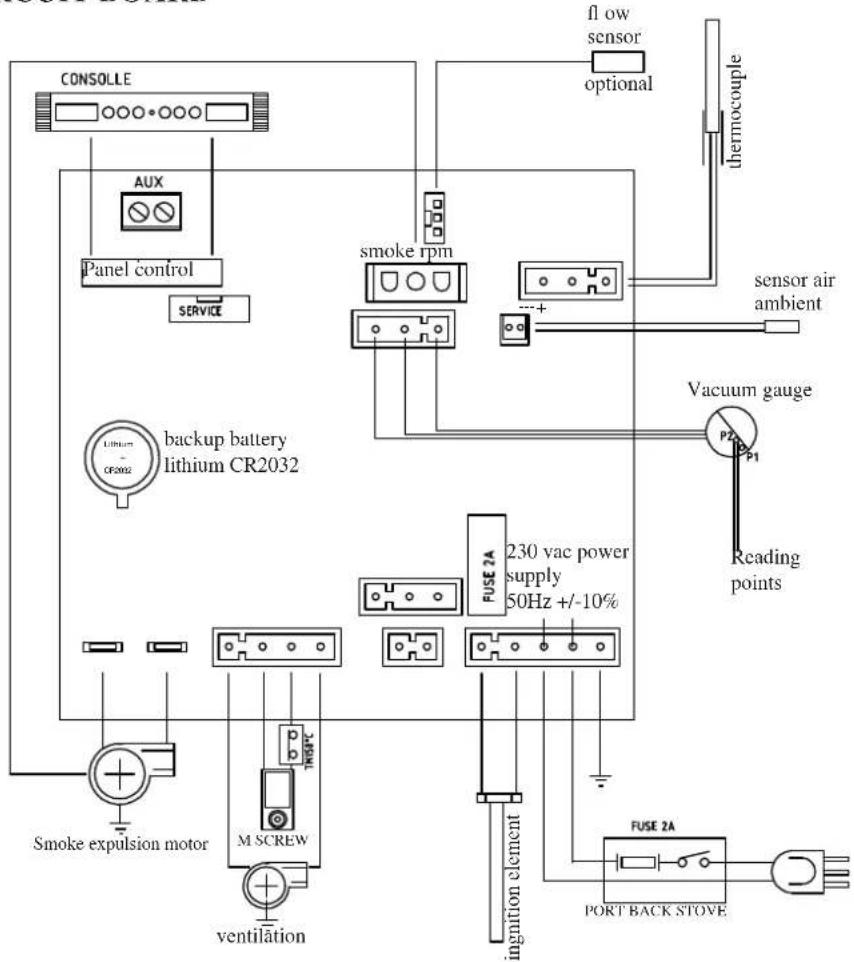
ELECTRONIC CIRCUIT BOARD

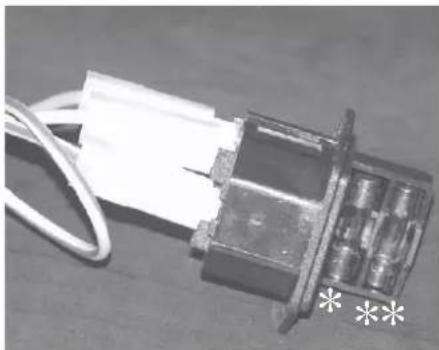
FUSE*
two fuses are inserted in the socket with switch, located on the back of the stove, one of which operational * and the other is held in reserve **.
SERIAL PORT
The Dealer can install an optional on the AUX outlet for controlling the process of switching on and off (e.g. telephone remote, local thermostat), located at the rear oh the stove. Can be connected via special optional trestle (code 640560).
BACKUP BATTERY
A backup battery is found on the control board (3-Volt CR 2032 battery). Its malfunction is indicated with the following messages (not considered a defect but due to normal wear-and-tear): "Battery check".
For more detailed information, please contact the DEALER who has performed the first 1st ignition.
CHARACTERISTICS
| THERMO TECHNICAL CHARACTERISTICS according to EN 14785 | |||
| Nominal power Reduced power | |||
| Heat output 13,2 5,1 kW | |||
| Yield / Efficiency | 92,5 | 93,3 | % |
| Emissions CO 13% O2 | 0,019 | 0,038 | % |
| Maximum flue gas temperature | 96 | 70 | °C |
| Minimum draught | 12 - 5 | 10 - 3 | Pa |
| Mass flow rate of flue gas | 13,5 | 7,4 | g/s |
| Fuel consumption | 3 | 1,1 | kg/h |
| Hopper capacity | 23,5 | kg | |
| Autonomy | 7 | 19 | hours |
| Volume riscaldabile * | 345 | m3 | |
| Smoke outlet pipe diameter (male) | 80 | mm | |
| Air intake pipe diameter (male) | 40 | mm | |
| Weight including packaging FANTASY / FATA / SIRENA / STORY | 271 / 248 / 248 /230 | kg | |
- The heatable room dimensions are calculated on the basis home insulation in compliance with Italian law 10/91, and subsequent changes together with an expected heat output of 33Kcal / m^3 per hour.
| ELECTRICAL CHARACTERISTICS | ||
| Power supply 230Vac +/- 10% 50 Hz | ||
| On/off switch si | ||
| Average power consumption 100 W | ||
| Power consumption during ignition 400 W | ||
| Remote control frequency Infrared | ||
| Protection on mains power supply* (see page 38) 2AT, | 250 Vac, 5x20 Fuse | |
| Protection on electronic circuit board 2AT, 250 Vac, 5x20 Fuse | ||
N.B.
1) keep in mind that external devices can cause interference to the operation of the circuit board.
2) caution: live parts. Servicing and/or inspections must be carried out by qualified staff.
The data shown above is purely indicative.
EDILKAMIN s.p.a. reserves the right to change the products at its discretion without notice.
SAFETY DEVICES
- THERMOCOUPLE:
Placed at the smoke outlet to detect the temperature.
Turns the stove on and off and controls its operation based on defined parameters.
VACUUM GAUGE:
positioned on the smoke extractor, which detects the vacuum value (compared to the installation environment) in the combustion chamber.
- AIR FLOW SENSOR:
located in the suction channel, it is activated when the combustion air flow is not correct, with consequent pressure problems in the smoke circuit causing the stove to shut-down.
- SAFETY THERMOSTAT:
Trips when the temperature inside the stove is too high. It stops pellet loading, causing the stove to go out.
COVERING INSTALLATION FATA/SIRENA
| 75 | 29 | 2 M6x25 screws 2 M6x12 screws 4 silicone spacers for ceramic top 8 fl at washers diam. 6 2 bushings 16 silicone spacers for ceramics 2 ceramic fi xing plates | ||
| 33 | ||||
| 75 | fi g. 2 | ASSEMBLING THE LATERAL TILES (fi g. 1-2) • Remove the rear panel (33) “And the two profi les (75). • Fix the two plates (29) to the zinc-plated sides.” | ||
| fi g. 1 | fi g. 4 | “for the FATA model (Illustr. 3-4) • The left-hand plate must be fi xed to the central and upper holes, whilst the right-hand plate must be fi xed to the central and lower holes. • Fit the ceramic tiles (138-139) on to the plates (29) • Place 2 silicone-coated spacers (150) in the lower part between the cast iron base and the lower, right-hand tile (139) (see detail Y - Illustr. 4). | ||
| 138-139 | 150 | 150 | ||
| fi g. 3 | 138 | 139 | ||
| 150 | detail. “Y” | 150 | ||
| fi g. 5 | 150 | 150 | ||
| fi g. 6 | fi g. 7 | NOTE: Being made through a process of casting, the tiles may differ slightly in height. To compensate for any height variations, silicone spacers may be inserted (150 - fi g. 4-9) without affecting the aesthetic appearance of the stove. | ||
| 29 | 61 | 61 | ||
| Replace the profi les (75) Replace the rear panel (33). | ||||
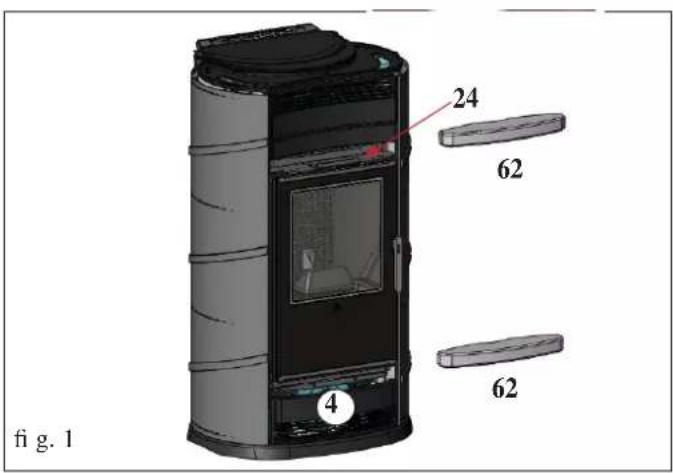
| 61 | 150 | ASSEMBLING THE UPPER FRONT PANEL FATA/SIRENA (fi g. 10-11) • Position the ceramic upper front panel (62) so that it rests against the front panel support (24) positioned above the door. • Use an Allen key to fasten the front panel in place using the 2 supplied M6x25 screws (the door must be opened before performing this operation). | ||
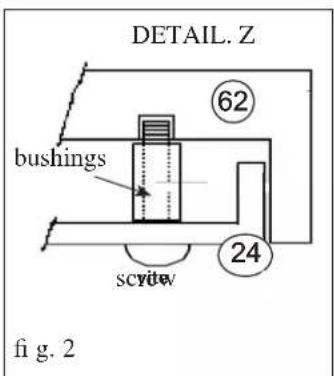
| fi g. 8 | 61 | NOTE: For correct assembly of the upper front panel (62), place the bushing supplied between the same and the front panel (24), as shown in detail “Z” in Illustr. 11. | ||
| 150 | ||||
| fi g. 9 | 62 | NOTE: For correct assembly of the upper front panel (62), place the bushing supplied between the same and the front panel (24), as shown in detail “Z” in Illustr. 11. | ||
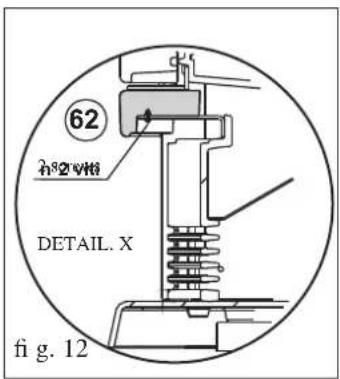
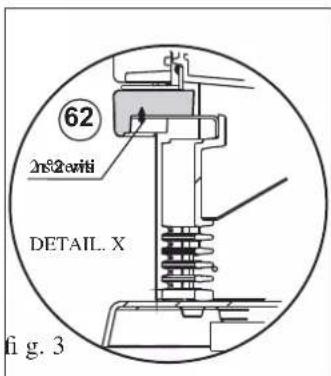
| 4 | 62 | ASSEMBLING THE LOWER FRONT PANEL FATA/SIRENA (fi g. 10-12) • Use the supplied Allen key to loosen the screws that hold the cast iron lower front grill (4) in place and remove it. • Position the front panel (62) and use an Allen key to fasten it in place using the 2 supplied M6x25 screws as indicated in detail “X” (fi g. 12). | ||
| scyteow | ||||
COVERING INSTALLATION FATA/SIRENA
ASSEMBLING THE CERAMIC TOP FATA/SIRENA (fi g. 13)
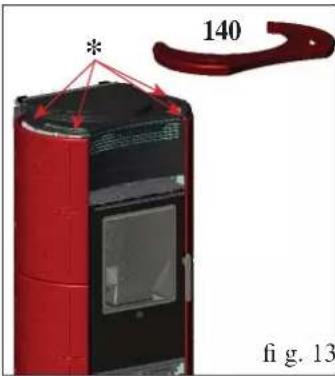
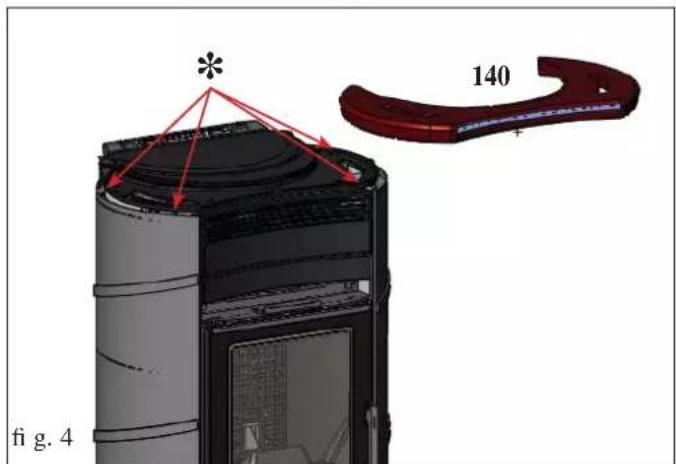
- Insert the 4 ceramics (*) spacers into their 4 free holes in the cast iron top and place the ceramic top (140)
- if necessary, insert a washer between the silicone spacer and the cast iron top.
NOTE:
- the red enamel with crystalline, applied to the majolica, crazes (cracks) evenly over the whole surface. Crazing is not a defect but is a characteristic of enamel applied to majolica known as "crackle".
- The ceramic parts (majolica) are cast and enamelled manually and may present small defects that will not affect their quality (small dents or enamel porosity), but instead testifi es to their manual manufacture.
COVERING INSTALLATION STORY
INCLUDED HARDWARE:
2 M6x25 screws
2 M6x12 screws
4 silicone spacers for ceramic top
8 fl at washers diam. 6
2 bushings
The stove comes furnished with its lateral metal side panels already assembled, while its ceramic upper and lower front panels (62) and top (140) must be assembled as follows:
ASSEMBLING THE UPPER FRONT PANEL (fig. 1-2)
- Position the ceramic upper front panel (62) so that it rests against the front panel support (24) positioned above the door.
- Use an Allen key to fasten the front panel in place using the 2 supplied M6x25 screws (the door must be opened before performing this operation).
NOTE:
For correct assembly of the upper front panel (62), place the bushing supplied between the same and the front panel (24), as shown in detail "Z" in Illustr. 2.
ASSEMBLING THE LOWER FRONT PANEL (fig. 1-3)
- Use the supplied Allen key to loosen the screws that hold the cast iron lower front grill (4) in place and remove it.
- Position the front panel (62) and use an Allen key to fasten it in place using the 2 supplied M6x25 screws as indicated in detail "X" (fi g. 3).
ASSEMBLING THE CERAMIC TOP (fig. 4)
- Insert the 4 ceramics (*) spacers into their 4 free holes in the cast iron top and place the ceramic top (140)
- Where necessary, affix the supplied washer between the silicone spacer and cast iron top.
All local and national laws and European standards must be met when installing and using the appliance. In Italy, refer to the UNI 10683 standard, as well as any regional or local health authority regulations
It is necessary to refer to regulations in force in each country. If installing in an apartment building, check with the management company first.
VERIFY COMPATIBILITY WITH OTHER DEVICES
The stove MUST NOT be installed in the same space as type B gas heating equipment (e.g. gas boilers, stoves, and equipment served by an extraction hood) as the stove may cause a vacuum in the space which may compromise or influence how these units work.
VERIFYTHE POWER SUPPLYCONNECTION
(the plug must be accessible)
The stove is supplied with a power cable that is to be connected to a 230V50Hz socket, preferably ftted with a magnetothermic switch. Voltage variations exceeding 10% can damage the stove (unless already installed, an appropriate differential switch must be ftted). The electrical system must comply with the law; particularly verify the effciency of the earthing system. The power line must have a suitable cross-section for the stove's power. An inadequate earthing system can cause anomalies for which Edilkamin cannot be held liable.
POSITIONING
The stove must be level for it to function correctly.
Verify the bearing capacity of the floor.
FIRE PREVENTION SAFETY DISTANCES
The stove must be installed in compliance with the following safety conditions:
- medium fl ammability items must be kept at a minimum distance of 40~cm from the sides and back of the stove
- highly fl ammable items must be kept at a minimum distance of 80~cm if placed in front of the stove.
If it is not possible to comply with the above mentioned distances, technical and construction-related provisions must be taken to prevent fire hazards. If connected to wooden walls or other flammable materials, the smoke exhaust pipe must be appropriately insulated
AIR INTAKE
The room where the stove is located must have an air intake with cross section of at least 80cm^2 to ensure replenishment of the air consumed by combustion. Alternatively, the stove air may be taken directly from outside through a 4cm steel extension of the pipe.
In this case, there may be condensation problems and it is necessary to protect the air intake with a grille, which must have a freesection of at least 12cm^2
The pipe must be less than 1 metre long and have no bends. It must end with section at 90^ facing downwards or be fitted with a wind guard. In any case all the way air intake duct must be a free section of at least 12cm^2
The external terminal of the air inlet channel must be protected with an anti-insect netting that does not reduce the 12cm^2 through passage.
MOKE OUTLET
The stove must have its own smoke outlet (the smoke cannot be discharged into a smoke flue used by other devices).
The smoke is discharged through the 8cm diameter outlet at the back of the stove. The smoke outlet must be connected to outside by means of suitable steel pipes EN 1856 certifi ed. The pipe must be hermetically sealed.
The material used to seal and if necessary insulate the pipes, must be resistant to high temperatures (high temperature silicone or mastic).
The only horizontal section allowed may be up to 2m long. It may have up to two 90^ bends.
A vertical section of at least 1.5m and an anti-wind terminal is necessary (if the discharge outlet is not in a chimney flue reference UNI 10683).
The vertical duct can be internal or external. If the smoke channel is outside, it must be appropriately insulated.
If the smoke channel is fitted inside a chimney flue, the latter must be suitable for solid fuel. If it is wider than 150~mm in diameter it must be improved by entering a pipe that has a suitable cross-section and is made of suitable material (e.g. 80~mm diameter steel). All sections of the smoke duct must be accessible for inspection. The chimney pots and smoke ducts connected to the solid fuel appliances must be cleaned once a year (verify whether a specific legislation exists in your country). Failure to regularly inspect and clean the stove increases the probability of a fire occurring in the chimney pot. In that case, proceed as follows: Do not use water to extinguish the fire; Empty the pellet hopper; Contact specialist personnel before reigning the stove. The stove is designed to work under any weather conditions. In case of particular conditions, such as strong wind, the safety system may be activated, which results in the stove being extinguished. If this happens, do not operate the stove with the safety devices disabled. If the problem persists, contact our Technical Service Department. In this case, do not operate the appliance while the safety devices are disabled. If the problem persists, contact the Service Centre.
TYPICAL EXAMPLES
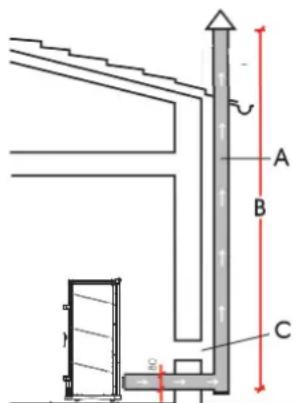
Fig. 1
A: insulated steel fluc
B: minimum height of 1.5m and in any case above the height of the roof gutter
C-E: air intake from inside room (minimum internal section: 80~cm^2 D: steel fluc, inside existing brick-built chimney.
CHIMNEY POT
The main characteristics are:
- an internal cross-section at the base, which is the same as that of the chimney flue
- an outlet cross-section which is no smaller than twice that of the chimney flue
- its position must be high enough to catch the wind and avoid downdraft areas in turbulent wind, it must be high enough to catch the wind and avoid downdraft areas in turbulent wind.
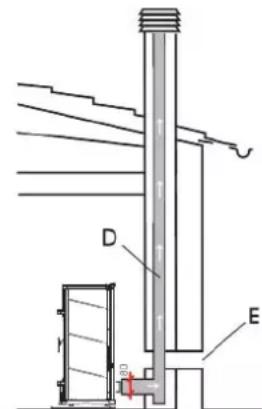
Fig.
INSTALLATION
HOT AIR CIRCULATION
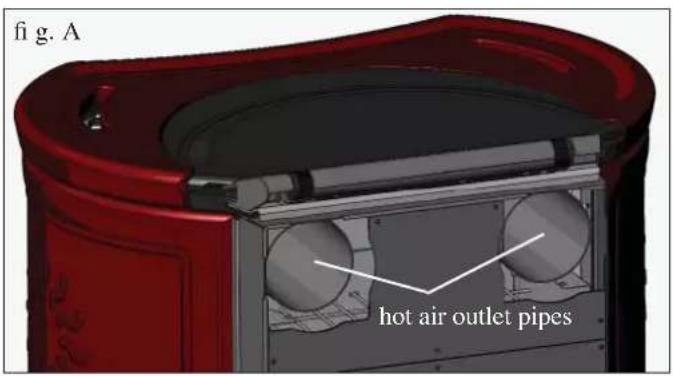
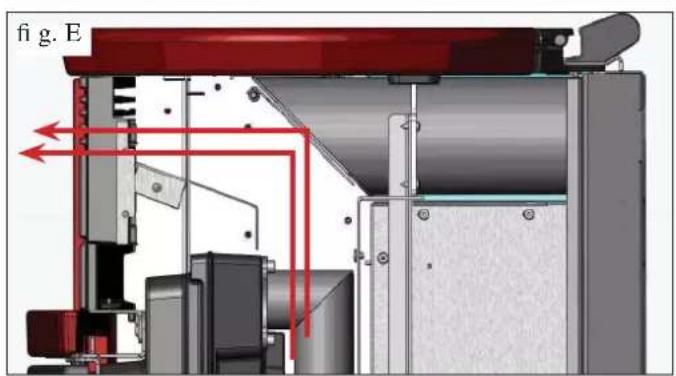
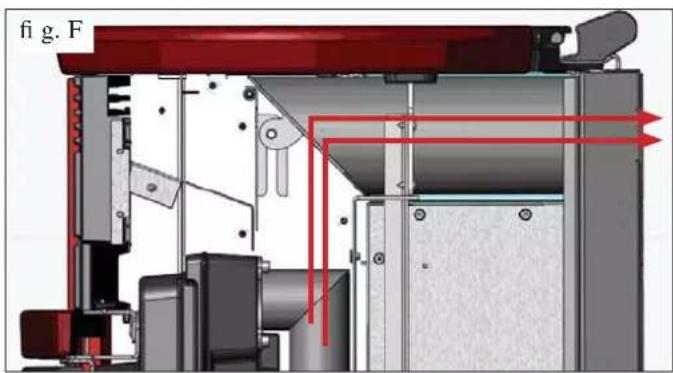
In the installation area, the hot air is emitted through the grill installed in the upper front portion (fi g. E). To channel the hot air in one or two adjoining rooms, the stove is equipped with two pipes on the back (fi g.A), to which special aluminium pipes must be connected.
KIT 11 and KIT 11 BIS optional are available to facilitate air distribution (see page 34-35-36).
It is essential to remember the importance of proper insulation on the pipe where the hot air passes to avoid dispersion. Avoid curves in the pipe as much as possible.
Note: THE PIPES ON THE HOT AIR OUTLETS MUST BE FITTED BEFORE APPLYING THE COVERINGS AND PRIOR TO DISASSEMBLY OF THE UPPER CAST IRON SIDE FLANK. THE FIRST PART OF THE FLEXIBLE PIPE MUST BE COMPLETELY "RELAXED" IN SUCH WAY TO ELIMINATE CORRUGATION. IN THIS WAY, THE INTERNAL DIAMETER WILL BE SLIGHTLY ENLARGED TO FAVOUR ENTRANCE.
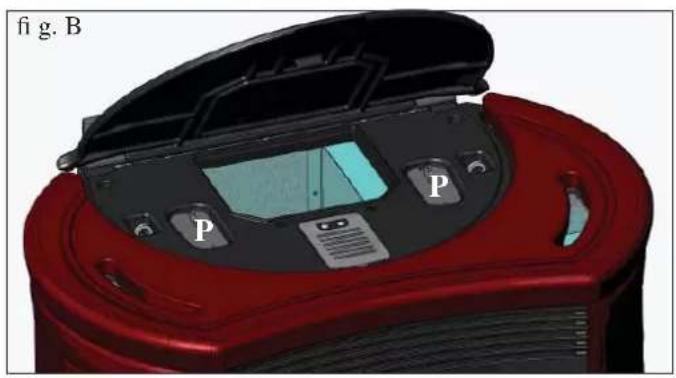
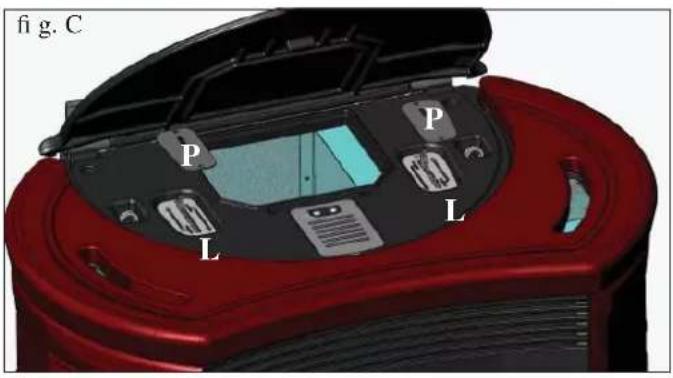
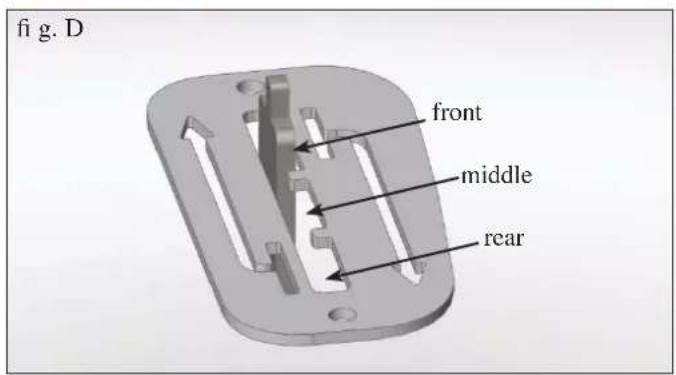
Channelled air distribution is adjustable manually by means of the "L" lever (fi g.D). To move, remove the "P" locking plates fastened with screws (fi g. B-C).
Once the plates have been removed, hot air can be directed either in the upper front panel part fig. E (lever pulled all the way back - see fig. D) or in the rear part fig. F (lever pulled all the way forward - see fig. D) or half in the upper front panel part and half in the rear part (lever in the middle - see fig. D).
Note: IF THE STOVE IS NOT CHANNELLED, THE PLATES (P) MUST NOT BE REMOVED.
INSTALLATION
1st SOLUTION: KIT 11 (code 645700) - ADJACENT ROOM ONLY
Note: THE PIPES ON THE HOT AIR OUTLETS MUST BE FITTED BEFORE APPLYING THE COVERINGS AND PRIOR TO DISASSEMBLY OF THE UPPER CAST IRON SIDE FLANK. THE FIRST PART OF THE FLEXIBLE PIPE MUST BE COMPLETELY “RELAXED” IN SUCH WAY TO ELIMINATE CORRUGATION. IN THIS WAY, THE INTERNAL DIAMETER WILL BE SLIGHTLY ENLARGED TO FAVOUR ENTRANCE.
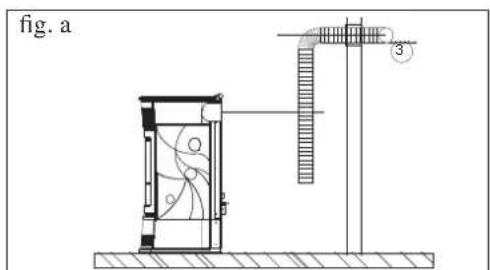
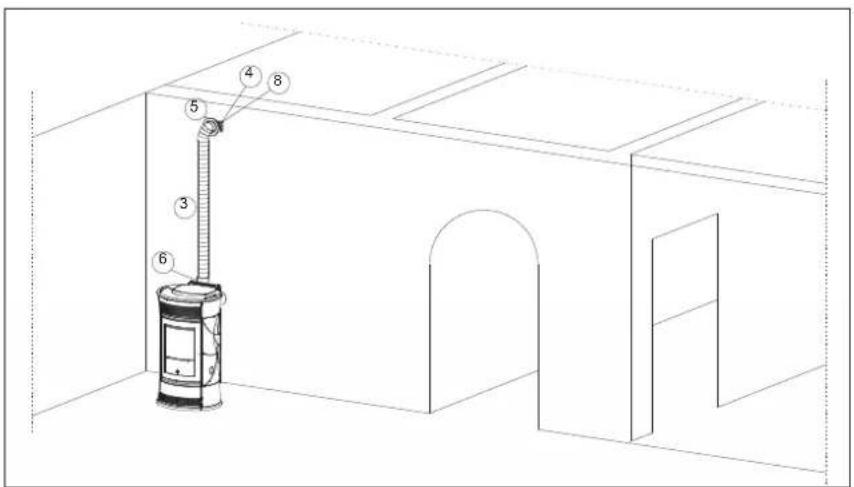
- Define the position of the stove with respect to the walling (fig. a).
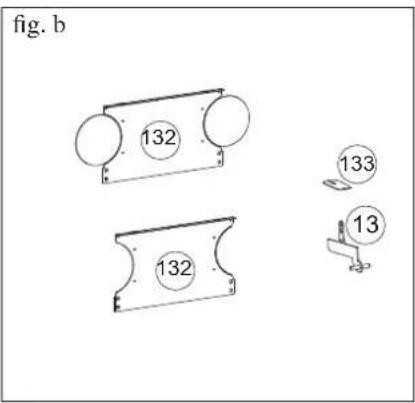
- Disassemble the upper part of the back (132) and remove one of the two predrilled caps in correspondence with the hot air outlet pipes (fi g. b).
- Activate the hot air channelling control lever (13), removing the locking plate (133) (fig. b).
- Cut the flue cover to size (6) on the wall side (fig.c)
- Place the stove in its definite position.
- Extend the aluminium pipe (3) for hot air channelling, without connecting the stove outlet.
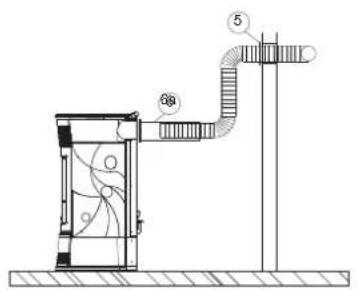
- Fit the medallion (5) on the aluminium pipe and the pipe cover (6a) without locking it in (fig. c).
- Fit the aluminium pipe to the hot air outlet on the back of the stove (8) (fig. d).
- Replace the upper part of the back (132).
- Place the pipe cover (6) in the definite position and fasten it to the back of the stove with the supplied screws (7) (fig. d).
- Install the terminal outlet (4) and its aluminium pipe (3) (fig. d).
- Fasten the wall medallion (5) with silicone (fi g d).
f i g. c
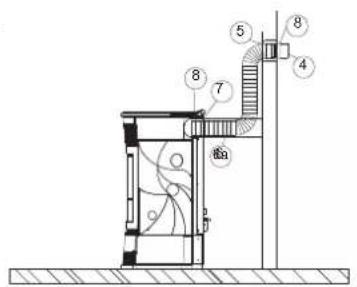
f i g. d
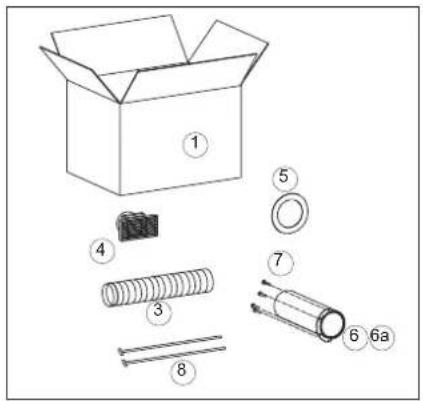
| n° KIT 11 | |||
| 1 Box 1 645740 | |||
| 3 Ø 10 pipe 1 162520 | |||
| 4 Smoke outlet end-piece 1 293430 | |||
| 5 Wall medallion 1 644190 | |||
| 6a Flue cover 1 645730 | |||
| 7 Flue cover fastening screws 4 168260 | |||
| 8 Pipe blocking clamp 2 46160 | |||
INSTALLATION
2nd SOLUTION: KIT 11 BIS (code 645710) - NON-ADJACENT ROOM ONLY
Note: THE PIPES ON THE HOT AIR OUTLETS MUST BE FITTED BEFORE APPLYING THE COVERINGS AND PRIOR TO DISASSEMBLY OF THE UPPER CAST IRON SIDE FLANK. THE FIRST PART OF THE FLEXIBLE PIPE MUST BE COMPLETELY “RELAXED” IN SUCH WAY TO ELIMINATE CORRUGATION. IN THIS WAY, THE INTERNAL DIAMETER WILL BE SLIGHTLY ENLARGED TO FAVOUR ENTRANCE.
- Define the position of the stove with respect to the walling (fig. a).
- Disassemble the upper part of the back (132) and remove one of the two predrilled caps in correspondence with the hot air outlet pipes (fi g. b).
- Activate the hot air channelling control lever (13), removing the locking plate (133) (fig. b).
- Cut the flue cover to size (6) on the wall side (fig.c)
- Place the stove in its defini nite position.
- Extend the aluminium pipe (2) for hot air channelling, without connecting the stove outlet.
- Fit the medallion (5) on the aluminium pipe and the pipe cover (6a) without locking it in (fig. c).
- Fit the aluminium pipe to the hot air outlet on the back of the stove (8) (fig. d).
- Replace the upper part of the back (132).
- Place the pipe cover (6) in the definite position and fasten it to the back of the stove with the supplied screws (7) (fig. d).
- Install the terminal outlet (4) and its aluminium pipe (2) fastening it with the wall collar (9) and the dowels with screws (10-11) (fig. d).
- Fasten the wall medallion (5) with silicone (fi g d).
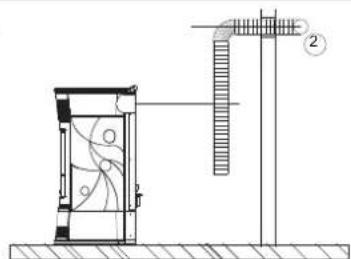
fig.a
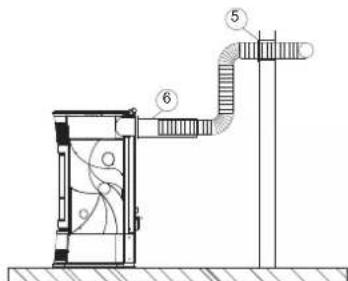
f i g. c
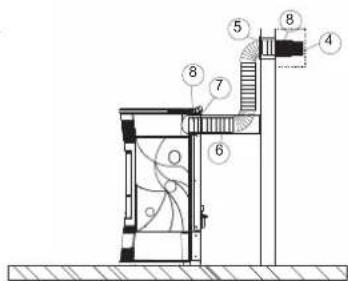
fi g.d
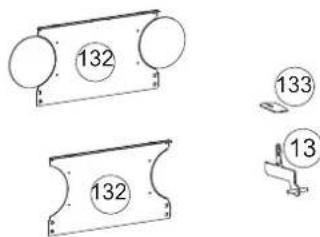
fig.b

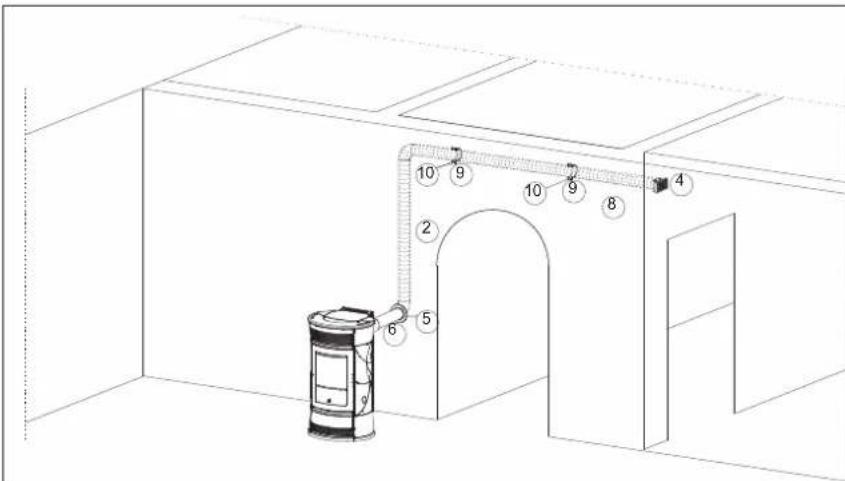
| n° KIT 11 | BIS | ||
| 1 Box 1 643910 | |||
| 2 Ø 10 pipe 1 643900 | |||
| 4 Smoke outlet end-piece 1 293430 | |||
| 5 Wall medallion 1 644190 | |||
| 6a Flue cover 1 645730 | |||
| 7 Flue cover fastening screws 4 168260 | |||
| 8 Pipe blocking clamp 2 46160 | |||
| 9 Wall collar | 2 645750 | ||
| 10 | Screws | 4 | 8410 |
| 11 | Dowels | 4 | 8520 |
INSTALLATION
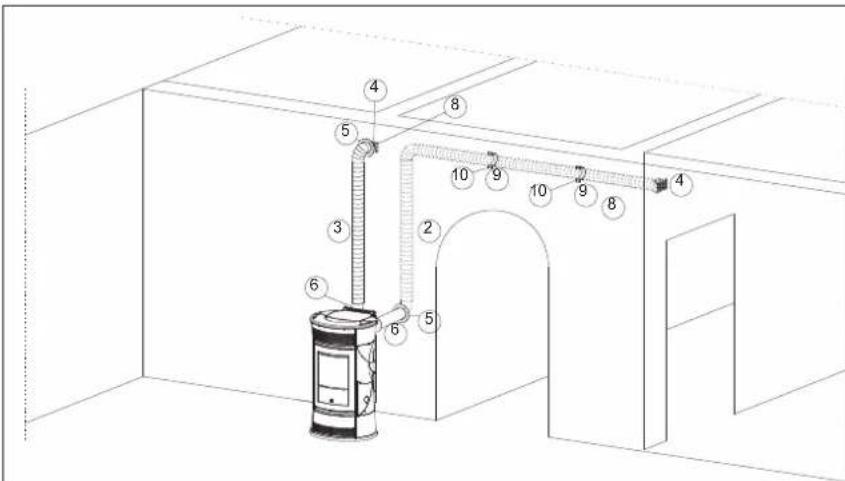
3rd SOLUTION: KIT 11 (code 645700) con KIT 11 BIS (code 645710) - BOTH ROOMS
Note: THE PIPES ON THE HOT AIR OUTLETS MUST BE FITTED BEFORE APPLYING THE COVERINGS AND PRIOR TO DISASSEMBLY OF THE UPPER CAST IRON SIDE FLANK. THE FIRST PART OF THE FLEXIBLE PIPE MUST BE COMPLETELY “RELAXED” IN SUCH WAY TO ELIMINATE CORRUGATION. IN THIS WAY, THE INTERNAL DIAMETER WILL BE SLIGHTLY ENLARGED TO FAVOUR ENTRANCE.
- Define the position of the stove with respect to the walling (fig. a).
- Disassemble the upper part of the back (132) and remove the predrilled caps in correspondence with the hot air outlet pipes (fig. b).
- Activate the hot air channelling control lever (13), removing the locking plates (133) (fig. b).
- Cut the flue cover to size (6) on the wall side (fig.c)
- Place the stove in its defini nite position.
- Extend the aluminium pipes (2-3) for hot air channelling, without connecting them to the stove outlets.
- Fit the medallions (5) on the aluminium pipes and the pipe covers (6a) without locking them in (fig. c).
- Fit the aluminium pipes to the hot air outlets on the back of the stove (8) (fig. d).
- Replace the upper part of the back (132).
- Place the pipe covers (6) in the definite position and fasten them to the back of the stove with the supplied screws (7) (fig. d).
- Install the terminal outlets (4) and relative aluminium pipes (2-3), fastening them with the wall collars (9) and the dowels with screws (10-11)(fi g. d).
- Fasten the wall medallions (5) with silicone (fi g d).
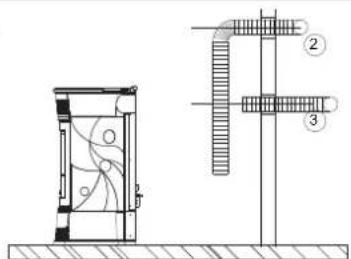
fig.a
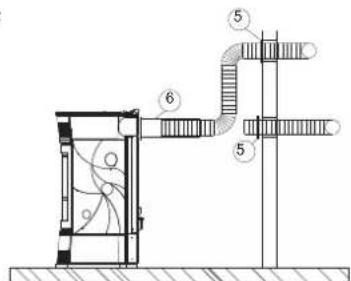
f i g. c
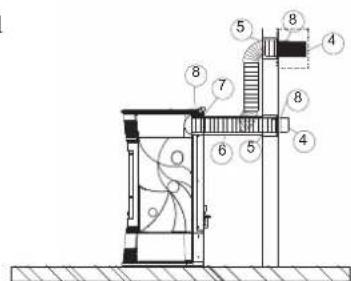
fi g.d
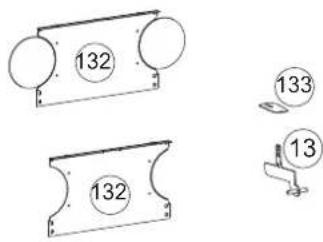
fig.b
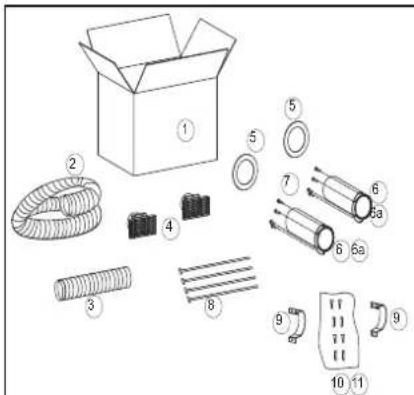
| \( {\mathrm{n}}^{ \circ } \) KIT 11 | KIT 11 BIS | |||
| 1 Box 1 645740 643910 | ||||
| 2 Ø 10 pipe 1 - 643900 | ||||
| 3 Ø 10 pipe 1 162520 - | ||||
| 4 Smoke outlet end-piece 2 293430 293430 | ||||
| 5 Wall medallion 2 644190 644190 | ||||
| 6a Flue cover | 2 645730 | 645730 | ||
| 7 Flue cover fastening screws | 8 | 168260 168260 | ||
| 8 Pipe blocking clamp | 4 | 46160 | 46160 | |
| 9 Wall collar | 2 | - | 645750 | |
| 10 Screws | 4 | - | 8410 | |
| 11 Dowels | 4 - | 8520 |
INSTRUCTIONS FOR USE
Commissioning must be done by a Technical Service Centre authorised by Edilkamin (CAT) prior to ignition and testing according to the UNI 10683 standard.
This standard indicates the control operations to be carried out in situ, aimed at ascertaining correct system function.
Before igniting.
To ignite for the first time, it is essential to contact your local Edilkamin technical service centre (CAT), (for information see the www.edilkamin.com website) to calibrate the stove according to the type of pellets used and installation conditions, thereby starting the guarantee.
Failure to have the stove ignited by an authorised C.A.T. prevents Edilkamin from guaranteeing correct functioning.
There may be a slight smell of paint the first few times it is ignited, however, this will disappear quickly.
Before igniting you must check:
- that installation is correct
the power supply - that the door closes properly to a perfect seal
- that the combustion chamber is clean
- that the display is on standby (the date, power or temperature flashes).
FILLING THE PELLET HOPPER
The hopper lid opens and closes with a practical click-clack system. Simply apply slight pressure to the front part of the cast iron lid (fi g. 1).
ATTENTION:
use the glove supplied when filling the stove whilst it is running and therefore is hot.
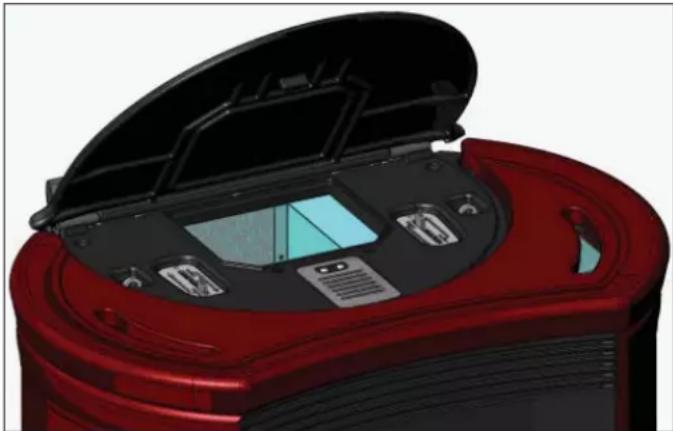
f g. 1
NOTE regarding the fuel.
The stoves is designed and programmed to burn wood pellets with 6mm diameter.
Pellets are a type of fuel in the form of little cylinders, made from compacted sawdust, compressed under high pressure with no adhesives or foreign materials.
They are sold in bags of 15kg
For the stove to function properly, you MUST NOT burn anything else in it. Using other materials (including wood) will render the warranty null and void. Such use is detected by laboratory analyses. Edilkamin has designed, tested and programmed their stoves to guarantee the best performance when pellets with the following characteristics are used:
diameter: 6 millimetres
maximum length: 40mm
maximum moisture content: 8%
calorific value: at least 4300kcal / kg
If pellets with different characteristics are used, the stoves must be recalibrated a similar procedure to that carried out by the DEALER when the stove is ignited the first time.
Using unsuitable pellets may: decrease efficiency; cause malfunctions; stop the stove from functioning due to clogging, dirt on the glass, unburnt fuel, etc.
A simple, visual analysis of the pellets may be carried out: Good quality: smooth, uniform length, not very dusty.
Poor quality: with longitudinal and transverse cracks, very dusty, various lengths and mixed with foreign matter.
INSTRUCTIONS FOR USE
MIMIC PANEL

hold down for 2 seconds to turn stove on or off

Pressed briefly it switches the stove from manual to automatic operating mode; held down (pressed and held for 2") it gives access to the various programming menus.

increases the various settings

decreases the various settings; pressing for 5s locks the keypad, pressing for another 5s unlocks the keypad

Each time it is pressed tells the electronic circuit board memory that 15Kg have been loaded into the tank; pressing it continuously for 5" cancels any residual or previously loaded Kg.

Pressed briefly it switches the stove's fan from the quieter "Comfort" level to the higher energy "Turbo" level.


"Touch in correspondence to the LED points to select the desired operating power.
Alternatively, the traditional setting can be used, which can be selected using the +/- buttons."

Loading the feed screw.
Should the pellet hopper empty completely the feed screw must be fi lled. To do so, keep the + and - keys pressed simultaneously for a few seconds (on the remote control or synoptic panel). Once released, 'REFILL' will appear on the display. This must be carried out before ignition if the stove has stopped due to the pellets having fi nished.
It is quite normal for some pellet residue to remain inside the hopper, this is what the feed screw is unable to pick up.
Once a month, fully vacuum the hopper to prevent dusty residue from accumulating.
Automatic ignition
With the stove on standby, press the 0/1 button for 2 seconds (on the synoptic panel or remote control). This will startup the ignition process, 'Start-up' will appear on the display and a countdown will commence in seconds (1020). There is no preset time for the ignition process: its duration will be automatically shortened if the control board detects that certain tests have been carried out positively. The fl ame appears after about 5 minutes.
Manual ignition
At a temperature lower than 3^ - too low for the electrical resistance to become red hot - or if the resistance is temporarily not working, you can use a fi relighter to ignite the stove. Insert a well-lit fi relighter into the combustion chamber, close the door and press 0/1 on the synoptic panel or remote control.
Operating modes
Manual: the user sets the desired operating power (from a minimum of 1 to a maximum of 5)
Automatic: the user sets the desired room temperature using the + / - key or the remote control, the stove reads the setting and adjusts the power to reach the temperature set, then sets itself to Power 1.
Manual mode from synoptic panel/remote control
With the stove in operation mode or on standby, press and release the MENU button on the synoptic panel/remote control and 'Power' will appear on the display (showing the power at which the stove is working). Press the + key on the remote control to increase the operating power (from Power 1 to Power 5). Setting the fan via the Synoptic Panel With the stove in operation mode or on standby, rotate the right knob to adjust the ventilation setting (from 1 to 10 in all powers).
INSTRUCTIONS FOR USE
Automatic mode from synoptic panel/remote control
Press the MENU button twice to switch from manual to automatic mode and adjust the temperature desired for the room (on the panel or the + and - keys on the remote control to set the temperature between 10 and 29 ..., and the stove will regulate the operating power required to reach it. If the set temperature is lower than the room temperature, the stove works at Power 1.
Shutdown
For greater comfort, the stove and the air vents go off at the same power at which it was operating.
With the stove in operation mode press the 0/1 key for 2 seconds (on the synoptic panel or remote control). The shutdown procedure will begin and the countdown is displayed. This varies according to the power at which it is running when the shutdown phase begins.
The shutdown phase (which will extinguish the flame without leaving any unburnt material in the combustion chamber and cool the stove), consists of:
- Pellet loading ceases.
- Ventilation is activated at the level at which the stove was operating.
- Smoke expulsion motor enabled.
Never unplug the stove during the shutdown process.
Setting the clock
Press the MENU button for 2 seconds and use the + and - keys to follow the instructions given on the display to access the 'Clock' menu. This allows you to set the time on the electronic control board.
Then press MENU and the following data appears in sequence - this can be adjusted:
day, month, year, hour, minutes, day of the week.
When Save? appears on the display you can check that the settings have been entered correctly before confirming.
Press MENU to save the information ('Save OK' then appears on the display).
Weekly timer
Press the MENU button for 2 seconds to access the time setting function and press the + key to access the weekly timer function - 'Program ON/OFF' will appear on the display.
A maximum of three timer programs can be set for each day of the week.
As you confirm via the MENU button, one of the following options will appear:
- 'No Prog.' (no program is set).
- 'Daily program' (a single program is set for every day)
- 'Weekly program' (a program is set for each day of the week).
Move from one to the other using the + and - keys. Use the MENU button to confirm the 'Daily program' option and access the selection of the number of programs (ignition/shutdown) to be set per day. Use the 'Daily program' option to set the identical program/s for every day of the week.
The following will be displayed if the ^+ key is pressed:
-
No Programs.
-
1st daily program (one ignition and one shutdown per day), 2nd daily program (same as before), 3rd daily program (same as before).
Use the MENU button to show them in reverse order.
If the 1st program is selected, the ignition time is shown.
The display shows: 1 Ignition Hour 10.30; use the +/- keys to change the hour and press MENU to confirm.
The display shows: 1 Ignition Minutes 10.30; use the +/- keys to change the minutes and press MENU to confirm.
In the same way, adjust the shutdown times. The program is confimed by pressing the MENU button when Save OK appears on the display. When confiming the Weekly program the day to which the program is to apply must be selected:
1 Mon; 2 Tues; 3 Wed; 4 Thurs; 5 Fri; 6 Sat; 7 Sun
Once you have chosen the day by scrolling through them with the + and - keys, confirm by pressing MENU and proceed with the settings of the programs in the same way as for the 'Daily program', selecting whether or not to enable a program for each day of the week and choosing the number and times of interventions.
Should you make a mistake whilst setting the programs you can exit without saving by pressing the 0/1 key.
Note on fl ame variability
The flame may vary depending on the type of pellets used, in addition to normal variability of the solid fuel flame and regular cleaning of the combustion chamber carried out automatically by the stove.
N.B. The automatic cleaning process performed by the stove does not replace the need for the user to vacuum the stove when cold, prior to ignition).
Pellet reserve warning
Stoves are equipped with an electronic pellet detection system. The detection system is integrated into the electronic control board, allowing the stove to monitor how many kilos of pellets are left. This verifi cation is implemented at any point whilst the stove is in operation mode. For correct system operation, it is important that the following procedure is adhered with during the first ignition (that must be implemented by the DEALER). Before starting to use the pellet detection system, you must load and consume a full sack of pellets. This allows for a brief running-in of the loading system. Hence, load 15kg of pellets. Then press the 'reserve' button once, thereby storing the data into the memory that 15kg have been loaded.
From now on the display will show the remaining pellets as they decrease in kg (15...14...13).
Each time pellets are reloaded you must enter the quantity.
E.g. when loading 15kg simply press the 'pellet load' button to enter this into the memory. For other quantities, or in the event of an error, you can specify the quantity using the pellet reserve menu as follows:
Press the MENU button for 2 seconds to view the SETTINGS. Press + or - consecutively to view RESERVE.
Pressing the + key increases the Kg to be loaded, pressing the -key reduces the Kg , pressing the -key repeatedly sets the load to 00Kg (R on the display), which makes it possible to cancel the residual load.
INSTRUCTIONS FOR USE
ConfirrmbypressingMENUand the remainingquantity ofpelletswill be displayed ^+ thatbeingloaded(defaultis15 and can be changed using the ± / - keys).Shouldthopper run out of pellets, the stove will block and Stop/Flame' will appear see page 35).
Note: Every now and again remember to reset the "pellet reserve warning" for it to function in a more reliable manner. For any clarifi cation please contact the authorised DEALER who performed the first 1st ignition.
This provides a reference indicator. Greater precision is obtained by regularly zeroing the system before flling it again. Edilkamin does not accept any responsibility for differences from what is indicated (which may be due to external factors).
Environmental temperature adjustment
this comfortable and simple adjustment feature, as standard in this line of products, allows you to manage the stove power based on the environmental temperature.
After activating the "Clima Comfort" function from the parameters menu (ask the technical assistance centre - TAC), we can use this function to switch off the stove when it reaches the set temperature. This function is combined with the AUTO-MATIC stove setting. MANUAL mode operation will in any case remain unchanged.
After the Comfort Clima function has been enabled by the TAC, you can activate/deactivate it from the user menu. Press the SET key, look for the "Comfort Clima" menu with the +/- keys, select it with the SET key, set ON/OFF with the +/- buttons, save the desired setting and exit using the 0/1 button.
Operation details Comfort Clima ON
when set on AUTOMATIC, the stove modulates its power by following the temperature set by the user. On reaching environmental temperature, the stove switches off and then switches on again independently when the temperature drops.
Temperature selection
In "Comfort Clima" mode, by pressing the + / - buttons on the synoptic panel or on the remote control, you can set the display to the desired environmental temperature. So we will have the following situations:
-At environmental temperatures below the setting, the stove switches on independently, modulating the power automatically.
-With environmental temperature reached (+2^) the stove switches to stand-by. The environmental temperature is sent from the remote control; the remote control transmitter must be visually aligned with the receiver of the synoptic panel. If the remote control is incorrectly positioned, it cannot send its recorded temperature. The stove therefore independently switches to use of its on-board temperature sensor and continues thus until the connection with the remote is restored
Temperature adjustment with external thermostat
another temperature control system is available as an alternative to the remote control. You can in fact connect the thermostat serial port to your home thermostat or any (clean output contact) easily available one.
The stove will automatically recognise the connection with the serial port of the thermostat under the following conditions:
With environmental temperature lower than the thermostat setting (contact closed), the stove modulates power normally to follow the set temperature
-With environmental temperature reached by the thermostat (contact open), the stove switches to stand-by mode.
| Conf i guration | Temperature provided by the remote control | Temperature provided by external environmental thermostat | No adjustment (factory setting) |
| "Comfort Clima" parameter | ON ON ON | ||
| "SONDA IR" parameter | ON OFF ON | ||
| Connection to serial port | NO no connection | Yes with blue serial cable | NO no connection |
INSTRUCTIONS FOR USE
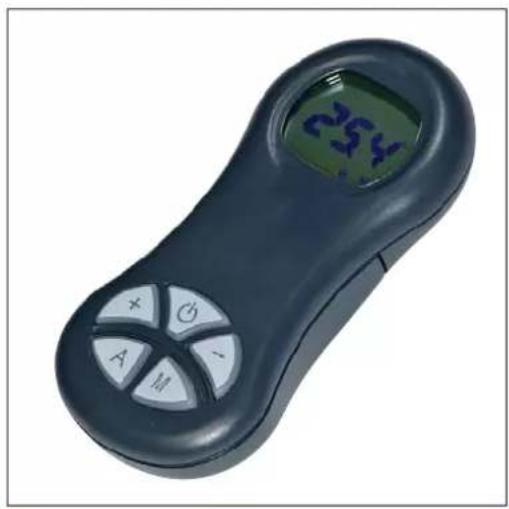
REMOTE CONTROL
Key to buttons and display:

: ignition / shutdown button
- : button to increase the power/operating temperature (when inside a menu, it increases the displayed variable)
- : button to decrease the power/operating temperature (when inside a menu, it decreases the displayed variable)
A : button to switch to the “EASY TIMER ” program
M : button to toggle from automatic to manual mode and vice versa



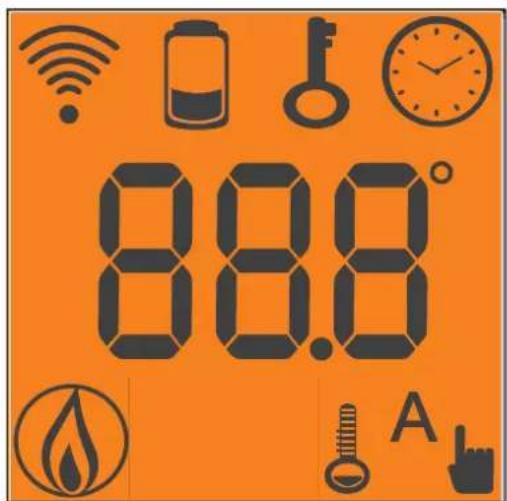



Indicates data transmission between the remote control and the control board.
blocked keypad; avoid turning on the remote control for no reason (press "A" and "M" simultaneously for a few seconds to block/unblock the keypad)
fl at battery (3 mini alkaline batteries type AAA)
Indicates that ignition / shutdown is being via the "EASY TIMER" program
Indicates the room temperature detected by the remote control (it indicates the values of the set parameters during its technical set-up).
Indicates that a setting has been transmitted for the stove to ignite
pellet/air stove remote control setting indicator
automatic function
(the temperature value appears on the display)
manual adjustment function
(the operating power value appears on the display)
TEMPERATURE DETECTED BY THE REMOTE CONTROL
The remote control is equipped with an internal sensor to detect the room temperature and display it in real time. The detected temperature is transmitted periodically to the control board of the insert/stove if the transmission LED of the remote control and the receiving sensor of the synoptic panel of the insert/stove are in each other's field of view. If the temperature of the remote control does not reach the control board of the insert/stove for over 30 minutes, the temperature detected by the sensor connected to the synoptic panel is used.
The following functions can be scrolled through and set by briefly pressing the "M" button:

automatic power adjustment

manual power adjustment
TEMPERATURE DETECTED BY THE REMOTE CONTROL

With the remote control it is possible to use the very quick and intuitive time programming function.
- If the stove is on: a delayed shutdown can be set using the remote control - from one to twelve hours. The remaining time before the scheduled shutdown is shown on the synoptic panel's display.
-
If the stove is off: a delayed ignition can be set using the remote control - from one to twelve hours. The remaining time before the scheduled ignition is shown on the synoptic panel's display.
-
Setting: proceed as follows to set the timer:
a) Press the "A" button and the icon will light up on the display, thereby confirming the "Easy timer" program has been accessed.
b) Set the hours by pressing the + / - buttons, for example:

c) Point the remote control towards the synoptic panel receiver
d) Confirm the setting by pressing the "A" button for a few seconds; the icon will go off and the remaining time before the scheduled intervention will appear on the synoptic panel.
e) Repeat points a), b), c), d) to cancel the setting, and set the hours to "00H"
BLOCKED KEYPAD

The remote control buttons can be blocked so as to prevent it from going on accidentally.
Press the A and M buttons simultaneously and the key symbol will light up confirming that the keys have been blocked. Press the A and M buttons simultaneously once again to unblock the keypad.
LOW BATTERY INDICATOR

When the battery icon lights up it indicates that the batteries inside the remote control are almost flat. Replace them with three new batteries of the same model (size AAA 1.5V).
- Do not use new batteries with used ones.
- Do not mix brands and different types as every type and brand has a different capacity.
- Do not mix traditional batteries with rechargeable ones;
- Do not try recharging alkaline and zinc-carbon batteries as this can cause them to break and/or a liquid leakage.

INFORMATION FOR USERS
In accordance with Art. 13 of the Legislative Decree No. 151, dated 25 July 2005, "Implementation of Directives: 2002/95/EC, 2002/96/EC and 2003/108/EC, pertaining to the reduction of hazardous substances used in electrical and electronic equipment, as well as disposal of waste". The crossed-out wheeled bin symbol shown on the equipment or on the packaging indicates that the product must be disposed of separately at the end of its useful life. Therefore, at the end of the equipment's useful life, the user must hand in the equipment to suitable collection facilities for electrical and electronic waste, or return it to the retailer when a new, equivalent appliance is purchased in a ratio of one to one.
MAINTENANCE
Before performing any maintenance, disconnect the appliance from the mains.
Regular maintenance is required for the stove to function correctly.
FAILURE TO PERFORM REGULAR MAINTENANCE, at least on a SEASONALbasis, could lead to poor functionality.
Any problems resulting from lack of maintenance will immediately void the warranty.
NOTE: After every 800kg , "Mainten." will appear to remind the user to clean the smoke channels, which is the user's responsibility. This message will disappear by pressing the "TURBO" button for 5 seconds. Upon reaching 2000kg of pellets, a "Mainten.-dealer" message will appear which will not disappear because the assistance of a DEALER is required.
This message can be reset from the parameters menu.
N.B.
- Any unauthorised modification is forbidden
- Use spare parts recommended by the manufacturer
- The use of pirate parts results in the guarantee becoming null and void
DAILY MAINTENANCE
Operations must be performed when the stove is off, cold and unplugged from the power supply
- Cleaning must be carried out with a vacuum cleaner. (see optional extras page 47).
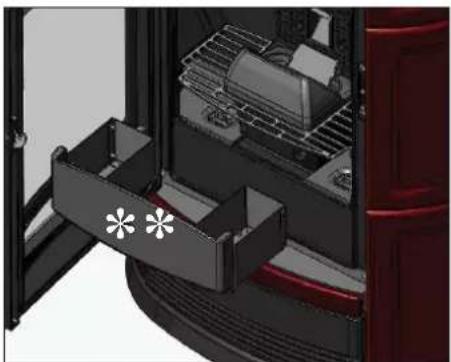
The whole procedure takes up a few minutes every day. - Open the door and remove and empty the ash pan (^** - fi g. B).
DO NOT EMPTY THE RESIDUE OUT INTO THE PELLET HOPPER. - Remove the combustion chamber or use the spatula to scrape it and clean out any blocked holes on all sides.
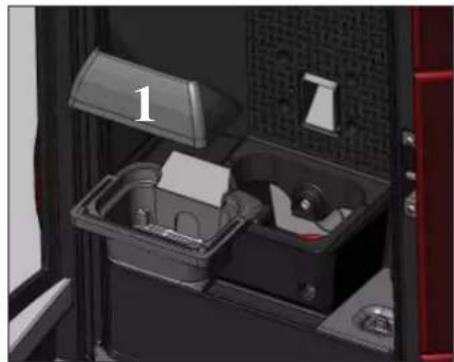
- Remove the combustion chamber (1) (fig. C) and scrape with a spatula. Clean any obstructions in the apertures.
- Suction the combustion chamber holder, clean the contact edges.
- Clean the glass, if necessary (when cold).
Never vacuum hot ash, it can make the vacuum cleaner breakdown and puts the household rooms at risk of fire.
fi g.B fi g.C
WEEKLY MAINTENANCE
- Clean the hearth (with a brush) after having removed the smoke deviators (3 - fig. D/E).
- Use the swabs (* - fi g. E).
- Empty the pellet hopper and clean the base with the vacuum cleaner.
- When cleaning the combustion chamber, lift the smoke caps (2 - fig. F) and suction the four pipes underneath (4 - fig. F).
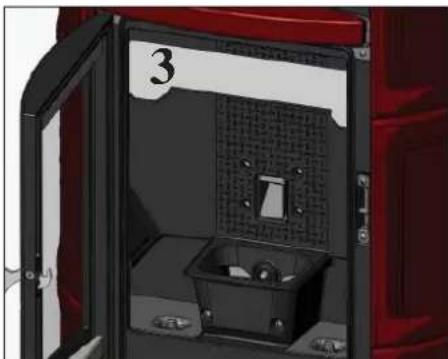
fig. D
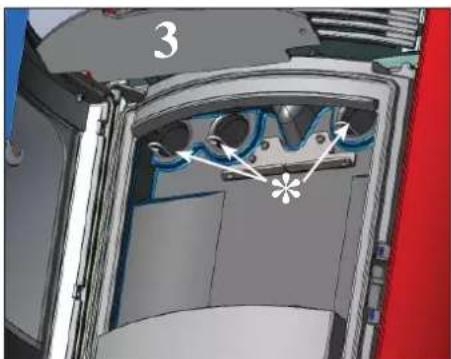
fig. E
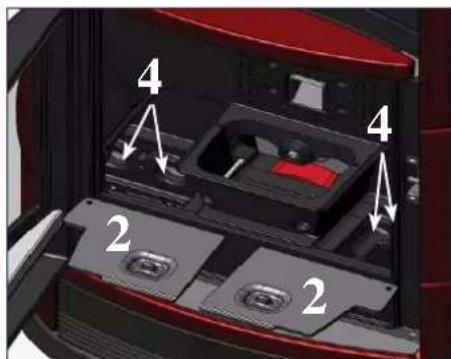
fig.F
MAINTENANCE
SEASONAL MAINTENANCE (implemented by the DEALER)
Consists in:
- Clean the stove internally and externally
- Carefully clean the heat exchange tubes
- Carefully clean and remove dirt from the combustion chamber and the relative compartment
- Clean fans, verify mechanical and clamp loosening
- Clean smoke channel (replace seals on smoke exhaust pipe)
- Clean smoke duct (see weekly cleaning)
- Clean smoke extraction fan compartment.
- Clean smoke flow sensor.
Clean smoke check thermocouple. - Clean, inspect and scrape any residue from the ignition resistance compartment and if necessary, replace it
Clean/check the Synoptic Panel - Visually inspect the electrical wires, connections and power cable
- Clean the pellet hopper and check loosening of the feed screw - gear motor assembly
- Replace the door seal
- Functionality test: load the feed screw, ignite, let it run for 10 minutes and shutdown
If the stove is used very often, it is recommended to clean the smoke channel every 3 months.
ATTENTION !!!
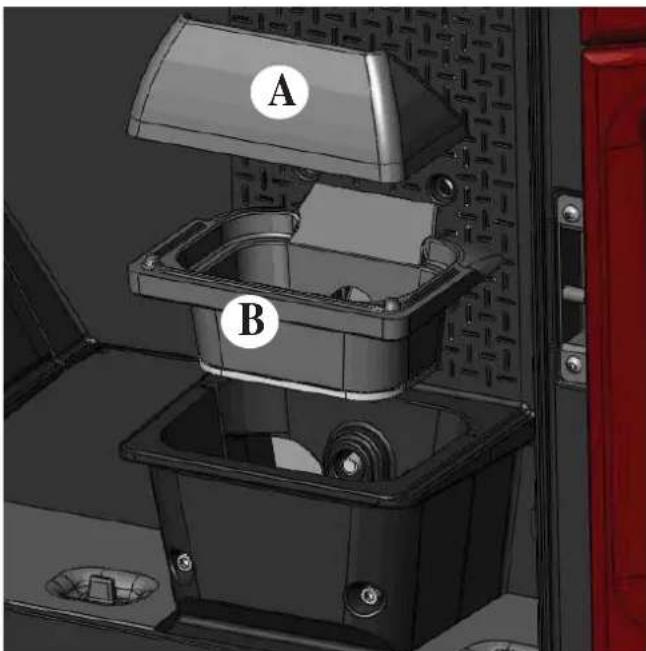
After implementing a normal cleaning procedure, INCORRECT coupling of the upper (A) (figura 1) and lower
(B) (figura 1) combustion chambers can compromise the stove's performance.
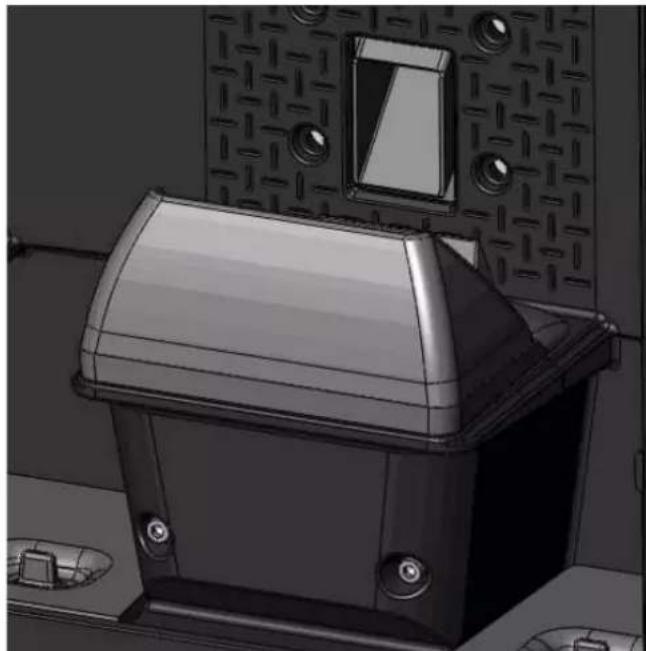
Before igniting the stove, make sure the combustion chambers are correctly paired as indicated in (fig. 2) without ash or unburnt material present on the support perimeter.
We remind you that using the stove without cleaning the melting pot, may cause a sudden ignition gas inside the combustion chamber with the consequent breaking of the glass
fi g. 1
f i g. 2
POSSIBLE TROUBLESHOOTING
In the event of problems the stove stops automatically and runs the shutdown process and the display shows text regarding the motivation of the shutdown (see the various alarms below).
Never pull the plug during shutdown on account of malfunction.
Should it block, to restart the stove you will need to allow the turn-off procedure to take place (600 seconds with audible signal), and then press the button 0/1.
Do not turn the stove on again before checking the cause of the malfunction and CLEANING/ EMPTYING the crucible.
INDICATION OF POSSIBLE CAUSES OF MALFUNCTION AND INDICATIONS AND REMEDIES:
1) Signalling: Verific./air flow: (intervenes if the flow sensor detects insufficient combustion).
Problem: Turns off for lack of depression
Air flow may be insufficient because the door is open, the door does not close properly (e.g. bad seal), there is an air intake or smoke extraction problem, or the combustion chamber is clogged.
Actions: Check:
door closure;
- combustion air intake duct (clean, paying attention to the flow sensor components);
- clean the flow sensor with dry air (like that used for PC keyboards);
- stove location: it must not be installed against a wall;
- combustion chamber position and cleanliness (clean regularly according to the type of pellet);
- smoke duct (clean);
- installation (if it does not comply with regulations or the smoke outlet has more than 2-3 bends);
If you suspect the sensor is malfunctioning, carry out cold tests. If the conditions are changed (for example by opening the door) and the value does not change, there is a sensor problem.
N.B.: The no depression alarm may also occur during ignition, since the flow sensor starts monitoring 90 seconds after the ignition cycle begins.
2) Signalling: Verific./extract.: (this trips if the smoke extraction speed sensor detects a fault)
Problem: Shutdown for smoke extraction speed fault detection
Actions: Check smoke extractor function (devolution sensor connection) and board (DEALER).
-
Check smoke channel for dirt
-
Verify the electrical system and earthing system.
- Check electronic circuit board (DEALER).
3) Signalling: Stop/Flame: (this trips if the thermocouple detects a smoke temperature lower than the value set, which it interprets as the absence of fl ames)
Problem: Turns off due to drop in smoke temperature
Actions: lack of pellets
-
too many pellets have suffocated the flame, check pellet quality (DEALER)
-
the maximum thermostat has intervened (rare, this only intervenes in the event of excessive smoke
temperature) (DEALER)
4) Signalling: Block_FI/NO Start: (intervenes if a flame fails to appear within a maximum of 15 minutes, or if ignition temperature is not reached).
Problem: Turns off due to incorrect smoke temperature during ignition
Distinguish either of the following cases:
Flame does NOT appear
Actions: Check: - combustion chamber position and cleanliness;
- arrival of combustion air in the combustion chamber;
- if the heating element is working (DEALER);
- room temperature (if lower than 3^ use a firelighter) and damp.
Try to light with a firelighter (see page 38).
Flames appear, but AF appears on the display after Ar
Actions: Check: (only by the Dealer)
- if the thermocouple is working (DEALER);
- start-up temperature setting in the parameters (DEALER).
- Repeat start up after having emptying the brazier.
5) Signalling: Black Out: (not a defect of the stove).
Problem: Turns off due to lack of electricity
Actions: Check electricity connection and drops in voltage.
6) Signalling: Fault/RC: (intervenes if the thermo coupling has failed or is disconnected).
Problem: Turns off due to thermo coupling failed or disconnected
Actions: Check connection of thermo coupling to board: check function in cold test (DEALER).
POSSIBLE TROUBLESHOOTING
7) Signalling: smoke ^ C /high.
Problem: turns off due to exceeding maximum smoke temperature.
Actions: Check the pellet type
- Check for anomalies with the smoke extraction motor
- Check to see if there are any obstructions in the smoke channel
- Check correct installation
- Check gear motor "drift"
- Check to make sure there is an air intake in the room
8) Signalling: ALARM - HIGH CURRENT: Activated when anomalous, excessive current absorption is detected on the gear motor..
Actions: Check functioning (CAT): gear motor - Electrical connections and electronic board.
9) Signalling: ALARM - LOW CURRENT: Activated when anomalous, insufficient current absorption is detected on the gear motor.
Actions: Check functioning (CAT): gear motor - pressure switch - tank thermostat - electrical connections and electronic board
10) Signalling: "Battery check"
Problem: The insert does not stop but the error appears on the display.
Actions: The buffer battery of the control board needs changing (DEALER). Remember that this component is subject to regular wear and so it is not covered by the guarantee.
11) Problem: Remote control not working
Actions: closer to the receiver of the insert
- check the battery and if necessary, replace it.
12) Problem: Outlet air not hot
Actions: clean heat exchanger from inside the firebox.
13) Problem: During ignition, the differential switch trips (DEALER):
Actions: check moisture content of ignition resistance
14) Problem: Does not ignite:
Actions: clean combustion chamber.
NOTA
Warnings are shown until you intervene and press the 0/1 key on the control panel.
Do not ignite the stove until the problem has been checked and resolved.
N.B.:
The combustion chambers and smoke ducts connected to the solid fuel appliances must be cleaned once a year (check if your country has specific legislation covering this).
Failure to regularly check and clean increases the likelihood of a fire in the chimney pot.
IMPORTANT!!!
In the case of a fire in the stove, in the flue or in the chimney, proceed as follows:
- Disconnect the power supply
- Use a carbon dioxide (CO^2) extinguisher
- Call the fire brigade
DO NOT ATTEMPT TO PUT THE FIRE OUT WITH WATER!
After the event, have the appliance checked by an authorised Service Centre and have an authorised technician check the flue.
CHECK LIST
To be integrated with a complete reading of the technical specifications
Positioning and installing
- First ignition performed by authorised CAT who released the guarantee certificate
- Room ventilation
- Only the stove outlet passes through the smoke channel/chimney flue
- The smoke channel has: a maximum of 2 curves, a maximum 2 horizontal metres
- Chimney pot that is high enough to avoid downdraft areas
- The discharge pipes are made of a suitable material (stainless steel is recommended)
- When using any flammable materials (e.g. wood), all precautions have been taken to prevent a fire hazard
Use
Good quality, dry pellets are used
- The chimney pot and ash compartment are clean and well positioned
The door is closed properly
- The combustion chamber is inserted properly into the relevant compartment
REMEMBER TO VACUUM THE COMBUSTION CHAMBER BEFORE EACH IGNITION Should ignition fail, DO NOT re-ignite until you have emptied the combustion chamber.
OPTIONAL
TELEPHONE COMBINER FOR REMOTE IGNITION (code 281900)
The stove can be ignited remotely by asking the DEALER to connect the telephone combiner to the serial port behind the stove via the optional cable (code 640560).
KIT 11 for channelling hot air into an adjacent room, with max channelling pipe length 1.5m (code 645700).
KIT 11 BIS for channelling hot air into a non-adjacent room, with max channelling pipe length 5m (code 645710).
CLEANING ACCESSORIES
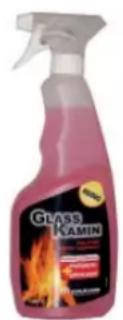
GlassKamin
code 155240)
Used for cleaning the
ceramic glass
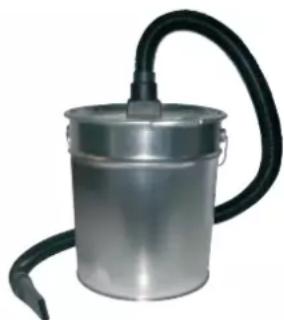
Ash vacuum cleaner
without motor
code 275400)
User for cleaning
the hearth
Madame, Monsieur,
2006/95/CE - Directive Basse Tension
positioned on the smoke extractor, which detects the vacuum value (compared to the installation environment) in the combustion chamber.
- CAPTEUR FLUX D'AIR:
EVACUATION DES FUMEES
Signalisation reserve pellet
INDICATION PILES DECHARGEES

Actions: clean combustion chamber.
REMARQUE
BESCHERMINGSINSTALLATIONS
- THERMOKOPPEL:
Reservesignaling pellets
10) Signaling: "Battery check"
KYKAOΦOPIA ZE2TOY AEPA
H npoxn cetot ou aepa sto xopo ykataostanpoyatoonoiitai ano tvy pia tns npsoyns otnv enavoo
Tua Tny diavoun tou ctoov aepa o evay n doo npapakeiuevovoo xopovc, nooua diaotei doo stouia stny niow naupa (EUK.A) OTA onoia npeneva ouvde0oukataa nnoi oolnvcs.
TnV diovokovon nGdavoung tov cetob aepa diatiovtar to KIT 11 kai KIT 11BIS eipa (bEe e. 149-150-151).
Eiva oynavtko v 0oyn0eite va movosete t c oolnyec nou npva o ceotoc aepac etoi wote va anopuyte anowae. Ipenei va anopoyovta i klaes tov oolnyov.
SHMANTIKH ZHMEIΩS:OI ΣΩAHNEΣ ΣTA ΣTOMIA EEOAOY ZEETOY AEPA IIPEIIEI NA TOIOOOETHOOYN IIPIN THN EIIENAYΣH META ANIO SYNTOMH AIOOSYNAPMOAOTHEH TOY EIANΩ IIAAINOY MANTEMIOY. TO APXIKO TMHMA TOY EYKAMITOTY ATOY IIPENEI NA EINAI “EAIIAMENO”(IIAHPH AIAZAHTAH) IIA NA AIIOΦEYXOOYN TAAAKOMATA, ME TPOIIIO ΩTE H E2OTEPIKH AIAMETPO2 NA METAANΩE1 EAAΦPΩ ΕT2I ΩTE NA AIEYKOAYNEI THN E120AO.
H doxyeovon tov aepa diavoungc pv0uicetai xepokivnta u e touc "L" (EK.D)
Tva kuvnoov 0 npenei nponyobueva va apaipoeote to
Tuaotpaki eanoknC P"TOO EVA OTEpeoEvO E B-C).
Apoov apaipoeetraiaopakia, o eotos aepac npopei va katevthetai n otyn npooyn otyn eaavw vopa E (eic stnv tiow oen- EK.D) n otyn iio w vopa EIK. F (eue c tny mpoostiv thcog -beneik.D) n uoc otny mpoostiv enavw vopa kai uoc stny nioc (eiec stny evoiueon theon - beneE.K.D).
Pntovtacotnyovvexia+npoovvaepaivtoov:
- No Programmi.
-10 Programma giorn. (mu evaon ka mu aeevepytoinon tnv nape), 20 Programma giorn. (kata tov iio tpo), 30 Programma giorn. (kata tov iio tpo).
Xpnouoioote to ktpo MENU'gammavaepavioTei e tyn avtiotpoop npopa.Eav eiaeEto 10 npoypauma eupavicetau n opa tnc evawosn.
Evdaan0aataikov pellet
H oμa dia0etεi λεκtpovikn λeitoupyia avixveo nTns πoσoτηα tc tou pellet. To oσoτma avixveo nC tou pellet, oμεριαμβavetai σην λεκtpovikn πλakéta kαεπιρεπε Σην σóμa va kataγpapεσ Εοιαδηποτε στιγμn TNS λeitoupyia nóσa κιλα απομενουν μexpi va εξαντλθει to pellet tnc φόptωo nC.
Eivai Omaavtiko yia tvn oaln aeitovpyia too ouotmaatoc kata tvn 1n evawon (noo penei va npaymuatoonthetai ano eieidikoevo texvko) va akolovthetai n nokato wadikacia. Ipv xpoanooiano tio oostma avixveosnel pellet ivai avaykaio va optowei eva oaki pellet kai va katavaawthetai, aro yia tvn oaln aeitovpyia too ouotmaatoc opoptoons. Optwote 15 kg pellet.
WYMIARY I TYPY WYKOÑCZENIA
1aSOLUCAO:KIT 11 (cod.645700)-APENAS DIVISAO ADJACENTE
N.B.: OS TUBOS NAS BOCAS DE SAÍDA DO AR QUENTE DEVÉM SER INTRODUZIDOS ANTES DE APLICAR O REVESTIMENTO E APOS DESMONTAR O FLANCO LATERAL SUPERIOR EM FERRO FUNDIDO. A PARTE INICIAL DA MANGUEIRA DEVE SER "ESTICADA" COMPLETAMENTE DE FORMA A ELIMINAR O ENRUGAMENTO; DESTA FORMA, O DIÁMETRO INTERNO IRÁ ALARGAR-SE SENSIVELMENTE FAVORECENDO A INTRODUÇÃO.
Para augmentar as varias regulacoes

- NOTE
- - Commissioning/ testing
- SAFETY INFORMATION
- DIMENSIONS AND FINISHINGS
- CHARACTERISTICS
- ELECTRONIC EQUIPMENT
- ELECTRONIC CIRCUIT BOARD
- SERIAL PORT
- BACKUP BATTERY
- N.B.
- SAFETY DEVICES
- - THERMOCOUPLE:
- VACUUM GAUGE:
- - AIR FLOW SENSOR:
- - SAFETY THERMOSTAT:
- COVERING INSTALLATION FATA/SIRENA
- NOTE:
- COVERING INSTALLATION STORY
- INCLUDED HARDWARE:
- ASSEMBLING THE UPPER FRONT PANEL (fig. 1-2)
- ASSEMBLING THE LOWER FRONT PANEL (fig. 1-3)
- ASSEMBLING THE CERAMIC TOP (fig. 4)
- VERIFY COMPATIBILITY WITH OTHER DEVICES
- VERIFYTHE POWER SUPPLYCONNECTION
- (the plug must be accessible)
- POSITIONING
- FIRE PREVENTION SAFETY DISTANCES
- AIR INTAKE
- MOKE OUTLET
- TYPICAL EXAMPLES
- CHIMNEY POT
- INSTALLATION
- HOT AIR CIRCULATION
- 1st SOLUTION: KIT 11 (code 645700) - ADJACENT ROOM ONLY
- 2nd SOLUTION: KIT 11 BIS (code 645710) - NON-ADJACENT ROOM ONLY
- INSTRUCTIONS FOR USE
- Before igniting.
- FILLING THE PELLET HOPPER
- ATTENTION:
- NOTE regarding the fuel.
- MIMIC PANEL
- Loading the feed screw.
- Automatic ignition
- Manual ignition
- Operating modes
- Manual mode from synoptic panel/remote control
- Automatic mode from synoptic panel/remote control
- Shutdown
- For greater comfort, the stove and the air vents go off at the same power at which it was operating.
- Setting the clock
- Weekly timer
- Note on fl ame variability
- Pellet reserve warning
- Environmental temperature adjustment
- Operation details Comfort Clima ON
- Temperature selection
- Temperature adjustment with external thermostat
- REMOTE CONTROL
- Key to buttons and display:
- TEMPERATURE DETECTED BY THE REMOTE CONTROL
- BLOCKED KEYPAD
- LOW BATTERY INDICATOR
- INFORMATION FOR USERS
- MAINTENANCE
- DAILY MAINTENANCE
- WEEKLY MAINTENANCE
- SEASONAL MAINTENANCE (implemented by the DEALER)
- ATTENTION !!!
- POSSIBLE TROUBLESHOOTING
- INDICATION OF POSSIBLE CAUSES OF MALFUNCTION AND INDICATIONS AND REMEDIES:
- Problem: Shutdown for smoke extraction speed fault detection
- Flame does NOT appear
- Flames appear, but AF appears on the display after Ar
- Problem: Turns off due to lack of electricity
- Problem: Turns off due to thermo coupling failed or disconnected
- IMPORTANT!!!
- DO NOT ATTEMPT TO PUT THE FIRE OUT WITH WATER!
- CHECK LIST
- Positioning and installing
- Use
- OPTIONAL
- TELEPHONE COMBINER FOR REMOTE IGNITION (code 281900)
- CLEANING ACCESSORIES
- - CAPTEUR FLUX D'AIR:
- EVACUATION DES FUMEES
- Signalisation reserve pellet
- INDICATION PILES DECHARGEES
- REMARQUE
- BESCHERMINGSINSTALLATIONS
- - THERMOKOPPEL:
- Reservesignaling pellets
- KYKAOΦOPIA ZE2TOY AEPA
- Evdaan0aataikov pellet
- WYMIARY I TYPY WYKOÑCZENIA
- 1aSOLUCAO:KIT 11 (cod.645700)-APENAS DIVISAO ADJACENTE
Brand : EDILKAMIN
Model : FATA
Category : Oven