
LDM100H - Rangefinder Toolcraft - Free user manual and instructions
Find the device manual for free LDM100H Toolcraft in PDF.
User questions about LDM100H Toolcraft
0 question about this device. Answer the ones you know or ask your own.
Ask a new question about this device
Download the instructions for your Rangefinder in PDF format for free! Find your manual LDM100H - Toolcraft and take your electronic device back in hand. On this page are published all the documents necessary for the use of your device. LDM100H by Toolcraft.
USER MANUAL LDM100H Toolcraft
Item No. 15ag648 - 63
F Mode d'emploi
- Introduction 35
2.Explanation of symbols. 36 - Intended use 37
- Scope of delivery 38
- Safety information 39
a) General 39
b) Laser. 41
c) Batteries/rechargeable batteries. 42
- Features 44
- Installation 45
a) Hand strap. 45
b) Battery change 46
- Operating and display elements 47
a) Operating elements 47
b) Display elements 48
- Commissioning and settings 49
a) Switching the device On and Off 49
b) Triggering a measurement 49
c) Deleting a measured value. 50
d) Selection of the reference edge. 50
e) Measuring modes. 51
f) Measurement unit change. 58
g) Display illumination. 58
Page
- Troubleshooting and corrective measures 59
- Maintenance and care 60
- Disposal 61
a) Product 61
b) Batteries/rechargeable batteries. 61
- Technical data 62
1. Introduction
Dear Customer,
thank you for purchasing this product.
This product complies with the statutory national and European specifications. To maintain this status and to ensure safe operation, you as the user must observe these operating instructions!

These operating instructions are part of this product. They contain important notes on commissioning and handling. Ensure that the operating instructions are enclosed if you pass the product on to any third party. Therefore, keep these operating instructions for future reference!
All company names and product names are trademarks of their respective owners. All rights reserved.
If there are any technical questions, please contact:
International: www.conrad.com/contact
United Kingdom: www.conrad-electronic.co.uk/contact
2. Explanation of symbols

The electrical safety note is used if there is any danger to your health, e.g. from electric shock. The device contains no parts that require servicing by the user. Therefore, never open the device. You may need to change the batteries.

An exclamation mark in a triangle shows important notes in these operating instructions that must be strictly observed. These must be read before commissioning of the device and observed in operation.

The arrow symbol indicates that special advice and notes on operation are provided.
3. Intended use
The laser distance meter (LDM-100H) measures distances easily and intuitively. Areas and volumes can be determined. The height can be determined via integrated calculation. Distances can be added up and subtracted. The units metre, inch and foot can be output. Several measured values can be used to determine the minimum and the maximum. Up to 20 measured values can be saved.
The product is only suitable for use in dry environments. Contact with moisture, e.g. in bathrooms, must be avoided under all circumstances.
For reasons of safety and approval, the product must not be converted and/or changed by you. Using the product for any other purposes than those described in these operating instructions may damage the product. Improper use also may cause dangers such as short circuit, fire, electric shock, etc.
4. Scope of delivery
- Laser distance meter
Case - Hand strap
- 2x batteries (type AAA)
- 5x warning sticker
- Operating instructions

Up-to-date operating instructions
Download the latest operating instructions via the link www.conrad.com/downloads or scan the QR code. Follow the instructions on the website.
5. Safety information
We assume no liability for property damage and injury caused by non-observation of the operating instructions and the safety notes or from improper handling! In such cases the warranty / guarantee is voided!
Read the operating instructions attentively and particularly observe the safety notes.
Dear Customer:
The following safety information is intended not only for the protection of the device but also for the protection of your health. Therefore, read this chapter carefully before taking the product into operation!
a) General
- The unauthorized conversion and/or modification of the product is inadmissible because of safety and approval reasons.
- The product is maintenance-free for you. Servicing or repair must only be carried out by a specialist or specialist workshop. The product contains no parts that require servicing by you. Therefore, do not open it.
- The product is not a toy. Keep it away from children and pets.
- Do not leave packaging material lying around carelessly. It may become a dangerous toy for children.

- Protect the product from extreme temperatures direct sunlight, high humidity, moisture, flammable gases, vapours and solvents.
- Do not subject the product to mechanical stress.
- If secure operation is not possible, shut off the product and protect it from inadvertent use.
-
Secure operation is no longer warranted if the product:
-
has visible damage,
- no longer works properly,
- was stored under detrimental ambience conditions for an extended period or
-
was subjected to considerable transport strain.
-
Never bypass the safety device. Never remove the safety notes and labels on the unit.
- In commercial institutions, the accident prevention regulations of the Employer's Liability Insurance Association for Electrical Systems and Operating Materials are to be observed.
- If there are any questions that are not answered in these operating instructions, contact our technical support or another expert.
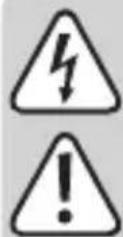
b) Laser
- Laser radiation may be dangerous if the laser beam or a reflection enters the unprotected eye. Therefore, familiarise yourself with the statutory regulations and measures of precaution for the operation of this kind of laser device before using the laser facility.
- Never look into the laser beam and never point it at people or animals. Laser irradiation may cause eye or skin damage.
- Never point the laser beam at any mirrors or other reflecting surfaces. The uncontrolledly reflected beam may hit persons or animals. Only operate the laser in monitored areas.
- Caution! Caution - if proceeding in a different way or using any other controls than those specified in this manual, you may expose yourself to hazardous radiation.
- This product is equipped with a class 2 laser. The scope of delivery includes laser warning signs in different languages. If the notice sign on the laser is not in your local language, attach the corresponding sign to your laser.
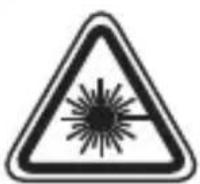

- Never look straight into the laser light source during operation. The bright light flashes temporarily impair your eyesight. Apart from this, epileptic fits may be triggered under certain circumstances in persons sensitive to such lights. This particularly applies to epileptics.
c) Batteries/rechargeable batteries
- Do not leave any batteries/rechargeable batteries lying around openly. There is a risk of batteries being swallowed by children or pets. If swallowed, consult a doctor immediately. Danger to life!
- Leaking or damaged batteries/rechargeable batteries can cause chemical burns to skin at contact; therefore, use suitable protective gloves.
- Observe correct polarity when inserting the batteries.
- Batteries/rechargeable batteries must not be short-circuited, disassembled or thrown into fire. There is a danger of explosion!
- Never recharge normal (non-rechargeable) batteries. There is a danger of explosion!
- If not used for a longer period, remove the inserted batteries/rechargeable batteries. Overaging otherwise poses the danger of the batteries/rechargeable batteries leaking. This may cause damage to the product. Loss of guarantee/warranty!

- Never mix batteries and rechargeable batteries. Use either batteries or rechargeable batteries.
- For proper disposal of batteries/rechargeable batteries, please read the chapter "Disposal".
- Ensure that you have chosen the right reference edge of the device before measuring. For measurements from the laser exit edge or from the hand strap, choose the correct reference via button 8 and check your settings in the display at the upper left.
- Inform all persons who may work in the measurement range during the measurement of your planned measurement and be attentive. If there are any persons, animals or sensitive objects (e.g. optical electronics) in the measurement range, discontinue your measurement and switch off the device. The high-energy light of the laser may cause severe damage and injury.
- Keep the device in the enclosed bag when it is not in use. To minimise the consequences of accidental activation, insert the laser meter into the protective sleeve with its laser exit opening first.
- Removing the batteries while the device is switched on may cause measured values to be lost and not be saved permanently in the log. Switch the device off to replace the batteries. The log is then preserved even if you (briefly) remove the batteries.
- Measure only in areas that you can view completely and where you do not endanger or distract anyone.
6. Features
Area/volume calculation
- Indirect measurement (Pythagoras)
- Addition/subtraction
- Continuous measurement
- Minimum/maximum distance tracking
- Display lighting and multi-line display
- Signal sound
7. Installation
Remove all films from the device. Most of all, ensure that the lenses in front of the laser and sensor are free.
Do not remove the safety notes or the serial number.
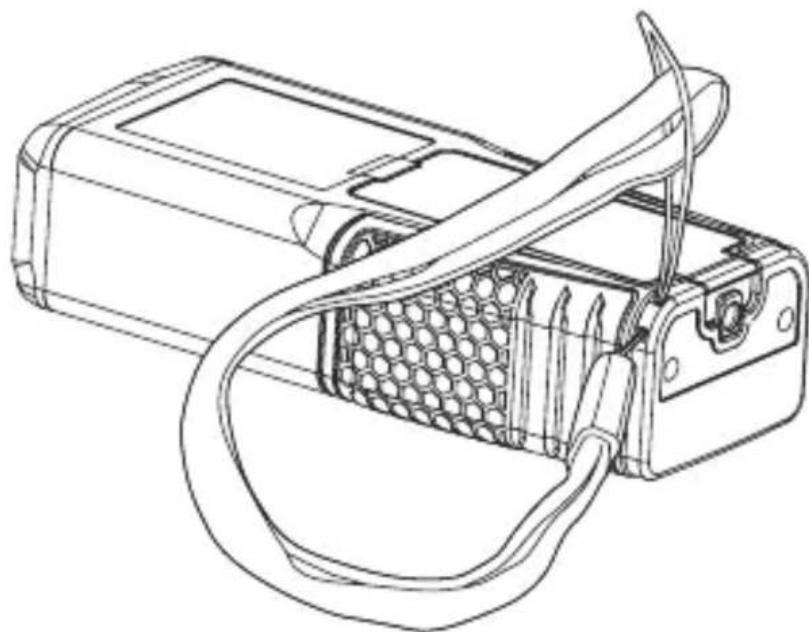
a) Hand strap
Figure 1
Insert the (thinner) attachment strap of the hand strap through the eyelet at the lower left edge of the device (when looking at the battery compartment) as shown in figure 1.
b) Battery change
Change the batteries if the symbol "Ties permanently. At the latest when the device cannot be switched on anymore.
- In order to change the batteries, remove the screw at the battery flap with a cross-head screwdriver.
- Pull the edge of the battery flap with slight pressure until
it comes loose. - Remove the old batteries and dispose of them profes
sionally.
Always exchange both batteries and replace them by two new batteries of the same size (2x 1.5 V, type AAA), brand, type and age. Observe the proper polarity of the batteries at insertion.
- Attach the cover again.

If you do not use the laser distance meter for a longer period, remove the batteries to protect the device from leaking batteries.
8. Operating and display elements
a) Operating elements

1 Trigger activation and distance measurement
2 Mode: Areas or volume calculation
3 Mode: Indirect measurement (Pythagoras)
4 Switching: Single measurement/continuous measurement with output of minimal and maximal and actual distance
5 () Mode: Addition of all of the following measured values
6 Mode: Subtraction of all of the following measured values from the first measured value
7 Measured value storage
8 Selection of the reference edge
9 Screen brightness/measured value unit
10 Delete + switch off the measuring system/switchoff the unit
b) Display elements

1 Laser activated
2 Reference edge: Laser exit (red upper edge)
3 Reference edge: Lower device edge (red)
4 Switching measuring methods
Square area calculation
Cubic volume calculation
Indirect length measurement (trigonometry)
Indirect (second) length measurement (trigonometry)
5 Mode: Single measurement
6 Mode: Single measurement
7 Measured value storage
8 Min-/maximum values for continuous measurement
9 Device error
10 First measured value display
11 Second measured value display
12 Display for the last measurement or calculation result (depending on measuring method)
9. Commissioning and settings
a) Switching the device On and Off
- In order to switch the laser measuring device on, push the red button (1) labelled "MEAS" and the laser warning symbol. Ensure that the laser is switched on at once and that a measurement is performed directly when you keep this button pushed.
- To switch the device off, push and hold the CLR - (10) button until the display light goes out. Switching off is acoustically confirmed. Pushing this button briefly will only switch the laser off and delete the last measured value. The device will also switch off on its own if you do not use it for 3 minutes.
b) Triggering a measurement
- To measure a distance (individual measurement), point the laser point at the desired position. The direct or smallest distance is measured between this position and the device.
- Hold the device steady and push the MEAS - (1) button.
- Measurement starts with a beep. Another beep follows upon a mechanical click. The measurement is now complete.
-
The current measured value is always displayed in the bottom-most line (display area 12).
-
After a new measurement, the last two measured values are displayed in the lines above. Further values are filed in the measured value storage.
c) Deleting a measured value
To repeat the least measurement, briefly push the CLR - (10) button.
The value is reset.

Individual memory items cannot be deleted.
- Concurrent pushing of the measured value memory (7) button and the CLR (10) button will delete all saved measured values.
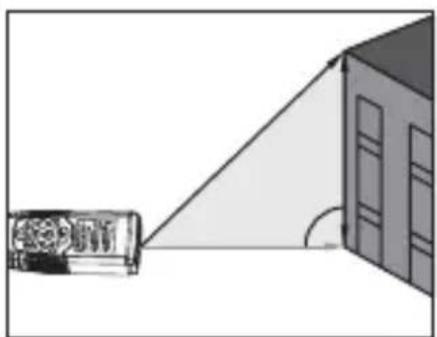
d) Selection of the reference edge
After switching on, the default measurement starts at the bottom edge of the device.
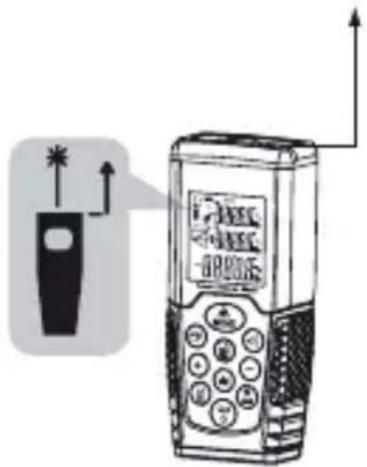

Figure 4
To switch between the reference edges, push the button (4).
- The display shows the current reference edge at the upper left with display elements 2 / 3 .
- The measurement from the laser exit edge is signalled as measurement from the lower edge of the device by a lower beep. The respective tone also confirms switching between the edges.

The device length is considered in the displayed measured result. When measuring from the lower edge, the device length is added up automatically. Changes to the device length falsify the measuring result.
e) Measuring modes
Single measurement
See chapter 8 b.) Triggering a Measurement
Continuous single measurement
- Push and hold the (1) - MEAS button, until the first sound signal is given.
- The distance between the device and the projected laser point is measured continually. The current distance is displayed in the bottom-most line.
- To transfer it into the measured value storage, push and hold the (1)-MEAS button.
- Continuous measurement is continued and can be left with the (10) - CLR button.
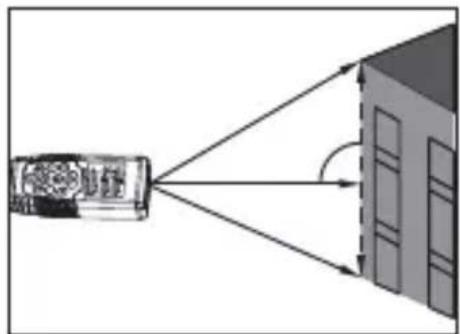
Maximum and minimum distance measurement
- In this mode, measurements are performed continually with every beep.
- When a new maximum or minimum value is found, a precise measurement is performed.

New extreme values in the set of all measurements replace the old maximum and minimum values.
- The current measured value is always displayed in the bottom-most line.
Measured values are renewed at intervals of approx. 0.5 s. - Holding the (1)- MEAS button terminates the measurement. After 500 measurements, this measuring mode will be left automatically.


Figure 5
Example
The distance from a narrow object such as a column should be measured from a (larger) distance.
-
Switch the device on via the (1)- MEAS button and target the object to be measured.
-
Switch the device to "Continuous measurement" with the (4) button. A first measured value is recorded and displayed as actual value (in the display area 12).
- Move the laser measuring point over the entire object.

The measurement does not need to be triggered via the (1) - MEAS button.
When the device recognises a lower minimum or a larger maximum value, a precise measurement is triggered. The lowest value from the current measurements is displayed under MIN (in the display area 10), the highest one under MAX (in the display area 11).
The device may trigger additional measurements.
These are displayed as actual values, but do not change the minimum and maximum values when they are in the interval between these.

For a very precise measurement, limit the degrees of freedom of movement of the device during measurement. To only turn the device around one axis, you can, e.g., support it on a level surface. The distance from the column to be measured is the minimum value.
Example
A tube depth can be measured the same way as described above.
- Move from one inner tube wall to the opposite inner tube wall in the middle. The total depth is displayed as the maximum value.
Addition and subtraction measurement
- Push and hold the (5) button for adding up all subsequent measured values to the current value or the (6) button to subtract the following measurements from the current value.
- Conduct the measurements (as described in b.)), but push the (1)- MEAS button twice.

Combination of the modes is possible. For example, you can subtract the distances measured subsequently from the added values.
- For this, hold the (6) button to switch the mode.

You can also switch from subtraction mode to addition mode. After a measurement, the old total is displayed in the top-most line, the measured value of the recorded distance in the middle and the new total value at the bottom. The last measurement can be deleted and repeated via the (10) - CLR button.
Example addition
The total of all package dimensions must not exceed a certain limit for shipping. Choose the addition function and measure the individual edges.
Example subtraction
You want to measure the distance of an edge to a protrusion. However, the protrusion cannot be clearly recorded from the edge. The entire wall length is measured and the measurement of the protrusion is deduced with the subtraction mode.
Area and volume measurement
The area of rectangular rooms can be calculated automatically by measuring two edges.
- Switch to area calculation mode by pushing button 2.
- Conduct two individual measurements (as described in b.)) for the room's edges in sequence.
Ensure that you measure two adjacent orthogonal (perpendicular) edges.
- The display (flashing on the left) will display a for the edge to be measured. The first measurement is displayed in the top-most display line, the second one in the middle.
Measurements can be rejected with the (10) - CLR button and repeated.
- The area calculation is displayed in the bottom-most line and filed in the measured value memory. It is evident as area/volume via the measured unit and the corresponding symbol (display element 4).
The volume calculation of a cubic room is conducted accordingly.
- Switch to volume calculation mode by pushing button (2).
- In addition to the two first measured values for the area measurement, you also must conduct another individual measurement (as described in b.)) for the height. The distance to be measured must be orthogonal on the distances measured previously.
- The new measured value is displayed in the middle line of the display. The previous one in the top-most line and the volume in the bottom line.
Indirect measurement (with 2 measuring points)
Partial measurements between two points on an area cannot be determined by an individual measurement.
- Push the (3) button once to switch to indirect measurement mode
- Target the two points between which you want to calculate the distance and conduct two individual measurements (as described in b.)). Internally, the distance between the two points will be calculated by trigonometry (Pythagoras: a^2 + b^2 = c^2 ).

Make sure to measure the point that is farther away first. If you measure the shorter distance first, an error message (Err) will appear display.

For correct calculation, the second distance must be orthogonal on the edge to be calculated.
For a precise measurement, rotate the laser meter at the current point after the first measurement and do not move it.
Indirect measurement (with 3 measuring points)
If you cannot measure from the position at which one edge is orthogonal on the edge to be calculated, three distances must be measured.
- Position yourself within the projected measuring section for the measurement.
- Push the button (3) twice until the icon flashes. Start the measurement at one end point of the section to be measured.
Measure the distance from a point on the section to be calculated.

The second distance measurement should be orthogonal again.
Measure the end point of the section.
f) Measurement unit change
The laser measuring device LDM-100H can measure and save measured values in different units. To change the unit, push and hold the UNIT(9) button. Push and hold it again until the desired unit is shown. You can switch between the units metre (m), inch (in) and feet (ft) - in this order. New measured values are measured and displayed in the unit that has been set before. While measured values are displayed in the measuring mode, you can switch between the units for all displayed values.
| Distance Area Volume | |||
| 10.000 m 0.000 m2 | 0.000 m3 | ||
| 20.0 in 0.000 ft2 0.000 ft3 | |||
| 30.1/16 in 0.000 ft2 0.000 ft3 | |||
| 40.000 ft 0.000 ft2 0.000 ft3 | |||
| 50.000” 1/16 0.000 ft2 0.000 ft3 | |||
The values are saved in the memory with the unit chosen at the time of the measurement.
g) Display illumination
The () (9) - screen brightness button switches the display backlighting on and off. The display brightness is reduced automatically at extended inactivity. Pushing a button (other than the brightness button) switches on the display backlighting again.
10. Troubleshooting and corrective measures
| Code Reason Corrective measure | ||
| 204 Calculation error Repeat measurement. | ||
| 208 Reception signal too weak, Measuring time too long, Distance > 50 m | Use a suitable target surface. | |
| 209 Reception signal too strong | Surface reflects too much. Use suitable target surface. | |
| 252 Temperature too high | Let the device cool off. | |
| 253 Temperature too low | Heat up the device. | |
| 255 Hardware error If necessary, switch the device on and off several times. If the symbol appears again, contact your dealer. | ||
11. Maintenance and care
The product does not require any maintenance, never take it apart or open it. Repair or maintenance work must be carried out by a specialist.
A dry, soft and clean cloth is sufficient for cleaning the outside. Never submerge the device in water.

Never use any aggressive cleaning agents or chemical solutions that may damage the surface of the casing.
12. Disposal
a) Product

Electronic devices are recyclable and should not be disposed of in household waste. Dispose of the product according to the applicable statutory provisions at the end of its service life.
Remove any inserted batteries/rechargeable batteries and dispose of them separately from the product.
b) Batteries/rechargeable batteries
You as the end user are required by law (Battery Ordinance) to return all used batteries/rechargeable batteries. Disposing of them in the household waste is prohibited.
Batteries/rechargeable batteries that contain any hazardous substances are labelled with the adjacent icon to indicate that disposal in domestic waste is forbidden. The symbols for the respective heavy metal are: Cd=cadmium, Hg=mercury, Pb=lead (the names are indicated on the battery/ rechargeable battery e.g. below the rubbish bin symbol shown on the left).
You may return used batteries/rechargeable batteries free of charge at the official collection points of your community, in our stores, or wherever batteries/rechargeable batteries are sold.
You thus fulfil your statutory obligations and contribute to the protection of the environment.
13. Technical data
Measurement range 0.05 - 100 m*
(0.16 ft - 328 ft*)
Measuring accuracy up to 10m
(2, standard deviation) ± 1.5 mm^ ( ± 0.06 in^ )
Measuring units .m, in, ft
Laser class 2
Laser type. 635 nm, < 1 mW
IP protection class.. IP54
Measured value storage.....20 values
Operating conditions.Temperature: -10 °C to +50 °C (14 °F to 122 °F)
Humidity: < 95% relative (non-condensing)
Storage conditions.Temperature: -20^ to +60^ (-4°F to 140°F)
Humidity: 30% 50% relative (for long storage times (exceeding 1 month))
Battery runtime up to 4000 measurements
Batteries .2x 1.5 V, type AAA
Automatic laser deactivation..after 0.5 min
Automatic device deactivation..after 3 min
Dimensions. 110 x 46 x 28 mm
Weight 100g
- Use a suitable target surface to increase the measurement range in daylight or if the measured object has bad reflection properties.
** At beneficial conditions (good target surface, room temperature) up to 10 m (33 ft). At unsuitable conditions, such as strong sunlight, badly reflecting target surface or high temperature differences, the deviation may increase at a distance of more than 10 m.
Sommaire
Page
Chere cliente, cher client,
France (email): technique@conrad-france.fr
Suisse:
www.conrad.ch
www.biz-conrad.ch
2. Explication des symboles
Chere cliente, cher client,
Copyright 2017 by Conrad Electronic SE.
This is a publication by Conrad Electronic SE, Klaus-Conrad-Str. 1, D-92240 Hirschau (www.conrad.com).
All rights including translation reserved. Reproduction by any method, e.g. photocopy, microfilming, or the capture in electronic data processing systems require the prior written approval by the editor. Reprinting, also in part, is prohibited. This publication represent the technical status at the time of printing.
Copyright 2017 by Conrad Electronic SE.
Copyright 2017 by Conrad Electronic SE.
Copyright 2017 by Conrad Electronic SE.
schriftelijke