
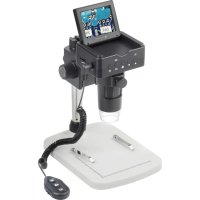
LAB 5.0 - Microscope Toolcraft - Free user manual and instructions
Find the device manual for free LAB 5.0 Toolcraft in PDF.


| Product Type | Digital Microscope |
| Model | LAB 5.0 |
| Brand | Toolcraft |
| Magnification | 20x to 500x (optical) + 4x digital zoom |
| Display | 3.5" TFT LCD (7.6 cm, 4:3 ratio) |
| Image Sensor | 5 MP (interpolated to 12 MP) |
| Photo Resolution | Up to 12M (4032 x 3024 pixels) |
| Video Resolution | VGA (max 30 fps) |
| Image Format | JPEG |
| Video Format | AVI |
| Storage | microSD card (max 32 GB, not included) |
| Battery | Rechargeable Li-Ion 3.7 V / 1050 mAh |
| Battery Life | Approx. 2 hours |
| Charging Time | Approx. 2 hours (via power adapter) |
| Power Supply | 5 V/DC via USB 2.0 or included power adapter (100-240 VAC) |
| Connectivity | USB 2.0 Mini-B, AV-out (composite) |
| Light Source | 8 white LEDs (dimmable) |
| Focus | Manual (fine and coarse), 10 mm range |
| Color Modes | Color, Positive, Negative |
| Software | PortableCapture Plus (Windows Vista/7/8/10, Mac OS 10.9-10.13) |
| Dimensions (L x W x H) | 147 x 104 x 227 mm |
| Weight | 760 g (with battery) |
| Operating Conditions | 0 to +70 °C, 25-50% RH (non-condensing) |
| Included Accessories | Power adaptor, calibration ruler, USB cable, AV cable, Li-ion battery, operating instructions |
Frequently Asked Questions - LAB 5.0 Toolcraft
User questions about LAB 5.0 Toolcraft
0 question about this device. Answer the ones you know or ask your own.
Ask a new question about this device
Download the instructions for your Microscope in PDF format for free! Find your manual LAB 5.0 - Toolcraft and take your electronic device back in hand. On this page are published all the documents necessary for the use of your device. LAB 5.0 by Toolcraft.
USER MANUAL LAB 5.0 Toolcraft
GB Operating Instructions
Digital Microscope Camera LAB 5.0
Item No. 1713199 Page 25 - 45
Seite
natural_image
Technical line drawing of a mechanical device with an inset close-up showing a detail (no text or symbols)b) Laden des Akkus

natural_image
Technical line drawing of a device with a cable, showing connections to an electrical outlet (no text or symbols present)natural_image
Line drawing of a computer monitor with a card slot attached, showing no text or symbols on the device itself.natural_image
Line drawing of a microscope and computer monitor with cable, no text or symbols presentPortable Stand Alone LCD Digital Microscope
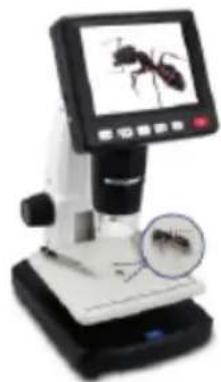
natural_image
Microscopic view of an insect microscope with a magnified inset showing the ant (no text or symbols visible)Install PortableCapture
User's manual
Browse the CD
Exit

chemical
Molecular structure diagram showing blue, orange, and gray atoms in a chain arrangement- Introduction......26
- Explanation of Symbols 26
- Intended Use ......26
- Delivery Content 27
- Features and Functions....27
- System Requirements 27
- Safety Instructions....28
a) General....28
b) Rechargeable Battery 28
c) Adaptor....29
d) Microscope 29
e) Protection Against Dust 29
- Operating Elements 30
a) Control Panel....30
b) LCD Display Icons....30
c) Microscope 31
- Setting Up the Microscope....32
a) Insert Battery 32
b) Charge Battery 32
c) Insert MicroSD Card....33
- Operation....33
a) Power ON / OFF 33
b) Focus the Microscope 33
c) High and Low Magnification 33
d) Digital Zoom 34
e) Photo / Video Capture 34
f) Photo / Video Preview 34
g) Playback Options....34
h) Color Modes 34
- Microscope Menu Options....35
a) Camera 35
b) Video 35
c) General 35
- Connect to Computer....36
- Download and install software 37
a) Windows® Installation 37
b) Mac OS Installation 37
c) Overview....38
d) Take Photo 39
e) Record Videos....39
f) Photo and Video Timer 39
g) Image Measuring Tools 40
h) Draw and Text....40
- Calibrating the Microscope .... 41
- Connect to Television....42
- Image Backup (USB Mode) 42
- Care and Cleaning....43
- Disposal 43
a) Product 43
b) Rechargeable Batteries 43
- Technical Data 44
1. Introduction
Dear customer,
Thank you for purchasing this product.
This product complies with the statutory national and European requirements.
To maintain this status and to ensure safe operation, you as the user must observe these operating instructions!

These operating instructions are part of this product. They contain important notes on commissioning and handling. Also consider this if you pass on the product to any third party. Therefore, retain these operating instructions for reference!
If there are any technical questions, please contact:
www.conrad.com/contact
2. Explanation of Symbols

The symbol with the lightning in the triangle is used if there is a risk to your health, e.g. due to an electric shock.

The symbol with the exclamation mark in the triangle is used to indicate important information in these operating instructions. Always read this information carefully.

The arrow symbol indicates special information and advice on operation.
3. Intended Use
This product is a standalone device powered by rechargeable battery. It can output a magnified image through the built in LCD display, television or a computer monitor. It is suitable for examining solid objects such as coins, stamps, rocks, insects, plants, textiles, circuit boards, etc. Dimmable LED lights provide brightness, and the bundled software allow the user to calibrate the microscope, and measure captured images.
It is intended for indoor use only. Do not use it outdoors. Contact with moisture, e.g. in bathrooms, must be avoided under all circumstances.
For safety and approval purposes, you must not rebuild and/or modify this product. If you use the product for purposes other than those described above, the product may be damaged. In addition, improper use can result in short circuits, fires, electric shocks or other hazards. Read the instructions carefully and store them in a safe place. Make this product available to third parties only together with its operating instructions.
All company names and product names are trademarks of their respective owners. All rights reserved.
4. Delivery Content
- Main unit
- Power adaptor
-
Calibration ruler
-
USB cable
- AV cable
- Li-ion battery
- Operating instructions
→ MicroSD card not included.
Up-to-Date Operating Instructions
Download the latest operating instructions at www.conrad.com/downloads or scan the QR code shown. Follow the instructions on the website.
5. Features and Functions
• 3.5 inches TFT panel
- 20x - 500x magnification
- 5 megapixel image sensor (12 M interpolated)
- Photo and video
- MicroSD card support (max. 32GB)
• Rechargeable Lithium-ion Battery
- Support for plug and play.
- PortableCapture Plus software
6. System Requirements
- OS: Windows® Vista/7/8/10; Mac OS 10.9\~10.13
• CPU: Pentium 300 or compatible AMD Processor
• 100 MB free hard disc space - 512 MB RAM
- 24-bit video card
• Available USB 2.0 port
7. Safety Instructions

Read the important information and operating instructions carefully and especially observe the safety information. If you do not follow the safety instructions and information on proper handling, we assume no liability for any resulting personal injury or damage to property. Such cases will invalidate the warranty/guarantee.
a) General
- The device is not a toy. Keep it out of the reach of children and pets.
- Do not leave packaging material lying around carelessly. This may become dangerous playing material for children.
- Protect the device from extreme temperatures, direct sunlight, strong jolts, high humidity, moisture, flammable gases, steam and solvents.
- Do not place the product under any mechanical stress.
-
If it is no longer possible to operate the product safely, take it out of operation and protect it from any accidental use. Safe operation can no longer be guaranteed if the product:
-
is visibly damaged,
- is no longer working properly,
- has been stored for extended periods in poor ambient conditions or
- has been subjected to any serious transport-related stresses.
- Please handle the product carefully. Jolts, impacts or a fall even from a low height can damage the product.
- Also observe the safety and operating instructions of any other devices which are connected to the product.
- Consult an expert when in doubt about the operation, safety or connection of the device.
- Maintenance, modifications and repairs must only be completed by a technician or an authorised repair centre.
- If you have questions which remain unanswered by the operating instructions, contact our technical support service or other technical personnel.
- Attention, LED light:
- Do not look directly into the LED light!
- Do not look into the beam directly or with optical instruments!
- In schools, training facilities, hobby or self-service workshops, handling of electrical devices must be monitored by trained personnel.
- When operating on commercial premises, the relevant accident prevention regulations of workers' compensation boards for electrical equipment must be observed.
b) Rechargeable Battery
- Correct polarity must be observed while inserting the rechargeable battery.
- The rechargeable battery should be removed from the device if it is not used for a long period of time to avoid damage through leaking. Leaking or damaged rechargeable battery might cause acid burns when

in contact with skin, therefore use suitable protective gloves to handle corrupted rechargeable battery.
- Rechargeable battery must be kept out of reach of children. Do not leave rechargeable battery lying around, as there is risk, that children or pets swallow them.
- Rechargeable battery must not be dismantled, short-circuited or thrown into fire. Never recharge non-rechargeable battery. There is a risk of explosion!
- Do not charge the rechargeable battery via mains power supply while the microscope is connected to a powered USB 2.0 port. This may cause the battery to overheat.
c) Adaptor
- The mains outlet must be located near to the device and be easily accessible.
- As power supply, only use the supplied mains adaptor.
- Never connect or disconnect power adaptors if your hands are wet.
- For safety reasons, disconnect the power adaptor from the mains socket during storms.
- Only connect the power adaptor to a normal mains socket connected to the public supply. Before plugging in the power adaptor, check whether the voltage stated on the power adaptor complies with the voltage of your electricity supplier.
- Never unplug the power adaptor from the mains socket by pulling on the cable; always use the grips on the plug.
- When setting up the product, make sure that the cable is not pinched, kinked or damaged by sharp edges.
• Always lay the cables so that nobody can trip over or become entangled in them. This poses a risk of injury.
d) Microscope
- Do not examine objects with temperatures outside the given operating temperature range of the product.
- Sudden temperature change may form dew inside the Microscope like entering a warm room in cold winter. Put it inside a handbag or plastic bag to slow down temperature changes.
- Do not point Microscope lens to the sun or strong light for a long time. Powerful light may damage the light-sensitive electronics.
- Do not force the card into the slot as this may damage the microscope and the MicroSD memory card.
- The base of the microscope may leave marks on sensitive surfaces.
e) Protection Against Dust
- Dust and debris from the air can lead to deterioration of image quality. Keep the Microscope away from dusty environments.
- The opening of the camera lens should always be protected either with dust covers such. Suitable options include aluminium foil or plastic bags.
- If dark specks or similar in-focus artifacts are observed in digital images, and they are not in the specimen plane, their most likely cause is particulate contamination on the image sensor or an associated filter surface. The cameras always need to be handled with the utmost care and protected from dirt according to the manufacturer's recommendations.
- Before every critical use, check the front lens of the objective for dirt.
8. Operating Elements
a) Control Panel
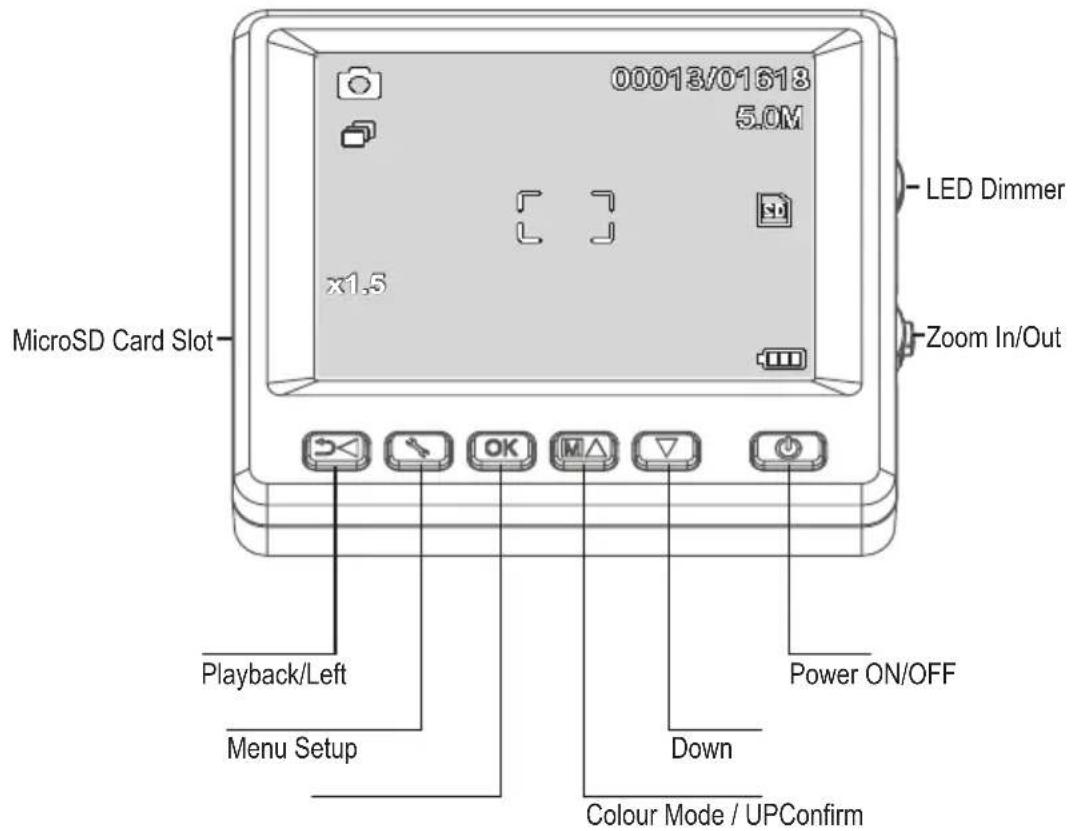
b) LCD Display Icons
| ICON DESCRIPTION | |
 | Still image / video mode |
 | Timer mode |
 | Images taken / remaining (based on current image resolution and MicroSD card size). |
 | MicroSD inserted |
 | Current image resolution |
 | Battery level |
 | Digital zoom level |
c) Microscope
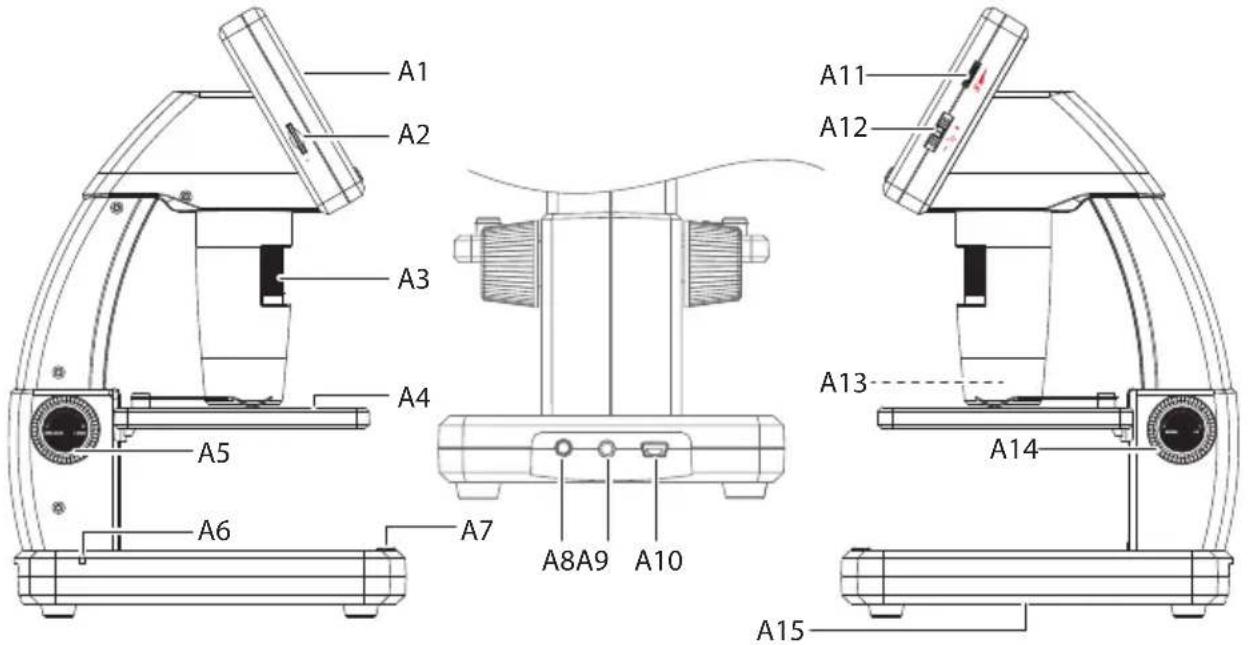
A1 3.5" display
A2 MicroSD card slot
A3 Fine focus dial
A4 Object stage
A5 Coarse focus (unlock / lock)
A6 Battery indicator LED
A7 Image capture button
A8 5V/DC charging port
A9 AV-out television cable port
A10 USB 2.0 Mini-B
A11 LED brightness adjust
A12 Digital zoom +/-
A13 Camera lens / LED light source
A14 Coarse focus (up / down)
A15 Battery compartment

The rubber feet on the base of the microscope may leave marks on sensitive surfaces.
9. Setting Up the Microscope
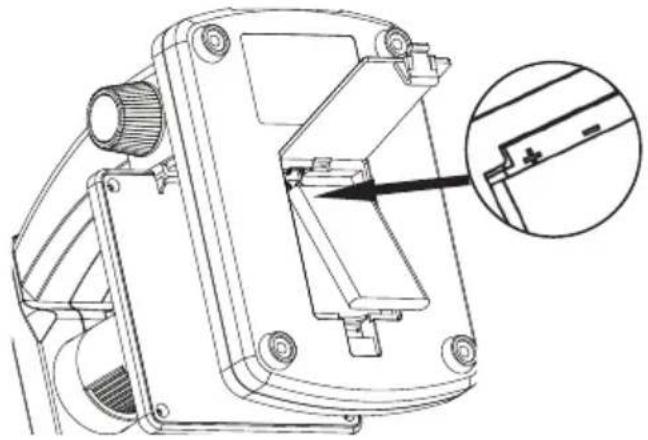
a) Insert Battery
- Match polarity as shown in the battery compartment (A15).
natural_image
Technical line drawing of a mechanical device with an inset close-up showing a detail (no text or symbols)b) Charge Battery

Do not charge the battery via mains power supply while the microscope is connected to a powered USB 2.0 port. This may cause the battery to overheat.
natural_image
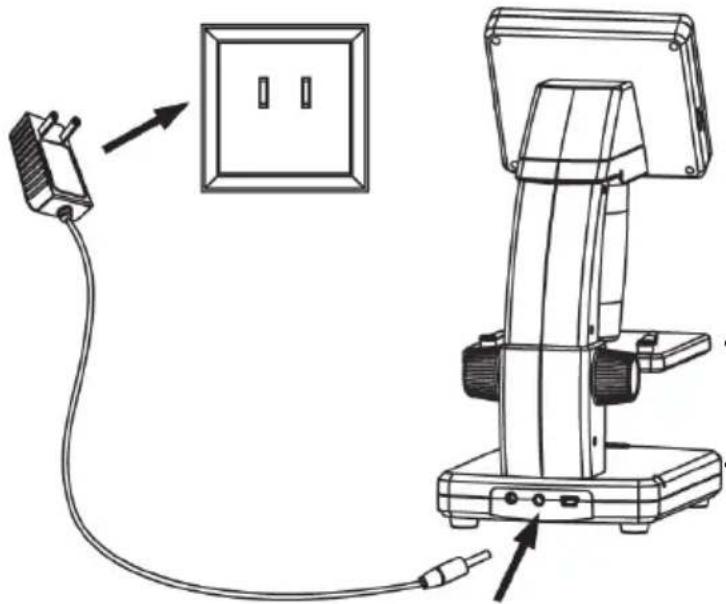
Technical line drawing of a medical device with two connectors and a wall-mounted panel (no text or symbols)- The battery will charge via USB cable or mains power supply.
- Connect the supplied charging cable to the 5V/DC charging port (A8) at the back of the base, and the other end to a power outlet.
- Or connect the supplied USB cable to the USB port (A10) at the back of the base, and the other end to the USB port on your computer.
- The battery indicator LED (A6) will glow red to indicate that the battery is charging, and turn off when the battery is fully charged.
- When it is time to recharge the battery, a low battery icon will show on the bottom right corner of the LCD display.
c) Insert MicroSD Card

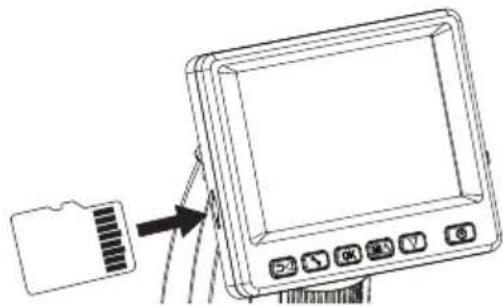
Do not force the card into the MicroSD card slot (A2) as this may damage microscope and the memory card. The MicroSD memory card must be formatted before use (see section 11.c General / Format SD).
natural_image
Line drawing of a monitor with a card attached to its side, showing no text or symbols on the device itself.- If you wish to use the microscope untethered to a computer, you must insert a MicroSD card (not included)
- Disconnect and turn the microscope OFF.
- Insert the MicroSD card as shown below.
See section "12. Connect to Computer" for information about connecting the microscope to a computer.
10. Operation

Do not cover the microscope when it is in use.
a) Power ON / OFF
- Press the power button to turn the microscope ON or OFF.
b) Focus the Microscope
- Place the object to be examined onto the stage (A4). If observing slides or similar, insert under the stage clips.
- While holding the coarse focus (A14) in place, release the coarse focus lock (A5).
- Rotate the coarse focus dial (A14) to lower the lens towards the object.
- Adjust the fine focus dial (A3) to bring the image into sharp focus.
It may take a few moments for the white balance to auto adjust and bring the image into focus. If there is too much reflection from the object, consider lowering the LED brightness or turning it off completely.
c) High and Low Magnification
• Center the lens (A13) over the object.
- High magnification: Turn the fine focus dial (A3) all the way to the right, then slowly dial back until the image comes into focus.
- Low magnification: Turn the fine focus dial (A3) all the way to the left, then slowly dial back until the image comes into focus.
→ After turning the fine focus dial (A3) all the way right or left, it will take a few seconds for the LED light balance to adjust.
d) Digital Zoom
- First bring the object into focus on the LCD display (A1).
- Zoom in or out of the object by adjusting the zoom wheel (1x - 4.0x).
e) Photo / Video Capture
- Press to switch between photo and video modes
- An icon on the LCD display indicates that you are in Photo mode.
-
An icon on the LCD display indicates that you are in Video mode.
-
Press the image capture button to take photo or begin recording video.
- If recording a video, press the image capture button 📄 again to stop recording.
f) Photo / Video Preview
- Press the button to enter playback mode.
-
Press ▲ to select a photo or video for viewing.
-
An Econ on the LCD display indicates that it is a video.
- An icon on the LCD display indicates that it is a photo.
- Press OK to playback a video.
g) Playback Options
- Press the button to enter playback mode.
- Press ▲ to select a photo or video for viewing.
-
Press to enter the sub-menu, then press or for further options such as:
-
Delete: Deletes image.
- Protect: Locks one or all images to prevent them from accidentally being deleted.
- Slide Show: Cycles through all saved photos. The show ends after all photos have shown.
- Press OK to select.
h) Color Modes
- In photo mode 📄, change color modes by pressing the Ⓜ▲ button to cycle between (colour / positive / negative).
→ You cannot change color modes for video recording.
11. Microscope Menu Options
- To access photo or video settings, first press ↩ to select a mode.
- An icon on the LCD display indicates that you are in Photo mode.
-
An icon on the LCD display indicates that you are in Video mode.
-
Press to enter settings.
- Press to switch between camera and general settings.
- Press ▲r to select up or down, press OK to select an option.
- Press to exit the settings.
a) Camera
- Resolution: Change the image resolution. The higher the resolution the more memory space each image takes.
-
Time Lapse:
-
Frames: Set the total number of images to be taken.
- Duration: Set the interval between images taken (hh:mm:sec).
- Press to exit the settings.
- Time lapse will automatically start and the LCD will show the time lapse icon
- Time lapse will finish after the total number of images have been taken, by pressing OK, or pressing 📄.
- Sharpness: Software sharpen the image on the LCD display (Hard, Normal, Soft).
b) Video
• Resolution: Switch resolution (VGA or QVGA)
c) General
• Language: Set display language
- Power Save: Set the auto shut off time if no keys are pressed (5, 10, 15) minutes.
• Frequency: Change the flicker frequency 50 Hz or 60 Hz.
- Date Stamp:
- First go to "Date/Time" and set the current time and date.
- Setting "Date/Time" will apply a date and time stamp to all your photo and video recordings.
• TV Out: Select between PAL or NTSC.
- Date/Time: Set the current date and time.
- Format SD: Erases all images on SD card / prepares new SD card for use.
- Sys. Reset: Restores all settings to factory defaults.
- Version: Indicates the installed firmware version.
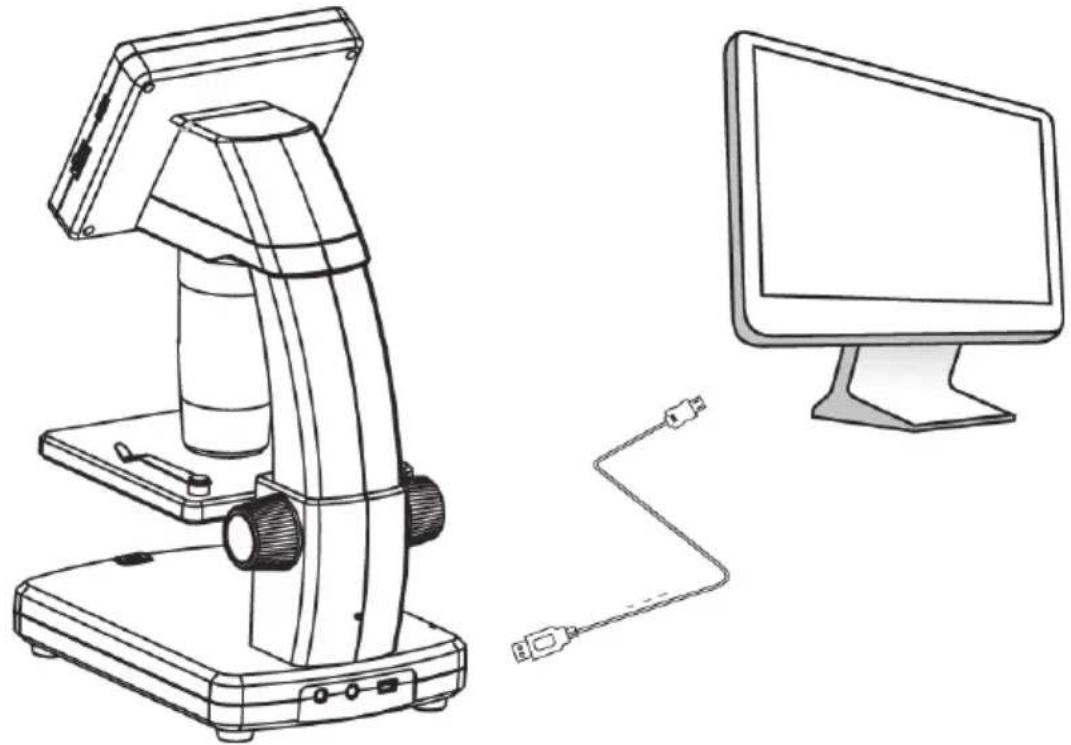
12. Connect to Computer
Using the bundled "PortableCapture Plus" software, you can preview images on your computer, take full control of your microscope and more. See section "PortableCapture Plus Software" for further information.
natural_image
Line drawing of a microscope and computer monitor with cable, no text or symbols present- Connect one end of the supplied USB cable to the USB port fine focus dial (A10) on your microscope, and the other end to an available USB 2.0 port on your computer.
- Press the power button to turn the microscope ON.
- Press ▲ and select PREVIEW ON COMPUTER, then press OK.
- Run the software by clicking the "PortableCapture Plus" icon generated on the desktop after installation.
When controlling the microscope through the computer software the hardware buttons will be disabled as most of functions are available through the "PortableCapture Plus" software.
13. Download and install software
a) Windows® Installation
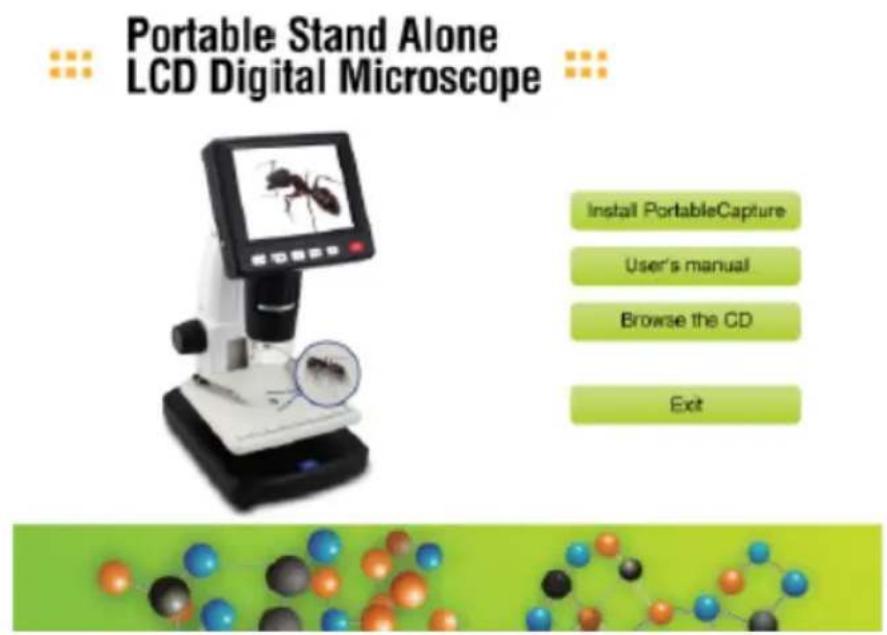
- Visit: www.conrad.com/downloads.
- Enter item number 1713199.
- Select the file for download.
- Select Install PortableCapture to install the software, then follow the on-screen instructions to complete the installation process.
- Run the software by clicking the PortableCapture Plus icon generated on the desktop after installation.
→ If needed change the display language e.g. Options > Language > English.
b) Mac OS Installation
- Visit: www.conrad.com/downloads.
- Enter item number 1713199.
- Select the file for download.
- Select the file PortableCapture Plus.pkg file.
- Follow the on screen instructions to complete the installation process.
- Run the software by clicking the PortableCapture Plus icon generated on the desktop after installation.
If needed change the display language e.g. Options > Language > English.
c) Overview
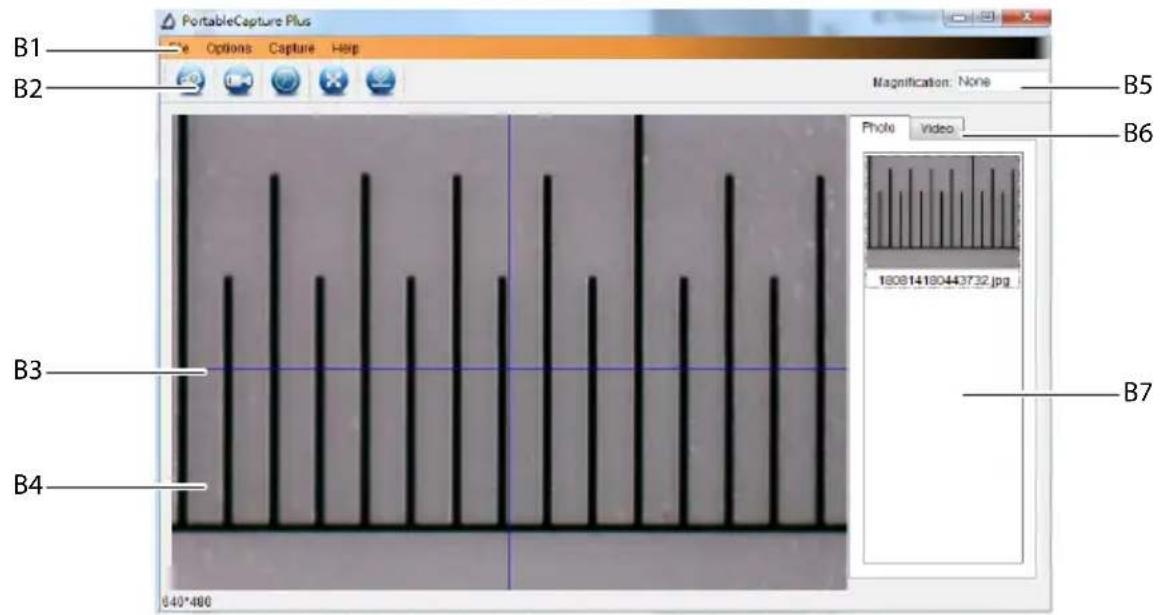
B1 Menu items
- File > Photos / Videos Folder: Where captured images are stored on your computer.
- Options > Resolution: Change image capture resolution.
- Options > Date /Time: Show/hide the recorded date and time in photo or video.
- Options > Language: Change user interface language.
- Options > XY Guide: Show/hide guidelines.
B2 Shortcuts: Camera / Video / Timer / Full Screen.

Enter / exit full screen mode by double-clicking the preview area or selecting the full screen icon.
B3 X and Y axis guidelines.
B4 Image preview area.
B5 Magnification information.
B6 Photo / Video tab: Select a tab to view saved Photos or Videos.
B7 Saved images window (thumbnail view).
- Captured images / videos show up as thumbnails.
- If you hover the mouse over a thumbnail, the image will show in the preview area (B4).
- Right mouse click an image for further options such as Open, Save as, Copy, Delete, Delete All.
d) Take Photo
- Adjust the microscope so that the camera lens (A3) is close to and pointing at the object.
- Make sure the object to be examined is centered under the lens.
- While observing the image preview area (B4), bring the image into focus.
• To capture the image select the camera shortcut icon 📄, or press the image capture button (A7). - Photos will be stored in File > Photos Folder.
Captured images show as thumbnails in the saved images window (B7). If you hover the mouse over a thumbnail, the image will show in the preview area (B4). Images are stored in the JPG format.
e) Record Videos
- Adjust the microscope so that the camera lens (A3) is close to and pointing at the object.
- Make sure the object to be examined is centered under the lens.
- While observing the image preview area (B4), bring the image into focus.
- To start recording select the Video shortcut icon 📁. The icon will flash to indicate recording has started.
- Click the flashing icon to stop recording.
- Videos will be stored in File > Videos Folder.
Captured videos show as thumbnails in the saved images window (B7). If you hover the mouse over a thumbnail, the image will show in the preview area (B4). Videos are stored in the AVI format.
f) Photo and Video Timer
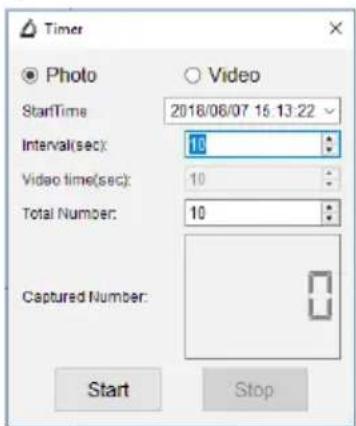
- You can set a custom start and stop timer for capturing photos or recording video.
- Select the Timer shortcut then choose Photo or Video.
- Set your desired parameters.
- Select Start, to begin recording.
Recording will stop after the program has run through the parameters, or if you select Stop to end the timer. Make sure you have enough memory space on your hard disc before recording.
g) Image Measuring Tools

For measuring tools to be accurate, first calibrate your microscope. See section "14 Microscope" for information about how to do this.

Double-click an image in the saved images window (B7) to enter the measurement interface, then select the measure icon.
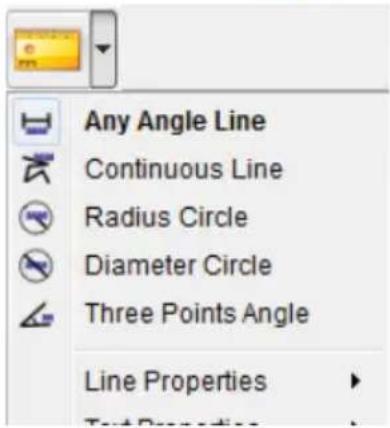
- Any Angle Line Measurement. Click and drag from one point to another.
- Continuous Line Measurement. Click and drag from one point to multiple points.
- Radius Circle Measurement. Click and drag to extend the radius.
- Diameter Circle Measurement. Click and drag to extend the diameter.
- Three Points Angle Measurement. Click and drag from one point to another, measure the angle, then click the mouse to release.
h) Draw and Text

Double-click an image in the saved images window (B7) to enter the Image Markup / Comment interface, then select the draw icon.
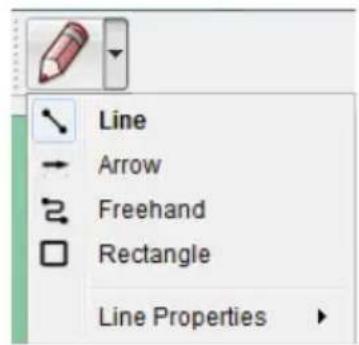
- A dropdown menu will show with various options.
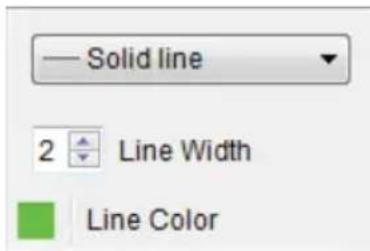
• Line Properties include Line Width and Line Color.
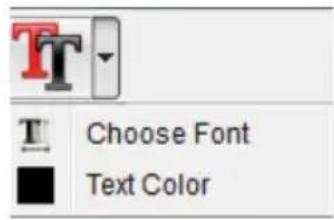
• To modify text options, select the text icon.
- A dropdown menu will show with various options such as font selection and text color.
14. Calibrating the Microscope
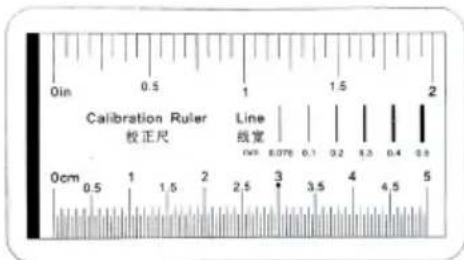
- Focus the microscope on the calibration ruler.
- Rotate the fine focus dial (A3) until the picture becomes sharp.
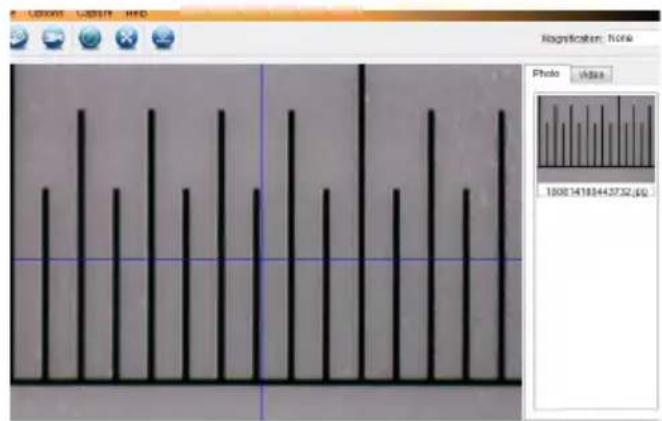
Adjust the ruler position so the image is lined up square with the XY guide lines.
Double-click an image in the saved images window (B7) to enter the measurement interface, then select the calibration icon.
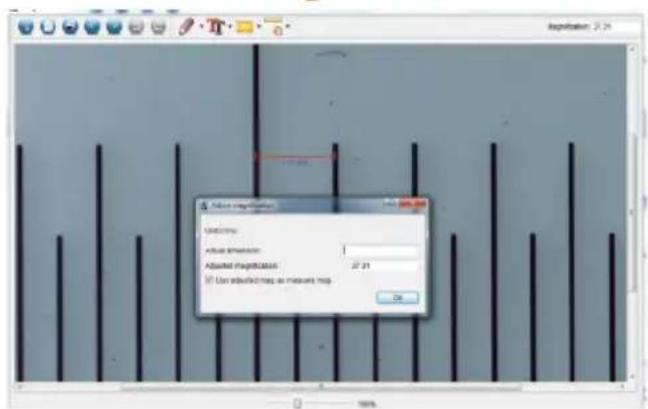
- Click and drag to select start and end points across a known value e.g. 1 mm increment along the ruler.
- When the dialog box shows, enter the exact value of the measurement sample in the Actual dimension field. The software will calculate the magnification.
- Select OK to confirm. The adjusted magnification value will show in the upper right corner.
15. Connect to Television
You can use your television screen as a large display for viewing magnified objects.
- Connect the supplied AV cable to the AV-out television cable port (A9) on the microscope, and the other end to the video input on your television.
- Press the power button to turn the microscope ON.
- Press to switch between photo or video modes.
- An icon on the LCD display indicates that you are in Photo mode.
- An icon on the LCD display indicates that you are in Video mode.
- Press to enter the microscope settings.
- Press to switch to "Setup".
- Press ▲r and select "TV Out", then press OK.
- Press ▲r and select "NTSC" or "PAL", then press OK.
- Press to exit the microscope settings.
- Select the appropriate input channel on your television.
→ Refer to your television operating manual for information about where to locate the video inputs, and how to select the input channel screen.
16. Image Backup (USB Mode)
→ You can save images directly to your computer without going through the bundled software.
- Connect one end of the supplied USB cable to the USB port (A10) on your microscope, and the other end to an available USB 2.0 port on your computer.
- Press the power button to turn the microscope ON.
- From the menu select UPLOAD IMAGES, then press OK. The microscope will appear on your computer as an external USB storage device USBSTORAGE.
- Select the applicable drive letter and navigate to the folders named PHOTO or VIDEO to access your saved images.
- Copy images to the desired location on your computer.
17. Care and Cleaning
- Disconnect the product from your computer before each cleaning. If it is hot, wait for it to cool down.
- Do not use any aggressive cleaning agents, rubbing alcohol or other chemical solutions as they can cause damage to the housing and malfunctioning.
- The LED lights are not replaceable.
- Avoid touching the lens with any substance. Clean the lens periodically with low pressure compressed air.
- Clean the product with a dry, fibre-free cloth.
18. Disposal
a) Product
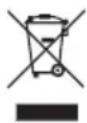
Electronic devices are recyclable waste and must not be disposed of in the household waste. At the end of its service life, dispose of the product in accordance with applicable regulatory guidelines. Remove any inserted rechargeable batteries and dispose of them separately from the product.
b) Rechargeable Batteries

You as the end user are required by law (Battery Ordinance) to return all used rechargeable batteries. Disposing of them in the household waste is prohibited.
Contaminated rechargeable batteries are labeled with this symbol to indicate that disposal in the domestic waste is forbidden. The designations for the heavy metals involved are: Cd = Cadmium, Hg = Mercury, Pb = Lead (name on (rechargeable) batteries, e.g. below the trash icon on the left).
Used rechargeable batteries can be returned to collection points in your municipality, our stores or wherever rechargeable batteries are sold.
You thus fulfill your statutory obligations and contribute to the protection of the environment.
19. Technical Data
a) Microscope
Power source....Li-Ion 3.7 V/1050 mAh (rechargeable battery) 5 V/DC, 500 mA (USB 2.0)
Battery charge time ....Approx. 2 hrs (via power adapter)
Battery life....Approx. 2 hrs
Memory......microSD (max. 32 GB)
LCD Display....7.6 cm (3") TFT, 4:3 ratio
Image sensor....5 MP
Video resolution....VGAI
Camera resolution ....12M (4032 × 3024), 9M (3456 × 2592), 5M (2560 × 1920), 3M (2048 × 1536), 1.3M (1280 × 960)
Color....24-bit RGB
Focus range.....10 mm (manual focus)
Magnification 20x to 500x
Flicker-frequency....50/60 Hz
Image format ......JPG
Video format ......AVI
Video frame rate....Max. 30 fps
White balance....Automatic
Light source....8 x LED (white)
Operating conditions....0 to +70 °C; 25 - 50 % relative humidity (non-condensing)
Storage conditions....-5 to +50 °C; 25 - 50 % relative humidity (non-condensing)
Dimensions (L x W x H)....147 x 104 x 227 mm
Weight 760 g (with battery)
b) Power Adaptor
Input....100 - 240 V/AC, 50/60 Hz
Output.... 5 V/DC, 1 A
c) Software
Supported operating systems....Windows® Vista/7/8/10; Mac OS 10.9\~10.13

Copyright 2021 by Conrad Electronic SE.

This is a publication by Conrad Electronic SE, Klaus-Conrad-Str. 1, D-92240 Hirschau (www.conrad.com).
All rights including translation reserved. Reproduction by any method, e.g. photocopy, microfilming, or the capture in electronic data processing systems require the prior written approval by the editor. Reprinting, also in part, is prohibited. This publication represents the technical status at the time of printing.
Copyright 2021 by Conrad Electronic SE.


- Seite
- b) Laden des Akkus
- Portable Stand Alone LCD Digital Microscope
- Introduction
- Explanation of Symbols
- Intended Use
- Delivery Content
- Up-to-Date Operating Instructions
- Features and Functions
- System Requirements
- Safety Instructions
- a) General
- b) Rechargeable Battery
- c) Adaptor
- d) Microscope
- e) Protection Against Dust
- Operating Elements
- Setting Up the Microscope
- a) Insert Battery
- b) Charge Battery
- c) Insert MicroSD Card
- Operation
- a) Power ON / OFF
- b) Focus the Microscope
- c) High and Low Magnification
- d) Digital Zoom
- e) Photo / Video Capture
- f) Photo / Video Preview
- g) Playback Options
- h) Color Modes
- Microscope Menu Options
- a) Camera
- b) Video
- c) General
- Connect to Computer
- Download and install software
- b) Mac OS Installation
- B1 Menu items
- d) Take Photo
- e) Record Videos
- f) Photo and Video Timer
- g) Image Measuring Tools
- h) Draw and Text
- Calibrating the Microscope
- Connect to Television
- Image Backup (USB Mode)
- Care and Cleaning
- Disposal
- a) Product
- b) Rechargeable Batteries
- Technical Data
- a) Microscope
- b) Power Adaptor
- c) Software
Brand : Toolcraft
Model : LAB 5.0
Category : Microscope