
8722 - Food Processor Becken - Free user manual and instructions
Find the device manual for free 8722 Becken in PDF.
| Product Type | Baby food cooker-blender robot |
| Brand | Becken |
| Model | 8722 |
| Power Supply | 220-240 V ~ 50/60 Hz |
| Steam Power | 600 W |
| Blending Power | 130 W |
| Blending Bowl Capacity | 300 ml |
| Water Tank Capacity | 250 ml (steam) / 100-150 ml (warm milk) |
| Main Functions | Steam cooking, Manual blending, Automatic blending, Sterilization, Warm milk |
| Default Steam Cooking Time | 15 minutes (adjustable) |
| Default Sterilization Time | 15 minutes |
| Default Automatic Blending Time | 1 minute |
| Max Continuous Manual Blending | 15 seconds |
| Included Accessories | Blending bowl, bowl lid, steam basket, blade (2 parts), sealing ring, locking ring, removable handle/spatula |
| Materials | Plastic (bowl, lid, tank), stainless steel (blade) |
| Care and Cleaning | Bowl, lid, steam basket: dishwasher (top rack) or warm soapy water. Blade, rings: hand wash. Base: wipe with damp cloth. Do not immerse base. |
| Descaling | Every 4 weeks with 250 ml white vinegar (leave for 30 min to 24 h) |
| Safety | Automatic shut-off if water is missing (code E1), bowl position detection (6 beeps if incorrectly installed), stop after 1 hour of milk warming |
| Usage | Prepare purees, compotes, juices, steam vegetables, fruits, meats, fish, sterilize bottles, warm milk |
| After-Sales Service | www.suporteworten.pt |
Frequently Asked Questions - 8722 Becken
User questions about 8722 Becken
0 question about this device. Answer the ones you know or ask your own.
Ask a new question about this device
Download the instructions for your Food Processor in PDF format for free! Find your manual 8722 - Becken and take your electronic device back in hand. On this page are published all the documents necessary for the use of your device. 8722 by Becken.
USER MANUAL 8722 Becken
MANUAL DE INSTRUÇÕES
8722
 |  |  | |||
| 15 mins. 15 | mins. 15 mins. | ||||
| 15 mins. 15 | mins. 20 mins. | ||||
| 15 mins. 15 | mins. | 20 mins. | |||
| 15 mins. 15 | mins. | ||||
| 15 mins. 15 | mins. | ||||
| 15 mins. | |||||
* DE - Beim Garen von Fleisch ist es äußerst wichtig, das Gerät alle 10 Minuten zu unterbrechen und die Speise gründlich umzurühren, um sicherzustellen, dass sie gleichmäßig gart.
EN - When cooking meat, it is extremely important to pause the unit every 10 minutes and stir food thoroughly to ensure even cooking.
ES - Cuando cocine carne, es muy importante detener la unidad cada 10 minutos y remover bien los alimentos para garantizar una cocción uniforme.
IT - Durante la cottura della carne è estremamente importante mettere in pausa l'apparecchio ogni 10 minuti e mescolare accuratamente il cibo per garantire una cottura uniforme.
FR - Lors de la cuisson de la viande, il est extrêmement important d'interrompre le fonctionnement de l'appareil toutes les 10 minutes et de remuer soigneusement les aliments afin de garantir une cuisson homogène.
NL - Bij het bereiden van vlees is het uiterst belangrijk om het apparaat elke 10 minuten te pauzeren en het voedsel goed door te roeren om ervoor te zorgen dat het gelijkmatig bakt.
PT - Ao cozinhar carne, é essencial parar o aparelho a cada 10 minutos e mexer bem os alimentos para garantir uma cozedura uniforme.
INDEX
Deutsch 4
English....15
Español 24
Français 34
Italiano. 44
Nederlands 54
Português 64
DE
Before using your appliance read this instructions manual carefully and keep it in a safe place as you may need to consult it in the future.
The user manual in digital format is available on the website www.suporteworten.pt
Before turning on your appliance, and to ensure a safe and correct operation, do not use if:
- It has fallen to the ground;
- You notice any evidence of damage;
- Any anomaly occurs during its operation.
Your appliance should not be used for other purposes than the ones intended and solely for household use. Any damage resulting from using the appliance outside this scope, any incorrect use, as well as any manual modifications to the product will not be covered and automatically voids the warranty.
SAFETY INSTRUCTIONS
- This appliance must not be used by children. Keep the appliance and its cord out of the reach of children.
- Appliances can be used by persons with reduced physical, sensory or mental capabilities or lack of experience and knowledge if they have been given supervision or instruction concerning
the safe use of the appliance and if they understand the hazards involved. Children must not play with the appliance.
- Always disconnect the appliance from the power supply if it is left unattended and before assembling, disassembling or cleaning.
Warning
Potential injury from misuse.
- Care must be taken when handling the accessories, and during cleaning.
- Switch off the appliance and disconnect it from the power supply before changing accessories or approaching parts that move when in use.
- If the power cord is damaged, it must be replaced by the manufacturer, its service agent or similarly qualified persons to avoid a hazard.
• This appliance is intended to be used in household
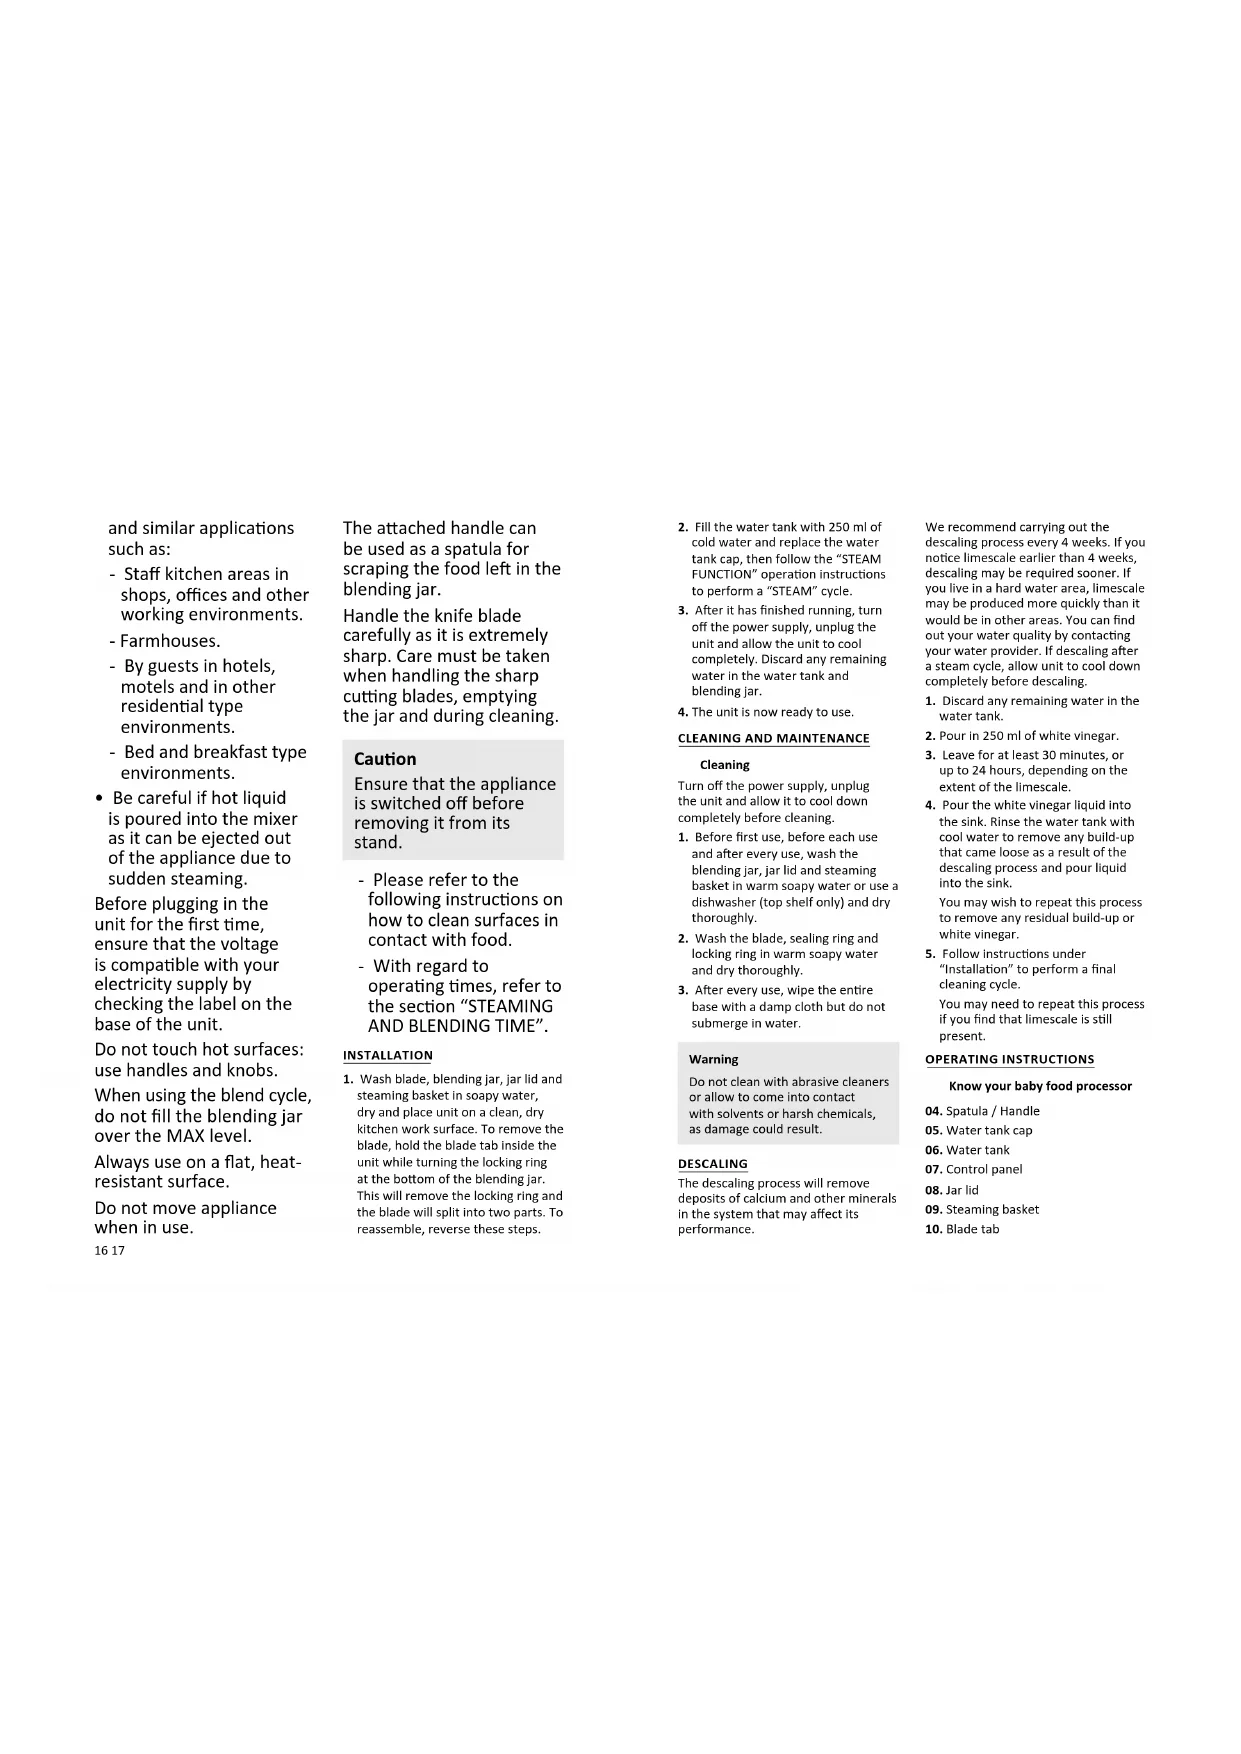
and similar applications such as:
- Staff kitchen areas in shops, offices and other working environments.
- Farmhouses.
- By guests in hotels, motels and in other residential type environments.
- Bed and breakfast type environments.
- Be careful if hot liquid is poured into the mixer as it can be ejected out of the appliance due to sudden steaming.
Before plugging in the unit for the first time, ensure that the voltage is compatible with your electricity supply by checking the label on the base of the unit.
Do not touch hot surfaces: use handles and knobs.
When using the blend cycle, do not fill the blending jar over the MAX level.
Always use on a flat, heat-resistant surface.
Do not move appliance when in use.
The attached handle can be used as a spatula for scraping the food left in the blending jar.
Handle the knife blade carefully as it is extremely sharp. Care must be taken when handling the sharp cutting blades, emptying the jar and during cleaning.
Caution
Ensure that the appliance is switched off before removing it from its stand.
- Please refer to the following instructions on how to clean surfaces in contact with food.
- With regard to operating times, refer to the section "STEAMING AND BLENDING TIME".
INSTALLATION
-
Wash blade, blending jar, jar lid and steaming basket in soapy water, dry and place unit on a clean, dry kitchen work surface. To remove the blade, hold the blade tab inside the unit while turning the locking ring at the bottom of the blending jar. This will remove the locking ring and the blade will split into two parts. To reassemble, reverse these steps.
-
Fill the water tank with 250 ml of cold water and replace the water tank cap, then follow the "STEAM FUNCTION" operation instructions to perform a "STEAM" cycle.
- After it has finished running, turn off the power supply, unplug the unit and allow the unit to cool completely. Discard any remaining water in the water tank and blending jar.
- The unit is now ready to use.
CLEANING AND MAINTENANCE
Cleaning
Turn off the power supply, unplug the unit and allow it to cool down completely before cleaning.
- Before first use, before each use and after every use, wash the blending jar, jar lid and steaming basket in warm soapy water or use a dishwasher (top shelf only) and dry thoroughly.
- Wash the blade, sealing ring and locking ring in warm soapy water and dry thoroughly.
- After every use, wipe the entire base with a damp cloth but do not submerge in water.
Warning
Do not clean with abrasive cleaners or allow to come into contact with solvents or harsh chemicals, as damage could result.
DESCALING
The descaling process will remove deposits of calcium and other minerals in the system that may affect its performance.
We recommend carrying out the descaling process every 4 weeks. If you notice limescale earlier than 4 weeks, descaling may be required sooner. If you live in a hard water area, limescale may be produced more quickly than it would be in other areas. You can find out your water quality by contacting your water provider. If descaling after a steam cycle, allow unit to cool down completely before descaling.
- Discard any remaining water in the water tank.
- Pour in 250 ml of white vinegar.
- Leave for at least 30 minutes, or up to 24 hours, depending on the extent of the limescale.
- Pour the white vinegar liquid into the sink. Rinse the water tank with cool water to remove any build-up that came loose as a result of the descaling process and pour liquid into the sink.
You may wish to repeat this process to remove any residual build-up or white vinegar.
- Follow instructions under "Installation" to perform a final cleaning cycle.
You may need to repeat this process if you find that limescale is still present.
OPERATING INSTRUCTIONS
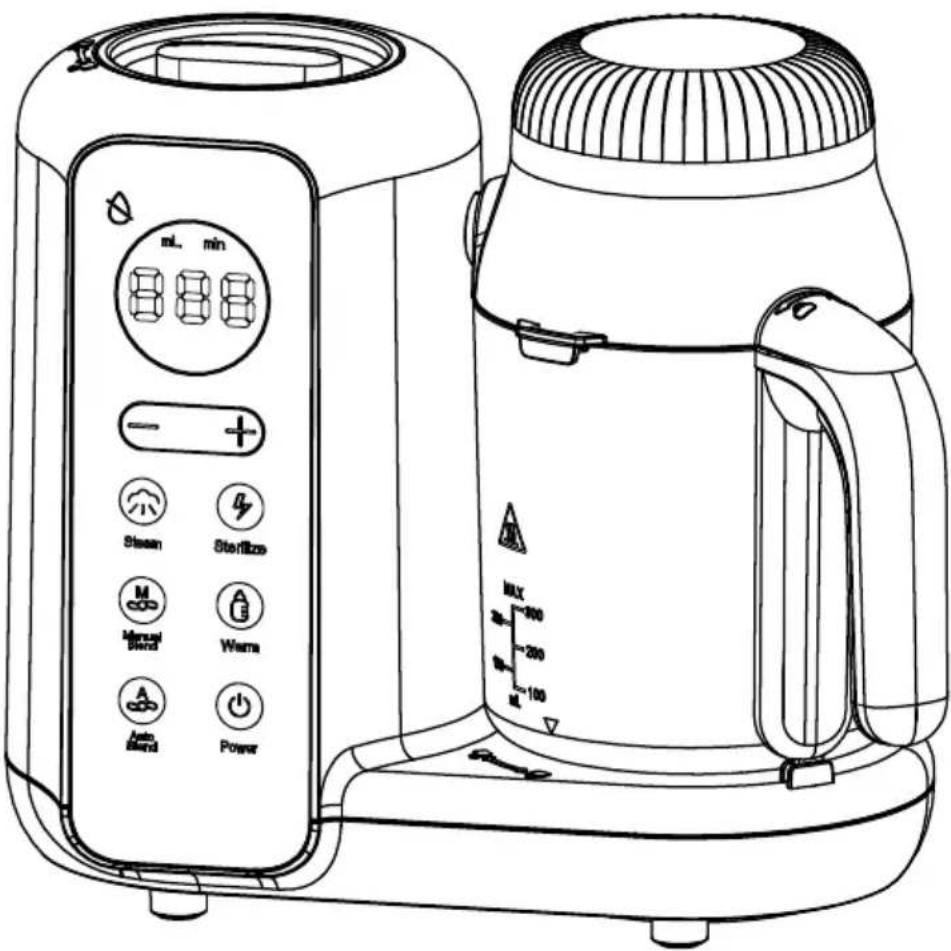
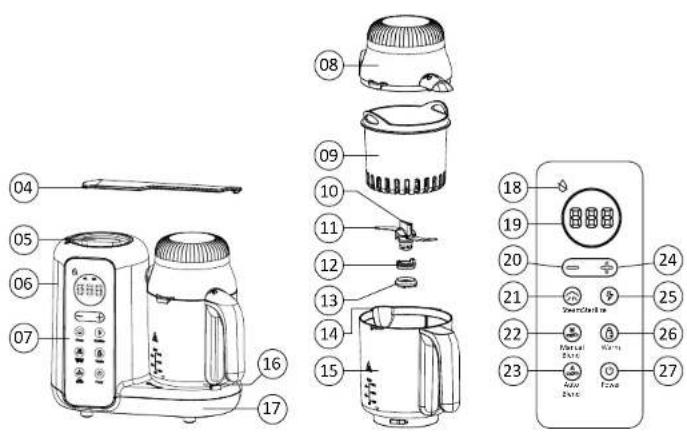
Know your baby food processor
- Spatula / Handle
- Water tank cap
- Water tank
- Control panel
- Jar lid
- Steaming basket
-
Blade tab
-
Blade
-
Sealing ring
-
Locking ring
-
Jar spout
-
Blending jar
-
Jar holder
-
Base
Control panel
-
No-water indicator
-
Display
-
Setting "-"
-
Steam
-
Manual blend
-
Auto blend
-
Setting "+"
-
Sterilise
-
Warm milk
-
Power
Note
For your child's safety, always check food temperature before feeding. This unit can steam, sterilise and warm milk as well as blend vegetables, fruits (peeled and cored/pips removed), meats and fish (with bones removed).
All food must be diced into approximately 1-2 cm cubes before being placed into the blending jar for cooking. Cooking times can be found in these instructions.

Steam function
- Place the unit on a dry kitchen working surface.
18 19
-
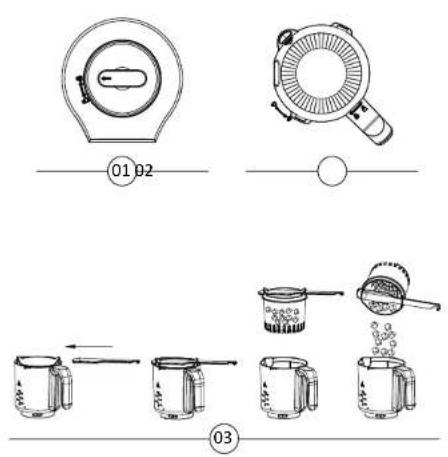
Rotate the water tank cap to the "☐" position to remove the cap, fill the water tank with 250 ml of cold water, and then rotate the water tank cap to the "☐" position to close the water tank cap (see Fig. 01).
-
Put the properly-cut food into the steaming basket, put the steaming basket into the blending jar, then close the jar lid into the correct position by following the marks on the jar lid (see Fig. 02). Finally, install the blending jar onto the appliance by following the marks on the jar holder (see Fig. 02).
Note
The blending jar must be installed in the correct position, otherwise, the "STEAM FUNCTION" cannot be activated and six beeps will be heard.
-
Connect the appliance to the power source. One beep will be heard, the “◎” will light up, while other function indicators and the display will not light up.
-
Touch Ⓞ": the appliance is turned on, the no-water indicator "Q" on the control panel will not light up, while other function indicators light up and the display shows "###".
-
Touch Ⓜ" to select the steam function: the display shows 15 minutes, which is the default steaming time. You can set the steaming time using "—" or "+" according to the recipe's requirements. You can then touch "⊕" to activate the "Steam"
function. Alternatively, you can wait for 5 seconds and the "Steam" function will be activated automatically.
After the function has been completed, three beeps will be heard and the appliance will go back to its state when it was plugged in.
Note
When the "Steam" function is activated, other functions are inactive. To select another function, the "Steam" function must be ended.
Note
The no-water indicator "Q" will flash and the display will show "E1" if there is no water in the water tank during the working process. When that happens, the appliance will stop working and the water tank will need to be refilled with water. When the water temperature is lower than 80°C, the display will show the running time. Press "f" and the appliance will continue working.
-
Open the jar lid and remove the steaming basket from the blending jar using the attached handle, then pour the food in the steaming basket into a container (see Fig. 03).
-
Clean the blade, steaming basket, blending jar and jar lid thoroughly.

Sterilise function
-
Place the unit on a dry kitchen working surface.
-
Rotate the water tank cap to the "☐" position to remove the cap, fill the water tank with 250 ml of cold water, then rotate the water tank cap to the "☐" position to close the water tank cap (see Fig. 01).
-
Put the milk bottle into the steaming basket and put the steaming basket into the blending jar, then close the jar lid into the correct position by following the marks on the jar lid (see Fig. 02). Finally, install the blending jar onto the appliance by following the marks on the jar holder (see Fig. 02).
Notes
-
The blending jar must be installed in the correct position, otherwise the "STERILISE FUNCTION" cannot be activated and six beeps will be heard.
-
The blending jar is only suitable for milk bottles less than 150 mm in height.
-
The appliance is only be suitable for high temperature-resistant objects which can withstand a high temperature of 1000C without being deformed or producing a hazardous substance.
-
Clean the milk bottle and other accessories completely before sterilising.
-
Connect the appliance to the power source. One beep will be heard, the " ⏻" will light up, while other function indicators and the display will not light up.
-
Touch ⚙ the appliance is turned on, the no-water indicator “☐” on the control panel will not light up, while other function indicators light up and the display shows “☐☐”.
-
Touch ⚙" to select the sterilise function: the display shows 15 minutes, which is the default sterilising time. You can then touch "⊕" to activate the "Sterilise" function. Alternatively, you can wait for 5 seconds and the "Sterilise" function will be activated automatically. After the function has been completed, three beeps will be heard and the appliance will go back to its state when it was plugged in.
Note
When the "Sterilise" function is activated, other functions are inactive. To select another function, the "Sterilise" function must be ended.
Note
The no-water indicator "Q" will flash and the display will show "E1" if there is no water in the water tank during the working process. When that happens, the appliance will stop working and the water tank will need to be refilled with water.
When the water temperature is lower than 80^ C, the display will show the running time. Press “①” and the appliance will continue working.
- After the appliance has cooled down, open the jar lid and remove
20 21
the steaming basket from the blending jar, then remove the milk bottle from the steaming basket.
- Clean the steaming basket, blending jar and jar lid thoroughly.
“💡” Warm milk function
-
Place the unit on a dry kitchen working surface.
-
Rotate the water tank cap to the "☐" position to remove the cap, then fill the water tank with 100-150 ml of cold water.
-
Put the milk bottle into the water tank and then install the blending jar onto the appliance by following the marks on the jar holder (see Fig. 02).
Notes
-
The water tank is only suitable for milk bottles less than 72 mm in diameter.
-
The blending jar must be installed in the correct position, otherwise the "WARM MILK FUNCTION" cannot be activated and six beeps will be heard.
-
Connect the appliance to the power source. One beep will be heard, the “⏻” will light up, while other function indicators and the display will not light up.
-
Touch Ⓤ": the appliance is turned on, the no-water indicator "♂" on the control panel will not light up, while other function indicators light up and the display shows "888".
-
Touch Ⓗ to select the warm milk function: the display shows 30, which is the default milk capacity.
You can set the milk capacity using “=” or “The maximum milk capacity is 300ml. You can then touch “” to activate the “Warm milk” function. Alternatively, you can wait for 5 seconds and the “Warm milk” function will be activated automatically. During the process of warming milk, the “” shown on the display lights up like a marquee. When the milk has been warmed up to the proper temperature, the “” shown on the display will light up solidly and three beeps will be heard. The appliance will then go into the keep-warm state.
After keeping the liquid warm for 1 hour, the appliance will go back to its state when it was plugged in.
Note
When the "Warm milk" function is activated, other functions are inactive. To select another function, the "Warm milk" function must be ended.
Note
The no-water indicator "Q" will flash and the display will show "E1" if there is no water in the water tank during the working process. When that happens, the appliance will stop working and the water tank will need to be refilled with water. When the water temperature is lower than 80°C, the "☐" shown on the display lights up like a marquee. Press "☐" and the appliance will continue working.
- Remove the milk bottle from the water tank and empty the water from the water tank.
Warning
The water will be hot after warming the milk: please handle carefully.
Note
Since the temperature of milk varies according to the room temperature, the amount of water added and the material and thickness of the bottle, you should check the milk's temperature before feeding the baby.

Manual blend function
-
Place the unit on a dry kitchen working surface.
-
Cook the food by following the operation detailed in the "STEAM FUNCTION" section, then remove the steaming basket with cooked food from the blending jar using the attached handle. Finally, pour the cooked food into the blending jar (see Fig. 04).
-
Close the jar lid into the correct position by following the marks on the jar lid (see Fig. 02). Finally, install the blending jar onto the appliance by following the marks on the jar holder (see Fig. 02).
Note
The blending jar must be installed in the correct position, otherwise, the "MANUAL BLEND FUNCTION" cannot be activated and six beeps will be heard.
-
Connect the appliance to the power source. One beep will be heard, the "◎" will light up, while other function indicators and the display will not light up.
-
Touch ⏻": the appliance is turned on, the no-water indicator "△" on the control panel will not light up, while other function indicators light up and the display shows "###".
-
Touch "M" to select the manual blend function: the appliance will start blending, and the appliance will stop blending after release "M". When that happens, the "……" shown in the display flashes.
Note
The continuous blending time for the "Manual blend" function cannot exceed 15 seconds.
-
Remove the blending jar and empty the food from the blending jar.
-
Clean the blade, steaming basket, blending jar and jar lid thoroughly.
Note
You can make vegetable juice and fruit juice using the "Manual blend" function.

Auto blend function
-
Place the unit on a dry kitchen working surface.
-
Cook the food by following the operation detailed in the "STEAM FUNCTION" section, then remove the steaming basket with cooked
22 23
food from the blending jar using the attached handle. Finally, pour the cooked food into the blending jar.
- Close the jar lid into the correct position by following the marks on the jar lid (see Fig. 02). Finally, install the blending jar onto the appliance by following the marks on the jar holder (see Fig. 02).
Note
The blending jar must be installed in the correct position, otherwise, the "AUTO BLEND FUNCTION" cannot be activated and six beeps will be heard.
-
Connect the appliance to the power source. One beep will be heard, the “⊕” will light up, while other function indicators and the display will not light up.
-
Touch Ⓞ": the appliance is turned on, the no-water indicator "Q" on the control panel will not light up, while other function indicators light up and the display shows "BBB".
-
Touch 🔒 to select the "Auto blend" function. The default blending time for the "Auto blend" function is 1 minute. You can then touch "⏻" to activate the "Auto blend" function.
Alternatively, you can wait for 5 seconds and the "Auto blend" function will be activated automatically. After the function has been completed, three beeps will be heard and the appliance will go back to its state when it was plugged in.
Note
When the "Auto blend" function is activated, other functions are inactive. To select another function, the "Auto blend" function must be ended.
-
Remove the blending jar and empty the food from the blending jar.
-
Clean the blade, steaming basket, blending jar and jar lid thoroughly.
Note
You can make vegetable juice and fruit juice using the "Auto Blend" function.
STEAMING AND BLENDING TIME
Steaming time
All times are approximate per 200 g. Steam no more than 300 g in one cycle.
The MAX fill line on the blending jar should not be exceeded when using a blend cycle.
Always check food is cooked and food temperature before feeding
When cooking meat, it is extremely important to pause the unit every 10 minutes and stir food thoroughly to ensure even cooking.
Blending time
The unit can be set to different times to control food texture.
These times can be used as a guide to achieve different consistencies for each weaning stage.
| Stage One Stage | Two Stage Three | |
| When introducing first tastes, food needs to be pureed. Blend for 1 minute to get a smooth consistency. | You can start experimenting with a combination of flavours and smooth, lumpy chunks. Blend for 20-30 seconds. | Now they can eat bigger portions with a chunky texture. Blend for 4-10 seconds. |
TROUBLESHOOTING
| Problem Cause Solution | ||
| The display shows "E0". | NTC failure. Contact the service department. | |
| The no-water indicator " 🔊" flashes and the display shows "E1". | No water in the water tank. | Refill the water tank with water, press " 🔊", and the appliance will continue working. |
TECHNICAL SPECIFICATIONS
Power Steam: 600W
Power Blend: 130W
Capacity: 300 ml
Time to heating: 30 minutes
POST-SALE SERVICE
Check the website
www.suporteworten.pt for the
warranty conditions for your product.
ENVIRONMENTAL PROTECTION
In order to protect the environment, we strive to reduce the volume of
packaging used, limiting it to three easily sorted materials: cardboard, paper and plastic. The appliance is manufactured using recyclable materials after disassembled by a specialized company.

Please comply with local regulations concerning the recycling of all materials.
ES
- Bed and breakfast.

- INDEX
- DE
- SAFETY INSTRUCTIONS
- Warning
- Caution
- INSTALLATION
- CLEANING AND MAINTENANCE
- Cleaning
- DESCALING
- OPERATING INSTRUCTIONS
- Know your baby food processor
- Control panel
- Note
- Steam function
- Sterilise function
- Notes
- “💡” Warm milk function
- Manual blend function
- Auto blend function
- STEAMING AND BLENDING TIME
- Steaming time
- Blending time
- TECHNICAL SPECIFICATIONS
- POST-SALE SERVICE
- ENVIRONMENTAL PROTECTION
- ES
Brand : Becken
Model : 8722
Category : Food Processor