SMART-DOOR10 - Smart Home Fysic - Free user manual and instructions
Find the device manual for free SMART-DOOR10 Fysic in PDF.

User questions about SMART-DOOR10 Fysic
0 question about this device. Answer the ones you know or ask your own.
Ask a new question about this device
Download the instructions for your Smart Home in PDF format for free! Find your manual SMART-DOOR10 - Fysic and take your electronic device back in hand. On this page are published all the documents necessary for the use of your device. SMART-DOOR10 by Fysic.
USER MANUAL SMART-DOOR10 Fysic
natural_image
Product display of a white wireless device including a circular smoke shield, a rectangular network box, and four connected devices (no visible text or symbols)Inhoud
Nederlands....3
English....13
Deutsch....23
Français....33
Aan de slag
text_image
QR code with a blue home icon in the center, likely linking to a digital service or application.- Selecteer: "When device status changes"

text_image
When device status changes >- Selecteer: "Send notification"

text_image
Send notification >text_image
Invitation code: 9NWYRT Scenario exampleinvites you to join"Scenario example" App . Please download [Smart Life] and register. Go to "My > Home Management > Join Home and enter the code. Please use the invitation code to join new home within 3 days and don't share it with others. Click to download App : https://a.smart321.com/smartlife- Selecteer "Join a home"

text_image
< Home-beheer Scenario example > Families toevoegen Join a hometext_image
Join a home Please contact with the administrator to get an invitation (Home Settings > Add Member) 9NWYRTtext_image
Home Member New member Example@cmail.com Scenario example Home Owner >Manage Device and Room | Manage Smart Setting
| Manage Member
Common Member
Use Device | Use Smart Setting

Before installing the Smarthome package and use its features. Make sure you have the
SmartLife app installed on your smartphone or tabled.
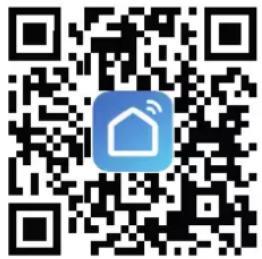
The app is freely available through the Google play store, Apple app store or by scanning the QR code on the side. The SmartLife app is free to download and there are no further program fees.
text_image
QR code with a blue house icon in the center, likely linking to a digital service or application.After installing the app, make sure to register and activate the SmartLife account. The SmartLife app can not be used without a registered account.
Note that all individuals you want to provide access to the Smarthome350 settings or scenario notifications require their own account.
Open the SmartLife app and log in
You will now see the home screen indicating no devices are active.
From this menu you will have a clear overview of the different devices that have been added to you home. By pressing the added devices you will be able to set up the core settings of the device.
Setting up the correct time zone
The correct time zone is important to effectively create scenarios based on time.
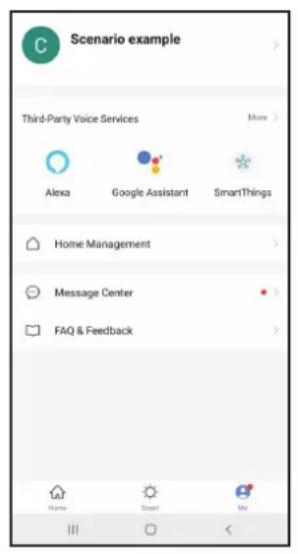
- On the right bottom corner, press Me.
This will show your account information. - Press on your name to open the personal information screen
- Press the option time zone to select the time zone in which the SMARTHOME350 will be used.
- Then return to the "Me" screen to continue setting up your home.

text_image
Scenario example Third-Party Voice Services Alexa Google Assistant SmartThings Home Management Message Center FAQ & Feedback Home Smart Me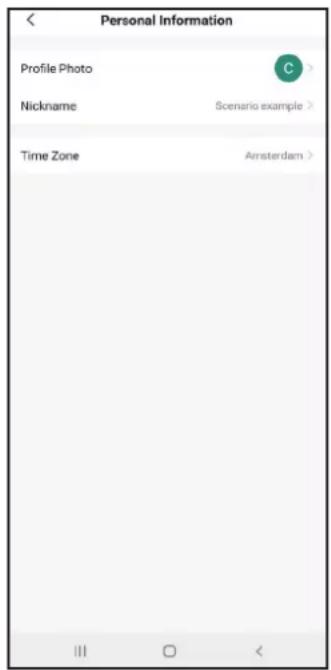
text_image
Personal Information Profile Photo Nickname Scenario example Time Zone Amsterdam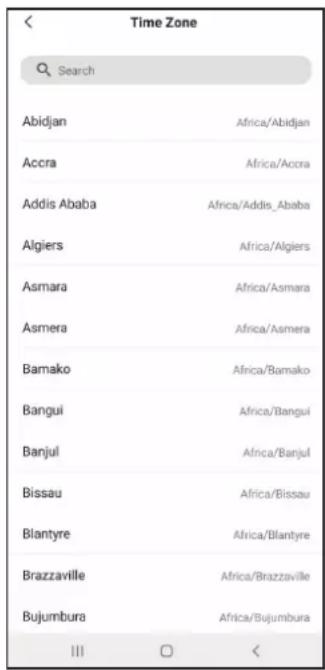
text_image
Time Zone Search Abidjan Africa/Abidjan Accra Africa/Acora Addis Ababa Africa/Addis_Ababa Algiers Africa/Algiers Asmara Africa/Asmara Asmera Africa/Asmera Bamako Africa/Bamako Bangui Africa/Bangui Banjul Africa/Banjul Bissau Africa/Bissau Blantyre Africa/Blantyre Brazzaville Africa/Brazzaville Bujumbura Africa/Bujumbura III OSetting up your digital home
Through setting up your digital home, you will be able to clearly assign the different smart products to specific rooms. This will create a clear overview of the active devices in different parts of your home.
- On the right bottom corner, press "Me".
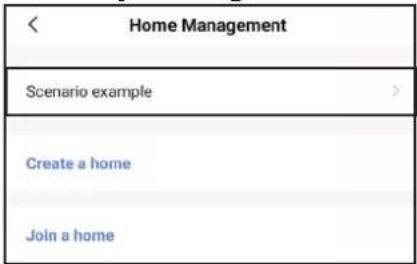
- Press the option "Home Management".
- At the top you will see "My Home", press that section to continue in the menu.
- Enter your selected home name
- Enter the home location. If GPS on you device is enabled the SmartLife app will automatically pinpoint your location. Press save to store your location.
- Select the type of rooms applicable to your situation. These are the rooms where the smart devices will be installed. More room options are available in the add room section. Keep in mind, you can always add new rooms later when new devices are added.
- Press "save" to continue
- Press "Home" on the left bottom corner to return to your home screen.
The home screen has been updated with local weather information and your previously added rooms.
text_image
Scenario example Third-Party Voice Services Alexa Google Assistant SmartThings Home Management Message Center FAQ & Feedback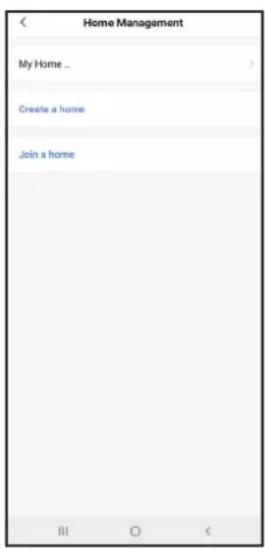
text_image
Home Management My Home ... Create a home Join a home
text_image
Cancel Complete Home Information Save Home Name* Scenario example Home Location Netherlands Rooms: Living Room ✓ Master Bedroom ✓ Second Bedroom ○ Dining Room ○ Kitchen ○ Study Room ○ Add Room III ○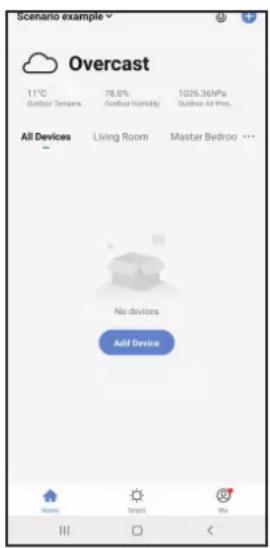
text_image
Scenario example Overcast 11°C Outdoor Tempera 78.0% Outdoor Humidity 1026.36MPa Outdoor All Press... All Devices Living Room Master Bedroom No devices Add Device Name Smart NoInstalling the SMARTHOME350
Start by installing the SMART-BRIDGE10 Zigbee Gateway. This is the central nerve center through which all products in this set communicate.
Follow the installation guide provided with the SMART-BRIDGE10 and add the bridge to you SmartLife app.
When asked you can rename the SMART-BRIDGE10 and assign to a room the product is installed in.
After the SMART-BRIDGE10 has been installed you can start setting up the SMART-SMOKE10, SMART-DOOR10 and SMART-MOTION10.
Make sure the device is connected to the SmartLife app before installing the devices to its final position.
The installation instructions are provided with each individual product and can be followed as such. At the end of product installation, it will be possible to change the name of the product and allocate the device to a digital room. When using more than one of the same device (Such as SMART-DOOR10) we suggest the name the products clearly. This will help to identify notifications when the scenario's are set up.
Setting up the scenario
In this example, we will monitor the fictive person Ms Brown.
Ms Brown is a keen elderly lady and very capable of living alone.
Still, we would like to monitor if Ms Brown is able to get out of bed in the morning and start up her day by going to the living room or if she may require assistance.
The SMART_DOOR10 sensor has been placed on the Bedroom door connecting to the living room.
Ms Brown starts her day between at 06:00 sharp.
To be safe we will Set the scenario time for 05:00 until 07:00
First it is important to change the base alarm setting of the SMART-DOOR10 from all to none. This will make sure that only the actions within the 05:00 until 07:00 window are notified.
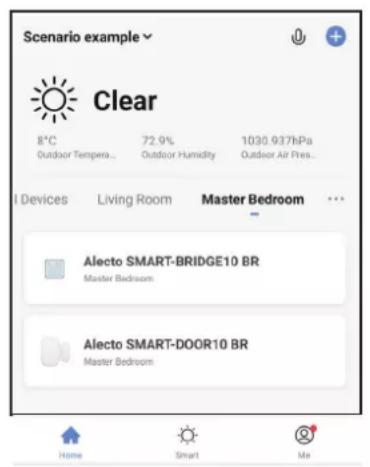
- From the home screen, select the digital room the device is placed in.
- Select the device you want to set up (SMART-DOOR10).
- Select alarm setting on the middle right of the screen.
- In the Notice pop up menu deselect Alarm, keep Battery low enabled.
- Return to the home screen and stay in the digital room the SMART-DOOR10 is allocated to.
text_image
Scenario example Clear 8°C 72.9% 1030.937hPa Outdoor Tempera... Outdoor Humidity Outdoor Air Pres... I Devices Living Room Master Bedroom Alecto SMART-BRIDGE10 BR Master Bedroom Alecto SMART-DOOR10 BR Master Bedroom Home Smart Me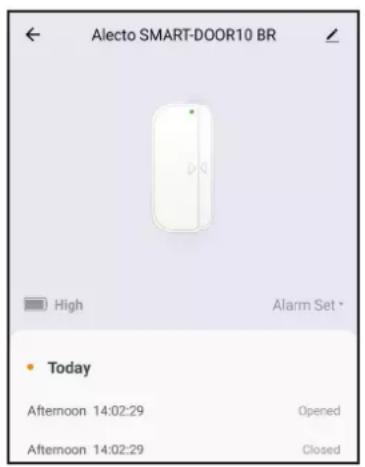
text_image
Alecto SMART-DOOR10 BR High Alarm Set * Today Afternoon 14:02:29 Opened Afternoon 14:02:29 Closed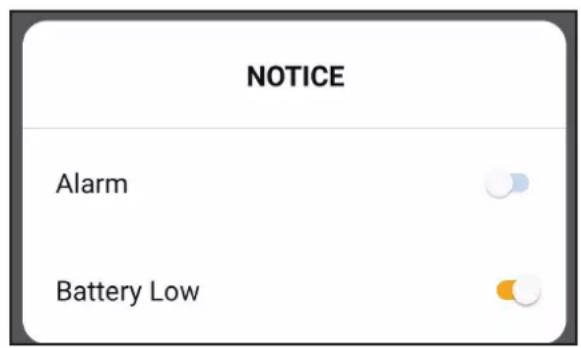
text_image
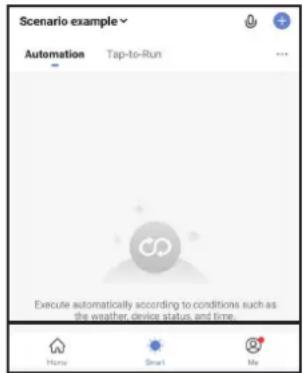
NOTICE Alarm Battery Low- Select "Smart" in the bottom middle of the screen. This will open the Smart page where all created scenarios are stored. In here you can create, modify, activate, deactivate and delete all the different scenarios that have been set up. Note that this page will show all created scenario's of all products connected to your SmartLife app.
Now you will be able to set up the desired Scenario.
text_image
Scenario example Automation Tap-to-Run Execute automatically according to conditions such as the weather, device status, and time.In our example, we want to know if Ms Brown has used Bedroom door between 05:00 and 07:00.
- Select the following options:
Select: “+” at the top right corner.

text_image
Scenario example Automation Tap-to-Run ...- Select: "When device status changes"

text_image
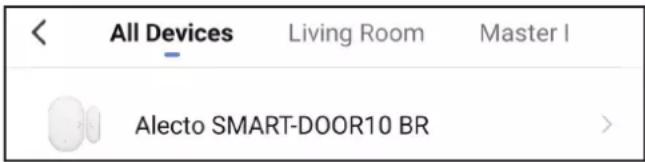
When device status changes >- Select: "Alecto SMART-DOOR10" or the personalized name for the door sensor. The available devices are grouped per room or all devices.
text_image
All Devices Living Room Master I Alecto SMART-DOOR10 BR >- Select: "State"

- Select: "Opened"
| Opened | Og |
- Select: "Send notification"

text_image
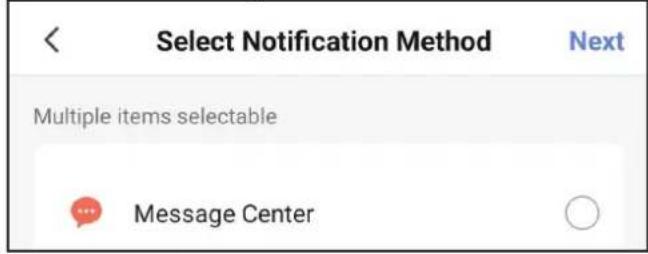
Send notification >- Select: "Message center" and Next to complete the base setup of the scenario
text_image
Select Notification Method Next Multiple items selectable Message CenterThis is your basic scenario where an action (opening of the SMART-DOOR10) at any time of day, triggers a reaction (notification send).
We want to have the notification send only during a specific time of the day (05:00 to 07:00).
- To make the scenario time specific to each day from 05:00 to 07:00.
Select: "Effective period"

text_image
Effective Period All day >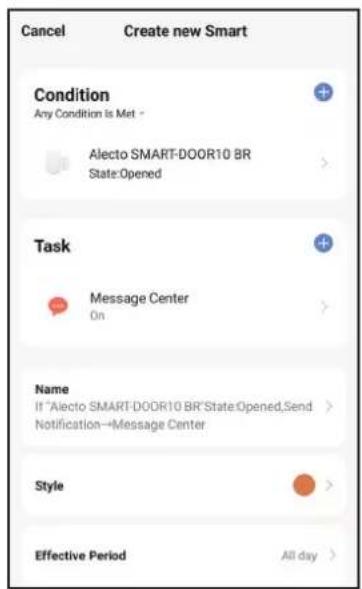
text_image
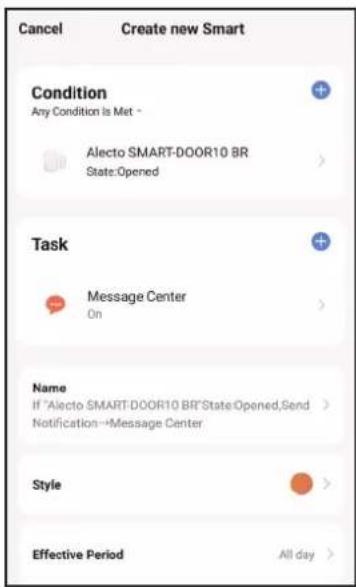
Cancel Create new Smart Condition Any Condition Is Met * Alecto SMART-DOOR10 BR State:Opened Task Message Center On Name If "Alecto SMART-DOOR10 BR"State:Opened,Send Notification→Message Center Style Effective Period All day >- Select: "Custom"

text_image
Custom 05:00-07:00 Same Day (GMT+01:00)- Set the Start and Ending time of the Scenario and press confirm
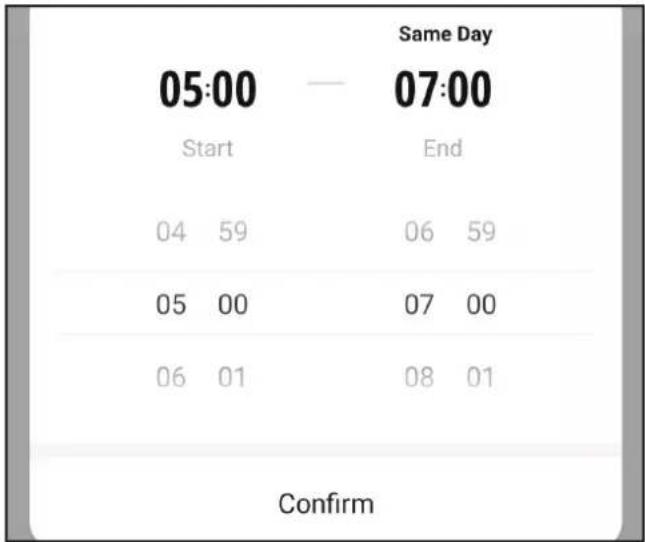
text_image
Same Day 05:00 — 07:00 Start End 04 59 06 59 05 00 07 00 06 01 08 01 Confirm- Select: "Repeat" to choose which days the Scenario is active and press "<" to save.
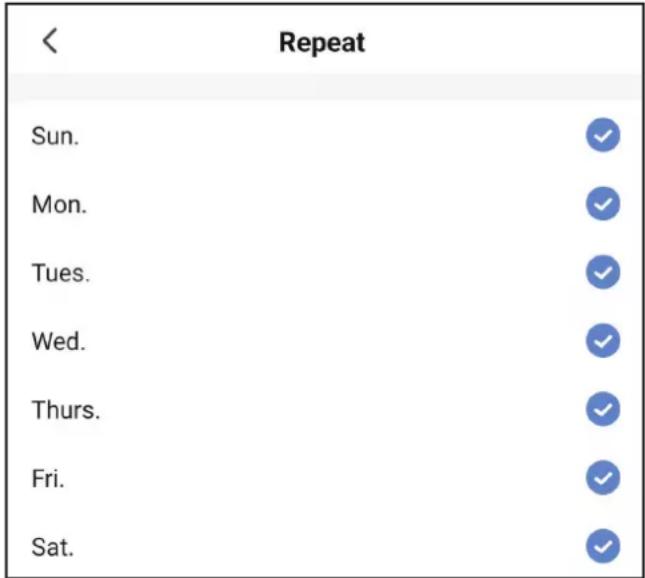
text_image
< Repeat Sun. ✓ Mon. ✓ Tues. ✓ Wed. ✓ Thurs. ✓ Fri. ✓ Sat. ✓- Select: "Next" to save the time schedule

text_image
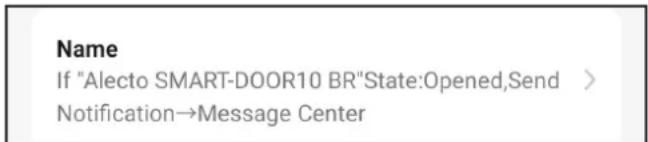
< Effective Period Next- Finally, you can change the name of the Scenario to suit your needs
text_image
Name If "Alecto SMART-DOOR10 BR"State:Opened,Send > Notification→Message Center >- Select: "Save" at the bottom of the screen when finished and select yes when asked to activate the Scenario.

text_image
Save- After saving the Scenario you will return to the Smart tab of the home page. The new scenario should be in place and enabled for use.
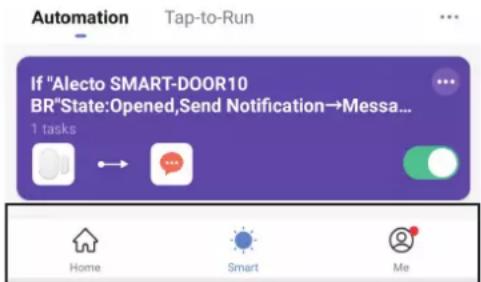
text_image
Automation Tap-to-Run If "Alecto SMART-DOOR10 BR"State:Opened,Send Notification→Messa... 1 tasks Home Smart MeAdditionally, you can create a similar scenario where a notification is sent when the door closes. This way you will receive notifications whenever the bedroom door opens or closes.
Do achieve this create a new scenario from step 2 and select "Closes" in step 6.
Sharing notifications with others
Through the SmartLife app it is possible to share your digital home with others.
Through which you allow multiple people such as family and caretakers to receive the notifications from set up scenario's.
Before a digital home can be shared the invitees require to have the SmartLife app installed and an active account.
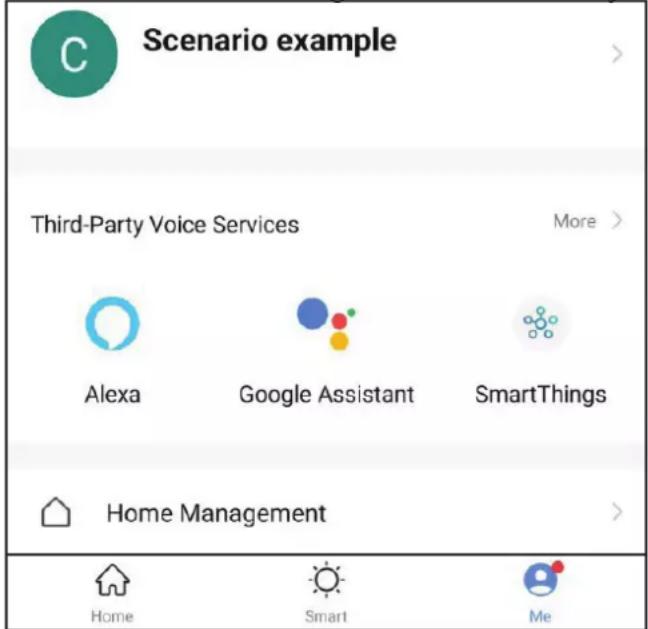
- From your home menu select "Me" to enter your profile page.
Select "Home Management" to enter your digital home.
text_image
Scenario example Third-Party Voice Services More > Alexa Google Assistant SmartThings Home Management Home Smart Me- Select your digital home in this case "Scenario example"
text_image
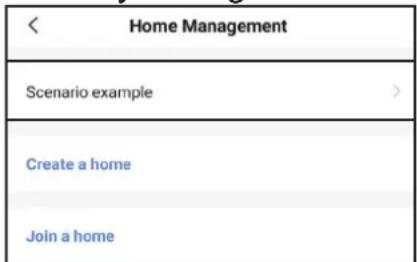
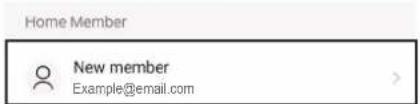
< Home Management Scenario example > Create a home Join a home- Select "Add Member"

- This gives you various options to share the invitation code needed for others to become members of your digital home.
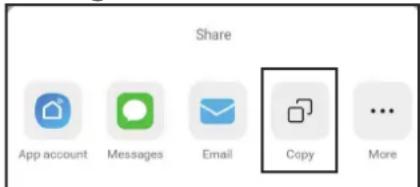
In this scenario we will select "Copy" as it provides the option to send the code through text, email and Whats app.
text_image
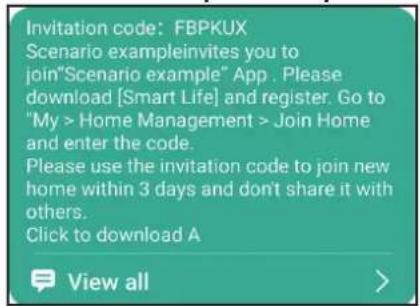
Share App account Messages Email Copy More- After selecting "Copy" the link is attached to your clipboard.
Send the invitation code to the designated person. The message will look similar to the image below.
In this example the personal invitation code is: FBPKUX
text_image
Invitation code: FBPKUX Scenario exampleinvites you to join"Scenario example" App. Please download [Smart Life] and register. Go to "My > Home Management > Join Home and enter the code. Please use the invitation code to join new home within 3 days and don't share it with others. Click to download A View all >Note that this is a personal code valid for 3 days. The invitee has 3 days to add the digital home to his SmartLife account.
If you want multiple people to access you digital home or the 3 day period has passed and the invitation is no longer valid then repeat this step for each individual.
Accepting an invitation to a digital home
The invited person has to add the new home to his own SmartLife account. The invitee has received the invitation code, has the SmartLife app installed and is logged in through his own account.
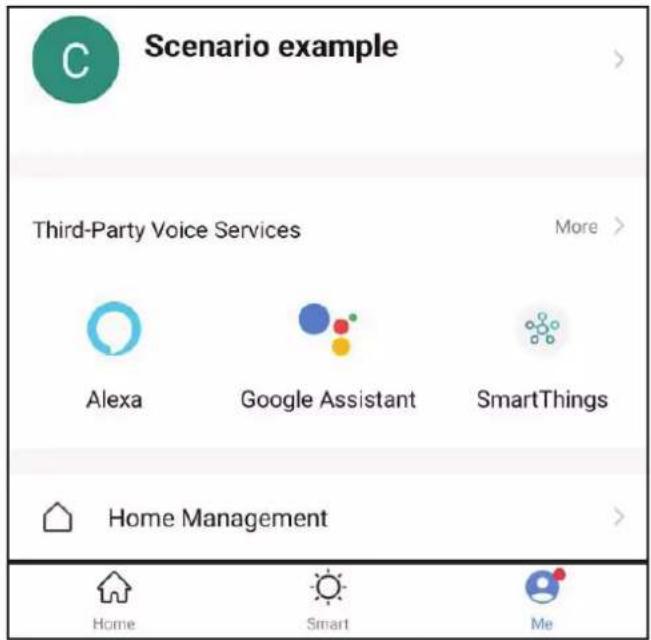
- From the Home screen select "Me" to enter the profile page.
Select "Home Management" to open your digital homes overview.
text_image
Scenario example Third-Party Voice Services More > Alexa Google Assistant SmartThings Home Management Home Smart Me- Select "Join a home

text_image
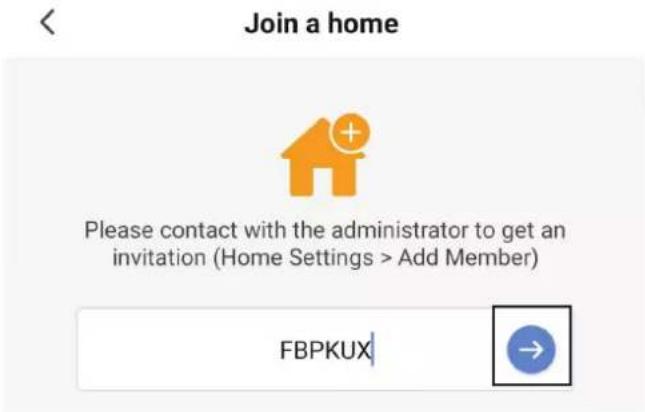
< Home Management Scenario example > Create a home Join a home- Insert the invitation code and press the arrow --> to accept and become a member.
text_image
Join a home Please contact with the administrator to get an invitation (Home Settings > Add Member) FBPKUXAfter the invitation is accepted you can change the member status.
- From the Home screen select "Me" to enter the profile page.
Select "Home Management" to open your digital homes overview.
text_image
Scenario example Third-Party Voice Services Alexa Google Assistant SmartThings Home Management Home Smart Me- Select your digital home
text_image
< Home Management Scenario example > Create a home Join a home- Select the newly added member to your digital home or the member you want to update the role.
text_image
Home Member New member Example@email.com
Scenario example gg-105566103719810083983
Home Owner
There are two types of roles: Administrator and Common Member.
Role Setting
Administrator
Manage Device and Room | Manage Smart Setting
| Manage Member
Common Member
Use Device | Use Smart Setting

Each role has a clearly defined set of actions that can used.
| Administrator:Add rooms to digital homeSwitch devices between roomsAdd devices to digital homeView current product statusSet up new scenario’sReceive notifications from active scenario’sInvite other people to digital homeManage the roles of other people in the digital home | Common Member:Receive notifications from active scenario’sView current product status |
Carefully decide for each member what their participation level is and adjust the role accordingly. Assigned roles can be changed by all Administrators.
Erste Schritte
text_image
QR code with a blue house icon in the center, likely linking to a digital service or application.text_image
Home Management My Home ... Create a home Join a home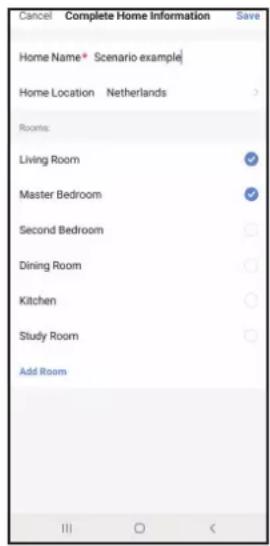
text_image
Cancel Complete Home Information Save Home Name* Scenario example Home Location Netherlands Rooms: Living Room ✓ Master Bedroom ✓ Second Bedroom ✓ Dining Room ✓ Kitchen ✓ Study Room ✓ Add Room III ○
text_image
Scenario example Overcast 11°C 78.6% 1026.36hPa Outdoor Tempera Outdoor Humidity Outdoor Air Pres. All Devices Living Room Master Bedroom No devices Add Devicetext_image
Alecto SMART-DOOR10 BR High Alarm Set * Today Afternoon 14:02:29 Opened Afternoon 14:02:29 Closed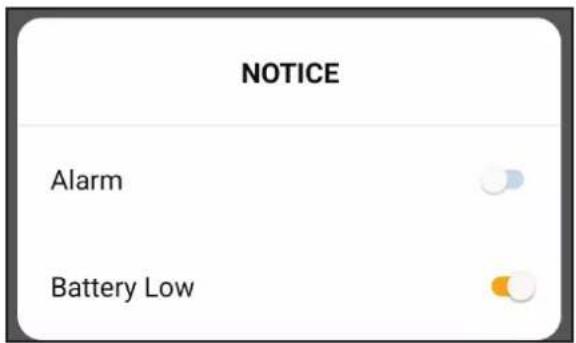
text_image
NOTICE Alarm Battery Lowtext_image
Scenario example Automation Tap-to-Run Execute automatically according to conditions such as the weather, device status, and time.text_image
Send notification >text_image
Select Notification Method Next Multiple items selectable Message Centertext_image
Effective Period All day >text_image
Cancel Create new Smart Condition Any Condition Is Met * Alecto SMART-DOOR10 BR State:Opened Task Message Center On Name If "Alecto SMART-DOOR10 BR"State:Opened,Send Notification-->Message Center Style Effective Period All day >text_image
< Repeat Sun. ✓ Mon. ✓ Tues. ✓ Wed. ✓ Thurs. ✓ Fri. ✓ Sat. ✓text_image
< Effective Period Nexttext_image
Scenario example Third-Party Voice Services More > Alexa Google Assistant SmartThings Home Management Home Smart Metext_image
< Home Management Scenario example > Create a home Join a hometext_image
Share App account Messages Email Copy Moretext_image
Invitation code: FBPKUX Scenario exampleinvites you to join"Scenario example" App. Please download [Smart Life] and register. Go to "My > Home Management > Join Home and enter the code. Please use the invitation code to join new home within 3 days and don't share it with others. Click to download A View all >text_image
Scenario example Third-Party Voice Services Alexa Google Assistant SmartThings Home Management Home Smart Metext_image
< Home Management Scenario example > Create a home Join a hometext_image
Join a home Please contact with the administrator to get an invitation (Home Settings > Add Member) FBPKUXtext_image
Scenario example Third-Party Voice Services More > Alexa Google Assistant SmartThings Home Management Home Smart Metext_image
< Home Management Scenario example > Create a home Join a hometext_image
Home Member New member Example@email.com Scenario example Home Owner >Manage Device and Room | Manage Smart Setting
| Manage Member
Common Member
Use Device | Use Smart Setting

text_image
QR code with a blue house icon in the center, likely linking to a digital service or application.text_image
Home Management My Home ... Create a home Join a home
text_image
Cancel Complete Home Information Save Home Name* Scenario example Home Location Netherlands Rooms: Living Room ✓ Master Bedroom ✓ Second Bedroom ○ Dining Room ○ Kitchen ○ Study Room ○ Add Room III ○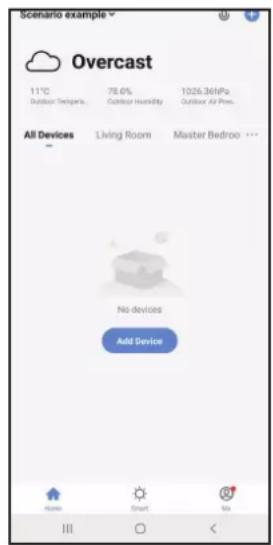
text_image
Scenario example Overcast 11°C 78.6% 1026.36hPa Outdoor Temperature Outdoor Humidity Outdoor Air Pres. All Devices Living Room Master Bedroom ... No devices Add Device Home Smart Us IIIInstallation du SMARTHOME350
text_image
Alecto SMART-DOOR10 BR High Alarm Set * Today Afternoon 14:02:29 Opened Afternoon 14:02:29 Closed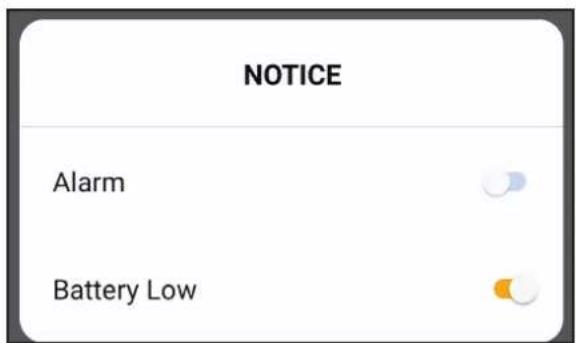
text_image
NOTICE Alarm Battery Lowtext_image
Scenario example Automation Tap-to-Run Execute automatically according to conditions such as the weather, device status, and time.text_image
Send notification >text_image
Select Notification Method Next Multiple items selectable Message Center| Effective Period | All day > |
text_image
Cancel Create new Smart Condition Any Condition is Met * Alecto SMART-DOOR10 BR State:Opened Task Message Center On Name If "Alecto SMART-DOOR10 BR"State:Opened,Send Notification→Message Center Style Effective Period All day >text_image
< Repeat Sun. ✓ Mon. ✓ Tues. ✓ Wed. ✓ Thurs. ✓ Fri. ✓ Sat. ✓text_image
< Effective Period Nexttext_image
Scenario example Third-Party Voice Services More > Alexa Google Assistant SmartThings Home Management > Home Smart Metext_image
< Home Management Scenario example > Create a home Join a hometext_image
Share App account Messages Email Copy Moretext_image
Invitation code: FBPKUX Scenario exampleinvites you to join"Scenario example" App. Please download [Smart Life] and register. Go to "My > Home Management > Join Home and enter the code. Please use the invitation code to join new home within 3 days and don't share it with others. Click to download A View all >text_image
Scenario example Third-Party Voice Services More > Alexa Google Assistant SmartThings Home Management Home Smart Metext_image
< Home Management Scenario example > Create a home Join a hometext_image
Join a home Please contact with the administrator to get an invitation (Home Settings > Add Member) FBPKUXtext_image
Scenario example Third-Party Voice Services More > Alexa Google Assistant SmartThings Home Management Home Smart Metext_image
< Home Management Scenario example > Create a home Join a hometext_image
Home Member New member Example@email.com Scenario example Home Owner >Manage Device and Room | Manage Smart Setting | Manage Member
Common Member
Use Device | Use Smart Setting