
FM-9000 - Smartphone Fysic - Free user manual and instructions
Find the device manual for free FM-9000 Fysic in PDF.


| Product Type | Smartphone |
| Brand | Fysic |
| Model | FM-9000 |
| Display | Color LCD, 2.4 inch (estimated) |
| Keypad | Alphanumeric with dedicated keys (M1, M2, M3, call, end, navigation) |
| Battery | Rechargeable Li-ion, 1000 mAh (estimated) |
| Power Supply | Input: 100-240 V~, 50/60 Hz, 200 mA; Output: 5 V, 800 mA |
| SIM Card | Standard SIM (1 slot) |
| Memory | Phonebook on SIM and phone (up to 250 entries estimated) |
| Connectivity | GSM 900/1800 (estimated) |
| Audio | Extra loud earpiece and speaker, hands-free function, hearing aid compatible |
| Flashlight | Built-in LED flashlight with switch |
| Emergency Call | One-click emergency call with up to 3 programmable numbers and pre-defined message |
| Direct Dial Keys | 3 programmable direct dial keys (M1, M2, M3) |
| Messaging | SMS send/receive with predictive text |
| Additional Functions | Alarm, calendar, calculator, key lock, volume adjustment, multiple ring tones |
| Dimensions | 110 x 50 x 15 mm (estimated) |
| Weight | 80 g (estimated) |
| Safety | Use only original battery and charger; keep away from children; maintain 20 cm distance from pacemaker; not waterproof |
| Maintenance | Clean with dry cloth; do not use harsh chemicals; avoid moisture and extreme temperatures |
| Disposal | Do not dispose with household waste; recycle battery separately at designated collection points |
| Spare Parts | Battery, charger, charging cradle (optional) – contact dealer |
Frequently Asked Questions - FM-9000 Fysic
User questions about FM-9000 Fysic
0 question about this device. Answer the ones you know or ask your own.
Ask a new question about this device
Download the instructions for your Smartphone in PDF format for free! Find your manual FM-9000 - Fysic and take your electronic device back in hand. On this page are published all the documents necessary for the use of your device. FM-9000 by Fysic.
USER MANUAL FM-9000 Fysic
FM-9000 GB
Enjoy pure telephony

NOTE
Go to www.branddistribution.de and read the detailed operating instructions in the chapters "Additional Safety Information", "Technical Data", "Maintenance and Care".
Thank you for choosing the Auro Comfort 1010. Particularly easy operation, extra-loud listening and ringtone volume, large characters, integrated flashlight, hearing-aid-compatibility and a one-click emergency call—with these performance characteristics this mobile phone can provide you with increased safety and add to your feeling of well-being.
To enable you to start using your Auro Comfort 1010 as soon as possible, we have summarized the most important information in this manual. Also included is a handy compa manual which you can carry around with you.
We wish you every enjoyment and success with your new Auro Comfort 1010 mobile phone.
Keys with important additional functions in the idle mode

Press in idle mode to open the main menu
Press in idle mode to open the phonebook
Press in idle mode to open the shortcut menu
Press in idle mode to open the call list
Table of Contents GB
1 Important Safety Information 6
2 Before Operation
2.1 Scope of Delivery 8
2.2 Information on Disposal 8
3 Starting Up
3.1 Inserting the SIM Card 9
3.2 Inserting the Battery 9
3.3 Charging the Mobile Phone 9
3.4 / 3.5 Switching the Device On / Off 10
3.6 Display Symbols 10
4 Making Phone Calls
4.1 Accepting a Call 11
4.2 Making a Call 11
4.3 Making a Call with Direct Dialling 11
4.4 Making a Call with the Phonebook 12
4.5 Calling Names (A-Z) from the Phonebook (Quick Search) 12
4.6 Redialling 13
4.7 / 4.8 Make Emergency Call / End Emergency Call 1
4.9 Phoning with the Hands-Free Function 14
4.10 Listening and Key Tone Volume 14
5 Menu
5.1 Navigating in the Menu 15
5.2 Fast Keys 16
5.3 Set Fast Key 2-9 16
6 Messages
6.1 Messages (SMS) 17
6.1.1 / 2 / 3 Receive / Display / Reply to SMS Message 17
Table of Contents GB
7 Settings
7.1 Display Setting 18
7.1.1 Change Language 18
7.2 Sound Setting 18
7.2.1 Change Ringtone Volume 18
7.2.2 Change Message Tone Volume 19
7.2.3 Change Alarm Volume 19
7.2.4 Change Key Tone Volume 19
7.2.5 Change System Tone Volume 19
7.2.6 Alert Type 19
7.2.7 Help Tone 20
7.3 Auto Key Lock 20
7.4 Security Setting 21
7.4.1 Change Password 21
7.5 Restore Factory Settings 22
7.6 Set M1/M2/M3 23
7.6.1 / 2 / 3 Set M1 / M2 / M3 Call Number
7.7 Clock & Alarm 24
7.7.1 Set Time & Date 24
7.8 Phonebook 25
7.8.1 Add New Entry 25
7.8.2 / 3 Delete Entry / Copy Entries 26/27
7.8.4 Set the Default Phonebook 28
7.9 Help Setting 29
7.9.1 / 2 / 3 Set Help Number 1 / 2 / 3 29
7.9.4 Predefine Help Message 30
1 Important Safety Information GB

IMPORTANT
Non-observance of these manual can result in serious injury or damage to the device.
Read this instruction manual carefully, in particular the safety instructions, before you begin using the device, and keep the instruction manual for future use. If you pass the device on to a third party, be sure to pass on this manual, too. For more detailed information than is contained in this manual, go to www.branddistribution.de.

WARNING
These warning notices must be observed in order to prevent any injury to the user or to third parties.
- In different countries, different regulations may apply to the use of mobile phones (e.g. when driving, in hospitals, at petrol stations, in aircrafts). Note the laws for using a mobile phone in your country, and turn the device off when usage is not permitted, or when dangerous situations or interference could occur.
- Only use the device in accordance with its purpose, and only at locations where telephoning poses no dangers.
- Only use the manufacturer's power supply and battery. Inserting an unsuitable battery, or inserting the battery incorrectly, can result in the danger of explosion. The battery must not be opened or exposed to a flame.
- The operation of medical devices can be affected. The manufacturers of pacemakers recommend a minimum distance of 20 cm between the devices when the mobile phone is switched on. Do not carry the phone in your breast pocket.
- If you suspect that there has been interference between the phone and a medical device, please consult your doctor before using the phone again.
1 Important Safety Information GB
- Make sure than small children do not play with the packaging material (danger of suffocation). The device and its accessories may contain small parts that can be ingested. Special care is needed if the device is to be used in the vicinity of small children or sick or disabled people. Keep the phone out of reach of such persons. Do not leave the device unattended when it is connected to the mains power supply.

CAUTION
Alerts you to possible damage to the device or other objects.
- Your mobile phone is suitable for hearing aids. However, if some hearing aids produce a buzzing noise, contact your hearing aid specialist.
- Do not expose the device to moisture, or to extreme heat (strong, direct sunlight) or cold (permafrost). Do not drop the device, and avoid joltings, shocks and pressure.
- The phone must only be opened to replace the battery or the SIM card. Any other changes made to the device are not permitted and result in the loss of the operating licence and the guarantee.
- The phone can cause interference in the vicinity of televisions, radios and other electronic devices.
2 Before Operation GB
2.1
Scope of Delivery
• 1 Auro Comfort 1010 mobile phone
- 1 battery
- 1 power supply unit Input: 100-240 V \~, 50/60 Hz, 200 mA
Output: 5 V ..., 800 mA
• 1 operating manual
- 1 compact manual
• 1 charging cradle (optional)
2.2
Information on Disposal

Packaging is reusable, or can be recycled. Please correctly dispose of packaging material no longer required. Should you detect any transportation damage when unpacking the device, please contact your dealer immediately.
This device may not be disposed of along with household refuse! Every consumer is obliged to deposit all electrical or electronic devices, no matter whether they contain harmful substances or not, at a collection point in his/her town or with a commercial dealer, so that it can be disposed of in an environmentally-friendly way.
Remove the battery before disposing of the deviceDo not throw used batteries into the household refuse; put them with special waste or in a collection station in a specialist shop. If you have any questions about disposal, contact your local authority or your dealer.
3 Starting Up GB
3.1
Inserting the SIM Card
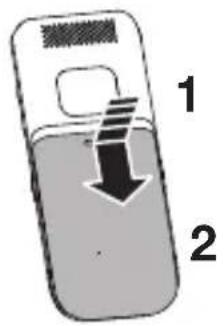

3.2
Inserting the Battery
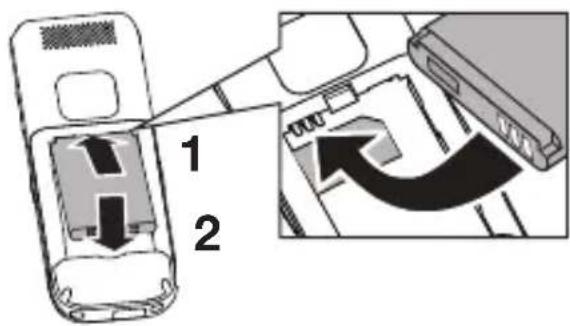
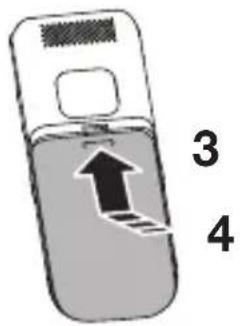
3.3
Charging the Mobile Phone

3 Starting Up GB
3.4
Switching the Device On

Press and hold down until the device switches on

Enter the PIN of the SIM card

Confirm PIN OK = device is ready for use
3.5
Switching the Device Off

Press and hold down until the device switches off
3.6
Display Symbols

Battery Display

Signal Strength

Alarm Switched On

Headset Plugged In

Key Lock On

Foreign Network

Call Transfer Active

Call Missed

SMS Received

Muting

Silent

Ringtone Switched On

Vibration Only

Vibration Then Ring

Vibration And Ring
4 Making Phone Calls GB
4.1
Accepting a Call

Press to accept a call
Press to end a call or to reject an incoming call
4.2
Making a Call
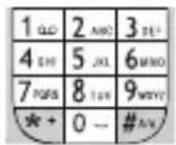
Enter the desired phone number with the area code

Press to delete the last number Press and hold down to delete all numbers

Press to dial the number displayed

Press to end the call or to interrupt the dialling
4.3
Making a Call with Direct Dialling

Press and hold down direct dialling key M1, M2 or M3 until the corresponding number stored is called

NOTE

Press to end the call
Setting phone numbers for direct dialling keys – see section 7.6.1.
4 Making Phone Calls GB
4.4
Making a Call with the Phonebook

NOTE
To save phone numbers in the phonebook, read section 7.8.1.

Press to open "Phonebook List"

Press until the desired phone number appears

Press to dial the phone number displayed

Press to end the call or to close the phonebook
4.5
Calling Names (A-Z) from the Phonebook (Quick Search)

Press to open "Phonebook"

Enter the first letters for the person you want to call

E.g. Press key 6 once for M key 3 twice for E key 9 three times for Y

until the name MEYER is displayed with its phone number

Press to dial the phone number displayed

Press to end the call or to close the phonebook
4 Making Phone Calls GB
4.6 Redialling

Press to open the call list
Press until the desired phone number is selected
Press to dial the phone number displayed
Press to end the call or to close the call list
4.7 Making an Emergency Call


NOTE
Save up to three emergency phone numbers that will be dialled in sequence in the case of an emergency. For reporting settings, see section 7.9.
Press the help call key on the back of the device and push it firmly upwards to trigger the emergency call.
The emergency call begins after a delay of 5 seconds. In this time you can prevent a possible false alarm by pushing the emergency call key back down again.
Your mobile phone dials in sequence the three emergency call numbers saved until the call is accepted. The phone then switches to the hands-free mode.
After the call, the phone emits an emergency ringtone. The display shows the predefined help message.
4 Making Phone Calls GB
4.8
Ending the Emergency Call Mode

Press the help call key and push it downwards
4.9
Phoning with the Hands-Free Function

Press during a phone call to switch the hands-free function on

Press again during a phone call to switch the hands-free function off again
4.10
Listening and Key Tone Volume

Press during a phone call to increase or decrease the listening volume

WARNING
Neverhold the mobile phone to your ear when it is ringing, when the hands-free function is active, or when an emergency call has been triggered. This could damage your hearing.
Press during a phone call with the hands-free function on to increase or decrease the loudspeaker volume
Press in idle mode to adjust the Key Tone Volume
5 Menu GB
5.1
Navigating in the Menu
The device is equipped with numerous functions that can be set in the menu.
Press in idle mode to go to the main menu. The following menu items are displayed:
Messages
Phone Setting
Set M1/M2/M3
Clock & Alarm
Phonebook
Help Setting
Calculator
Calendar
SIM Toolkit

Press in the main menu to select the desired menu item

Press again to open the selected menu item, e.g.:

NOTE
Pressing the M3key takes you back to the previous menu from any menu.
Messages → Write a message
→ Inbox
→ Outbox
→ Message Settings
5 Menu GB
5.2
Fast Keys
Fast keys 2 to 9 are useful for getting to the most important menu items quickly. By pressing and holding down one of these keys, you call up the menu item assigned to it. For example, “Alarm”, “Select image”, etc...
5.3
Set Fast Key 2-9


NOTE
Pressing the M3key takes you back to the previous level from any level.
6 Messages GB
6.1
Messages (SMS)
6.1.1 Receive SMS message
6.1.2 Display SMS Message
6.1.3 Reply to SMS Message

NOTE
Pressing the key #A/a switches from upper case to lower case, and vice versa. Press and hold #A/a switches to the numeric mode (123).
Pressing this key enters a space.
0 -
Pressing the key *+ selects special characters.
SMS messages are short written messages. They can be entered, sent and received with mobile phones and some landline phones.
A signal tone and the message “1 New Message!” in the display indicate that a new SMS message has been received.

Press to display the message
Press to scroll down and display the rest of the text

Press to go to "Message Option"
Press to open the window for replying to the SMS message
Use the number keys to enter the desired text (e.g. HELLO = 4 twice for H,
3 twice for E,
5 three times for L, brief pause,
5 three times for L and
6 three times for O)
Press to delete an incorrect entry
Press to send the reply
Press to return to idle mode
7 Settings GB
7.1
Display Setting
7.1.1 Change Language
In the Display Setting menu, you can adapt, for example, the language, screen saver, etc. to your personal requirements.

NOTE
Pressing the key returns you to the idle mode.

7.2
Sound Setting
7.2.1 Change Ringtone Volume
Press to open the main menu
Press to select "Phone Setting"
Press to open "Phone Setting"
Press to select "Sound Setting"
7 Settings GB

NOTE
Pressing the M3key takes you back to the previous level from any level.
Pressing the key returns you to the idle mode.

7.2.2 Change Message Tone Volume Procedure to change "Message Tone Vol." (7 volume levels) as in section 7.2.1 Change Ringtone Volume
7.2.3 Change Alarm Tone Volume Procedure to change "Alarm Tone Vol." (7 volume levels) as in section 7.2.1 Change Ringtone Volume
7.2.4 Change Key Tone Volume Procedure to change "Key Tone Volume" (7 volume levels) as in section 7.2.1 Change Ringtone Volume
7.2.5 Change System Tone Volume Procedure to change "System Tone Vol." (7 volume levels) as in section 7.2.1 Change Ringtone Volume
7.2.6 Alert Type Procedure to change "Alert Type" (Ring Only, Vibration Only, Vibrate And Ring, Vibrate Then Ring, Silent) as in section 7.2.1 Change Ringtone Volume
7 Settings GB
7.2.7 Help Tone
Procedure to change Help Tone (Help Tone ON /OFF) as in section 7.2.1 Change Ringtone Volume
7.3
Auto Key Lock

NOTE
A call can be accepted by pressing the accept call key even if the keys are locked. The lock is reactivated when the call is finished.
To deactivate the keypad lock again, set Nonein the menu.
Protects against accidental pressing of phone keys
Press to go to menu
Press to go to "Phone Setting"
Press to enter "Phone Setting"
Press to go to "Auto KeyLock"
Press to enter "Auto KeyLock"

Press to select the time (None, 5 sec, 30 sec, 1 min, 5 min) after which the keypad lock is to be activated (after the last time the phone is used)
Press to confirm your selection
Press to return to idle mode The keys will now be locked after the last time the phone is used, as set
Press M3 followed by #N/2 to unlock the keys
7 Settings GB
7.4
Security Setting
7.4.1 Change Password

NOTE
Pressing the M3key takes you back to the previous level from any level.
Pressing the key 📞 returns you directly to the idle mode.

Press to go to the main menu
Press to go to "Phone Setting"
Press to enter "Phone Setting"
Press to go to "Security Setting"
Press to enter "Security Setting"
Press to go to "Change Password"
Press to enter "Change Password"
Press to go to the password you want to change (e.g. PIN2)
Press to go to the PIN entry for "Old PIN2:"
Enter the PIN set (factory setting: 9999)
Press to go to the PIN entry for "New PIN2:"
Enter the new PIN
Press to confirm your entry
7 Settings GB

Repeat the new PIN
Press to confirm your entry
7.5 Restore Factory Settings

Press to go to the main menu
Press to go to "Phone Setting"
Press to enter "Phone Setting"
Press to go to "Restore Factory Settings"
Press to enter "Password:"

Enter the password set (factory setting: 1122)
Press to confirm your entry
The message ARE YOU SURE? appears in the display
Press if you are sure you want to restore the factory settings or
Press if you do not want the current settings to be changed
Press to return to idle mode

NOTE
The settings in the phone are changed. Data stored on the SIM card is retained.
7 Settings GB
7.6
Set M1 / M2 / M3
7.6.1 Set M1 Call Number

Press to go to the main menu
Press to go to "Set M1/M2/M3"
Press to enter "Set M1/M2/M3"
Press to enter "M1 Call Number"
Press to enter "From Phonebook"
Press to enter "From Phonebook"
Press to go to the number you want in the phonebook
Press to confirm your selection
Press to return to idle mode
7.6.2 Set M2 Call Number
Procesure to set "M2 Call Number" as in section 7.6.1, Set M1 Call Number
7.6.3 Set M3 Call Number
Procesure to set "M3 Call Number" as in section 7.6.1, Set M1 Call Number
7 Settings GB
7.7
Clock & Alarm
7.7.1 Set Time & Date

NOTE
In the "Format" menu you can change the display time format: 12/24 hours and the date format e.g.: DD/MM/YYYY.

Press to go to the main menu
Press to go to "Clock & Alarm"
Press to go to "Time & Date"
Press to go to "Set Time & Date"
Press to enter "Set Time & Date"
Enter the current time: hours (HH), minutes (MM)
Press to enter the date
Enter the current date: year (YYYY), month (MM), day (TT)
Press to confirm your entry
Press to return to idle mode
7 Settings GB
7.8
Phonebook
7.8.1 Add a New Entry

Press to go to the main menu
Press to go to "Phonebook"
Press to enter "Phonebook"
Press to go to "Add New"
Press to select“Add New”
Press to select "To SIM" or "To Phone"
Press to go to "Name"
Press to open "Name" input field
Enter the name
Press to save entered name
Press to open "Mobile Number" input field
Enter the mobile number
7 Settings GB

Press to save the entry
Press to confirm saving the entryor
Press to cancel
Press to return to the idle mode
7.8.2 Delete entry

Press to open "Phonebook"
Press until the desired phone number appears or
Enter the first letters for the person you want to call
E.g. Press key 6 once for M key 3 twice for E key 9 three times for Y
until the name MEYER is displayed with its phone number
Press to open the "Entry Option"
Press to select "Delete"
7 Settings GB
When you press this, "Delete?" appears
Press to delete the entryor
If you do not want to delete it
Press to return to idle mode
7.8.3 Copy Entries (SIM ↔ Phone)
Press to open "Phonebook"
Press until the desired phone number appears or
Enter the first letters for the person you want to call
E.g. Press key 6 once for M key 3 twice for E key 9 three times for Y
until the name MEYER is displayed with its phone number
Press to open the "Entry Option"
Press to select "Copy"

7 Settings GB

When you press this, "Copy?" appears
Press to copy the entryor
If you do not want to copy it
Press to return to idle mode
7.8.4 Set the Default Phonebook

Press to go to the "Main Menu"
Press to go to "Phonebook"
Press to enter "Phonebook"
Press to go to "Default Phonebook"
Press to enter "Default Phonebook"
Press to select the "SIM Only", the "Phone Only" or "Both"
Press to confirm your selection
Press to return to idle mode
7 Settings GB
7.9
Help Setting
7.9.1 Set Help Number 1

Press to go to the main menu
Press to go to "Help Setting"
Press to enter "Help Setting"
Press to enter "Set Help Numbers"
Press to enter "Help No. 1"
Press to go to "Select"
Press to choose from Phonebook
Press to go to the number you want in the phonebook
Press to confirm your selection
Press to return to idle mode
7.9.2 Set Help Number 2
Procesure to set "Help No. 2" as in section 7.9.1, Set Help Number 1
7.9.3 Set Help Number 3
Procedure to set "Help No. 3" as in section 7.9.1, Set Help Number 1
7 Settings GB
7.9.4 Predefine Help Message



- FM-9000 GB
- ENJOY PURE TELEPHONY
- NOTE
- KEYS WITH IMPORTANT ADDITIONAL FUNCTIONS IN THE IDLE MODE
- TABLE OF CONTENTS GB
- 1 IMPORTANT SAFETY INFORMATION 6
- 2 BEFORE OPERATION
- 3 STARTING UP
- 4 MAKING PHONE CALLS
- 5 MENU
- 6 MESSAGES
- 7 SETTINGS
- 1 IMPORTANT SAFETY INFORMATION GB
- IMPORTANT
- WARNING
- CAUTION
- 2 BEFORE OPERATION GB
- 2.1
- SCOPE OF DELIVERY
- 2.2
- INFORMATION ON DISPOSAL
- 3 STARTING UP GB
- 3.1
- 3.2
- 3.3
- 3.4
- SWITCHING THE DEVICE ON
- 3.5
- SWITCHING THE DEVICE OFF
- 3.6
- DISPLAY SYMBOLS
- 4 MAKING PHONE CALLS GB
- 4.1
- ACCEPTING A CALL
- 4.2
- MAKING A CALL
- 4.3
- MAKING A CALL WITH DIRECT DIALLING
- 4.4
- MAKING A CALL WITH THE PHONEBOOK
- 4.5
- CALLING NAMES (A-Z) FROM THE PHONEBOOK (QUICK SEARCH)
- 4.6 REDIALLING
- 4.7 MAKING AN EMERGENCY CALL
- 4.8
- 4.9
- 4.10
- 5 MENU GB
- 5.1
- NAVIGATING IN THE MENU
- 5.2
- FAST KEYS
- 5.3
- SET FAST KEY 2-9
- 6 MESSAGES GB
- 6.1
- MESSAGES (SMS)
- 7 SETTINGS GB
- 7.1
- DISPLAY SETTING
- 7.1.1 CHANGE LANGUAGE
- 7.2
- SOUND SETTING
- 7.2.1 CHANGE RINGTONE VOLUME
- 7.2.7 HELP TONE
- 7.3
- AUTO KEY LOCK
- 7.4
- SECURITY SETTING
- 7.4.1 CHANGE PASSWORD
- 7.5 RESTORE FACTORY SETTINGS
- 7.6
- 7.6.2 SET M2 CALL NUMBER
- 7.6.3 SET M3 CALL NUMBER
- 7.7
- CLOCK & ALARM
- 7.7.1 SET TIME & DATE
- 7.8
- PHONEBOOK
- 7.8.1 ADD A NEW ENTRY
- 7.8.2 DELETE ENTRY
- 7.8.3 COPY ENTRIES (SIM ↔ PHONE)
- 7.8.4 SET THE DEFAULT PHONEBOOK
- 7.9
- HELP SETTING
- 7.9.1 SET HELP NUMBER 1
- 7.9.2 SET HELP NUMBER 2
- 7.9.3 SET HELP NUMBER 3
- 7.9.4 PREDEFINE HELP MESSAGE
Brand : Fysic
Model : FM-9000
Category : Smartphone