
FX-3950 - Telephone Fysic - Free user manual and instructions
Find the device manual for free FX-3950 Fysic in PDF.


| Product Type | Cordless DECT Phone |
| Brand | Fysic |
| Model | FX-3950 |
| Display | Backlit LCD, 1.8 inches |
| Frequency | DECT (1880-1900 MHz) |
| Range | Up to 50 m indoors, up to 300 m outdoors |
| Phonebook | Up to 100 entries |
| Caller ID | Yes (support for FSK and DTMF) |
| Hands-free | Yes, with speakerphone |
| Ringtones | 10 polyphonic ringtones |
| Volume Control | Adjustable earpiece and ringer volume |
| Power Supply | AC adapter (input: 100-240V, output: 6V DC 500mA) or 2x AAA Ni-MH rechargeable batteries |
| Standby Time | Up to 100 hours |
| Talk Time | Up to 10 hours |
| Dimensions (Handset) | 170 x 45 x 25 mm |
| Weight (Handset) | 130 g (including batteries) |
| Base Station Dimensions | 120 x 100 x 60 mm |
| Additional Features | Redial, Mute, Flash, Keypad lock, Wall mountable base |
| Cleaning | Wipe with a soft, dry cloth; do not use solvents |
| Safety | Use only approved power adapters; keep away from water and heat sources |
| Spare Parts | Replacement batteries, chargers, and handsets available via Fysic customer service |
| Repairability | Refer to manual; user-replaceable batteries only; other repairs by authorized service |
Frequently Asked Questions - FX-3950 Fysic
User questions about FX-3950 Fysic
0 question about this device. Answer the ones you know or ask your own.
Ask a new question about this device
Download the instructions for your Telephone in PDF format for free! Find your manual FX-3950 - Fysic and take your electronic device back in hand. On this page are published all the documents necessary for the use of your device. FX-3950 by Fysic.
USER MANUAL FX-3950 Fysic
FX-3950
CONTENTS
- DECLARATION OF CONFORMITY ...... 4
- NETWORK COMPATIBILITY .... 4
- MAINTENANCE......5
4. INSTALLATION
4.1 Table stand....5
4.2 Wall-mounting....6
4.3 Batteries 7
4.4 Power adaptor 8
4.5 Receiver 9
4.6 'Vibrat.' connection 9
- SETUP 10
6. USING THE TELEPHONE
6.1 Incoming calls....14
6.2 Call timer 14
6.3 Ending calls....14
6.4 Dialling numbers....15
6.5 Pre-dialling 15
6.6 Re-dialling last number(s) 16
6.7 Dialling direct memories 16
6.8 Dialling phonebook memories....17
6.9 Call volume and tone....17
6.10 R button....19
6.11 * and # buttons 20
7. Caller-ID
7.1 Introduction....21
7.2 New call indication....21
7.3 Checking the memory & calling back ..... 22
7.4 Copying calls to the phonebook 22
7.5 Deleting calls....23
7.6 Remarks & tips regarding Caller-ID.....24
8. NUMBER MEMORY
8.1 Introduction....26
8.2 Programming....27
8.3 Changing / correcting 29
8.4 Deleting 30
9. SOS FUNCTION
9.1 Preparation 32
9.2 Operation.... 36
10. WARNINGS AND USER TIPS
10.1 General 38
10.2 Installation 38
10.3 Environment 39
11. WARRANTY....40
1. DECLARATION OF CONFORMITY
The declaration of conformity is available on the website WWW.FYSIC.COM

2. NETWORK COMPATIBILITY
This telephone is designed for use on the ‘public switched telephone networks (analogue single line)’ of telephony and cable companies in all countries of the EU.
However, each provider could require a different connecting wire with plug.
This device meets the essential requirements and other relevant provisions as stipulated by the European Guideline 1999/5/EC

Loading factor: 50

3. MAINTENANCE
- Only clean the housing with a moist cloth, never use chemical cleaning agents.
- Never place the FX-3950 onto cellulose-treated surfaces; the rubber feet could leave tracks.
4. INSTALLATION
4.1 Table stand:
When using the telephone on a table or desk, you should first attach the table stand to the bottom of the telephone.
- first, hook this side of the stand into the bottom of the telephone (see 1)

- now push the other side of the stand into the
bottom until the 2 clips lock (see 2), if necessary depress these clips somewhat (see 3)
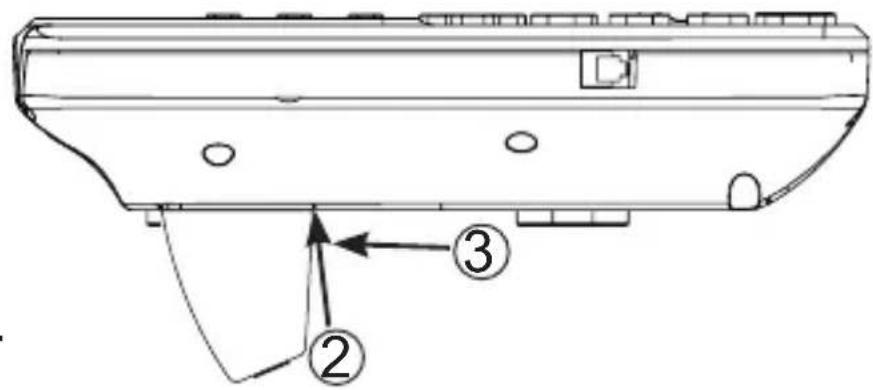
When you want to detach the stand again, press at 3 and remove in the direction of 4.

4.2 Wall-mounting:
- in a vertical line, drill 2 holes at a distance of 8.4 cm from each other and insert plugs and screws; let the head of the screws protrude for 5 mm

-
slide the receiver clamp out of the telephone, turn it 180° and place it back onto the telephone; this clamp will hold the receiver in case of wall-mounting
-
hook the telephone with the screw holes over the screws and press it downward
-
fix the telephone wire to the wall using the cable clips
In case of wall-mounting, the table stand is NOT used.
4.3 Batteries:
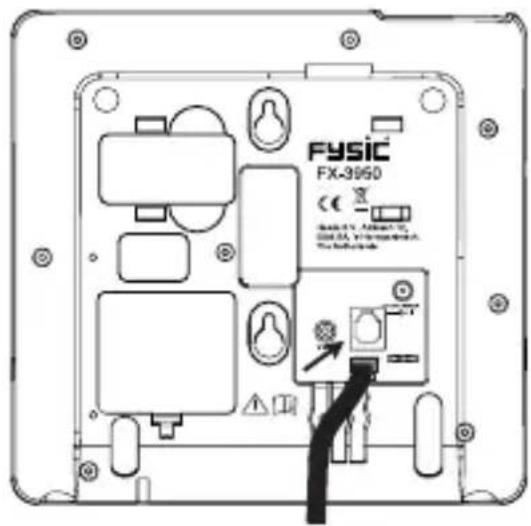
The display of the telephone is powered by the supplied power adaptor. You can install 4 backup batteries to ensure the display will also keep working during a power outage.

Attention: do NOT remove the battery compartment cover while the telephone is connected with the telephone line

-
use a sharp object to remove the battery cover and open the compartment.
-
insert 4 AAA (pencil cells) according to the markings inside the battery compartment.
-
replace the battery cover and make sure it "clicks" onto the telephone.
4.4 Power adaptor:
The power adaptor must be connected to be able to use the additional functions, such as hands-free calling and the speaker function
-
connect the supplied power adaptor to the DC 9V input at the bottom of the telephone.
-
insert the power adaptor into a 23V AC wall socket.

Only connect the supplied power adaptor. Connection other power adaptors with different specifications can damage the telephone or even cause a fire
4.5 Receiver:
-
connect the receiver with the telephone by attaching one side of the spiral cable to the bottom of the receiver and the other side to the left side of the telephone
-
push in the plugs until they're securely connected
4.6 'Vibrat.' connection:
The bottom of the phone is provided with a ‘Vibrat.’ input for connecting a shaker that starts vibrating when receiving incoming calls. This shaker is not included, but can be obtained from the Fysic service department. See page 4 of this user’s manual for address information.
5. SETUP
You can set the time and date as follows.

TIME/DATE
press 1x the button
press the OK button
use ▲ and ▼ to adjust the settings in the following order:
the hours, press OK,
the minutes, press OK,
the date, press OK,
the month, press OK
briefly pick up the receiver and put it down again to save your settings
Other settings:
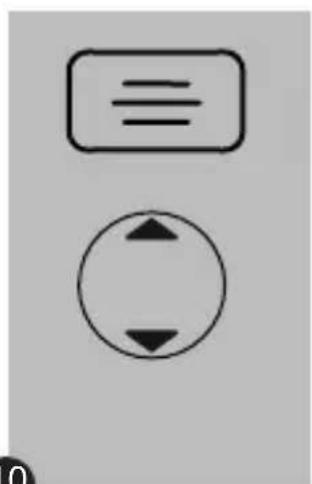
press the button
use ▲ and ▶ to scroll the setup op- tions below
LANGUAGE
to set the display language
SPOKEN NUMBERS
to turn the spoken numbers function on or off
RING MEL
to set the ring tone, you can choose from 3 melodies
RING VOL
to set the ring tone volume, you can choose from 4 volume levels or turn the ring tone off
CALL LIGHT
determine whether the call light must turn on when receiving incoming calls
CONTRAST
to set the display contrast, you can choose from 4 levels
KEY TONE
to enable of disable beep tones when pressing buttons
FLASH
use this option to set the interruption time for the flash function; 100ms is the standard flash time, also the recommended time to set. See also paragraph 6.11.
TONE/PULSE
use this option to set the phone to pulse dialling or tone dialling; the entire public telephone network in the Benelux is suitable for tone dialling, the recommended choice
PAUSE
use this option to set how long the phone must pause when dialling numbers with a dial pause added to the number
further in this manual, the following functions are explained in separate chapters.
STORE NO.
NAME REC
PENDANT
BOOST LOCK

ALARM FUNC SILENC.URG AL.ANNOUNC NW.CALL.LED
press OK when the choice appears in the display
use ▲ and ▶ to adjust the setting or to enable or disable the function
press OK
briefly pick up the receiver and put it back down to save your setting
PRE-DIAL NUMBER
The ‘PRE-DIAL NUMBER’ is not activated in this phone
6. USING THE TELEPHONE
6.1 Incoming calls:
see chapter 5 to set the ring tone and tone volume and to enable or disable the incoming call light

pick up the receiver to have your conversation through the receiver or briefly press the speaker button or the alarm button to use the hands-free function for your call
Pay attention, the power adaptor must be connected to be able to use the speaker function.
6.2 Call timer:

the display will keep track of the call time; this time will disappear 2 seconds after ending the call
6.3 Ending calls:

put the receiver back onto the cradle if using the receiver for the current call

or
press the speaker button again to end the call if using the speaker for the current call
6.4 Dialling numbers:

pick up the receiver or turn on the speaker function
enter the desired phone number, the number will be dialled directly
6.5 Pre-dialling:

enter the telephone number
use the ⬤ button to correct any errors
pick up the receiver or turn on the speaker function and the number will be dialled instantly
6.6 Re-dialling last number(s):
The FX-3950 memorizes the 15 last dialled numbers.

press the ● button, the last dialled number will appear in the display, the time when the number was dialled last is shown in the lower part of the display
repeatedly press the button for the other numbers before the last one
pick up the receiver or turn on the speaker function to re-dial the selected number
6.7 Dialling direct memories (*):

pick up the receiver or turn on the speaker function
press the M1, M2 or M3 button
that number will be dialled
6.8 Dialling phonebook memories (*):

briefly press the 📄 button until the 📋 symbol illuminates in the upper right corner of the display
use ▲ and ▶ to search for the desired contact or use the ABC on the numeric buttons to directly select your contact
pick up the receiver, turn on the speaker function or press the OK button to dial the selected number
*: for programming the memories, see paragraph 8.2
6.9 Call volume and tone:

ATTENTION: EXCESSIVE VOLUMES CAN LEAD TO HEARING LOSS.
IF MULTIPLE USERS ARE USING THE
TELEPHONE, ALWAYS SET THE VOLUME TO NEUTRAL AFTER EACH CALL.

Volume:
press ▲to increase the volume or press ▼to decrease the volume, these volume buttons control the volume of both the receiver and the speaker

Amplifier:
press the +40dB button to switch on the amplifier, press again to turn off the amplifier, this function is only available in combination with the receiver

ATTENTION: DANGER DUE TO THE PRESENCE OF EXTREMELY HIGH MAXIMUM VOLUME
You can use the menu ‘SETTINGS’ (see chapter 5) to have the amplifier switch on automatically when you pick up the receiver. In this menu, select the ‘BOOST LOCK’ option and set it to ‘ON’.

tone adjustment:
press the ♪ button the increase the high tones
attention: this function is only available in combination with an activated amplifier and the receiver
6.10 R button:

the R button (also called FLASH) is used to briefly interrupt the telephone connection; this brief interruption is used by some home or office switchboards for call forwarding; public switchboards use this button for telecom functions, such call waiting.
For setting the duration of the interruption, see paragraph 5, item ‘flash’.
The setting ‘100’ is most commonly used in the Benelux. The setting 300 or 600 is often used by company switchboards.
For more information regarding this function, please contact your telephone service provider.
6.11 * and # buttons:

the *and #are buttons mainly used for tele-banking:
- press the button when requested to press the ASTERISK button
- press the # button when requested to press the POUND button
7. Caller-ID
7.1 Introduction:
Provided this function is supported by your service provider, the number of the calling party will be shown in the display of the telephone.
If this number, including the name, is programmed in the phonebook memory of the telephone, the display will not only show the number but also the name.
The telephone has a capacity for 15 calls.
7.2 New call indication:

the call indicator will flash continuously when new calls are saved in the Caller-ID memory
you can use the settings menu to disable this flashing indicator; for this, see chapter 5, item NW.CALL. LED
in the upper part of the display, the 📞icon will also appear
7.3 Checking the memory & calling back:

make sure the word CID lights up in the upper left corner in the display (if necessary, press the 📄 button)
use ▲ and to scroll the memory
- in the lower part of the display, the time of the call will be shown
- when a name is assigned to the number, the name alternating with the time of the call will be shown in the lower part of the display.
pick up the receiver, turn on the speaker function or press the OK button to call back this number
7.4 Copying calls to the phonebook:

make sure the word CID lights up in the upper left corner in the display (if necessary, press the 📄 button)

use ▲ and ▶ to scroll to the desired call
press and hold the button for at least 2 seconds until the first digit of the number starts flashing, you can now edit the number if so desired
press OK
you can now add a name, for this see chapter 5 and select 'SAVE NAME'.
press OK to save the selected call
7.5 Deleting calls:
CID
make sure the word CID is shown in the upper right corner of the display (you might need to press the button several times)

use ▲ and ▶ to select the desired call (or select a random call when all calls must be deleted)
briefly press the ✉button, 'DELETE' will appear in the display? or press and hold the ✉button and 'DEL ALL?' will appear in the display
now press and hold the Ⓧbutton for 2 seconds to confirm deleting the call or calls
7.6 Remarks & tips regarding Caller-ID:
- the FX-3950 is suitable for both the DTMF system, offered by the Dutch KPN, as well as for the FSK system, offered by the Belgian Belg-acom and the Dutch and Belgian cable companies for as far as they offer telephony services
- the Caller-ID function usually requires an additional subscription, for more information please contact your telephone service provider
- displaying the name:
- the Dutch DTMF system doesn’t send names; the name will only appear in the display when it’s programmed in the phonebook memory of the telephone
- however, the FSK system is capable of sending names (please ask your telephone service provider); when receiving an incoming call, both the name and number will be shown in the display
- Time:
- using the FSK system, the time set by the network is used
- the DTMF system uses the time set in the telephone (see chapter 5, ‘Setup’)
- multiple calls from the same number will only be stored 1x
- if the display [OUT OF AREA], [PRIVATE] or [0000000000] is shows, the subscriber has blocked sending his/her name and number
- you can also save the names/numbers of received calls
8. NUMBER MEMORY
8.1 Introduction:
The FX-3950 provides a phonebook with a capacity for 99 frequently used numbers. The maximum length of each memory is 22 digits and the name programmed for each memory number can contain up to 10 characters.
In addition to regular phone numbers, you can also program numbers of mobile phones.
For each memory you can record a spoken name that will be pronounced by the phone when dialling that memory or when that subscriber calls you.
These numbers are stored in special memory chips that require no mains supply. That means the memory remains stored even with a disconnected adaptor and the batteries removed.
The number memory is linked to the Caller-ID function.
With each call, the telephone checks whether the number is programmed in its memory and will show the corresponding name in the display accordingly.
The FX-3950 is also provided with 3 speed-dial memories, M1, M2 and M3, for telephone numbers only.
8.2 Programming:

direct memories:
Attention: the speed-dial numbers M1, M2 and M3 are also the SOS numbers that will be dialled in case of an emergency
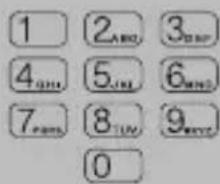
use the keypad to enter the phone number (max. 22 digits)
you can use the Ⓧbutton to delete an incorrect input
press and hold the desired memory button for at least 2 seconds until 'SAVED' appears in the display




2 sec.

phonebook memories: press the button
use ▲ and to scroll to the 'STORE NO.' option
press OK
use the keypad to enter the phone number (*)(**)
press OK
use the keypad to enter the name (*) (***)
press OK
Name record ‘NAME REC’ will appear in the dis- play
now press and hold OK - a beep will sound after approx. 2 seconds (keep pressing the OK button)

- you now have 5 seconds to speak the name into the microphone (or you can release the OK button when the recording takes less time)
to verify the name, it will be played back once
To add or change a name at a later time:
See chapter 5 and select 'NAME REC'.
Press OK and use ▲ and ▶ to look for the desired memory.
Now follow the instructions described on the previous page.
8.3 Changing / correcting:
direct memories:
it's not possible to change a direct memory; in this case, you just need to program a new and correct number in the place of the old number
phonebook memories:
-
press the 📄 button to open the phonebook
-
use ▲ and ▼ to select the desired memory contact
-
press and hold the button for at least 2 seconds until the first digit of the telephone number starts flashing
-
delete the old number with the button
- now enter the correct number
- briefly press the OK button
- repeat these instructions for the name
- briefly press the OK button
the new data will overwrite the old data in the memory
8.4 Deleting:
direct memories:
it's not possible to delete a direct memory, but in this case you can program a non-existing number in the place of the old number to delete it
phonebook memories:
- press the button to open the phonebook
- use ▲ and ▶ to select the desired call (or select a random call when all calls must be deleted)
- briefly press the Ⓧ button until ‘DELETE?’ appears in the display or press and hold the Ⓧ button until ‘DEL ALL?’ appears in the display
- now press and hold the ⓣ button for 2 seconds to confirm deleting the selected calls
*: use the Ⓧ button to delete any mistakes while entering names or numbers
**: if you want to add a dial pause to the number, e.g. because the phone is connected through a home or office switchboard and 0 must be pressed first to get an outside line, then press the ⚙ button at that position in the phone number; when dialling, the phone will pause at that point; see chapter 5 to set the duration of this pause
***: adding names is done via the ABC on the dial buttons, the following characters are available:
button 1: space + & - / X 1
button 2: A B C Å Ä Æ æ à ä β 2
button 3: D E F ë 3
button 4: G H I i 4
button 5: J K L 5
button 6: M N O Ñ ñ Ö ö 6
button 7: P Q R S 7
button 8: T U V 8 Ü ü
button 9: W X Y Z 9
button 0: , . : ? = 0
button *: '@ ( ) * < >
button #: $ _ % ! #
9. SOS FUNCTION
KEEP IN MIND THAT THE SOS FUNCTION ONLY WORKS WHEN THE POWER ADAPTOR IS CONNECTED AND/OR WHEN FULL BATTER- IES ARE INSERTED!
9.1 Preparation:
SOS function on/off:
When not using the SOS function at all, you can turn this function off entirely via the setting ‘ALARM FUNC’ (see chapter 5. If you do want to use this function, use this setting to check whether the SOS function is set to ‘ON’.
SOS numbers:
The numbers you’ve saved under M1, M2 and M3 will be dialled in case of emergencies. Check whether these numbers are correct and discuss with these contacts beforehand what must be done when you call them in case of an emergency. Paragraph 8.2 describes how you can program the numbers under M1, M2 and M3.
Registering/de-registering alarm buttons:
You can register up to 5 alarm buttons on your FX-3950. The alarm button supplied with the phone is already registered to your phone. You can register additional alarm buttons as follows:
- press the button
- use ▲ and to scroll to 'PENDANT'
- press the OK button
- use and to scroll to 'PAIRING'.
- press the OK button, the display will show 'PAIRING...'
-
within 3 seconds, press the red key on the alarm button, the display of the phone will show 'OK' and the alarm button is now registered.
-
If the display shows 'ERROR', the registration was unsuccessful. Please repeat the procedure.
- If the display shows ‘FULL’, it means 5 alarm buttons are already registered.
- By selecting the ‘DELETE?’ option at instruction 4 and press OK, ALL alarm buttons will be deregistered at once. The alarm buttons still in use, must now be registered again.
SOS message:
The SOS message is a message that is played in case of an emergency. You can either use the pre-programmed SOS message or record a personal SOS message:
The pre-programmed SOS message is:
"THIS IS AN EMERGENCY CALL, PRESS BUTTON 5 TO CONFIRM"
Recording/checking your personal SOS message:
- press the button
- use ▲ and ▶ to scroll to 'AL.ANNOUNC'
- briefly press the OK button to play the message
- press and hold the OK button to, after the beep, record your own SOS message of minimum 5 and maximum 30 seconds (keep pressing the OK button during the recording); after 30 seconds or as soon as you release the OK button, the recording stops and the SOS message will be played back once for you to verify
Deleting your personal SOS message:
-
use ▲ and ▶ to scroll to 'AL.ANNOUNC'
-
press and hold the OK button until you hear a beep
- release the OK button immediately after the beep, you'll hear another tone and the pre-programmed SOS text will be played
Silent alarm or loud alarm:
Depending on your situation, you can set the FX-3950 to ‘silent alarm ON’ or ‘silent alarm OFF’. Carefully read the following descriptions and determine which type of alarm is most suitable for your current situation.
- When selecting silent alarm OFF, for the first 15 seconds the phone will emit loud alarm tones, alerting people around you that you're in need of help. At the same time, you can hear whether person you're calling is answering or not.
- When selecting silent alarm ON, these alarm tones will not sound nor can you hear whether the call is answered or not. However, the speaker function will be activated when the emergency call is accepted by pressing the 5 button.
Use the ‘SILENC.URG’ option (see chapter 5) to turn the silent alarm ON or OFF.
9.2 Operation:
- in case of an emergency, press and hold the red SOS key on the phone or on the wireless alarm button for 2 seconds
- the call indicator will start flashing and for 15 seconds the phone will emit alarm tones to alert people around you, provided the silent alarm option is set to 'OFF'
-
memory number M1 will be dialled and the SOS message is played
-
when this number is busy, the following number will be dialled after several seconds
- when nobody is answering, the following number is dialled after 60 seconds
- when somebody does answer (e.g. voicemail) but the 5 button is not pressed, the following number will be dialled after 60 seconds
-
for as long as nobody presses the 5 button, the phone will keep dialling (up to maximum 10x) the M1, M2 and M3 numbers in order
-
if somebody does answer and presses the 5 button:
- the SOS message stops and you have 3 minutes to explain your situation to the person you’ve called through the speaker function - after 3 minutes, the SOS message will be played again; the person you’ve called must press the 5 button again for a further 3 minutes to talk with you; if the 5 button is not pressed again, the call will be disconnected and the SOS mode is cancelled
- if the person you’ve called presses the 1 and 2 buttons after having pressed the 5 button, the call will be disconnected immediately and the SOS mode is cancelled

Keep in mind that the SOS mode of the phone is cancelled in any case after having spoken to the person you've called.
This means, you should make clear agreements with the contacts the phone dials in case of emergencies.
10. WARNINGS AND USER TIPS
10.1 General:
- Carefully read the user’s manual and follow all directions.
- Always remove the telephone plug from the telephone wall socket before cleaning the device.
- Never install or use the telephone in wet or moist rooms or environments.
- Ensure adequate heat dissipation; never cover the telephone nor place it directly next to a heat source.
• Make sure not to damage the telephone wire and ensure nobody can fall or trip over it. - Never disassemble the telephone, only qualified personnel are allowed to do so.
10.2 Installation:
- Only connect/disconnect the telephone wire with/from the telephone when the telephone plug is removed from the wall socket.
-
Never install the telephone during thunder storms.
-
Never install telephone connecting terminals in wet or moist environments.
- Never touch non-insulated telephone wires unless disconnected from the telephone network
10.3 Environment:

The packaging of this telephone can be collected as old paper. However, we recommend you to save it, to adequately protect the phone during transport. When replacing this telephone, please return it to the supplier to ensure environment-friendly processing.
11. WARRANTY
For the FYSIC FX-3950 telephone you have a warranty of 24 months from the date of purchase. During this period, we guarantee the free repair of defects caused by material and workmanship errors. All this subjected to the final assessment of the importer.
HOW TO HANDLE: If you notice any defect, first refer to the user's manual. Please contact the supplier of this telephone or contact customer service of FYSIC on telephone number 073 6411 355 (Netherlands), 03 238 5666 (Belgium), 018 0503 0085 (Germany) or via the Internet www.fysic.com.
THE WARRANTY BECOMES NULL AND VOID: In case of improper use, incorrect connections, leaking and/or incorrectly installed batteries, use of unoriginal parts or accessories, negligence and in case of defects caused by moisture, fire, flooding, lightning and natural disasters. In case of unauthorised modifications and/or repairs performed by third parties. In case of incorrect transportation of the device without adequate packaging and when the device is not accompanied by this warranty card and proof of purchase. The warranty does not cover connecting cables, plugs and batteries. All further liability, especially concerning any consequential damages, is excluded.

- CONTENTS
- INSTALLATION
- USING THE TELEPHONE
- CALLER-ID
- NUMBER MEMORY
- SOS FUNCTION
- WARNINGS AND USER TIPS
- WARRANTY....40
- DECLARATION OF CONFORMITY
- NETWORK COMPATIBILITY
- MAINTENANCE
- 4.1 TABLE STAND
- 4.2 WALL-MOUNTING
- 4.3 BATTERIES
- 4.4 POWER ADAPTOR
- 4.5 RECEIVER
- 4.6 'VIBRAT.' CONNECTION
- SETUP
- TIME/DATE
- LANGUAGE
- SPOKEN NUMBERS
- RING MEL
- RING VOL
- CALL LIGHT
- CONTRAST
- KEY TONE
- FLASH
- TONE/PULSE
- PAUSE
- PRE-DIAL NUMBER
- 6.1 INCOMING CALLS
- 6.2 CALL TIMER
- 6.3 ENDING CALLS
- 6.4 DIALLING NUMBERS
- 6.5 PRE-DIALLING
- 6.6 RE-DIALLING LAST NUMBER(S)
- 6.7 DIALLING DIRECT MEMORIES (*)
- 6.8 DIALLING PHONEBOOK MEMORIES (*)
- 6.9 CALL VOLUME AND TONE
- VOLUME
- AMPLIFIER
- ATTENTION: DANGER DUE TO THE PRESENCE OF EXTREMELY HIGH MAXIMUM VOLUME
- 6.10 R BUTTON
- 6.11 * AND # BUTTONS
- 7.1 INTRODUCTION
- 7.2 NEW CALL INDICATION
- 7.3 CHECKING THE MEMORY & CALLING BACK
- 7.4 COPYING CALLS TO THE PHONEBOOK
- 7.5 DELETING CALLS
- 7.6 REMARKS & TIPS REGARDING CALLER-ID
- 8.1 INTRODUCTION
- 8.2 PROGRAMMING
- 8.3 CHANGING / CORRECTING
- PHONEBOOK MEMORIES
- 8.4 DELETING
- 9.1 PREPARATION
- SOS NUMBERS
- REGISTERING/DE-REGISTERING ALARM BUTTONS
- SOS MESSAGE
- SILENT ALARM OR LOUD ALARM
- 9.2 OPERATION
- 10.1 GENERAL
- 10.2 INSTALLATION
- 10.3 ENVIRONMENT
- WARRANTY
Brand : Fysic
Model : FX-3950
Category : Telephone