
HAF2900D - Deep fryer HISENSE - Free user manual and instructions
Find the device manual for free HAF2900D HISENSE in PDF.
| Product type | Oil-free hot air fryer |
| Brand | Hisense |
| Model | HAF2900D |
| Power supply | 220-240 V ~ 50/60 Hz |
| Temperature range | 80 °C – 200 °C |
| Timer | 1 – 60 minutes |
| Number of baskets | 2 |
| Preset programs | 8 (frozen fries, cake, steak, drumsticks, chicken wings, shrimp, roasted sausage, flan) |
| Special functions | Single-basket mode, dual-basket mode, memory function, automatic shut-off |
| Basket and grid material | Non-stick coating |
| Safety | Automatic shut-off at end of cooking, shut-off if basket removed, overheat protection |
| Cleaning | Basket and grid washable with hot water and a non-abrasive sponge; do not use in dishwasher |
| Maintenance | Clean after each use; do not immerse the electrical housing |
| Warranty | See Hisense worldwide warranty brochure |
| Intended use | Household only |
| Included accessories | 2 baskets, 2 grids |
Frequently Asked Questions - HAF2900D HISENSE
User questions about HAF2900D HISENSE
0 question about this device. Answer the ones you know or ask your own.
Ask a new question about this device
Download the instructions for your Deep fryer in PDF format for free! Find your manual HAF2900D - HISENSE and take your electronic device back in hand. On this page are published all the documents necessary for the use of your device. HAF2900D by HISENSE.
USER MANUAL HAF2900D HISENSE
Ynotpe6a Ha anapatOT
- Iobp3eTe ro npNKnyOKOT 3a cTpyja BO 3a3emjeH sIeH uTekep.
- BhimateJIHO n3BneYeTe ja Kopnata oD pnpTe3aTa (CJnka 2).
- Ctabete rncocctojknte BO kopnata. (Clnka 3).
4.Полеса Вратete ja корпата bo Фрптуэта (Сика 4). - Hnkoraaw He kopncTeTe ja Kopnata 6e3 pewetkata 3a npxebe BO Hea.
BHHMaHHe: He donnpajTe ja Kopnata 3a BpeMe ynoTpe6ata n HeKoe BpeMe no Toa, 6nJeKn MHory ce BKeWtYBa. DpxKeTe ja Kopnata NCKJyUHBO 3a paKaTata.
- OndeTe ro nOtebHTo BpeMe 3a noIroTOBka Ha cocTojkaTa (BnTe Ro JeIOT ,PiocTAbKn "BO Oba nOrnaBe).
- Hekon coctojkn e noTpe6ho da ce npotpcat Ha noIobnHa od BpeMeTo Ha noIroTOBka (BndTe ro DeIOT, NocTaBKn" BO OBA nOrnaBe). 3a da rH npotpecete coctojknte, n3Bneye te ja Kopnata od anapatot dpxekjN ja 3a paKaTa n npotpecete ja. Iotoa, noneka BpaTe je kOpnata Bo fprte3aTa Ha TOnoI BO3dyX.
- Kora ke ro cnuyshete 3BykOT, Toa 3Nauchn Deka NoCTaBeHTo BpeMe 3a NODROTOBka NCTeKNo.
I3Bneye ja Kopnata oAnapaTOT.
Beneuka: PnTncHeTe ro konheTo 3a BknyyBaBe n npxTe ro npntncHaTo 2 cekyHn. Notoa, moKe paHNo da ro ncknyuTe anapatot.
Cobet: Temnepaypata n BpeMeTo Ha npriOTByBaHe MOKe da rN IIOdecnte cnopei BaHa JxJI6a BO TEKOT Ha yIOTpe6aTa Ha anapatot.
- Поберете дади сoctojknte ce roTOBn.
- Ako coctojknte ce yuTe He ce NOIroTBehn, eNHOCTaBHO BpaTe je KOpNaTa BO anapaTOT n NOCTaBeTe Ro TajMepOT Ha yuTe HekOJky DOONHHTeHN MNHyTu.
- 3a Да Г OTCTpaHNTe COCTOJKTte (Ha np., NOMФPHTOT), ИЗБЛECHETe ja KOPnATA od ФрTe3aTaNCTabete ja Ha pa60THata Maca.
- He npeBpyBajte ja Kopnata Haonaky, 6nnejkn BnwoKOT Macno ITO ce HacobpaJn Ha dHOTO od Kopnata Ke nCTeue Ha coctojknte.
- Kopnata n coctojknte ce jekn. Bo 3aBnCHoCT oD BnOTo Ha coctojknte Bo pnte3ata, od Kopnata Moke da n36ne napea.
- KopucTeTe cooDbTeH npnbop 3a npeepnahe Ha xpaHaTa BO YUnHja.
- Kora rotBeHbTo Ha eHa rpyna coctojkn Ke 3aBpwn, pnte3ata Ha TOnON B03dyx e BeHaNn noTROBeHa 3a rotBeHbE npyra rpyna coctojkn.
YnataCTBO 3a KOHTPOHNOT nHeI
Konche 1 Konche 3a BknyBaBe
OTkako Ke I n CTaBnTe N DbTa Cada npabHIO BO rnaBHOTO KyKuIHTe, CBETHyBa HndkaTOpOT 3a HanojyBaHe. N36epete ro KonyeTo 3a BknyuBaHe 3a Da ro npedePnnte anapatot BO peKIM Ha NOdTBeHocT. OTkako Ke ro N36epete caDTo Ke ro KopNCtNe, pnpTnCHeTe ro KOnyeTo 3a BknyuBaHe no BTO nat, 3a da 3anOHTe co npoecot Ha rotBeHe.
KoNue 2 OOnue 3a oDHaPep 3aadaeHn BpeHocTn
Co n3bpaHe Ha OBA KOpye, Moxe Da npe6apyBaTe N da n3bepeTe eDeH od 8-Te noynapnHaunnHa roTBeHe (od 17 do 24). Co o3bpaHe Ha cakaHaTa fynKcuiJa, ce noDecyBaaT oHaanpei3aJaHeHte Bpeme i TempePaTypa Ha roTBeHe.
Koynye 3 Konye 3a neBnot caD
DoppeTo ro konueTo 3a JeBnOT caJ.Ke CBeTHe 3HaKOT Ha KonueTo Ha yHKunJaTa Ha JeBaTa cTpaHa Ha pnte3ata. MeHnTo aBtOMatcKn ce npeppna Ha npBOTo MeHn (nompPIT), a HndIkAToPOr 3a NompPIT Tpenka. 3HaKOT 3a JeBnOT caJ HA KOHTponHnO TaHeJ Ke Tpenka HnAn3MeHnUHO Ke rN PnPKaKyBa cTaNapdHaTAtempePaTypa u BpeMe 3a nporpaMaTa 3a NompPIT. Kora ke ce npikakTe TEMpePaYATA, INDnKaTOPoT 3a TEMpePaTypa BO TropHnOT JEB aRJ Ha ekpaHOT NoCToJaHO Ke CBETN. Kora ke CE npikakKe BpeMeTO, INDnKaTOPoT 3a BpeMeTO BO DOHNOT JEB aRJ Ha ekpaHOT NoCToJaHO Ke CBETN. Ako To npitncheI To dpXnTE KOueTo 3a JeBnOT caJ npITncHato 2 cekyni, Moxe da Ro OTkajte n36opot Ha JeBnOT caJ anapaTOT Ke CE BpATN BO peKIM Ha NOdTBEHOCT.
Konue 4 Konue 3a dechnoT caI
Допөге тг кончето 3a DeCHNOT caI. Ke CBEThe 3HaKOT Ha KONHTO Ha Функида Ha DeCHATA CTpaHa Ha Фрnte3ata. MeHnTo aBtOMaTcKi Ce IpeФрla Ha npBOTO MeHn (nomФpNT), a HnDnKaTOpOT 3a NOMФPNT TpeNka. 3HaKOT 3a DeCHNOT caI Ha KOHTPOJHNOT NaHeJI Ke TpeNka i Han3MeHnUHO Ke Tn PnPKaKyBa CTaHapdHaTa TempePaTypa i BpeMe 3a Iporpamata 3a NOMФPNT. Kora Ke ce PnPKaKe TeMnePApTa, INDnKaTOpOT 3a TempePaTypa BO TropHnot JEB aRoi Ha ekpaHOT NOCToJaHO Ke CBETN. Kora Ke CE PnPKaKe BpeMeTO, INDnKaTOpOT 3a BpeMeTO BO DOJHnot JEB aRoi Ha ekpaHOT NOCToJaHO Ke CBETN. Ako Ro IprTNChTe n To IprXITE KONHTO 3a DeCHNOT caI PnTnCHaTO 2 cEkyHdi, Moxe da To OTkAkeTe n36opOT Ha NeBNot caI n anapaTOT Ke CE BpATN BO pexIM Ha NOITROBEHOCT.
KoNue 5 KOnue 6 -KoNnHa 3a KOHTpOJa Ha BpeMeTo n TempePaTypaHa Na NeBnOT caD Co KOnuNbata 5 n 6 MoKe Da ja 3roJeMyBaTe uHn HamaNyBaTe TempePaTypaHa rOtBeHe 3a neBnOT caD 3a 5 ^ C . TempepatypaTa ce MeHyBa 6p30 co npTnCKaHe n DpxeHe Ha KonUeTo
PnTnchato. Oncer Ha KOHTpOHa Ha TemnepaTypaTa: 80 °C - 200 °C. KOnHbTa MoKe Da ce Kopnstat N 3a 3roJIeMyBaHBe IIN HaMaIyBaHBe Ha BpeMeTo 3a rOTBeHBe Ha JEBNt caD, PnI StTO BpeMeTo Ce MeHyBa 3a eIHa MInHyTa co eIHO pRITnCKaHBe. BpeMeTo Ha rOTBeHBe Ce MeHyBa 6p3o Co pRITnCKaHBe N dPrKeHBe Ha KOHTeTo pRITnCHato. Oncer Ha KOHTpOHa Ha BpeMeTo: 1 MmH - 60 MmH.
KoNue 7 n konue 8 - KonuHb a 3a KOHTpOHa Ha BpeMeTo n TemnepaTypaHa deCHNOt ca Co KOnuHbata 7 n 8 MoKe Da ja 3roJIeMyBaTe Nn HaMaJyBaTe TemnpaTypaHa rOTBeHe Ha DecHnot ca d 3a 5^ . TemnepaTypaTa ce MeHyBa 6p30 co npITnCKaHe n dpKeHe Ha KOnUeTo npITnCHaTo. Oncer Ha KOHTpOHa TEmnepaTypa: 80^ - 200^ . KOnuHbTa moKe da ce Kopnstat n 3a 3roJIeMyBaHe Nn HaMaJyBaHe Ha BpeMeTo 3a rotBeHe Ha DecHnot caD, pni wTO BpeMeTo ce MeHyBa 3a eDHa MInyTa co eDNo npITnCKaHe. BpeMeTo Ha rotBeHe ce MeHyBa 6p30 co npITnCKaHe n dpKeHe Ha KOnUeTo npITnCHaTo. Oncer Ha KOHTpOHa BpeMeTo: 1 MNH-60 MNH.
KoNue 9 Konue 3a oDbpaBe Ha Tempepatypata
DoppeTo ro konHeTo 3a od6npaHBe Ha TempePaTypata. Notoa MoKe da ja MeHyBaTe TempePaTypata npKakKaHa Ha ekpaHot cnopeNd notpe6nte.
KoIue 10 3a n36op Ha BpeMeTo Ha rotBeHe
DoppeTo ro konuTeTo 3a n36Op Ha BpeMeTpaEheTo. Notoa MoKe da ro MeHyBaTe BpeMeTo Ha rotBeHe npikKaJHo Ha ekpaHOT cnopeI notpe6nTe.
CjajnUkaHaHnDnKaTOpOT“11”Ekpah3aJeBnOT caI
CjanaHkaHa HndnKaTOpOT“12"HndnKaTOp Ha TemnepaTpaTa 3a JneBnOT caI
CjajnUka Ha HndkAToPOT "13" NndkAToHbpeMeTo Ha rOtBeHe 3a JeBnot caI
Cjanauka Ha HndkaTopoT "14" EkpaH 3a DeCHNOT caD
CjajnueKa Ha Hndnkatopot "15" Nndnkatop Ha TeMnepaTypaTa 3a DecHnot caI
CjanaHkaHa HndkaTopoT“16"HndkaTop Ha BpeMeTo Ha rotBeHe 3a DeCHNOT caI
CnjannuKaHa INdkaTOpnte“17-24" INdkaTOp Ha peCNT
2. Pexim Ha noIrotBeHOCT
DoppeTo 3a BknyBaHe; 3a H36op Ha Kopnata 1 n 3a H36op Ha Kopnata 2 CBeTHyBaAT n octaHyBaT 3analeH. Anapatot BneryBa BO pexm Ha noIrotBeHocT. Kora ypeDoT e Bo OBOJ peXIM n He ce ynoTe6n BO pok o3 MInHyTu, ce npeppna BO pexm Ha noDiHaBe.
3. Pekim Ha pa6oTa Ha eHa Kopna
3.1. Pekim Ha pa6oTa Ha JeBaTa Kopna
3.1.1. DOnpTe ro konUeTo 3a neBa Kopna eHaA. O3HaKInTe BO noOpauJeTo 1 n noOpauJeTo 2 CBeTHyBaAT u OCTaHyBaAT 3aIaJIeHn ZeIo BpeMe. Ce npKakCyBaAT aBtOMaTcKn 3aJaDeHnTE BpeHocTn 3a IomΦpNT, pRi UTo Ha ekpaHot HAn3MeHnUHO ce npKakCyBaAT aBtOMaTcKn 3aJaDeHnTa TempePaTypa N BpeMe Ha rotBeHe. Dokonky ro npITncHete KOnUeTo 3a BKJyBaBe N rO dpXnTe npITncHaTo 2 cekHyd, ce OTKaKyBa n36OpOT Ha NeBaT a KopNa uypeDor BJIeYBa BO peXm HA NOIrotBeHOCT.
3.1.2. Co donupahe Ha konyeTo 3a noDecyBaHe (preset) moKe da ro n36peTe MeHnTo 7to cakate da ro KopncHTe. PnTnchete ro Oba konye edHaaw 3a da ce nppeppnTe Ha CneDnHO MeHn; n36paHata o3HaKa od MeHnTO TpeNka u Ce npNKaKyaat CTaHdapnHaTa TemnepaTypa u Bpeme. MeHnTO moKe da ce npebapyBa u n36npa od npBaTa do OCmTa o3HaKa.
3.1.3. Donpete ro koncheTo 3a TemnepaTypa. TemnepaTypaHa TeKOBHOT MeHn TpeNka Ha ekpaHot. Co npntickaHe ha koncheTo 3a KOHTpOla Ha TemnepaTypa MoKe da ja meHyBaTe TemnepaTypa 3a no 5^ Ako ro npntichTe koncheTo 3a TemnepaTypa I ro 3aDpxHte npntiChato, TemnepaTypa NoctoJaho Ke ce MeHyBa. TemnepaTypaMoKe da ce MeHyBa BO oncer od 80^ - 200^ 3a cekoj peent.
3.1.4. Донпета щюнота на кочуто 3а Врем. Стадарно Ии постовeto Врема ззбрано Meн Крпка на ekразов. Ппшсichte ro konчeto 3a koHTpona Ha BpemTo 3a Да Г мeHyBaTe BpeMeTo 3a no 1 MmHyTa. Ako ro ппшсichte konчeto 3a KOHTpona на Времeto, Времeto NOctojaHo ce мeHyBa. BpeMeTo може дa ce мeHyBa od 1do 60 mHyTu 3a cekoj pecentt.
3.1.5. Kora ke rn o6epe Te peuNTOT, TemepaTpaTa n BpeMeTo Ha rotBeHe, donpeTe ro KOHTo 3a BKnyBaHe. JeBaT a Kopna NoHyBa da pa6OTn, a TEKOBHOTO BpeMe Ha rotBeHe ce od6pojyBa Ha ekpaHot.
3.1.6. 3a da ja noodeCNTe TemnepaTpa Tnn BpeMeTo Ha rotBeHe BO TEKOT Ha npoecot Ha rotBeHe, npntncTe To KOHTO 3a TemnepaTpa nn 3a BpeMe Ha rotBeHe eHa, a notoa co nocJeobateJHo npntuCKaHe Ha KOnHTo 3a TemnepaTpa nn 3a BpeMe Ha rotBeHe MOKe Da n MeHyBaTe TemnepaTpa Tnn BpeMeTo Ha rotBeHe. 3a BpeMe Ha npoecot Ha noDecyBaHe, ypeDTo npdoJxBya da pa60tn.
3.1.7. 3a da ro pecetnpate peceenTOT 3a BpeMe Ha npocot HA rotBehe, npntucheTe ro KONHeTo 3a BKnyBaHe eHaaw 3a da ro nay3npate roTBeHbEto; rpejaOT mOtopoT npctahybaat da pa6oTa. IToa, cneDeTe rN yeKOpnte od 3.1.2 do 3.1.5 3a da ro pecetnpate peceenTOT n da npdoJnKeTe co rotBeHbEto.
3.2. Pny3npaBe nI IN NCKJyUBaHe Ha anapaT0 BO TEKOT Ha npOceCOT Ha rotBeHe
3.2.1. 3a da ro nay3npate npoecot Ha rotBehe doeKa Toa e BO TEk, npTnCHete ro KOHcTo 3a BknyBaHe eHaaw 3a da ro nay3npate rpeEbeTo npabOtata Ha MOTOPOT. Ako He ce 3aJaDe cneHa onepauja BO pOK oD 3 MmHyTu NO nay3npaBeto Ha anapatOT, Toj BneryBa BO peKIM HA noTROBHOCT.
3.2.2. 3a Da ro ncknyuite anapatot 3a BpeMe Ha rotBeheTo, npntncHe To KOnueTo 3a BKnyuBaIbe I dpKeTe ro npntncHaTo 2 cekyHdi, doeKa Ha ekpaHot He ce nojaBn o3HaKata ,NCKNYUeHO("OFF"). Anapatot ncyuTa eDeH 3ByeH cnHan, ekpaHot ce NCKnyuBa I anapatot BneryBa BO pexIM Ha nOdrTOBeHocT. IpOToa, npntncHeTo Ro KOnHeTo 3a BKnyuBaIbe I dpKeTe ro npntncHaTo 2 cekyHdi I anapatot BneryBa BO pexIM Ha nOdrnaIbe.
3.3. Badehe Ha Kopnata
3.3.1. Ako Kopnata ce n3BaDi oJ anapaTOT BO Koe 6nlo BpeMe, Ha ekpaHOT ce npkaKyBa "OTBOPEHO" ("OPEN").
3.3.2. Ako Kopnata ce n3BaAn 3a BpeMe Ha npouecot Ha rotBeHe, anapatot npecTaHyBa da pa60tn (npeknHyba pa60tata n Ha rpeeHeto n Ha motopot). Kora Kopnata ke ce BpaTN, anapatot npoDOnjxBy co pa60ta cnopeI nocJeHNte noCTabKN.
3.4. Pexim Ha pa60Ta Ha deChata Kopna
3.4.1. Donpete ro koncheTo 3a dechata Kopna n noToa cneJeTe rN YekOpHTe oD 3.1.2 do 3.1.7 3a noHaTAMoOHnTe YekOpN.
3.5. Ppoecot Ha roTbeHe 3aBpwn
3.5.1. Kora npocot Ha roTbeKe 3aBpHn,Ha ekpaHOT ce npKakyBa "NCKJLYUeHO("OFF") n anapaTOT nCnyuTa 3ByueH cnHaj 5 naH. Iotoa, ekpaHOT ce NCKJlyuBa, a anapaTOT BJeryBa BO peXIM Ha NOdrotBeHOCT.
- Pexim Ha pa6oTa Ha DBeTe Kopn
4.1. BkIyUyBaHe Ha DBeTe Kopn
4.1.1. Hajnpbo, n36epete eHa cTpaHa n n36epete rNoCTaBKeTe Ha MeHnTo, Tempepatpata n BpeMeTo Ha rOtBeHe cNopeJ qekOpTe o3.1.2 do 3.1.7. Notoa, n36epete ja dpyrata cTpHa n Ha nCT hauHH NoCTaBeTe rN Notpe6HnTe peeHTn, Tempepatpa n BpeMe Ha rOtBeHe.
4.1.2. Пи捜сichte ГКОнчETO 3a BKNIуВаьe.ДБЕТЕ KОРПИ NOЧИУBAAT DA pa6OTaT BO nCTO Врeme.Ha ekpaHOT ce ппкakуBa OДБpojYBaHbETo Ha IpeOCTaHATO Врeme 3a DBeTe KOPПИ.
4.1.3. AInTePHaTINBHO, MoKe I npBO da ja nyuTIne BO pa6Ota cAmO eHnata cTpaHa cnopei YeKOpIne od 3.1.1 do 3.1.7, a noToa da ja BkInyUte n dpyrata cTpaHa cnopei 3.5.1.
4.2. Ondepete rnoctabknte 3a peximot Ha pa6oTa Ha Dbete Kopn
4.2.1. Bo peximot Ha pa6oTa Ha IBeTe KOpN, n IBeTe KOpN pa6oTa HcTObpeMeHo. 3a Da ja NoCTabNTe TemnepaTypa Tn Nn BpeMeTo Ha rotBeHbe Ha JEBaTa Nn Ha DeChata KopNa, npITncHeTe ro KonyeTo 3a JeBaTa Nn KOnyeTo 3a DeChata KopNa, a Notoa cIeDeTe rN Yekopnte 3.1.6 n 3.1.7 3a da rN KomnIeTpate NoCTabKInTe.
4.3. Pny3npaBe nIIN NCKJyUBaHe Ha anapaT0 Bo TEKOT Ha npOceCOT Ha rotBeHbe
4.3.1. 3a da ja nay3npate pa6oTaTc amo Ha eHaTc TpaHa 3a BpeMe Ha peXIMOT Ha pa6ota Ha DeTe KOpN, npBO npNTnCHete Ro KOnHeTo 3a NeBaTa Nn 3a DecHaT a Kopna, a NotoA npNTnCHete Ro KOnHeTo 3a BKnyBaHb. Pa6oteHbeto Ha cooDbetnata Kopna Ke 6nde Nay3npaHO. Ako He 6nde 3aJaDeHa OepauJia BO CneHNTE 3 MNHTN, nay3npaHATA CTpHaCe PpePpNa BO peXIM Ha NOIroTBHeOCT. 3a Da ro nay3npate pa6oTeHbeto Ha DBete CTpAHn, cMo npNTnCHete Ro KOnHeTO 3a BKnyBaHb e np6oTeHbeto Ha DBete CTpAHn Ke 6nde Nay3npaHO. Ako He 6nde 3aJaDeHa NoHaTAMoUHa FyHKUnja BO CnEHNTE 3 MNHTN, DBeTe CTpAHn BInrByBaAT BO pexm Ha NODGTBeHOCT. 3a Da npDoJnxHte Co pa6ota, npNTnCHete edHaW Ha KOJIeTO 3a BKnyBaHbE.
4.3.2. 3a ja ja ncknyuhte eHaTa cTpaHa 3a BpeMe Ha npoecot Ha rotBeHe, npBO npNTnCHte KOChTe 3a JeBaTa Hn 3a DeChTa KOpNa, a NoToa npNTnCHte Ro KOChTe 3a BknyuBaHe n 3aDpxTe ro npNTnCHato 2 cekyHn. Notoa, n36paHaTa Kopna (n nn CTpHa) ce npeppna BO pexm Ha noDrTOBHeOCT. 3a da rN ncknyuHte DBeTe cTpaHn, npNTnCHte Ro KOChTe 3a BknyuBaHe n 3aDpxTe ro npNTnCHato 2 cekyHn.
4.4. Banehe Ha Kopnata
4.4.1. Ako Kopnata Ce n3BaAn OAn apaTOT BO Koe 6nIO BpeMe, Ha ekpaHOT ce npKkaKyBa "OTBOPEHO("OPEN").
4.4.2. Ako eHa oJ KOpnIte ce n3BaIa 3a BpeMe Ha npOueCOT Ha rotBeHbe, COoDBeTHaTa cTpaHa IppecTaHyBa da pa60Tu (npEKNHyBa pa60TaTa H Na rpeHbeto H a MoTOpOT). Kora Kopnata Ke ce bpaTu, anapaTOT npOdoNkUyBa co pa60Ta CnopeiNoCJIeHNTe NOCTaBKn.
4.5. Ipoecot Ha roTbeHe 3aBpwn
4.5.1. Kora npouecoT ha rotBeHe ke 3aBpHn, Ha ekpaHOT ce npKakyBa INCKJnyEHO" ("OFF") u anapaToT nCnytta 3ByeH cInHaI 5 nat. Notoa, ekpaHOT ce ncknyuBa, a anapaToT bneryBa BO pexHM Ha noDrotBeHocT.
BeJIeUkI
- Pexim Ha noDnraHe: kora anapaTTo e BO OBOj peXIM, CBETn EINHCTBeHO KOnYeTo 3a BKJyUyBaHe.
- Pexim Ha noirotbeHoc: CBet a N KOnyTo 3a BknyuBaHe, N KOnyTe 3a JIeBaTa N KOnyTe 3a DeChata Kopna.
- Ondpahe Ha noCTaBKeTe
7.1. OdibpaHBe Ha nocTabKIne Kora anapaTOT He pa60TN
7.1.1. KonchuTo Ha cooDbETHaT a cyHKunja cekoraw CBeTN. HndnkaTopot 3a n36paHnot peent TpeNka, octaHaTne INDnKaTOpN oM MeHTo Ce cekoraw BknyeH,doEka COoDBeTHNOT ekpan TpeNka Hau3MeHnuHO, npKakyBajkn ja TemnpaTypata/Bpemeto Ha rotBeHe Ha n36paHnot peent. Kora ro noCTaByBaTe MeHTo, TpeNka n36paHnot peent. 3a da ja noCTaBnte TemnpaTypata, npTnCHete ro konyeTo 3a Temnepatypa. Ekpanot TpeNka, npKakyBajkn ja MOMENTaHata TemnpaTypa. PnTnCHete ro konyeTo 3a BpeMe Ha rotBeHe 3a da ro odpeNTe BpeMeTPaeHbeto; ekpanot TpeNka I rO npKakxBya TKOBHTo BpeMe Ha rotBeHe. Kora anapatot e BO pexmHa pa60Ta Ha DBete Kopn, MeHTo 3a CTpaHata uTO He e n36paHa He TpeNka; COoDBeTHNOT ekpan Hau3MeHnuHO rN npKakyBa TemnpaTypata N Bpemeto Ha rotBeHe, 6e3 da TpeNka. 3a BpeMe Ha OBOJ npocec, rpejauHte mOTopnte He pa60Ta.
7.2. O6bpaHBe Ha NOCTaBknte BO TEKOT Ha IPOUecOT Ha rotBeHe
7.2.1. Bo TeKOT Ha npoecot Ha rotBeHe, MeHTo He TpeNka; HameCTO Toa, OCBETJIeHa e cAmO O3HaKaTAt 3a O6paHnOt peCNT. EkpaHOT TpeNka, Han3MeHnUHO npiKaJyBaJkn I n Tempepatypata n Bpemeto Ha rotBeHe. Tempepatypata n Bpemeto Ha rotBeHe MoKe Da ce NoCTaBt Ha NaHnHOT OOnuHaBn BO ToUkTe 3.1.3 n 3.1.4, Ho peeHTOT He MoKe Da ce MeHyBa. IpejaYOT n BeHTNuIaTOpOT pa6OtaT HenpeKnHaTo.
7.3. Пayзраье Ha paBOTATA: konyeTo Ha coODBeTHaTaФункиJa NOCTOJAHO CBeTN; INDNKAtoPOT Ha O6paHOT MeHn TpeNka, a DpyrIte INDInKaTOpN NOCToJaHO CBeTaT. COODBeTHNoT ekpan TpeNka, Han3MeHnUH NoPKaKByBajKn Tn TemNepaTypata N BpeMeTo Ha rotBeHbE Ha O6paHOT MeHn. ГpejaOT И BEHTInaTOpot pIpecTaNyBaAT Da pa6oT aN cera MOnke Da ce MeHyBaat MeHnTO, BpeMeTo Ha rotBeHbE I TemNepaTypata.
7.4. Ipouec Ha pa6ota: KOnyeTo Ha COoBbHTHa TcYHKUJia NOcTOJaHO CBETn, INHdkaTOpOT 3a H36paHnot peuNT e cekoraW BKnyeH, a OCTaHaTnte INHdkaTOpN Ha MeHtO ce NCKnyeHn. COoBbTHNOt ekpan To npKakyBa npeocTaHaTOTO BpeMe Ha rotBeHe Ha H36paHnot peuNT, a rpejauot IN BENTINaTOpOT pa60tAT HepeKInaHTo. Kora DBeTe Kopn pa60tAT NCTOBpemeHo, KOnyeTo 3a JEBata KOpna IN KOnyeTo 3a COoBbTHNOt peuNT 3a Taa KOpna TpeNkaat NCTOBpemeHo, PO eHaW Ha cekon 6 cekyni. 3 cekyni noDOUHa, KOnyeTo 3a DeChata KOpna IN KOnyeTo 3a COoBbTHNOt peuNT 3a Taa KOpna TpeNkaat NCTOBpemeHo, PO eHaW Ha cekon 6 cekyni.
8.Функида на Меморида: anapatOT Иma Мemopnska Функцида. Ha npimep, ako ro n3bepeTe MeHTo NNNEsKn Kpunla 3a Dechata Koprna u ja noCTabNTe TemnepaTypata Ha 190 °C, a BpeMeTO Ha rotBeHeHa 22 MInHyTN, no 3abPswBaHbeto Ha ynoTpe6ata,doKoIky anapatOT He ce Ncknyu,ce npimeHyBaAT NCTITE NOCTABKN. Kora ke ja OndapeTe Dechata Kopna 3a BpeMe Ha cneHaTa YnoTpe6a, BeDnAa Se npkKaJyBa MEHITO NInNeShKn Kprnla, co TeMnepaTpya NoCTabeHa Ha 190 °C and BpeMeTo Ha rotBeHeNoCTabeHo Ha 22 MInHyTN. Memopnjata ce 6pnue kora anapatOT e Ncknyueh 1 vac. Ako ro BknyuHTe anapatOT no edeH qacnja oJ od6epete Dechata Kopna, ce npkKaJyBa npBnuHata coctoj6a.
9.2.ИcknyuBaHe Ha MemOpnJaTa: Ako anapaTOT cnUajHo ce ncknyo od HanojyBaHbTo 3a BpeMe Ha yNtpeBaTa, ce Bpaka Ha NocTabKite KOI 6IIe AKTNBn IpeI peknHOT Ha HanojyBaHbTo, NOd YcNoB HanojyBaHbTe IOBTOPOHO Da Ce BOCNOCTABN BO POK O3 MInHyTu.
NocTaBKn
DolHaTa Ta6eJa MoKe Da Bn NmOrHe Da rN 36epTe OCHOBHTe NOCTaBKn 3a COcTojKnte.
Beneuka: ImajTe Ha yM DeKa OBne NOCTaBKn Ce cAmO INHdNkATNBn. BundeJkn COcTojKnte ce pa3NkYBaat No NoteKNo, rOJIeMnHa, ObIeN K 6peHd, He MoXeMe Da rapaHTnpame Hajdo6pn NOCTaBKn 3a BaunTe COcTojKn.
BndejKn TexHONorjata 3a 6p3 npOTOK Ha TOnOJ Bo3dyx NOBTO HO 3arpeBa BO3dyXOT BO anapaTOT BeDHa, KpaTKoTPajHOTo N3BNeKyBaHe Ha KopNaTa OD anapaTOT 3a BpeMe Ha npxeHeTo HA TOnOJ BO3dyx Hema 3HaHTeJIHO Da r Ho HApUHN pOueCOT.
Cobetn:
- 3a nOmaJIte coCtoJKN oBnUHO e IOTpe6Ho MaIky NOKpaTKO BpeMe 3a NOdROTOBka Ond NoroJIemITE.
- 3a noronema koJnUHa Ha coctojkn noTpe6Ho e camo MaNky noDOnro BpeMe 3a noDrotOBka, 3a NOMaJa KOJnUHa COCTojkn noTpe6Ho e camo MaNky nOKpaTKo BpeMe 3a noDrotOBka.
- Co npoTpeCyBaHBe Ha NOMaJIInTe COCTOJKN Ha NOIIOBnHa OD BpEmeTO Ha NODrTOBka Ce ONTUMn3npa KOHeuHNOT pe3yJITat Od rOTBeHbETo I MOKe Da NOMOrHe Da ce cnpeu HepamHOMepHo npXeHBe Ha COCTOJKNTe.
- ДдajTe MaIky MacNo BO CBexKnot KOMnnp 3a da 6nDAT KpuKabN. OTKako ke ro DoJaTe Macnoto, IncpxKeTe rcoctojknte Bo pnte3ata 3a npxHe Ha TOnON Bo3dyX BO pOK od HeKOJIky MmHyTu.
- He noIroTByBajTe npekymepHO mpcHn COcTojKn, kako ITO ce KOJI6acn, BO pnte3aTa Ha TOnon BO3nyx.
- 3aKcN ITO MoKe Da Ce NODrOeBt BO pepHa MoKe Da Ce NODrOeBAt N Bo cPnTe3aTa Ha TOnoJI BO3dYx.
-
OntmalHaTa KOJIuYHa 3a NOIroTOBka Ha KpuKaB IomΦpnt e 500 rpama.
-
Kopnctete Ondanpeid noTROBHeO Tecto 3a 6p30 n IecHO da 3rotbnte nonheTn 3akcKn. 3a Ondanpeid noTROBHeTO Tecto e IOTpe6Ho n NOKpaTKO BpeMe 3a noTROTBka od paHNO HappaBeHTo.
- Ctabete kaan 3a neehebe nnncad 3a neehebe BO Kopnata Ha pnte3ata aKO cakate da neeTe KOJauch nn KNI nIaKO cakate da npkeTe deNkathn COctoJKN IJI naJeBa co fNil nII INOJIHeBe.
| Мени | РedingортыSpecина(g) | Зададан Темпера Тура(°C) | Врeme на готва BO[eelen сад (MMH.) | Врeme на готва БО Два сада (MMH.) | Temперараз- саню (°C) | Врeme (MMH.) | Прост- ecу Ване | |
| Замрзат nomфрит | Мал | 500 | 200 | 25 | 28-32 | 80-200 | 1-60 | 1-2 |
| Голем | 300 | |||||||
| Topта | Мала | 300 | 150 | 25 | 25-30 | 80-200 | 1-60 | |
| Голема | 150 | |||||||
| Стек | Мал | 170 | 200 | 15 | 15-20 | 80-200 | 1-60 | 1-2 |
| Голем | 85 | |||||||
| Корану | Малу | 800 | 200 | 30 | 30-35 | 80-200 | 1-60 | 1-2 |
| Големи | 300 | |||||||
| Пильшkin Крелца | Малу | 500 | 190 | 22 | 22-27 | 80-200 | 1-60 | 1-2 |
| Големи | 300 | |||||||
| Рakчниа | Малу | 350 | 190 | 12 | 12-15 | 80-200 | 1-60 | 1-2 |
| Големи | 175 | |||||||
| Пechenvi Колбаси | Малу | 240 | 160 | 15 | 15-18 | 80-200 | 1-60 | 1-2 |
| Големи | 130 | |||||||
| Колач со Крems od jaца | Мал | 290 | 170 | 20 | 18-23 | 80-200 | 1-60 | |
| Голем | 150 | |||||||
Beneuka 1: DoaTe 3 MInHyTn Ha BpeMeTo Ha roTBeHe Kora NoHyBaTe co npXeHe doKea anapaTOe ce yUte CTyDeH.
Beneuka 2: Temnepaypata nn BpeMeTo Ha rotBeHbe MoKe Da ce MeHyBaat cnopeD paKTNUKOTo BpeMe Ha rotBeHbeto Kora Ce rotBn NCTOBpeMeHO BO DBe KOpN.
Ynctebe
Ynctete ro anapatot no cekoja ynoTpe6a.
He KopncTeMeTaJIeH KyJHcN npIbOp nIIa6pa3NBHcpeICTBa 3a YIcTeHBe Ha KOpNaTn peWetkata 3a npKeHbe, 6nJeKn Taka MoKe da ce OwTeH HeJIenJIbBnot cNoj.
- ɪəBaʌdete ro npɪkʌyʊkɔt 3a cTpyja oɪ snɪdHnO T wTekep n ocTaBæte ro anapatot da ce nɪsʌnɪ.
HannomeHa: ɪzbaɪte ja kɔpnta 3a anapatot no6p30 da ce n3naɪn. - Побшиете ja надовецнастара на anapatOT co влжнka крna.
IcnuCTeTe rKopnnte co TOnJa BOna, MaNky TeuHoc3 a MneHe n CyHep To He e a6pa3nBeH. - Moxe da KOpncntte TeuHocT 3a OdMaCTyBaHe 3a da ja OTcTaHnTe npeoCTaHaTaTa HeuNCTOTnJa.
Cobet: Ako Heuicotnjata e 3aJeneHa Ha noJIucaTa (peWetKaTa) HnHa dHOTo Ha Kopnata, HanoJIHeTe ja Kopnata co TOnJa BODa n MaIKy TeUHOCT 3a MneHe. CTabeTe ja peWetKaTa 3a npKeHe Bo KOpnata n OCTaBeTe n Kopnata n peWetKaTa da KNCHat npNbIxxHo 10 MNHyTN.
4.Исунstete ja BHaTpeHIOCTa Ha anapaTOT co TOnla BODa n cyHefep ITo He e a6pa3nBeH.
5. IcHCTeTe ro rpejHnOT eIemEnT co YeTka 3a YnCTeHe, 3a da Tn OTCTpaHnTe CnTe OCTaTOuN OxpaHa.
Peшаые пробLEMn
| ПюбLEM | Можна пооча | Решения |
| Анаралов не павOT. | Анаралов не e поочучени настура. | Проблесутое го с低调иот кабел bo заземеншт ekр. |
| СоюжкITE Испжени bo Фрита не сеrotobи. | Пробета на поочина на состодан и поочины состодан. | Налоче ща корпата сponерачаны Клични (пли Глични) на состодан. |
| Temператуда в поочида. | Променete ща temператуда сооветно. | |
| Анаралов не e поочида. | ПосравETо го времeto погбно за поочotьк. | |
| СоюжкITE не се поедима bo Испжени. | Од revertени вiodовс состодан.Tгеба да с поочецат на поочида.од поочида. | Союжпite коншто се edna врз дура ул л endа руга (ha np.,nomфprитot) тгеба дa с поочецат на поочида од времeto на поочotьka. |
| Исржени Закскени не се поочи КORA се вадат od Фрита. | Говени се вiodовс закскени се наименета 3a поочOTВКВ BOТradицунална Фрита. | Проботвая差别 закскени за bo регни лл наименетe малку Масло на закскite за дa budat порцкави. |
| Корпata не може павILAима за се сави BO anapatot. | Премногу состодан bo корпata. | He по�е ща корпата над озakatable MAX. |
| Корпata не e поочида STавна BO anapatot. | Спштajte ща корпата поека BO anapatot ДдЕКе HeЧуerte „Клик". | |
| Од anapatot ИЗлergува сели чад. | Се по bat machни состодан. | Кora roTBITE масни состодан, rolема клични масло мостEVBA BO корпата. Маслоу доа бел чад, a korрпата може дa e загpeана поевке od обично. Toa He Влиjae Брз anapatot лл по鹿ьETO. |
| Корпata не e поочида по пооч徳нatable уnotреба. | Бел чад се сизда в поаду маслоу кoe се загрва bo корпата. Korрпата тгеба дa ce чicitи павILAима по сөкоja уnotреба. | |
| Помфprитов не се поедима BO. | He se кориси павILAим� ТВДkomпири. | Корисе CB经и KMлрени и поberувajte дали се zbrpctи BO TEKOT Na rotbeBJeto. |
| Корпруньаты не се убaven Измены п徴 по鹿ьETO. | Испалкнete ng KMлрениытупavalno, за дa go otstpanite скобот od надворецнatable страза. | |
| Комлрчени САТУЕ ПОДЕДАКВ. | КрцавOSTа на поочичны BTа STAVCSODКOLUNHANaТA STAVCSODКOLUNHANaTAMACNOI BODA BO HINB. | ИсUALSEе ng KMлрениы Temelho. |
| Исualseе ng KMлрениы на помалипарчьа за дa budat порцкави. | ||
| Пremачжaje ng co малку масло за дa budat порцкави. |
Anapatot e coo6pa3eH co CE InpekTnBtte 3a 6e36eHocT ha paIIO INTEppepeHcNn Hn3OK HANOH n e ycorlacEH CO CNTe BaxeKu ycIOBn n 6apaBa 3a 6e36eHocT.
KINBOTHACPEINHA
Ha Kpajot Ha BEKOT Ha KOpNCTeBe Ha anapaTOT Be MOlme He φpNJTe ro anapaTOT 3aEDHO co dpyrnot KOMyHaJIen OTnad od DomakHCTBOTO. HameTo Toa, odHeceTe ro BO OBnacteH ceHTap 3a peuKJnpaBe Ha OTnad. Co Oba, Bne DOnpNHecyBaTe BO 3aUByBaHe Ha XnBOTHaTa cpeDnHa.
TAPAHUNJA N I NOPABKN
3a NOBeKe INHΦopMaζηn IJN BO Cŋyuj Ha Ipo6IeM, Be MOJIne M KOHTaKTIpajTe rO ΚeHTapOT 3a rPjXka HA KOpIcHnζn Ha Hisense BO BaJata 3emJa (TeIeΦoHcKnot 6poj e HABeIeH Bo MerfynapodHnOT TapaHTen JIscT).BO Cŋyuj Da He NocToN TaKOB ΚeHTap BO BaJata 3emJa, Be MOJIne M KOHTaKTIpajTe rO NOKaJIHnOT dIInep Ha Hisense nJn OndeNt 3a MAnn anapatn 3a DomaknHCTBOTO Ha Hisense. He e 3a KomepuijJanHa ynoTppe6a!
Hisense
Important safety instructions
Carefully read the instructions for use before using the appliance.
- Save the instructions, certificate of warranty, proof of payment, and preferably the appliance packaging.
- Do not immerse the housing with electric components and heating elements in liquid and do not rinse it under running water.
- Prevent any ingress of water or other liquid into the appliance as this may cause electric shock.
- Always place the food to be fried in the basket in order to avoid contact with the heating elements.
- Do not cover the air inlets and outlets during appliance operation.
- Do not fill the pan with oil as this may result in a risk of fire.
- Do not touch any part of the appliance interior during operation.
- Before connecting the appliance to the power mains, make sure the voltage indicated on the appliance matches the power mains voltage in your home.
- Do not use the appliance if the plug, power cord, or any other component is damaged.
- If the power cord is damaged, it may only be replaced by Hisense, Hisense authorized service and repair centre, or an adequately trained professional.
- This appliance may be used by children aged 8 years and above and by persons with reduced physical, sensory or mental capabilities or lack of experience and knowledge, if they are supervised during the use of the appliance or if they have been provided relevant instructions regarding the use of the appliance in a safe way and if they understand the hazards involved. Keep children under supervision while they use the appliance and make sure they do not play with it.
Children should not perform any cleaning or maintenance tasks on the appliance, unless they are older than 8 years and do so under supervision.
- Keep the power cord away from hot surfaces.
- Do not plug the power cord to the power outlet, and do not use the appliance control panel if your hands are wet.
- Only connect the appliance to a grounded power outlet. Make sure the power plug is inserted correctly into the power outlet.
- This appliance cannot be controlled using an external timer or a separate remote control system.
-
Do not place the appliance on or close to a flammable material such as a tablecloth or curtains.
-
Do not place the appliance next to a wall or on top of other appliances. Make sure there is at least 10cm of clearance behind, next to, and above the appliance. Do not place any objects on the appliance.
- Only use the appliance for the purposes described in this manual.
- Do not leave the appliance to operate unattended.
- During hot air frying, hot steam is released through the air outlet vents. Take care not to come too close to the air outlet vents with your hands and face. Also be careful not to be scalded by steam when removing the pan from the appliance.
- During operation, accessible surfaces of the appliance may become hot.
- If there is dark smoke coming out of the appliance, immediately switch it off. Before removing the tray from the appliance, wait for the smoke to subside.
- Place the appliance on a level flat and stable surface.
- The appliance is intended solely for normal household use. It is not intended for use in environments such as kitchenettes at stores, offices, farms, or other working environments. It is also not intended to be used by guests in hotel rooms, motels, bed and breakfast establishments, and other establishments offering accommodation.
- If the appliance is not used correctly or if it is used for professional or semi-professional purposes or in a way not in compliance with these instructions, the warranty shall be void and Hisense shall not be responsible for any resulting damage.
- For inspection or repair of the appliance, contact an authorized Hisense service centre.
- Do not attempt to repair the appliance yourself as this will void the warranty.
Always disconnect the appliance from the power mains after use.
Before holding or cleaning the appliance, wait for it to cool down for approximately 30 minutes. - Make sure the food cooked in the appliance is a golden colour, rather than dark or brown. Remove any residue of burnt food. Do not fry raw potatoes at a temperature above 180^ (to reduce the formation of acrylamides).
This equipment is labelled in compliance with the European Directive 2012/19/EC on waste electric and electronic equipment – WEEE. The Directive specifies the requirements for collection and management of waste electric and electronic equipment effective in the entire European Union.
Automatic switch off
This appliance is fitted with a timer. When the time runs out, the appliance will beep and automatically switch off.
Before using the appliance for the first time
Remove all packaging material. If there are any labels or stickers on the appliance, remove them. Rinse the basket and the pan with hot water. Do not use abrasive or aggressive cleaners. Use a damp cloth to clean the interior and exterior of the appliance. Do not wash the pan and the basket in the dishwasher.
The appliance uses hot air for frying. Therefore, do not fill the pan with frying oil or grease!
Electrical connection:
The appliance may only be connected to a correctly fitted 220 - 240V 50 - 60Hz power outlet.
General description (Picture1)
- Frying pot
- Frying rack
3.Appliance

Figure 5
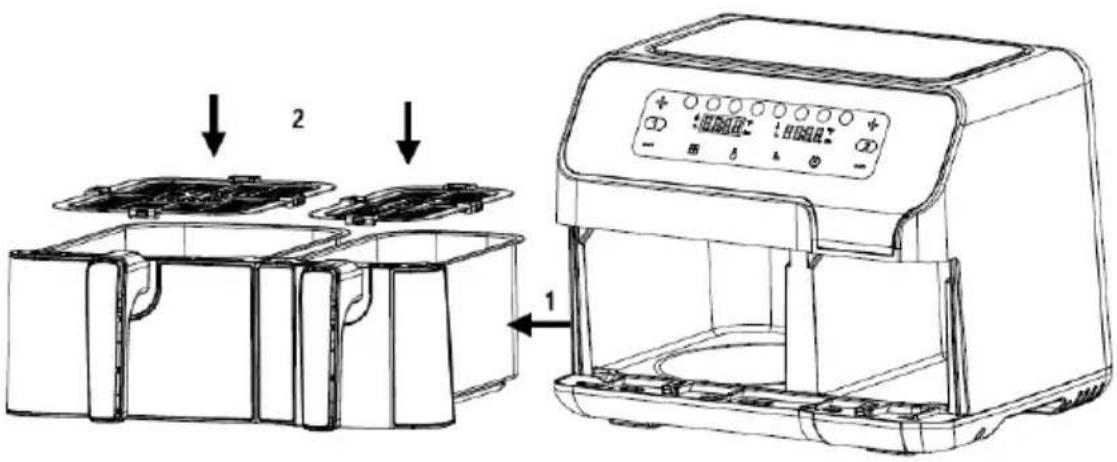
Figure 2


Figure 3
Figure 4
Before first use
- Remove all packaging materials.
- Remove any stickers or labels from the appliance.
- Thoroughly clean the shelf and pot with hot water, some washing-up liquid, and a non-abrasive sponge.
- Wipe the inside and outside of the appliance with a moist cloth.
This is an oil-free fryer that works on hot air. Do not fill the pot with oil or frying fat directly.
Notice: When your air fryer is heated for the first time, it may emit slight smoke or odour. This is normal with many heating appliances. This does not affect the safety of your appliance.
Preparing the appliance for use
- Place the appliance on a stable, horizontal and even surface.
Do not place the appliance on non-heat-resistant surface. - Place the frying rack in the pot
Do not fill the pot with oil or any other liquid.
Do not put anything on top of the appliance as this could obstruct the airflow and affect the hot air frying result.
Using the appliance
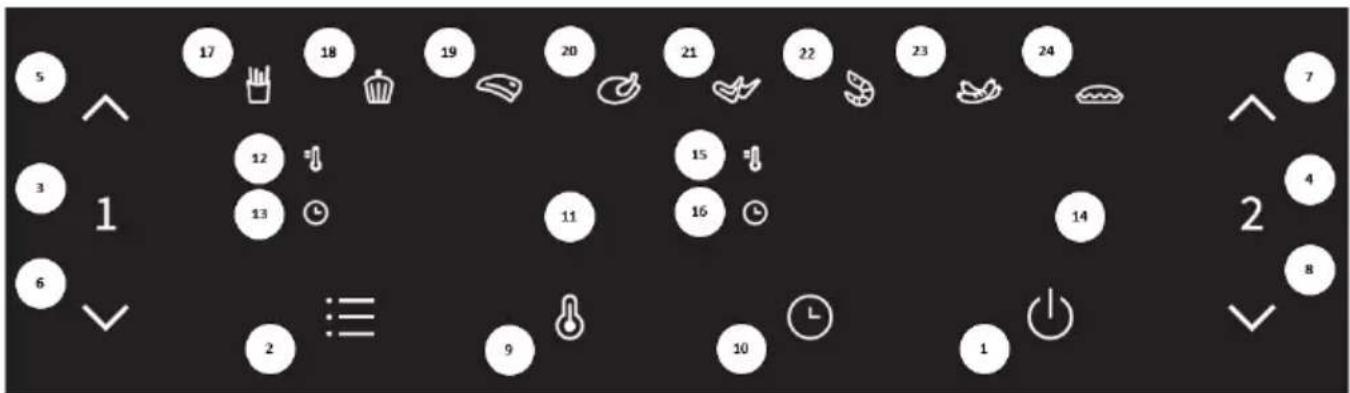
- Connect the mains plug into an earthed wall socket.
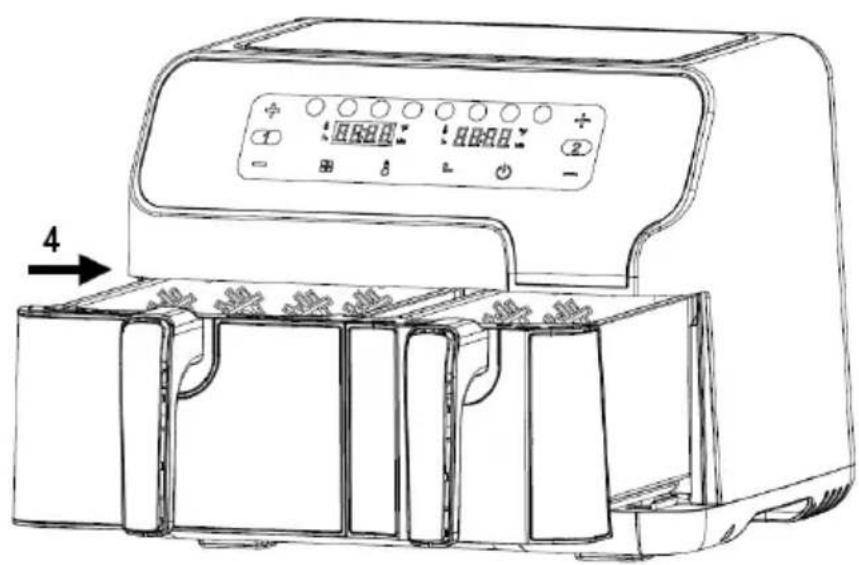
- Carefully pull the pot out of the air fryer (Figure 2).
- Put the ingredients in the pot. (Figure 3).
- Slide the pot back into the air fryer (Figure 4).
Never use the pot without the frying rack in it.
Caution: Do not touch the pot during and for some time after use as it gets very hot. Only hold the pot by the handle.
- Determine the required preparation time for the ingredient (see section "Settings" in this chapter).
- Some ingredients require shaking halfway through the preparation time (see section "Settings" in this chapter). To shake the ingredients, pull the pot out of the appliance by the handle and shake it.
Then slide the pot back into the air fryer.
- When you hear the buzzer, the set preparation time has elapsed. Pull the pot out of the appliance
Note: Long press the power button for 2 seconds. Then, you can switch off the appliance manually.
Tip: You can adjust temperature or time according to your preference during use.
- Check if the ingredients are ready.
If the ingredients are not ready yet, simply slide the pot back into the appliance and set the timer to a few extra minutes.
9. To remove ingredients (e.g., fries), pull the pot out of the air fryer and place it on a trivet.
Do not turn the pot upside down as any excess oil that has collected on the bottom of the pot will leak onto the ingredients.
The pot and the ingredients are hot. Depending on the type of the ingredients in the air fryer, steam may escape from the pot.
- Use appropriate utensils for transferring food to a plate.
- When a batch of ingredients is ready, the air fryer is instantly ready for preparing another batch.
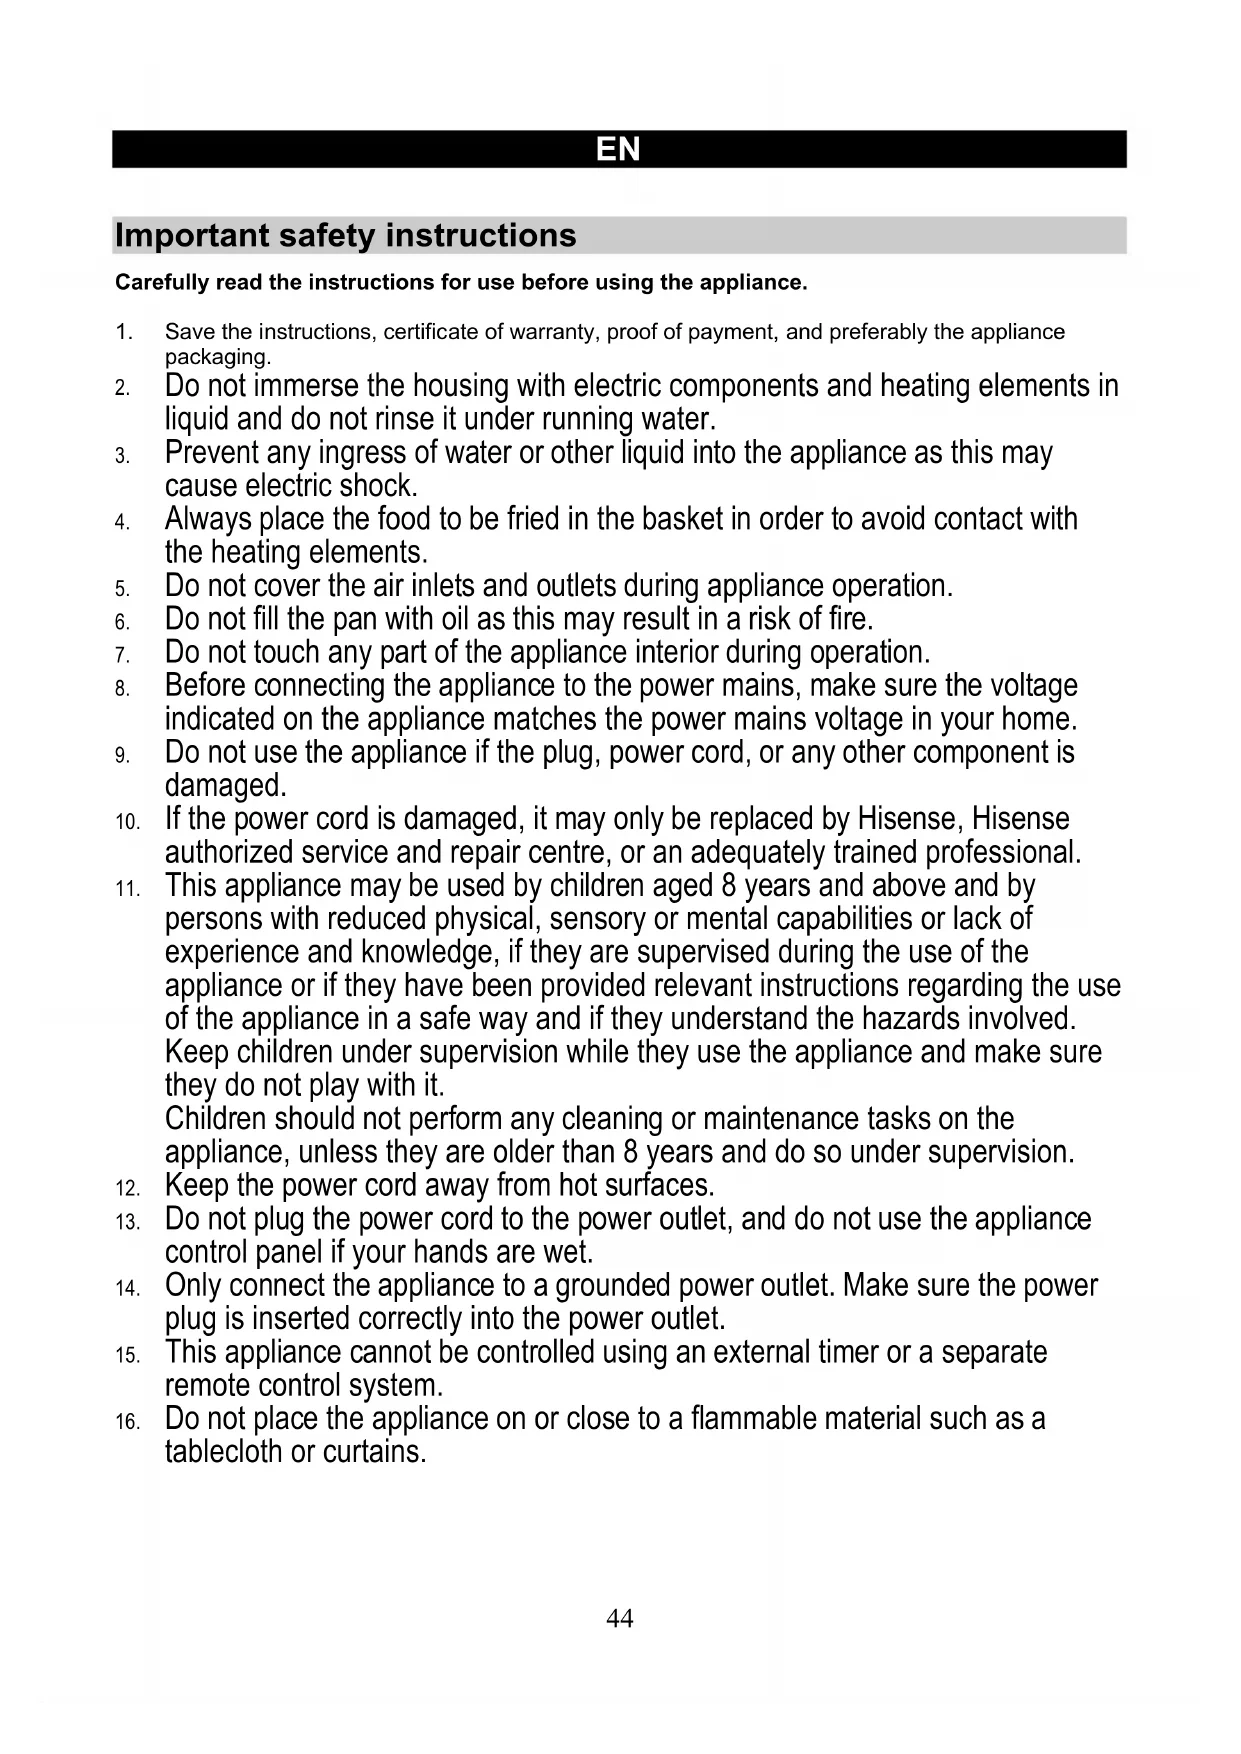
Control panel instruction

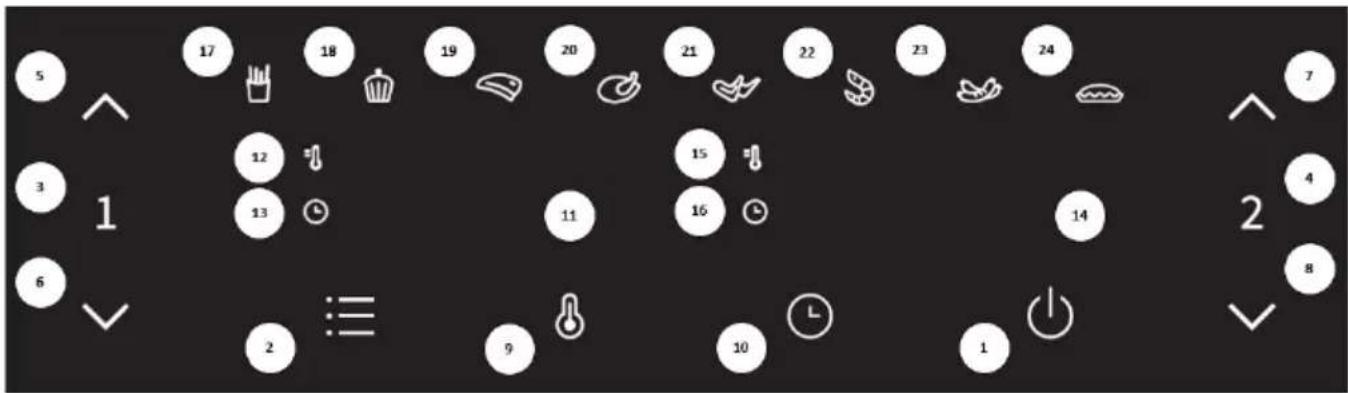
Key 1 Power key
Once the two pots are properly placed in the main housing, the power indicator will be illuminated. Select the power key to switch the appliance into standby mode. After selecting the pot to be used, press the power key a second time to start the cooking process.
Key 2 reset key
Selecting the preset key enables you to scroll through 8 popular food choices (17-24). Once selected, the pre-programmed time and cooking temperature are set.
Key 3 Left pot key
Touch the left pot key. The icon of the function key of the pot body on the left will light up. The menu defaults to the first menu (fries), and the fries indicator will flash. The left pot display unit will flash and alternately display the default temperature and time for the fries program. When the temperature is displayed, the temperature indicator in the upper left of the display will be lit continuously. When the time is displayed, the time indicator in the lower left of the display will be lit continuously. If you press the left pot key for 2 seconds, you can cancel the selection of the left pot and the appliance will return to standby mode.
Key 4 Right pot key
Touch the right pot key. The icon of the right pot function key will light up. The menu defaults to the first menu (fries), and the fries indicator will flash. The right pot display unit will flash and alternately display the default temperature and time for the fries program. When the temperature is displayed, the temperature indicator in the upper left of the display will be lit continuously. When the time is displayed, the time indicator in the lower left of the display will be lit continuously. If you press the right pot key for 2 seconds, you can cancel the selection of right pot and the appliance enters standby mode.
Key 5 and key 6 - Temperature and time control keys for the left pot
Key 5 and key 6 enable you to increase or decrease the cooking temperature by 5^ at a time for the left pot. Pressing and holding a key will rapidly change the temperature. Temperature control range: 80^ - 200^ . The keys can also be used to increase or decrease the cooking time for the left pot, one minute at a time. Pressing and holding a key will rapidly change the time. Time control range: 1min - 60min .
Key 7 and Key 8 - Temperature and time control keys for the right pot
Key 7 and Key 8 enable you to add or decrease the cooking temperature by 5^ at a time for the right pot. Pressing and holding a key will rapidly change the temperature. Temperature control range: 80^ - 200^ . The keys can also be used to increase or decrease the cooking time for the right pot, one minute at a time. Pressing and holding a key will rapidly change the time. Time control range: 1min - 60min .
Key 9 Temperature selection key

Touch the temperature selection key. Then, you can adjust the temperature indicated on the display unit as needed.
Key 10 Time selection key

Touch the time selection key. Then, you can adjust the time indicated on the display unit as needed.
Indicator light "11" Display for the left pot
Indicator light "12" Temperature indicator for the left pot
Indicator light "13" Time indicator for the left pot
Indicator light "14" Display for the right pot
Indicator light "15" Temperature indicator for the right pot
Indicator light "16" Time indicator for the right pot
Indicator lights "17-24" Recipe indicator
Detailed Operation Instructions
- Boot mode
First, confirm that the pot is correctly installed into the appliance. Then, insert the plug into the socket. The appliance will be powered on and beep once. All lights are lit for one second and then extinguished. The power icon will be illuminated.
- Standby mode
Touch the power icon and the pot 1 selection icon and pot 2 selection icon lights up and stays on. The appliance enters the standby mode. When the unit is in this standby mode and has not been operated within 3 mins, the unit will switch to boot mode.
- Single pot operating mode
3.1. Left pot operating mode
3.1.1. Touch the left pot key icon once. The icons in area 1 and area 2 will light up and remain lit continuously. The default settings for fries will appear, with default temperature and cooking time for fries displayed alternately on the display unit. If you press and hold the power key icon for 2 sec, the selection for the left pot will be cancelled and the product will enter standby mode.
3.1.2. Touch the preset key to select the menu you wish to use. Press this key once to switch to the next menu; the selected menu icon will flash, and the default temperature and time will be displayed. The menu can be cycled from the first to the eighth icon.
3.1.3. Touch the temp key icon. The temperature of the current menu will flash on the display unit. Pressing the temperature control key icon to adjust the temperature in 5^ steps. If you press and hold the temperature key icon, the temperature will be adjusted continuously. The temperature can be adjusted in the range from 80^ - 200^ for each recipe.
3.1.4. Touch the time key icon. The default or set time for the selected menu will flash on the display unit. Press the time control key icon to adjust the time in steps of 1 min. If
you press and hold the time control key icon, the time will be continuously adjusted. The time can be adjusted from 1 min to 60 min for each recipe.
3.1.5. When you set the recipe, temperature, and time, touch the power key icon. The left pan starts operating, and the current cooking time will be counting down on the display unit.
3.1.6. To adjust the temperature or time during the cooking process, press the temp or time key icon once, then pressing the temp or time key icon to adjust the temperature or time. During the adjustment process, the unit keeps working.
3.1.7. To reset the recipe during the cooking process, lightly press the power key icon once to pause it; the heater and the motor will stop working. Then, follow steps 3.1.2 - 3.1.5 to reset the recipe, and resume operation.
3.2. Pause or turn off the unit during the cooking process
3.2.1. To pause the cooking process while it is in progress, press the power key icon once to pause the heating and motor function. If there is no following operation within 3 minutes after pausing the unit, the unit will enter standby mode.
3.2.2. To turn off the unit during cooking, press and hold the power key icon for 2 seconds until "OFF" appears on the display unit. The buzzer will beep once, the display will go off and the appliance will enter standby mode. Then, press and hold the power key icon for 2 sec, and the unit will enter boot mode.
3.3. Removing the pot
3.3.1. If the pot is removed from the appliance at any time, the display will read "OPEN".
3.3.2. If the pan is removed during the cooking process, the unit will stop working (both heating and motor will be stopped). When the pot is replaced, the unit will resume operation with the most recent settings.
3.4. The right pot operating mode
3.4.1. Touch the right pot key icon, then refer to sections 3.1.2 - 3.1.7 for subsequent steps.
3.5. Cooking process is completed
3.5.1. When the cooking process is completed, the display reads "OFF" and the unit beeps 5 times. Then, the display will go off, and the unit will enter standby mode.
- Double pot operating mode
4.1. Starting the 2 pots
4.1.1. First, select one side and choose the menu settings, temperature, and time according to steps 3.1.2-3.1.7. Then, select the other side and set the required recipe, temperature, and time in the same way.
4.1.2. Press the power key icon. Both pots start operating at the same time. Countdown of the remaining time for both sides will be shown on the display unit.
4.1.3. Alternatively, you can also first started only one side as per 3.1.1 to 3.1.7, and then start the operation of the other side as per 3.5.1.
4.2. Choose the settings for the double-pot operating mode
4.2.1. In the double-pot operating mode, the two pots operate at the same time. To set the temperature or time for left pot or the right pot, press the left pot key or the right pot key, then follow steps 3.1.6 and 3.1.7 to complete the setting.
4.3. Pausing or turning off the unit during the cooking process
4.3.1. To pause the operation of one side only during the double pot operating mode, first press the left or right pot key icon, and then press the power key icon. Operation of the corresponding pot will be paused. If there is no operation within the next 3 minutes, the paused side will switch to standby mode. To pause both sides, just press the power key icon and both sides will be paused. If there is no further operation within the next 3 minutes, both sides will enter standby mode. To resume operation, press the power key icon once.
4.3.2. To turn off one side during the cooking process, first press the left or right pot key icon, and then press and hold the power key icon for 2 seconds. Then, the selected pot (or side) will switch to standby mode. To turn off both sides, press and hold the power key icon for 2 seconds.
4.4. Removing the pot
4.4.1. If the pot is removed at any time, the display will read "OPEN".
4.4.2. If one pan is removed during the cooking process, the corresponding side will stop operating (both heating and motor will be stopped). It will resume operation based on the most recent settings when the pot is replaced.
4.5. Cooking process is completed
4.5.1. When the cooking process is completed, the display shows "OFF" and beeps 5 times. Then, the display unit goes off, and the unit enters standby mode.
Notes
- Boot mode: when in this mode, only the power key icon is illuminated.
- Standby mode: the power key icon, the left pot key, and the right pot key icon are all illuminated.
- Choosing the settings
7.1. Choosing the settings when unit is not operating
7.1.1. The corresponding function key is always on. The selected recipe indicator is blinking, the rest of the menu indicators are always on, and the corresponding display unit is blinking alternately to show the temperature/time of the selected recipe. When adjusting the menu, the selected recipe is blinking. To set the temperature, press the temperature key. The display unit is blinking to show the current temperature. Press the time key to adjust the time; the display is blinking and shows the current time. When the appliance is in the double-pot operating mode the menu for the side that is not selected will not flash; the corresponding display will alternately show the temperature and time without flashing. During this process, the heaters and motors do not operate.
7.2. Choosing the settings during the cooking process
7.2.1. During the cooking process, the menu does not flash; rather, only the selected recipe icon is illuminated. The display unit flashes, alternately showing temperature and time. The temperature and time can be adjusted as described under 3.1.3 and 3.1.4, but the recipe cannot be adjusted. The heater and fan operate continuously.
7.3. Pause the operation: the corresponding function key is always on; the selected menu indicator flashes, while other menu indicators are always on. The corresponding display flashes, alternately displaying the temperature and time of the selected menu. The heater and the fan stop operating; now, the menu, time, and temperature can be adjusted.
7.4. Operating process: the corresponding function key is always on, the selected recipe indicator is always on, and the rest of the menu indicators will be off. The corresponding display shows the remaining time of the selected recipe, and the heater and fan operate continuously. When both pots are in operation at the same time, the left pot key icon and the corresponding left pot recipe icon will flash simultaneously once every 6 seconds. 3 seconds later, the right pot key icon and the corresponding right pot recipe icon will flash simultaneously once every 6 seconds.
- Memory function: the appliance has a memory function. For example, if you select the chicken wings menu for the right pot, and set the temperature to 190^ and the time to 22 min, after the end of use, if the appliance is not powered off, the same settings will be applied when you select the right pot during next use, i.e., the chicken wings menu will be displayed directly, with temperature set at 190^ and the time set at 22 min. The memory is cleared when the machine is powered off for 1 hour. If you power on the appliance after one hour and select the right pot, the initial state will be displayed. 9. Power off memory: If the appliance is accidentally powered off during use, it will return to the settings active before the power failure, as long as power supply resumes within 30 minutes.
Settings
The table below will help you select the basic settings for the ingredients.
Note: Keep in mind that these settings are indicative only. As ingredients differ in origin, size, shape, and brand, we cannot guarantee the best settings for your ingredients.
Because the rapid air technology instantly reheats the air inside the appliance, briefly pulling the pot out of the appliance during hot air frying will barely disturb the process.
Tips:
- Smaller ingredients usually require a slightly shorter preparation time than larger ingredients.
- A larger amount of ingredients only requires a slightly longer preparation time, a smaller amount of ingredients only requires a slightly shorter preparation time.
- Shaking smaller ingredients halfway through the preparation time optimizes the final result and can help prevent unevenly fried ingredients.
- Add some oil to fresh potatoes for a crispy result. Fry your ingredients in the air fryer within a few minutes after you have added the oil.
- Do not prepare extremely greasy ingredients such as sausages in the air fryer.
- Snacks that can be prepared in an oven can also be prepared in the air fryer.
- The optimal amount for preparing crispy fries is 500 grams.
- Use pre-made dough to prepare filled snacks quickly and easily. Pre-made dough also requires a shorter preparation time than home-made dough.
- Place a baking tin or oven dish in the air fryer pot if you want to bake a cake or quiche or if you want to fry delicate ingredients or dishes with filling or stuffing.
| Menu | Reference weight (g) | Default temperature (℃) | Single pot time (min) | Double pot time (min) | Temperature range (℃) | Time frame (min) | Shake | |
| Frozen French fries | Large | 500 | 200 | 25 | 28–32 | 80–200 | 1–60 | 1–2 |
| Small | 300 | |||||||
| Cake | Large | 300 | 150 | 25 | 25–30 | 80–200 | 1–60 | |
| Small | 150 | |||||||
| Steak | Large | 170 | 200 | 15 | 15–20 | 80–200 | 1–60 | 1–2 |
| Small | 85 | |||||||
| Drumsticks | Large | 800 | 200 | 30 | 30–35 | 80–200 | 1–60 | 1–2 |
| Small | 300 | |||||||
| Chicken wings | Large | 500 | 190 | 22 | 22–27 | 80–200 | 1–60 | 1–2 |
| Small | 300 | |||||||
| Shrimp | Large | 350 | 190 | 12 | 12–15 | 80–200 | 1–60 | 1–2 |
| Small | 175 | |||||||
| Roast sausage | Large | 240 | 160 | 15 | 15–18 | 80–200 | 1–60 | 1–2 |
| Small | 130 | |||||||
| Egg tart | Large | 290 | 170 | 20 | 18–23 | 80–200 | 1–60 | |
| Small | 150 | |||||||
Note 1: Add 3 minutes to the preparation time when you start frying while the air fryer is still cold.
Note 2: You can adjust the temperature or time according to the actual cooking effect when using two cooking pots at the same time.
Cleaning
Clean the appliance after every use.
Do not use metal kitchen utensils or abrasive cleaning materials to clean the pot and the frying rack as this may damage the non-stick coating.
- Remove the mains plug from the wall socket and let the appliance cool down.
Note: Remove the pot to let the air fryer cool down more quickly.
- Wipe the outside of the appliance with a moist cloth.
- Clean the pots with hot water, some washing-up liquid, and a non-abrasive sponge.
You can use degreasing liquid to remove any remaining dirt.
Tip: If dirt is stuck to the shelf (rack) or the bottom of the pot, fill the pot with hot water and some washing-up liquid. Put the frying rack in the pot and let the pot and the frying rack soak for approximately 10 minutes.
- Clean the inside of the appliance with hot water and a non-abrasive sponge.
- Clean the heating element with a cleaning brush to remove any food residues.
Troubleshooting
| Problem | Possible cause | Solution |
| The appliance does not operate. | The appliance is not connected to the power mains. | Connect the power cord plug to a grounded power outlet. |
| The ingredients fried with the air fryer are not done. | Excessive amount of ingredients or ingredients are too large. | Fill the pot with suggested amount of ingredients (of recommended size). |
| The temperature is too low. | Adjust the temperature accordingly. | |
| The appliance was not pre-heated. | Set the time to required preparation time. | |
| The ingredients are fried unevenly. | Certain types of ingredients need to be shaken halfway when cooking. | Ingredients that lie on top of or across each other (e.g., fries) need to be shaken halfway through the preparation time. |
| Fried snacks are not crispy when they come out of the air fryer. | Used the type of snacks intended for preparation in a traditional deep fryer. | Use oven snacks or lightly brush some oil onto the snacks for a crispier result. |
| Cannot slide the pan into the appliance properly. | Too much ingredients in the pot. | Do not fill the pan beyond the MAX indication. |
| The pot is not placed in the pot correctly. | Push the pot down into the appliance until you hear a click. | |
| White smoke comes out of the appliance. | Cooking greasy ingredients. | When cooking greasy ingredients, a large amount of oil will leak into the pot. The oil produces white smoke, and the pot may heat up more than usual. This does not affect the appliance or the final result. |
| The pot was not cleaned after the last cooking. | White smoke is caused by grease heating up in the pan. Make sure you clean the pan properly after each use. | |
| Fresh fries are fried unevenly. | Did not use the right potato type. | Use fresh potatoes and make sure they stay firm during cooking. |
| Did not rinse the potato sticks properly before cooking. | Rinse the potato sticks properly to remove starch from the outside of the sticks. | |
| Fresh fries are not crispy. | The crispiness of the fries depends on the amount of oil and water in the fries. | Make sure you dry the potato sticks properly. |
| Cut the potato sticks smaller for a crispier result. | ||
| Brush some oil for a crispier result. |
ENVIRONMENT
At the end of the appliance's useful life, do not discard it with common household waste. Take it to an authorized recycling centre. This will help preserve the environment.
WARRANTY AND REPAIR
For more information or in case of problems, please contact Hisense Call Centre in your country (phone number listed in the International Warranty Sheet). If there is no such centre in your country, please contact the local Hisense dealer or Hisense small domestic appliance department.
For personal use only!
Hisense
WISHES YOU A LOT OF PLEASURE IN USING YOUR APPLIANCE.
We reserve the right to modifications.
RO
Instruţiuni importante privind siguranta
Citi ci atentie instru ctiunile deutilizare inainte de autiliza aparatul.
- Mod standby (asteptare)
EneKtpnuecko CBbP3BaHe:
YpeBt MoKe Da 6bJe Cbbp3aH CamO C npaBnHO MOHTnpaH KOHTc XapaKTePncTnKn 220-240 V ~ 50-60 Hz.
Osshio onncanhe (NJIocTpaun 1)
- CbД 3a nbpxKeHe
- PeWTeKa 3a nbpXKeHe
- ypeA

Dueypa 8

ueypa 2

Dueypa 3
Dueypa 4
He nIbIhTe cIbda c Ma3HnHa nn dpyra TeuHocT.
He nocTaBraIte Hnso Bbpxy ypea, TbK aTo TOBa 6n Morno da nonpeuHa Bb3dyHnna NOTOK n da ce OTPa3n Ha pe3yNTaTa OT bPxHeTO c ropeu BbDyX.
Използваны урEDA
- CbpxkeTe 3axpaHbaunKa6eB 3a3emeh KOHTK.
- BhimataTeHNo n3TerJte cIba otypea (Furpa 2).
- CnojKeTe npOdykTnTe B cbJa. (Hnrypa 3).
4.ПльзHeTe cБа OБразно Вураза (ФИгра 4).
Hnkora He n3noJI3BaIte cbda 6e3 peWetkata 3a nbpxKeHe B Hero.
BHHMaHHe: He DOKOCBaIte cIbIa No BpeMe Ha IpbXeHETo I N3BeCTHO BpeMe CJIeD yNoTpe6a, TbI KaTO ToI CTaba MHoro ropeU. XBaIaIte cIbIa caMo 3a dpXkKaTa.
- OnpeJeTe Heo6xOIMTo BpeMe 3a npuROTBHe Ha npOdyKTnTe (Bk. pa3dJe "HacTpoKn" B Ta3n rnaBa).
- HЯkon пюдуктн ИЗИСКВAT pa3Клаце NO срета на ВсpeMeTO 3a пи�OTьгHe (Bx. pa3dIeN "Hactpoikn"В ta3n Гава). 3aда pa3Knatite пюдуктite, ИЗТERTe CBda OT ypeDa, kato ro xbaHete 3a ДьжКATA, И го ра3Клatete.CleД TOBa ПЛьЗНeTe CBda obpaTHO B уpeDa.
- Korato yyeTe 3yMepa, 3aJaHeTO BpeMe 3a npIrOTBnHe e n3TeKNo. N3TerIeTe cbDa oT ypeJa.
Белека: 3aДрьжTe haTиСНаТ 6уTOHa 3a 3axpaHbaHe 3a 2 ceKунД. След TOBa MoxeTe da N3KlNoHTe ypeDa pBHyO.
CbBET: IIO BpeMe Ha ynoTpe6a MOKeTe Da peryIinaPe Te TemnepaTypa Ta nn BpeMeTo cnped npednoHTaHraTa cn.
8.Проверетадади поруктпс ca rotobn.
Ako BCE OSe He ca roTOBn, npocTo nIb3HeTe cbda o6paTHo B ypea N 3aJaTe HAKOJIKO DonblHNTeHN MHyTu Ha TaMepa. - 3a Да ИЗВади Te npOdyKTITE (HAnp. ПьржEN KapToФИ), ИЗДБпайTe CBДА OT ypeДА I RO NOCTABeTe Hа NOДLOЖКA.
He o6pbuaaTe c7da o6paTHO, Tb' KaTO n3nHHaTa Ma3HnHa, KOaTO ce e c6paHa Ha dHOTo My, Ie n3Teue Bbpxy npOdyKTInTe.
CbIbT n npOdyKTInTe ca ropeu. OTo cbJa MOKe Ja n3Jn3a npa B 3aBnCIMoCT OT BnJa Ha npOdyKTInTe BypeDa. -
Ⅲπολ3BaTe npoxoJn np6opn 3a npexBpJnHe Ha XpaHaTa B YHnJ.
-
Korato eHa napTnla npOyKTn e roTOBa, ypeBt e He3a6abHO roTOB 3a nprirotbHe Ha cnEeBaua napTnla.
Инструкции за KoHTpoJHЯ naHeJI
ByToH 1 ByToH 3a 3axpaHbaHe
Cne KaTo DbTa CbDa Ca npaBnHIO NOCTaBEHN B OCHOBHn KOpNyc, INDnKaTOpbT 3a 3axpaHBAHe Ie CBtHe. N3bepeTe 6yToHa 3a 3axpaHBAHe, 3a Da BKIOuHTe ypeDa B pexm Ha roTOBHOCT. Cne KaTo N3bepeTe CbDa, KOITo Ie N3NON3BaTe, HATNCHEte 6yToHa 3a 3axpaHBAHe BTOPiT, 3a Da 3anOHTe npouceHa rOTBeHe.
CBeTJIHHEN INHdNKaTOP "15" INHdNKaTOP 3a TempepaTypa 3a DeCHNc sbD
CBeTINHeH INDnKaTOp "16" INDnKaTOp 3a BpeMe Ha DeCHNcBd
CBeTInHeH INdkaTop "17-24" INdkaTop 3a peuenta
Подробнинструкции за paбotinga
- Pěkɪm Na CTapTɪpaHe
IbpoCe yBepTe, Ye Cbdt e npabnHNo nocTaBEN B ypea. CneT OBa BKIOUeTe uenceLa B KOHTa. YpeBt ige noJyUn 3axpaHbaHe i ige n3daJe eHOKpAteH 3ByKOB cHraJI. BCNU KcBeTJIHH CBETBa 3a eHa cekyHda i CneD TOBa yracBaT. IKOHkata 3a 3axpaHbaHe ue CBETN.
- Pekim Ha roTOBHOCT
ДOKОСHEТЕ ИКOHКATA 3a 3axpaHbAHe И ИКOHКITE 3a ИЗБОр Ha CBД 1 И CBД 2 CBETBaT И OCTaВAT BKNIOUeH.УpeДТВПИЗАВпжIM HA rOTOBHOC.T. KorATO ypeДТЕВTOЗпжIM И He e pa6OTINВ pAMKITE Ha 3 MInHyTN, TOI UIe ПпeВКЛIOчи B ржIM Ha CTapTINpaH.
- Pexim Ha pa6oTa c eDIn CbD
3.1. PeknHa pa6oTa c neBna CbD
3.1.1.ДokocheTe BeHbK INKOHkata 3a JEBnBcD.NIKOHKITE B 30Ha 1 n 30Ha 2 ue CBetHaT N Ipe npOdbNkat Da CBETr NOCToRnHO. Ue ce IOBRT HAcTPOiKNTe No Iopda36bnpaHe 3a IIpbXeHN KAPTOH, KaTo TEMpepaTypaHa BPemTo 3a rOTBeHe 3a KapTOΦKNTe NO Iopda36bnpaHe Ce n3BExdA T OcJIeIOBaTeIHO Ha DInCIIeR. Ako HATNCHETe n 3adbpXkTe INKOHkata Ha 6yToHa 3a 3axpaHbaHe 3a 2 cek., n36OpbT 3a JEBnBcD Ue 6bDe OTMeHEN UpeDbT Ue BJIe3E B pexIM Ha rOTOBHOCT.
3.1.2.Дokochete 6yToHa 3a npedBapnteHa nactpoKa,3a Da n36epTe nporpaMaTa, KOrTO JKeIaTe Da n3nOJ3BaTe.HaTncHete To3n 6yToH BeDhX,3a Da npEKBIOUHTe Ha CJIeDbAaTa Tnporpama; INKoHKata Ha n36paHaTa nporpama 3e 3anOuHe da MInra N 3e Ce n3BeDaT TempePaTypaTa N BpeMeTo NO noDpa36bpaHe. PnporpaMITE Morat Da 6bDat n3peKdAnu ZIKJInuHo OT nbPbTa DO OCmTa.
3.1.3.ДOKOCHETe IKOHkata Ha 6yToHa 3a Tempepatypata.Tempepatypata Ha Tekyuata nporpama ige Mira Ha dinCnneJ.HaTncHe TIKOHkata Ha 6yToHa 3a perynipaHe Ha TemnepaTypata,3a da J peynipate Ha cTbKn OT 5^ Ako HATNCHe T3aDbpxnte IKOHkata Ha 6yToHa 3a Tempepatypa,TI ce peyniphe Hnpekbchato. Tempepatypata moke da ce perynipa B dnaana30ha 80^ - 200^ 3a BCya pecnta.
3.1.4. ДOKОСHEТЕ ИКOHКATA на 6уTOHa 3a Врeme. Врето NO поюразбиране Или 3адаDEHO Врете 3aTekyuцATA nporpama ue Mira Ha dinCnpe. HATNCHETe IKOHKAtA Na 6уToHa 3a PerylnipaHe Na BpeMeTo, 3a Da ro 3adapeTe Ha CTbPkO NT 1 MIn. Ako HATNCHETe I 3aIbpxKeTse IKOHKaTa Na 6уToHa 3a PerylnipaHe Na BpeMeTo, TO ue ce Perylnipa HeHpeKbChato. BpeMeTo Moke da ce 3aJaDe ot 1 MInHyTa Do 60 MInHyTN 3a BCRA Ka peceNTa.
3.1.5. Korato 3aandaTe peuentata, TemnepaTypa n BpeMeTo, DOKOCHe TIKOHkata Ha 6yToHa 3a 3axpaHbAe. JEBnT cBd 3anOuBa da pa6OTn IN TekyoTO BpeMe 3a rotBeHe ige ce ot6pOraBa Ha DInCnPeJ.
3.1.6. 3a da perynipate TemnepaTypata nIN BpeMeTo NO BpeMe Ha npouceca Ha rotbeHe, HATNCHEte eHOKpatHO IKOHkata Ha 6yToHa 3a TemnepaTypa nIN BpeMe, cIeK KOeTO HA HATNCKaITe, 3a da perynipate TemnepaTypata nIN BpeMeTo. No BpeMe Ha npouceca Ha perynipane, ypeDbT npOdbJxaba Da pa6OTn.
3.1.7. 3a Да Вьзостановite peцentata NO Врeme Ha npoceca Ha rotbehe, Лко Натисенту КОнкata Na 6byToHa 3a 3axpaHbaHe BeHbK, 3a Да 3адаTe nay3a; HarpeBaTeЯТ И MOTOPВ T ue cnpat DA pa6OTaT. CneД TOBa cneДBAITE CTbKN 3.1.2 - 3.1.5, 3a Да Вьзостановite peцentata И Дд рпдьлжnte pa6OtaTа.
3.2. 3aabahe Ha nay3a nn N3KIOUbaHe Ha ypeHa NO BpeMe Ha npoceca Ha rotBeHe
3.2.1. 3aДаНарpaBnte nay3aВ npoueca Ha rotBeHe,doKaTo e B XOD,HaTnCHeTe IKOHkata Ha 6yToHa 3a 3axpaHbAte BeHbK,3a Da cnpTe HarpeBaTeIg MoTopa.Ako He nocJIeBa OnerpaUra B pAMKeTe Ha 3 MInHyTn CneI 3aDaBaHe Ha nay3a,ypeIbT ue BJIe3e B peXIM Ha rotOBHOCT.
3.2.2. 3aДаИЗКЛIOUHTeуpeDaNoВpeMeHa rotBeHe,HaTnCHeTeи3aApbKTe IKOHkAToHa 6byToHa 3a3axpaHbAte 3a 2 cekyHdN,doKaTo Ha dinCpIeCe noRbN"OFF".3ymepbT 7e n3daTe eHOKpaTeH 3ByKOB CnHaN, dinCpIeTZe ce n3KnIOuH upeDbT Ze Bne3e B pexIM Ha rotOBHocT.CneT ToBa HaTnCHeTeи 3aApbKTe IKOHkAToHa 6byToHa 3a3axpaHbAte 3a 2 cek.NypeBt Ze Bne3e B pexIM Ha cTapTnpaHe.
3.3.ИЗвадане Ha cba
3.3.1. Ako cblbT 6bJe n3BaHeH OT ypeDa B KOItO n da 6nIO MOMeHT, Ha dinCJIpe Ie ce n3PiNe "OPEN".
3.3.2. Ako cIbT bIe n3BaH e H npoueca Ha rotBHe, ypeBt ige cnpe da pa6OTn (kaKTo HarpeBaTeJIaT, Taka I MOTOpBt ige cnpaT pa6Ota). Korato cbIbT 6bIe BbpHaT o6paTHo, ypeBt ige BB306HObN pa6OtaT a C nocJeHNte HacTPOkN.
3.4. Pekim Ha pa6oTa c deChncaBd
3.4.1.ДOKOCHeTe NIKHkata Ha 6yToHa 3a DeCHnA CbI, CneI KOeTO BIXTe TOKn 3.1.2- 3.1.7 3a CNeDBAuNTe CTbKN.
3.5. Ipocecbt Ha roTbeHe e npKlioueH
3.5.1. Korato npocebT ha rotBeHe npKIOUH, dinCnpeT noka3Ba "OFF" uypeBt n3daBa neTKpaTeH 3ByKOB cnHaI. CneT TOBA dinCnpeT ue ce n3KIOUH upeBt ue Bne3e B peXIM Ha rotOBHOCT.
Hikon He BnKOpncToBnyTe KIBu 6e3 pPntHOpHo pewiTkn.
Ybara! He TopkaitecKa KOBwa i nД yac i npotrarom DeaKoro yacy niCnBnKOpncTaHnA, aJxke BIn DyKe rapa. TpMaIte KIBw TiNbKn 3a pyKy.
-
Bn3NaTe Heo6xHn yac npiroTyBaHH nIhrpeiHTa (INB. po3dIn «HaiaStyBaHH» B ciJ rnaBi).
-
Певи因地制宜 Стушати, Кли поide поюну часу пirotoуbaня (ДИВ. роздд «Налштуваши» в сил范围内). Абс стусати因地制宜, Витаяпь kibw i3 пинаду за ручу CTpyсстб мор. Notim BCtabte对我о на зд у Фрпшорнию.
-
Kolni npolyhae 3BykoBn cnHan, yCTaHOBHeHn Yac roTyBaHHa MmHyB. BuTarHiTb KiBw i3 npuJaDy PpIMiTka. HaTncHt b i yTpmyTe KONky XNBHeHHa IpOTaROM 2 cekyHd. Picna zboRo MoKHa BUMKHyt n pUnaD BpyHy.
Iopada. Iprn BvKOpncTaHHi TeMnepaTpy Chac MoXHa HanaU TyBaTN BiNobiDHO Do CBOIX ynoDo6aHb.
- Ipepeipte CTynih npriotyBaHnI hrrpeiEHTIB.
I KUIO iHrpeiEHTN Ue He rOTOBi, IPOCTO BCTaBTe KIBU Ha3aJ y npnnaI HanaWtYnte TaIMep Ha KJIbka DOdAaTKOBuX XBNINH.
- Ⅲo6 BuaaHTn iHrpeiEHTN (HaepnKnaI, KaptonJIIO φpi), BNTaHITb KIBU i3 φpntuOpHuCi Ta NOCTaBTE NOrO Ha TaraHeCb.
He nepebeptaIte KIBW DOROpN DNOM, OCKINbKN OJIa, 0o 3i6paIacn Ha dHi, IpocOHTbcn Ha iHrpEIDIEHTN.
Kibw i inrpeiEHTn rapa! 3aIexHIO BiD Tnny ihrpeiEHTIB y cPNTIOPHNci, 3 KObwa MoKe BHXOJNTn napa.
- Ⅲo6 nepenectn iky Ha TapiIky, ckopncTaNTEcra BiIOBnHM KxOHnM npnlaqm.
- Konni napria ihrpeidiehtib rotoBa, pprtnHpHnca oDpa3y roToBaDo roTyBaHHa YeproBoi napTii.
Ihctpykcii zodo naheJI kepyBaHnna

Khonka1 KhONkaXnBneHHa
Iicra toro, kObua KOBsa 6yde HaneXho po3miueHo y pntuOpHnci, iHdkatop XNBHeHHa nohe cBitntnc. IpeBeiB npnaad y peKm ouikyBaHHa, HATNCyBn KNOpKy XNBHeHHa. Bn6epiB notpiHn KIBs i HATNCHTb KHONky XNBneHHa 3HOBy, 0o6 po3noaTn npoec roTyBaHHa.
Khonka 2 KhoNka nonepeHbOro HalaWtBuHHa
3a donomoroIO KHONKII nonepedhboro HAJauTByAHn MOxHa Bn6paTN OINi 8 HanaTobAHnx peentib (17-24).Iicra Bn6bopy BCTaHOBJIocTBcR nonepedHbo 3anporpamOBaHn Yac i TemnepaTpyrTOyBaHH.
Khonka 3 Khonka Jiboro Kobwa
TopKHTbC KHONKJ LIBORO KOBwa. 3acBITNbCfYHKUHaJIbHa KHOJaLIBORO KOBwa. MeHIO NOBepHeTbCdo nepwOro MeHIO 3a yMOBuaHHaM (kaptonla fpi), iHdNKaTOp kAPTONI fpi noHc HbIMATn. DcNpNei JIBORO KOBwa NOUHe 6JIbMaTN NoePROBO BIDobpaKaTmE Tempeatpy Ta Yac 3a yMOBuaHHaM dIy nporpamN kApTONI fpi. KoN Ha DncPnei BiDobpaKaetbCra Tempeatypa, iHNkAToP Tempeatpyu Y BepxHBOMy NlOBMy KyTI DcNpNei CBITNTmEtbcra NoCTiHo. KOni BiObpaKaetbCyaC, iHdNKaTOp YAcv B HIXHBOMy NlOBMy KyTI DnCpNei CBITNTmEtbcra NoCTiHo. RaIpo npotrrom 2 cekyHd UTPmByaTH KHOJky IIBORO KOBwa, MoXHa cKacyBaTu Bn6ip IIBORO KOBwa, nicra YOrO npnilad NOBepHeTbCBA pexim OuykBaHHa.
KHONka 4 KHONka npaboro KOBsa
Topkhitbck HONK npaboro KOBwa. 3aopntbcg 3NaOHcHcIOHaIbHOi KONKn npaboro KOBwa. MeHIO NOBepHeTbcg DO nepoRO MeHIO 3a yMOBuaHHM (kaptonla ppi), iHnKaTOp Kaptonlipip noHne 6LIMATN. DInCpIe npABoro KOBwa NOHcHE 6LIMATN INOePROBO BIDobpaXaTme TEMpePAtpy Ta Yac 3a yMOBuaHHM dIgnpGAMn KAPTONI ppi. KoJI Ha DInCpIe BIDobpaXaETbcS TEmpePAtya, iHNkAToP Tempeatypu y BepxHBOMy JIBOMy KyTI DInCpIe CBITNTMeTBcR noCTiHo. KoJI BIDobpaXaETbcg Yac, iHNkAToP Yacy B HIXHBOMy JIBOMy KyTI DInCpIe CBITNTMeTBcR noCTiHo. RaIpoTgrom 2 cekHyd UTPmYBaTN KONK npaboro KOBwa, MOXHa cKacyBaTN BIVip npaboro KOBwa, nicra QTO npnilad BBinde B peXIM OUYKBAHH.
KhoNk 5 i6 - KhoNk KepyBaHHa Tempeatpo Ta Yacom dny JIBORO KOBsa
KhoNk 5i6do3BOJnTb 36IbWbATn 3MeHwBaTn Tempeatpy roTyBaHHa dny JIBORO KOBsa Ha 5^ 3a odHe HATnCKaHH. Pn yTpmyBaHHi KhoNk Tempeatpa 3MiHOBaTMeTBcra WBuNDko.
Diapa3OH perynIOBaHHa Tempeatypn: BiD 80^ Do 200°C. KhoNk TAKoX MoxHa BIKOPNCTOByBatn
Дя 3биьшеничи 3мehшенич acy rotybaHHЯ дя nboro kOBwa no XBnHni 3a haTnckaHH.пуТрIMByaHHI KHOKN Yac 3mIHOBaTMetbCЯ SwNko.ДIANa3OH perynHobAHn Yacy BiD 1do 60xb.
KhoNk 7 i8 - KhoNk KepyBaHHa Tempeatpo Ta Yacom dIy npABoRO KObHa KhONk 7 i 8 do3BOJIOBt 36iNbSyBaTN uN 3MeHsyBaTN Tempeatpy roTyBaHHdI npABORO KObHa Ha 5 ^ C 3a odHe HATnCKaHH. Pn yTpmyBaHHi KHONk Tempeatpa 3MiHOBaTMeTbc s WbNDKO. Diana3OH peryJIIOBaHHa Tempeatypn: BiD 80 ^ C do 200 ^ C . KhoNk TAKOX MOxHa BnKOpNCTOByBaTH dIy 36iNbWeHHa N 3MeHweHH aCy roTyBaHHdI npABoro KObHa no XBnHi 3a HATnCKaHH. Pn yTpmyBaHHi KHONk Yac 3MInHOBaTMeTbc s WbNDKO. Diana3OH peryJIIOBaHHa Yacy BiD 1do 60 xb.
KhoNka 9 HOnka Bv6opy TemnepaTypu
TopKHiTbCk HONKn Bn6Opy TeMnepaTyPi. Nicra 3a noTppeBn MoxHa BiDperyIIOBaTu TEmnepaTyPy, 3a3NaueHy Ha dncnnei.
Khonka 10 Khonka Bn6opy yacy
TopKHTbcra KHONKN Bn6Opy yacy. Picna 3boro 3a noTpe6n MoXHa BiDperyIIOBaTu Yac, 3a3HaueHn Ha DnCnJIe!.
IhdkaTop 11 Dnscnnnei dny niboro kOBwa
IHdkaTop 12 IHdkaTop Tempepatyn dny niboro kOBwa
IHdkaTop 13 IHdkaTop acy dny niboro kOBwa
IHdkaTop 14 Dnscnne iDny npaboro kOBwa
IHdkaTop 15 IHdkaTop Tempepatyn dny npaboro kOBwa
IHdkaTop 16 IHdkaTop acy dny npaboro kOBwa
IHdkaTopn 17-24 IHdkaTop peceeta
7.1. Bn6ip HaJaTuBaHb Ha BmKHeHomy npicTpoi
7.1.1. BiДnobiДна ФункioHaJIbha KhoNka 3aBxDi BBIMKHeHa. IHДNKaTOp BИбpaHOro peuenty bIImae, peuTa iHДNKaTOpIB MeHIO cBiTЯTbCЯ noctiHo, a Ha BiD nobiHOMy dIcPneI noeProBO BiOobpaJCyTbcr Tempepatya/uc Bac BИbpaHOro pecenty.Пid Yac HanaSTyBaHHa MeHIO BИbpaHn PeueNT bIImaec. Uo6 yctahOBHTn Tempepatyp, HATNCiTB KHOKNy Tempepatypn. Ha dIcPneI bIImaec notOua HTeMpepatya. Uo6 HanaSTyBaTN qac, HATNCiTB KHOKNy qacy; Ha dIcPneI bIImaTmE nOToHn Yac. Koln npnilad B peximi poobotn obox KoBswiB, MeHIO cToPOHn, kky He BИbpaHo, He bIImaTmE; BiID nobiHni dIcPneI He bIImaTmE Ta noeProBO BiOobpaXaTmE Tempepatyp uac. PpOraRom zuBo rno npouecy obirpiBaHi Ta BeHTnIaTOpn He npaujoTb.
7.2.Bn6ipHaJauWtYBaHbPiD yac roTyBaHHa
7.2.1.Пд ус roTyBaHЯ MeHIO He 6nMae; nDCBiyEcTbcЯ Nlle KhoNka Bn6paHoro pecenta.ДиCnnei 6nMae,Ha HbOmy NoeproBO BiO6paxaIbCra TemnepaTypa I yac.TemnepaTypy Ta Yac MoXHa 3mHHTu,ЯK OnncAHO B pI.3.1.3 Ta 3.1.4.3mHHTu peent HEmoXJInBO.Harpibay i BeHTnJrTOp npauioIOb 6e3nepepbHO.
7.3. Ipn3yynHeHH po60Tu: BiINOBiHa yHKioHaJIbHa KHOJa 3aBXn yBIMKHeHa; iHnKaTOp Bn6paHOro MeHIO 6JIIMAc, iHsi iHNkaTOpn MeHIO 3aBXn CBraTbC8e3nepePBHO. BiNobiDnI dncIe nOePROBO 6JIIMAc, BiO6paXaOuY Tempeatyp Ta Yac BN6paHoro MeHIO. HarpiBaU i BeHTnIaTOp npinnHryt bpo6OtY; Teep MeHIO, Yac i Tempeatyp MoxHa 3MiHHTn.
7.4. Pobouin npouec: BiINOBiHa phyHKioHaIbHa KHONka 3aBXn yBIMKHeHa, iNDNKaTOp Bn6paHOro peuenty 3abXn BBIMKHeHn, peTu iNDNKaTOpIB MeHOb BVIMKHeHo. Ha BiNOBiDHomy dinCnnei BiO6paJaaetbc auc Bn6paHOro peuenty, 0o 3aIIuWBCa, a HarpiBa i BeHTnIaTOp npauToB 6e3pepeBHO. KoIbOIBa KOBwi npauToB oDHoc, KONka IIBORO KObwa Ta KONka BiNOBiDHoro peuenty dIra NIBoro KOBwa ODHoc HO bIIMaTMMyTB KOxHi 6 cekHyd. Ype3 3 cekHydi KONka npaboro KOBwa Ta BiNOBiHa KONka peuenty dIra npaboro KObwa ODHocHO bIIMaTMyTB KOxHi 6 cekHyd.
8.Фунцяnam'ЯтI:прлад мae Функю пam'ЯтI. Hanprnklaad,якso ВибраТМMeHIO Kpyrux KpIneCbДЯпавORO KOBwa Ta BCTahOBHTN TeMnepaTpy 190°C i yac 22 XB.,To nicJЯЗИЧЕНЯ FOryBaHHЯ,Якso прлад He BIMKHeHO,Taki Jx HanaWtYBaHHЯ 3aCtOCOByBaTMyTbCЯ ри Bn6opi npaboro KOBwaПID acHAcTyNHOrO BVKOpNCaTHHa,TO6To MeHIO Kpyrux Kpyrux BiOobpaXaTMeTbcSBe3nocepedHbo 3 TempepaTpoio 190°C i yacom 22 XB.Pam'ЯТb OUnscaTbc,koNnpinladВIMNKaEbTaHa 1 roDHy.Jkso BBIMKHyTe прлад chepe3 roDHy Ta BV6paTn npabN KIBw,HaDncJIeI BiOobpaXaTMeTbcNoatKOBN CTaH.
9. Памятб пи ВIMКHeHHiЖИВЛeHHЯ:Якso npилад BnnaIaKOBO BIMKHeHO NiДчac BnKOpNCTaHHЯ,TO, RAкшоЖИВЛeHHЯ BiIDHOBHTbcrnpotraGM 30xbuHn, npicrtpi' NOBepHetbcrdoHaNaSTyBaHb, lo6byn AKTINBHI npeD BIMKHeHHaM.
Hanaштуваимя
HnKue HabeJeHO Ta6nIuO, 10 DOJOMoKe Bam Bn6paTn OCHOBHi HanaWtYBaHHa IInrpeDiEHTIB.
PpIMiTka. Nam'raTe, 10 cI HanaWtYBaHHa IINs OpiEHTOBHi. OckiNbKn IHrpeDiEHTN BiDpi3HryIObcr 3a
NoXODKeHNAM, PO3MipOM, fOpMOTo Ta MapKO, Mn He MOxEMO rapaHTyBaTu HaIKpaUJI
HaNaWtYBaHHa IINBauNX IHrpeDiEHTIB.
Ockibk TExHOJIorI WBNKOro NOBITP MHTEBO HarpBaE NOBITp BcepeHnHi npnaHy, HeTpNBaJe BNTaRyBaHH KOBsA 3 npuAdy niD Yac roTyBaHH He BnInHe Ha npocec.
Iopa:
- IHrpeiHTn MeHwOro po3Mipy 3a3BnuaN noTpe6yIOb KOpOTwOro Yacy roTyBaHHra, HIX ihrpeiHTn 6ilbwoRo po3Mipy.
- ⅡIbwoi KInbKocti iHrpeiEHTIB nOtpi6Ho TPOxN bInbue yAcy dIra roTyBaHHa, Ima MeHWOI KInbKocTi iHrpeiEHTIB, BiIDNOBIAHO, nOtpi6Ho TPOxN MeHwe yAcy.
- CtpyuSyBaHHa Dpi6hiuX iHrpeiEHTIB, KOJI NIOOBHa Yacy roTyBaHHa MNHyla, ONTUM3ye KInIeBn pe3yIbTaT i DonOMOKe 3ano6irTH HepiBHomipHomy npocMaKeHHIO.
- DoaTe TPOxN OII DO CBIXOI KAPTONNI, IO6 BOHa 6yNa xpycTKIO. O6cMaXTe iHrpeiEHTn y pHTOpHnCi npTgrom DeKJIbKOX XBUNH NicJra DoDaBaHHa ONII.
5.He roTyIe y φpntIOpHnci Haad3BnuaHNO JxnpHi IHrpeJeHTN, kT O COncKn. - 3aKcckn, kI MoKHa npiroToyBaTn B dYxOBU, TAKoK MoKHa npiroToyBaTn B pPHTOpHNIU.
7.ДЯ roTyBaHnXpycTkOi KaptonJI pI onTImaIbHa KjIbKicTB cKnJaae 500 rpaMIB. - 506 wBnko Ta JERKO npiroToyBaTn 3aKcKn 3 HAnOBHIOBaYAMN, BnKOpNCTOByTe 3a3dAneriDb BnroToBneHe Ticto. IJRA nonepedHb BO BnroToBneHoro Ticta TAKOX nOtpi6Ho MeHwe Yacy dIra npiroToyBaHHa, HIX Dnla DomaunHboro.
- RaKu Bn BnikaTe ticTeKa nn Kiu, abo KaCmaKeTe deJIkaTHi BnpO6N nn cTpaBn 3 NaHHKOIO, po3TaWyIe foOpMy dIra BnIyKn B KOWi.
| Мени | Еталонна Bara (r) | Tempepatура за умовчиням (℃) | Час у рекима роботи одною ковши (хВ) | Час у рекимi роботи дbox ковши (хВ) | Tempepatуни дIANAZON (℃) | Доступни чac (хВ) | Сtrушваши | |
| Заморожения kartoplесь φри | Вениka | 500 | 200 | 25 | 28-32 | 80-200 | 1-60 | 1-2 |
| Мana | 300 | |||||||
| ТICTECHО | Вениka | 300 | 150 | 25 | 25-30 | 80-200 | 1-60 | |
| Мana | 150 | |||||||
| Стейк | Вениka | 170 | 200 | 15 | 15-20 | 80-200 | 1-60 | 1-2 |
| Мana | 85 | |||||||
| Курч diжkin | Вениka | 800 | 200 | 30 | 30-35 | 80-200 | 1-60 | 1-2 |
| Мana | 300 | |||||||
| Курч diжkin Крелbethа | Вениka | 500 | 190 | 22 | 22-27 | 80-200 | 1-60 | 1-2 |
| Мana | 300 | |||||||
| Креевские | Вениka | 350 | 190 | 12 | 12-15 | 80-200 | 1-60 | 1-2 |
| Мana | 175 | |||||||
| Смажения ковбаса | Вениka | 240 | 160 | 15 | 15-18 | 80-200 | 1-60 | 1-2 |
| Мana | 130 | |||||||
| Яочни пир | Вениka | 290 | 170 | 20 | 18-23 | 80-200 | 1-60 | |
| Мana | 150 | |||||||
PpIMtka 1. JaKIOO pIPTIOHnIe xoJIoNDHa, IdoaIte Do yacy roTyBaHNr 3 XbNJINH.
PnIMtKa 2. Pn OndnoacHomy BnKOpncTaHHi DBOX KOWBiB Yac a6o TeMnepeatpy MoXHa perynBoTNI BIDNOIDHO do qakTuHOro pe3yIbTaTy roTyBaHHra.
OuHcHnHa
OuIaIe npIJaD nicJy KOxHOro BnKOpNCtAHN.
He BnKOpNCToBnyTe MeTaneBn KxOHN NocyD a6o abpa3NBHI ONUIuyOi MaTepiAn n DnA OUYeHHa pHTOpHnx KOUBiB i peSiTOK, aJKe Ie MoKe NOUKOdNTn aHTInpNpArpe NOKpTTT.
- BnMItb wTeNCeB 3 po3eTKa daIte npuanaDy oxoNoHyTN.
Ppimitka. A6n npnaD oxonoHyB wBnDiE, BnMItb i3 HbO rKIBu/KoBui. - 3OBHIHIO qaCTInHy npnlaNy npOTpiTB BONORIO TKAHHHO.
- PpomnTe KOBwi rapaTO BOIO 3 HeBeJIHKoIO KJIbKICTHO MIOOOT PiINH Ta Hea6pa3NBHOI r6KOIO.
Ioo6 BnJaTn 3aNnKn 6pydy, MoKHa cOpncTaTnca 3HexKnPbAabNoHO pINHO.
Iopada. JKIO 6pyd noraHO 3MnBaTbC8 3 peiITKn YN dHa KOBsa, HAnOBHITb KIBW rapiyOBOIO 3 HeBeJIkoIO KINbKicTHo MInOoI pIDHH. POKnaIITb peoiTKy B i 3aIIuTe npi6Jn3Ho Ha 10XBUNH. - OunchbTe BHytpiHIO yactnHy npilayrnapyHO BOHO Ta Hea6pa3NBHO IO r6koHO.
- Ounchbte HarpBaIbHn eIeMeHT 10IO Ira OUnIeHHa, IO6 BuaJIITN 6yIb-ka3aIIuKn iKi.
YcyuHHeHHa HeCnpaBHOCTe
Pnp6op ochaueH TaMePOM. Korda TaMep DoCTnraeT HynEBOI OTMeTKN, np6op n3daet 3BykoBoi cnHaJI n aBToMaTuYeCKN BbIKnOuHaETcR.
Ipeed nepBbIM nCNoJb3OBaHneM
CHIMITE BeCb ynaKOBouHbMaTePnAJI. CHIMITE c np6opa BCE hakNeiN I apIbIK. TuaTeNbHO BbMOte KOp3Hy n npOTuBeHb rOpaye BoDoH. He nCnoB3yTe a6pa3NBhle N arpeccNBhle CpeDCTBa. IpOtpnTE BHTpeHHne N BHeUHne NOBepXHOCTN np6opa BlaxHoN TkaHbIO. He MoTe KOp3Hy n npOTuBeHb B NocydomoEHO MaUHHe.
Pn6op roTOBNT nIuCy c IOMoubIO rOpAero Bo3dyxa. He 3aONHnTe npOTnBeHb MacnOM nn Jnnpom!
IodroTOBka K nepbOMy IcnoJb3OBaHnO
- YdaJIInTe BcO ynaKOBky c npIbopa.
- YdaJIInTe C np6opa BCE 3TuKeTKn N HauKneKn.
- TuaTeNbHO BbIMoTe peWteKU KOp3Hry IopRyEe BOdo, He6OJIbIIM KOINueCTBOM MOIOeRO cpeDCTBa Hna6pa3NBHO r6koN.
4.ПоТпTe BHyTpENHnEиВHeшнe NOBepXHocTи npIbOpa BlaJxHOn TkaHbIO.
3TaФрntHOpHnua roTOBNT 6e3 Macna, TOnbko C nOmoU bIO rOpAero Bo3dyxa. He HanoJIHrTe KOp3Hy MacIOM IIN JxIpOM dJa KapKn.
PnmeHne. Pn npBom HarpBe np6op MoKet BbIeJeTb HeMHoro Dbima nn 3anax. To xapakTepeHO nla MHorix HarpeBaTeJbHbIX np6opOBn He BnireT Ha nx 6e3onacHoCTb.
Pojrotobka npnbopa k pa6ote
- YcTaHOBnTe npIbOp Ha yCToUHyIO nPoBHyIO rOpI3OHTaIbHyIO NOBepXHOCTb.
He pa3meaaiTe np6op Ha HeTepmoctoKoN NobepxHocTn.
- YcTaHOBnTe peWteKy B KOp3nHy.
He hanoHnIe KOp3nHy MacNo IIN dpyro KndkocTbIO.
He KnaIte HnKaKne npEmdTebl Ha np6Op, TaK KaK 3TO MOKeT npEnrTcTBoBaTb cIrpKyJIaCm BO3dyxa I NOBnraTb Ha pe3yJbTaT npuroToBJeHn.
IcnoJIb3OBAHne npi6opa
- PódklouHTe BnIky CeTeBOrO UHypa K 3a3emJHHO pO3eTKe.
2.AkkypaTHo n3BnKeNte KOp3nHy n3 np6opa (pnc. 2).
3.ПолхиTe INHгрдиЕнтыВКорзИну (pnc.3). - BCTaBbTe KOp3nHy o6paTHo B npu6Op (pnc. 4).
3anpeuaeTcNcNoIb3OBaTb KOp3nHy 6e3 yCTaHOBneHHo peWeTKn.
BhImaHne! He npKacaiTecb K Kop3nHe BO BpeM n HeKOToOpoe BpeM nocNe npNroTOBJIeHn, TaK KaK OHa cnIbHo HArpeBaetc. DepxKe Tep3nHy ToIbKO 3a pyKy.
5. YcTaHOBInTe BpeM npriroTOBneHn Iy BbI6paHHoro npOdyKta (cm. pa3deJ «TaNua npImepHoro BpeMeHn I TeMnepaTpybl npriroTOBneHnry)
6. HeKoTOpBle npOdykTbI cNeJeYET BCTpXnBaTb NO nCTeueHn NOnOBnHbIBpeMeHn npiroTOBneHn (cM. pa3dEe I 工 Ta6nua npimepHoro BpeMeHn n TemnepaTypbI npiroTOBneHn'). UTo6bl BCTpXHyTb npOdykTbI, INBLeKeHTe KOp3InHy n3 np6opa 3a pyky n BCTpXnTe. 3aTeM BCTaBbTe Kop3InHy o6paTHO B np6Op.
7. ПО ИСТЕЧЕНИ YСТАНБЛЕННО ВРЕМЕНИ ПИΝΤΟВЛЕНЯ pa3ДаETСЯ 3BYKOВСИнHAJI. ИЗВЛЕКИTE KOPЗИNY ИЗ пибopa.
PpimMeaHne. Haxmnte u yedeXnBaTe 2 cekyHdbi KhoNky nItaHna. Pocne 3Toro npnbop MoxHo BbIKIOUHTb BpyHyIO.
Cobet. Bo Bpempa 60bI np6opma MoKHO peryInpoBaT TempeaTy pIN BpemnnproToBHeNBA COOTBETCTBUN CO CBOIMn PpeIOYTeHnMn.
8. Поберп, roTOBы Ли npOdyKТы.
Ecn npodykbl He ycneI npiroTOBntbcra, BCTaBBTe KOp3HHy o6paTHO B npnbop n yctahOBnTe TaHep eue Ha HeckoJIbKO MmHyT.
9. YTo6bI BByHtB npOdyKtBi (HaPnMep, KapToOpEnb 0pn), N3BNeKeNte KOp3uHy n3 np6opa n NOCTaBbTe Ha NoDcTaBky.
He nepeBopauBaIe Kop3nHy, TaK KaK MaCNo, Co6paBWeecr Ha IHe KOp3uHbI, MoKet nonactbHa npOdykTbl.
Kop3nHa n npOdyktbI ropayne. B 3aBncmocTn OT Tnna rotobraeroCRA npOdykTa n3 KOp3nHbI MoKeT BbIXoNTb nap.
10.Дляпесладываяnpodуктовнарapedукиncnoьуtepoхordую nocyd.
11. После приготовленя одно поци побор сюва ГOTВ K пригOTOBlenko следуюпорци.
3.1. PnproToBJeHHe BJeBOKop3Ine
3.1.1. Haxmte KhoKJy JbeoB KO3HbOOnn pa3. 3aOpTcN HndkaToPbB O6naT8x 1 n 2. Ha dncnlee NaHyT nonepemeHHo MrrTaB npedyctaHOBHeHHbE 3NaueHnra Tempeatpyi N BpeMeH IpnorpaMMbI «KapToeJIb cprn». Ecnn HaxaTb u ydepXINBaTB KhoKJy PntAHn8 2 ceKyHdbI, Bbl6op JbeoB KO3HbI 6yDet OTMeHeH, n np60p nepeNdET B pexIM OxndaHn.
3.1.2.ДЯ Вьбopa nporpamMbI nprirotOBHeHnNcNoJIb3yIte KhoNky nporpaMM.HaXmTe KhoNky OOnH pa3,чTo6bl npeeTn K cNeDyUoUe nporpaMMe.NHdNKaTOp Bv6paHHo nporpaMMbMIraet,aHa dncIee OTo6paKaAOTcnpedYCTaHOBHeHbIe 3HaueHn TEmpepaTypbI INBpeMeH.IpOrpaMMbI NocJeDoBaTeJIbHo NepeKJIIOuAOTcTc OT nepBOK BOcMbOJ.
3.1.3. HaxmTe KhoNky Bb6opa TemnepaTpybHa dncnlee Haunet MuraTb 3haeHne TemnepaTpyb Tekyue nporpaMMbl. KhoKampeynpobKn TemnepaTpyb yCTaHOBtte Heo6xOIMyU TemnepaTypC warom 5^ .Ecnn KhoNky Haxatb u YdepXNBAtb, 3naehne 6ydt MeHrtbc8bictpee. TemnepaTyp moxHo perynpoBaTb B dnaana3OHe ot 80^ do 200^ da KaKdo nporpaMMbl.
3.1.4. HaxmTe KhoNky Bb6opa BpeMeHn. Ha dinCnlee HaCyHe TMIraTb npedyctaHOBHeHoe nIIu Bb6paHHe 3NaueHne BpeMeHn TeKyuSei nporpAMMbI. KhonkAm npereynpOBKn BpeMeHn yCTaHOBtte Heo6xoDnMOe BpeMc C warom 1 MHyTa.Ecn KhoNky HaxaTb N ydepXNBaTb, 3NaueHne 6yDeT MeHrTBc 6blcTpee. BpeMa MoxHo perynpoBaTb B dnaNa3OHe ot 1 do 60 MInyT dJa KaJdoi nporpAMMbI.
3.1.5. После Вьбopa nporpaMMbl, HabpoKn TemnepaTypb I BpeMeHn HaxMnte KhoNky nItaHn. 3anyctntbcra npiroTOBneHne B neBOI KOp3nHe, nHa DnCpJIee 6ydet OTo6paKaTbcra obpaTHbI OTcHET BpeMeHn npiroTOBneHn.
3.1.6. UTo6bI NImeHnTb TempeaTypy nII IN BpeM B IpoceCCE npriTOBJIeHn, HaxMMTe OINH pa3 KhoNkY Bbl6opa TempeaTypbI nII IN BpeMeH N COOTBeTCTBYUcIMN KHOJKAm peYInpOBKn yCTaHOBnTE Heo6xOdmyo TempeaTypy nII IN BpeM. Bo BpeM NaCTPOKn Pnp6Op npoDOnJaet pa60TaTb.
3.1.7. UTo6bI OTMeHnTb npOrpAMMy BO BpeM npriROTOBHeHna, HaxMnte KhoNky nHTaHnO nn pa3; HarpeBaTeJIbHbI 3JIeMeHT N BeHTnIaTOp pNoCTaHOBrt pa60Ty. 3aTeM cJeNyIte NyKtAm 3.1.2-3.1.5, UTo6bI yCTaHOBNTb HOBbie npaMeTpbl npriROTOBHeHn I 3aNyCTnTb pa60Ty.
3.2. IpnocTaHOBKa n BbIKIOUeHne np6opa BO BpEm npIroTOBJIeHn
3.2.1. UTO6bI npnoctaHOBtB npnroTOBHeHne, OINH pa3 HaxMnte KHNky NITAHnHa HarpeBaTeJIbHbI 3JemeHT n BeHTnIaTOp npnoCTaHOBtPa6OBy. EcnI nocIe npnoCTaHOBKn pa6OBy I np6Oba He BbINOJHrTb C HmHnKaKnx DeiCTBn, Ype3 3 MInHyTbI np6Op nepeiDeT B pexIM OxNiDaHnA.
3.2.2. 306bI BvIKHouHTb np6op BO BpeM npiroTOBHeHnHaXmTe u yepKuBaTKe KhoNky nHTaHn2 cekyHdbI, noka Ha dncnnee He oTo6pa3ntc8 OFF (BblkI.). Pa3dactc oDHH 3ByKOBo CnHan, dinnei noracHet, n np6op nepeiDeT B pexm OxndaHn. 3aTe m HaxmTe u ydepKuBaTKe KhoNky nHTaHn2 cekyHdbI, n np6op nepeiDeT B pexm 3arpy3kn.
3.3.N3BneueHnE KOp3nHbI
3.3.1. EcInn 3Bney KOp3nHy n3 np6opab B IIO6oMmEHT, HAn DnCpIee OTo6pa3ntc coo6uHHe OPEN (OTKpblTO).
3.3.2. Ecnn n3Bnueb Kop3nHy n3 npnbopa BO Bpem npiroTOBneHn, npnbop nepeCTaHET pa6oTaTb (HarpeBaTeJbHbI 3JIeMeHT n BeHTnJrTO pnpocTaHOBrt pa6oTy). NocJe yCTaHOBKn KOp3nHbI Ha MeTo np6op npdoJXnT pa6oTy c NocJeHNMn HacTroNkamn.
3.4. ПпuroToBJIeHne B npaBoN KOp3nHe
3.4.1. Haxmte KhONky npaOB KOp3HbI nCleDyTe yKa3aHnM nyHKTOB 3.1.2-3.1.7.
3.5. 3aBepseHne npiroToBneHn
3.5.1. Korda nprirotobnene 3aBepseHo, Ha dinCnIee nOraBnIeTcra Hndncb OFF (BbIKI.). n 5 pa3 pa3daetcra 3BykoBoi cnHaJI. Ducnne racHeT, n npnbop nepexoDnt B pexm OxndaHna.
Tast 3 1stast for venstre beholder
Tryk på tasten for venstre beholder. Ikonet for Funktionstaten på beholderens krop til venstre lyser. Menuen går som standard til den förste menu (pommes frites), og pommes frites-indikatoren blinker. Displayet for den venstre beholder blinker og viser skiftevis standardtemperaturesn og -tiden for pommes frites-programmet. Når temperaturen vises, lyser temperaturindikatoren øverst til venstre på displayet permanent. Når tiden vises, lyser tidsindikatoren nederst til venstre på displayet permanent. Hvis du trykker på tasten for den venstre beholder i 2 sekunder, kan du annullere valget af den venstre beholder, og apparatet vender tilbage til standbytilstand.
Tast 4 -Tast for hore beholder
Tast 2 East for forhandsinnstilling
Tast 4 -Tast for hye gryte
Berør tasten for hoyre gryte. Ikonet for funksjonstasten til hoyre gryte begyinner Å lyse. Menyen bruker den Forste menyen som standard (pommes frites), og pommes frites-indikatoren blinker. Den hoyre grytevisningen blinker og viser vekselvis standardtemperatur og -tid for pommes frites-programmet. När temperaturen vises, lyser temperaturindikatoren øverst til venstre på displayet kontinuereglig. När tiden vises, lyser tidsindikatoren nederst til venstre på displayet kontinuereglig. Hvis du trykker på tasten for hoyre gryte i 2 sekunder, kan du avbryte valget av hoyre gryte, og apparatet går tilbake til hvilemodus.
- Driftsmodus for to gryter
4.1. Starte de 2 grytene
Nappain 1 irtanappain
Nappain 2 sivalintanappain
Nappain 10 -jan valintanappain

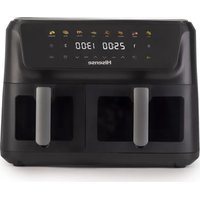
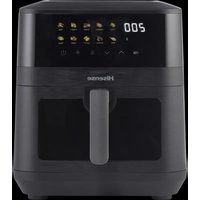
- Ynotpe6a Ha anapatOT
- YnataCTBO 3a KOHTPOHNOT nHeI
- Pexim Ha noIrotBeHOCT
- Pekim Ha pa6oTa Ha eHa Kopna
- BeJIeUkI
- NocTaBKn
- Cobetn:
- Ynctebe
- KINBOTHACPEINHA
- TAPAHUNJA N I NOPABKN
- Hisense
- Important safety instructions
- Automatic switch off
- Before using the appliance for the first time
- Electrical connection:
- General description (Picture1)
- Before first use
- Preparing the appliance for use
- Using the appliance
- Control panel instruction
- Detailed Operation Instructions
- Notes
- Settings
- Tips:
- Cleaning
- ENVIRONMENT
- WARRANTY AND REPAIR
- RO
- Instruţiuni importante privind siguranta
- EneKtpnuecko CBbP3BaHe:
- Osshio onncanhe (NJIocTpaun 1)
- Използваны урEDA
- Инструкции за KoHTpoJHЯ naHeJI
- ByToH 1 ByToH 3a 3axpaHbaHe
- Подробнинструкции за paбotinga
- Ihctpykcii zodo naheJI kepyBaHnna
- Hanaштуваимя
- Iopa:
- OuHcHnHa
- Ipeed nepBbIM nCNoJb3OBaHneM
- IodroTOBka K nepbOMy IcnoJb3OBaHnO
- Pojrotobka npnbopa k pa6ote
- IcnoJIb3OBAHne npi6opa
- Tast 2 East for forhandsinnstilling
- Tast 4 -Tast for hye gryte
- Nappain 10 -jan valintanappain
Brand : HISENSE
Model : HAF2900D
Category : Deep fryer