
FRL 3374 B - Saucepan BEKO - Free user manual and instructions
Find the device manual for free FRL 3374 B BEKO in PDF.
| Product Type | Air Fryer |
| Brand | Beko |
| Model | FRL 3374 B |
| Power Supply | 220-240 V ~, 50-60 Hz |
| Rated Power | 1750 W |
| Control Type | Digital with LED display and touch panel |
| Cooking Programs | Manual, Chicken, Vegetables, Oven/Cake, Reheat, Dehydrate, Grill, Skewers |
| Temperature Range | From 70 °C (dehydrate) to 200 °C (standard) |
| Timer | Yes, adjustable per program |
| Basket Capacity | Approximately 4 to 5 liters (removable basket with grid) |
| Material | Plastic, stainless steel (high-temperature resistant silicone grid) |
| Handle | Yes, thermally insulated |
| Viewing Window | Yes, on the removable container |
| Safety | Automatic shut-off at end of cooking, overheat protection, cool-touch handle, hot surfaces indicated |
| Cleaning | Basket and grid washable with soapy water; exterior with damp cloth |
| Maintenance | Unplug and let cool before cleaning; store in a cool, dry place |
| Included Accessories | Removable cooking basket, removable cooking grid |
| Usage | Household use only |
| Weight | Approximately 5 kg (estimation) |
| Dimensions (approx.) | 30 x 30 x 35 cm (estimation) |
| Error Codes | E2 (NTC short-circuited), E4 (faulty parts) |
Frequently Asked Questions - FRL 3374 B BEKO
User questions about FRL 3374 B BEKO
0 question about this device. Answer the ones you know or ask your own.
Ask a new question about this device
Download the instructions for your Saucepan in PDF format for free! Find your manual FRL 3374 B - BEKO and take your electronic device back in hand. On this page are published all the documents necessary for the use of your device. FRL 3374 B by BEKO.
USER MANUAL FRL 3374 B BEKO
natural_image
Simple line drawing of a rice cooker (no text or symbols)FRL 3374 B
EN - DE - FR - PL - ES - RO - IT - BG - HR - SL - SQ - SR - RU - AR
CONTENTS
| ENGLISH | 3-19 |
| DEUTSCH 20-37 | |
| FRANÇAIS | 38-53 |
| POLISH | 54-70 |
| ESPAÑOL 71-87 | |
| ROMÂNĂ 88-106 | |
| ITALIANO | 107-123 |
| БЪЛГАРСКИ 124-140 | |
| HRVATSKI 141-155 | |
| SLOVENŠČINA 156-170 | |
| SHQIPTARE 171-185 | |
| СРПСКИ 186-200 | |
| RUSSIAN | 201-224 |
Please read this guide first!
Dear Customer,
Thank you for choosing a Beko product. We would like you to achieve the optimal efficiency from this high quality product which has been manufactured with the state of the art technology. Please make sure you read and understand this guide and supplementary documentation fully before use and keep it as a reference. Include this guide with the unit if you hand it over to someone else. Observe all warnings and information herein and follow the instructions.
Keep in mind that this user guide may apply to several product models. The guide clearly indicates any variations of different models.
Symbols and their meanings
Following symbols have been used throughout this guide:

Important information and helpful advice on using the device.

WARNING: Warnings about dangerous situations related to life and property safety.

Suitable for contact with food.
Do not immerse the appliance, the power cord or the plug in water or in any other liquids.

WARNING: Warning about hot surfaces.
1 Important safety and environmental instructions
This section contains safety instructions to prevent hazards that can result in injury or property damage.
Failure to follow these instructions will void any warranty.
1.1 General safety
• This appliance complies with international safety standards.
• This appliance is intended for home use and food preparation only, it is not suitable for professional use.
- This appliance cannot be used by children between the ages 0-8. The appliance can only be used by children aged 8 and over, provided that they are under constant surveillance. This appliance may be used by people who have limited physical, auditory or mental skills, or lack of experience and knowledge, if they are provided with supervision or information about the safe use and hazards encountered.
• This product is not desi-
gned for commercial use, it is intended for use at home and in applications as follows:
- In the staff kitchens of the stores, offices and other working environments,
- In farm houses,
- By customers in hotels, motels or other accommodation facilities;
- In hostels, or similar environments.
-Bedrooms and breakfast locations
• Children being supervised not to play with the appliance.
• Children should not do cleaning and user maintenance unless an adult supervises them.
- Keep the product and the product cable out of the reach of children under the age of 8.
- Position the handles of the cooking appliances (if any) so that hot liquids do not spill and place them securely.
1 Important safety and environmental instructions
• Make sure that the voltage indicated on the appliance is the same as the mains voltage in your home.
- Use the appliance in a grounding plug.
- Do not use the appliance with an extension cord.
- Do not place your appliance on or near heat sources such as ovens and stoves.
• To prevent damage to the power cord, prevent it from being pinched, crimped or rubbed against sharp edges.
- Do not unplug the appliance by pulling on the cord.
- Do not immerse the appliance or its power cord in water.
- Do not leave the appliance unattended while it is plugged in.
- Do not disassemble the appliance.
- Use only original parts or parts recommended by the manufacturer.
- Unplug the appliance before cleaning and dry all parts
completely after cleaning.
- Clean the appliance in accordance with the instructions in the Cleaning and Maintenance section.
- Do not put large pieces of food in the appliance as it may cause a fire.
- Do not touch the plug of the appliance while your hands are damp or wet.
- Do not use the appliance in humid environments.
- Do not move the appliance while it is in use and the oil inside is hot.
- Do not use the appliance in or near explosive or flammable environments and substances.
• To avoid the risk of burns, do not touch hot surfaces. - Let the appliance cool down in a safe place out of the reach of children.
- Do not block the air inlet and air outlet openings while the appliance is operating.
- Do not lean over while the appliance is in use. Hot air rises from the appliance
1 Important safety and environmental instructions
during use!
- The appliance becomes hot during use. To avoid the risk of burns, do not touch hot surfaces.
• Make sure that the room is adequately ventilated during use.
• In case of fire, unplug the appliance. - Do not pour water on the appliance, as it may cause electric shock hazard.
- Do not operate the appliance with an external timer or a separate remote control system.
- Only use metal kitchenware with insulated handles with the appliance.
- Do not put anything on the appliance while it is operating or hot.
- Turn the indicator button off to disconnect. Then unplug the appliance.
- If you keep the packaging materials, keep them out of the reach of children.
- If the power cord is damaged, it must be replaced
by the manufacturer, its service agent or similarly qualified persons to avoid potential hazards.
1.2 Compliance with the WEEE Directive and Disposing of the Waste Product:
This product complies with EU WEEE Directive (2012/19/EU). This product bears a classification symbol for waste electrical and electronic equipment (WEEE).
This symbol indicates that this product shall not be disposed with other household wastes at the end of its service life. Used device must be returned to official collection point for recycling of electrical and electronic devices. To find these collection systems please contact to your local authorities or retailer where the product was purchased. Each household performs important role in recovering and recycling of old appliance. Appropriate disposal of used appliance helps prevent potential negative consequences for the environment and human health.
1 Important safety and environmental instructions
1.3 Compliance with RoHS Directive
The product you have purchased complies with EU RoHS Directive (2011/65/EU). It does not contain harmful and prohibited materials specified in the Directive.
1.4 Package information
Packaging materials of the product are manufactured from recyclable materials in accordance with our National Environment Regulations. Do not dispose of the packaging materials together with the domestic or other wastes. Take them to the packaging material collection points designated by the local authorities.
1.5 Important points for saving energy
Comply with the times recommended by the manual while using the appliance. Unplug the appliance after each use.1.5 Plug Wiring
The moulded plug on this appliance incorporates a 13 A fuse. Should the fuse need to be replaced an ASTA approved BS1362 fuse of the same rating must be used. Do not forget to refit the fuse cover. In the event of losing the fuse cover, the plug must not to be used until a replacement fuse cover has been fitted. Colour of the replacement fuse cover must be the same colour as that visible on the pin face of the plug Fuse covers are available from any good electrical store.
• Fiting a different plug
- As the colours of the wires in the mains lead of this appliance may not correspond with the coloured markings identifying the terminals on your plug, proceed as follows:
- Brown cable = L (Live)
- Blue cable = N (Neutral)
- Green/yellow cable must be connected to ground (E) line
- With the alternative plugs a 13 A fuse must be fitted either in the plug or adaptore or in the main fuse box. If in doubt contact a qualified electrician.

text_image
Green and yellow or green E N Blue or black L Brown or red UK Plug2 Less Oil Cooker
text_image
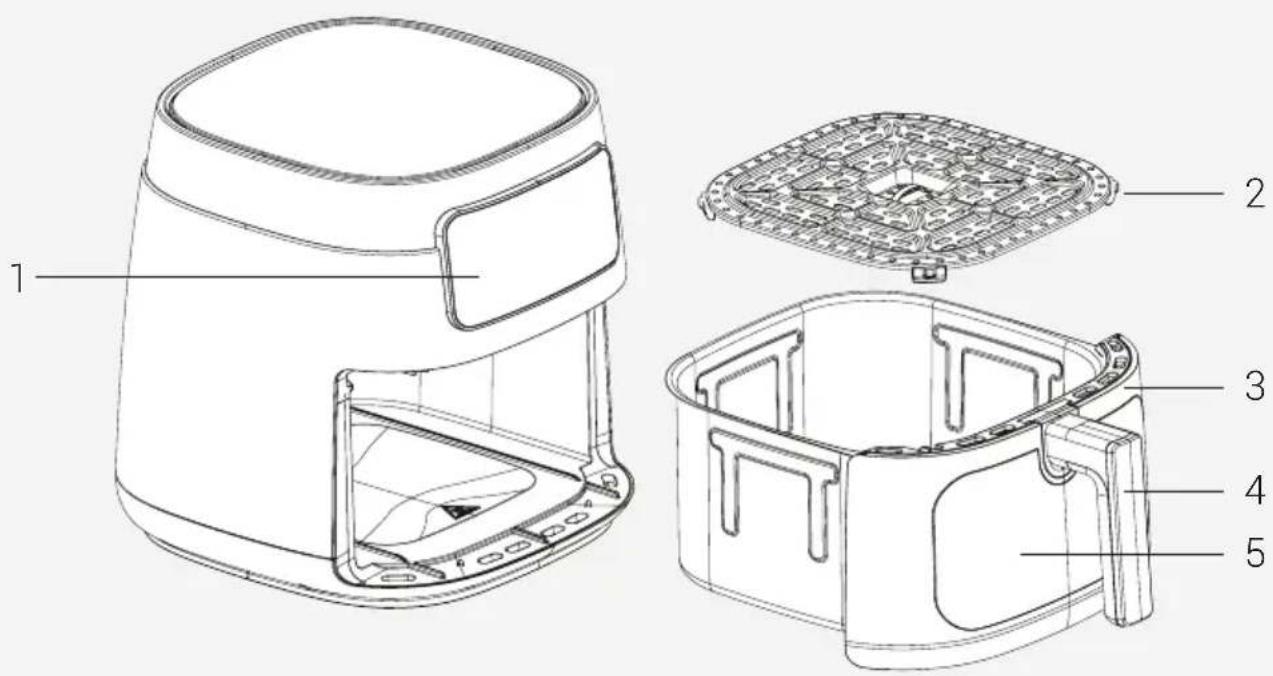
Technical diagram of a air fryer with labeled parts in Chinese- Digital control panel
- Cooking grid
- Removable cooking basket
- Handle
- Illuminated traceable cooking chamber
Technical data
| Power Source | 220-240V~,50-60Hz |
| Power Consumption | 1750 W |
Signs on the appliance and values specified by the documents provided along with the product have been obtained under laboratory conditions in accordance with the related standards. The values may vary based on use of the appliance and ambient conditions. Power values have been tested in the voltage of 230 V.
3 Usage
3 Intended use
• The appliance is intended for home use only and is not suitable for professional use.
- When you use the appliance for the first time, there may be a slight emission of smoke. This is normal.
3.1 Preparing the appliance for use
- Use the appliance in an upright position on a stable, level, clean, dry and non-slip surface.
natural_image
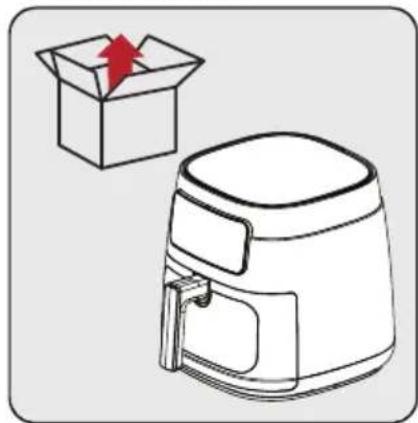
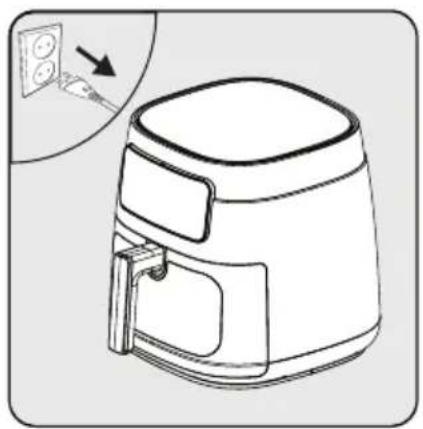
Line drawing of an air fryer with a red arrow pointing to the box (no text or symbols)Before using the appliance for the first time, remove the packaging materials and place the appliance in a flat and clean area.
text_image
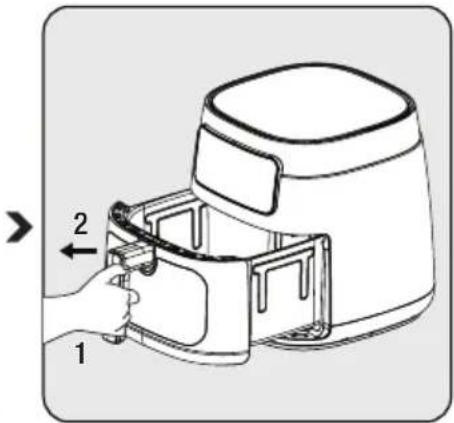
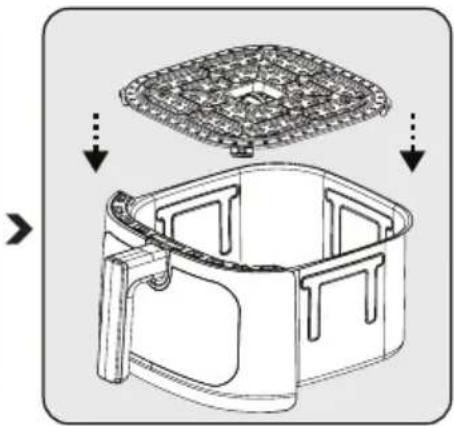
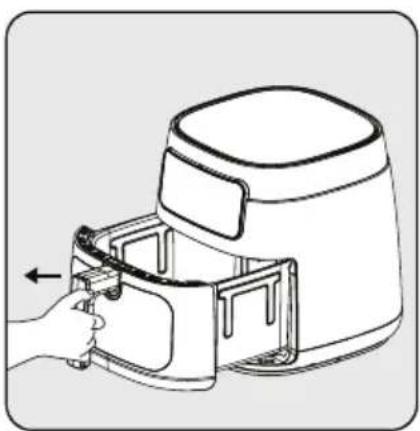
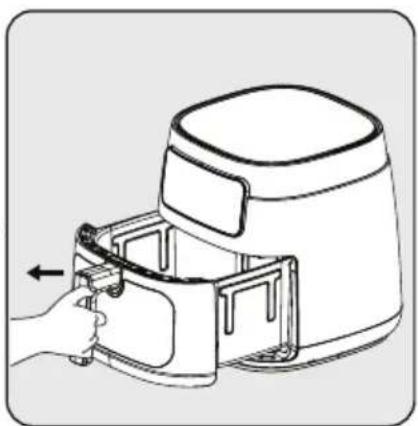
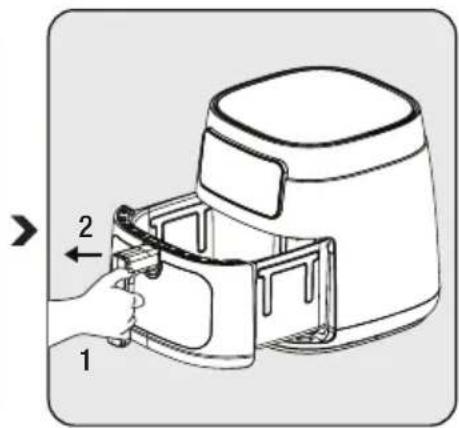
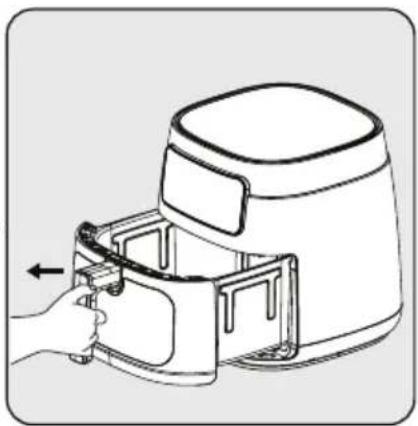
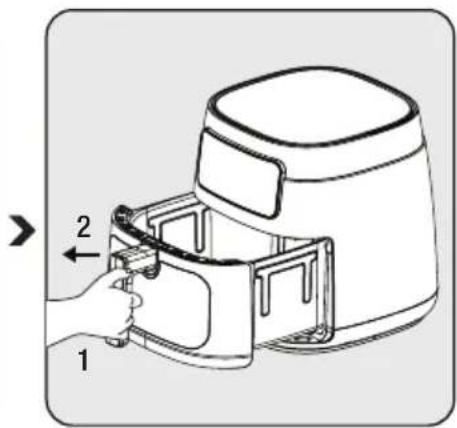
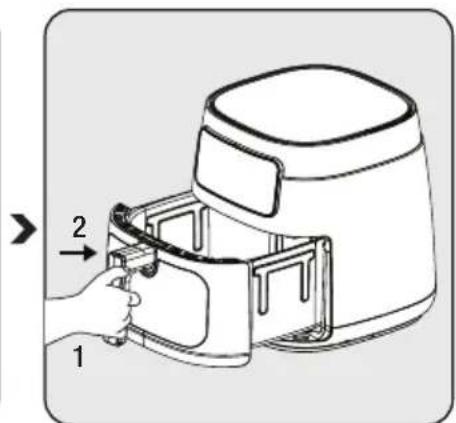
Diagram of an air fryer with labeled parts and directional arrows indicating assembly stepsGrab the handle (4) firmly to release the removable cooking basket (3); then, take the drawer out of its housing.
natural_image
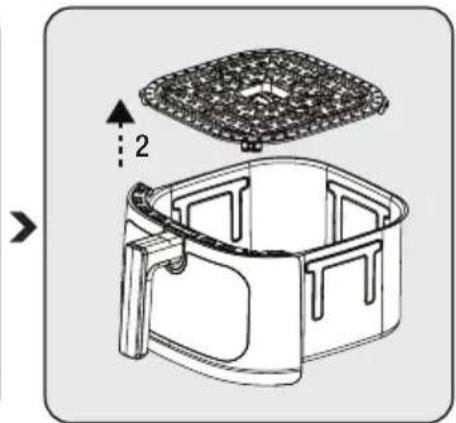
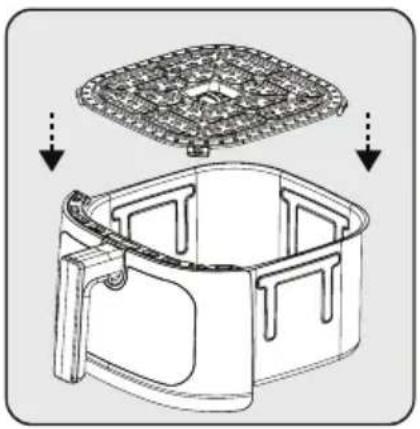
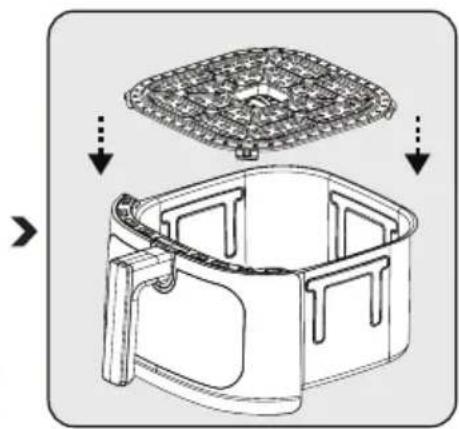
Line drawing of a cooking pan with a lid and side panel, showing internal structure (no text or symbols)Place the drawer on a flat surface to detach the cooking grid (2) from the drawer. Remove the cooking grid (2) by lifting it from the drawer.

text_image
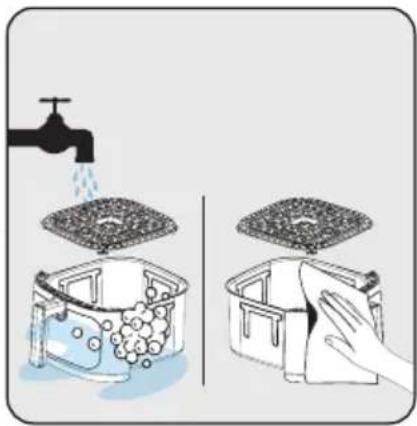
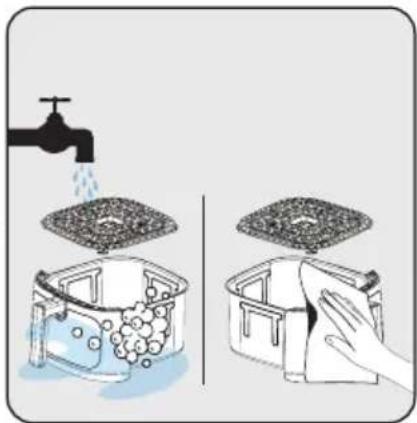
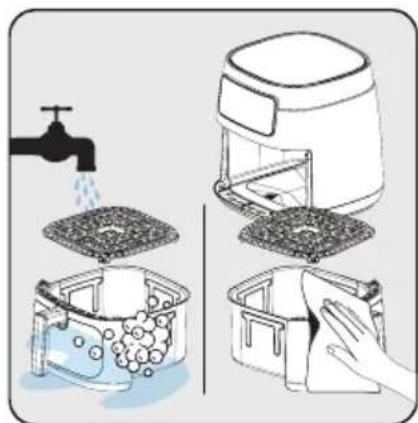
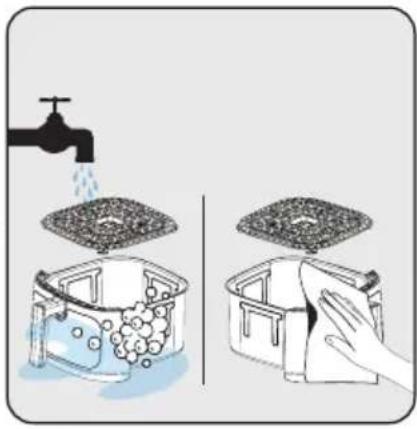
Illustration showing four steps of cleaning a kitchen appliance: tap, drain, air fryer, and cleaning container.Clean the cooking grid (2) and the removable cooking basket (3) with warm soapy water, then dry the appliance's outer surface and the parts you have washed thoroughly.
natural_image
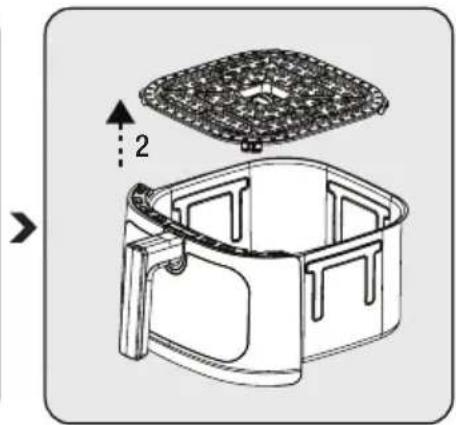
Technical illustration of a mechanical component with internal structure and top view (no text or symbols)There are 2 notches on both sides of the handle. Seat the basket in its housing by aligning the tabs into the notches on the top of the basket drawer.
text_image
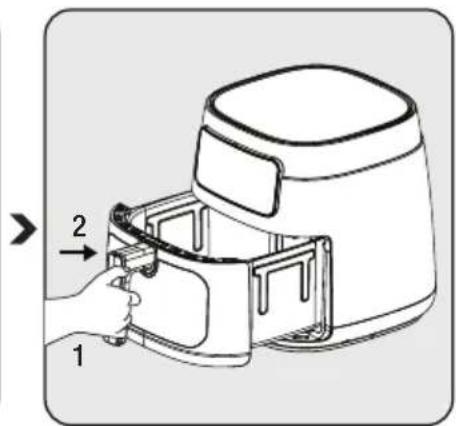
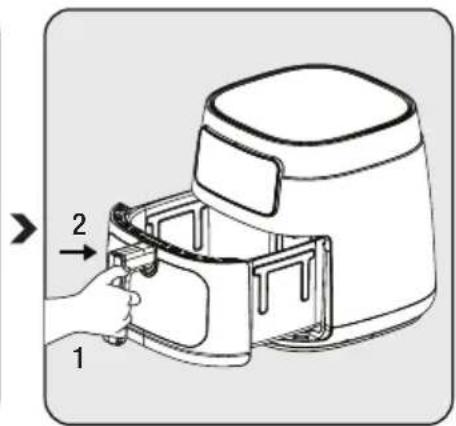
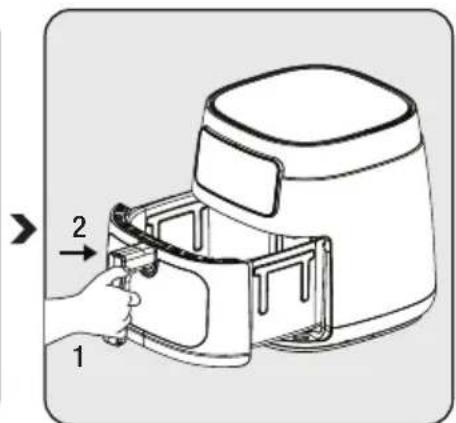
Diagram of an air fryer with labeled parts and directional arrows indicating assembly stepsAttach the drawer to the appliance after cleaning all parts. The appliance is ready for use.

- For the first use, set the product to the highest temperature and run it for about 10 minutes without adding any food.
• Never use the basket drawer (6) without the removable cooking grid (2).
3 Usage
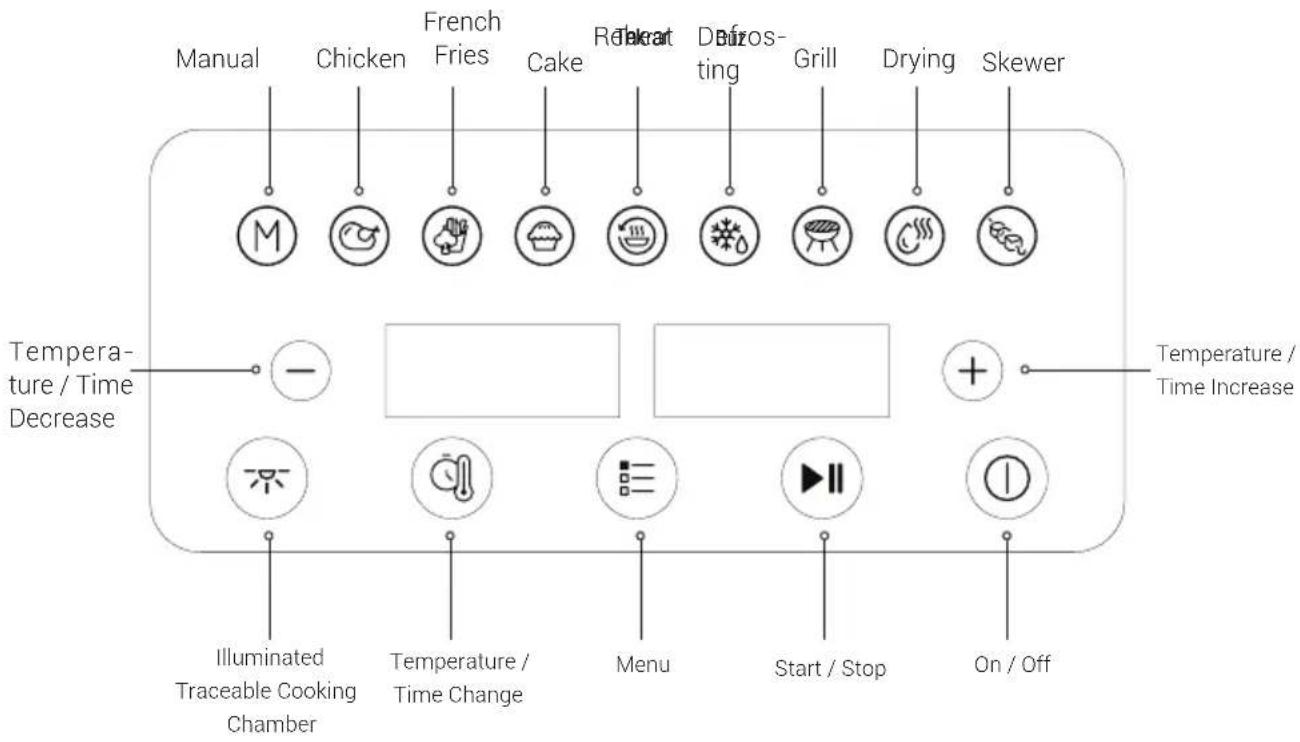
3.2 Control panel and LED display:
text_image
Manual Chicken French Fries Cake Reheat Dyeos- ting Grill Drying Skewer Temperature / Time Decrease Illuminated Traceable Cooking Chamber Temperature / Time Change Menu Start / Stop On / Off Temperature / Time Increase
- Press "Menu ☐" symbol until finding the desired program to select a program. When the desired program is found, the light of the program will blink, press "Start ▶" symbol to start the program.
- When "End" appears on the display, the cooking process is completed, and the cooking basket must be removed.
- Display shuts down, when the cooking basket is taken out of the appliance. Appliance resumes, when the cooking basket is put back.
3 Usage
3.3 Warnings before first use
text_image
Diagram of an air fryer with labeled parts and airflow indicator
natural_image
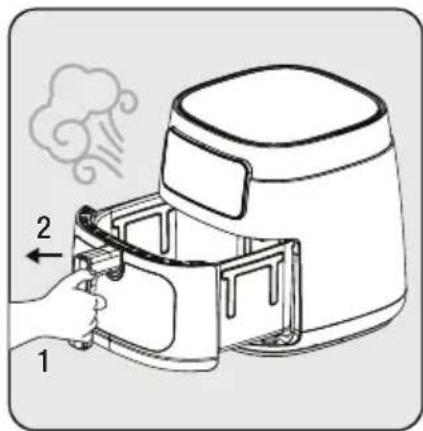
Technical line drawing of a cooking pot with a lid and handle (no text or symbols)When the removable cooking basket (3) is pulled back while the appliance is operating, hot steam will emanate from the air outlet and the top of the basket. Therefore, be careful not to get burned by the high-temperature steam.
While using the cooking grid (2) and basket drawer (3) at higher temperatures, be careful not to make a direct contact with them.
3.4 Operation
3.4.1 Selecting and starting a program

The display shows the automatically set temperatures and times according to the selected cooking functions. You can change these temperatures and times as desired.
Press the shutdown symbol if you want to switch to a different program after the product is started. Afterwards, press "Menu" to select the desired program.
3 Usage
text_image
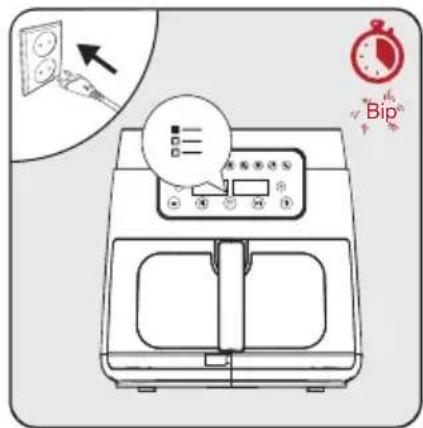
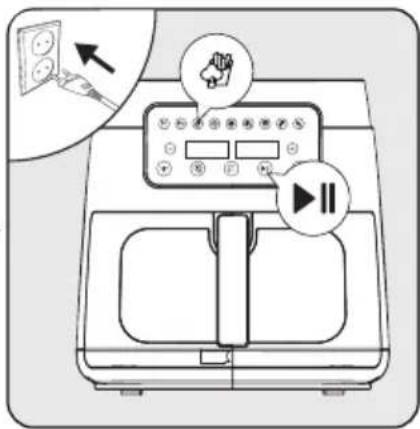
Diagram of a microwave oven with labeled components including a dial, control panel, and stopwatch iconPlug the product in and press the on/off symbol once. The entire selection display will appear. Press the "Menu" symbol until you reach the function you want to select.

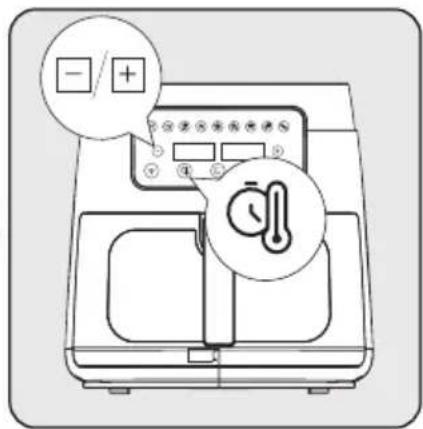
text_image
Diagram of a kitchen appliance with control panel and thermometer, annotated with symbols for polarity and temperature readings.Press the "Temperature / Time 🔒" change symbol. The temperature will flash on the display. Replace with the desired temperature or symbols. When you press the "Temperature / Time 🔒" symbol again, the time will flash on the display. Set the cooking time with the + or - symbols".

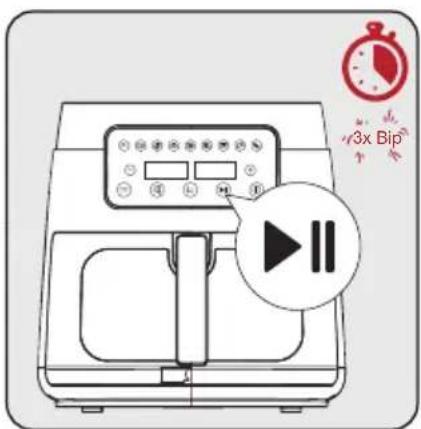
text_image
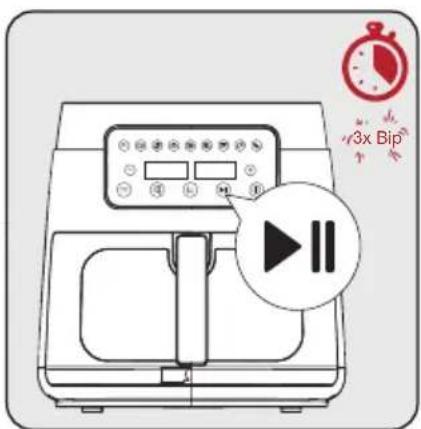
3x BipPress the "Start/Stop symbol and start the device. Place the food you want to cook in the cooking basket of the product. When you place the cooking basket in its place, the time you set will be seen on the display, excluding the preheating time, and the time will start to count down.
3.4.2 Temperature and time setting
natural_image
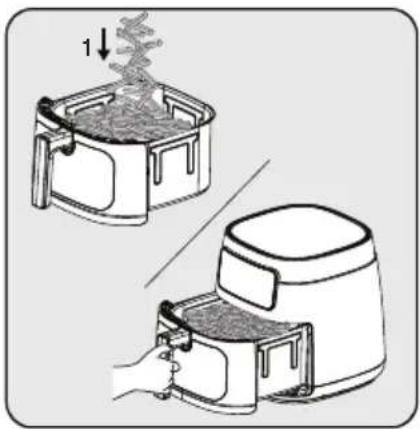
Illustration of two air fryer designs with a hand inserting food into the air (no text or symbols)Press symbol to set the temperature and time. Afterwards, press symbol to set the necessary temperature and time. Press symbol to start.

text_image
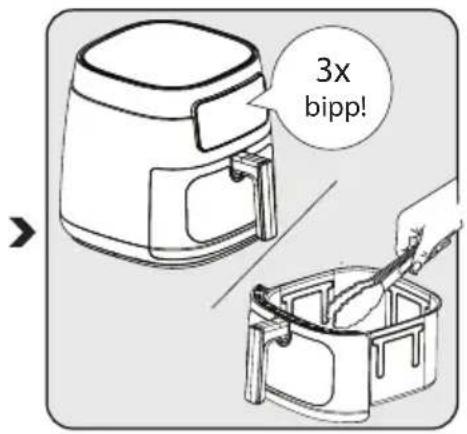
3x bipp!When half of the set time of the program is reached, at this point, the basket drawer (3) can be removed, and you can turn the food with an auxiliary tool (tongs, etc.).
3 Usage
- The cooking grid is made of high-temperature resistant silicone material that can be used for cooking food. It essentially prevents the basket lining from being scratched. Therefore, make sure that it does not come off during cooking.
- Be aware of hot steam that may be outlet while pulling the basket drawer (3) out and do not touch with your bare hands, because it is highly hot.
- When removing cooked food, use a tool (tongs, etc.) that will not damage the inner surface of the appliance.
3.5. Cooking
- Blend food with oil before placing it in the removable cooking basket (3).
Please do not hold the basket drawer (3) and the removable cooking grid (2) with anything other than the handle while they are hot.
natural_image
Line drawing of a hand inserting a component into an air fryer (no text or symbols)
natural_image
Illustration of two air fryer stoves with a hand holding a tray, showing the process (no text or symbols)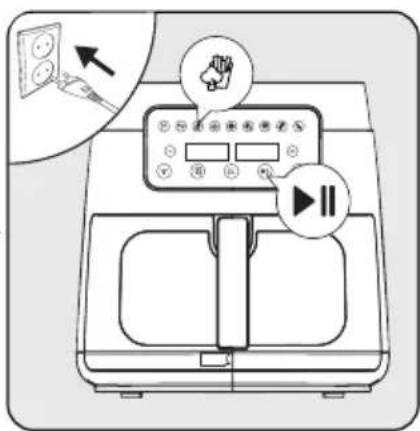
text_image
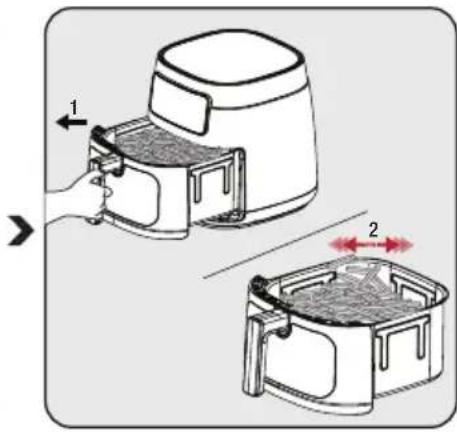
Diagram of a kitchen appliance control panel with labeled buttons and icons, showing a zoomed-in view of the screen.Grasp the handle firmly to open the basket drawer (3); then remove the drawer from the machine and place it on a flat, clean surface.
Place foods in the cooking basket (3). Then attach the basket to the appliance and make sure it fits completely.
Plug your appliance in and select the desired cooking program. Then, start the cooking process.
3 Usage

natural_image
Line drawing of a modern air fryer with a stopwatch icon and 'Bip' label (no text or symbols on the device itself)Warning sound will be heard when the set time is up and your appliance turns off automatically. When the cooking program is completed, an "End" notification appears on the display. This expression indicates that the food program is finished.
text_image
Diagram showing two steps of an air fryer being placed on a tray, with directional arrows indicating movement.Take the removable cooking basket (3) out and check the food, whether it is fried or frozen or not. If it requires additional cooking time, you can prolong the cooking time a little bit more.
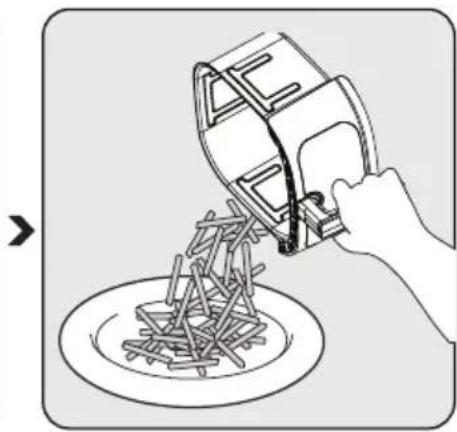
natural_image
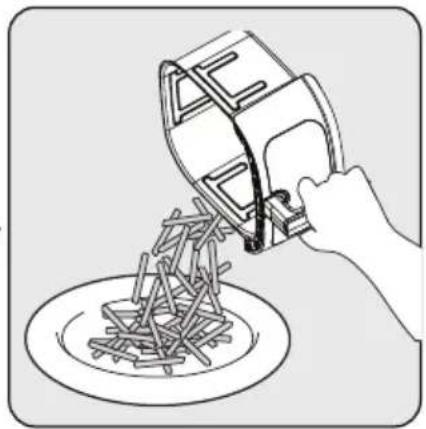
Illustration of a hand pouring liquid into a container with a wooden structure, no text or symbols presentAfter the process is completed, pour the ingredients in the basket into a bowl or plate.
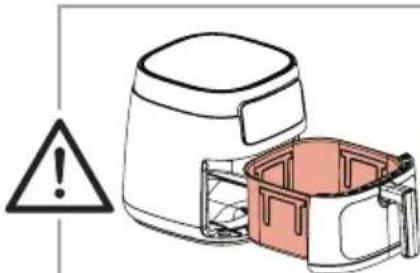
natural_image
Illustration of an air fryer with a warning symbol and plastic container (no text or labels)Avoid contact of the cooking basket with the outer surface of the appliance, since surface of the cooking basket (5) will be hot during and after cooking.

- Let the foods rest for 5-10 seconds before removing them from the removable cooking basket (5).
- Use tongs to take large or soft foods out of the basket not to cause any damage on the interior surface of the appliance.
- When one batch is ready, the appliance is immediately ready for another batch.
Note that the device can become very hot during the turning process.
4 Cooking time
The following table gives an overview of cooking times for different foods. Cooking time varies based on thickness and texture of foods. The recommended times and quantities should be regarded as approximate.
Perform a pre-heating process until the appliance reaches up to the recommended temperature specified in the table before cooking process to achieve successful results.
| PROGRAM | FOOD AMOUNT | SYMBOL | TEMPERA-TURE | TIME (min.) INTERVAL | BLENDING / SHAKING | |
| DEFROS-TING | 80 °C | 13-17 min. 2 |  | |||
| FRENCH FRIES | Frozen Potato | 500 g 200 | °C 15  min. 4 min. 4 | |||
| CHICKEN | Chicken Thigh | 450 g 200 | °C 20  minutes 2 minutes 2 | |||
| GRILL | Burger in Rolls | 500 g 190 | °C 15  min. 2 min. 2 | |||
| SKEWER | Chicken Skewer | 500 g 180 | °C 15  min. 4 min. 4 | |||
| CAKE Muffin | 6 mini muff-in cups |  | 160 °C 20 minutes X | |||
| DRYING | 70 °C | 60-140 min. |  < < |
5 Cleaning and maintenance
5.1 Cleaning

Never use gasoline, solvents, abrasive cleaners, metal objects or hard brushes to clean the appliance.
natural_image
Line drawing of an air fryer with a close-up inset showing the outlet (no text or symbols)Switch off the appliance and disconnect it from the power supply.

natural_image
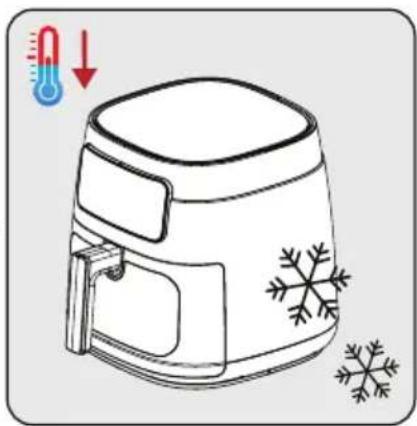
Line drawing of a microwave oven with snowflake patterns and thermometer symbols (no text or labels)Allow the appliance to cool down completely.

natural_image
Line drawing of a hand inserting a component into an air fryer (no text or symbols)Remove the cooking basket (3) from the drawer.
natural_image
Technical line drawing of a mechanical component with internal structure and mounting holes (no text or symbols)Remove the cooking grid (2) from the basket by grasping its handle and pulling it upwards.

natural_image
Illustration showing a faucet spraying water into a washing machine with bubbles, and a hand cleaning the product (no text or symbols)Clean the cooking basket (3) and the cooking grid (2) with warm soapy water and then dry them thoroughly.

natural_image
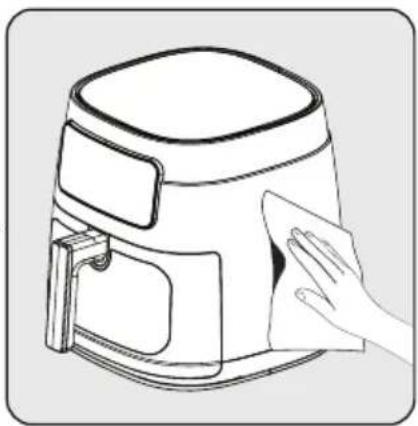
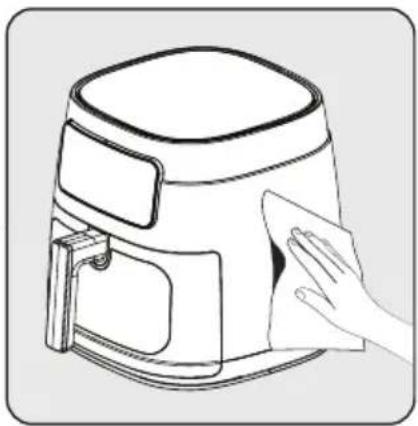
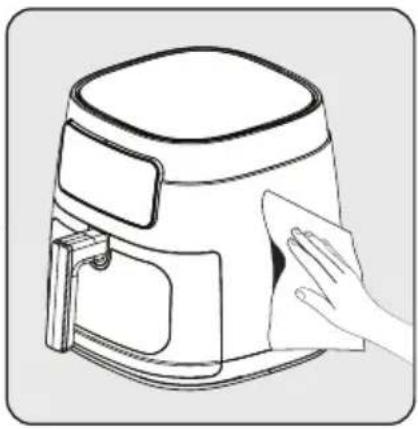
Line drawing of a hand cleaning a small air fryer (no text or symbols)Clean the outside of the appliance with a damp cloth. Dry the outside of the appliance completely.

Always keep the base of the removable cooking basket (3) and the cooking grid (2) clean to prevent the accumulation of foreign substances.
5 Cleaning and maintenance
5.2 Storage
- If you do not intend to use the appliance for a longer period of time, store it carefully.
- Unplug the appliance and let it cool down before putting it away.
- Store the appliance in a cool and dry place.
- Keep the appliance and the cable out of the reach of children.
5.3 Transport and shipping
- Transport the appliance in its original packaging during handling and transport. The packaging protects the appliance from physical damage.
- Do not place heavy objects on the appliance or its packaging. The appliance may get damaged.
- If the appliance is dropped, it may stop working or permanent damage may occur.
6 Troubleshooting
| The problem Cause Solution | |||
| 1 | Appliance inoperative Power outages Check the power supply and make sure there is power | ||
| 2 | The food is insufficiently cooked/burnt | The cooking time is not correct Combine recipes and your personal experience to adjust preparation and timing | |
| 3 | Smoke during first use Rust-preventive oil remaining on the heater of appliance | Set the temperature at maximum and perform a pre-heating fro 10-15 minutes to remove rust-preventive oil on the heat of appliance | |
| 4 | Strange smell Foreign object on cooking basket, basket drawer and heater | Remove the foreign object | |
| 5 | E2 NTC shorted, Parts Defective Send to service for repair | ||
| 6 | E4 NTC shorted, Parts Defective | ||
| Contact our authorised service for repair, in case the problem cannot be solved after performing the above-mentioned supervision. | |||
Product Guarantee
12 months breakdown and repair guarantee
Guarantor: Beko plc, 1 Greenhill Crescent, Watford, Hertfordshire. WD18 8UF
The guarantee does not in any way diminish your statutory or legal rights.
Your appliance has the benefit of our manufacturer's guarantee which covers the product for 12 months from the date of original purchase.
This gives you reassurance that if within that time, your appliance is proven to be defective because of either workmanship or materials, we will at our discretion either repair or replace your appliance.
The appliance must be correctly installed, located and operated in accordance with the instructions contained in the user manual. The guarantor disclaims any liability for accidental or consequential damage.
The Guarantee is subject to the following conditions:
- Documentary proof of the original purchase date is provided.
The appliance has been installed and operated correctly and in accordance with our operating and maintenance instructions.
The appliance is used only on the electricity supply on the rating plate.
■ The appliance has only been used for normal domestic purposes.
The appliance has not been altered, serviced, dismantled or otherwise interfered with by any person.
■ The appliance is used in the United Kingdom or Republic of Ireland. - Any parts removed during repair work or any product that has been replaced becomes our property.
The guarantee is not transferrable if the product is resold.
The Guarantee does not cover:
■ Transit, installation or delivery damage.
■ Accidental damage.
- Misuse or abuse.
- Replacement of any consumable item or accessories. These include but are not limited to: plugs, cables, light bulbs, knobs, filters and flaps.
- Repairs or replacements required as a result of unauthorised repairs or inexpert installation that fails to meet the requirements contained in the user guide or instruction book.
■ Repairs to products used in commercial or non-residential household premises.
How to obtain after sales service, help or general advice
Please keep your purchase receipt or other proof of purchase in a safe place as you will need to show us this document if your product requires attention within the guarantee period.
Please also record your product details below, which will allow you to access our services more quickly and help us identify your product. The model number is printed on the front of the user guide and the serial and model number is shown on your products rating plate.
| Model number | Serial number | Purchased from | Date of purchase |
Please call our UK based Customer Service department if you need help or advice from us:
United Kingdom and Northern Ireland: 0333 207 9710
Republic of Ireland: 01 862 3411
You can also contact us through our website: www.beko.co.uk
text_image
Technical diagram of a microwave oven with labeled parts in Chinesenatural_image
Illustration of an air fryer with a red arrow pointing to its lid, next to a cardboard box (no text or symbols)text_image
Diagram of an air fryer with labeled parts and directional arrow indicating movement or positioningnatural_image
Technical line drawing of a cooking pan with a lid and side panel, showing internal components (no text or symbols)text_image
Diagram illustrating the process of cleaning a air fryer using a water filter, showing steps from tap to cleaning container.natural_image
Technical illustration of a cooking pot with a lid and side panel, showing internal structure (no text or symbols)text_image
Diagram of an air fryer with labeled parts and directional arrows indicating assembly stepstext_image
Diagram of an air fryer with labeled parts and airflow indicator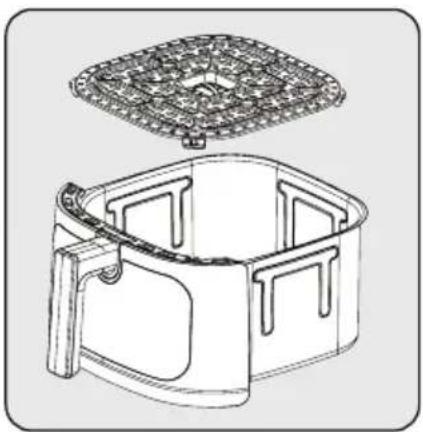
natural_image
Technical line drawing of a rectangular appliance with internal compartments and a top panel (no text or symbols)text_image
Diagram of a microwave oven with labeled components and a 'Bip' indicator, showing a brush tip and control panel.text_image
Diagram of a kitchen appliance with labeled control panel and thermometer indicator, showing plus/minus signs and temperature symbol.text_image
Diagram of an air fryer with control panel and play button, accompanied by a stopwatch icon and text '3x Bip'text_image
Illustration showing two steps of a cooking process: adding hot air to a baking pan and using an air fryer.natural_image
Line drawing of a hand inserting a component into an air fryer (no text or symbols)
text_image
Diagram showing two steps of a food preparation or processing procedure: adding a plant to a tray, then using an air fryer.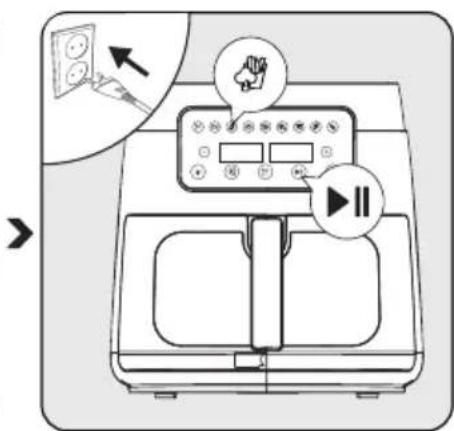
text_image
Diagram of a kitchen appliance with labeled control panel and directional arrows indicating action or operationnatural_image
Line drawing of a modern air fryer with a stopwatch icon and 'Bip' label (no text or symbols on the device itself)text_image
Diagram showing two-step cooking process of an air fryer, labeled with directional arrows and step numbers 1 and 2.natural_image
Illustration of a hand pouring liquid into a container with a stand (no text or symbols)natural_image
Illustration of an air fryer with a warning triangle and plastic casing (no text or symbols)natural_image
Line drawing of an air fryer with a close-up inset showing the outlet (no text or symbols)natural_image
Line drawing of a microwave oven with snowflake patterns and temperature indicators (no text or symbols)natural_image
Line drawing of a hand inserting a component into an air fryer (no text or symbols)natural_image
Technical line drawing of a mechanical component with internal structure and mounting holes (no text or symbols)natural_image
Illustration showing a faucet spraying water into a washing machine with bubbles, and a hand cleaning a clean container (no text or symbols)natural_image
Line drawing of a hand cleaning a small air fryer (no text or symbols)Cher/Chère client(e),
text_image
Technical diagram of a microwave oven with labeled parts in Chinesenatural_image
Illustration of an air fryer with a red arrow pointing to its lid, next to a cardboard box (no text or symbols)text_image
Diagram of an air fryer with labeled parts and directional arrow indicating movement or assemblynatural_image
Technical line drawing of a cooking pan with a mesh lid and side view showing internal structure (no text or symbols)text_image
Illustration showing cleaning steps of a air fryer with water spray, including drain, drain bath, and cleaning container.natural_image
Technical line drawing of a mechanical component with internal structure and top view (no text or symbols)text_image
Diagram of an air fryer with labeled parts and directional arrows indicating assembly stepstext_image
Diagram showing air fryer packaging process with labeled parts and airflow indicatortext_image
Diagram of a microwave oven with labeled control panel and stopwatch, showing step-by-step instructions for cleaning or repair.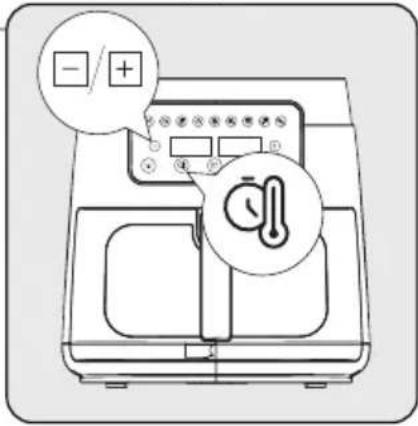
text_image
Diagram showing a kitchen appliance with temperature and control buttons, including speech bubble and thermometer icon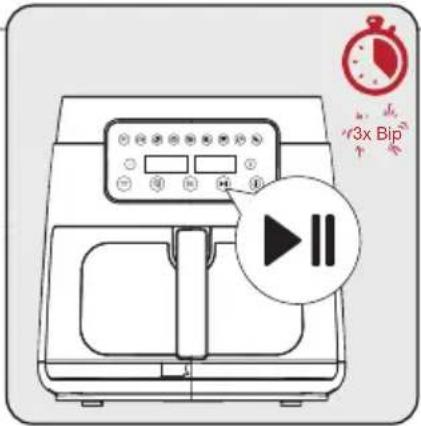
text_image
3x Bipnatural_image
Illustration of two different air fryer designs, one being compressed and the other holding a handle (no text or symbols)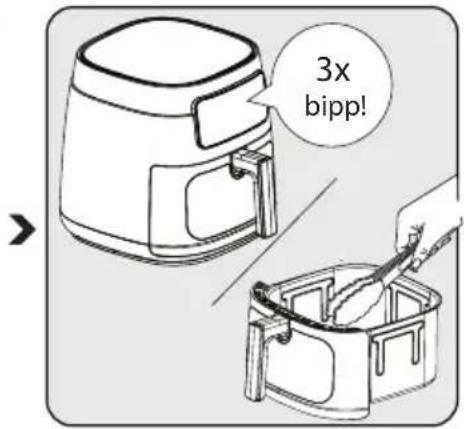
text_image
3x bipp!natural_image
Line drawing of a hand inserting a component into an air fryer (no text or symbols)text_image
Diagram showing two steps of a cooking process: adding a straw to a air fryer and using a hand mixer.text_image
Diagram of a digital air fryer with control panel and buttons, showing action buttons and a play button.natural_image
Line drawing of a modern air fryer with a stopwatch icon and 'Bip' label (no text or symbols on the device itself)text_image
Diagram showing two-step cooking process of an air fryer, labeled with directional arrows and step numbers 1 and 2.natural_image
Illustration of a hand pouring liquid into a container with a wooden structure, no text or symbols presentnatural_image
Line drawing of an air fryer with a side panel showing internal components (no text or symbols)natural_image
Line drawing of an air fryer with a close-up inset showing the outlet (no text or symbols)natural_image
Line drawing of a thermosier with snowflake decoration and thermometer indicator (no text or symbols)natural_image
Line drawing of a hand inserting a component into an air fryer (no text or symbols)natural_image
Technical line drawing of a cooking pan with a lid and side panel, showing internal components (no text or symbols)natural_image
Illustration showing a faucet cleaning a basin with bubbles, and a hand cleaning a container (no text or symbols)natural_image
Line drawing of a hand cleaning a mounted air fryer (no text or symbols)text_image
Technical diagram of a microwave oven with labeled parts in Chinesenatural_image
Line drawing of an air fryer with a red arrow pointing to the box (no text or symbols)text_image
Diagram of an air fryer with labeled parts and directional arrows indicating assembly stepsnatural_image
Technical line drawing of a cooking air fryer with a square plate and side arm, showing internal components (no text or symbols)text_image
Illustration showing cleaning steps of a water heater with labeled components and actionsnatural_image
Technical illustration of a cooking pot with a lid and side panel, showing internal structure (no text or symbols)text_image
Diagram of an air fryer with labeled parts and directional arrows indicating assembly stepstext_image
Diagram of an air fryer with labeled parts and airflow indicator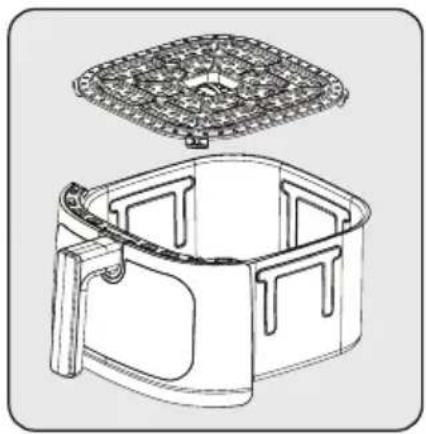
natural_image
Line drawing of a square oven with a lid and handle, showing internal structure (no text or symbols)text_image
Diagram of a microwave oven setup with labeled components and a 'Bip' indicator, showing a magnified view of the lid.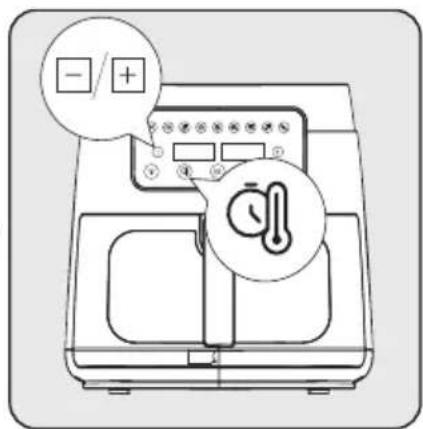
text_image
- / + - / +
text_image
3x Bipnatural_image
Line drawing of a hand inserting a component into an air fryer (no text or symbols)natural_image
Illustration of two air fryer stoves with a hand holding a tray, showing the process (no text or symbols)text_image
Diagram of a kitchen appliance with labeled control panel and directional arrows indicating electrical outlet and playback controls.natural_image
Line drawing of an air fryer with a stopwatch icon and 'Bip' label (no text or symbols on the device itself)natural_image
Illustration of a two-step cooking process: adding air from a flat-screen oven to a mounted air fryer (no text or symbols present)natural_image
Illustration of a hand pouring liquid into a bowl of noodles (no text or symbols)natural_image
Illustration of an air fryer with a warning symbol (no text or labels present)natural_image
Line drawing of an air fryer with a close-up inset showing the outlet (no text or symbols)natural_image
Line drawing of a microwave oven with snowflake patterns and temperature indicators (no text or symbols)natural_image
Line drawing of a hand inserting a component into an air fryer (no text or symbols)natural_image
Technical line drawing of a cooking pan with a square plate and side handles, showing internal structure (no text or symbols)natural_image
Illustration showing a faucet spraying water onto a square basin while cleaning it with a hand using a cloth (no text or symbols)natural_image
Line drawing of a hand cleaning a square oven with a cloth (no text or symbols)text_image
Technical diagram of a microwave oven with labeled parts in Chinesenatural_image
Illustration of an air fryer with a red arrow pointing to its lid, next to a cardboard box (no text or symbols)text_image
Diagram of an air fryer with labeled parts and directional arrows indicating movement or assembly.natural_image
Technical line drawing of a cooking air fryer with a grid-patterned lid and side arm, showing internal components (no text or symbols)text_image
Illustration showing four steps of cleaning a kitchen appliance: tap, drain, washing machine, and cleaning bin with cloth.natural_image
Technical line drawing of a mechanical component with internal structure and top view (no text or symbols)text_image
Diagram of an air fryer with labeled parts and directional arrows indicating assembly stepstext_image
Diagram of an air fryer with labeled parts and airflow indicator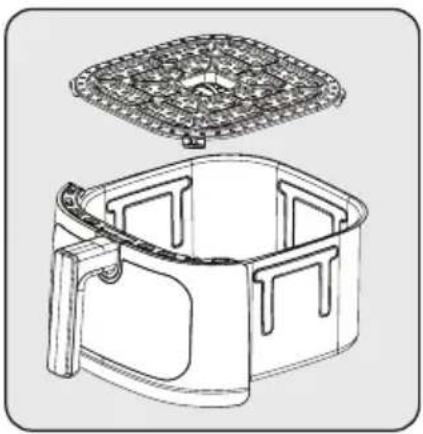
natural_image
Line drawing of a square oven with a lid and handle, showing internal structure (no text or symbols)text_image
Diagram of a microwave oven with labeled components including a dial, control panel, and stopwatch icon
text_image
Diagram of a kitchen appliance with control panel and thermometer, annotated with symbols for polarity and thermal monitoring.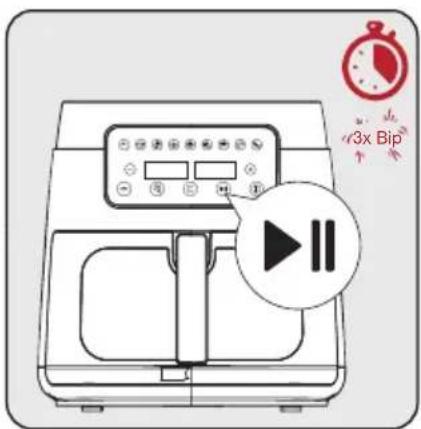
text_image
3x Bipnatural_image
Line drawing of a hand inserting a component into an air fryer (no text or symbols)natural_image
Illustration of two air fryer stoves with a hand holding a tray, showing the process (no text or symbols)text_image
Diagram of a digital kitchen appliance with labeled buttons and control panel, showing electrical outlet and play button icons.natural_image
Line drawing of an air fryer with a stopwatch icon and 'Bip' label (no text or symbols on the device itself)natural_image
Illustration of a two-step cooking process: adding air from a flat-screen oven to a mounted air fryer (no text or symbols present)natural_image
Illustration of a hand pouring liquid into a bowl of noodles (no text or symbols)natural_image
Line drawing of an air fryer with a side panel showing internal components (no text or symbols)natural_image
Line drawing of an air fryer with a close-up inset showing the outlet of electrical outlets (no text or symbols)natural_image
Line drawing of a microwave oven with snowflake patterns and temperature indicators (no text or symbols)natural_image
Line drawing of a hand inserting a component into an air fryer (no text or symbols)natural_image
Technical line drawing of a cooking pan with a grid-patterned lid and side panels (no text or symbols)natural_image
Illustration showing a faucet cleaning a water tank with bubbles, and a hand cleaning a container (no text or symbols)natural_image
Line drawing of a hand cleaning a square oven with a cloth (no text or symbols)text_image
Technical diagram of a microwave oven with labeled parts in Chinesenatural_image
Illustration of an air fryer with a red arrow pointing to its box (no text or symbols present)text_image
Diagram of an air fryer with labeled parts and directional arrows indicating movement or assembly.natural_image
Line drawing of a cooking air fryer with a lid and handle, showing internal components and an arrow indicating part number 2 (no text or symbols present)text_image
Illustration showing cleaning steps of a water heater with labeled components including faucet, air fryer, and cleaning container.natural_image
Technical line drawing of a cooking pot with a lid and side view showing internal structure (no text or symbols)text_image
Diagram of an air fryer with labeled parts and directional arrows indicating assembly stepstext_image
Diagram of an air fryer with labeled parts and airflow indicator
natural_image
Technical line drawing of a square oven with a lid and handle (no text or symbols)text_image
Diagram of a microwave oven with labeled components including a dial indicator and stopwatch, showing a kitchen setup with a magnified view.
text_image
- / + - / +
text_image
3x Bipnatural_image
Illustration of a cooking process showing a hand pressing down on a mounted air fryer with a handle (no text or symbols present)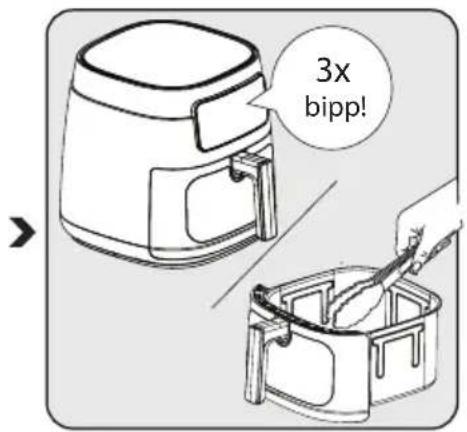
text_image
3x bipp!natural_image
Line drawing of a hand inserting a component into an air fryer (no text or symbols)natural_image
Illustration of two air fryer units with a hand holding a tray, showing a process step (no text or symbols)text_image
Diagram of a digital kitchen appliance with labeled buttons and control panel, showing electrical outlet and directional arrows.natural_image
Line drawing of an air fryer with a stopwatch icon and 'Bip' label (no text or symbols on the device itself)text_image
Diagram showing two stages of an air fryer with directional arrows indicating process flownatural_image
Illustration of a hand pouring liquid into a bowl of noodles (no text or symbols)natural_image
Line drawing of a modern air fryer with a side panel showing internal structure (no text or symbols)natural_image
Line drawing of an air fryer with a close-up inset showing the outlet (no text or symbols)natural_image
Line drawing of a microwave oven with snowflake patterns and temperature indicators (no text or symbols)natural_image
Line drawing of a hand inserting a component into an air fryer (no text or symbols)natural_image
Technical line drawing of a cooking pan with a gridded lid and side panels, showing internal structure (no text or symbols)natural_image
Illustration showing a faucet cleaning a water tank with bubbles, and a hand cleaning a container (no text or symbols)natural_image
Line drawing of a hand cleaning a square oven with a cloth (no text or symbols)text_image
Technical diagram of a microwave oven with labeled parts in Chinesenatural_image
Illustration of a cardboard box with an arrow pointing to it and a cooking saucer (no text or symbols)text_image
Diagram of an air fryer with labeled parts and directional arrow indicating movement from component 1 to component 2natural_image
Technical line drawing of a cooking pan with a square plate and side arm, showing internal components (no text or symbols)text_image
Illustration showing three steps of cleaning a kitchen appliance: tap, drain with filter, and air fryer with cloth.natural_image
Technical line drawing of a mechanical component with internal structure and top plate (no text or symbols)text_image
Diagram of an air fryer with labeled parts and directional arrows indicating assembly stepstext_image
Diagram of an air fryer with labeled parts and airflow indicator
natural_image
Line drawing of a square oven with a lid and handle, showing internal structure (no text or symbols)text_image
Diagram of a microwave oven with labeled components including a dial indicator and stopwatch, showing a step to 'Bip' with an arrow pointing to the dial.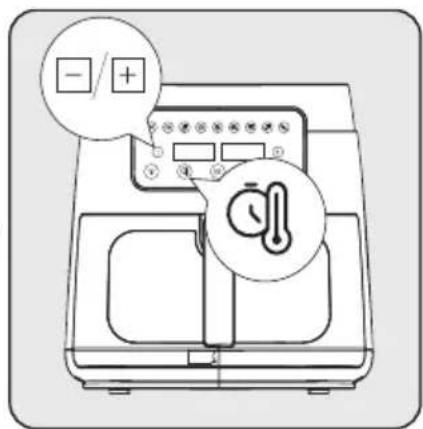
text_image
- / + - / +
text_image
3x Bipnatural_image
Illustration of a two-step cooking process: adding a food item into air fryer (no text or symbols)
text_image
3x bipp!natural_image
Line drawing of a hand using a tool to adjust or install an air fryer (no text or symbols present)natural_image
Illustration of two air fryer stoves with a hand holding a tray, showing the process (no text or symbols)text_image
Diagram of a kitchen appliance with labeled buttons and control panel, showing electrical outlet and directional arrowsnatural_image
Line drawing of an air fryer with a stopwatch icon and 'Bip' label (no text or symbols on the device itself)natural_image
Illustration of two air fryer designs with directional arrows indicating process flow (no text or symbols)natural_image
Illustration of a hand pouring liquid into a bowl of noodles (no text or symbols)natural_image
Line drawing of a modern air fryer with a side panel showing internal structure (no text or symbols)natural_image
Line drawing of an air fryer with a close-up inset showing the outlet (no text or symbols)natural_image
Line drawing of a microwave oven with snowflake patterns and temperature indicators (no text or symbols)natural_image
Line drawing of a hand inserting a component into an air fryer (no text or symbols)natural_image
Technical line drawing of a cooking pan with a square plate and side handles, showing internal structure (no text or symbols)natural_image
Illustration showing a faucet spraying water onto a square basin while cleaning it with a hand using a cloth (no text or symbols)natural_image
Line drawing of a hand cleaning a square oven with a cloth (no text or symbols)text_image
Technical diagram of an air fryer with labeled parts in Chinesenatural_image
Illustration of an air fryer with a red arrow pointing to its lid, next to a box (no text or symbols)text_image
Diagram of an air fryer with labeled parts and directional arrow indicating movement from component 1 to component 2natural_image
Line drawing of a cooking air fryer with a lid and side panel, showing internal components (no text or symbols)text_image
Illustration showing four steps of cleaning a kitchen appliance: tap, drain, washing machine, and cleaning bin with cloth.natural_image
Technical illustration of a cooking pot with a lid and side panel, showing internal structure (no text or symbols)text_image
Diagram of an air fryer with labeled parts and directional arrows indicating assembly stepstext_image
Diagram of an air fryer with labeled parts and airflow indicator
natural_image
Technical line drawing of a square-shaped container with internal compartments and a top panel (no text or symbols)text_image
Diagram showing a microwave oven setup with a dialog box and stopwatch, accompanied by a magnified view of the screen.text_image
Diagram of a kitchen appliance with control panel and thermometer icon, showing polarity labelstext_image
3x Bip IInatural_image
Illustration of two air fryer stoves with a hand holding a tray, showing a step 1 (no text or symbols)natural_image
Line drawing of a hand inserting a component into an air fryer (no text or symbols)natural_image
Illustration of two air fryer stoves with a hand placing a piece on the lid (no text or symbols)text_image
Diagram showing a kitchen appliance control panel with icons and directional arrows indicating action buttons.natural_image
Line drawing of a modern air fryer with a stopwatch icon and 'Bip' label (no text or symbols on the device itself)text_image
Diagram showing two steps of an air fryer with labeled arrows indicating process flow.natural_image
Illustration of a hand pouring liquid into a bowl with a stand (no text or symbols)natural_image
Line drawing of a modern air fryer with a red plastic container inside (no text or symbols)natural_image
Line drawing of an air fryer with a close-up inset showing the outlet (no text or symbols)natural_image
Line drawing of a microwave oven with snowflake decoration and thermometer indicator (no text or symbols)natural_image
Line drawing of a hand inserting a component into an air fryer (no text or symbols)natural_image
Technical line drawing of a cooking pot with a lid and side panel, showing internal structure (no text or symbols)natural_image
Illustration showing a faucet pouring liquid into a washing machine with bubbles, and a hand cleaning the water (no text or symbols)natural_image
Line drawing of a hand cleaning a mounted air fryer with a cloth (no text or symbols)text_image
Technical diagram of a microwave oven with labeled parts in Chinesenatural_image
Illustration of an air fryer with a red arrow pointing to its lid, next to a cardboard box (no text or symbols)Prije prve upotrebe uređaja uklonite ambalažu i stavite uređaj na ravnu i čistu površinu.
text_image
Diagram of an air fryer with labeled parts and directional arrows indicating movement or assembly.natural_image
Technical line drawing of a cooking pan with a lid and side panel, showing internal components (no text or symbols)text_image
Illustration showing four steps of cleaning a kitchen appliance: tap, drain, air fryer, and cleaning a container.Očistite rešetku za pripremu hrane (2) i odvojivu košaru za pripremu hrane (3) sa sapunicom i vodom, zatim osušite vanjsku površinu uređaja i dijelove koje ste dobro oprali.
natural_image
Technical line drawing of a mechanical component with internal structure and top view (no text or symbols)S obje strane ručke nalaze se dva ureza. Postavite košaru u njezino kućište tako da poravnate jezičce u ureze na vrhu ladice košare.
text_image
Diagram of an air fryer with labeled parts and directional arrows indicating assembly stepsPričvrstite ladicu na uređaj nakon što ste očistili sve dijelove. Uređaj je spreman za uporabu.

- Prilikom prve upotrebe, podesite proizvod na najvišu temperaturu i pustite ga neka radi približno 10 minuta bez dodavanja hrane.
- Nikad ne koristite ladicu košare (6) bez odvojive rešetke za pripremu hrane (2).
3 Upotreba
text_image
Diagram of an air fryer with labeled parts and airflow indicator
natural_image
Line drawing of a square oven with a lid and handle, showing internal structure (no text or symbols)Kada se odvojiva košare za pripremu hrane (3) povuče natrag dok uređaj radi, vruća para is-pustit će se kroz otvor za izlaz zraka na vrhu košare. Stoga, budite oprezni da vas ne opeče vruća para.
text_image
Diagram showing a microwave oven setup with a dialog box and a stopwatch, accompanied by an instructional arrow and 'Bip' label.
text_image
- / + - / +
text_image
Diagram of an air fryer with control panel and play button, accompanied by a stopwatch and '3x Bip' label©
3 Upotreba
3.5. Priprema hrane
natural_image
Line drawing of a hand inserting a component into an air fryer (no text or symbols)Čvrstu uhvatite ručku i otvorite ladicu košare (3), zatim uklonite ladicu iz košare i stavite je na ravnu, čistu površinu.
natural_image
Illustration of two air fryer units with a hand holding a tray, showing a process step (no text or symbols)Stavite hranu u košaru za pripremu hrane (3). Zatim pričvrstite ladicu na uređaj i pripazite da dobro prianja na uređaj.

text_image
Diagram of a kitchen appliance with labeled control panel and directional arrows indicating electrical outlet and playback controls.Ukopčajte uređaj u strujnu utičnicu i odaberite željeni program pripreme hrane. Zatim, pokrenite postupak pripreme hrane.
natural_image
Line drawing of an air fryer with a stopwatch icon and 'Bip' label (no text or symbols on the device itself)Začut ćete zvučno upozorenje kada istekne podešeno vrijeme i kada se uređaj automatski isključi. Kada se dovrši postupak pripreme hrane, na zaslonu će se pojaviti obavijest „Kraj“. To znači kako je program pripreme hrane završio.
natural_image
Illustration of a two-step cooking process: adding air from a flat-screen oven to a mounted air fryer (no text or symbols present)Izvadite odvojivu košaru za pripremu hrane (3) i provjerite je li hrana ispržena, zamrznuta ili nije. Ako je potrebno dodatno vrijeme za pripremu hrane, možete malo produžiti vrijeme pripreme hrane.
natural_image
Illustration of a hand pouring liquid into a bowl of noodles (no text or symbols)natural_image
Line drawing of a modern air fryer with a side panel showing internal structure (no text or symbols)natural_image
Line drawing of an air fryer with a close-up inset showing the outlet (no text or symbols)natural_image
Line drawing of a food ice cream oven with snowflake patterns and thermometer symbols (no text or labels)Pustite neka se uređaj potpuno ohladi. Uklonite košaru za pripremu hrane (3) iz ladice.

natural_image
Line drawing of a hand inserting a component into an air fryer (no text or symbols)
natural_image
Line drawing of a hand inserting a component into an air fryer (no text or symbols)
natural_image
Technical line drawing of a cooking pot with a grid-patterned lid and side handles, showing internal structure (no text or symbols)Uklonite rešetku za pripremu hrane (2) iz košare tako da je uhvatite za ručku i povučete prema gore.

natural_image
Illustration showing a faucet pouring liquid into a basin with bubbles, and a hand cleaning a container (no text or symbols)Očistite košaru za pripremu hrane (3) i rešetku za pripremu hrane (2) s toplom vodom i deterdžentom, a zatim ih dobro osušite.

natural_image
Line drawing of a hand cleaning a square oven with a cloth (no text or symbols)text_image
Technical diagram of a microwave oven with labeled parts in Chinesenatural_image
Illustration of an air fryer and a cardboard box with a red arrow pointing to the top box (no text or symbols)Pred prvo uporabo aparata odstranite embalažo in ga postavite na ravno in čisto mesto.
text_image
Diagram of an air fryer with labeled parts and directional arrow indicating movement or assemblynatural_image
Technical line drawing of a cooking pan with a square lid and side arm, showing internal components (no text or symbols)Postavite predal na ravno površino, da se rešetka za kuhanje (2) odstrani iz predala. Odstranite rešetko (2) tako, da jo dvignete iz predala.
text_image
Illustration showing four steps of cleaning a kitchen appliance: tap, drain, air fryer, and clean container.Kuhalno mrežo (2) in odstranljivo košaro za kuhanje (3) očistite s toplo milnico, nato pa temeljito osušite zunanjo površino aparata in oprane dele.

natural_image
Technical illustration of a cooking pot with a decorative lid and side panels, showing internal structure (no text or symbols)Na obeh straneh ročaja sta dve zarezi. Košarico namestite v ohišje tako, da zavihke poravnate z zarezami na vrhu predala košarice.
text_image
Diagram of an air fryer with labeled parts and directional arrows indicating assembly stepstext_image
Diagram of an air fryer with labeled parts and airflow indicator
natural_image
Line drawing of a square oven with a lid and handle, showing internal structure (no text or symbols)text_image
Diagram of a microwave oven setup with labeled components and a 'Bip' indicator, showing a brush tip and control panel.
text_image
- / + - / +
text_image
3x BipVključite izdelek in enkrat pritisnite simbol za vklop/izklop. Prikaže se celoten prikaz izbire. Pritisnite "Meni dokler ne pridete do funkcije, ki jo želite izbrati.
Pritisnite simbol za spremembo "Temperature / Time 📄. Na zaslonu bo utripala temperatura. Zamenjajte z želeno temperaturo 📋ali 🍐 Simboli. Ko ponovno pritisnete simbol "Temperatura / Čas 📄, bo na zaslonu utripala ura. Čas kuhanja nastavite s simboli 📋 ali ". —
Pritisnite simbol "Start/Stop ▶" in zaženite napravo. Živilo, ki ga želite skuhati, položite v košaro za kuhanje izdelka. Ko postavite košaro za kuhanje na njeno mesto, se na zaslonu prikaže nastavljeni čas, razen časa segrevanja, in čas se začne odštevati.
3 Uporaba
natural_image
Illustration of a two-step cooking process: adding food into air fryer with a hand holding a tray (no text or symbols)Za nastavitev temperature in časa pritisnite simbol 📄Nato pritisnite simbol - +, da nastavite potrebno temperaturo in čas. Za začetek pritisnite simbol ▶II
text_image
3x bipp!natural_image
Line drawing of a hand inserting a component into an air fryer (no text or symbols)natural_image
Illustration of two air fryer units with a hand holding a tray, showing a process step (no text or symbols)Živila položite v košaro za kuhanje (3). Nato pritrdite košaro na aparat in se prepričajte, da se popolnoma prilega.

text_image
Diagram of a kitchen appliance with labeled control panel and directional arrows indicating electrical outlet and playback controls.Priključite aparat in izberite želeni program kuhanja. Nato začnite s kuhanjem.

natural_image
Line drawing of an air fryer with a stopwatch icon and 'Bip' label (no text or symbols on the device itself)natural_image
Illustration of a two-step cooking process: adding air from a flat-screen air fryer, then adding a grater (no text or symbols present)natural_image
Illustration of a hand pouring liquid into a bowl of noodles (no text or symbols)natural_image
Line drawing of a modern air fryer with a side panel showing internal structure (no text or symbols)Izogibajte se stiku košare za kuhanje z zunanjo površino aparata, saj bo površina košare za kuhanje (5) med kuhanjem in po njem vroča.

natural_image
Line drawing of an air fryer with a close-up inset showing the outlet (no text or symbols)natural_image
Line drawing of a food microwave oven with snowflake patterns and temperature indicators (no text or symbols)Počakajte, da se naprava popolnoma ohladi.


natural_image
Line drawing of a hand inserting a component into an air fryer (no text or symbols)natural_image
Technical line drawing of a cooking pan with a grid-patterned lid and side panels (no text or symbols)Pekač (2) odstranite iz košare tako, da ga primete za ročaj in potegnete navzgor.

natural_image
Illustration showing a faucet spraying water onto a square basin while cleaning it with a hand using a cloth (no text or symbols)Košarico za kuhanje (3) in rešetko za kuhanje (2) očistite s toplo milnico in ju nato temeljito osušite.

natural_image
Line drawing of a hand cleaning a square oven with a cloth (no text or symbols)Zunanjost naprave očistite z vlažno krpo. Zunanjost naprave popolnoma posušite.

text_image
Technical diagram of a microwave oven with labeled parts in Chinese- Paneli dixhital i kontrollit
- Rrjeta e gatimit
- Koshi i lëvizshëm i gatimit
- Doreza
- Dhomëza e gatimit me ndriçim me monitorim
Të dhënat teknike
natural_image
Line drawing of an air fryer with a red arrow pointing to the box (no text or symbols)natural_image
Line drawing of a hand operating a mounted air fryer with a handle, labeled with parts 1 and 2 (no text or symbols on the diagram itself)natural_image
Technical line drawing of a cooking pot with a lid and side panel, showing internal components (no text or symbols)text_image
Illustration showing cleaning steps of a kitchen appliance: dropping faucet, washing machine, and cleaning container with cloth.natural_image
Technical line drawing of a mechanical component with internal structure and mounting holes (no text or symbols)text_image
Diagram of an air fryer with labeled parts and directional arrow indicating assembly or movementtext_image
Diagram of an air fryer with labeled parts and airflow indicator
natural_image
Line drawing of a square oven with a lid and handle, showing internal structure (no text or symbols)text_image
Diagram of a microwave oven with labeled components and a 'Bip' indicator, showing a close-up of the lid and control panel.
text_image
- / + - / +
text_image
3x Bipnatural_image
Illustration of a two-step cooking process: adding food into air fryer with a hand holding a tray (no text or symbols)
text_image
3x bipp!natural_image
Line drawing of a hand inserting a component into an air fryer (no text or symbols)natural_image
Illustration of two air fryer stoves with a hand holding a tray, showing the process (no text or symbols)text_image
Diagram of a kitchen appliance with labeled control panel and directional arrows indicating electrical outlet and play buttonsnatural_image
Line drawing of an air fryer with a red stopwatch icon and 'Bip' label (no text or symbols on the device itself)natural_image
Illustration of a two-step cooking process: adding air from a flat-screen oven to a mounted air fryer (no text or symbols present)natural_image
Illustration of a hand pouring liquid into a container with a fork (no text or symbols)natural_image
Line drawing of an air fryer with a side panel showing internal components (no text or symbols)natural_image
Line drawing of an air fryer with a close-up inset showing the outlet (no text or symbols)natural_image
Line drawing of a food oven with snowflake patterns and temperature indicators (no text or symbols)natural_image
Line drawing of a hand inserting a component into an air fryer (no text or symbols)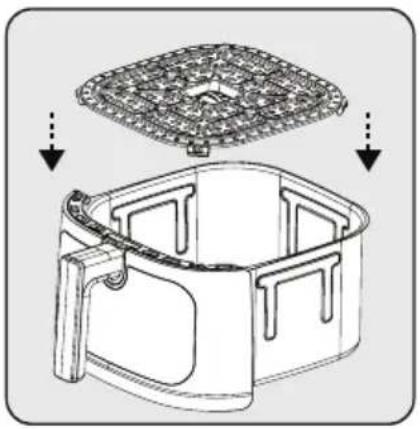
natural_image
Technical line drawing of a cooking pan with a square plate and side handles, showing internal structure (no text or symbols)natural_image
Illustration showing a faucet spraying water onto a square basin while cleaning it with a hand using a cloth (no text or symbols)natural_image
Line drawing of a hand cleaning a square oven with a cloth (no text or symbols)text_image
Technical diagram of a air fryer with labeled parts in Chinesenatural_image
Illustration of an air fryer with a red arrow pointing to its lid, next to a cardboard box (no text or symbols)Pre prve upotrebe uređaja uklonite ambalažni materijal i postavite ga na ravno i čisto mesto.

text_image
Diagram of an air fryer with labeled parts and directional arrow indicating movement or assemblyČvrsto uhvatite ručku (4) da biste otpustili korpu za kuvanje (3) koja se može ukloniti; zatim izvadite fioku iz njenog kućišta.
natural_image
Technical line drawing of a cooking pan with a square lid and side arm, showing internal components (no text or symbols)text_image
Diagram illustrating four steps of cleaning a kitchen appliance: tap, drain, air fryer, and clean water.natural_image
Technical illustration of a cooking pot with a decorative lid and side panels, showing internal structure (no text or symbols)Postoje 2 ureza sa obe strane ručke. Postavite korpu u njeno kućište tako što ćete poravnati jezičke u zareze na vrhu fioke korpe.
text_image
Diagram of a cooking air fryer with labeled parts and directional arrows indicating assembly stepstext_image
Diagram of an air fryer with labeled parts and airflow indicatornatural_image
Line drawing of a square oven with a lid and handle, showing internal structure (no text or symbols)text_image
Diagram of a microwave oven with labeled components and a 'Bip' indicator, showing a close-up of the lid and control panel.Uključite proizvod i jednom pritisnite sim- bol za uključivanje/isključivanje. Poja- viće se ceo ekran za izbor. Pritisnite sim- bol „Meni ☐dok ne dodete do funkcije koju želite da izaberete.

text_image
Diagram of a kitchen appliance with control panel and thermometer, annotated with symbols for polarity and thermal monitoring.Pritisnite simbol promene „Temperatura /Vreme 📄 temperatura će treptati na displeju. Zamenite željenom temperaturom 📋 ili simbolima. Kada pono-vo pritisnete simbol „Temperatura /Vreme 📄 vreme će treptati na displeju. Podesite vreme kuvanja sa 🕐+ili 🍃 simbolima”.

text_image
3x Bipnatural_image
Illustration of a two-step cooking process: adding food into air fryer with a hand holding a tray (no text or symbols)
text_image
3x bipp!Pritisnite simbol da podesite temperaturu i vreme. Zatim pritisnite simbol - + da podesite potrebnu temperaturu i vreme. Pritisnite simbol početakt.
natural_image
Line drawing of a hand inserting a component into an air fryer (no text or symbols)Čvrsto uhvatite ručku da otvorite fioku korpe (3); zatim izvadite fioku iz mašine i stavite je na ravnu, čistu površinu.

natural_image
Illustration of two air fryers with a hand holding their handles, showing the process (no text or symbols)text_image
Diagram of a kitchen appliance with labeled control panel and directional arrows indicating electrical outlet and playback controls.natural_image
Line drawing of a modern air fryer with a stopwatch icon and 'Bip' label (no text or symbols on the device itself)natural_image
Illustration of a two-step cooking process: adding air from a flat-screen air fryer, then adding a pan with red arrows indicating rotation (no text or symbols)natural_image
Illustration of a hand pouring liquid into a bowl of noodles (no text or symbols)natural_image
Line drawing of a modern air fryer with a side panel showing internal structure (no text or symbols)natural_image
Line drawing of an air fryer with a close-up inset showing the outlet (no text or symbols)natural_image
Line drawing of a microwave oven with snowflake patterns and temperature indicators (no text or symbols)natural_image
Line drawing of a hand inserting a component into an air fryer (no text or symbols)
natural_image
Technical line drawing of a cooking pot with a grid-patterned lid and side handles, showing internal structure (no text or symbols)natural_image
Illustration showing a faucet pouring liquid into a pot with bubbles, and a hand cleaning a container (no text or symbols)natural_image
Line drawing of a hand cleaning a square oven with a cloth (no text or symbols)5.3 Transport i otprema
- Prevozite uređaj u originalnoj ambalaži tokom rukovanja i transporta. Ambalaža štiti uređaj od fizičkih oštećenja.
- Ne stavljajte teške predmete na uređaj ili njegovu ambalažu. Uređaj se može oštetiti.
- Ako aparat padne, može prestati raditi ili može doći do trajnog oštećenja.
6 Rješavanje problema
| Problem Uzrok Rešenje | |||
| 1 Uređaj ne radi Prekidi struje Proverite | napajanje i proverite da li ima | struje | |
| Nema napajanja ili je slab kontakt na utičnici | |||
| Neuskladenost napona napajanja sa nominalnim naponom uređaja | |||
| 2 Hrana | je nedovoljno kuva-na/izgorela | Vreme kuvanja nije odgovarajuće Kombinujte recepte i svoje iskustvo da biste prilagodili pripremu i vreme | |
| 3 Dimiti | prilikom prve upotrebe | Preostalo ulje za zaštitu od rđe na grejaču uređaja | Podesite temperaturu na maksimum i izvršite prethodno zagrevanje od 10-15 minuta da biste uklonili ulje koje sprečava rđu na toplom uređaju |
| 4 Čudan | miris Strani predmet na korpi | za kuvanje, fioci korpe i grejaču | Uklonite strani predmet |
| 5 E2 NTC | kratko spojen, delovi su neispravni | Poslati serviseru na popravku | |
| 6 E4 NTC | kratko spojen, delovi su neispravni | ||
Obratite se našem ovlašćenom servisu radi popravke, u slučaju da se problem ne može rešiti nakon izvršenog gore navedenog nadzora.

text_image
bekoАэрогриль
natural_image
Simple line drawing of a rice cooker (no text or symbols)FRL 3374 B
RU
text_image
Technical diagram of a air fryer with labeled parts in Chinesenatural_image
Line drawing of an air fryer with a red arrow pointing to the box (no text or symbols)text_image
Diagram of an air fryer with labeled parts and directional arrow indicating movement from component 1 to component 2natural_image
Technical line drawing of a cooking pan with a side panel and handle, showing internal components and a numbered arrow (no text or symbols)text_image
Illustration showing cleaning steps of a hair dryer with water filter, including drain, drain bath, and cloth swabbing.natural_image
Technical line drawing of a mechanical component with internal structure and top plate (no text or symbols)text_image
Diagram of an air fryer with labeled parts and directional arrows indicating assembly stepstext_image
Diagram of an air fryer with labeled parts and airflow indicator
natural_image
Technical line drawing of a mechanical housing with a top panel and internal components (no text or symbols)text_image
Diagram of a microwave oven with labeled components including a dial, control panel, and stopwatch icon
text_image
Diagram of a kitchen appliance with labeled buttons and temperature indicators, showing control panel and display screen.
text_image
3x Bipnatural_image
Illustration of two air fryer designs with a hand holding a tray, showing heat transfer (no text or symbols)
text_image
3x bipp!natural_image
Line drawing of a hand inserting a component into an air fryer (no text or symbols)
natural_image
Illustration of two air fryer stoves with a hand holding a tray, showing the process (no text or symbols)
text_image
Diagram showing a digital kitchen appliance with control panel and buttons, including a magnified view of the screen and directional arrows.natural_image
Line drawing of an air fryer with a stopwatch icon and 'Bip' label (no text or symbols on the device itself)
natural_image
Illustration of a two-step cooking process: adding air from a grater to a pan, with no text or symbols present.
natural_image
Illustration of a hand pouring liquid into a bowl of noodles (no text or symbols)natural_image
Line drawing of a modern air fryer with a side panel showing internal structure (no text or symbols)natural_image
Line drawing of a air fryer with a close-up inset showing the outlet (no text or symbols)natural_image
Line drawing of a food oven with snowflake patterns and temperature indicators (no text or symbols)natural_image
Line drawing of a hand using a right-hand tool to adjust or install an air fryer (no text or symbols present)Извлеките варочную корзину (3) из яшика.
natural_image
Technical illustration of a cooking pot with a lid and side panel, showing internal structure (no text or symbols)text_image
Diagram illustrating a kitchen cleaning process with a faucet, water bath, and cloth swabbing stepsnatural_image
Line drawing of a hand cleaning a small air fryer (no text or symbols)natural_image
Simple line drawing of a rice cooker (no text or symbols)FRL 3374 B
AR
text_image
Technical diagram of a microwave oven with labeled components in Chinesenatural_image
Illustration of an air fryer with a red arrow pointing to it, next to a cardboard box (no text or symbols)text_image
Diagram of an air fryer with labeled parts and directional arrow indicating movement from component 1 to component 2natural_image
Technical line drawing of a cooking pan with a square plate and side panel, showing internal components (no text or symbols)text_image
Illustration showing cleaning steps of a food appliance: dropping faucet, washing machine, and cleaning container with cloth.natural_image
Technical illustration of a mechanical component with internal structure and top view (no text or symbols)text_image
Diagram of an air fryer with labeled parts and directional arrows indicating assembly stepstext_image
Diagram of an air fryer with labeled parts and airflow indicatornatural_image
Line drawing of a rectangular oven with internal compartments and a top panel (no text or symbols)text_image
Diagram showing a microwave oven setup with a digital display and a stopwatch, indicating a Bip (bip) operation.text_image
Diagram of a kitchen appliance with control panel and temperature thermometer, annotated with icons for function buttons.natural_image
Illustration of two air fryer designs with a hand holding a tray, showing a step 1 (no text or symbols)natural_image
Line drawing of a hand inserting a component into an air fryer (no text or symbols)natural_image
Illustration of two air fryer stoves with a hand holding a tray, showing the process (no text or symbols)text_image
Diagram of a digital air fryer with control panel and labeled buttons, showing action icons and labels in Chinese.natural_image
Line drawing of a modern air fryer with a stopwatch icon and 'Bip' label (no text or symbols on the device itself)natural_image
Illustration of a two-step cooking process: adding air from a grater to a flat oven, with no text or symbols present.natural_image
Illustration of a hand pouring liquid into a bowl of noodles (no text or symbols)natural_image
Line drawing of a modern air fryer with a side panel showing internal structure (no text or symbols)
natural_image
Line drawing of a air fryer with an outlet, showing the lid and handle (no text or symbols)natural_image
Line drawing of a food ice cream oven with snowflake patterns and temperature indicators (no text or symbols)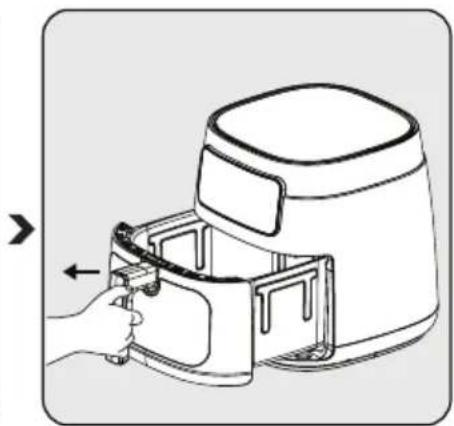
natural_image
Line drawing of a hand holding an air fryer with a handle, showing the blade and handle mechanism (no text or symbols)natural_image
Technical line drawing of a cooking pan with a decorative top and side panels, showing internal structure (no text or symbols)natural_image
Illustration showing a faucet cleaning a basin with a lid and a hand cleaning a container (no text or symbols)natural_image
Line drawing of a hand cleaning a square air fryer with a cloth (no text or symbols)نظف الجزءHWARAJYI MUNHJHAAZ BQCTOBA قماش mblll. JHFVJHAAZ HWARAJYI MUNHJHAAZ TCMAMA
