
MG301 - Mincer Duronic - Free user manual and instructions
Find the device manual for free MG301 Duronic in PDF.
| Product type | Electric meat grinder |
| Brand | Duronic |
| Model | MG301 |
| Power | 1200 W |
| Voltage/Frequency | 220-240 V, 50/60 Hz |
| Main functions | Minced meat preparation, kibbeh preparation, sausage making |
| Speeds | Forward (ON) and reverse (R) |
| Max. continuous operation time | 10 minutes |
| Blade material | Stainless steel |
| Included accessories | Fine, medium and thick grinding discs; kibbeh accessory with tube; sausage accessories (large, medium, small); pusher; ring; central screw |
| Safety system | Motor protection and automatic shutdown in case of overload |
| Care and cleaning | Hand wash with warm water; do not put in dishwasher; apply a thin layer of cooking oil to blades after drying |
| Warranty | 1 year (by Shine-Mart Ltd) |
| Use | Household use only |
Frequently Asked Questions - MG301 Duronic
User questions about MG301 Duronic
0 question about this device. Answer the ones you know or ask your own.
Ask a new question about this device
Download the instructions for your Mincer in PDF format for free! Find your manual MG301 - Duronic and take your electronic device back in hand. On this page are published all the documents necessary for the use of your device. MG301 by Duronic.
USER MANUAL MG301 Duronic
Creative Consumer Products
natural_image
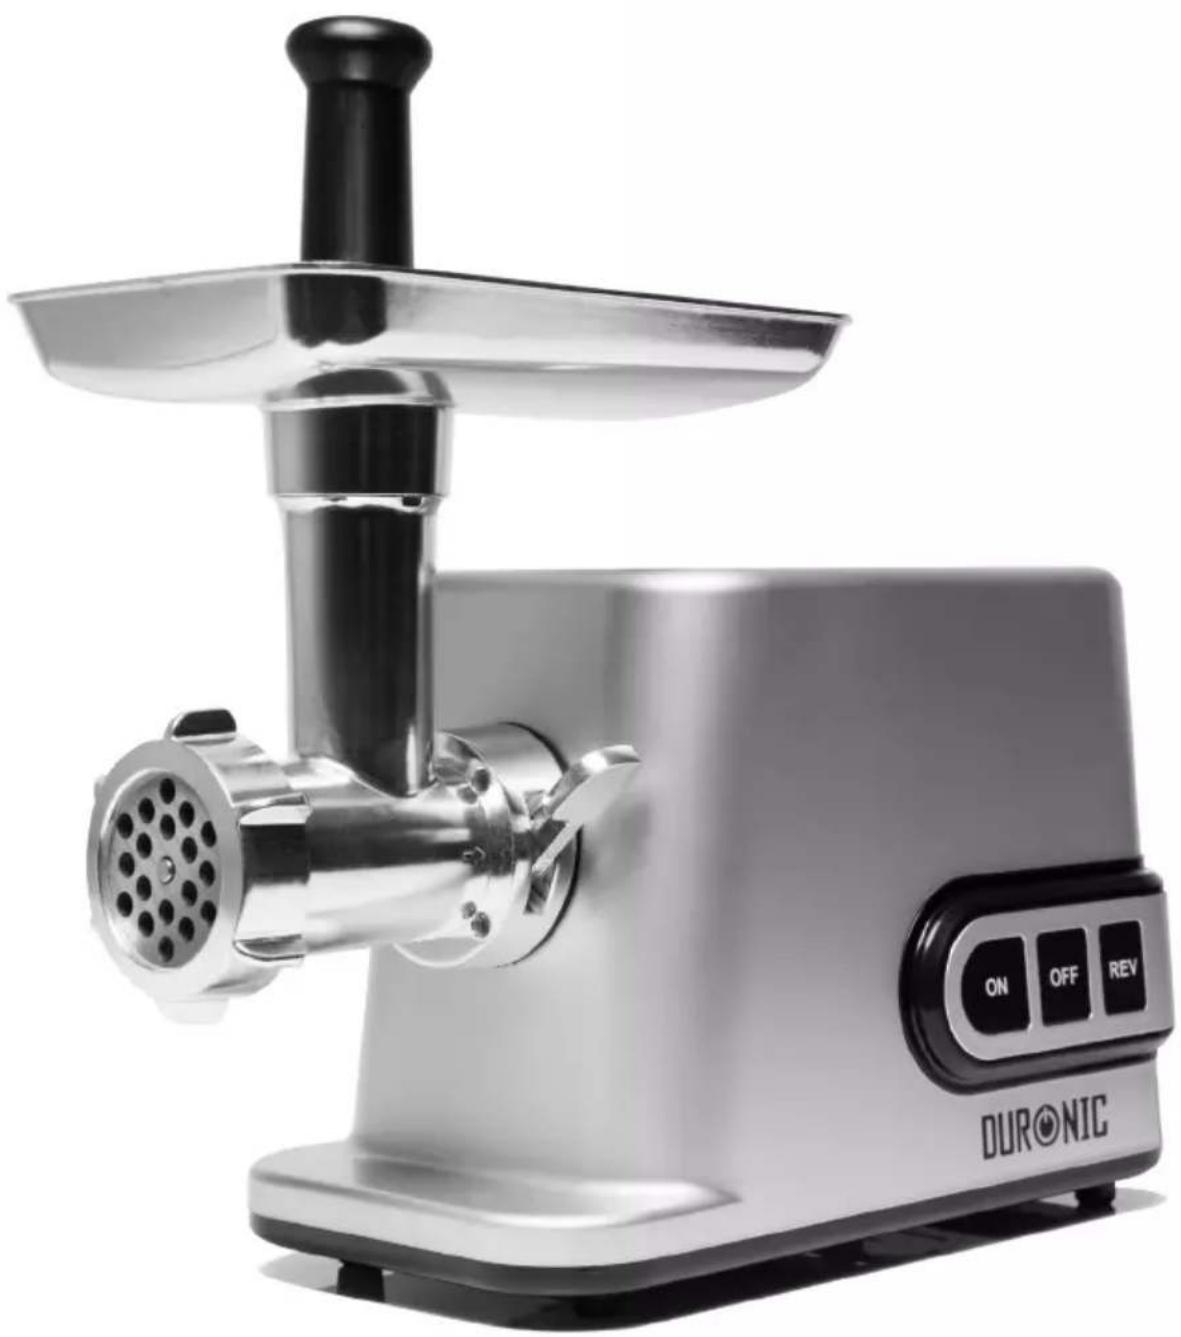
Exterior view of a DURONIC stainless steel robotic feeder (no text or symbols on the device itself)PLEASE READ ALL THE INSTRUCTIONS BEFORE USE

duronic.com

duronic

@duronicmedia

Duronic

@duronicmedia
DURONIC
DURONIC
Contents
English Manual 5
Read these instructions carefully and retain for future reference.
• The MG301 meat grinder is for indoor/household use. Do not use outdoors.
- This appliance is not intended for use by persons (including children) with reduced physical, sensory or mental capabilities, or lack of experience and knowledge, unless they have been given supervision or instruction concerning use of the appliance by a person responsible for their safety.
- Children should be closely supervised at all times to ensure that they do not play with the appliance.
- Do not operate this appliance if the power cable or plug is damaged. If either is damaged return it to Duronic for service or repair by professional technician.
- Never try to replace the parts and repair the unit by yourself.
- When the circuit breaker activates, do not switch on the appliance. Let the grinder rest for 5 minutes before pressing the 'ON' button to resume grinding.
- Do not have the machine grinding meat for more than 10 minutes. If you need to continue grinding over 10 minutes, allow the machine to rest for 10 minutes before continuing. 10 minutes on / 10 minutes off.
- Do not let the power cable hang over the edge of a table or counter.
- Ensure that the power cable is not in a position where it can be pulled or tripped over accidentally.
- Do not allow the power cable to touch hot surfaces; do not place the cable near hot gas or electric burners or near a heated oven.
- Use of an extension lead with this appliance is not recommended. However, if it is necessary to use an extension lead, ensure that the extension lead is equal to or greater than the power consumption of the appliance to avoid overheating of the appliance and extension lead. Do not use any other appliance on the extension lead at the same time. Do not place the extension lead in an unsafe position where it can be pulled on by children or animals or be tripped over.
• Always operate the grinder on a dry, smooth, even and stable surface. Do not place the unit on a hot surface.
- Choose a location for the grinder that allows air to pass under the bottom. The sides of the machine should be kept clear and not blocked by any other items.
DURONIC
DURING USE
- Before first use, ensure you remove all of the packaging and any labels.
- When carrying the unit, be sure to hold the body securely from the base with both hands. Do not carry the unit by the hopper plate or head.
- Never push food into the grinder by hand. Always use the food pusher.
- Do not use the MG301 to grind hard food such as nuts and bones; always ensure that bones and rind are removed from meat before mincing.
- Do not grind ginger and other foods with hard fibre content.
- Operate the grinder from "ON" to "REV" or from "REV" to "ON". It is very important to let the grinder stop before you press another button. We recommend to wait 30 seconds before pressing the opposite button.
• To avoid jamming, do not force food into the grinder with excessive pressure. - Do not fix the cutting blade or cutting plate onto the grinder when using kibbe attachment.
• Always switch off and unplug from the mains power outlet when not in use.
CLEANING AND MAINTENANCE
- Before cleaning, ensure that the machine is unplugged from the mains power outlet.
- Unplug when assembling and disassembling the unit; always unplug when changing attachments.
• After the blade is used each time, rinse under warm water and wipe it dry.
• To preserve the quality of your blade, apply a small amount of cooking oil onto a tissue and wipe the blade with it. - Accessories cannot be cleaned with dishwasher – If any parts are put into the dishwasher it will ruin the parts and render them useless.
- Do not immerse power cable or the body of grinder into water as this would give create an electric shock.
• To clean the body of the machine safely, unplug from the mains power and use a damp cloth to clean the machine. After cleaning dry thoroughly with a dry cloth.
DURONIC
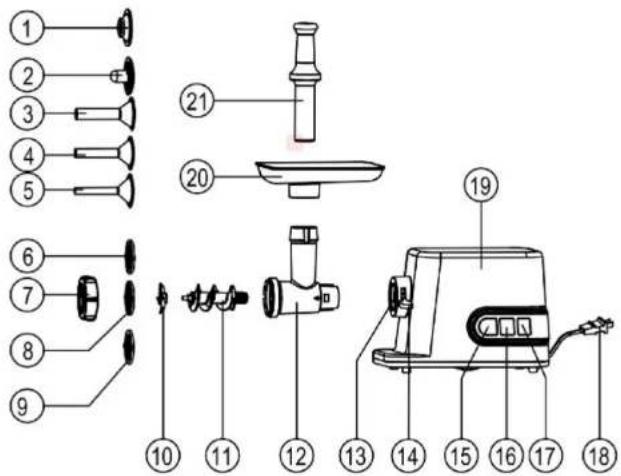
Components
text_image
Labeled diagram of a kitchen appliance with numbered parts for identificationProduct Specifications
- Kibbe set
- Kibbe plate
- Sausage attachment (Large)
- Sausage attachment (Medium)
- Sausage attachment (Fine)
- Cutting plate(Fine)
- Fixing ring
- Cutting plate(Medium)
- Cutting plate(Large)
- Cutting blade
-
Feed Screw
-
Head
- Head inlet
- Locker
- ON switch
- OFF switch
- REVERSE switch
- Plug & power cable
- Machine Body
- Hopper plate
- Food pusher
| Model Name | Voltage Rated Power | Frequency | |
| MG301 220 | -240V | 1200W | 50/60Hz |
DURONIC
Before First Use
Before first use please do the following:
- Check the voltage indicated on the rating label of the grinder corresponds with the mains voltage in your home.
- Remove all packaging and labels.
- Wash all parts (except the main body of the machine) in warm soapy water. Ensure they are dry before re-assembling them together again.
- Wipe clean the main body of the machine with a damp cloth, ensuring you then wipe dry afterwards.
- Before you plug in the machine, make sure the power switch is in the 'OFF' position.
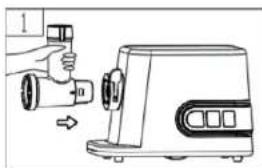
Assembly
natural_image
Illustration of a hand holding a small device next to a separate kitchen appliance (no text or symbols visible)Step 1: Hold the head(12) and insert it into the head inlet(13).
natural_image
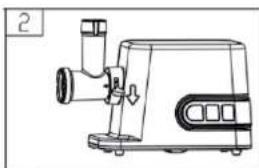
Line drawing of a sewing machine with no visible text or symbolsStep 2: Press the locker(14) downwards, then rotate the head anti-clockwise to fasten the head tightly into place.
natural_image
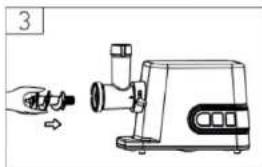
Line drawing of a hand using a tool to interact with a small device (no text or symbols present)Step 3: Place the feed screw(11) into the head, long end first, then turn slightly until it set into place inside the machine.
natural_image
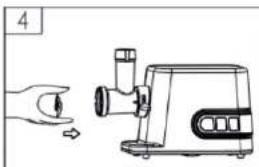
Line drawing of a hand pressing a button next to a small kitchen brush (no text or symbols)Step 4: Place the cutting blade(10) onto the feed screw(11) with the blade facing the front as illustrated. If it is not fitted properly, meat will not be grinded.
DURONIC
natural_image
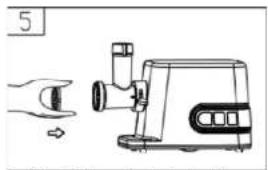
Line drawing of a hand holding a small object next to a blender with a handle (no text or symbols)Step 5: Place the desired cutting plate(6 / 8 / 9) over the cutting blade(10) ensuring that the slots are correctly inserted.
natural_image
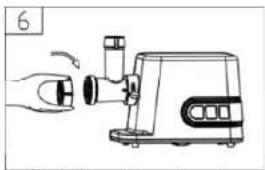
Line drawing of a hand holding a small object next to a kitchen grater (no text or symbols)Step 6: Support/press the centre of the cutting plate with one finger, then screw the fixing ring(7) on tightly with the other hand. Do not over-tighten.
If you wish to use the sausage or kibbe attachments, put into place after the cutting plate, ensuring that the fixing ring is fitted last over the top of the attachment.
Mincing Meat
1) Cut all meat into pieces roughly 2cm so that they can fit into the hopper opening. We recommend using boneless, fatless meat with no sinews.
2) Place some diced meat into the hopper, using the food pusher to push the meat into the opening.
3) To start mincing the meat press the 'ON' button which will switch on the power and make the machine start to grind.
4) Continue to add meat into the hopper as and when required, using only the food pusher. DO NOT use your fingers.
5) After you have finished grinding meat, press the 'OFF' button to stop the machine. Then unplug from the mains socket.
REVERSE FUNCTION
If the machine becomes blocked press the 'REV' button to reverse the direction of the blades to loosen up the blockage. After unblocking, unplug the machine from the mains socket and clean the food out from the head.
natural_image
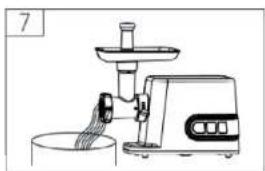
Line drawing of a handwashing machine with a bowl and handle (no text or symbols)Step 7: Place a bowl or pan underneath the head to catch the mince/sausage/kibbe you've made.
DURONIC
Making Kibbe
Kibbe Filling
100g mushrooms
1 tbsp olive oil
1 tbsp plain flour
1 onion onion (finely chopped)
Salt and pepper to your preferred taste
Kibbe Dough Shell
450g lean meat
150-200g plain flour
1 tsp ground nutmeg
Salt and pepper to your preferred taste
Spices to your taste: my cumin, contander, allspice or paprika.
Step 1: Get the machine ready for grinding meat, as shown above
- Place the feed screw(11) into the head, long end first, then turn slightly until it set into place inside the machine.
- Place the cutting blade(10) onto the feed screw(11) with the blade facing the front as illustrated. If it is not fitted properly, meat will not be grinded.
- Place the desired cutting plate(6 / 8 / 9) over the cutting blade(10) ensuring that the slots are correctly inserted.
- Support/press the centre of the cutting plate with one finger, then screw the fixing ring(7) on tightly with the other hand. Do not over-tighten.
- Place the hopper plate(20) onto the head(12) and fix it into position.
Step 2: Make the filling
Mince the mushrooms once or twice. Add them to minced mushrooms to a bowl and add the other ingredients, mixing well to create a stuffing. If the mixture is too loose, add some more flour to thicken it.
Step 3: Make the outer shell
Mince the meat three times to ensure a smooth consistency. Add to a separate bowl from the stuffing mix, and mix all ingredients together thoroughly until you get a dough-like consistency. More meat and less flour will create a better consistency and taste. Add the mixture back into the grinder and grind three more times.
Step 4: Making the kibbes
Disassemble the attachments on the grinder by removing the cutting plate and cutting blade. Leave the feed screw in place. Place the kibbe attachments (1) & (2) onto the feed screw(11) together, fitting the parts so that the slots align.
Screw the fixing ring(7) into place to hold the attachments securely. Do not over-tighten.
Place a baking tray nearby to place your formed kibbe onto.
Using the feed pusher(21), insert the shell mixture into the grinder and switch it on to re-grind the mixture allowing it to pass through the kilboe attachments. Cut the dough tube every 7-8cm, placing each cut piece onto a baking tray.
Step 5: Filling the kibbe
Close the end of each tube by squeezing it with your fingers. Stuff the kibbe tubes with the mushroom stuffing, and squeeze the other ends to close them. Use your hands to shape the kibbe as illustrated, into lemon shaped pieces.
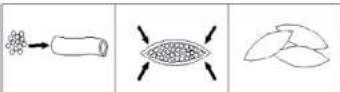
Step 6: Cook the klbbe
Deep-fry the kibbes in cooking oil for roughly 10 minutes or until golden brown.
DURONIC
Making Sausages
Casings (pre-soaking for 30 minutes in boiling water and washed through with cold water)
450g beef or pork meat (diced into 2cm cubes)
12 tsp ground black pepper
1 tsp salt
½ tsp sage (fresh and chopped into tiny pieces)
14 tsp thyme
1/4 tsp paprika
1/8 cup Liquid (wine, vinegar or water)
Step 1: Get the machine ready for grinding meat
- Place the feed screw(11) into the head, long end first, then turn slightly until it set into place inside the machine.
- Place the cutting blade(10) onto the feed screw(11) with the blade facing the front as illustrated. If it is not fitted properly, meat will not be grinded.
- Place the desired cutting plate(6 / 8 / 9) over the cutting blade(10) ensuring that the slots are correctly inserted.
- Support/press the centre of the cutting plate with one finger, then screw the fixing ring(7) on tightly with the other hand. Do not over-tighten.
- Place the hopper plate(20) onto the head(12) and fix it into position.
Step 2: Prepare the Casings
Cut casings to a length of 2 to 2 1/2 feet, so they're easier to handle. Soak the casings for 30 minutes in hot water before using them, or soak overnight in warm water. Before using the casings, rinse them out by putting the end over a funnel and pouring cool water through them several times.
Step 3: Grind the meat
Cut the meat into pieces that are small enough to fit into the grinder, around 2cm in size. Remove any bones, gristle and sinew from the meat and discard.
Step 4: Season the filling
Put the minced meat in a bowl with the pepper, salt, sage, ginger, nutmeg, thyme, paprika and stir the mixture to work the ingredients into the meat. Add the liquid ingredient you have chosen and work into the meat mixture using a spoon.
Step 5: Get the machine ready for filling the sausages (see figure 11)
- Place the feed screw(11) into the head, long end first, then turn slightly until it set into place inside the machine.
- Place the feed screw(11) into the head, long end first, then turn slightly until it set into place inside the machine
- Place the cutting blade(10) onto the feed screw(11) with the blade facing the front as illustrated. If it is not fitted properly, meat will not be grinded.
- Place the cutting plate(6) over the cutting blade(10) ensuring that the slots are correctly inserted.
- Place your chosen sausage attachment onto the head, hold in place with one finger and then screw the fixing ring(7) on the top of it, ensuring it's fixed on lightly with the other hand. Do not over-lighten.

text_image
11 →Step 6: Fill the casings
Take one of the prepared casings, open at one end and slide onto the sausage attachment almost entirely, leaving only a few inches surplus. Tie a knot in the end of the end of the casing to prevent any meat mixture falling out. Fill the hopper plate(20) with your sausage mix, switch on the machine and gently push the meat mixture through with the food pusher(21), while using another hand to support the newly-filled sausage casings. When you have almost filled the casing up with sausage meat, stop the machine and remove the sausage casing from the machine, then tie it in a knot.
DURONIC
Step 7: Separate the sausages
Lay out the one long sausage you have just made and prick it lightly with a fork. Decide what size sausages you would like, press with one finger in each place you want to separate the sausages. Then in each place you made a dent, twist the casing.
Step 8: Cook the sausages
You can then cut and separate the sausages ready for cooking. Sausages can be grilled, barbecued, fried or bakfd in the oven. Cooking times vary depending on the size of the sausages – ensure they are thoroughly cooked through before serving.
Disassembly
• Make sure that the motor has stopped completely.
- Disconnect the lug from the power outlet.
- Disassemble by removing the attachments in reverse of that shown in figures 1-6 on the previous pages.

natural_image
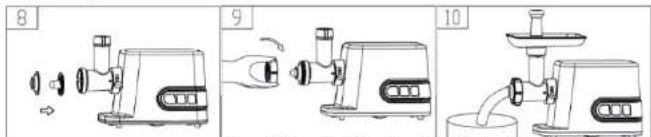
Line drawing of a kitchen grater with handle and control panel (no text or symbols)12: To remove the cutting plate
easily, place a screwdriver between the cutting plate and the head as illustrated. Simply lift it off using the screwdriver.
natural_image
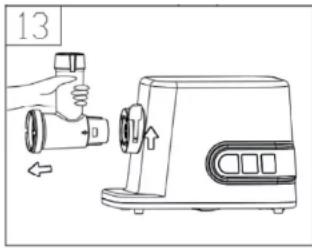
Line drawing of a hand holding a small device next to a kitchen appliance, with no visible text or symbols.13: Press the locker(14) and move
he head(12) as the image shows
Then you can remove the head
with ease.
Cleaning
- Remove meat and any food left over inside the machine.
- Wash each attachment with warm soapy water.
- Wipe the machine clean with a damp wet cloth, ensuring to also dry straight afterwards with a dry cloth.
- Ensure all parts are dry before storing or using again.
- Use a little cooking oil on a cloth to wipe over all metal attachments with a cloth – this will maintain the quality and durability of the parts.
- Do not use bleach or any chlorine solution as this will discolour the aluminium parts.
- Do not use any thinners or petrol to clean the machine as this will discolour it or cause cracks to appear.
- Do not immerse the main machine in water.
DURONIC
Warranty
1 Year Guarantee from Shine-Mart Ltd, Trademark owners of Duronic Products. NOTE: THESE STATEMENTS DO NOT AFFECT YOUR STATUTORY RIGHTS AS A CONSUMER
This product has been manufactured under the strictest or quality control procedures, and using the highest quality of materials, to ensure excellent performance and reliability. It will give very good and long lasting service, provided it is properly used and maintained. The product is guaranteed for 1 years from the date of original purchase. If any defect arises due to a faulty materials or poor workmanship, the faulty product must be returned to the original place of purchase. Refund or replacement is at the discretion of that company. Duronic Products are offered with a 1 year guarantee under the following conditions:
- The product must be returned to the retailer with original proof of purchase.
- The product must be installed and used in accordance with the instructions contained in this operating manual.
- It must be used only for domestic purposes.
- It does not cover wear and tear, malicious damage, misuse, neglect, inexpert repairs or consumable parts.
- Shine-Mart Ltd has no responsibilities for accidental or consequential loss or damage.
- Shine-Mart Ltd are not liable to carry out any type of servicing work, under the guarantee
- Valid in the UK only

This product is filled with CE:1363 plug and fuse Imported by Shino-Marl Ltd, RM3 8SB

DURONIC
Information on waste Disposal for Consumers of
Electrical & Electronic Equipment.
This mark on a product and/or accompanying documents indicates that when it
Is to be disposed of, it must be treated as Waste Electrical & Electronic Equipment (AEEE).
Any WEEE marked products must not be mixed with general household waste,
but kept separate for the treatment, recovery and recycling of the materials used
For proper treatment, recovery and recycling; please take all WEEE marked
Waste to your Local Authority Civic Waste Site, where it will be accepted free of charge.
If customers dispose of Waste Electrical & Electronic Equipment correctly, they
will be helping to save valuable resources and preventing any potential negative effects upon human health and the environment of any brand-virus materials that
checks upon human health and the environment, of any hazardous materials that the waste may contain.
text_image
Labeled diagram of a kitchen appliance with numbered parts for identificationnatural_image
Illustration of a hand holding a small device next to a kitchen grater (no text or symbols visible)natural_image
Line drawing of a manual pump or filter unit with no visible text or symbolsnatural_image
Line drawing of a hand holding a tool next to a small device, no text or symbols presentnatural_image
Line drawing of a hand holding a small object next to a sewing machine (no text or symbols)natural_image
Line drawing of a hand holding a small object next to a speedometer device (no text or symbols)natural_image
Line drawing of a hand holding a small object next to a kitchen grater (no text or symbols)natural_image
Line drawing of a food grater machine with a side arm and bowl (no text or symbols)natural_image
Line drawing of a toaster with control panel and fan (no text or symbols)natural_image
Line drawing of a hand holding a small device next to a manual blender (no text or symbols)text_image
Labeled diagram of a kitchen appliance with numbered parts for identificationGeräteteile
natural_image
Line drawing of a hand using a tool to press or install a small electronic device (no text or symbols present)natural_image
Line drawing of a sewing machine with no visible text or symbolsnatural_image
Line drawing of a hand holding a small object next to a device, no text or symbols presentnatural_image
Illustration of a hand using a manual shaver to interact with a device (no text or symbols present)natural_image
Line drawing of a hand holding a small object next to a device with a handle (no text or symbols)natural_image
Line drawing of a hand holding a small object next to a device with a handle (no text or symbols)natural_image
Line drawing of a food robotic arm with a bowl and spoon, no text or symbols presentnatural_image
Line drawing of a mechanical device with lever and handle (no text or symbols)natural_image
Line drawing of a hand operating a manual pump device with directional arrows (no text or symbols)text_image
Diagram showing exploded view of a portable washing machine with numbered parts for identification.Product Specifications
natural_image
Illustration of a hand holding a cylindrical device next to a small electric shaver (no text or symbols visible)natural_image
Line drawing of a mechanical device with no visible text or symbolsnatural_image
Line drawing of a hand pouring liquid into a blender (no text or symbols)natural_image
Illustration of a hand pressing down on a small mechanical device (no text or symbols present)natural_image
Line drawing of a hand holding a small object next to a kitchen grater (no text or symbols)natural_image
Line drawing of a kitchen grater with a handle and fan (no text or symbols)natural_image
Line drawing of a food processing machine with a bowl and side bowl (no text or symbols)text_image
Technical diagram showing a device with labeled parts and exploded view, including speaker, valve, and pump components.natural_image
Line drawing of a mechanical device with no visible text or symbolstext_image
Labeled diagram of a kitchen appliance with numbered parts for identificationnatural_image
Illustration of a hand using a tool to adjust or install a small electric shaver (no text or symbols visible)natural_image
Line drawing of a sewing machine with no visible text or symbolsnatural_image
Line drawing of a hand holding a tool next to a manual washing machine (no text or symbols)natural_image
Illustration of a hand using a sewing machine to interact with a tool (no text or symbols present)natural_image
Line drawing of a toaster with handle and control panel, showing a hand holding a small object (no text or symbols)natural_image
Line drawing of a hand holding a small object next to a kitchen grater (no text or symbols)natural_image
Line drawing of a food grater machine with a bowl of food being inserted (no text or symbols)text_image
Diagram showing a mechanical device with labeled parts including a funnel, valve, gear, and motor.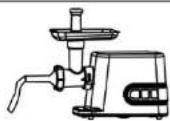
natural_image
Line drawing of a mechanical device with no visible text or symbolsnatural_image
Line drawing of a hand holding a device next to a kitchen appliance, with no visible text or symbols.text_image
Labeled diagram of a kitchen appliance with numbered parts for identificationnatural_image
Line drawing of a hand holding a device next to a portable device (no text or symbols)natural_image
Line drawing of a sewing machine with no visible text or symbolsnatural_image
Line drawing of a hand holding a small object next to a device with a handle (no text or symbols)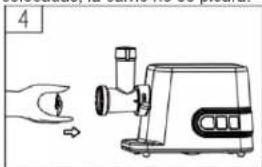
natural_image
Illustration of a hand holding a small object next to a device with a handle, no text or symbols presentnatural_image
Line drawing of a hand holding a small object next to a device, with no visible text or symbolsDURONIC
natural_image
Line drawing of a hand holding a small object next to a device, no text or symbols presentnatural_image
Line drawing of a kitchen grater with a side handle and bowl (no text or symbols)natural_image
Line drawing of a microwave oven with labeled components and exploded view (no text or symbols)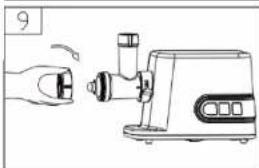
natural_image
Line drawing of a hand holding a small object next to a kitchen grater (no text or symbols)
natural_image
Line drawing of a manual grater with a side arm and control panel (no text or symbols)DURONIC
natural_image
Line drawing of a manual blender with handle and control knob (no text or symbols)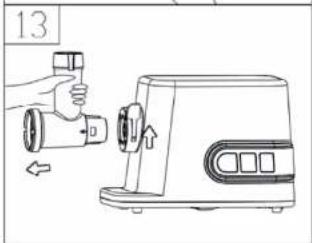
natural_image
Line drawing of a hand operating a sewing machine with a handle and rotary knob (no text or symbols)DURONIC
DURONIC