
TotalPure 7500 - Air purifier CECOTEC - Free user manual and instructions
Find the device manual for free TotalPure 7500 CECOTEC in PDF.
| Brand | Cecotec |
| Model | TotalPure 7500 Connected |
| Product type | Air purifier |
| Power supply | 220-240 V~, 50/60 Hz |
| Power consumption | 60 W |
| Wi-Fi frequency band | 2.4 GHz |
| Maximum Wi-Fi transmission power | 20 dBm |
| Speed levels | Eco, Low, Medium, High |
| Operating modes | Auto, Night, Silent |
| Timer | 1, 4 or 8 hours |
| Air quality indicator | Blue (PM2.5 0-50, Perfect), Green (PM2.5 50-100, Good), Yellow (PM2.5 100-150, Normal), Red (PM2.5 >150, Bad) |
| Child safety system | Yes (key lock) |
| Filters | Pre-filter, High efficiency filter, Activated carbon filter |
| Pre-filter efficiency | Blocks particles up to 2.5 mm (99.9% of large particles) |
| High efficiency filter efficiency | Filters particles up to 0.3 micron (95% of small particles) |
| Activated carbon filter | Filters volatile organic compounds (smoke, polluting gases) |
| Pre-filter cleaning | Washable with water or neutral soap solution |
| Air quality sensor cleaning | Every 2 months with a damp cotton swab |
| Filter replacement | Every 1600 hours (about 1 year in normal use) |
| Minimum distance to wall | 50 cm from air intake, 10 cm from air outlet |
| Connectivity | Wi-Fi 2.4 GHz via EnergySilence app |
| Warranty | 2 years from date of purchase |
Frequently Asked Questions - TotalPure 7500 CECOTEC
User questions about TotalPure 7500 CECOTEC
0 question about this device. Answer the ones you know or ask your own.
Ask a new question about this device
Download the instructions for your Air purifier in PDF format for free! Find your manual TotalPure 7500 - CECOTEC and take your electronic device back in hand. On this page are published all the documents necessary for the use of your device. TotalPure 7500 by CECOTEC.
USER MANUAL TotalPure 7500 CECOTEC
Safety instructions 6
-
Parts and components 30
-
Before use 30
-
Operation 32
-
Cleaning and maintenance 33
-
Connectivity 35
-
Troubleshooting 36
-
Technical specifications 38
-
Disposal of old electrical appliances 38
-
Technical support service and warranty 38
SOMMAIRE
Make sure that the mains voltage matches the voltage stated on the rating label of the appliance and that the wall outlet is grounded.
Check the power cord regularly for visible damage. If the cord is damaged, it must be replaced by the official Technical Support Service of Cecotec in order to avoid any type of danger.
To avoid electric shocks, do not clean with or allow to get inside the product: water, liquid or any flammable substance.
Do not immerse the cord, plug, or any non-removable part of the appliance in water or any other liquid, nor expose the electrical connections to water. Make sure your hands are dry before handling the plug or switching on the appliance.
Switch off the device immediately in the event of defects or malfunctions.
Do not use the device if its cord or any other part is damaged. In this case, contact the official Technical Support Service of Cecotec.
Do not use the device in places where air particles are dense such as kitchens, as this can reduce its service life.
Do not install the device near heat-generating appliances, flammable, dangerous materials, or in places where temperature or humidity levels are high. Do not use it in bathrooms.
This product does not replace normal ventilation or extraction products.
Make sure the product is kept and stored in well-ventilated areas.
The device must be placed so that the plug is accessible.
Do not sit or stand on the device.
Do not use outdoors.
Do not insert fingers or other objects in the air inlet or outlet to prevent injuries and product damage.
Do not twist, bend, strain, or damage the power cord in any way. Protect it from sharp edges and heat sources. Do not let it touch hot surfaces. Do not let the cord hang over the edge of the surface.
Regularly clean the plug with a dry cloth to prevent dust from building up and to avoid product damage.
This appliance cannot be used by children or persons with reduced physical, sensory or mental capabilities or lack of experience and knowledge. Children shall not play with the appliance.
INSTRUCTIONS DE SÉCURITÉ
Verde (PM2.5 = 50 \~100) Bueno
Amarillo (PM2.5 = 100 \~150) Normal
Rojo (PM2.5 = 150 \~ ) Malo
Modo Auto
Fig. 19
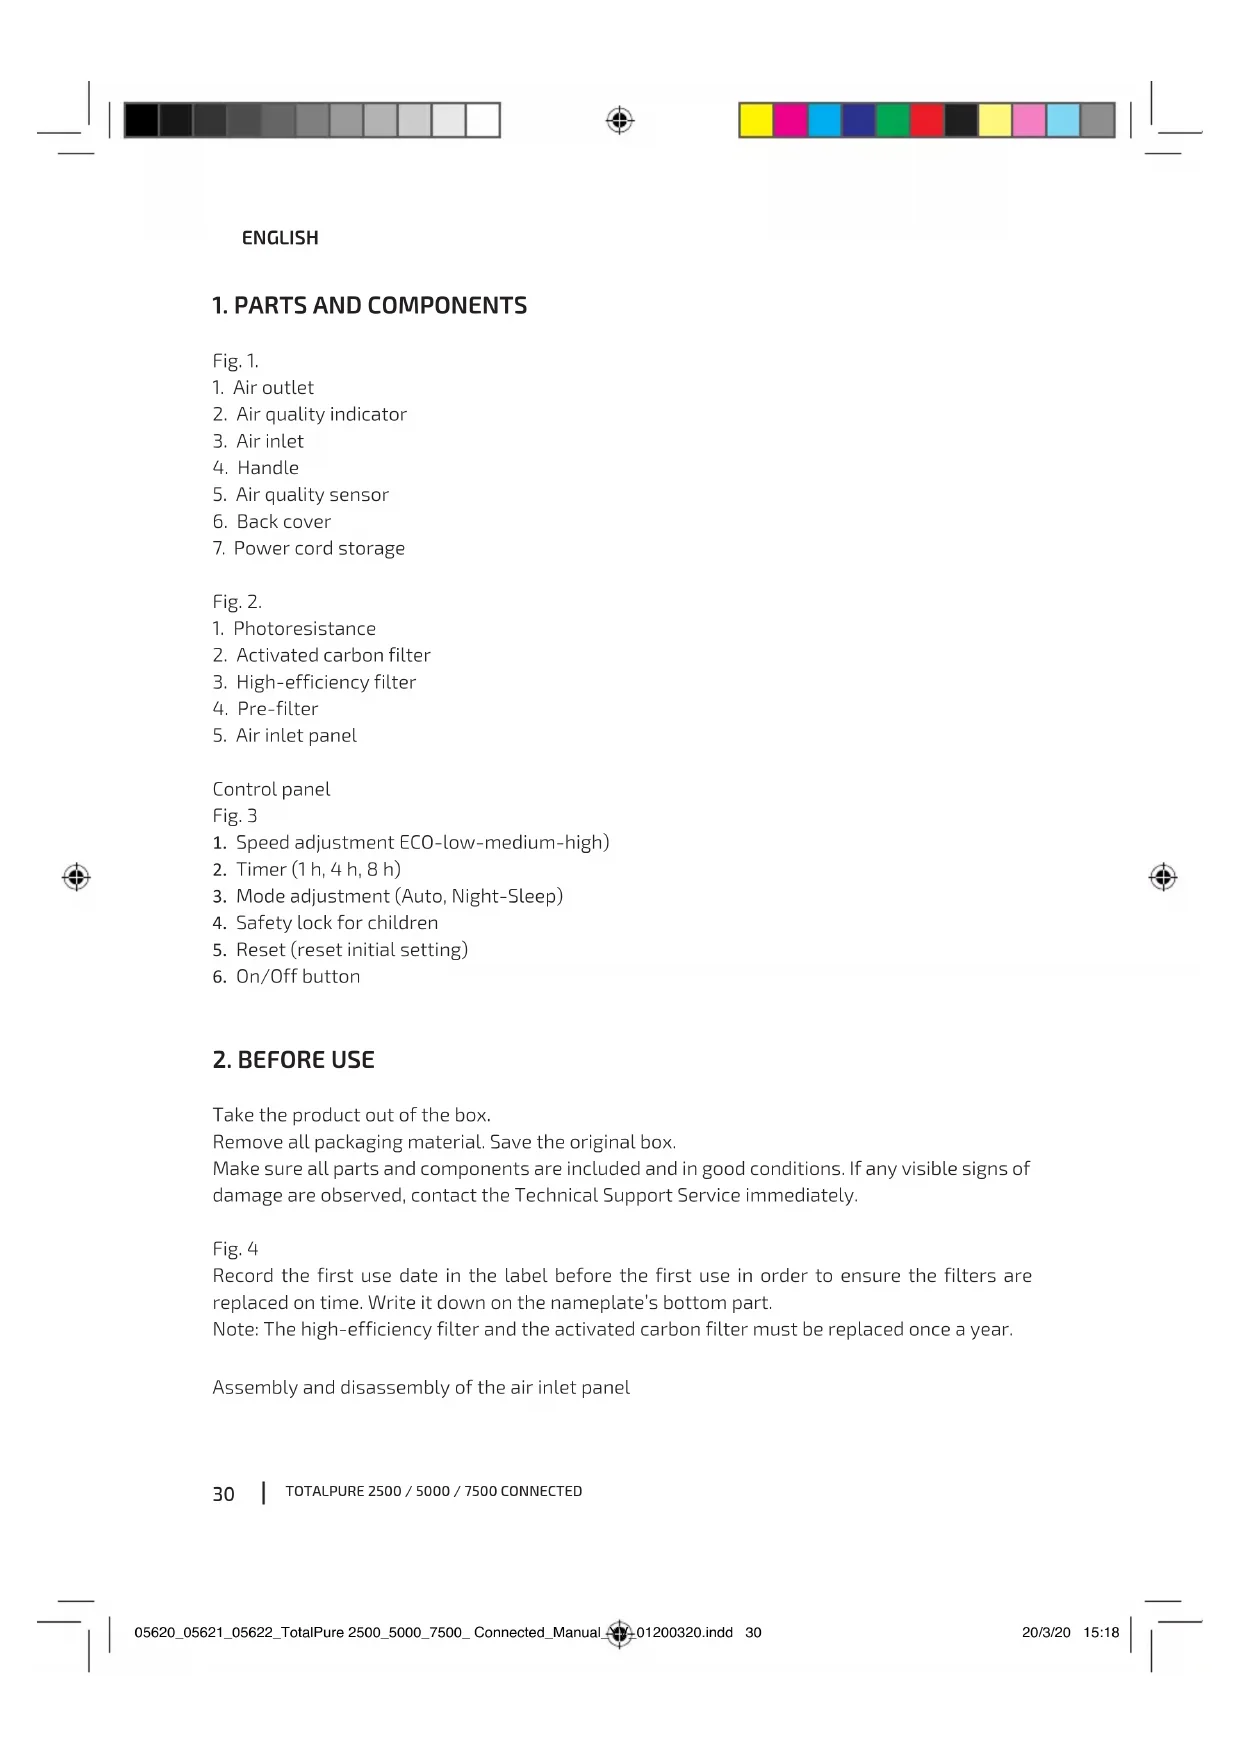
- Air outlet
- Air quality indicator
- Air inlet
- Handle
- Air quality sensor
- Back cover
- Power cord storage
Fig. 2.
- Photoresistance
- Activated carbon filter
- High-efficiency filter
- Pre-filter
- Air inlet panel
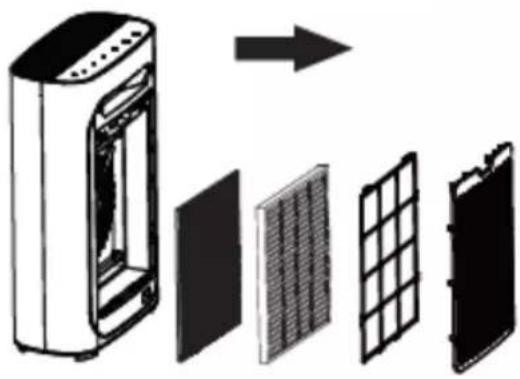
Control panel
Fig. 3
- Speed adjustment ECO-low-medium-high)
- Timer (1 h, 4 h, 8 h)
- Mode adjustment (Auto, Night-Sleep)
- Safety lock for children
- Reset (reset initial setting)
- On/Off button
2. BEFORE USE
Take the product out of the box.
Remove all packaging material. Save the original box.
Make sure all parts and components are included and in good conditions. If any visible signs of damage are observed, contact the Technical Support Service immediately.
Fig. 4
Record the first use date in the label before the first use in order to ensure the filters are replaced on time. Write it down on the nameplate's bottom part.
Note: The high-efficiency filter and the activated carbon filter must be replaced once a year.
Assembly and disassembly of the air inlet panel
ENGLISH
Fig. 5
For disassembling the air inlet panel, press the tabs at both sides of the air inlet panel and pull it up gently.
For assembling the air inlet panel back, repeat the process viceversa.
Fig. 6
Make sure the gap between the air inlet and the wall is at least 50 cm, and 10 cm to the air outlet.
Keep the device 1 meter from any television, radio, etcetera. Otherwise it may cause strong magnetic fields.
Having the device placed in the same spot for a long time may dirty the walls.
To ensure that the device has an adequate ventilation and efficiency, do not cover the air outlet nor inlet.
Fig. 7
Installation of the filter
- Remove all the packages and place the device on a dry and stable surface.
Fig. 8
- For disassembling the filter, press the tabs at both sides of the air inlet panel and pull it up gently.
Fig. 9
- Take out the filters from this purifier.
Fig. 10
- Remove all packages.
Fig. 11
- Install the filters back to its place in order.
Fig. 12
- Install the pre-filter back as seen in the image.
Fig. 13
- Install the air inlet panel back to its place. Fix the filter into the tabs and gently push it. Be careful when installing the front panel.
Fig. 14
Make sure the device is switched off before installation, maintenance and transportation.
Do not operate the air purifier without its filters installed
Remove the plastic package of each filter before operation.
Filters and functions
Fig. 15
Pre-filter
TOTALPURE 2500 / 5000 / 7500 CONNECTED
ENGLISH
Mesh filter that effectively blocks particles of up to 2.5 mm, which are the 99.9% of the dirt accumulated. Preventing larger particles such as pet fur, dander and coarse dust can increase the lifespan of the filter.
High-efficiency filter
It filters small-size particles of up to 0.3 microns, such as pollen, which represents 95% of the dirt.
Activated-carbon filter
Filters volatile organic compounds, such as smoke and different kinds of polluting gases.
Fig. 16
3. OPERATION
Control panel
Fig. 17
Plug the device in. XXXX
Press the On/Off button, the device will start up on Auto mode with the lights on and detect the air quality automatically.
When the device is switched on, the air quality indicator light will flash slowly. It will detect the air quality and start pre-heating after 5 seconds.
Air quality indicator:
Fig. 18
Blue (PM2.5 = 0 \~50) Perfect
Green (PM2.5 = 50 \~100) Good
Yellow (PM2.5 = 100 \~150) Normal
Red (PM2.5 = 150 \~ ) Bad
Auto mode
Fig. 19
Auto mode will detect the air quality automatically and will operate on the most suitable fan speed.
Sleep mode
The device includes a built-in radial sensor which senses the level of luminosity. If the luminosity level is low, all the device's light will be dim and the device will automatically switch to Night-Silent mode.
ENGLISH
Air-speed adjustment
Fig. 20
Air can be selected in low (ECO), medium, medium-high and high speed.
Timer function
Fig. 21
You can select the operating time: press the Timer button once to select 1 hour; press again to select 2 hours; again for 8 hours; and press it again to deactivate this function.
Child lock
Fig. 22
Press and hold for 5 seconds to turn the child-lock function on or off.
Reset (initial settings)
Fig. 23
Reset the device by pressing the reset button for at least five seconds. This function is only available after the reminder to replace the filter.
On/Off button
Press this button to activate or deactivate the air quality indicator (switch on/off the device).
4. CLEANING AND MAINTENANCE
Turn off and unplug the product from the power supply before cleaning or repairing it.
Use a soft, dry (or slightly damp) cloth with some neutral cleaning agent to clean the product's outside and prevent the accumulation of dust and dirt.
If the product is not going to be used for a long time, store it in a safe and well-ventilated place. Do not use detergent, scouring pads, chemically-treated cloths, gasoline, benzene, alcohol, thinner, or other solvents, as these can scratch and damage the tank and cause water leakage. Do not immerse the product in water or any other liquid.
The only filter that can be cleaned with water is the pre-filter.
Clean the air quality sensor every two months to lengthen its lifespan. When the indoor humidity is very high, condensation may occur in the air quality indicator. Even if the air quality is good, the air quality indicator may indicate poor air quality. In this case, clean the air-quality indicator.
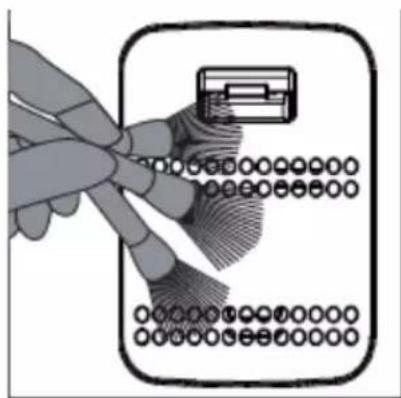
Clean the air quality sensor every two months, at least, to lengthen its lifespan.
- Use a soft brush to clean the air quality sensor inlet and outlet.
Fig. 24
- Remove the protective cover of the air quality sensor.
TOTALPURE 2500 / 5000 / 7500 CONNECTED
ENGLISH
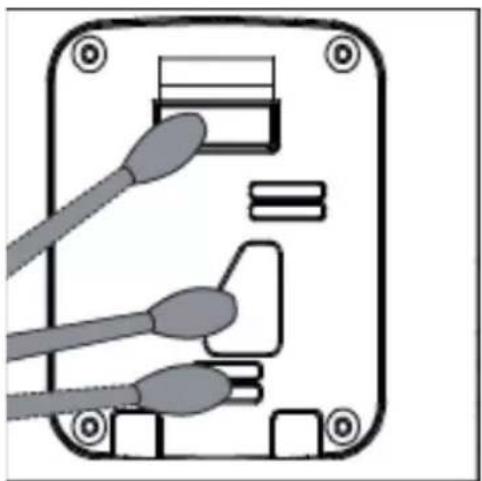
Fig. 25
- Clean gently the air quality sensor inlet and outlet with wet cotton buds.
Fig. 26
-
Dry it with dry cotton buds.
-
Reassemble the air quality sensor's protective cover.
Cleaning of the pre-filter
To achieve the best performance of this filter, clean it every two months or 480 hours.
Clean the pre-filter with a wet cloth or a mild detergent to prevent the accumulation of dust.
The device must be switched off and unplugged when the filter is being cleaned. This is the only filter that can be cleaned.
We recommend you to use the device in low power, preventing the filter from being damaged. Before installing all the filters in the machine, please remove the plastic packaging and make sure that the labels on the filters are outwards.
Steps to follow:
- Switch the device off to stop the air filter.
- Unplug the device.
- Hold on the tabs at both sides of the air inlet panel and pull it outwards. Then, pull it up.
- Remove the protruding part of the mesh filter before cleaning it.
- Use a soft brush or a vacuum cleaner to remove the particles. Use water or soap to clean the filter, then place it into the machine when it is completely dry.
- Install the pre-filter back into the air purifier.
- Reinstall the air inlet panel.
- Plug the device in.
- 9 Turn on the power and start the air purifier.
Replacing filters
After 1600 hours of usage, the power indicator light will flash slowly (in red colour when the device is on standby mode and in blue colour when it is working).
Make sure the device is switched off and unplugged before placing the filter.
Device not used in a long time
Unplug the device (as power consumption happens even if the device is on Standby mode).
Dry the device on the inside, as this may cause malfunctions.
Store the device in a dry ventilated place.
Reference time for replacing the filter
When the total operation time reaches 1600 hours, the device's power indicator will flash at an approximate rate of one flash per second. The power indicator light will be red when the device is on Standby mode and blue when it is operating. The device will still work even after receiving the notification for replacing the filter.
ENGLISH
Replace the filter when its lifespan is over.
After the replacement of the filter, if you notice that the lifespan of the new filter is shortened, change it every six months.
Normally, the filter should be changed once every 12 months.
Make sure the device is unplugged when changing the filter.
5. CONNECTIVITY
1. Downloading the App
Browse the EnergySilence app in Google Play or in the APP Store.
Fig. 27
2. Register
Register in the App by pressing "Create new account", accept the Privacy policy and enter your e-mail account in the next display. After entering the verification code that was sent to the registered e-mail account, enter the password.
Fig. 28
Fig. 29
Fig. 30
Fig. 31
3. Login
To log in press on 'Log in with an existing account' and enter your e-mail account and the registered password.
Fig. 32
Fig. 33
4. Linking the App
Make sure the phone is connected to the Wi-Fi network and the device is on.
To link the App, follow these steps:
Choose the product that you want to link.
Fig. 34
Press the mode button (three horizontal bars) for 5 seconds. The Wi-Fi symbol will flicker in the frontal display.
Enter the Wi-Fi password or change the Wi-Fi network to another one that suits you better.
Note: This device only works with 2.4-GHz networks.
Fig. 35
The linking process will start automatically.
Fig. 36
TOTALPURE 2500 / 5000 / 7500 CONNECTED
ENGLISH
Fig. 37
After pressing "Done", a display will appear where you can start using the product.
Fig. 38
5. Home
From 'My home' you can manage all the devices connected to the application.
Fig. 39
To see the product settings, tap on it and then on the pencil on the right top part.
Fig. 40
Fig. 41
6. Intelligence
From the intelligence section you may manage the settings of your device.
Fig. 42
Fig. 43
Fig. 44
7. Me
From this section you can manage the user profile, your home, see the notifications on the message center, find about the frequent questions and problems. Go to app settings.
Fig. 45

6. TROUBLESHOOTING
| Problem Possible reason Possible solution | ||
| The device does not turn on. | The front panel may not be installed. | Remove the front panel and reinstall it again. |
| The device is not plugged in. Un plug the device and pulg it back again. | ||
| Power plug or wire is damaged. | Contact Cecotec's customer service. | |
ENGLISH
| The device does not turn on. | The device is not turned on. Plug the device in and switch it on again. | |
| The dynamo is damaged. Contact Cecotec's customer service. | ||
| The device is placed on an unstable surface. | Place the device on a stable surface. | |
| Loose or foreign particles inside the device. | Contact Cecotec's customer service. | |
| The motor is loose. Contact Cecotec's customer service. | ||
| The plastic packaging of each filter has not been removed. | Before using the device, remove the plastic pack | |
| The device's performance is lower than usual | The washable mesh filter is dirty. | Clean the device's mesh filter. |
| The filter has not been replaced. | Replace a set of new filters. | |
| The device's air inlet or outlet is blocked. | Contact Cecotec's customer service. | |
| The plastic packaging of each filter has not been removed. | Before using the device, remove the plastic packaging of each filter. | |
| The gap between the device and other objects is not the adequate one. | Make sure the distance between the device and other objects is 50 cm from both sides of the air inlet and outlet, and 10 cm from the back of the device. | |
| The device's filter is missing. Make sure all the filters are installed correctly. | ||
| The device exceeds the adequate covering area. | Make sure the device operates on an adequate covering area. | |
If your problem persists, please contact Cecotec's customer service.
TOTALPURE 2500 / 5000 / 7500 CONNECTED
ENGLISH
7. TECHNICAL SPECIFICATIONS
Product reference: 05620/05621/05622
Product: TotalPure 2500/5000/7500 Connected
Power: 20 W / 30 W / 60 W
Voltage: 220 -240 V\~, 50/60 Hz
Frequency band: 2.4 GHz
Maximum emission power: 20 dBm
8. DISPOSAL OF OLD ELECTRICAL APPLIANCES

The European directive 2012/19/EU on Waste Electrical and Electronic Equipment (WEEE), specifies that old household electrical appliances must not be disposed of with the normal unsorted municipal waste. Old appliances must be collected separately, in order to optimize the recovery and recycling of the materials they contain and reduce the impact on human health and the environment.
The crossed out "wheeled bin" symbol on the product reminds you of your obligation to dispose of the appliance correctly. If the product has a built-in battery or uses batteries, they should be removed from the appliance and disposed of appropriately.
Consumers must contact their local authorities or retailer for information concerning the correct disposal of old appliances and/or their batteries.
9. TECHNICAL SUPPORT SERVICE AND WARRANTY
This product is under warranty for 2 years from the date of purchase, as long as the proof of purchase is submitted, the product is in perfect physical condition, and it has been given proper use, as explained in this instruction manual.
The warranty will not cover the following situations:
The product has been used for purposes other than those intended for it, misused, beaten, exposed to moisture, immersed in liquid or corrosive substances, as well as any other fault attributable to the customer.
The product has been disassembled, modified, or repaired by persons, not authorised by the official Technical Support Service of Cecotec.
Faults deriving from the normal wear and tear of its parts, due to use.
The warranty service covers every manufacturing defects of your appliance for 2 years, based on current legislation, except consumable parts. In the event of misuse, the warranty will not apply.
If at any moment you detect any problem with your product or have any doubt, do not hesitate to contact Cecotec Technical Support Service at +34 963 210 728.
FRANÇAIS
1. PIÈCES ET COMPOSANTS
Img. 1.
Verde (PM2.5 = 50 \~100) Bom
Amarelo (PM2.5 = 100 \~150) Normal
Zelená (PM2.5 = 50 \~100) Dobrá
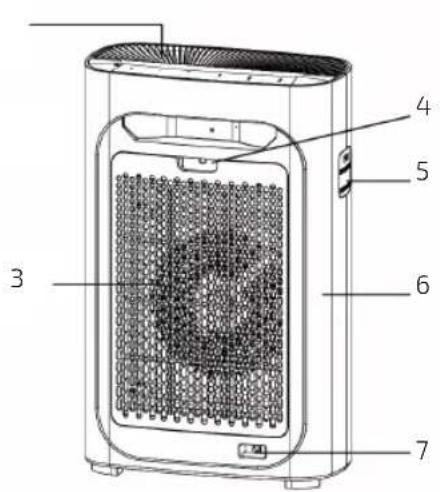
Fig./Img./Abb./Afb./Rys./Obr.1


Fig./Img./Abb./Afb./Rys./Obr.2 *

Fig./Img./Abb./Afb./Rys./Obr. 3


natural_image
Top-down schematic of a vehicle or enclosure with four corner supports (no text or symbols)Fig./Img./Abb./Afb./Rys./Obr. 4


natural_image
Two illustrations of a portable air conditioner unit with arrows indicating process flow (no text or symbols)Fig./Img./Abb./Afb./Rys./Obr. 5


natural_image
Diagram of a device with a door and fan, showing internal components and airflow direction (no text or symbols)
Fig./Img./Abb./Afb./Rys./Obr. 6 Fig./Img./Abb./Afb./Rys./Obr.7


natural_image
Simple line drawing of a rectangular electronic device with a circular button and indicator lights (no text or symbols)Fig./Img./Abb./Afb./Rys./Obr. 8

natural_image
Diagram of a portable electronic device with a black panel and indicator lights, showing airflow direction (no text or symbols)
natural_image
Illustration of a washing machine with hand inserting a fan into the door (no text or symbols)Fig./Img./Abb./Afb./Rys./Obr. 9


natural_image
Diagram showing a device with internal components and an arrow indicating direction (no text or symbols)Fig./Img./Abb./Afb./Rys./Obr. 10

natural_image
3D illustration of a solar panel with mesh insulation and a curved internal structure (no text or symbols)
natural_image
Exploded view diagram of a smart air purifier with internal components (no text or labels)Fig./Img./Abb./Afb./Rys./Obr. 11 Fig./Img./Abb./Afb./Rys./Obr.12


natural_image
Illustration of a portable air purifier unit with ventilation slots and control panel (no text or symbols)
natural_image
Diagram of a washing machine with a door and fan, showing hand placement (no text or symbols)Fig./Img./Abb./Afb./Rys./Obr. 13 Fig./Img./Abb./Afb./Rys./Obr. 14


natural_image
Three-panel diagram showing different types of solar panels: grid, mesh, and grid-patterned (no text or symbols)234
Fig./Img./Abb./Afb./Rys./Obr. 15 (2*)


natural_image
Diagram showing four stages of a solar panel installation: cooling, drying, drying with leaf cover, and drying with particles (no text or symbols)Fig./Img./Abb./Afb./Rys./Obr. 16
natural_image
Close-up of a modern air conditioner fan with heat sink and control buttons (no text or symbols visible)
Fig./Img./Abb./Afb./Rys./Obr. 17 Fig./Img./Abb./Afb./Rys./Obr. 18


AUTO
Fig./Img./Abb./Afb./Rys./Obr. 19

Fig./Img./Abb./Afb./Rys./Obr. 21

Fig./Img./Abb./Afb./Rys./Obr. 20

Fig./Img./Abb./Afb./Rys./Obr. 22

Fig./Img./Abb./Afb./Rys./Obr. 23
natural_image
Illustration of a hand inserting a card into a device (no text or symbols visible)Fig./Img./Abb./Afb./Rys./Obr. 24

natural_image
Line drawing of a handheld electronic device with a scroll and display panel (no text or symbols)Fig./Img./Abb./Afb./Rys./Obr. 25

natural_image
Diagram of an electronic device showing a connector with two cables and a socket (no text or symbols)Fig./Img./Abb./Afb./Rys./Obr. 26

flowchart
graph TD
    A["GET IT ON Google Play"] --> C["EnergySilence"]
    B["Download on the App Store"] --> C
Fig./Img./Abb./Afb./Rys./Obr.27


Quart de Poblet, Valencia (Spain)
YY01200320

- SOMMAIRE
- INSTRUCTIONS DE SÉCURITÉ
- Fig. 2.
- Control panel
- Fig. 3
- BEFORE USE
- Fig. 4
- ENGLISH
- Fig. 5
- Installation of the filter
- OPERATION
- CLEANING AND MAINTENANCE
- Fig. 25
- Fig. 26
- Cleaning of the pre-filter
- Steps to follow:
- Replacing filters
- Device not used in a long time
- Reference time for replacing the filter
- CONNECTIVITY
- Downloading the App
- Register
- Login
- Linking the App
- Fig. 37
- Home
- Intelligence
- Me
- TROUBLESHOOTING
- TECHNICAL SPECIFICATIONS
- DISPOSAL OF OLD ELECTRICAL APPLIANCES
- TECHNICAL SUPPORT SERVICE AND WARRANTY
- PIÈCES ET COMPOSANTS
- Img. 1.
- AUTO
Brand : CECOTEC
Model : TotalPure 7500
Category : Air purifier