
Getto-Vap G40019 - Steamer G3 Ferrari - Free user manual and instructions
Find the device manual for free Getto-Vap G40019 G3 Ferrari in PDF.

User questions about Getto-Vap G40019 G3 Ferrari
0 question about this device. Answer the ones you know or ask your own.
Ask a new question about this device
Download the instructions for your Steamer in PDF format for free! Find your manual Getto-Vap G40019 - G3 Ferrari and take your electronic device back in hand. On this page are published all the documents necessary for the use of your device. Getto-Vap G40019 by G3 Ferrari.
USER MANUAL Getto-Vap G40019 G3 Ferrari
Symbols. p. 2
Safety instructions. p. 9
General information. p. 12
G40019. p. 13
Installation p. 13
Operating. p. 13
Filling the tank. p. 13
Temperature setting. p. 14
Steam ironing. p. 14
Dry ironing. p. 15
Cleaning. p. 15
Before storing. p. 15
Technical features. p. 15
Waste of electric and electronic equipment (WEEE Directive) p. 39
PORTUGUES: p. 15
ESPANOL p. 22
FRANCAIS p. 28
SLOVENSKO p. 35
CLASSI DI PROTEZION/PROTECTION CLASSES
ATTENZIONE RISCHIO DI SCOSSE ELETTRICHE NON ESPORRE A PIOGGIA E UMIDITA'

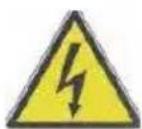
WARNING ELECTRIC SHOCK RISK DO NOT EXPOSE TO RAIN OR MOISTURE

ATTENZIONE: NON APRITE L'APPARECCHIO. ALL'INTERNO NON VI SONO COMANDI MANIPOLABILI DALL'UTENTE NE' PARTI DI RICAMBIO. PER TUTTE LE OPERAZIONI DI SERVIZIO RIVOLGERSI AD UN CENTRO DI ASSISTENZA AUTORIZZATO.
This symbol warns the user that un-insulated dangerous voltage inside the system may cause an electrical shock. Do not open the case.
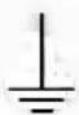
Class I Appliance symbol. This means the appliance must have the chassis connected to electrical earth/ground by an earth conductor.
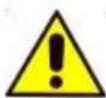
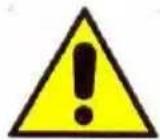
Caution: this symbol reminds the user to read carefully the important operations and maintenance instructions in this owner's guide.
AVVERTENZE DISICUREZZA
ENGLISH: SAFETY INSTRUCTIONS
The following are important notes on the installation, use and maintenance; save this instruction manual for future reference; use the equipment only as specified in this guide; any other use is considered improper and dangerous; therefore, the manufacturer cannot be held responsible in the event of damages caused by improper, incorrect or unreasonable use.
Before use, ensure the equipment is undamaged; if in doubt, do not attempt to use it and contact the authorized service center; do not leave packing materials (i.e. plastic bags, polystyrene foam, nails, staples, etc.) within the reach of children as they are potential sources of danger; always remember that they must be separately collected. Make sure that the rating information given on the technical label are compatible with those of the electricity grid; the installation must be performed according to the
manufacturer's instructions considering the maximum power of the appliance as shown on the label; an incorrect installation may cause damage to people, animals or things, for which the manufacturer cannot be considered responsible thereof.
If it is necessary to use adapters, multiple sockets or electrical extensions, use only those that comply with current safety standards; in any case do not exceed the power consumption limits indicated on the electrical adapter and / or extensions, as well as the maximum power shown on multiple adaptor.
Do not leave the unit plugged; better to remove the plug from the mains when the device is not in use. Always disconnect from power supply if you leave it unattended. Cleaning operations should be carried out after unplugging the unit.
If the unit is out of order and you do not want to fix it, it must be made inoperable by cutting power cord.
- Do not allow the power cord to get closer to sharp objects or in contact with hot surfaces; do not pull it to disconnect the plug.
- Do not use the appliance in the event of damage to the power cord, plug, or in case of short circuits; to repair the product only address an authorized service center.
- Do not handle or touch the appliance with wet hands or bare feet. Do not expose the appliance to harmful weather conditions such as rain, moisture, frost, etc.. Always store it in a dry place.
- Children must not play with the appliance.
- This appliance can be used by children of 8 years and above and persons with reduced physical, sensory or mental capabilities or lack of experience and knowledge if they received supervision or instruction concerning use of the appliance in a safe way and understand hazards involved; children shall not play with the
appliance; cleaning and user maintenance shall not be made by children without supervision.
- Keep the appliance and its cord out of reach of children less than 8 years.
- Not for commercial use. Household use only
- Children must not play with the appliance.
- Keep the appliance and its cord out of reach of children less than 8 years.
If the power cord is damaged, or in case of failure and / or malfunction do not tamper with the unit. The reparation must be done by manufacturer or by service center authorized by the manufacturer in order to prevent any risk. Failure to comply with the above may compromise the unit safety and invalidate the warranty.
WARNING: This appliance includes heating function. Surfaces, other than functional surfaces may develop high temperatures. Since temperatures are perceived differently by different people, this device should be used with CAUTION. Hold the appliance exclusively to grip surfaces intended to be touched.
- The appliance is not intended to be operated by means of an external timer or separate remote-control system.
- This appliance is intended to be used in household an. similar applications such as: staff kitchen areas in shops, offices and other working environments; by clients in hotels, motels and other residential type environments; farm houses, bed and breakfast type environments.
- Before every use, unroll the power cord.
- Use original spare parts and accessories only.
- Do not subject the product to strong impacts, serious damages may result.
- Do not use near or under flammable materials (like curtains), heat, cold spots and steam.
GENERAL INFORMATION
At first use, remove the protective film of the plate; due to the presence of a protective oil and residues left over from the film, the plate could emit some smoke. After few uses, the smoke will disappear.
When using the product for the first time, repeatedly use the steam (away from clothes) and try to use the iron on a worthless piece of cloth to remove any manufacturing residues that may stain or scratch the fabric.
Thoroughly dry the clothes before iron them, do not iron over buttons and zippers.
When not using the ironing system or during breaks, always store the iron on the appropriate insulated rubber placed on tank and make sure it is stable. Do not leave product unattended when the plate is hot.
Keep the cord free from knots and tangles. Do not wrap the power cord around the iron, either before or after use, or place it closer to the iron plate when it is hot.
Do not pull the cord to unplug the unit.
When inside the boiler there is a pressure such as to produce steam, do not screw the cap off. Only when the pressure decreases, the cap can be opened.
CAUTION: if you wish to open the tank, wait few minutes and then unscrew the cap slowly to slowly release the remaining steam from the tank until exhausting
Do not use the ironing system as a heating unit.
Unplug the appliance before you fill or empty the tank.
We recommend the use of distilled water to avoid excessive fouling (not covered by warranty).
Do not fill the tank above the maximum capacity and do not introduce into the tank mixtures for removing stain, vinegar, descaling agents or chemicals in general.
Always select the most suitable temperature according to the fabric to be ironed.
Use the appropriate refill cup to fill the tank of the boiler; do not fill it directly under the tap or with very cold liquids.
After ironing, drain all the water pushing the appropriate release button, empty the tank and wait for the cooling of all parts before storing the system.
CAUTION: the iron plate gets very hot during use, be careful not to touch it, serious risk of burns. Do not put face near the steam coming out the iron plate. For correct boiler closing, press the cap while rotating.
DESCRIPTION G40019
(1) Main unit/boiler (2) Iron power on button and working light
(3) Control light: "Steam ready" (4) Steam control knob
(5) Boiler power on button and working light (6) Steam cord
(7) Power cord (8) Insulating rubber base
(9) Cap Water level control light (10) Iron plate
(11) Temperature control knob (12) Continuous steam button
(13) Steam button (14) Cork iron
(15) Iron cable attachment (16) Iron body
INSTALLATION
Place the ironing system on a stable surface, away from heat sources.
Unscrew the cap (9) and fill the tank using the appropriate dispenser without reaching the maximum capacity of 700cc. On first use, or after the iron has been unused for a long time, it is recommended to expel the steam by pushing the button (12 and 13) for about 20 seconds. This procedure allows to eliminate any working or limestone leftovers. For correct boiler closing, press cap while rotating it.
- Power on the unit by placing the knob (5) to position "1". The button will light up to indicate that the boiler is heating up. CAUTION: when the tank control light (3) goes off, it means that the boiler is ready to produce steam. During normal operation, the light lights on intermittently.
- Turn on the iron by switching the knob (2) to position "1". Adjust the temperature using the control knob (11) according to the fabric to be ironed (see table at page 14). The ironing temperature control light (14), placed on the iron, will light to show when the iron is heating up. CAUTION: when this light goes off, it means that iron has reached the desired temperature. During normal operation, light is intermittent.
- Adjust the quantity of steam using the knob (4). For using the steam, either horizontally or vertically, press the button (13). Use the button (12) to supply continuous steam.

CAUTION: when using the steam, wait for the complete heating of both the iron and the boiler. In the beginning, few drops will come out together with the steam. This is normal and it is due to the heating of the cable connecting the boiler and iron.
CAUTION: do not completely fill the tank of the boiler (max 700cc), since this operation prevents the formation of the steam, causing the loss of water from the iron.
FILLING THE TANK
Use of demineralized water is recommended to avoid excessive fouling (not covered by warranty). The
capacity of the tank is 700cc. It is compulsory filling up the tank when it comes out of water or when the indicator light (3) turns off during use. Follow the steps below for filling the tank:
1) Stop the heating boiler by switching the control knob (5) to position "0".
2) Let the steam comes out from the boiler by pressing the button (13).
To avoid any risk of injury, always eject the steam before opening the cap of the boiler.
3) Remove the plug from the main power outlet and wait until the pressure goes down.
4) Slowly unscrew the boiler cap (9) to release remaining steam and lower the pressure. The air coming out is very hot, be careful and unscrew the cap of the boiler very slowly.
5) Fill in the tank using the cup and the funnel without exceeding the maximum capacity.

CAUTION: do not completely fill the tank of the boiler (max 700cc), since this operation prevents the formation of steam causing the loss of water from the iron.
TEMPERATURE SETTING
The following table provides a guideline on how to adjust the thermostat according to the international symbols printed on the clothing labels or according to the type of fabric.
- It is recommended ironing clothes that require low temperatures first and then medium and high temperatures. This operation allows to save time since the ironing plate heats faster than it cools down. In the case of blend fabric (Ex: Acrylic and cotton), it is recommended to select the temperature according to the fabric that requires the lowest.
- When you do not know the composition, it is recommended to iron a non-visible part of the it, starting from the lowest temperature to find the most suitable temperature.
| LABEL | FABRIC | TEMPERATURE |
| ● | Synthetic (Acrylic, nylon...) | ● Low temperature |
| ●● | silk – wool | ●● Medium temperature |
| ●●● | cotton – linen | ●●● High temperature |
| ●● | Do not iron | |
- Sometimes the clothing becomes shiny, in this case you need to iron it on the inside not to ruin it. When ironing at maximum temperature (MAX), it is recommended to place a cloth between the ironing plate and the fabric.
Setting the temperature
1) Place the iron on the insulated rubber housing above the boiler.
2) Plug the system to the electrical outlet, and switch the power button (6) to "1" position.
3) Select the temperature regulator (11) according to the symbols shown on page 7. The chosen symbol has to be aligned with the mark placed on the body of the iron. The iron plate temperature control light, placed on the side of the iron, shows that the iron plate is warming up. Wait until the light turns off to start ironing.
Caution: While ironing, the control light lights up periodically indicating that the temperature is constant. If you lower the thermostat, do not start ironing until iron temperature control light turns off.
STEAM IRONING
Before using the steam, check the water level first. The steam that the boiler supplies to the iron can be adjusted with the steam control (4). Place the steam control between minimum and maximum depending on the quantity of steam and the temperature selected.
At this point you can use the jet steam or the continuous flow of steam by pushing the proper button (13). It's possible to use the vertical jet of steam; pressing the steam button (13) periodically allows to freshen up curtains, hanging clothes, etc ...
Caution: to avoid the dripping of water, it is recommended to only use steam at high temperatures.
DRY IRONING For dry ironing, switch to "0" the steam flow control knob (4). In this way the steam feature is disabled.
CLEANING - Before cleaning any part of the product, ensure that the unit is unplugged from the electrical outlet, the ironing plate is not hot and that the boiler is turned off.
Any leftovers on the ironing plate can be removed with a damp cloth or with a non-abrasive detergents. Do not scrape the ironing plate with iron sponge or metal objects. The plastic parts can be cleaned with a damp cloth and neutral detergent, then wiped with a dry cloth. Do not immerse the unit in water.
BEFORE STORING
- Turn off the boiler and put the iron on the insulating rubber base.
- Remove the remaining water by pressing the button (13).
- Unplug the system from the outlet. Allow the plate to cool down completely.
- Wrap the power cord around the boiler.
TECHNICAL FEATURES
Power supply: AC 230V~50 Hz. Total power: max 2000W
- Iron power: max 800W. Boiler power: max 1200W
- Safety cap
Tank capacity: 700cc - Pressure: 3 Bar
PORTUGUES: ADVERTÉNCIAS
The product is made of non-biodegradable and potentially polluting substances if not properly disposed of; other parts can be recycled. It's our duty to contribute to the ecological health of the environment following the correct procedures for disposal. The crossed out wheelie bin symbol indicates the product complies with the requirements of the new directives introduced to protect the environment (2002/96/EC, 2003/108/EC, 2002/95/EC, 2012/19/EC) and must be properly disposed at the end of its lifetime. If you need further information, ask for the dedicated waste disposal areas at your place of residence. Who does not dispose of the product as specified in this section shall be liable according to the law.
RESIDUOS DE APARELHIOS ELECTRICOS E ELECTRONICOS
To find the nearest service center, please call the telephone number 0541 694246, fax number 0541 756430 or contact us at assistenzatecnica@trevidea.it asking for the service centers supervisor.
Appliance is conform to the pertinent European regulation and is therefore marked with the CE mark.

www.g3ferrari.it TREVIDEA S.r.l.