
GPS 17 X NMEA 0183 HVS - GPS Receiver GARMIN - Free user manual and instructions
Find the device manual for free GPS 17 X NMEA 0183 HVS GARMIN in PDF.
| Product type | GPS receiver |
| Brand | GARMIN |
| Model | GPS 17 X NMEA 0183 HVS |
| Dimensions | 91,6 mm (diameter) × 49,5 mm (height) |
| Weight | 201 g |
| Housing material | Impact-resistant plastic alloy |
| Waterproof rating | IPX7 (temporary immersion) |
| Temperature range | -30 °C to 80 °C |
| Input power | 8-33 V DC unregulated |
| Input current | 40 mA at 12 V DC |
| GPS accuracy | 10 m (95 %) |
| Differential GPS accuracy (WAAS/EGNOS) | 3-5 m (95 %) |
| Velocity | 0.05 m/s steady state |
| Data interface | NMEA 0183 (Tx/Rx) |
| Number of connectable devices | Up to 3 NMEA 0183 devices |
| Mounting types | Surface, pole (25 mm), under deck (fiberglass) |
| Cable length | Not specified (power/data cable included) |
| Care and cleaning | Clean with a soft, dry cloth. Do not use solvents. |
| Safety | Wear safety glasses and hearing protection during installation. Avoid interference with radar and VHF antennas. |
| Spare parts and repairability | Contact Garmin support or a professional installer. No spare parts specified. |
| General information | User manual included. Online registration recommended at www.garmin.com/registration. |
Frequently Asked Questions - GPS 17 X NMEA 0183 HVS GARMIN
User questions about GPS 17 X NMEA 0183 HVS GARMIN
0 question about this device. Answer the ones you know or ask your own.
Ask a new question about this device
Download the instructions for your GPS Receiver in PDF format for free! Find your manual GPS 17 X NMEA 0183 HVS - GARMIN and take your electronic device back in hand. On this page are published all the documents necessary for the use of your device. GPS 17 X NMEA 0183 HVS by GARMIN.
USER MANUAL GPS 17 X NMEA 0183 HVS GARMIN
GPS 17x NMEA 0183 HVS Installation Instructions
The Garmin GPS 17x NMEA 0183 HVS high-sensitivity GPS antenna provides position information over NMEA 0183. The GPS 17x NMEA 0183 HVS can be connected to a Garmin chartplotter or a NMEA 0183-compliant device.
The GPS 17x antenna must be properly installed according to the following instructions. You need the appropriate fasteners, tools, and mounts listed in each section. These items are available at most marine dealers. Always wear safety goggles, ear protection, and a dust mask when drilling, cutting, or sanding. When drilling or cutting, always check what is on the opposite side of the surface.
If you experience difficulty installing the unit, seek the assistance of a professional installer or contact Garmin Product Support by phone at 913/397.8200 or 800/800.1020. Go to www.garmin.com/support/ for more information. In Europe, contact Garmin (Europe) Ltd. at 44/0870.8501241.
WARNING: See the Important Safety and Product Information guide in the product box for product warnings and other important information.
Product Registration
Help us better support you by completing our online registration at www.garmin.com/ registration/.
For future reference, write the serial number assigned to your GPS 17x in the space provided. It is located on a sticker on the back of the unit.
Serial number
Packing List and Accessories
Before installing your unit, confirm that your package includes the following items. If any parts are missing, contact your Garmin dealer immediately.
Standard Package
GPS 17x Antenna
Surface-mount bracket
- Pole-mount bracket
Under-deck-mount bracket
- Mounting hardware (screws and adhesive pads)
Power/data cable
Installation instructions
Tools Needed
- Drill
- Drill bit—surface-mount pilot-holes (see table)
- Drill bit—3/4 in. (19 mm) pole-mount cable-hole
- Hole saw, 1 in. (25 mm)—surface-mount cable-hole
- Screwdriver—surface mount screws
Center punch and hammer (to mark surface-mount pilot holes) - Countersink bit (when mounting on fiberglass)
- Marine sealant (for some mounting options)
Pilot Hole Size Table
| Material | Material Thickness (in.) | Material Thickness (mm) | Hole Size (in.) | Hole Size (mm) | Hole Size (Drill Number) |
| Aluminum alloy sheet metal | from 1/32 to 5/64 | from 0.76 to 2.03 | .128 | 3.25 | 30 |
| from 3/32 to 3/8 | from 2.28 to 9.52 | .147 | 3.73 | 26 | |
| Fiberglass—all thicknesses | .140 | 3.56 | 28 | ||
| High Density Plastic—all thicknesses | .125 | 3.17 | 1/8 | ||
| Plywood (resin impregnated)—Professional installation recommended | .144 | 3.66 | 27 | ||
Step 1: Mount the GPS 17x Antenna
You can surface mount the GPS 17x antenna, attach it to a standard 1 in. OD pipe-threaded-pole marine mount
(14 threads-per-inch—not included), or even install the antenna under fiberglass.
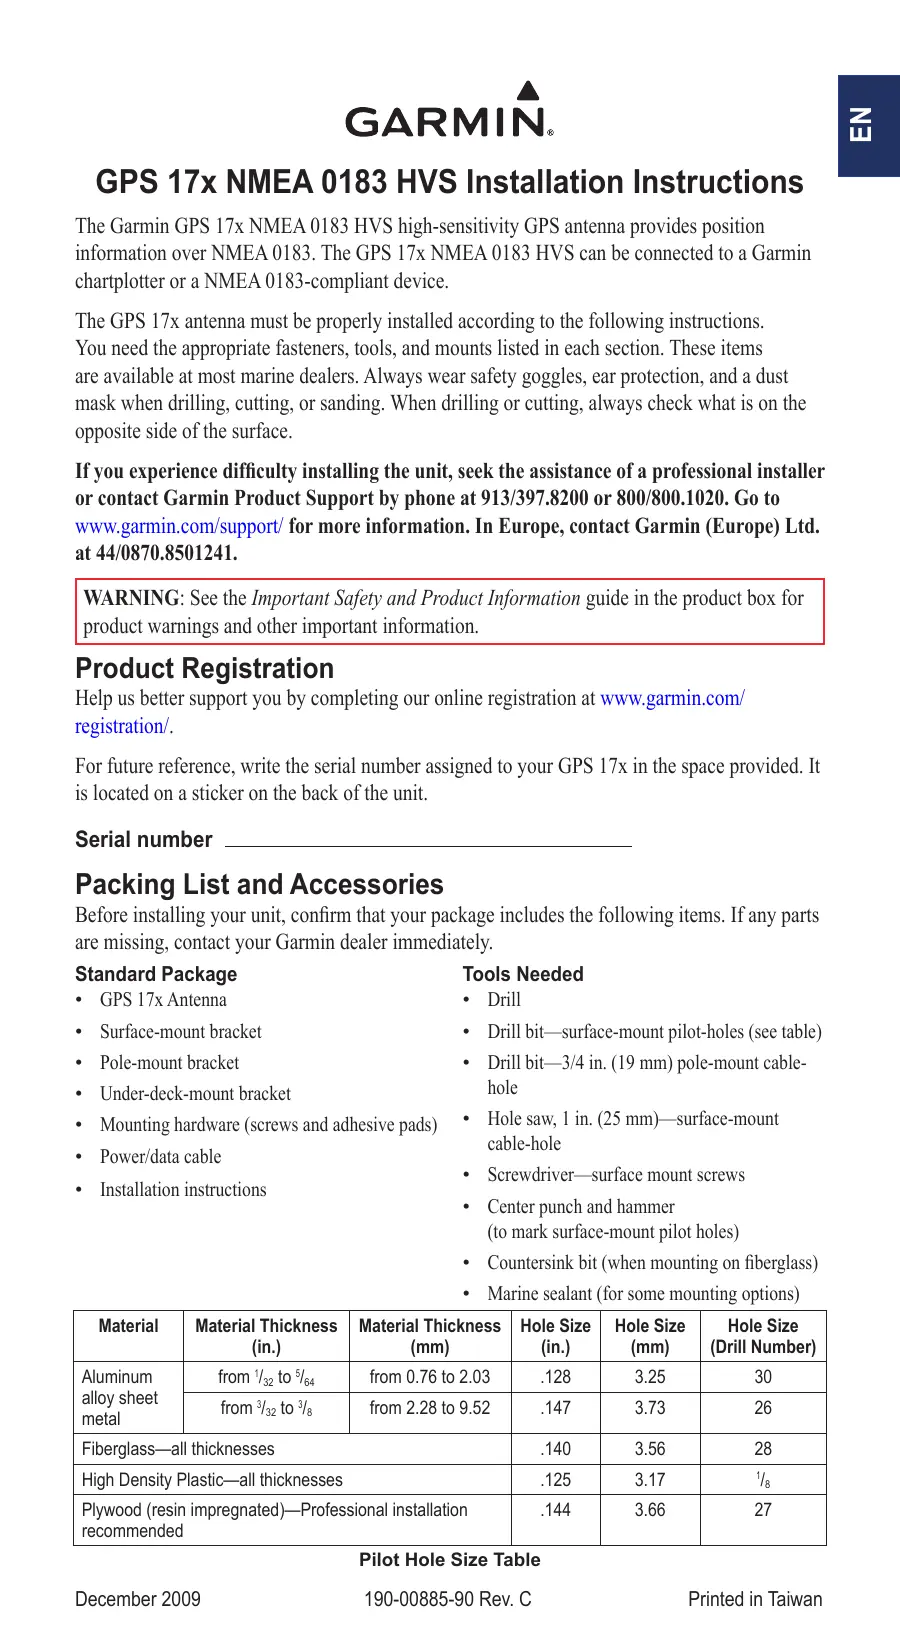
Select a suitable location for the GPS 17x antenna on your boat. To ensure the best reception, mount the GPS 17x antenna in a location that has a clear, unobstructed view of the sky in all directions.
- Avoid mounting the GPS 17x antenna where it is shaded by the superstructure of the boat, a radome antenna, or mast.
- On a sailboat, avoid mounting the GPS 17 × antenna high on the mast, to prevent inaccurate speed readings caused by excessive heeling.
- The GPS 17x antenna provides more-stable readings when located nearer to water level.
- Mount the GPS 17x antenna at least 3 ft. (1 m) away from (preferably above) the path of any radar beam or a VHF radio antenna.
- Temporarily secure the antenna in the preferred mounting location and test it for correct operation. If you experience interference with other electronics, try a different location. When you verify correct operation, permanently mount the antenna.
GPS 17x Placement Considerations
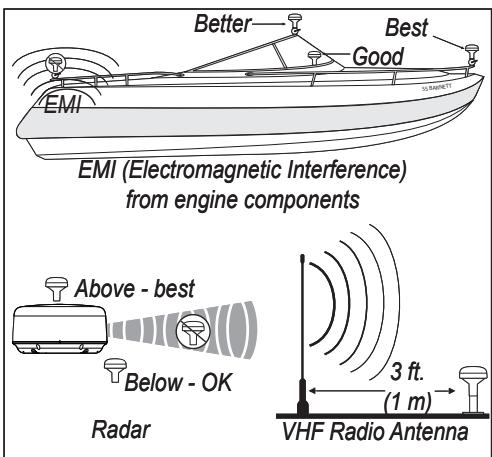
Surface-mounting the GPS 17x Antenna
-
Use the surface-mount bracket as your mounting template.
-
Use the center punch to mark the three screw locations on the surface.
- Use a pencil to trace the cable hole in the center of the bracket.
-
Set the surface-mount bracket aside. Do not drill through the surface-mount bracket.
-
Select the appropriate drill bit for your mounting surface using the drill bit table (page 1), and drill the three pilot holes.

NOTE: If you are mounting the GPS 17x on fiberglass, it is recommended to use a countersink bit to drill a clearance countbore through the top gelcoat layer (but no deeper). This will help to avoid cracking in the gelcoat layer when the screws are tightened.
- Use a 1 in. (25 mm) hole saw to cut the cable hole in the center.
- Place the seal pad on the bottom of the surface-mount bracket. Make sure that the screw holes align.
- Use the included M4 screws to attach the surface-mount bracket to the mounting surface.
- Route the power/data cable through the 1 in. cable hole and connect it to the GPS 17x.
- Make sure the large gasket is in place on the bottom of the GPS 17x antenna, place the antenna on the surface-mount bracket ①, and twist it clockwise to lock it in place ②.
- Secure the antenna to the mounting bracket with the included M3 set screw ③.
- Route the power/data cable away from sources of electronic interference, and connect it to power and a NMEA 0183-compliant device. (Page 4)
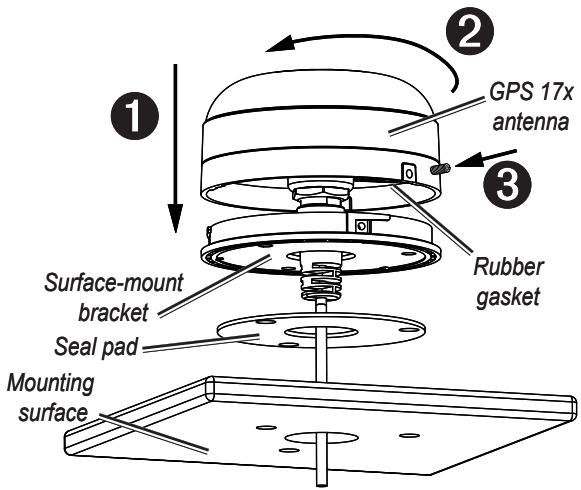
Pole Mounting the GPS 17x Antenna
With the pole-mount adapter attached to the GPS 17x, you can install the GPS 17x on a standard 1 in. OD pipe-threaded-pole marine mount (14 threads per inch—not included). You can run the power/data cable through the pole or outside the pole.
To mount the GPS 17x with the cable run outside the pole:
- Route the power/data drop cable through the pole-mount adapter, and place the cable in the vertical slot along the base of the pole-mount adapter.
- Thread the pole-mount adapter onto a standard 1 in. OD pipe-threaded-pole marine mount (14 threads per inch—not included). Do not overtighten the adapter.
- Connect the power/data drop cable to the GPS 17x antenna.
- Place the GPS 17x antenna on the pole-mount adapter ① and twist it clockwise to lock it in place ②
- Secure the antenna to the adapter with the included M3 set screw ③
- (Optional) With the GPS 17x installed on the pole mount, fill the remaining gap in the vertical cable slot with a marine sealant.
- Attach the marine mount to the boat if it is not already attached.
- Route the cable away from sources of electronic interference, and connect it to power and a NMEA 0183-compliant device (page 4).
To mount the GPS 17x with the cable run through the pole:
- Position a standard 1 in. OD pipe-threaded-pole marine mount (14 threads per inch—not included) in the preferred location, and mark the approximate center of the pole.
- Drill a hole using a 3/4 in. (19 mm) drill bit for the cable to pass through.
- Fasten the marine mount to the boat.
- Thread the pole-mount adapter onto the pole. Do not overtighten the adapter.
- Route the power/data drop cable through the pole and connect it to the GPS 17x antenna.
- Place the GPS 17x antenna on the pole-mount adapter ① and twist it clockwise to lock it in place ②.
- Secure the antenna to the adapter with the included M3 set screw ③.
- (Optional) With the GPS 17x installed on the pole mount, fill the vertical cable slot with a marine sealant.
- Route the cable away from sources of electronic interference, and connect it to power and a NMEA 0183-compliant device (page 4).
Under-deck-mounting the GPS 17x Antenna
The GPS 17x can be mounted under a fiberglass surface with the included adhesive pads. The GPS 17x will not acquire satellite signals through metal--you can only use the under-deck
mount under a fiberglass surface.
- Determine the location on the fiberglass surface where you want to mount the GPS 17x.
- Place the adhesive pads on the underdeck mounting bracket.
- Place the GPS 17x in the under-deck mounting bracket.
- Adhere the under-deck mounting bracket to the mounting surface.
- Secure the under-deck mount to the mounting surface with screws. Use extreme care to ensure that the screws do not penetrate the upper surface of the deck.
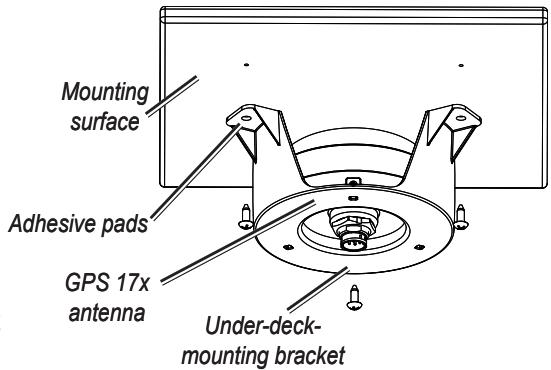
- Connect the power/data cable to the GPS 17x.
- Route the cable away from sources of electronic interference, and connect it to power and a NMEA 0183-compliant device (page 4).
Step 2: Connect the GPS 17x to Power and a NMEA 0183-compliant device
The GPS 17x NMEA 0183 HVS must be connected to power. Use the diagrams to correctly wire the GPS 17x. In the diagrams, Tx = transmit, and Rx = receive.
You can connect up to three NMEA 0183-compliant devices to receive data from one GPS 17x NMEA 0183 HVS antenna.
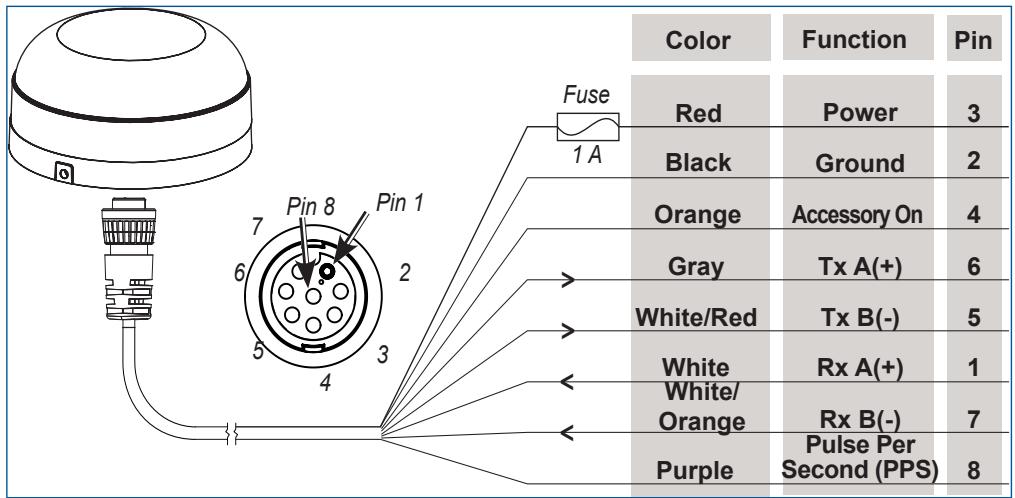
GPS 17x NMEA 0183 HVS Power/Data Cable
Examples
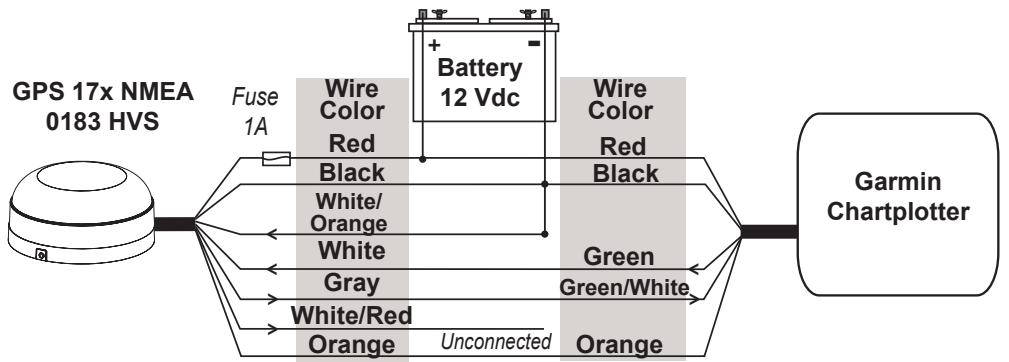
GPS 17x NMEA 0183 HVS Wired to a Garmin Chartplotter
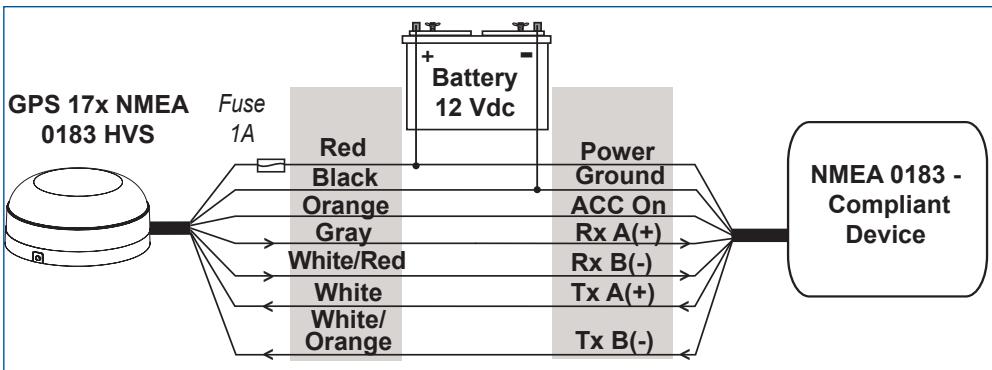
GPS 17x NMEA 0183 HVS Wired for Two-Way Communication
Exceptions:
- If your NMEA 0183-compliant device has only one receiving wire (Rx), connect it to the gray wire (Tx/A) from the GPS 17x antenna, and leave the white/red wire (Tx/B) from the antenna unconnected.
- If your NMEA 0183-compliant device has only one transmitting wire (Tx), connect it to the white wire (Rx/A) from the GPS 17x antenna, and connect the white/orange wire (Rx/B) to ground.

NOTE: The orange (accessory on) wire is used when wiring the GPS 17x to a Garmin chartplotter, or other NMEA 0183 device that has a defined accessory signal wire. If you are wiring the GPS 17x to a device that does not have an accessory signal wire, the orange wire from the GPS 17x should be connected to ground.

CAUTION: If you are wiring the GPS 17x to a device that does not have an accessory signal wire, connect the GPS 17x power wire to the ignition or install an in-line switch. The GPS 17x can drain the battery of the boat if it is not switched.
Step 3: Update Your Chartplotter
To ensure compatibility with the GPS 17x, upgrade your Garmin chartplotter with the latest software. For more information, visit www.garmin.com.
Specifications Physical
Dimensions: 3^19 / 32 in. (91.6mm) Diameter × 1^15 / 16 in. (49.5mm) High
Weight: 7.1 oz. (201 g)
Power/data cable: 30 ft. (9.14m)
Temperature range: -22^ (-30^) to 176^ (80^)
Case Material: Fully gasketed, high-impact plastic alloy, waterproof to IEC 529 IPX7 standards
Accuracy
GPS: <33 ft. (10 m) 95% typical
DGPS: 10-16 ft. (3-5 m) 95% typical (WAAS/EGNOS accuracy.)
Velocity: 0.05 meter/sec steady state
Power
Power input source: 8-33 Vdc unregulated
Input current: 40mA at 12 Vdc
Software License Agreement
BY USING THE GPS 17x, YOU AGREE TO BE BOUND BY THE TERMS AND CONDITIONS OF THE FOLLOWING SOFTWARE LICENSE AGREEMENT. PLEASE READ THIS AGREEMENT CAREFULLY.
Garmin grants you a limited license to use the software embedded in this device (the "Software") in binary executable form in the normal operation of the product. Title, ownership rights, and intellectual property rights in and to the Software remain in Garmin.
You acknowledge that the Software is the property of Garmin and is protected under the United States of America copyright laws and international copyright treaties. You further acknowledge that the structure, organization, and code of the Software are valuable trade secrets of Garmin and that the Software in source code form remains a valuable trade secret of Garmin. You agree not to decompile, disassemble, modify, reverse assemble, reverse engineer, or reduce to human readable form the Software or any part thereof or create any derivative works based on the Software. You agree not to export or re-export the Software to any country in violation of the export control laws of the United States of America.
GARMIN
© 2008-2009 Garmin Ltd. or its subsidiaries
Garmin International, Inc.
1200 East 151^st Street, Olathe, Kansas 66062, USA
Garmin (Europe) Ltd.
Liberty House, Hounsdown Business Park, Southampton, Hampshire, SO40 9LR UK
Garmin Corporation
No. 68, Jangshu 2^nd Road, Sijhih, Taipei County, Taiwan
Garmin International, Inc.
1200 East 151^st Street, Olathe, Kansas 66062, Etats-Unis
Garmin (Europe) Ltd.
Liberty House, Hounsdown Business Park, Southampton, Hampshire, SO40 9LR, Royaume-Uni
Garmin Corporation
No. 68, Jangshu 2^nd Road, Sijhih, Taipei County, Taiwan
GARMIN
Garmin International, Inc.
1200 East 151^st Street, Olathe, Kansas 66062, USA
Garmin (Europe) Ltd.
Liberty House, Hounsdown Business Park, Southampton, Hampshire, SO40 9LR UK
Garmin Corporation
No. 68, Jangshu 2^nd Road, Sijhih, Taipei County, Taiwan
GARMIN
Garmin International, Inc.
1200 East 151^st Street, Olathe, Kansas 66062, USA
Garmin (Europe) Ltd.
Liberty House, Hounsdown Business Park, Southampton, SO40 9LR, Großbritannien.
Garmin Corporation
No. 68, Jangshu 2^nd Road, Sijhih, Taipei County, Taiwan
GARMIN
Instrucciones de instalacion de GPS 17x NMEA 0183 HVS
Garmin International, Inc.
1200 East 151^st Street, Olathe, Kansas 66062, EE.UU.
Garmin (Europe) Ltd.
Liberty House, Hounsdown Business Park, Southampton, Hampshire, SO40 9LR Reino Unido
Garmin Corporation
No. 68, Jangshu 2^nd Road, Sijhih, Taipei County, Taiwan
GARMIN
Garmin International, Inc.
1200 East 151^st Street, Olathe, Kansas 66062, USA
Garmin (Europe) Ltd.
Liberty House, Hounsdown Business Park, Southampton, Hampshire, SO40 9LR, UK
Garmin Corporation
No. 68, Jangshu 2^nd Road, Sijhih, Taipei County, Taiwan
GARMIN
Garmin International, Inc.
1200 East 151^st Street, Olathe, Kansas 66062, USA
Garmin (Europe) Ltd.
Liberty House, Hounsdown Business Park, Southampton, Hampshire, SO40 9LR, Storbritannia
Garmin Corporation
No. 68, Jangshu 2^nd Road, Sijhih, Taipei County, Taiwan
GARMIN
Garmin International, Inc.
1200 East 151^st Street, Olathe, Kansas 66062, USA
Garmin (Europe) Ltd.
Liberty House, Hounsdown Business Park, Southampton, Hampshire, SO40 9LR, Storbritannien
Garmin Corporation
No. 68, Jangshu 2^nd Road, Sijhih, Taipei County, Taiwan
www.garmin.com
- GPS 17x NMEA 0183 HVS Installation Instructions
- Product Registration
- Serial number
- Packing List and Accessories
- Standard Package
- Tools Needed
- Step 1: Mount the GPS 17x Antenna
- Surface-mounting the GPS 17x Antenna
- Pole Mounting the GPS 17x Antenna
- To mount the GPS 17x with the cable run outside the pole:
- To mount the GPS 17x with the cable run through the pole:
- Under-deck-mounting the GPS 17x Antenna
- Step 2: Connect the GPS 17x to Power and a NMEA 0183-compliant device
- Examples
- Exceptions:
- Step 3: Update Your Chartplotter
- Specifications Physical
- Accuracy
- Power
- Software License Agreement
- GARMIN
- Instrucciones de instalacion de GPS 17x NMEA 0183 HVS
Brand : GARMIN
Model : GPS 17 X NMEA 0183 HVS
Category : GPS Receiver