
HDL 1400 - Pressure washer Orbegozo - Free user manual and instructions
Find the device manual for free HDL 1400 Orbegozo in PDF.

| Product type | High pressure cleaner |
| Brand | Orbegozo |
| Model | HDL 1400 |
| Power supply | 220-240 V ~ 50 Hz |
| Rated power | 1400 W |
| Automatic shut-off | Yes (motor only runs when trigger is pressed) |
| Safety lock | Yes, on the gun |
| Adjustable nozzle | Yes (flat spray to straight jet) |
| Detergent tank | Yes, removable |
| Cleaning needle included | Yes |
| Water inlet filter | Yes, removable and cleanable |
| Lubrication system | Sealed (no oil addition needed) |
| Usage | Domestic |
| Compliance | Low Voltage Directive 2014/35/EU and EMC Directive 2014/30/EU |
| Warranty | Legal (in compliance with applicable legislation) |
| After-sales service | Authorized technical service (www.orbegozo.com) |
| Included accessories | Lance, gun, adjustable nozzle, detergent tank, cleaning needle, high pressure hose, quick connector with filter |
| Storage temperature | Above 0 °C |
| Spare parts | Use original parts recommended by the manufacturer |
Frequently Asked Questions - HDL 1400 Orbegozo
User questions about HDL 1400 Orbegozo
0 question about this device. Answer the ones you know or ask your own.
Ask a new question about this device
Download the instructions for your Pressure washer in PDF format for free! Find your manual HDL 1400 - Orbegozo and take your electronic device back in hand. On this page are published all the documents necessary for the use of your device. HDL 1400 by Orbegozo.
USER MANUAL HDL 1400 Orbegozo
natural_image
Yellow and black blue Bluysa 800 water heater with coiled cable (no visible text or symbols)HDL 1400
Sonifer, S.A.
natural_image
Simple line icon of an open book with a lowercase 'i' in the center, no text or symbols present.Read this manual carefully before running this appliance and save it for reference in order to obtain the best results and ensure safe use.
MONTAJE
Paso 1
natural_image
Technical line drawing of a mechanical assembly with arrows indicating components (no text or symbols)Paso 2
natural_image
Technical line drawing of a handheld device with internal components and a separate connector (no text or symbols)Paso 5
natural_image
Line drawing of a handheld electric shock absorber with attached cable (no text or symbols)Paso 6
natural_image
Line drawing of a pressure water heater with attached hoses and wheels (no text or symbols)Paso 7
natural_image
Technical line drawing of a mechanical assembly with hoses and components (no text or symbols)INSTRUCCIONES
natural_image
Line drawing of a hand holding a pen tip into a cylindrical device (no text or symbols)USO DEL DEPÓSITO DE DETERGENTE
natural_image
Diagram showing two methods of a water spray bottle, one using a dropper and the other with a coiled tube (no text or symbols present)Paso 3
natural_image
Technical line drawing of a spray gun and its internal mechanism, showing motion sequence (no text or symbols)IMPORTANT SAFETY PRECAUTIONS
When using electrical devices it is necessary to observe safety precautions both, for the product purchased and for the user.
-
This appliance can be used by children aged from 8 years and above and persons with reduced physical, sensory or mental capabilities or lack of experience and knowledge if they have been given supervision or instruction concerning use of the appliance in a safe way and understand the hazards involved. Children must never play with the appliance. Cleaning and user maintenance must never be carried out by children without supervision.
-
Children should be supervised to ensure that they do not play with the appliance.
-
Keep the appliance and the cable cord out of the reach of children less than 8 years old.
-
WARNING: In order to ensure your children's safety, please keep all packaging (plastic bags, boxes, polystyrene etc.) out of their reach.
-
If the supply cord is damaged it must be repaired by the Authorized Service Agent in order to avoid hazards.
-
Never pull on the cord when unplugging.
-
Do not use the unit with a damaged cord or plug, or if it is not working properly.
- Do not handle the appliance with wet hands.
- Never immerse the appliance in water or any other liquid.
- Make sure the appliance has been unplugged before cleaning.
- This appliance must be installed following the national regulations for electrical installations.
- This appliance is for household use only.
- In case that you need a copy of the instruction manual, you can find it in www.orbegozo.com.
-
WARNING: In case of misuse, there is a risk of possible injury.
-
Do not use to vacuum water.
- Do not leave vacuum cleaner when plugged in. Unplug from outlet when no use and before servicing.
- Connect the appliance only if the installation and power point have a capacity of 16A. It is recommended that before starting the motor, you adjust the power to the minimum position and increase it to the desired power setting once the motor is in operation.
- After removing the packaging, check the condition of the product. In the event of any doubt or query,
- Use only as described in this manual. Use only manufacturers recommend attachments.
- Do not put any object into openings. Do not use with any opening blocked. Keep free of dust, lint, hair and anything that may reduce airflow.
- Keep hair, loose clothing, fingers and all parts of body away from openings and moving parts.
- Use extra care when cleaning on stairs.
- Do not use to pick up flammable or combustible liquids, such as gasoline, or use in areas where they may be present.
- Do not pick up anything that is burning or smoking, such as cigarettes, matches, or hot ashes.
WARNING!
- High pressure jets can be dangerous if misused. The jet must not be directed at people, live electrical equipment or the device itself.
- Do not direct the jet towards yourself or others in order to clean clothes or shoes.
- High-pressure cleaners must not be used by children or untrained personnel.
- High-pressure hoses, fittings and couplings are important for the safety of the appliance. Use only hoses, fittings and couplings recommended by the manufacturer.
- To ensure the safety of the appliance, use only spare parts from the manufacturer or those approved by the manufacturer.
• Water that has flowed through backflow preventers is considered undrinkable.
- Do not use the appliance if a power cord or important parts of the appliance are damaged, eg safety devices, high pressure hoses, trigger gun.
- Improper extension cords can be dangerous. If an extension cord is used, it must be suitable for outdoor use, and the connection must be kept dry and off the ground. It is recommended that this be achieved by means of a cable reel that keeps the base at least 60mm above the ground.
- Remove the plug from the outlet during cleaning or maintenance and when replacing parts.
- To reduce the risk of injury from kickback, hold the spray wand securely and firmly with both hands.
- Stay Alert – Always be aware of where you are directing the high pressure spray.
- Keep the cleaning area clear of people.
- Maintain good footing and balance at all times. Do not overreach or stand on an unstable surface.
- The work area must have adequate drainage to reduce the possibility of a fall due to slippery surfaces.
- To reduce the risk of electrocution, keep all connections dry and off the ground.
- Do not touch the plug with wet hands.
- The hose can develop leaks due to wear, abuse, kinking, etc. Do not use a damaged hose.
- Do not use pressure washer in areas near combustible materials, combustible vapors, or dust.
- Before operating the pressure washer in cold weather, check all parts of the equipment and make sure that no ice has formed.
- Do not store the unit in any place where the temperature falls below 0^ C .
- Keep the hose connected to the apparatus until the system is pressurized. Disconnecting the hose while the unit is pressurized is dangerous and can cause injury.
- Do not leave the pressure washer unattended while the power switch is in the ON position.
- Never operate the pressure washer without a water supply. Doing so will cause irreparable damage to the unit.
- Make sure the water supply you use is not dirty, gritty, and does not contain any corrosive chemicals.
- Never move the unit by pulling on the hose. Use the handle.
- When dispensing detergent, apply it to the cleaning area at low pressure.
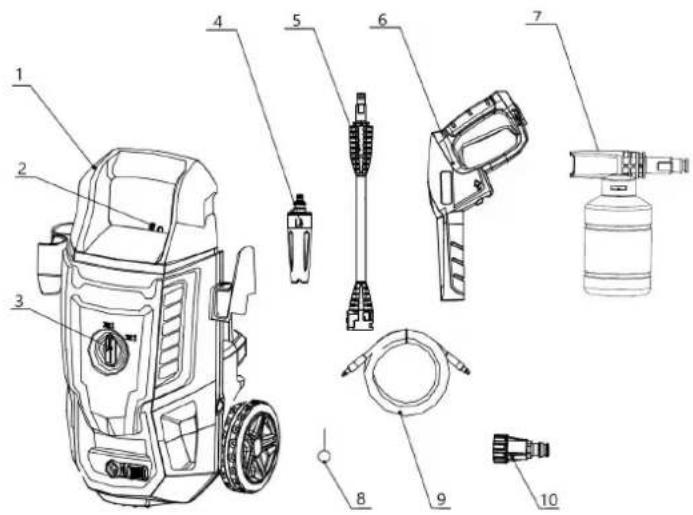
Pressure washer parts
- Handle
- Switch
- Adjustable nozzle
- Throw
- Gun
- Detergent tank
- Cleaning needle
- High pressure hose
- Quick water inlet connector with filter
- Support accessories
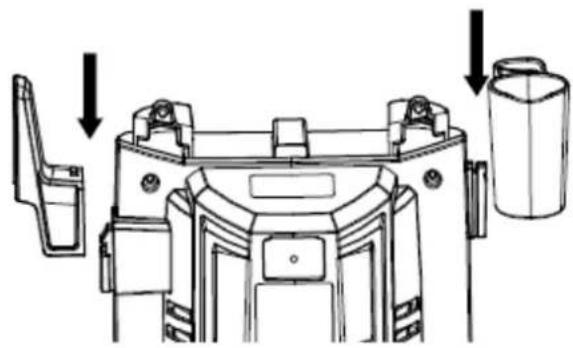
MOUNTING
Step 1
Install the gun holder and power cord hook
natural_image
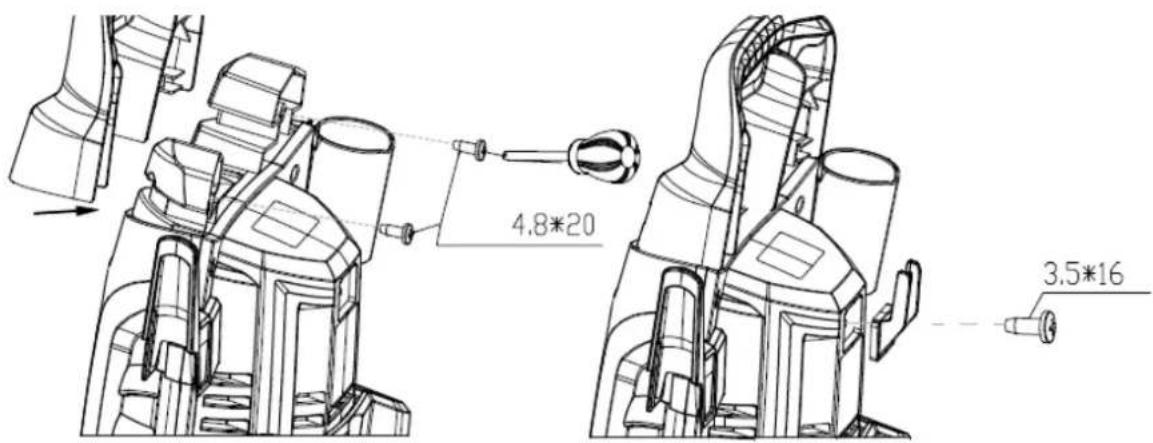
Technical line drawing of a mechanical assembly with arrows indicating components (no text or symbols)Step 2
Screw the handle and accessory holder firmly to the main body as shown in the picture.
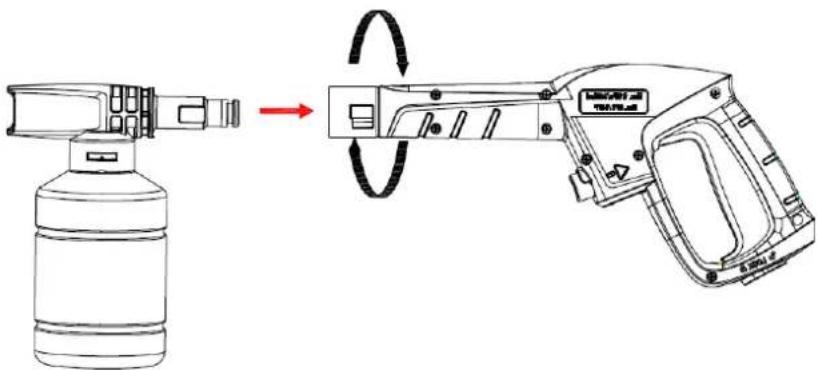
Step 3
Insert the lance into the gun. Push in and turn clockwise to lock in place. When the pieces are joined correctly, you cannot separate the two components by pulling them out.
Step 4
Insert the adjustable nozzle into the lance, push hard until it locks. When the pieces fit together correctly, they cannot be pulled apart.
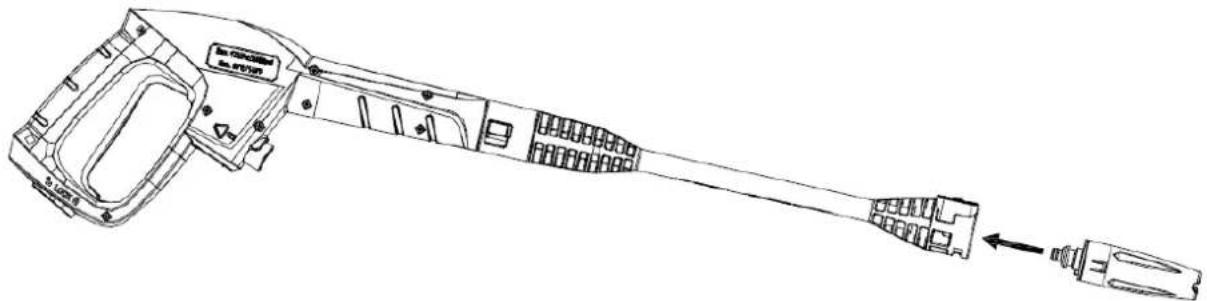
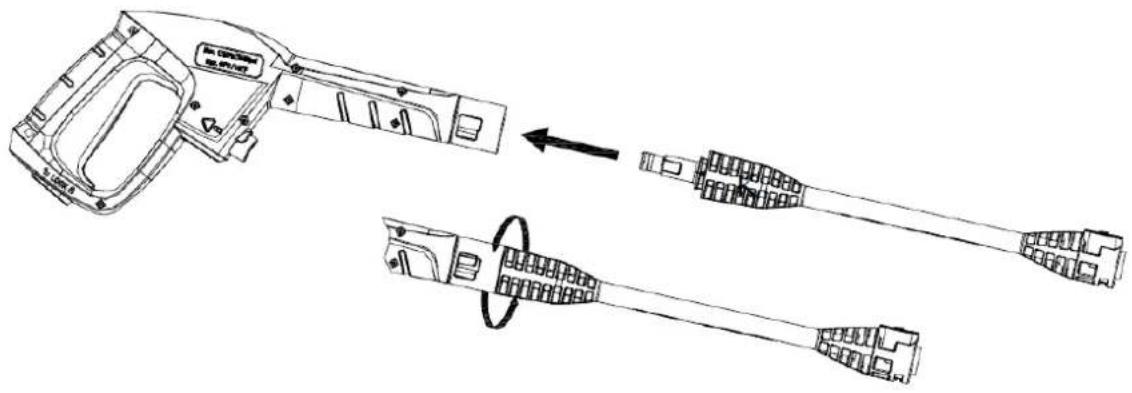
Step 5
Connect the hose to the gun. Insert it until you hear a click, pull down to check that it is well attached.
natural_image
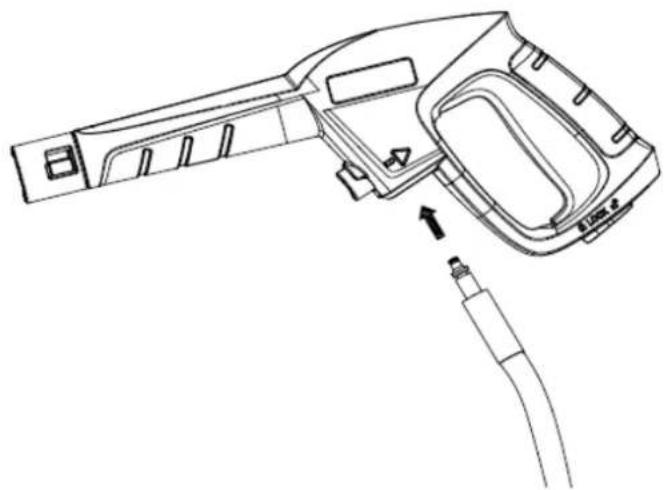
Line drawing of a handheld electric shock absorber with attached cable (no text or symbols)Step 6
Connect the hose to the water outlet. Insert it until you hear a click, pull down to check that it is well attached.
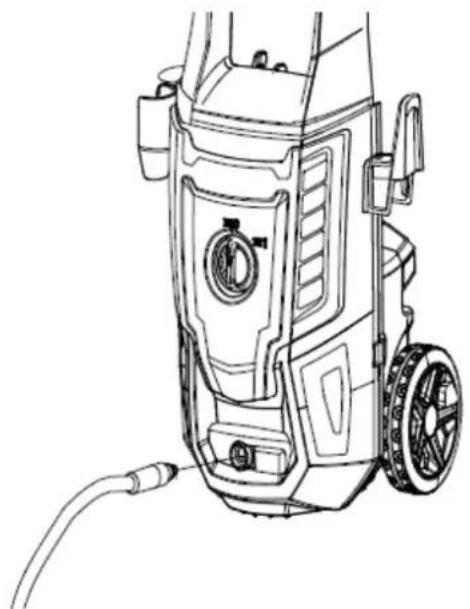
natural_image
Line drawing of a portable water heater with attached hoses and wheels (no text or symbols)Step 7
Screw the quick connector with filter into the water inlet of the pressure washer Before screwing the connector to the male union, remove the plastic cap that is inserted for transport. This plastic cap can be disposed of once removed. After both components have been installed, connect the garden hose with a quick connector suitable for the hose you are going to use. Connect the hose to the fauce
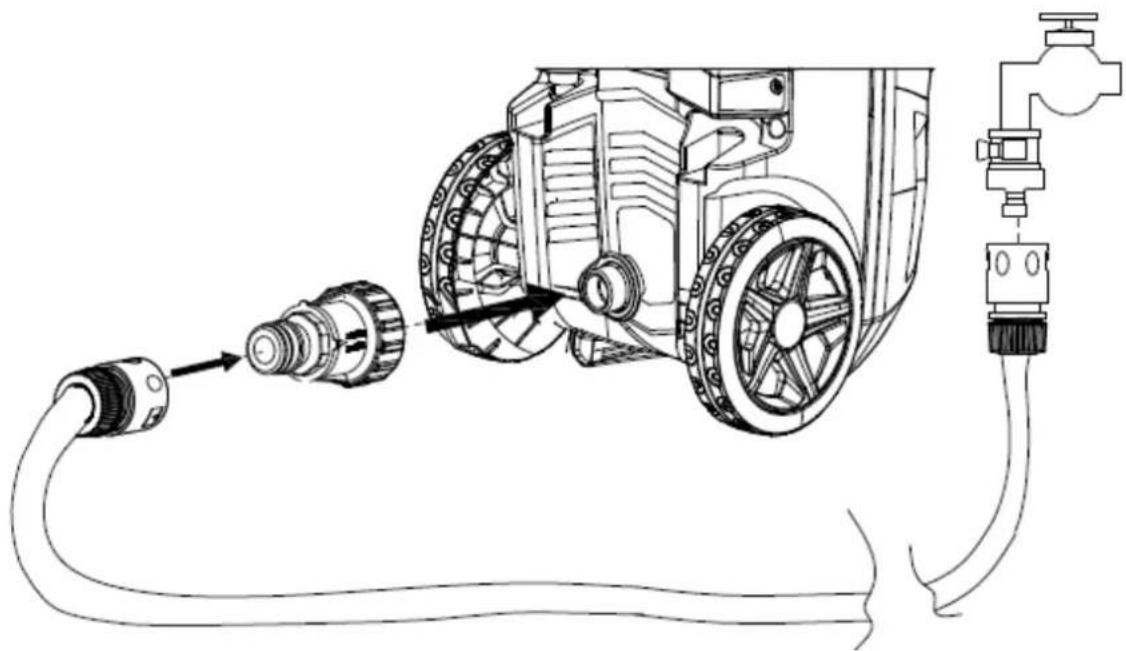
natural_image
Technical line drawing of a mechanical assembly with hoses and components (no text or symbols)INSTRUCTIONS
After connecting the appliance to the water outlet, follow the instructions
- Make sure the switch is off
-
Connect the hose
-
Connect the gun, the lance and the nozzle as it appears in the instructions.
- open the water
- Before turning on the appliance, press the trigger to release any air remaining in the hose and the pump
- Turn on the switch and pull the trigger. Remember, the motor does not run continuously, only when the trigger is pulled.
WARNING: RISK OF DAMAGE! The unit will begin to spray when the trigger is pulled.
When turning off the unit after use, there is still high pressure inside the hose and unit. Point the gun in a safe direction and release excess pressure. NEVER direct the high pressure water jet towards people or animals.
AUTO ON/OFF
The pressure washer is equipped with an automatic on/off switch. The pressure washer will only operate when the power switch is in the ON position and the gun trigger is pulled. When you release the trigger to stop spraying water through the gun, the motor will automatically shut off. Just squeeze the trigger again to continue using the cleaner. To release the pressure washer, release the trigger and turn the switch to the OFF position. The unit must be completely OFF when not in use or while unattended.
PURGE THE GUN
It is very important to purge the gun before using the pressure washer. To do this, simply connect the hose to the pressure washer and squeeze the trigger BEFORE turning on the power. This allows trapped air to be removed from within the pressure washer and gun prior to using the unit. Continue holding the trigger for about a minute to allow excess air to escape from the unit. Water will flow through the gun during this procedure.
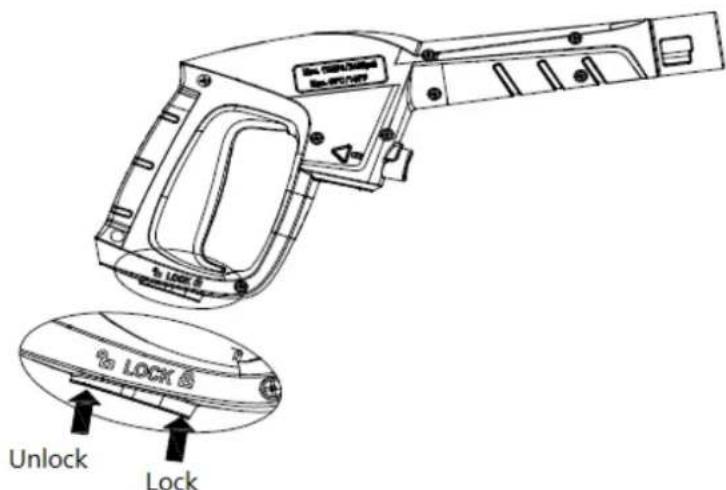
SAFETY LOCK FOR THE GUN
This pressure washer is equipped with a gun trigger safety lock. When the pressure washer is not in use, use the safety lock to avoid accidentally activating the high pressure spray.
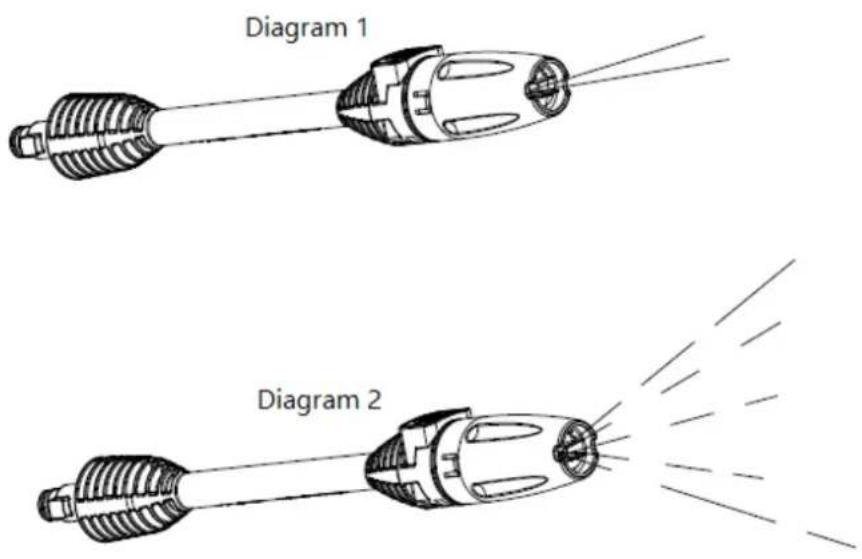
ADJUSTABLE SPRAY TIP
The adjustable nozzle will allow you to use any variety of spray patterns from a full fan spray (Diagram 1) to a straight stream spray (Diagram 2). When using the pressure washer to clean wood, decking, siding, vehicles etc., always start using the fan spray and start spraying from a minimum of 1m away to avoid damaging the surface of the material being cleaned. Always start by cleaning in a free test area clear of people and objects.
- Warning: High pressure jets can be dangerous if misused. The jet must not be directed at people, live electrical equipment or the appliance itself.
- Do not direct the jet towards yourself or towards other people to clean clothes or shoes.
UNLOCK SPEAR
When the nozzle is clogged it will cause the pump to build up pressure and can cause the unit to overload. You can clean the nozzle by inserting the provided needle into the tip to remove clogging. For the adjustable nozzle, you can lubricate the neck of the nozzle using non-water soluble grease.
natural_image
Line drawing of a hand holding a small cylindrical object with a pointed tip, next to a cylindrical device (no text or symbols)USING THE DETERGENT TANK
Use biodegradable detergents; they are specifically formulated to protect the environment and your pressure washer. These detergents will not clog the filter and will protect the internal parts of the pressure washer for longer life.
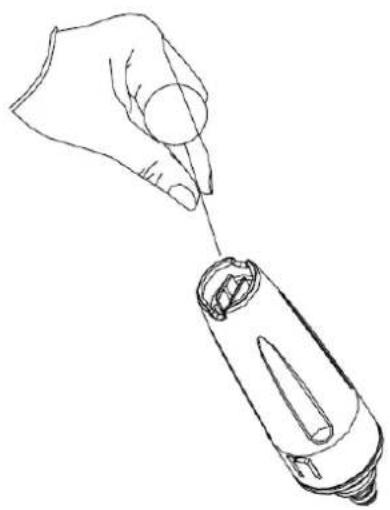
Step 1
Separate the nozzle from the detergent container by turning clockwise and separating the two parts.

Step 2
Fill the detergent container. Pour the detergent slowly into the tank using a funnel. Reinsert the nozzle into the reservoir and turn clockwise.
natural_image
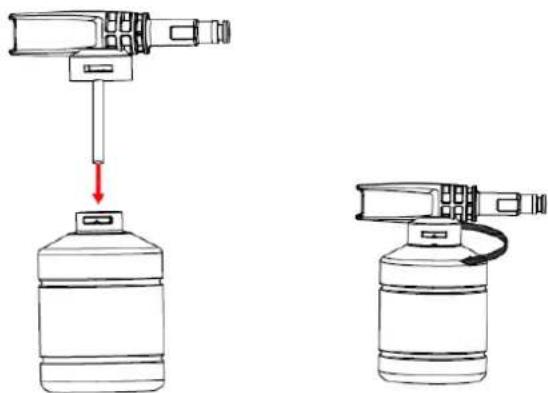
Diagram showing two laboratory gas collection apparatus setups with a water bottle and a syringe (no text or labels)Step 3
Connect the nozzle with detergent tank to the gun. Turn the switch on the pressure washer to the ON position. Squeeze trigger to turn unit on. The pressure washer will mix the detergent with water. Do not let the detergent dry on the item you are cleaning.
WARNING: never use products with bleach, chlorine or any other corrosive material, including liquids containing solvents (ie gas, oils, etc.), tri-sodium phosphate, ammonia or acid-based products. These chemicals will damage the unit and cause damage to the surface being cleaned.
CLEANING AND STORAGE
When you are finished using the pressure washer, follow these steps to put it away:
- Put the switch in the OFF position.
- Close the water supply.
- Before disconnecting the hose, point the gun in a safe direction and discharge any remaining water.
- Disconnect hose, pressure washer, and gun.
- Disconnect the hose from the water supply.
- Remove excess water from the pump by tilting the unit on both sides to drain remaining water from the inlet and outlet fittings.
- Remove the water inlet filter and rinse it with water to remove any dirt or debris. Replace the filter once clean.
- Empty the detergent tank and rinse it with clean water.
- Clean any remaining water from all parts and accessories.
- Activate the gun safety lock.
- Store the pressure washer, parts and accessories in an area with a temperature above 0^ (32°F).
MAINTENANCE
- This pressure washer is supplied with a closed lubrication system, so it is not necessary to add oil.
- Check all hoses and fittings for damage before use.
- Periodically check the inlet filter for deposits. Clean this filter regularly for maximum performance.
CLEANING TIPS
WARNING: ALWAYS TEST THE WATER JET IN A FREE AREA CLEAR OF PERSONS AND OBJECTS BEFORE SPRAYING ON THE INTENDED CLEANING SURFACE.
Wood and vinyl decking
Rinse the cover and the surrounding area with clean water. If you are using detergent, fill the detergent tank and apply it to the area being cleaned at low pressure. For best results, reduce your work area to smaller sections and clean each section one at a time. Let the detergent sit on the surface for a few minutes, then rinse with high pressure. DO NOT
ALLOW THE DETERGENT TO DRY ON THE SURFACE. Always wipe from left to right and top to bottom for best results. Rinse at high pressure with the fan spray keeping the tip of the spray nozzle a minimum of 15cm to 25cm from the cleaning surface. Keep a greater distance from the cleaning area when using a direct spray. Caution: For softer woods, increase the distance from the cleaning area.
Cement, Stone and Brick Patios
Rinse the area with clean water. If you are using detergent, fill the reservoir and apply it to the area being cleaned at low pressure. High pressure rinse using a fan spray in a sweeping motion keeping the tip of the nozzle a minimum of 15cm to 25cm from the cleaning surface. Keep a greater distance from the cleaning area when using a direct spray.
Cars, Boats and Motorcycles
Rinse with clean water. If using detergent, fill reservoir and apply to area being cleaned at low pressure. For best results, clean one side at a time. Let the detergent sit on the surface for a few minutes, but don't let it dry. High pressure rinse using the fan jet in a sweeping motion keeping the nozzle at least 20cm from the cleaning surface. Keep a greater distance from the cleaning area when using a direct spray. Dry the surface to obtain an optimal finish.
Barbecue grills, electrical equipment and garden tools
Rinse with fresh water. If you use detergent, fill the tank and apply it to the area being cleaned at low pressure. Let the detergent sit on the surface for a few minutes, but do not let the detergent dry out. High pressure rinse at a minimum distance of 3cm to 8cm from the cleaning surface. Keep a greater distance from the cleaning area when using a direct spray.
TROUBLESHOOTING TIPS
THE SWITCH IS IN THE "I" POSITION AND THE MACHINE DOES NOT START
| CAUSE | POSSIBLE SOLUTION |
| The power socket is faulty | Check the plug, power socket and fuses |
| The voltage is inadequate | Check if the voltage is adequate |
| The power cord is not plugged in | Plug in the power cord |
THE PUMP DOES NOT REACH THE PROPER PRESSURE OR FLUCTUATES
| CAUSE | POSSIBLE SOLUTION |
| The water inlet filter is clogged | Remove and clean the filter |
| Pump sucks air | Tighten connections/bleed system |
| Suction valves are clogged or worn | Clean or replace valves |
| Garden hose diameter too small | Replace with 34 -inch garden hose |
| The water supply is restricted | Check that the hose is not kinked or leaking |
| Insufficient water supply | Water source fully open |
THE PRESSURE WASHER DOES NOT HAVE OR DOES NOT MAINTAIN PRESSURE
| CAUSE | POSSIBLE SOLUTION |
| Excess air in water line and pump | Turn off unit and water supply/Purge System/Hold Trigger |
PRESSURE WASHER MAKES EXCESSIVE NOISE
| CAUSE | POSSIBLE SOLUTION |
| Intake is blocked | Check intake valves |
| Valves are worn, dirty, or clogged | Check, clean, or replace valves |
| The filter is dirty | Check, clean or replace the filter |
MOTOR STOPS WORKING WHILE IN USE
| CAUSE | POSSIBLE SOLUTION |
| Input voltage lower than necessary | Check if the voltage is adequate |
DISPOSAL OF OLD ELECTRICAL APPLIANCES
The European directive 2012/19/EU on Waste Electrical and Electronic Equipment (WEEE), requires that old household electrical appliances must not be disposed of in the normal unsorted municipal waste stream. Old appliances must be collected separately in order to optimize the recovery and recycling of the materials they contain, and reduce the impact on human health and the environment. The crossed out "wheeled bin" symbol on the product reminds you of your obligation, that when you dispose of the appliance, it must be separately collected. Consumers should contact their local authority or retailer for information concerning the correct disposal of their old appliance.
DECLARATION OF CONFORMITY:
This device complies with the requirements of the Low Voltage Directive 2014/35/EU and the requirements of the EMC directive 2014/30/EU.
GUARANTEE
This appliance is covered and is entitled to the legal guarantee in accordance with the legislation in force from the date of purchase. Keep the purchase receipt to be able to claim your right to the guarantee. To find the closest service to your location, contact through the following web link: https://orbegozo.com/asistencia-tecnica/
For any type of query, doubt or incident, you can contact us through our email shown on the main page of this manual or through our technical assistance service at https://orbegozo.com/contacto/
Orbegozo is not responsible for components and accessories that are subject to wear and tear due to use, as well as perishable compounds or those that have deteriorated due to improper use. Nor will it be held responsible if the owner has technically modified the device. Check the legal conditions on our website.
RÈGLES DE FONCTIONNEMENT
MONTAGE
Étape 1
natural_image
Technical line drawing of a mechanical assembly with arrows indicating components (no text or symbols)Étape 2
Étape 4
natural_image
Line drawing of a mechanical device with internal components and a separate connector (no text or symbols)Étape 5
natural_image
Line drawing of a handheld electric shock absorber with attached cable (no text or symbols)Étape 6
natural_image
Line drawing of a portable water heater with attached hoses and a coiled cable (no text or symbols)Étape 7
natural_image
Technical line drawing of a mechanical assembly with hoses and components (no text or symbols)INSTRUCTIONS
natural_image
Line drawing of a hand holding a pen tip above a cylindrical object (no text or symbols)UTILISATION DU RÉSERVOIR DE DÉTERGENT
natural_image
Diagram showing two methods of a water spray bottle being injected from a sensor, with no text or symbols present.Étape 3
MONTAGEM
Passo 1
natural_image
Technical line drawing of a mechanical assembly with no visible text or symbolsPasso 2
natural_image
Technical line drawing of a mechanical device with internal components and a separate connector (no text or symbols)Passo 5
natural_image
Line drawing of a handheld electric shock absorber with attached cable (no text or symbols)Passo 6
natural_image
Line drawing of a portable water heater with attached hoses and control panel (no text or symbols)Passo 7
natural_image
Technical line drawing of a mechanical assembly with hoses and components (no text or symbols)INSTRUÇÕES
natural_image
Line drawing of a hand holding a small cylindrical object with a pointed tip, next to a cylindrical device (no text or symbols)UTILIZAR O DEPÓSITO DE DETERGENTE
natural_image
Diagram showing two laboratory apparatus setups with a water bottle and a gas collection device (no text or labels)Passo 3
natural_image
Line drawing of a gas gun with a syringe and a handheld device, showing a circular motion arrow (no text or symbols)MUNTATGE
Pas 1
natural_image
Technical line drawing of a mechanical assembly with no visible text or symbolsPas 2
Pas 4