Black200A Mini - Surveillance Camera BRAUN - Free user manual and instructions
Find the device manual for free Black200A Mini BRAUN in PDF.
User questions about Black200A Mini BRAUN
0 question about this device. Answer the ones you know or ask your own.
Ask a new question about this device
Download the instructions for your Surveillance Camera in PDF format for free! Find your manual Black200A Mini - BRAUN and take your electronic device back in hand. On this page are published all the documents necessary for the use of your device. Black200A Mini by BRAUN.
USER MANUAL Black200A Mini BRAUN
text_image
1915 - 2015 BRAUN® PHOTO TECHNIKtext_image
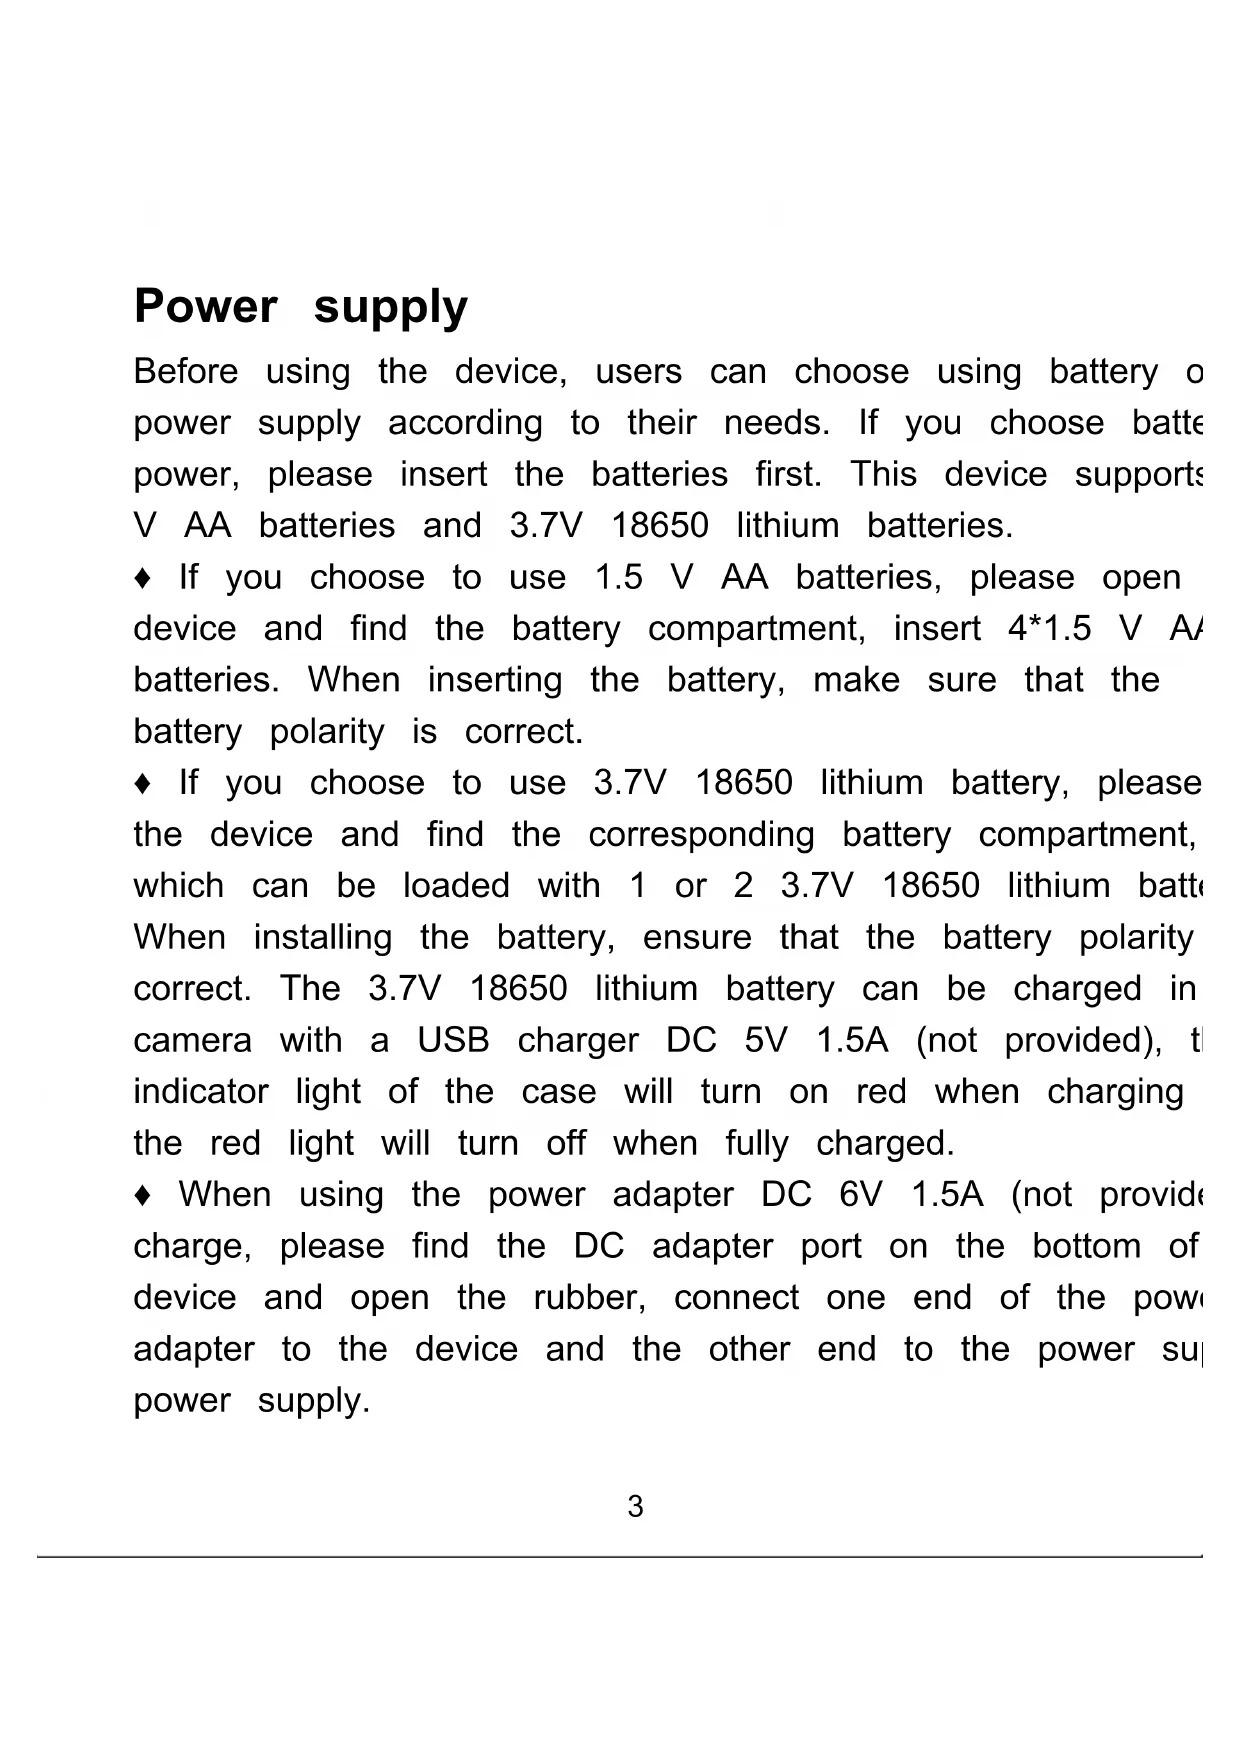
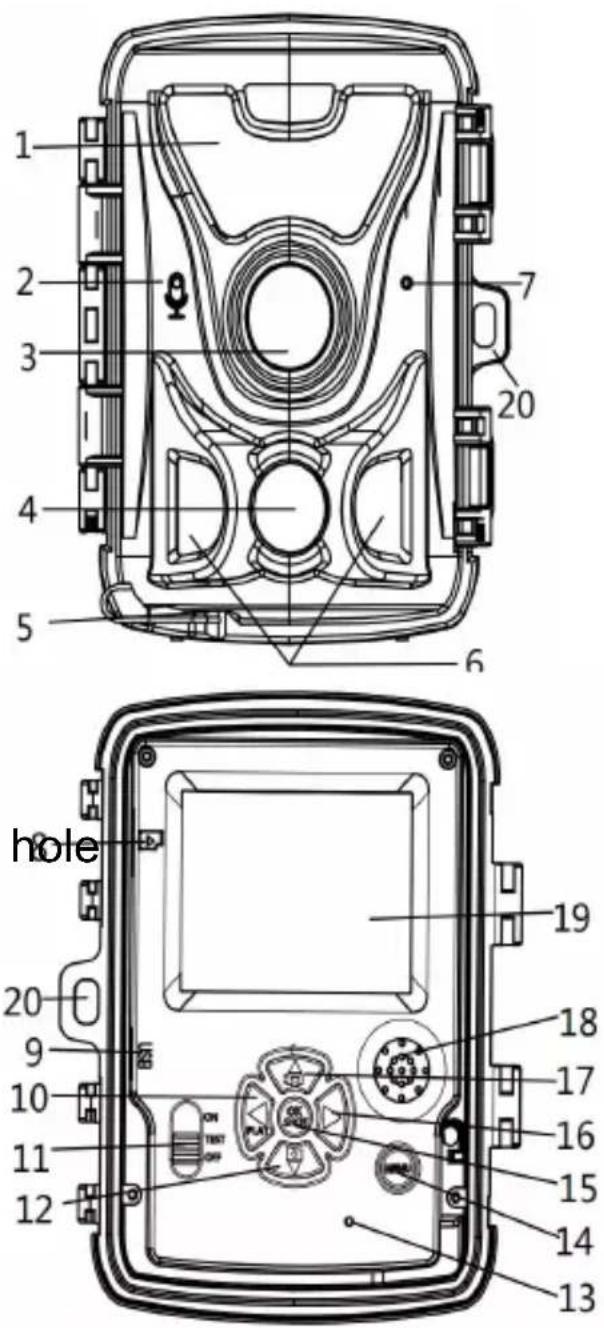
Technical diagram of a device casing with numbered components for identification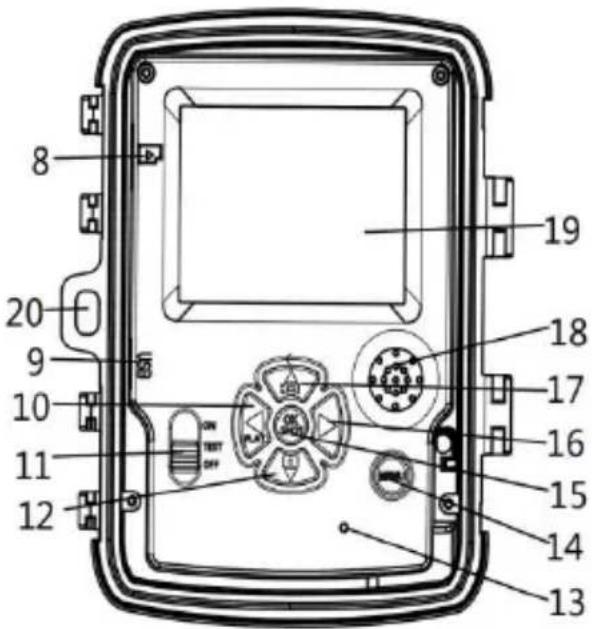
text_image
8 20 9 10 11 12 13 14 15 16 17 18 19text_image
Labeled diagram of a mechanical device with numbered components, likely for assembly or maintenance instructions.- IR LED
- Microphone
- Lens
- Front motion sensor
- DC adapter port
- Side motion sensor
- Indicator light
- Micro SD card slot
-
USB-C jack
-
Left/playback button
-
ON-TEST-OFF switch
-
Down/Capture Button
-
Optional alarm matching
-
Menu Button
-
OK/Shot button
-
Right button
-
Up/Video Button
-
Speaker
-
Display screen
-
Lock hole
Power supply
Before using the device, users can choose using battery of power supply according to their needs. If you choose battery power, please insert the batteries first. This device supports V AA batteries and 3.7V 18650 lithium batteries.
If you choose to use 1.5 V AA batteries, please open device and find the battery compartment, insert 4*1.5 V AA batteries. When inserting the battery, make sure that the battery polarity is correct.
If you choose to use 3.7V 18650 lithium battery, please the device and find the corresponding battery compartment, which can be loaded with 1 or 2 3.7V 18650 lithium battery. When installing the battery, ensure that the battery polarity correct. The 3.7V 18650 lithium battery can be charged in camera with a USB charger DC 5V 1.5A (not provided), the indicator light of the case will turn on red when charging the red light will turn off when fully charged.
When using the power adapter DC 6V 1.5A (not provide charge, please find the DC adapter port on the bottom of device and open the rubber, connect one end of the power adapter to the device and the other end to the power supply power supply.
Inserting the memory card
Please prepare a micro SD card and insert it into the card for saving files. Before recording, please format the memory card first.
◆ Supports micro SD card up to 512GB. Using class 6 o higher speed card is recommended.
◆ To avoid malfunction, the memory card should be far away from water, strong vibration, dust, hot source and direct sunlight.
- Do not insert the memory card forcibly. Please refer to marking on the camera.
For the first time use, please wait for the memory card temperature reach the ambient temperature. The camera will be short-circuit influenced by environment temperature and humidity. Please notice protection for the camera when using outdoor.
◆ If the capacity of memory card is full, the camera will recording automatically if endless capture function is turned off.
◆ Press the edge of the card gently to pop-out the micro card.
Basic operation
Turn the camera on and off
Switch the Mode switch to “Test/On” to turn on the camera. After power on, it will pop up the battery type selection in 1.5V alkaline battery/3.7V lithium battery, press the up and down keys to select the corresponding battery, press the (C) button to confirm.
Switch the Mode switch to "Off" to turn off the camera.
System setup
Switch Mode switch to “Test”, then you can set the system parameters.
- Press Menu button to open the setup menu.
- Press Up/Down button to navigate through all menu. The press OK button to enter the options interface.
- Press Up/Down button to navigate through all options. F OK button to confirm options.
- Press Menu button again to turn back to last menu or setup menu.
Mode
Set the working mode. In photo mode, the camera just ta pictures. In Video mode, the camera just records video. In photo&video mode, the camera will take a photo first, then to record video.
Options : 【Photo】/【Video】/【Photo&Video】.
Photo resolution
Set the still image resolution.
Options : 【20MP(6144x3456P)】/【16MP(5376x3024P)】/
Set the photo number of continuous shooting. In photo mc the camera will take photos continuously.
Options : 【1 photo】/【2 photos in series】/【3 photos in series】/【10 photos in series】.
Video resolution
Set the video resolution. The higher the resolution, the shot the video duration that can be stored, and vice versa.
Options : 【1920x1080P】/【1280x720P】/【848x480P】/【720x480P】/【640x480P】/【320x240P】.
TL video resolution
Set the resolution of time lapse video.
Options: 【8MP(3840x2160P)】/【5MP (3072x1728P)【3MP(2304x1296P)】.
Video length
Set the duration of recording a video clip. The shortest tir seconds and the longest time is 10 minutes.
Options : 3 seconds\~10 minutes.
Audio recording
The camera can record audio when recording video.
Options : 【On】/【Off】.
Shot lag
Set the time of shooting delay when the camera detects motion. In the selected time, the camera will not record a image or video. This function can avoid to store too much same event and save more capacity.
Options : 5 seconds\~60 minutes.
Sensitivity motion sensors
Set the sensitivity of the sensor. Environmental impact is in indoors, you can choose “Low”. In outdoor, choose “Middle” normal condition. Choose “High” if the environment impacts big outdoors. The temperature can also influence the sensor sensitivity. “High Sensitivity” applies to mild environment. “Low Sensitivity” applies to cold environment.
Options : 【Low】/【Middle】/【High】.
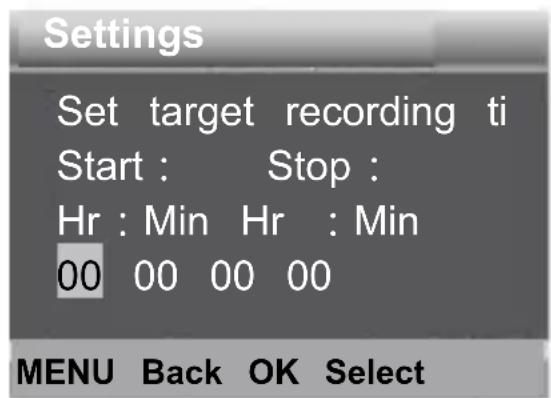
Target recording time
Set the target recording time. It shown in below picture, you can the start and stop time. The c will work just in the stated time. In other time, the camera will in standby state.
Options : 【On】/【Off】.
Target recording time 2
Set the second target recording time. .
Options : 【On】/【Off】.
text_image
Settings Set target recording ti Start : Stop : Hr : Min Hr : Min 00 00 00 00 MENU Back OK Select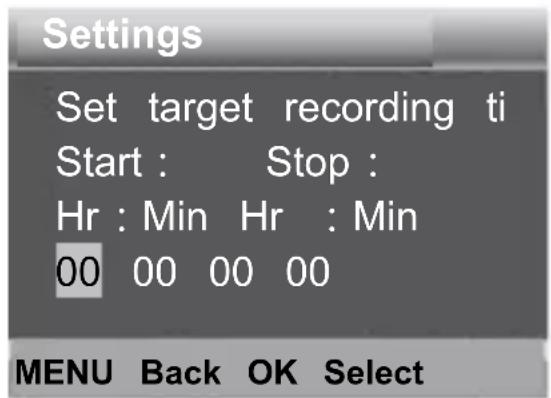
text_image
Settings Set target recording ti Start : Stop : Hr : Min Hr : Min 00 00 00 00 MENU Back OK SelectTime lapse
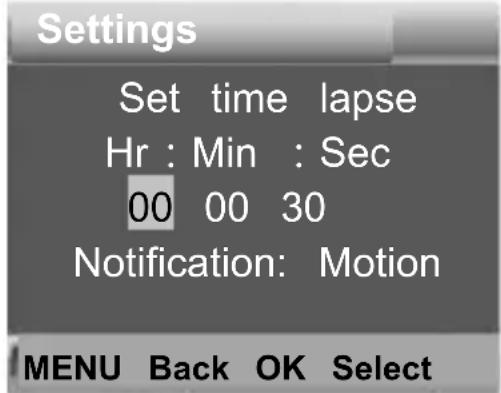
In Time lapse menu, there are three options as below.
[Normal]: The camera will take pictures automatically as per set time interval. For example, set the interval time to 1 l the camera will take a photo each hour. If you want to observe a blooming plant, the camera will take 24 photos hours to record the whole process of blooming.
[TL Video]: You can set the interval time. The time range
from 3 seconds to 24 hours. For example, set the interval to 1 h the camera will take a photo each hour. If the camera works for 2 hours, there will be 24 photos. These photos will be converted a video.
text_image
Settings Set time lapse Hr : Min : Sec 00 00 30 Notification: Motion MENU Back OK Select[Off]: Turn off the time lapse function.
Language
Set the language display on screen.
Options : [English]/[Deutsch]/[Dansk]/[Suomi]/[Svenska]/[Español]/[Français]/[Italiano]/[Dutch]/[Portugués]/[Czech]/[简体中文]/[日本语].
Endless capture
Set the camera to record in loop. When the memory card the oldes recordings will get deleted.
Options : 【On】/【Off】.
Time & date
Set the date and time of camera.
The date format: dd/mm/yyyy, yyyy/mm/dd, mm/dd/yyyy.
The time format: 24h, 12h.
Press Right button to choose. Press Up/Down button to act the value and press OK button to confirm.
Options : 【Set time&date】/【Time format】/【Date format】.
Photo stamp
Stamp the date&time on the photos or not.
Options : 【Time&date】/【Date】/【Off】.
Password protection
Set the power-on password of the camera. The password four digits, each digit ranges from 0 to 9 and A to Z.
Options : 【On】/【Off】.
Beep sound
Turn the button sound on/off.
Options : 【On】/【Off】.
Format memory card
Formatting the memory card will delete all data permanently. Before using a new memory card or a card that has been in another device previously, please format the memory card. Options: 【Yes】/【No】.
Serial NO.
Set the unique serial number of the camera. The number digits, each digit ranges from 0 to 9 and A to Z.
Options : 【On】/【Off】.
Reset settings
Restore the camera's factory default settings including password, serial number and so on.
Options : 【On】/【Off】.
Version
Look up the Firmware information of the camera.
Take photos, record video, playback
Switch the Mode switch to "Test". In this mode, you can photos, record video and playback files manually.
Take Photos: Press Capture button to switch to photo n Press Shot button to take a picture.
◆ Record Video : Press Video button to switch to video mode. Press Shot button to start to record a video clip. Press S button again to stop recording.
◆ Playback: Press Playback button to enter the playback interface. Press Up/Down button to navigate through photos video. To playback a video, press OK button to play the Press OK button again to pause. Press Menu button to stop playback. Press Playback button again to exit the playback mode.
Playback menu :
1 ) Delete current file : Delete the current photo or video.
Options : 【Cancel】 / 【Delete】.
2 ) Delete all files : Delete all photo and video files in the memory card. Options : 【Cancel】/【Delete】.
3) Activate slide show: Playback the photos in slide show. Each photo is displayed for 3 seconds. Press OK button to playing.
4 ) Overwrite protection : Lock the file. It can avoid accidental deletion. Options : 【Write-protect current file】 / 【Write-protect
all files】/【Unlock current file】/【Unlock all files】.
Working mode
Switch the Mode switch to “On”. After turning on the cam, the screen will display a 15 second countdown. Then the and screen will turn off. The camera begins to operate independently and enters standby mode.
If wild animals enter the detection range of the motion set the camera will be activated and detect the motion.
If wild animals continue to move to the detection zone of sensor, the camera will take photos or record video automatically.
When wild animals leave the detection zone of the sensors camera will be deactivated and turn back to standby mode
Night mode
In night mode, the recordings will be black and white.
When recording a video for longer time in the evening, th voltage may have a great influence on the stability of the camera. Do not record video with low voltage in the even
Using the wall bracket
You can mount the camera on a wall or tree by the sup wall bracket. Before mounting the wall bracket you should ensure that all existing screws are tightened. The best installation height distance from the ground is about 1 met
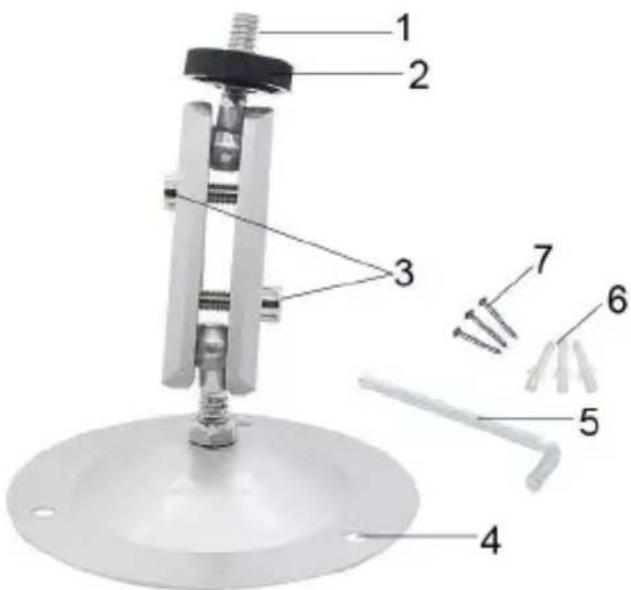
Components
- Tripod screw
- Lock nut
- Pivot bolts
- Drill holes
- Hexagonal screw
- Wall plugs
- Screws
text_image
Labeled diagram of a mechanical device with numbered components for assembly or maintenance reference.Mounting the wall bracket Required tools
Drill
■ 6 mm masonry/concrete drill bit
■ Phillips head screwdriver
Caution
◆ Ensure that there are no electric lines, water or heating installed at the proposed drilling location.
◆ The supplied wall plugs are only suitable for mounting concrete or stone. Before starting the installation, please check your installation location carefully for its suitability for the p. The assembly material used must be suitable for the respective location. If in doubt, consult a professional.
Installation Steps
◆ Mark the drill holes by holding the foot of the wall bra the desired mounting location and marking the hole position
◆ Use a drill with a 6 mm drill bit to drill the required h insert the plugs and insert the wall plugs flush with the w
♦ Screw the wall bracket to the wall using the supplied s
◆ Mount the camera on the tripod screw and screw the c a little way on (about three turns).
◆ Turn the camera in the desired direction and lock it with lock nut.
◆ To move the camera into its final position, undo the tw bolts a little, position the camera and fix the position by tightening the two pivot bolts.
Download files to the computer
There are two ways to download files from the memory c a computer:
By inserting the memory card into a card reader.
By connecting the camera to a computer using the supplier USB cable.
Using a card reader
- Remove the memory card from the camera and insert a card reader. Then connect the card reader to a comput
- Open [My Computer] or [Windows Explorer] and double-the removable disk icon that represents the memory card.
- Copy image or video files from the memory card to your computer.
Connecting the camera to a PC by the USB ca
- Connect the camera to the computer via USB cable. The camera (TEST), the screen will display MSDC".
- Open [My Computer] or [Windows Explorer]. A "Remova Disk" appears in the drive list. Double-click the "Removable Disk" icon to view its contents. All files are stored in the named "DCIM".
- Copy the photos or files to your computer.
Privacy Policy
In every country, legal data protection rules apply. As these rules may vary per country, please contact the appropriate authorities to learn about the latest privacy policy in your country. In any case kindly note:
- Do not observe public areas such as sidewalks, road parking lots, etc.
- Never observe your staff.
- Respect the general right of privacy.
- Do not publish pictures showing individuals without having their permission. Do not publish pictures showing identifiable automobile license plates.
- Make aware of the observed areas with a sign and inform your neighbours and visitors if necessary.

CE MARKING
The CE marking complies with the European standards a indicates that the product meets the requirements of the applicable EU directives. The complete declaration of conformity can be found on our website www.braun-phototechnik.de directly on the product page.