RoboVac L35 Hybrid+ - Vacuum Cleaner eufy - Free user manual and instructions
Find the device manual for free RoboVac L35 Hybrid+ eufy in PDF.
User questions about RoboVac L35 Hybrid+ eufy
0 question about this device. Answer the ones you know or ask your own.
Ask a new question about this device
Download the instructions for your Vacuum Cleaner in PDF format for free! Find your manual RoboVac L35 Hybrid+ - eufy and take your electronic device back in hand. On this page are published all the documents necessary for the use of your device. RoboVac L35 Hybrid+ by eufy.
USER MANUAL RoboVac L35 Hybrid+ eufy
natural_image
Abstract graphic with a white circular shape and scattered triangular shapes on a gray background (no text or symbols)Cleaning
eufy
For FAQs and more information, please visit
www.eufylife.com
RoboVac L35 Hybrid + Owner's Manual
PAP 22
Raccolta Carta
T2182 51005003863 V01
English
Français
Italiano
Español
Nederlands 173
Deutsch
Русский
Türkçe
304
Table of Contents
02 Important Safety Instructions
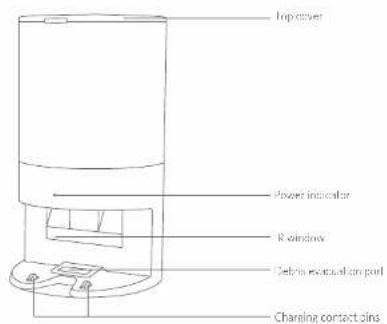
09 About Your RoboVac
What's in the Box
RoboVac Anatomy
LED Indication
Map Navigation and Management
15 Using Your RoboVac
Important Tips Before Use
Preparation
Use the Auto Empty Station
Use Your RoboVac with the eufy Clean App
Start / Stop Cleaning
Select a Cleaning Mode
Select a Suclion Power Level
Use Mopping System
Use Your RoboVac with Amazon Alexa / the
Google Assistant
Enable / Disable the Child Safely Lock
29 Cleaning and Maintenance
Clean the Dust Box, Water Tank, and Filter
Clean the Rolling Brush
Clean the Side Brushes
Replace the Side Brushes
Clean the Sensors and Charging Pins
Clean the Swivel Wheel
Clean the Mopping Cloth
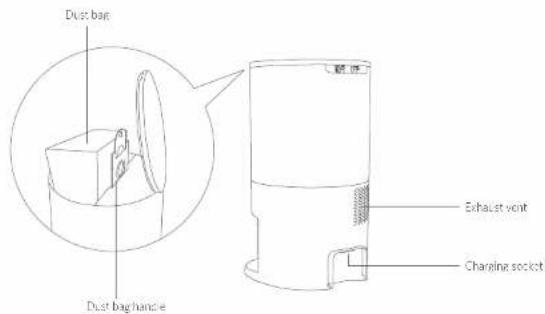
Replace the Dust Bag
38 Troubleshooting
Voice Alert
42 Specifications
43 Customer Service
Thank you for purchasing RohoVac. Carefully read all the instructions below before using this device, and keep this manual for future reference.
EN 01
EnglishEng
Important Safety Instructions
To reduce the risk of injury or damage, keep these instructions at hand when setting up, using, and maintaining this device.
WARNING SYMBOLS USED

This is the safety alert symbol. This symbol alerts you to potential hazards that could result in property damage and/or serious bodily harm or death.
• This device can be used by children aged from 8 years and above and persons with reduced physical, sensory or mental capabilities or lack of experience and knowledge if they have been given supervision or instruction concerning use of this device in a safe way and understand the hazards involved.
• Children should be supervised to ensure they do not play with this device.
- Clearing and maintenance shall not be performed by children without adult supervision.
- This device is only to be used with the auto empty station provided.
- Before cleaning or maintaining this device, the plug must be removed from the outlet.
- The battery in this device should only be replaced by a skilled professional.
- Before removing the battery, disconnect the device from its power supply.
- The battery must be removed before this device is disposed of. To remove the battery, first unscrew the screws on the bottom, then remove the back cover. Remove the battery by disconnecting the quick connector.
- The used battery should be placed in a sealed plastic bag and disposed of safely according to local environmental regulations.
- The external flexible cable or cord of the power supply unit cannot be replaced; if the cord is damaged, the power supply unit should be disposed of.
• This device is for indoor use only. - This device is not a toy. Do not sit or stand on this device. Small children and pets should be supervised when this device is operating.
- Store and operate this device in room temperature environments only.
- Do not use this device to pick up anything that is burning or smoking.
- Do not use this device to clean up spills of bleach, paint, chemicals, or anything wet.
- Before using this device, pick up objects like clothing and loose paper. Lift up cords for blinds or curtains. Move power cords and sharp, pointed, or fragile objects out of the way. If this device passes over a power cord and drags it, an object could be pulled off a table or shelf.
- If the room to be cleaned has a balcony, a physical barrier should be used to prevent access to the balcony and to ensure safe operation.
- Do not place anything on top of this device.
- Be aware that this device moves around on its own. Take care when walking in the area where this device is operating to avoid stepping on it.
- Do not operate this device in areas with exposed electrical outlets on the floor.
- Do not expose the electronics of this device, its battery, or the auto empty station. There are no user-serviceable parts inside.
- Do not use this device on an unfinished, unsealed, waxed or rough floor. It may result in damage to the floor and this device. Use only on hard floor surfaces or low-pile carpets, and not on carpets with tasseled edges or loose threads.
02 EN EN 03
EnglishEng
- This device has been designed to be used on floors without scratching them. We still recommend that you test this device on a small area of the room to be cleaned to ensure no scratches are made before cleaning the whole room.
- Only use attachments recommended or described in this manual.
- Do not handle the device or plug with wet hands.
- Ensure that the dust bag and/or filters are correctly in-place before use.
- Do not use a battery pack or device that is damaged or modified. Damaged or modified batteries may exhibit unpredictable behavior resulting in fire, explosion, or risk of injury.
- Do not expose the battery pack or device to fire or excessive heat. Exposure to fire or temperatures above 130^ / 266^ may cause an explosion.
- Do not modify or attempt to repair the device or the battery pack (as applicable), except as indicated in the instructions for use and care.
- Follow all charging instructions and do not charge the battery pack or device outside of the temperature range specified in the instructions. Charging improperly or at temperatures outside of the specified range may damage the battery and increase the risk of fire.
- The laser distance sensor of this device meets the standards for Class I Laser Products in IEC 60825-1:2014 and will not generate hazardous laser radiation.
Notice

This symbol on the device or its packaging indicates:
Do not dispose of electrical appliances as unsorted municipal waste; use separate collection facilities. Contact your local authority for information regarding the collection systems available. If electrical appliances are disposed of in landfills or dumps, hazardous substances can leak into the groundwater and get into the food chain, damaging your health and well-being. When replacing old appliances with new ones, the retailer is legally obliged to take back your old appliance for disposal at least free of charge.
FCC Statement
This device complies with Part 15 of the FCC Rules. Operation is subject to the following two conditions: (1) This device may not cause harmful interference, and (2) this device must accept any interference received, including interference that may cause undesired operation.
Warning: Changes or modifications not expressly approved by the party responsible for compliance could void the user's authority to operate the equipment.
Note: This equipment has been tested and found to comply with the limits for a Class B digital device, pursuant to Part 15 of the FCC Rules. These limits are designed to provide reasonable protection against harmful interference in a residential installation.
This equipment generates, uses, and can radiate radio frequency energy and, if not installed and used in accordance with the instructions, may cause harmful
04 EN EN 05
EnglishEng
interference to radio communications. However, there is no guarantee that interference will not occur in a particular installation. If this equipment does cause harmful interference to radio or television reception, which can be determined by turning the equipment off and on, the user is encouraged to try to correct the interference by one or more of the following measures: (1) Reorient or relocate the receiving antenna. (2) Increase the separation between the equipment and receiver. (3) Connect the equipment into an outlet on a circuit different from that to which the receiver is connected. (4) Consult the dealer or an experienced radio / TV technician for help.
The following importer is the responsible party (for FCC matters only).
Company Name: POWER MOBILE LIFE, LLC
Address: 400 108th Ave NE Ste 400, Bellevue, WA 98004-5541
Telephone: +1 (800) 994 3056
RF Exposure Compliance Statement
This equipment complies with FCC/IC radiation exposure limits set forth for an uncontrolled environment. This equipment should be installed and operated with a minimum distance of 20 cm between the radiator and your body.
ISED Compliance Statement
This device contains licence-exempt transmitter(s)/receiver(s) that comply with Innovation, Science and Economic Development Canada's licence-exempt RSS(s). Operation is subject to the following two conditions:
-
This device may not cause interference.
-
This device must accept any interference, including
06 EN EN 07
interference that may cause undesired operation of the device.
Declaration of Conformity
This product complies with the radio interference requirements of the European Community. Hereby, Anker Innovations Limited declares that the radio equipment type T2182 is in compliance with Directive 2014/53/EU. The full text of the EU declaration of conformity is available at the following website: https://support.eufylife.com/s/articleRecommend?type=DownLoad.
Maximum output power: 18 dBm (For EU)
Frequency band: 2.4G band (2.4000GHz - 2.4835GHz)
GB Declaration of Conformity
Hereby, Anker Innovations Limited declares that the product type T2182 is in compliance with Radio Equipment Regulations 2017 and The Restriction of the Use of Certain Hazardous Substances in Electrical and Electronic Equipment Regulations 2012. The full text of the GB declaration of conformity is available at the following website: https://support.eufylife.com/s/articleRecommend?type=DownLoad.
The following importer is the responsible party (contract for EU and UK matters)
Anker Technology (UK) Ltd
GNR8, 49 Clarendon Road, Watford, Hertfordshire, WD17 1HP, United Kingdom
Anker Innovations Limited
Room 1318-19, Hollywood Plaza, 610 Nathan Road, Mongkok, Kowloon, Hong Kong
EnglishEng
Trademark Notice
- Amazon, Echo, Alexa and all related logos are trademarks of Amazon.com, Inc. or its affiliates.
• Apple and the Apple logo are trademarks of Apple Inc., registered in the U.S. and other countries. App Store is a service mark of Apple Inc., registered in the U.S. and other countries. - Google Play and the Google Play logo are trademarks of Google Inc.
• Google Home is a trademark of Google Inc.
About Your RoboVac
What's in the Box
natural_image
Line drawings of three household appliances: a robotic vacuum fan, a water dispenser with a light bulb, and a power cord (no text or symbols)

08 EN EN 09
EnglishEng
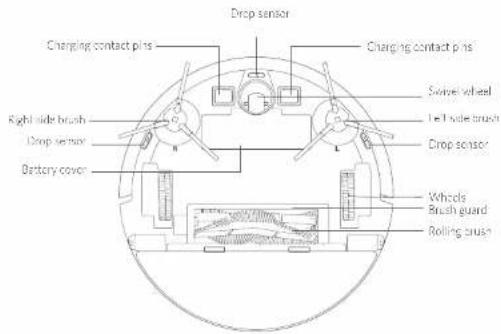
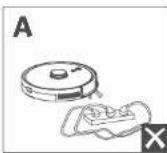
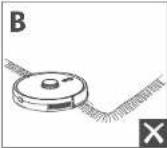
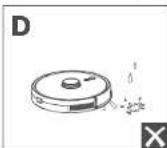
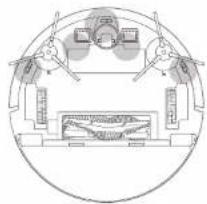
RoboVac Anatomy
A. Top
B. Side
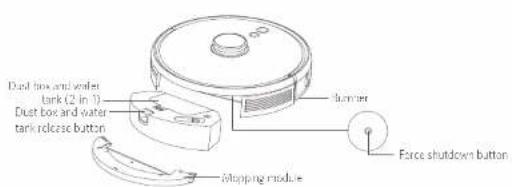
C. Bottom
D. Dust Box and Water Tank (2-in-1)
10 EN EN 11
EnglishEng
E. Mopping Module
F. Suction Inlet
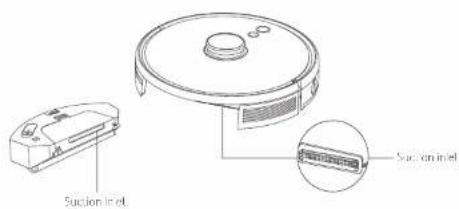
G. Auto Empty Station
12 EN EN 13
EnglishEng
LED Indication
You can see the status of RoboVac from the LED indicators.
| and | Status |
| Pulsing blue Charging | |
| Solid blue Standby / Cleaning / Fully charged | |
| Solid red Low power and returning to auto empty station | |
| Off | • RoboVac is off• To conserve power, the light automatically turns off when RoboVac is not docked to the auto empty station and has been inactive for 10 minutes. |
| Flashing blue Waiting for Wi-Fi connection | |
| Flashing red with voice alert | RoboVac has an errorRefer to the “Troubleshooting > Voice Alert” section in this manual for solutions |
Map Navigation and Management
Navigation
Once RoboVac starts to auto clean, it will move away from the auto empty station and automatically scan your house to generate maps, intelligently determine its cleaning route, and divide the space into zones. The cleaning paths are planned along the walls, following a Z-shaped cleaning method to clean one zone at a time.
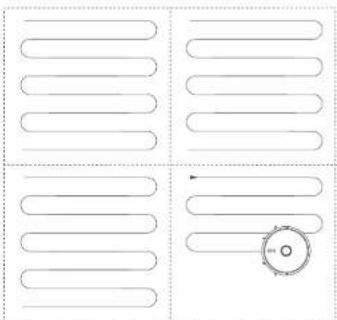
natural_image
Pure diagram of four quadrants with curved lines and a circular symbol in the bottom-right corner (no text or labels)14 EN EN 15
Real-Time Mapping and Floor Plan
Real-time mapping helps RoboVac easily learn the environment of your home to generate the most efficient cleaning path. A floor plan will be built after cleaning. The map will be updated in real-time during each cleaning session to ensure normal navigation.
To create a complete floor plan:
- Open your doors so that RoboVac can map each room.
- Remove any objects that may be in the way or that might entangle RoboVac
Repositioning and Remapping
If the position of RoboVac / auto empty station is adjusted or the surroundings are charged significantly, RoboVac will try to reposition and remap to match the surroundings.
- If the repositioning is successful, ReboVac will resume cleaning.
- If the repositioning fails, RoboVec will remap to ensure normal navigation with a new cleaning.

- When using for the first time, make sure RoboVac starts cleaning from the auto empty station
- During cleaning, do not move RoboVac frequently. If moved, place RoboVac back in the original position.
Using Your RoboVac
Important Tips Before Use
EnglishEng
Remove power cords and small objects from the floor that may entangle RoboVac.
b Fold tasseled edges of rugs underneath to prevent tangling RoboVac. Avoid cleaning dark-colored high-pile rugs or rugs thicker than 1.02 in / 26 mm as they may cause RoboVac to malfunction.
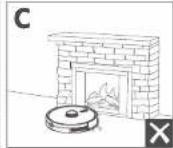
C It is strongly recommended to set a No-Go zone or a virtual boundary in the eufy Clean app in front of fireplaces and certain areas (i.e. air vents) that may cause damage to RoboVac if entered.
d Keep RanoVac away from wet areas during cleaning.
e RoboVac may climb on top of objects less than 0.79 in / 20 mm in height. Remove these objects if possible.
Anti-drop sensors will prevent RoboVac from turning down stairs and steep drops in most cases. Sensors are less effective if dirty or used on carpeted / reflective / dark-colored floors. It is recommended to place physical barriers or set a No-Go zone / a virtual boundary in the early Clean app to block off areas where RoboVac may fall.
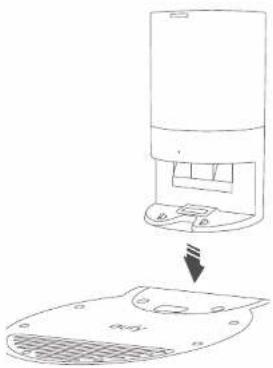
Preparation
1 Remove the foam blocks beside the bumper before use
2 Before mopping, install the waterproof pad under the auto empty station to keep the floor dry. Make sure it is firmly installed. Skip this step if mopping is not needed.
natural_image
Diagram showing a device with a lid and a base plate, no text or symbols present16 EN EN 17
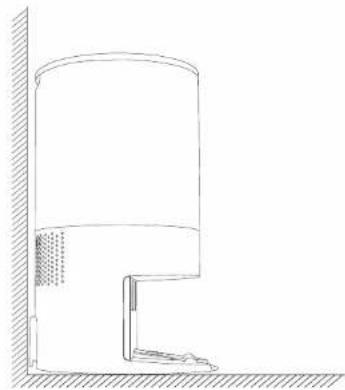
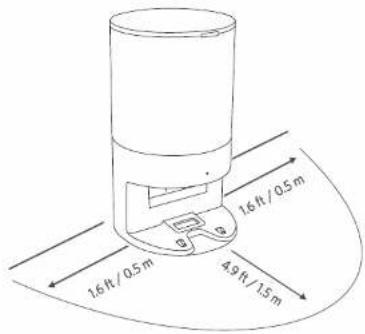
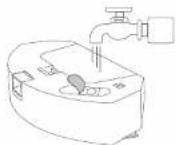
3 Place the auto empty station on a level surface and against a wall.
natural_image
Technical line drawing of a vertical cylindrical tank with a side support structure (no text or symbols)4 Remove objects within 1.6 ft / 0.5 m of the left and right side and within 4.9 ft / 1.5 m of the front of the auto empty station. If you cannot remove the objects, check whether RoboVac can return to the auto empty station normally. If not contact only customer service for help.
EnglishEng
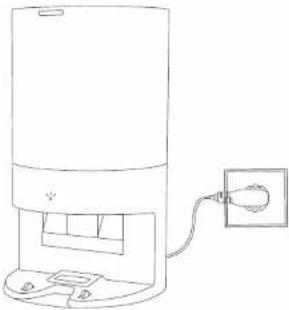
- Connect the power cord to the auto empty station and a wall outlet.
When the auto empty station connects to AC power, the LED indicator on the auto empty station is solid blue.
natural_image
Line drawing of a cylindrical device with a power outlet connected to its side panel (no text or symbols)
- Install the auto empty station in a location that RoboVac can easily access. It is recommended to place the auto empty stall on against a wall, and on a hard, level surface rather than or rugs or carpets.
• Always keep the auto empty station plugged in, otherwise RoboVac will not automatically return to it.
Use the Auto Empty Station

- RoboVac will return to the auto empty station at the end of a cleaning cycle or when its battery is running low.
- Make sure the power cord is connected to a power outlet.
- Before emptying the dust box, make sure the mopping module has been removed.
Attach RoboVac to the auto empty station by aligning its charging pins.
RoboVac starts charging automatically
If RoboVac has finished a round of clearing, I will employ its dust box automatically by default when it returns to the auto empty station. The emptying frequency can be adjusted in the early Clean app.
natural_image
Line drawing of a vacuum cleaner with a cylindrical top and circular base (no text or symbols)LED Indicator Status of Auto Empty Station
| Solid blue Standby | |
| Solid blue, with 50% brightness | Sleeching mode /After 10 minutes of nacively /Do Not Disurb mode |
| Flashing blue Working normally | |
| Flashing red Working abnormally | |

To preserve the battery's lifespan, recharge at least once every 6 months.
18 EN EN 19
EnglishEng
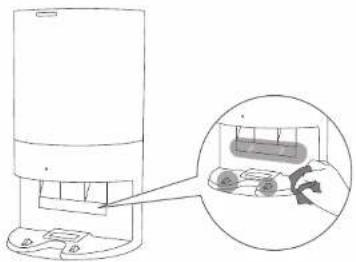
Switch to Power Saving Mode
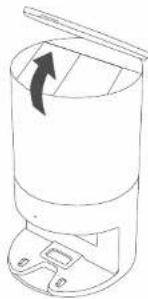
1 When the auto empty station is connected to power, lift open the top cover
natural_image
Line drawing of a cylindrical device with an arrow indicating rotation or movement (no text or symbols)2 Pull the dust bag handle up to remove the dust bag. Then replace it.
3 Repeat Step 2 three times within 5 seconds. The auto empty station will switch to power saving mode automat cally.
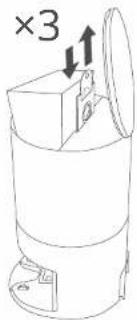
In the power saving mode, the LED indicator on the auto empty station will turn off, and the auto empty station can only charge RoboVac once. The emptying function will be disabled.
To exit this mode, disconnect and then reconnect to the AC power supply.
20 EN EN 21
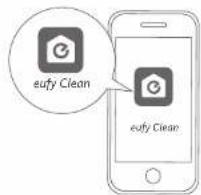
Use Your RoboVac with the eufy Clean App
To enjoy all available features, it is recommended to control your RoboVac via the early Clean app.
Before you start, make sure that:
- Your smartphone or tablet is running iOS 10.0 (or above) or Android 5.0 (or above).
• The 2.4GHz band wireless signal is enabled on your wireless reader. - RoboVac is attached to the auto empty station to ensure it has enough power during setup.

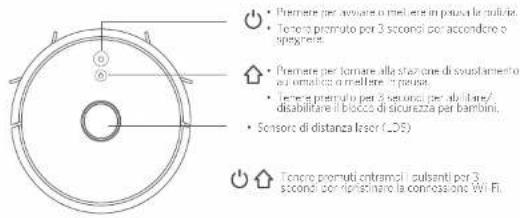
1 Press and hold the two buttons (and) simultaneously for 10 seconds to start the Wi-Fi connection.
2 Download the eufy Clean app from the App Store (iOS devices) or Google Play (Android devices).
3 Open the app and create a user account.
4 Tap Inc "+" icon to add "RoboVac L35 Hybrid+" to your cufy Clean account.
5 Follow the instructions in the app to set up the Wi-Fi connection.
After connecting successfully, you can control RoboVac via the app.
With the apo, you can select a cleaning mode, set the time, schedule a cleaning, adjust suction power and water flow, view the system status, receive notifications, and access additional features.
| and | Slowly flashing blue Waiting for connection |
| Rapidly flashing blue Connecting with your wireless router | |
| Solid blue Connected with your wireless router |

EnglishEng
Schedule Cleaning
With the early Clear app, you can schedule RoboVac to start cleaning at a particular time.

- You can set the time and customize the cleaning schedules from Sunday to Saturday on the early Clean app. This function is only available on the app.
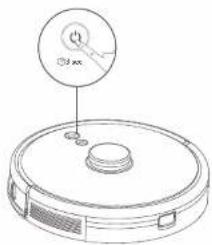
Start / Stop Cleaning

- You can also start or stop cleaning via the eufy Clean app.

Press and hold (1) or 3 seconds to turn on.
natural_image
Line drawing of a robotic vacuum cleaner with a circular dial indicator (no text or symbols)
Press ⏻ to start clearing in Auto Clearing mode.
• To pause cleaning, press again.
• To turn off, press and hold (1) for 3 seconds
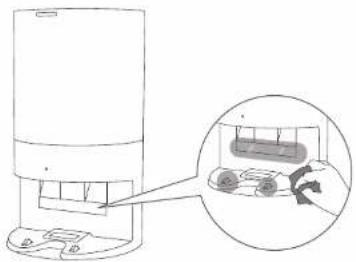
*! RoboVac is not responding when you press a button, press the Force Shutdown button (located inside the main unit) to forcibly power off the device. Then press and hold ⏻ for 3 seconds to restart the device

natural_image
Technical line drawing of a vacuum cleaner with a close-up inset showing internal components (no text or symbols)22 EN EN 23
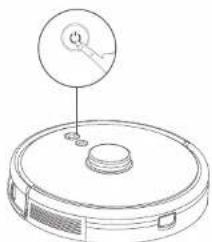
Select a Cleaning Mode
Auto Cleaning Mode
Press ⏻ to start clearing in Auto Clearing mode. You can also select this mode in the early Clean app.
natural_image
Line drawing of a robotic vacuum cleaner with a circular dial indicator (no text or symbols)
- During cleaning, Robovac will return to the auto empty station automatically if the battery level becomes low. To resume cleaning from where it left off, enable this feature in the eufy Clean app.
- By default, RoboVac starts in Auto Clearing mode when it is turned on.
Spot Cleaning Mode (Only Available via the eufy Clean App)
In this mode, RoboVac intensive y cleans a specific area with a size of 4.9 ft x 4.9 ft / 15 m x 15 m — great for concentrated areas of dust or debris. When the clearing of a certain zone is finished, RoboVac will automatically return to the auto empty station.
EnglishEng
Room Cleaning Mode (Only Available via the eufy Clean App)
In this mode, your house is automatically divided into several rooms for cleaning in the auto Clean app. You can also customize your room settings in the app. RopoVac will clean the selected rooms only and return to the auto empty station after cleaning.

- Start Room cleaning only after RoboVac has created the map.
- It is recommended that RoboVac moves from the auto empty station to start Room cleaning
Zone Cleaning Mode (Only Available via the eufy Clean App)
In this mode, you can set up a cleaning zone in the eufy Clean app. RopoVac will only clean the selected zone.
Select a Suction Power Level
In the eufy Clean app, select a suction power level according to your needs:
- Quiet
- Standard (Default)
- Turbo
• M28

- When RoboVac starts cleaning the next time, it will clean according to the such on power level you previously selected.
Select BoostIQ™ feature
In the early Clean app, select the BoostIQ™ feature according to your needs. RoboVac will automatically increase the suction power if it detects that stronger power is needed to ensure the best clean. BoostQ™ is ideal for ceening thicker carpets and hard to sweep messes, which will reduce the total cleaning time, but increase the noise level. If the vacuuming noise caused by BoostIQ™ discros you, you can disable this feature.
Use Mopping System

The mopping mode is only intended for a clean floor without stubborn stains or liquids. To avoid staining floors, do not use the mopping function when dust is mixed with liquids such as coffee or ink.
- Mapping System cleans best on smooth hard surfaces and may not perform so well on uneven tiles, heavily waxed floors or rough surfaces like slate or brick, which may snag the mopping module.
- The mapping mode is not recommended for use when no one is at home.
- Do not use the mopping mode on a carpeted floor. It is recommended to set a "No-Mop" zone in the eufy Clean app to avoid cleaning the carpeted area.
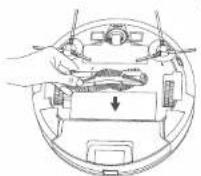
Before mopping, install the waterproof pad under the auto empty station to protect the floor.
natural_image
Line drawing of a device with a button and a base, showing an arrow pointing to it (no text or symbols present)2 Wet the mopping cloth and wring it until it does not drip, then attach the cloth to the mopping module.
24 EN EN 25
EnglishEng
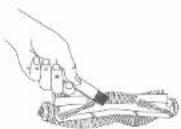
3 Remove the water tank.
natural_image
Line drawing of a robotic vacuum cleaner with a hand holding the device (no text or symbols)4 Open the water inlet cover to fill with water, then close the cover.
Do not use any cleaning solution, as your floor may become slippery and therefore affect the cleaning effect.
5 Install the water tank and the mopping module under RoboVac with a click.
natural_image
Line drawing of a robotic vacuum cleaner with three steps: top view, internal component, and curved blade (no text or symbols)26 EN EN 27
The mopping mode is only intended for a clean floor without stubborn stains. To achieve a better mopping effect, it is recommended to clean the floor with RoboVac three times before mopping.
6 Start clearing. RoboVac will automatically vacuum and mop.
7 When RoboVac finishes cleaning, remove the mapping module.
natural_image
Line drawing of a robotic vacuum cleaner with a hand holding the blade (no text or symbols)8 Remove the dust box and the water tank.

natural_image
Line drawing of a robotic vacuum cleaner with a hand holding a small device (no text or symbols)9 Clean the dust box and water tank, empty any remaining water, and clean the mopping cloth to prevent mildew or unpleasant smells. For how to clean and maintain the components, refer to the "Cleaning and Maintenance" section in this manual.
English Eng
Use Your RoboVac with Amazon Alexa / the Google Assistant
Amazon Alexa or the Google Assistant is a smart voice control device that enables you to control RoboVac with your voice.
Before you start, make sure that:
- RoboVac is attached to the auto empy station to ensure there is enough power.
• RuboVac is connected with the early Clean app. - You have an Amazon Alexa-enabled device (i.e. Amazon Echo, Echo Dot and Amazon Tap, Echo Show, Echo Spot) or a device enabled with the Google Assistant (i.e. Google Home, Google Home Mini). These devices are sold separately.
- The Amazon Alexa app or Google Home app is already installed on your smart device, and you have created an account.
To control RoboVac with Amazon Alexa or the Google Assistant:
- Open the early Clean app and find "Smart Integrations" in the top left.
- Follow the on-screen instructions to complete the setup.

- Currently, this feature only supports English, German, French, and Spanish. For more supported languages, check https://www.ecfyife.com/support/
Enable / Disable the Child Safety Lock
Press and hold the Burton for 3 seconds to turn on the child safety lock. Once the child safety lock is enabled, RuboVac will not respond if any button is pressed to protect children from accidentally getting hurt.
• To disable the child safety lock, press and hold the button for 3 seconds again.

- This function is also available in the only Clean app.
Cleaning and Maintenance
Before cleaning and maintaining, turn off the device and unplug the power cord. For optimal performance, follow the instructions below to clean and maintain RoboVac regularly. The cleaning / replacement frequency will depend on your RoboVac usage habits.
Recommended Cleaning / Replacement Frequency
| RoboVac Part Cleaning Frequency Replacement Frequency | ||
| Dust box and water tank After each use - | ||
| Filler | Once a week (Twice a week if you have a pet) | Every 6 months or after every 50 rounds of cleaning |
| Side brushes Once a month | Every 3-6 months (or when visibly worn) | |
| Side brushes Once a month | Every 3-6 months (or when visibly worn) | |
| Brush guard Once a month | Every 3-6 months (or when visibly worn) | |
| Rolling brush | Once a month | Every 6-8 months |
| Sensors | Once a month | - |
| Charging pins | Once a month | - |
| Swivel wheel | Once a month | - |
| Mopping cloth | After each use - | |
| Dust bag | - | After every 60 rounds of cleaning |
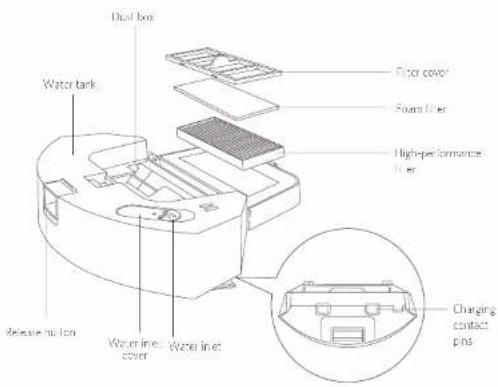
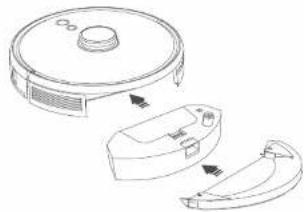
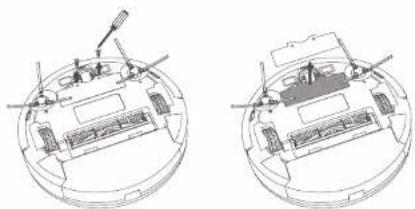
Clean the Dust Box, Water Tank, and Filter

Press the release button to remove the dust box and water tank.
28 EN EN 29
English Eng
2 Remove the foam filter and high-performance filter
natural_image
Line drawing of a printer with a hand inserting a slot into it, alongside three separate views of a tray (no text or symbols)3 Clean the dust box and filters with the cleaning brush.
4 Empty the remaining water in the water tank.
5 Rinse the dust box, water tank, and filters thoroughly with water.
30 EN EN 31

Do not use hot water or any detergent to clean the filters.
6 Air dry the dust box, water tank, and filters completely before next use. You may use another filter if the original one is not dry

Do not use the filters if they are not completely dry, otherwise it may affect the cleaning performance.
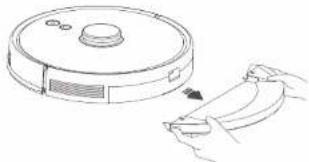
7 Place the filters back into the dust box.
natural_image
Illustration of a computer processing step showing steps from card to printer (no text or symbols)8 Push the dust box and water tank back into the main unit.

natural_image
Line drawing of a robotic vacuum cleaner with a hand holding a remote control device (no text or symbols)English Eng
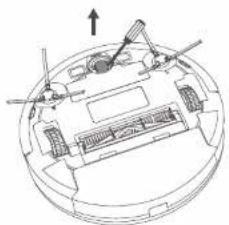
Clean the Rolling Brush
1 Full or the release labs to unlock the brush guard as shown.
2 Lift the rolling brush to remove
3 Clean the rolling brush with the cleaning tool
4 Reinstall the rolling brush by inserting the fixed protruding end first.
5 Press down to snap the brush guard into place.
1
2
3
4
5
32 EN EN 33
Clean the Side Brushes
Foreign substances, such as hair, can easily get tangled in the side brushes, and dirt may adhere to them. Be sure to clean them regularly.
1 Remove the side brushes.
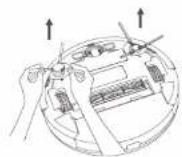
2 Carefully unwind and pull off any hair or string that is wrapped between the main unit and the side brushes.
3 Use a cloth dampened with warm water to remove dust from the brushes or to gently reshape them.
natural_image
Line drawing of a robotic device with a hand operating it (no text or symbols)
- Only use the side brushes when they are completely dry
English Eng
Replace the Side Brushes
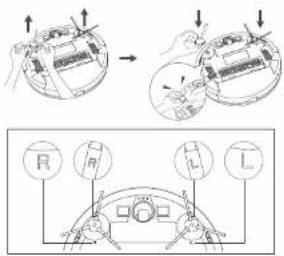
The side brushes may become damaged after being used for a period of time. Follow the instructions below to replace them.
- Pull off the old side brushes and snap the new ones into place until you hear a click.

- Make sure the left side brush marked with an L (Left) and the right side brush marked with an R (right) are installed correctly. Otherwise, the side brushes may be damaged.
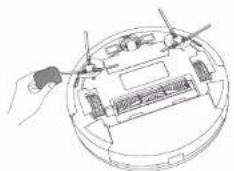
Clean the Sensors and Charging Pins
To maintain the best performance, clean the sensors and charging pins regularly.
- Dust of the sensors, charging contact pins, and IR window using a cloth or cleaning brush.
natural_image
Top-down schematic of a circular mechanical or architectural component with two vertical supports and internal components (no text or symbols)34 EN EN 35
natural_image
Diagram of a water dispenser with a close-up inset showing a cart being moved, no text or symbols present.Clean the Swivel Wheel
Hair or dust particles can easily get entangled in the swivel wheel. Be sure to clean the swivel wheel periodically and as needed.
1 Remove the battery cover.
natural_image
Technical line drawings of a circular mechanical component with internal components and mounting holes (no text or symbols)English Eng
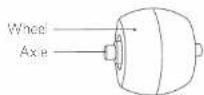
2 Full out the swivel wheel with a tool (such as a screwdriver).
natural_image
Technical line drawing of a circular mechanical component with internal structure and mounting brackets (no text or symbols)3 Clean any hair or debris wrapped around the wheel or entangled inside the wheel cavity.
4 Reinstall the wheel and push in until it clicks into place.

- Do not clean the swivel wheel with water.
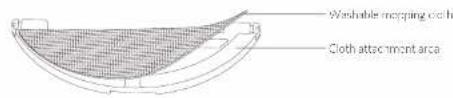
Clean the Mopping Cloth
It is recommended to clean the washable mopping cloth after each use.
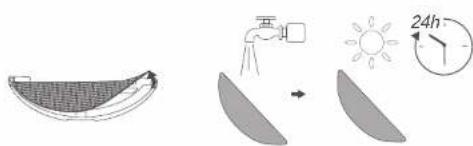
1 Remove the mopping cloth from the mopping module.
② Rinse the mopping cloth thoroughly with water.
3 Air-cry the mopping cloth completely to prevent mildew or unpleasant smells.
36 EN EN 37
Replace the Dust Bag
1 Lift open the top cover.
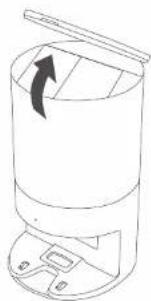
natural_image
Line drawing of a cylindrical device with a handle and internal components, no text or symbols present2 Pull up the dust bag handle to remove the dust bag.

natural_image
Line drawing of a cylindrical container with an open lid and a box, showing internal components (no text or symbols)English Eng
3 Discard the used dust bag.
4 Install a new dust bag.

natural_image
Line drawing of a cylindrical container with an open lid and a small box inside, showing internal structure (no text or symbols)5 Press down to close the top cover
Troubleshooting
The solutions below are for general questions. If your problem persists, visit www.eufylife.com, go to the eufy Clean app, or contact support@eufylife.com for help.
| Problems Solutions | |
| RoboVac cannot be activated. | Make sure the battery is fully charged.If you still have trouble, reset RoboVac to factory settings. |
| RoboVac stops working suddenly. | Check if RoboVac is trapped or stuck on an obstacle.Check if the battery level is too low.If you still have trouble, turn RoboVac off, and then turn it back on.Check if RoboVac has alerted you with any voice prompts or LED indicators. Refer to the "Voice Alert" section in this manual. |
38 EN EN 39
| Problems Solutions | |
| You cannot schedule clearings. | Make sure RoboVac is turned onMake sure the scheduled time has been set correctly. Check if the time zone in the early Clean app is consistent with that on your mobile device.Check if RoboVac's power is too low to start cleaning.Cleaning schedules are crased when RoboVac is powered off. If RoboVac is powered on without Internet access, cleaning schedules will not synchronize and must be reset via the app. |
| Suction power is weak. | Check if any obstructions are blocking the suction inlet.Empty the dust box.Check if the filter is wet due to water or other liquid on the floor. Air-dry the filter completely before use. |
| RoboVac cannot be charged. | Check if the indicator on the auto empty station lights up. If not, reconnect the power cord with the auto empty station and try a new power outlet. If the problem persists, contact the early service center to repair or replace the auto empty station.Dust off the charging contact pins with a dry cloth.Check if you can hear a beep when RoboVac is docked and to the auto empty station. If not, contact the early service center to repair or replace the auto empty station. |
| RoboVac cannot return to the auto empty station | Remove objects within 1.6 ft / 0.5 m to the left and right side and within 4.9 ft / 1.5 m of the front of the auto empty station.Check if RoboVac is stuck on any objects.Clean the charging contact pins. |
| RoboVac's movements or travel path are abnormal. | Clean the sensors carefully with a dry cloth.Restart RoboVac by turning it on. |
| Water does not come out during mopping. | Make sure there is enough water in the water tank.Make sure the water tank and mopping cloth are properly installed. |
| Too much water comes out during mopping. | Make sure the water tank and mopping cloth has been installed properly.Check if the water tank is damaged. |
| RoboVac's cleaning time becomes shorter. | Make sure RoboVac is fully charged (indicated by a solid blue LED light) before cleaning.Check if RoboVac has alerted you with any voice prompts or LED indicators. Refer to the "Voice Alert" section in this manual.If your cleaning time is much less than the time mentioned above, contact eufy customer service for help. |
| RoboVac cannot connect to a Wi-Fi network. | Make sure you entered the Wi-Fi password correctly.Make sure your RoboVac, router, and mobile phone, are close enough to ensure a strong signal strength.Make sure your Wi-Fi router supports a 2.4GHz and 802.1lb/g/n band; a 5GHz band is not supported. |
| You cannot control RoboVac with Amazon Alexa. | Check if there are any Internet connection problems.Check whether you have installed the Amazon Alexa app onto your smart device and enabled "eufy Clean - RoboVac" Skill in the Amazon Alexa app. For details, refer to the "Smart integrations" page in the eufy Clean App.Make sure you have an eufy Clean account and have connected to RoboVac.Make sure you are using correct Alexa voice-commands. |
| You cannot control RoboVac with the Google Assistant. | Check if there are any Internet connection problems.Check if you have installed the Google Home app onto your smart device and initiated the "eufy Clean" action in the Google Home app. For details, refer to the "Smart Integrations" page in the eufy Clean App.Check if you are using the proper commands when talking to the Google Assistant. When making your request, first say the wake phrase "Ok Google".Repeat your question. Speak clearly to the Google Assistant. |
Voice Alert
When RoboVac encounters a problem, the red indicator on RoboVac will flash and you will hear the relevant voice prompts.
The voice prompts below are only for reference and may be changed slightly after voice pack updates. Please follow the voice prompts you have heard to find the cause and solution below.
| Voice Prompt Cause and Solution | |
| Error 1: Front bumper stuck | Front bumper is stuck. Tap it repeatedly to remove any dust, or move the device to a new position and try again. |
| Error 2: Wheel stuck | Wheel may be stuck or trapped. Clear any obstacles in the surrounding area and check the wheel for any trapped dust. Move the device to a new position and try again. |
| Error 3: Side brush stuck | Side brush may be stuck. Clean it and try again. |
| Error 4: Rolling brush stuck. Remove and clean the rolling brush. | Remove the rolling brush, roller joint, roller brush cover, and suction inlet to clean it. Once cleaned, place the items back into the device and try again. |
| Error 5: Device stuck or trapped | Device is trapped. Clear any obstacles in the surrounding area and try again. |
| Error 6: Device trapped | Device may be suspended in the air. Move it to a new position close to the original position and try again. If the device is still unable to start, clean the drop sensors and try again. |
| Error 8: Low battery Shutting down. | Low battery. System will shut down. Charge the device and try again. |
Voice Prompt Cause and Solution
| Error S1: Battery error | Open the battery compartment and check whether the battery is connected and restart the device.Battery temperature may be too high or low. Wait until the battery falls to normal temperatures before use (0 °C - 40 °C / 32 °F - 104 °F).If the issue persists, contact customer support for help. |
| Error S2: Wheel module error | Check whether the wheels are stuck or dust is trapped inside before restarting the device.If the issue persists, contact customer support for help. |
| Error S3: Side brush error | Check whether the side brush is stuck in an unknown object before restarting the device.If the issue persists, contact customer support for help. |
| Error S4: Suction fan error | Check whether the fan blades are stuck in an unknown object before restarting the device.Clean the dust bin and filler before restarting the device.If the issue persists, contact customer support for help. |
| Error S5: Rolling Brush Error. Refer to Owner's Manual or app for help | Remove and clean the roller brush, roller brush connection, roller brush cover and suction in et before restarting the device.If the issue persists, contact customer support for help. |
Specifications
| Input 24 V-1A | == | |
| Battery Voltage 14.4 V | == | |
| Power Consumption 50 W | ||
| Battery Type | Li-ion 3700 mAh (Typical) | |
| Dust Box Capacity 200 ml | ||
| Water Tank Capacity 200 ml | ||
| Charging Time 180 - 240 mins |
Customer Service
Contact Us

support@eufylife.com

www.eufylife.com

(US/CA) +1 (800) 994 3056
(UK) +44 (0) 1604 936200
(DE) +49 (0) 69 9579 7960
(日本)+81 03 4455 7823
For more support phone numbers, please visit: For tutorial videos, FAQs, manuals, and more information, please visit: https://support.euflylife.com/s/ https://support.euflylife.com phonecontactus Or scan the QR code below: Or scan the QR code below:


@EufyOfficial

@EufyOfficial

@EufyOfficial

@EufyOfficial
42 EN EN 43
Français
Table des matières
natural_image
Technical diagram of a circular mechanical component with concentric rings and mounting holes (no text or symbols)natural_image
Pure diagram of four identical U-shaped pipes arranged in a 2x2 grid, with a circular component on the rightmost pipe (no text or symbols)Français
natural_image
Line drawing of a device with a lid and base plate, showing a downward arrow indicating a process (no text or symbols present)Français
natural_image
Technical line drawing of a cylindrical tank mounted on a side, with no visible text or symbolsnatural_image
Line drawing of a portable electronic device with a cable and connector (no text or symbols)
natural_image
Line drawing of a vacuum cleaner with a cylindrical top and circular base (no text or symbols)natural_image
Line drawing of a cylindrical device with a handle and internal components, no text or symbols presentnatural_image
Technical line drawing of a vacuum cleaner with a close-up inset showing its internal components (no text or symbols)natural_image
Line drawing of a robotic vacuum cleaner with a circular inset showing a labeled component (no text or symbols present)
natural_image
Line drawing of a device with a button and a base panel, showing an arrow pointing to it (no text or symbols present)natural_image
Line drawing of a robotic vacuum cleaner with a hand holding a handheld device (no text or symbols)67 FR FR 68
Français
natural_image
Line drawing of a robotic vacuum cleaner with three labeled parts (no text or symbols)
natural_image
Line drawing of a robotic vacuum cleaner with a handle and control panel (no text or symbols)natural_image
Line drawing of a robotic vacuum cleaner with a hand holding a small object (no text or symbols)natural_image
Line drawing of a printer with a hand inserting a slot into it, alongside three separate views of a tray (no text or symbols)
natural_image
Illustration of a printer's internal components being processed into a final printer (no text or symbols visible)natural_image
Line drawing of a robotic vacuum cleaner with a hand holding the control panel (no text or symbols)Français
natural_image
Line drawing of a hand using a tool to adjust or install electronic components on a circular device (no text or symbols visible)
natural_image
Top-down schematic of a mechanical or architectural component with no visible text, numbers, or symbols.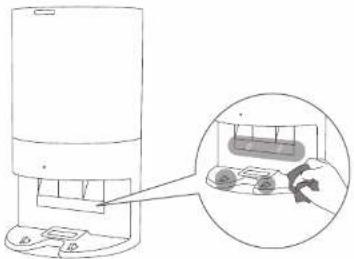
natural_image
Diagram of a device with a magnified inset showing a close-up of its internal components (no text or symbols present)77 FR FR 78
natural_image
Technical line drawing of a mechanical assembly with two views (top and side), no text or symbols present.natural_image
Technical line drawing of a circular mechanical component with internal structure and mounting features (no text or symbols)Français
natural_image
Line drawing of a cylindrical device with a handle and internal components, no text or symbols presentnatural_image
Line drawing of a cylindrical device with an open lid and internal components, no text or symbols present79 FR FR 80
Français
natural_image
Line drawing of a cylindrical container with an open lid and a small box inside, showing internal structure (no text or symbols)support@eufylife.com

www.eufylife.com

(US/CA) +1 (800) 994 3056
(UK) +44 (0) 1604 936200
(DE) +49 (0) 69 9579 7960
(日本)+81 03 4455 7823
https://support.eufylife.com/s/
phonecontactus
https://support.eufylife.com
spas/obet lateral (A-2)
93 IT IT 94
Italianoltal
Anatomia di RoboVac
A. Parte superiore
natural_image
Pure diagram of four identical U-shaped pipes arranged in a 2x2 grid, with a circular symbol on the right side (no text or labels)natural_image
Diagram showing a device with a lid and a base panel, no text or symbols presentItalianoltal
natural_image
Technical line drawing of a cylindrical container with a side support structure, mounted on a vertical wall (no text or symbols)natural_image
Line drawing of a portable electronic device with a cable and connector (no text or symbols)
natural_image
Line drawing of a vacuum cleaner with a cylindrical top and circular base (no text or symbols)natural_image
Line drawing of a cylindrical container with an arrow indicating rotation (no text or symbols)natural_image
Technical line drawing of a vacuum cleaner with a close-up inset showing its internal components (no text or symbols)natural_image
Line drawing of a robotic vacuum cleaner with a circular component above it (no text or symbols)
natural_image
Diagram showing a device with a lid and a base, no text or symbols present111 IT IT 112
natural_image
Line drawing of a robotic vacuum cleaner with a hand holding a device (no text or symbols)natural_image
Line drawing of a robotic vacuum cleaner with three labeled components (no text or symbols)
natural_image
Line drawing of a robotic vacuum cleaner with a hand holding the blade (no text or symbols)natural_image
Line drawing of a robotic vacuum cleaner with a hand holding a remote control device (no text or symbols)113 IT IT 114
natural_image
Line drawing of a computer with a hand inserting a component into the case, alongside three separate views of a laptop (no text or symbols present)natural_image
Illustration of a printer's internal structure being processed into a device, showing components like tray, base, and paper (no text or symbols present)117 IT IT 118
natural_image
Line drawing of a robotic vacuum cleaner with a hand holding the device (no text or symbols)natural_image
Line drawing of a device with a hand holding a tool, showing internal components and wiring (no text or symbols)
natural_image
Diagram showing a room interior with ceiling-mounted appliances and a close-up of a device with a hand holding a device (no text or symbols present)natural_image
Technical line drawing of two circular mechanical components with internal components and mounting features (no text or symbols)natural_image
Technical line drawing of a mechanical component with no visible text or symbolsnatural_image
Line drawing of a cylindrical device with an arrow indicating rotation or movement (no text or symbols)123 IT IT 124
natural_image
Line drawing of a cylindrical container with an open lid and a box, showing an upward arrow (no text or symbols)natural_image
Line drawing of a cylindrical trash bin with an open lid and a downward arrow indicating a drop (no text or symbols)support@eufylife.com
www.eufylife.com
(US/CA) +1 (800) 994 3056
(UK) +44 (0) 1604 936200
(DE) +49 (0) 69 9579 7960
(日本)+81 03 4455 7823
https://support.eufylife.com/s/ https://support.eufylife.com
natural_image
Technical diagram of a circular mechanical component with labeled parts (no text or symbols present)natural_image
Pure diagram of four identical U-shaped pipes arranged in a 2x2 grid, with a circular inset showing a hole (no text or symbols)142 ES ES 143
natural_image
Diagram showing a device with a lid and a base panel, no text or symbols present144 ES ES 145
natural_image
Technical line drawing of a cylindrical device with a side panel and base, mounted on a wall (no text or symbols)natural_image
Line drawing of a desktop computer with an attached power outlet (no text or symbols)
natural_image
Line drawing of a vacuum cleaner with a cylindrical top and circular base (no text or symbols)natural_image
Line drawing of a cylindrical device with a handle and internal components, no text or symbols presentnatural_image
Line drawing of a cylindrical container with a lid and a rectangular block, marked with '×3' and an arrow (no text or symbols on the main diagram)natural_image
Line drawing of a robotic vacuum cleaner with a circular sensor and indicator light (no text or symbols)natural_image
Technical line drawing of a vacuum cleaner with a close-up inset showing its internal components (no text or symbols)150 ES ES 151
natural_image
Line drawing of a robotic vacuum cleaner with a circular dial indicator (no text or symbols)
natural_image
Line drawing of a device with a button and a base plate, no text or symbols present152 ES ES 153
EspañolEsp
natural_image
Line drawing of a robotic vacuum cleaner with a hand holding a small electronic device (no text or symbols present)natural_image
Line drawing of a robotic vacuum cleaner with three labeled parts (no text or symbols)
natural_image
Line drawing of a robotic vacuum cleaner with a hand holding the blade (no text or symbols)natural_image
Line drawing of a robotic vacuum cleaner with a hand holding the device (no text or symbols)natural_image
Line drawing of a hand inserting into a device into a tray, with additional views of a tray and keyboard (no text or symbols)
natural_image
Line drawing of a robotic vacuum cleaner with a hand holding a small device (no text or symbols)EspañolEsp
natural_image
Line drawing of a hand using a tool to adjust or install electronic components on a circular device (no text or symbols)
natural_image
Top-down schematic of a room layout with ceiling, walls, and ceiling-mounted equipment (no text or symbols)162 ES ES 163
natural_image
Diagram of a water dispenser with a magnified inset showing a person climbing a cart (no text or symbols present)natural_image
Technical line drawings of a circular mechanical component with internal components and mounting holes (no text or symbols)EspañolEsp
natural_image
Technical diagram of a circular mechanical or electrical component with internal components and an upward arrow indicating motion (no text or symbols present)natural_image
Line drawing of a cylindrical device with a handle and internal components, no text or symbols presentnatural_image
Line drawing of a cylindrical container with an open lid and a box, showing internal components (no text or symbols)EspañolEsp
natural_image
Line drawing of a cylindrical container with an open lid and internal compartments, no text or symbols presentsupport@eufylife.com

www.eufylife.com

(US/CA) +1 (800) 994 3056
(UK) +44 (0) 1604 936200
(DE) +49 (0) 69 9579 7960
(日本)+81 03 4455 7823
F. Zuiginlaat

natural_image
Pure diagram of four identical U-shaped pipes arranged in a 2x2 grid, with a circular symbol on the right side (no text or labels)natural_image
Line drawing of a device with a lid and base plate, showing a downward arrow indicating process (no text or symbols)Nederlands
natural_image
Line drawing of a vertical cylindrical device with a side-mounted base and a small protrusion, mounted on a flat surface (no text or symbols)natural_image
Line drawing of a cylindrical device connected to a power outlet with a cable (no text or symbols)
natural_image
Line drawing of a vacuum cleaner with a cylindrical top and circular base (no text or symbols)natural_image
Line drawing of a cylindrical container with an arrow indicating rotation (no text or symbols)natural_image
Simple line drawing of a cylindrical container with an open lid and a rectangular opening, marked with '×3' and an upward arrow (no text or symbols on the diagram itself)natural_image
Technical line drawing of a vacuum cleaner with a close-up inset showing its internal components (no text or symbols)Nederlands
Schoonmaakmodus selecteren Automatische reinigingsmodus
natural_image
Line drawing of a robotic vacuum cleaner with a circular dial indicator (no text or symbols)
natural_image
Line drawing of a device with a lid and base, showing a step-down view (no text or symbols)natural_image
Line drawing of a vacuum cleaner with a hand holding a small electronic device (no text or symbols)
natural_image
Line drawing of a robotic vacuum cleaner with three labeled parts (no text or symbols)Nederlands

natural_image
Line drawing of a robotic vacuum cleaner with a hand holding a bag (no text or symbols)natural_image
Line drawing of a robotic vacuum cleaner with a hand holding the tool (no text or symbols)natural_image
Line drawing of a computer with an open lid and a separate diagram showing a tray, keyboard, and monitor (no text or symbols)
natural_image
Illustration of a printer's internal components being placed into a machine, with no visible text or symbols.natural_image
Line drawing of a robotic vacuum cleaner with a hand holding the device (no text or symbols)De borstelrol schoonmaken
natural_image
Line drawing of a device with a hand holding a tool, showing internal components and wiring (no text or symbols)
natural_image
Diagram showing a device with a top-down view and a close-up of its internal components, no text or symbols present.natural_image
Technical line drawing of a mechanical component with two views (top and side), no visible text or symbolsnatural_image
Technical line drawing of a circular mechanical component with internal structure and mounting brackets (no text or symbols)Nederlands
natural_image
Line drawing of a cylindrical container with an arrow indicating rotation (no text or symbols)natural_image
Line drawing of a cylindrical device with an open lid and internal components, no text or symbols present208 NL NL 209
natural_image
Line drawing of a cylindrical container with an open lid and a small box inside, showing a downward arrow (no text or symbols)support@eufylife.com
www.eufylife.com
(US/CA) +1 (800) 994 3056 (UK) +44 (0) 1604 936200 (DE) +49 (0) 69 9579 7960 (日本) +81 03 4455 7823
Alexa/Google Assistant
natural_image
Technical diagram of a circular mechanical component with labeled parts (no text or symbols present)natural_image
Pure diagram of four identical U-shaped pipes arranged in a 2x2 grid, with a circular inset showing a hole (no text or symbols)227 DE DE 228
natural_image
Diagram showing a device with a lid and a base cover, connected to a separate panel (no text or symbols present)229 DE DE 230
natural_image
Technical line drawing of a cylindrical tank mounted on a side wall, with no visible text or symbols.natural_image
Line drawing of a portable electronic device with a power outlet connected to its side panel (no text or symbols)
natural_image
Line drawing of a vacuum cleaner with a cylindrical top and circular base (no text or symbols)natural_image
Line drawing of a cylindrical container with an arrow indicating rotation (no text or symbols)natural_image
Line drawing of a robotic vacuum cleaner with a circular dial indicator (no text or symbols)
natural_image
Line drawing of a vacuum cleaner with a close-up inset showing its internal components (no text or symbols)235 DE DE 236
natural_image
Line drawing of a robotic vacuum cleaner with a circular inset showing a dial (no text or symbols)
natural_image
Line drawing of a device with a lid and base, showing a downward arrow indicating process (no text or symbols)natural_image
Line drawing of a robotic vacuum cleaner with a hand holding the device (no text or symbols)natural_image
Line drawing of a robotic vacuum cleaner with three sequential steps (no text or symbols)
natural_image
Line drawing of a robotic vacuum cleaner with a hand holding a curved tool (no text or symbols)natural_image
Line drawing of a robotic vacuum cleaner with a hand holding the device (no text or symbols)natural_image
Line drawing of a printer with a hand inserting a slot into it, alongside three separate views of a tray (no text or symbols)
natural_image
Illustration of a printer's internal components being placed into a paper case, with no visible text or symbols.natural_image
Line drawing of a robotic vacuum cleaner with a hand holding a small device (no text or symbols)DeutschDe
natural_image
Line drawing of a circular device with internal components and a hand holding a small electronic device (no text or symbols)
natural_image
Diagram of a circular room layout with ceiling, walls, and furniture (no text or symbols)247 DE DE 248

natural_image
Diagram of a water dispenser with a hand holding a cart, showing internal components and a magnified view of the device (no text or symbols present)natural_image
Technical line drawings of a circular mechanical component with internal components and mounting holes (no text or symbols)DeutschDe
natural_image
Technical line drawing of a mechanical component with no visible text or symbolsnatural_image
Line drawing of a cylindrical device with an arrow indicating rotation (no text or symbols)natural_image
Line drawing of a cylindrical container with an open lid and a small box inside, showing an upward arrow (no text or symbols)natural_image
Line drawing of a cylindrical container with an open lid and a downward arrow indicating a drop or motion (no text or symbols)support@eufylife.com

www.eufylife.com

(US/CA) +1 (800) 994 3056
(UK) +44 (0) 1604 936200
(DE) +49 (0) 69 9579 7960
(日本)+81 03 4455 7823
https://support.eurylife.com/s/
phonecontactus
https://support.eufylife.com
natural_image
Technical line drawing of a circular mechanical component with mounting holes and central bore (no text or symbols)natural_image
Pure diagram of four rectangular panels with curved lines and a central circular symbol, no text or labels present.natural_image
Diagram showing a device with a lid and a base plate, no text or symbols presentРусский
natural_image
Technical line drawing of a cylindrical tank with side supports and a side outlet, mounted on a wall (no text or symbols)natural_image
Line drawing of a desktop computer with an attached power outlet (no text or symbols)
natural_image
Line drawing of a vacuum cleaner with a cylindrical top and circular base (no text or symbols)natural_image
Line drawing of a cylindrical device with an arrow indicating rotation or movement (no text or symbols)

natural_image
Technical line drawing of a vacuum cleaner with a close-up inset showing internal components (no text or symbols)Выбор режима уборки
natural_image
Line drawing of a robotic vacuum cleaner with a circular dial indicator (no text or symbols)
natural_image
Line drawing of a device with a button and a base panel, showing an arrow pointing to it (no text or symbols present)natural_image
Line drawing of a robotic vacuum cleaner with a hand holding the device (no text or symbols)Русский
natural_image
Line drawing of a robotic vacuum cleaner with three labeled components (no text or symbols)
natural_image
Line drawing of a robotic vacuum cleaner with a hand holding the blade (no text or symbols)natural_image
Line drawing of a robotic vacuum cleaner with a hand holding a small object (no text or symbols)natural_image
Line drawing of a hand inserting a device into a machine, with additional views of a computer and keyboard (no text or symbols)
natural_image
Illustration of a hand inserting a card into a device, showing components like a tray, keyboard, and battery (no text or symbols present)natural_image
Line drawing of a robotic vacuum cleaner with a hand holding a small device (no text or symbols)289 RU RU 290
natural_image
Diagram showing a device with a top-down view and a close-up of its internal components, no text or symbols present.Русский
natural_image
Technical line drawings of a circular mechanical component with internal components and mounting features (no text or symbols)natural_image
Technical line drawing of a circular mechanical or architectural component with internal structure and directional arrows (no text or symbols)natural_image
Line drawing of a cylindrical device with an arrow indicating rotation, no text or symbols presentРусский
natural_image
Line drawing of a cylindrical container with an open lid and internal compartments, no text or symbols presentnatural_image
Line drawing of a cylindrical container with an open lid and a small box inside, no text or symbols present.support@eufylife.com
www.eufylife.com
(US/CA) +1 (800) 994 3056 (UK) +44 (0) 1604 936200 (DE) +49 (0) 69 9579 7960 (日本) -81 03 4455 7823
natural_image
Technical line drawing of a circular mechanical component with concentric rings and mounting holes (no text or symbols)natural_image
Four-panel diagram showing a U-shaped pipe system with a circular component on the right side (no text or symbols)315 TR TR 316
natural_image
Diagram showing a device with a lid and a base cover, no text or symbols present317 TR TR 318
natural_image
Line drawing of a vertical cylindrical device with a side-mounted sensor or sensor, mounted on a base (no text or symbols)natural_image
Line drawing of a portable electronic device with a power outlet connected to its right arm (no text or symbols)
natural_image
Line drawing of a vacuum cleaner with a cylindrical top and circular base (no text or symbols)natural_image
Line drawing of a cylindrical device with an arrow indicating rotation or movement (no text or symbols)natural_image
Line drawing of a cylindrical container with a lid and an open lid, showing a 3x magnified view (no text or symbols)natural_image
Line drawing of a robotic vacuum cleaner with a circular dial indicator (no text or symbols)
natural_image
Line drawing of a vacuum cleaner with a close-up inset showing its internal components (no text or symbols)natural_image
Line drawing of a robotic vacuum cleaner with a circular dial indicator (no text or symbols)
natural_image
Line drawing of a device with a lid and base, showing a drop from top to bottom (no text or symbols)Türkçe
natural_image
Line drawing of a robotic vacuum cleaner with a hand holding the device (no text or symbols)natural_image
Line drawing of a robotic vacuum cleaner with three labeled parts (no text or symbols)
natural_image
Line drawing of a robotic vacuum cleaner with a hand holding a blade (no text or symbols)
natural_image
Line drawing of a robotic vacuum cleaner with a hand holding a small electronic device (no text or symbols)Türkçe
natural_image
Line drawing of a computer with an open lid and a separate diagram showing a tray, keyboard, and monitor (no text or symbols)Türkçe
natural_image
Line drawing of a robotic vacuum cleaner with a hand holding a remote control (no text or symbols)335 TR TR 336
natural_image
Diagram showing a room interior with ceiling lights and a device with a close-up view of its interior (no text or symbols present)natural_image
Technical line drawing of a mechanical component with two views (top and side), no visible text or symbolsnatural_image
Technical line drawing of a mechanical assembly with no visible text or symbolsnatural_image
Line drawing of a cylindrical device with a handle and internal components, no text or symbols presentTürkçe
natural_image
Line drawing of a cylindrical container with an open lid and internal compartments, no text or symbols presentnatural_image
Line drawing of a cylindrical trash bin with an open lid and a downward arrow indicating a drop (no text or symbols)support@eufylife.com
www.eufylife.com
(US/CA) +1 (800) 994 3056
(UK) +44 (0) 1604 936200
(DE) +49 (0) 69 9579 7960
(TR) +90 (850) 460 14 14
https://support.eurylife.com/s/
phonecontactus
https://support.eufylife.com