
ClearTronic 9 W - Water filter OASE - Free user manual and instructions
Find the device manual for free ClearTronic 9 W OASE in PDF.

| Product type | UVC clarifier for aquarium |
| Brand and model | OASE ClearTronic 9W |
| UVC lamp power | 9 W |
| Supply voltage | 230 V / 50 Hz |
| Power consumption | 12 W |
| Recommended aquarium volume | Up to 400 L |
| Recommended flow rate (turbidity) | 500 L/h |
| Recommended flow rate (disinfection) | 400 L/h |
| Maximum operating pressure | 0.5 bar |
| Hose connection diameter | 16 mm (inner) |
| Protection rating | IP24 |
| Permissible water temperature | +4 to +35 °C |
| Dimensions (L x W x H) | 330 x 120 x 100 mm |
| Weight | 1.4 kg |
| Main functions | Elimination of algae, bacteria and germs by UVC radiation |
| Maintenance and cleaning | Clean with clear water and soft brush; replace UVC lamp after 8,000 hours |
| Wear parts | UVC lamp, quartz glass, O-ring |
| Safety | Splash water protection (IP24); lamp shuts off if head is incorrectly mounted |
| Manufacturer warranty | 24 months |
Frequently Asked Questions - ClearTronic 9 W OASE
User questions about ClearTronic 9 W OASE
0 question about this device. Answer the ones you know or ask your own.
Ask a new question about this device
Download the instructions for your Water filter in PDF format for free! Find your manual ClearTronic 9 W - OASE and take your electronic device back in hand. On this page are published all the documents necessary for the use of your device. ClearTronic 9 W by OASE.
USER MANUAL ClearTronic 9 W OASE
natural_image
Black-and-white photo of three striped fish swimming in a pool with fish head visible (no text or symbols)ClearTronic 7 W / 9 W / 11 W
EN Operating instructions
FR Notice d'emploi
natural_image
Black industrial electrical shaver with cooling fins and mechanical components (no visible text or symbols)A
natural_image
Simple line drawing of a cylindrical object with a labeled dimension (no text or symbols)
VTC0023
B
natural_image
Pure mechanical diagram showing a lever mechanism with pulleys and weights, no text or symbols present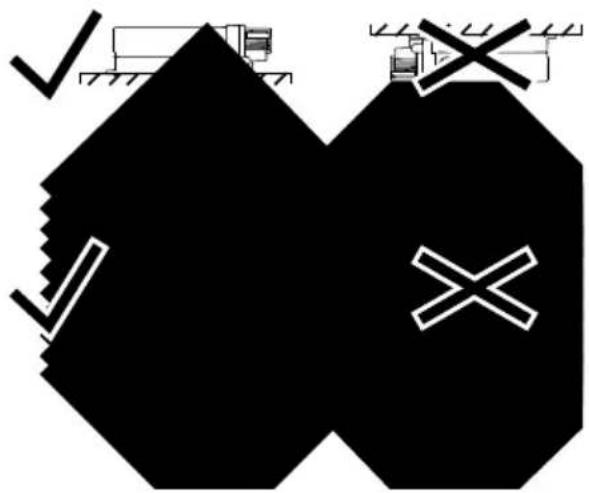
VTCD024
C
VTC0025
D
natural_image
Technical line drawing of a mechanical assembly with pipe fittings and a magnified inset showing a welding joint (no text or symbols)VTC0026
VTC0002
VTC0004
G
VTC0027
Translation of the original Operating Instructions
SAFETY INFORMATION
This unit can be used by children aged 8 and above and by persons with reduced physical, sensory or mental capabilities or lack of experi-
ence and knowledge if they are supervised or have been instructed on how to use the unit in a safe way and they understand the hazards involved.
Do not allow children to play with the unit.
Only allow children to carry out cleaning and user maintenance under supervision.
Safe operation
- Dangerous electrical voltage. Possible death or severe injury from electrocution! Prior to starting any work, switch off and disconnect (isolate) the unit, and secure it from being switched on again.
- Never operate the unit if either the electrical cables or the housing are defective!
- Do not carry or pull the unit by its electrical cable.
- Route cables/hoses such that they are protected from damage and do not present a tripping hazard.
- Only open the unit housing or its attendant components, when this is explicitly required in the operating instructions.
- Only carry out work on the unit that is described in this manual. If problems cannot be overcome, please contact an authorised customer service point or, when in doubt, the manufacturer.
- Only use original spare parts and accessories for the unit.
- Never carry out technical modifications to the unit.
- Power connection cables cannot be replaced. If a cable is damaged, dispose of the respective unit or components.
Electrical connection
- Only connect the unit if the electrical data of the unit and the power supply coincide. The unit data is to be found on the unit type plate, on the packaging or in this manual.
- Ensure that the unit is fused for a rated fault current of max. 30 mA by means of a fault current protection device.
- Protect the plug connections from moisture.
- Only plug the unit into a correctly fitted socket.
Symbols used in these instructions

CAUTION
- Indicates a possibly hazardous situation.
- Non-observance may lead to slight or minor injuries.

NOTE
Indicates information intended to give the user a better understanding.
Additional information
☐ A Reference to a figure, e.g. Fig. A.
→ Reference to another section.
PRODUCT DESCRIPTION
Scope of delivery
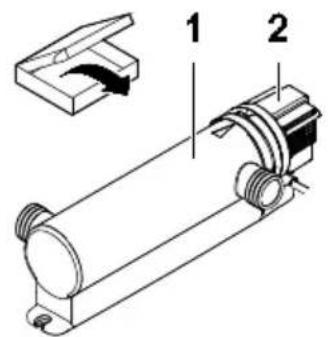
| ☐ A | |
| 1 | Casing |
| 2 | Unit head |
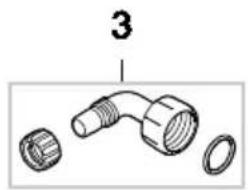
| 3 | Hose nozzle |
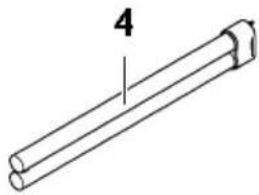
| 4 | UVC lamp |
| 5 | Operating instructions |
Function description
The special UVC radiation of the UVC clarifier eliminates floating algae and other algae that give water a green colour. It also kills bacteria and other germs. The UVC clarifier is integrated in the water circuit, ideally upstream of a filter.
Intended use
ClearTronic 7 W / 9 W / 11 W, referred to in the following as "unit", may only be used as specified in the following:
- For cleaning aquariums.
• Operation under observance of the technical data.
The following restrictions apply to the unit:
- Only use indoors and outside of the aquarium.
- Do not use for commercial or industrial purposes.
- Never use the unit to convey fluids other than water.
- Not to be used for sterilising drinking water or other fluids.
- Do not use in conjunction with chemicals, foodstuff, easily flammable or explosive substances.
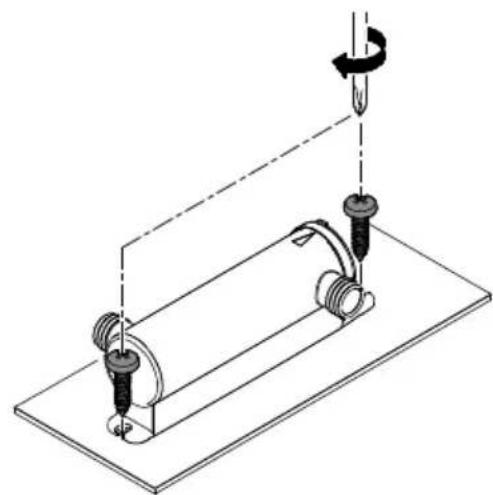
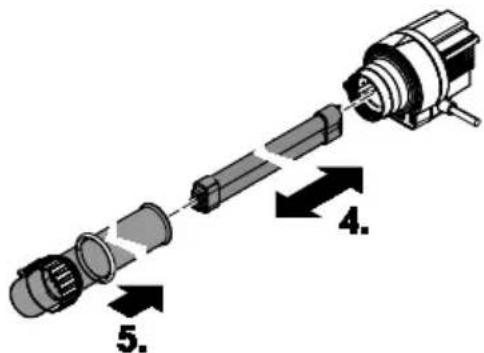
INSTALLATION AND CONNECTION
Prerequisite
- The unit head is removed. (→ Dismantling the unit head)
Set-up the unit
How to proceed:
B
- Only install the unit in the permitted positions to ensure fault-free operation.
- Allow sufficient space for carrying out maintenance work.
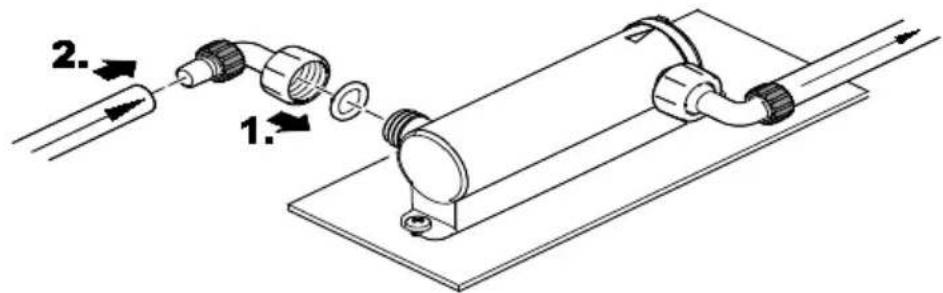
Connect the unit
How to proceed:
□ C
- Screw the hose connector with union nut and seal onto the connection on the casing.
- Connect the inlet and outlet.
-
Hand-tighten the union nut.
-
Screw the lock nut onto the hose connector, fit the hose onto the hose connector and turn back the lock nut to fix the hose in place.
-
On completion of the work, fit the unit head. (→ Fitting the unit head)
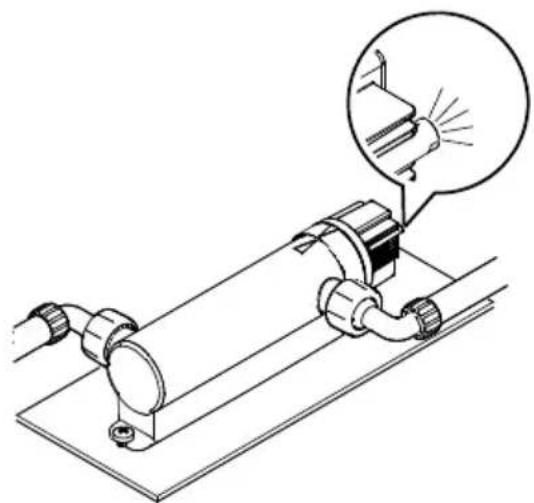
COMMISSIONING/START-UP
Prerequisite
- First switch on the pump, then the UVC clarifier.
- Check all connections for leaks.
Switching ON/switching OFF
- Switching on: Insert the power plug into the socket.
- The unit switches on immediately.
- Switching off: Disconnect the power plug.
Check the function.
□D
- The function display is lit when the UVC lamp is switched on.
REMEDY OF FAULTS
| Malfunction | Cause | Remedy |
| The performance of the unit is not satisfactory | The water is extremely soiled. | Remove algae and leaves from the aquarium, change the water. |
| The quartz glass is soiled. | Clean the quartz glass. | |
| The UVC lamp capacity is exhausted. | The lamp must be replaced after 8000 operating hours. | |
| Flow rate is too high. | Reduce the pump capacity. | |
| UVC lamp is not lit. | Power plug not connected | Connect the power plug. |
| UVC lamp defective | Replace the UVC lamp. | |
| Connection defective | Check the electrical connection. |
MAINTENANCE AND CLEANING
If necessary, clean the unit with clear water using a soft brush.
- Do not use cleaning agents or chemical solutions. We recommend using OASE PumpClean for removing calcium deposits.
Dismantling the unit head

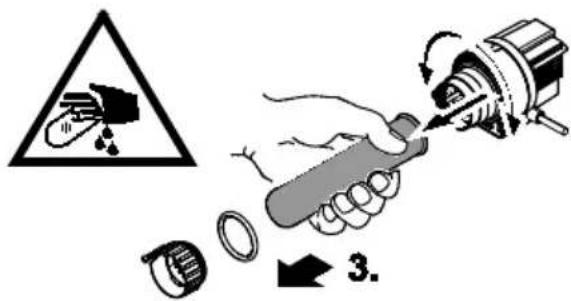
CAUTION
The ultra-violet radiation of the UVC lamp can burn your eyes and skin.
- Never operate the UVC lamp outside its casing.
- Never operate the UVC lamp in a casing that is defective.

Attention! Breakable glass.
Possible consequences: Injury to your hands caused by cuts.
Protective measures: Handle the quartz glass and UVC lamp with care.
How to proceed:
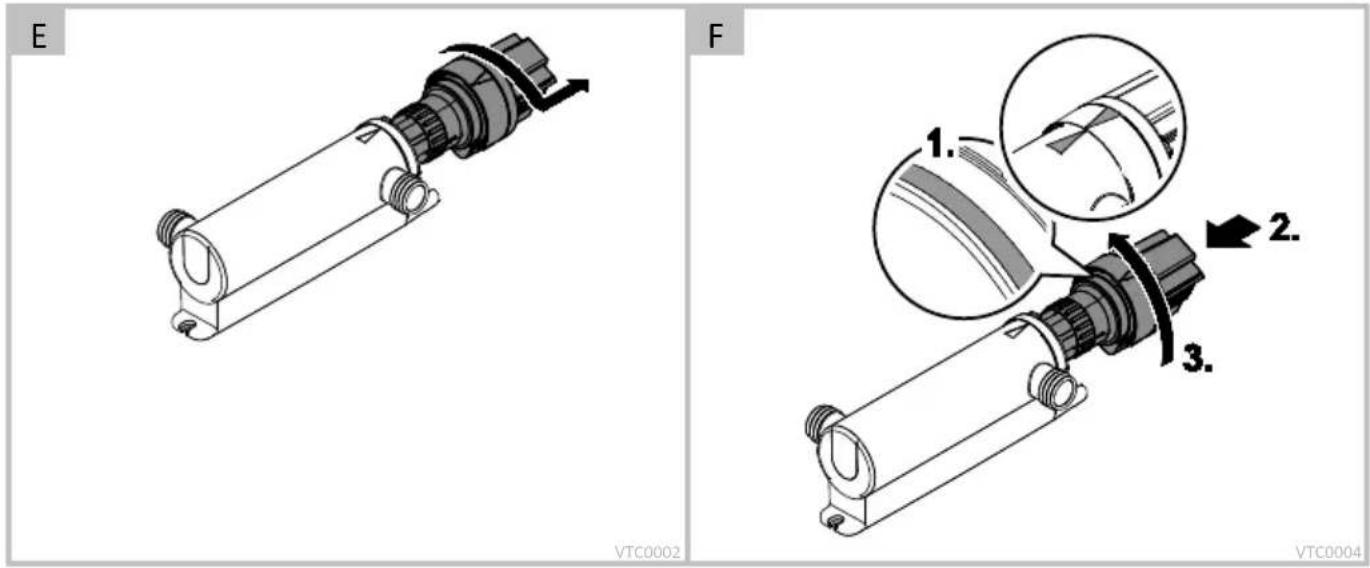
□ E
- Turn the unit head counter-clockwise up to the stop and carefully pull it out of the casing together with the O ring.
- Clean the casing from the inside and the outside.

NOTE
For safety reasons, the UVC lamp can only be switched on when the unit head has been correctly fitted into the casing.
Fitting the unit head
How to proceed:
□F
- Check the O ring at the unit head for correct seating. — Clean the O ring, replace if damaged.
- Carefully push the unit head into the casing up to the stop while applying slight pressure.
- Turn the unit head slightly so that the tenons and grooves of the bayonet closure intermesh.
- Turn the unit head clockwise up to the stop.
- The two arrows on the casing and unit head must point towards one another.
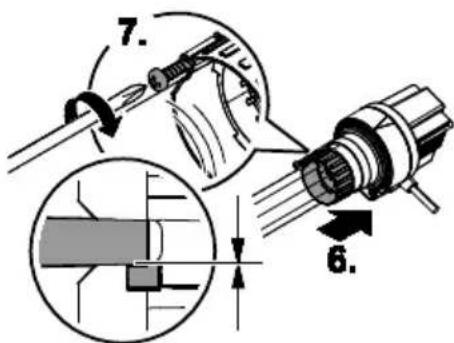
Cleaning the quartz glass / Replacing the UVC lamp
Replace the UVC lamp after max. 8,000 operating hours. This ensures optimum filtering performance.

Attention! Breakable glass.
Possible consequences: Injury to your hands caused by cuts.
Protective measures: Handle the quartz glass and UVC lamp with care.
Prerequisite
- The unit head is removed. (→ Dismantling the unit head)
- Ensure that the identification and capacity data of the UVC lamps used correspond to the information on the unit type plate. (→ Technical data)
How to proceed:
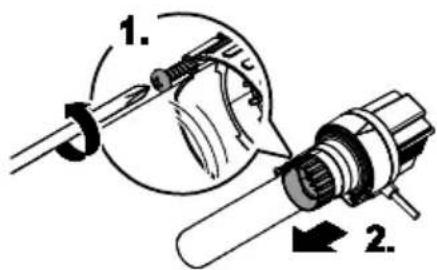
□G
- Loosen the self-tapping screw until the the screw tip is sunk in the housing of the clamping screw.
- Unscrew the clamping screw counter-clockwise.
-
Remove the quartz glass including the O ring towards the front with a slight turning movement.
-
Pull out the UVC lamp and replace.
-
Push the quartz glass including the O ring as far as the stop in the unit head.
-
Clean the O ring, replace if damaged.
-
Ensure that the O ring is located in the gap between the unit head and the quartz glass.
-
Tighten the clamping screw clockwise up to the stop.
-
Tighten the self-tapping screw.
-
Wipe the quartz glass tube with a damp cloth
-
On completion of the work, fit the unit head. (→ Fitting the unit head)
WEAR PARTS
The following components are wear parts and are excluded from the warranty:
• UVC lamp, quartz glass and O ring for quartz glass
DISPOSAL
Do not dispose of this unit with domestic waste! For disposal purposes, please use the return system provided. Render the unit unusable beforehand by cutting the cables.
GUARANTEE
For this OASE unit purchased by you, OASE GmbH assumes a 24 month manufacturer's guarantee in accordance with the guarantee conditions laid down in the following. The guarantee period starts with the first purchase from an OASE specialist dealer. In other words, in the event of a resale, the guarantee period will not start again. If services are provided under the terms of this guarantee, this does not lead to extension or renewal of the guarantee period. Your legal rights as a purchaser, especially those ensuing from the warranty, persist. They are not restricted by this guarantee.
Guarantee conditions
OASE GmbH guarantees impeccable, purpose-related properties and workmanship, expert assembly and proper functionality. Subject to our discretion, the guarantee refers to free-of-charge repair or free-of-charge supply of spare parts or of a replacement unit respectively. Should the unit type concerned no longer be manufactured, we reserve the right, at our discretion, to supply a replacement unit from our range that is closest to the type subject to complaint. Claims, the origin of which can be traced back to installation and operating faults as well as lack of care, e.g. the use of unsuitable cleaning materials or negligent maintenance, use other than that intended, damage due to accidents, falls, impact, effect of frost, cutting plugs, shortening cables, calcium deposits or improper attempts to repair the unit, are not covered by our guarantee. We hereby refer to the proper use as specified in the instructions of use that form an integral part of the guarantee. Wear parts such as bulbs etc. are exempted from the guarantee.
The refund of costs for removal and installation, checks, claims for lost profit and damages are exempted from the guarantee together with further reaching claims for damages and loss of whatever nature caused by the unit or its use.
The guarantee is only valid in the country in which the unit was purchased from an OASE dealer. This guarantee is governed by German law under the exclusion of the agreement of the United Nations covering contracts governing the international sale of goods (CISG) regulations.
Guarantee claims can only be brought forward by presenting the sales receipt to us, OASE GmbH, Tecklenburger Straße 161 in D-48477 Hörstel, Germany by returning to us the unit or part of the unit subject to complaint, freight free, at your own risk, accompanied by a copy of the original purchase receipt from the OASE specialist dealer, this guarantee document and written information of the fault encountered.
TECHNICAL DATA
| Description | ClearTronic | ||||
| 7 W | 9 W | 11 W | |||
| Rated voltage | V AC | 230 | 230 | 230 | |
| Mains frequency | Hz | 50 | 50 | 50 | |
| Power consumption | W | 10 | 12 | 14 | |
| Protection type | IP24 | IP24 | IP24 | ||
| Permissible water temperature | °C | +4 ... +35 | +4 ... +35 | +4 ... +35 | |
| Recommended for an aquarium volume of | I | 250 | 400 | 600 | |
| UVC lamp | Type | 7 W TC-S (UV-C) | 9 W TC-S (UV-C) | 11 W TC-S (UV-C) | |
| Recommended max. flow rate | For cloudy water | I/h | 350 | 500 | 750 |
| For removal of germs | I/h | 250 | 400 | 600 | |
| Operating pressure | Max. | bar | 0.5 | 0.5 | 0.5 |
| Hose connector, inlet/outlet | Hose inside diameter | mm | 16 | 16 | 16 |
| Dimensions | Length | mm | 330 | 330 | 330 |
| Description | ClearTronic | |||
| 7 W | 9 W | 11 W | ||
| Width | mm | 120 | 120 | 120 |
| Height | mm | 100 | 100 | 100 |
| Weight | kg | 1.4 | 1.4 | 1.4 |
SYMBOLS ON THE UNIT
| IP 24 | Protection to prevent contact with dangerous components, splash water protection | |
 | Dangerous UVC radiation | |
 | Protect from direct sun radiation. | |
 | The lamp is suitable for direct fastening to normally flammable mounting surfaces. | |
 | Remove at temperatures of 0 °C and below. | |
 | Do not dispose of with household waste. | |
 | Read and adhere to the instructions for use. | |
AFVOER VAN HET AFGEDANKTE APPARAAT
OPSTILLING OG TILSLUTNING
Forudsætning
- Apparathovedet er taget af. (→ Afmontering af apparathoved)
SYMBOLER PÅ APPARATET
SYMBOLER PÅ APPARATET
INSTALLATION OCH ANSLUTNING
Förutsättning
- Enhetens ovandel har tagits av. (→ Demontera apparatens ovandel)
Installera apparaten
Gör så här:
□ B
natural_image
Abstract line drawing of three overlapping curved shapes resembling stylized leaves or petals (no text or symbols)- ClearTronic 7 W / 9 W / 11 W
- Translation of the original Operating Instructions
- SAFETY INFORMATION
- Only allow children to carry out cleaning and user maintenance under supervision.
- Safe operation
- Electrical connection
- Symbols used in these instructions
- CAUTION
- NOTE
- Additional information
- PRODUCT DESCRIPTION
- Scope of delivery
- Function description
- Intended use
- INSTALLATION AND CONNECTION
- Prerequisite
- Set-up the unit
- Connect the unit
- COMMISSIONING/START-UP
- Switching ON/switching OFF
- Check the function.
- MAINTENANCE AND CLEANING
- Dismantling the unit head
- Fitting the unit head
- Cleaning the quartz glass / Replacing the UVC lamp
- WEAR PARTS
- DISPOSAL
- GUARANTEE
- Guarantee conditions
- AFVOER VAN HET AFGEDANKTE APPARAAT
- OPSTILLING OG TILSLUTNING
- Forudsætning
- INSTALLATION OCH ANSLUTNING
- Förutsättning
- Installera apparaten
Brand : OASE
Model : ClearTronic 9 W
Category : Water filter