
EUROSET 2020 - Cordless phone SIEMENS - Free user manual and instructions
Find the device manual for free EUROSET 2020 SIEMENS in PDF.

| Brand | Siemens |
| Model | Euroset 2020 |
| Type | Cordless Telephone |
| Power Supply | 2 AA 1.5V alkaline batteries |
| Main Functions | Directory of 20 numbers, redial, call list of 10 entries, mute, double call, call forwarding, network prefix programming |
| Display | Display with symbols (call, programming, etc.) |
| Ringtone | 3 volume levels, 10 melodies |
| Dialing | Tone dialing (DTMF) and pulse dialing |
| Maintenance | Damp or antistatic cloth, do not use corrosive products |
| Safety | Do not use in a bathroom or shower |
| Batteries | 2 AA 1.5V alkaline batteries (replacement) |
| Call List | 10 entries, stores number and time |
| Lock | Keypad lock to prevent unauthorized use |
| Destination Keys | 20 destination keys on two levels |
Frequently Asked Questions - EUROSET 2020 SIEMENS
User questions about EUROSET 2020 SIEMENS
0 question about this device. Answer the ones you know or ask your own.
Ask a new question about this device
Download the instructions for your Cordless phone in PDF format for free! Find your manual EUROSET 2020 - SIEMENS and take your electronic device back in hand. On this page are published all the documents necessary for the use of your device. EUROSET 2020 by SIEMENS.
USER MANUAL EUROSET 2020 SIEMENS
Gigaset Communications GmbH is the legal successor to Siemens Home and Office Communication Devices GmbH & Co. KG (SHC), which in turn continued the Gigaset business of Siemens AG. Any statements made by Siemens AG or SHC that are found in the user guides should therefore be understood as statements of Gigaset Communications GmbH.
We hope you enjoy your Gigaset.
Gigaset Communications GmbH is a trademark
licensee of Siemens AG
© Gigaset Communications GmbH 2008
All rights reserved.
Subject to availability. Rights of modifications reserved.
Explanation of keys and display symbols
Keys

Set key

Shift key

Mute key

Enquiry call key

Redial key

Call list key

# Special function
Display

in save mode

Shift key pressed

Microphone off

Enquiry call key pressed

Call waiting on

Call forwarding immediately

Call forwarding on no reply

Call forwarding on busy

Message received

Anonymous call on

Battery exhausted

Call (with calling line
identification restriction)

Ready

Cursor

Pause

Memory empty

Telephone locked

Call number

In tone dialling mode:

key pressed

key pressed

Siemens Information
and Communications
natural_image
Diagram of a device with cable and connector, showing internal components and wiring (no text or symbols)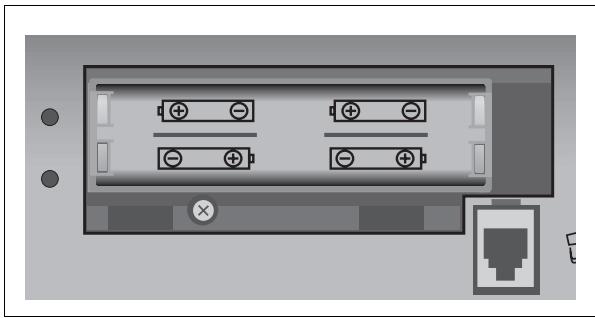
natural_image
Diagram of a computer interface panel with ports and connectors (no text or symbols)☐ Inserting/ replacing the batteries
A caller's number will only appear on the display and calls will only be saved in the call list if batteries have been inserted.
If no batteries have been inserted, or if the battery charge is critically low, the □ symbol appears on the display when the handset is lifted.
Before inserting or removing the batteries, disconnect the telephone cord from the wall socket or from the phone itself.
Only use 1.5 V AA type alkaline batteries, as specified!
- Slide off the battery compartment cover from the edge of the base of the housing (see diagram S. 3).
- Insert the batteries (1.5 V Type AA alkaline) into the battery compartment in accordance with the polarity symbols (+/-).
- Replace the battery compartment cover.
Setting the internal clock


Lift the handset, then start the function.
The time currently set is displayed in 24-hour clock mode.

Enter the correct time in hours

Press the set key, then replace the handset.
Your telephone is now ready to use.
Régler l'horloge interne


For your safety and protection, the phone should not be used in bathrooms or shower rooms (wet rooms). The phone is not splash-proof.
The phone should only be disposed of in an environmentally friendly manner.
Never give the Euroset 2020 to a third party without the operating instructions.
Note on saving phone settings
Various telephone setting have to be confirmed with the set key ⏻ if they are to be permanently available.
To cancel the setting procedure (e.g. after an incorrect entry) without saving, replace the handset instead of pressing ⏻ . The original setting is then unchanged.
Saving call numbers
☐ Saving repertory numbers/notebook function
You can save up to 20 call numbers using the two levels of the repertory keys, see also „Using functions for additional services on public telephone systems“ on page 10.
Lift the handset, then press the set key. (Also press ⏻ for the 2nd storage level.)
Press the repertory key under which the repertory call number is to be stored. Any call number already saved will appear on the display. If the memory for this repertory key is empty, the display shows a symbol
Enter the call number to be stored (max. 32 digits). or Save with notebook function:
Press the redial key. The last call number dialled is displayed. or Save from the call list (if this service is available)
Press the call list key until the required call number appears on the display. Press the set key then replace the handset.
You can store dial pauses of 3 seconds by pressing ➞ (a pause should not occur as the first element in a call number).
After the 20th digit, any subsequent digits are shifted from right to left on the display.
Dialling call numbers
☐ Dialling call numbers

Lift the handset.

Dial the call number.
Any digits following the 20th digit are shifted from right to left on the display. Dial pauses of 3 seconds can be inserted by pressing ➡ (a pause should not occur as the first element in a call number).
☐ Dialling with the repertory

Lift the handset.
If necessary, press ⏻ (for a 2nd level repertory key).
Harris

Press the repertory key.
□ Last number redial
The last number dialled is automatically saved (max. 32 digits).

Lift the handset.

Press the redial key.
The last number dialled is redialled.
Hearing and being heard
☐ Setting the volume of tone ringing
There are 3 tone ringer volume settings (factory setting: 3).
Setting while the telephone is in standby:


Lift the handset, then start the function.


Press one of the keys 0 ... 3:
0 = Tone ringing off, 1 = Minimum volume,
3 = Maximum volume.


Press the set key, then replace the handset.
Setting while the phone is ringing:
Press one of the keys 0 ... 3 before lifting the handset.
The last value set is stored.
☐ Setting the frequency of the ringing tone
There are 3 settings for the frequency (speed) of tone ringing (factory setting: 3).


Lift the handset, then start the function.
Press one of the keys 1 ... 3:


1 = Lowest frequency; 3 = Highest frequency.


Press the set key, then replace the handset.
Setting the tone ringing melody
10 different melodies can be set for tone ringing (factory setting: melody 0).


Lift the handset, then start the function.


Press one of the keys 0 ... 9


Press the set key, then replace the handset.
Mute
You can deactivate the handset microphone so that the called party can no longer hear you.
Press the mute key during the call.
To reactivate the microphone, press the key again.
Setting the handset volume
There are 2 handset volume settings (factory setting: 1).


Lift the handset, then start the function.


Press 1 or 2:
1 = Normal volume,
2 = Increased volume.


Press the set key, then replace the handset.
Lock, length of call display
The telephone can be locked to prevent unauthorised use.
□ Locking/unlocking the telephone
The telephone can be locked to prevent dialling. Incoming calls are not affected by the lock.


Lift the handset, then start the function.


0 = Unlock,
1 = Lock:


Press the set key, then replace the handset.
When the phone is locked, the display shows .
Is the telephone locked, you can temporarily deactivate the telephone lock (for one call) with the procedur ↗ → TUV 8 ABC 2 ↗ .
☐ Length of call display on/off
Your telephone can display the approximate length of a call. If call display is on, then the time display starts 8 seconds after the last digit is dialled.


Lift the handset,


then start the function.


0 = call display off,
1 = call display


Press the set key, then replace the handset.
Operation at private PABXs
☐ Entering/deleting exchange codes
If you are using your telephone on a private PABX, you may need to store one or more exchange codes. A dialling pause of 3 seconds is automatically set when the exchange code is programmed.
| → | 0 | Lift the handset, then start the function. |
| If no exchange code has been programmed, the display shows ≡. | ||
| If one or more exchange codes have been stored, these are displayed side-by-side; the code currently available for editing flashes. | ||
| Press ➡ to switch between the displayed exchange codes as necessary in order to edit them as follows: | ||
| (a) To delete an exchange code:Press the set key and replace the handset. | ||
| (b) To enter an exchange code:Enter a one to three-digit exchange code. | ||
| If you want to enter another exchange code:Press the redial key and enter the next exchange code. | ||
| Press the set key, then replace the handset. |
□ Switching the dialling mode
| Lift the handset, then start the function. | |
| 1 or 2 | 1 = Tone dialling.2 = Pulse dialling without flash function. |
| Press the set key, then replace the handset. |
☐ Switching the dialling mode while connected
If your telephone is set to pulse dialling and you want to use functions that require tone dialling (e.g. remote replay on an answering machine), you can switch the dialling mode while connected.
* While connected: press the asterisk key. The dialling mode is switched.
Enter the digits for remote control/data transfer.
You can revert to the original dialling mode by replacing the handset.
☐ Recall key (use on private PABXs)
During a trunk call, you can make an enquiry call or transfer a call. To do this, press the recall key Ⓡ. The next step depends on your PABX. In the factory setting, the recall key function is set to a flash time (interrupt time) of 90 ms to permit new features to be used on public telephone systems. When your telephone is connected to a private PABX, it may be necessary to change the flash time (e.g. 600 ms). Please check the operating instructions for your PABX.
Setting the flash time for the recall key
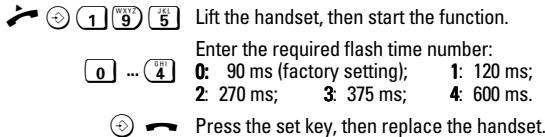
Using functions for additional services on public telephone systems
If you wish to use services that are activated with the recall key, you should first make sure that the correct flash time is set for the key.
☐ Recall key (on public telephone systems)
This key is required in order to use certain additional services on public telephone systems, for example "Callback on busy".
Note:
Depending on the country where the telephone is used, it may be necessary to set the appropriate flash time before using the recall key (see "Setting the flash time for the recall key" on page 10). Your public telephone system offers a range of additional useful services - some of them only available on order/application (e.g. call number transmission, call forwarding, callback on busy, timed reminder, etc.).
☐ Using call number transmission
Under the following conditions call numbers for received calls will be (a) shown on the display of the Euroset 2020 and (b) all received calls will be automatically stored in a call list:
- Both your operator and the caller's operator provide call number transmission.
- Both you and the caller have applied to the operator for this service (if necessary).
If these requirements are met, but a caller has chosen to suppress call number transmission before making the call, the display will show "____" instead of a (flashing) number.
Up to 20 digits of a call number can be shown on the display. Longer call numbers are cut off from the start of the number (e.g. the prefix).
□ Call list
The call list contains a maximum of 10 entries. A new entry is not created if a subscriber calls more than once. Up to 99 repeated calls are shown by a counter in the additional information.
Order of list entries: The most recent call appears in the first position (place number "1"). Older calls are shifted to positions 2 to 10 (place number "0"). The entry at position 10 is deleted if the last call came from a call number not yet stored in the call list.
A call list entry contains the following information:
- call number,
- date and time (if this is transmitted by the telephone, otherwise just the time as recorded by the telephone's internal clock),
• number of calls from the relevant call number.
In the call list you can
• scroll through the call numbers displayed, - obtain additional information (if this is transmitted by the telephone, otherwise just the time as recorded by the telephone's internal clock and the frequency of a call),
- delete entries,
- save call numbers from the call list under a repertory key (see "Saving repertory numbers/notebook function" on page 6),
• dial a displayed number directly.
Viewing a call list and dialling a call number
If the call list contains entries that have not yet been viewed, then the call number of the last caller flashes on the display. Follow the procedure below to activate the call list, scroll through the entries, view additional information for a call and call back directly:

Lift the handset and press the call list key.
The call number of the most recent call appears on the display. The associated place number "1" appears on the left next to the call number.

- Scroll through call list
Press the call list key repeatedly. The call number of the previous call is displayed in each case.

• View additional information
Press the shift key. The date and time of the call displayed appear, along with the corresponding number of calls.

- Return to call list (call number display) Press the shift key again.
- Dial a call number

Enter the place number of the required call number. The call number is dialled immediately.
Deleting call list entries

Lift the handset and press the call list key.

- Delete all entries at the same time Press the set key, then (*), then press the set key again. All entries are deleted and the call list is closed.
- Delete an individual entry If necessary, use Ⓥ to scroll through the list to find the place number of the required entry.

Press the set key, then enter the place number of the entry, then press the set key again. The entry is deleted and the call list is closed.
☐ "Message received" display
Various operators offer services for storing incoming messages from callers (e.g. call answering services).
The operator may use your phone to inform you if one or more newly received messages for you have been stored. This information from the operator is indicated on the Euroset 2020 display by means of a ☑ symbol.
You can now dial the relevant call number in order to check the stored caller messages. The ☑ symbol disappears when there are no new messages for you.
☐ Using the repertory keys as "function keys"
Various services/functions on public telephone systems (which may require a special order/application) can be selected using defined key combinations available from your operator. The necessary key combinations can be saved on repertory keys as normal call numbers and can be "dialled" and deactivated in the usual way.
Note:
If you activate the symbol display and store functions on the 2nd level of the repertory keys, then you can use the "function keys" to link the activation and deactivation of various services with the appearance and disappearance of certain symbols on the display.
You should therefore remember, when assigning the repertory keys on the 2nd level, that the activation and deactivation of the display symbols , ^ , r , 13 and r^2-3 is linked to very specific keys on the second level – irrespective of what call numbers or functions are set there!
Activating/deactivating the symbol display
Symbol display can be activates or deactivated as required. The factory setting is for activated display.
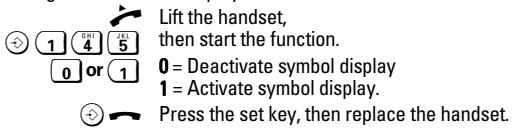
If you press ⏻ and then one of the following repertory keys when symbol display is active, then the appropriate display symbol will be activated/de-activated on the display:
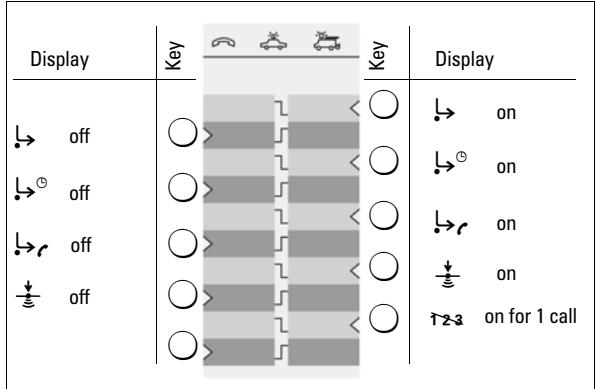
Recommended use of symbols and assigned keys:
→ Call forwarding immediately → Call forwarding on busy → Call forwarding on no reply ↓ Call waiting ↑2-3 Anonymous call
Assigning/changing function keys

Lift the handset, then start the function.
Press the function key you want to assign.
If the function key is already assigned, the key assignment is shown on the display. If the memory for this function is empty, then a symbol appears on the display
Enter the key combination/code for the service you want.
Important
If part of the key combination to be saved consists of numbers/characters that may vary from case to case (e.g. a call number for a call forwarding destination or a time for a reminder call), then the shift key ⏻ must be stored at this point.
This key causes the cursor to flash for the variable part to be entered when the service is subsequently activated.
Press the set key, then replace the handset.
Example: call forwarding
The following is an example of how to use repertory keys as "function keys". If the symbol display is activated and "call forwarding" is selected, for example, then the relevant symbol in the display appears when the service is activated and disappears when it is deactivated.
The key sequence for activating the "call forwarding immediately" function on your operator's system may consist of three parts:
| Activate function | Call forwarding destination | End function |
| Call number of the call forwarding destination |
The following options are available to you:
-
Dial the complete key sequence each time using the keys.
-
Store the key sequence on repertory keys
(a) as an entire function together with the call number of a fixed call forwarding destination;
(b) just to start and stop the function. You retain the option of defining a call forwarding destination that may vary from case to case.
• Storing call forwarding on a function key

Lift the handset, then start the function.

Press the repertory key for symbol display " on" (see "Activating/deactivating the symbol display" on page 12). An call number already stored ppears on the display. If the memory for this repertory key is empty, the display shows .

Activate the "call forwarding immediately" function.
(a) Define the call number of the call forwarding destination

Enter the call number of the call forwarding destination.

Press the hash key to mark the end of the function.

Press the set key, then replace the handset.
or
(b) Reserve a variable call forwarding destination
Press the shift key.
This key causes the cursor to flash for the call number of the call forwarding destination to be entered when "call forwarding immediately" is subsequently activated.

Press the hash key to mark the end of the function.

Press the set key, then replace the handset.
- Activating call forwarding with a function key
Lift the handset, then press the shift key.
Press the repertory key to display the " on" symbol. appears on the display.
(a) Define the call number of the call forwarding destination
You may hear an announcement indicating that the service is active.
Replace the handset. From now on, incoming calls will be forwarded to the call forwarding destination and your telephone will not ring.
(b) Variable call forwarding destination
Enter the call number for the call forwarding destination.
Press the redial key to mark the end of the entered call number. You may hear an announcement indicating that the service is active.
Replace the handset. From now on, incoming calls will be forwarded to the call forwarding destination and your telephone will not ring.
- Storing "deactivate call forwarding" on a function key
In the previous example, call forwarding is deactivated on the operator's system using the key sequence # 2 1 # .
This key sequence can also be stored on a separate repertory key. If the symbol display is activated and if the service is activated as described, then the symbol disappears from the display after the service is deactivated.
Lift the handset, then start the function.
Press the repertory key for displaying the "→ off" symbol (see "Activating/deactivating the symbol display" on page 12).
# ABC 2 1 # Activate the "call forwarding immediately" function.
Press the set key then replace the handset.
- Deactivating call forwarding with a function key
Lift the handset, then press the shift key.
Press the repertory key to display the " off" symbol. The symbol disappears and you may hear an announcement indicating that the service is deactivated.
Replace the handset.
Additional information
☐ Recommendations for telephone installation
- Do not expose the telephone to direct sunlight or other heat sources.
• Operation at temperatures between +5°C and +40°C. - A distance of at least one meter must be observed between the telephone and radio equipment, such as radio telephones, radio paging devices or TVs.
Otherwise telephone traffic can be affected. - Do not install the telephone in rooms where large quantities of dust accumulate as this can considerably reduce the service life of the telephone.
- To clean the telephone, simply wipe it with a damp cloth or an antistatic wipe. Never use a dry cloth (danger of electrostatic discharge) or abrasive cleaning agents!
- Contact with unit parts (e.g. rubber feet) can leave marks on surface finishes applied to furniture.
☐ If your telephone is not functioning correctly
No tone: The tone ringing volume may be set to 0.
Handset off-hook, no dial tone: is the connecting cord inserted correctly in the telephone and the wall socket?
A dial tone is audible, but dialling is not possible: the connection is OK. Is the dialling mode set correctly? See "Switching the dialling mode" on page 9.
PABXs only: Connection fails or is incorrect when a number is dialled from memory (e.g. redial, speed dialling): program the exchange code.
The other party cannot hear you: has the mute key been activated? Press the key again. Is the handset cord connector inserted correctly?
Recall key not working: set a suitable flash time.
Caller's number and call list are not displayed:
See "Inserting/ replacing the batteries" on page 4 and "Using call number transmission" on page 10.
□ Contacts
Your dealer will be pleased to answer any questions you may have about how to operate the phone.
Questions about the network and its features should be addressed to your network provider.
2: 270 ms; 3: 375 ms; 4: 600 ms.
◇
2: 270 ms; 3: 375 ms; 4: 600 ms.
bar
| Display | Descriptions | Frequency | | :--- | :--- | :--- | | ▶ | des. | ○ > | | ▶ | des. | ○ > | | ▶ | des. | ○ > | | ⏱ | des. | ○ > | | ⏱ | des. | ○ > | | ▶ | ▶ | ▶ < ○ | | ▶ | ▶ | ▶ < ○ | | ▶ | ▶ | ▶ < ○ | | ▶ | ▶ | ▶ < ○ | | ▶ | ▶ | ▶ < ○ | | ▶ | ▶ | ▶ < ○ | | ▶ | ▶ | ▶ < ○ | | ▶ | ▶ | ▶ < ○ | | ▶ | ▶ | ▶ < ○ | | ▷ | des. | ○ > | | ▷ | des. | ○ > | | ▷ | des. | ○ > | | ▷ | des. | ○ > | | ▷ | des. | ○ > | | ▷ | des. | ○ > | | ▷ | des. | ○ > | | ▷ | des. | ○ > | | ▷ | des. | ○ > | | ▷ | des. | ○ > | | ▷ | des. | ○ < ○ | | ▷ | des. | ○ < ○ | | ▷ | des. | ○ < ○ | | ▷ | des. | ○ < ○ | | ▷ | des. | ○ < ○ | | ▷ | des. | ○ < ○ | | ▷ | des. | ○ < ○ | | ▷ | des. | ○ < ○ | | ▷ | des. | ○ < ○ | | ▷ | des. | ○ < ○ Act. Act. Act. Act. Act. Act. Act. Act. Act. Act. Act. Act. Act. Act. Act. Act. Act. Act. Act. Act. Act. Act. Act. Act. Act. Act. Act. Act. Act. Act. Act. Act. Act. Act. 1 llamadaInformation and Communication Products
Hofmannstraße 51
D-81359 Munich
Siemens Aktiengesellschaft
© Siemens AG 2000
All rights reserved.
Subject to availability and tech-
nical changes.
Reference no.:
A31008-E2020-B100-1-3S19
(01/2000)

- Explanation of keys and display symbols
- Keys
- Display
- ☐ Inserting/ replacing the batteries
- Before inserting or removing the batteries, disconnect the telephone cord from the wall socket or from the phone itself.
- Only use 1.5 V AA type alkaline batteries, as specified!
- Setting the internal clock
- Régler l'horloge interne
- Note on saving phone settings
- Saving call numbers
- ☐ Saving repertory numbers/notebook function
- Dialling call numbers
- ☐ Dialling call numbers
- ☐ Dialling with the repertory
- □ Last number redial
- Hearing and being heard
- ☐ Setting the volume of tone ringing
- Setting while the telephone is in standby:
- Setting while the phone is ringing:
- ☐ Setting the frequency of the ringing tone
- Setting the tone ringing melody
- Mute
- Setting the handset volume
- Lock, length of call display
- □ Locking/unlocking the telephone
- ☐ Length of call display on/off
- Operation at private PABXs
- ☐ Entering/deleting exchange codes
- □ Switching the dialling mode
- ☐ Switching the dialling mode while connected
- ☐ Recall key (use on private PABXs)
- Setting the flash time for the recall key
- Using functions for additional services on public telephone systems
- ☐ Recall key (on public telephone systems)
- Note:
- ☐ Using call number transmission
- □ Call list
- Viewing a call list and dialling a call number
- Deleting call list entries
- ☐ "Message received" display
- ☐ Using the repertory keys as "function keys"
- Activating/deactivating the symbol display
- Recommended use of symbols and assigned keys:
- Assigning/changing function keys
- Important
- Example: call forwarding
- - Activating call forwarding with a function key
- Define the call number of the call forwarding destination
- Variable call forwarding destination
- - Storing "deactivate call forwarding" on a function key
- - Deactivating call forwarding with a function key
- Additional information
- ☐ Recommendations for telephone installation
- ☐ If your telephone is not functioning correctly
- □ Contacts
Brand : SIEMENS
Model : EUROSET 2020
Category : Cordless phone