1499511 - Garden hose Toolcraft - Free user manual and instructions
Find the device manual for free 1499511 Toolcraft in PDF.
Document temporarily unavailable
The manual is currently being transferred to our new server. It will be accessible again in a few hours. Thank you for your patience.
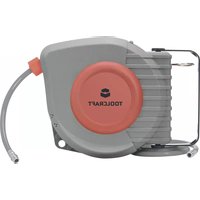
| Product type | Compressed air hose reel |
| Brand | Toolcraft |
| Model | 1499511 |
| Housing material | PP (polypropylene) |
| Hose material | Reinforced PU |
| Output hose length | 9 m |
| Input hose length | 1 m |
| Hose diameter (inside/outside) | 8 x 12 mm |
| Maximum working pressure | 7 bar |
| Minimum burst pressure | 28 bar |
| Connection fitting | 1/4" (BSP) |
| Rotation | 180° |
| Adjustable hose stop | Yes |
| Automatic hose guide | Yes |
| Dimensions (L x W x H) | 342 x 261 x 151 mm |
| Weight | 2.68 kg |
| Operating conditions | -5 to +45 °C, 20-80% RH (non-condensing) |
| Use | Indoor only |
| Safety instructions | Read the manual; not for children; do not use outdoors or in explosive atmospheres |
| Maintenance | Clean with a dry, lint-free cloth; do not use harsh products |
| Hose cleaning | With mild detergent only |
| Repairs | To be carried out by a professional |
Frequently Asked Questions - 1499511 Toolcraft
User questions about 1499511 Toolcraft
0 question about this device. Answer the ones you know or ask your own.
Ask a new question about this device
Download the instructions for your Garden hose in PDF format for free! Find your manual 1499511 - Toolcraft and take your electronic device back in hand. On this page are published all the documents necessary for the use of your device. 1499511 by Toolcraft.