GS 8863 - Fridge SEVERIN - Free user manual and instructions
Find the device manual for free GS 8863 SEVERIN in PDF.
| Product type | Fridge-freezer (4 star) |
| Brand | Severin |
| Model | GS 8863 |
| Total volume | 61 L |
| Dimensions (H × W × D) | 840 × 450 × 475 mm |
| Weight | 23,7 kg |
| Energy class | E |
| Annual consumption | 156 kWh/year |
| Climate class | N-ST-T (16-43 °C) |
| Freezing capacity | 3,0 kg/24h |
| Storage time in case of power failure | 8 h |
| Noise level | 38 dB(A) – Class C |
| Refrigerant | Isobutane (R600a) |
| Defrosting | Manual |
| Quick freezing | No |
| Reversible door | Yes |
| Adjustable feet | Yes, at the front |
| Installation type | Freestanding |
| Power supply | See rating plate (230 V ~ 50 Hz) |
| Ice cube making | Yes, with included tray |
Frequently Asked Questions - GS 8863 SEVERIN
User questions about GS 8863 SEVERIN
0 question about this device. Answer the ones you know or ask your own.
Ask a new question about this device
Download the instructions for your Fridge in PDF format for free! Find your manual GS 8863 - SEVERIN and take your electronic device back in hand. On this page are published all the documents necessary for the use of your device. GS 8863 by SEVERIN.
USER MANUAL GS 8863 SEVERIN
natural_image
White rectangular refrigerator with 'SEVERIK' branding on the front panel (no other text or symbols visible)ART.-NR. GS 8863
GB Instructions for use Tabletop freezer 15
- WARNUNG: BRANDGEFAHR!
text_image
Warning sign depicting a flame symbol inside a triangle, indicating hazard or cautiontext_image
Diagram of a refrigerator with numbered parts for identificationtext_image
Two vertical panels with checkmark and cross symbols, likely indicating approval or rejection statusAufstellmaße
natural_image
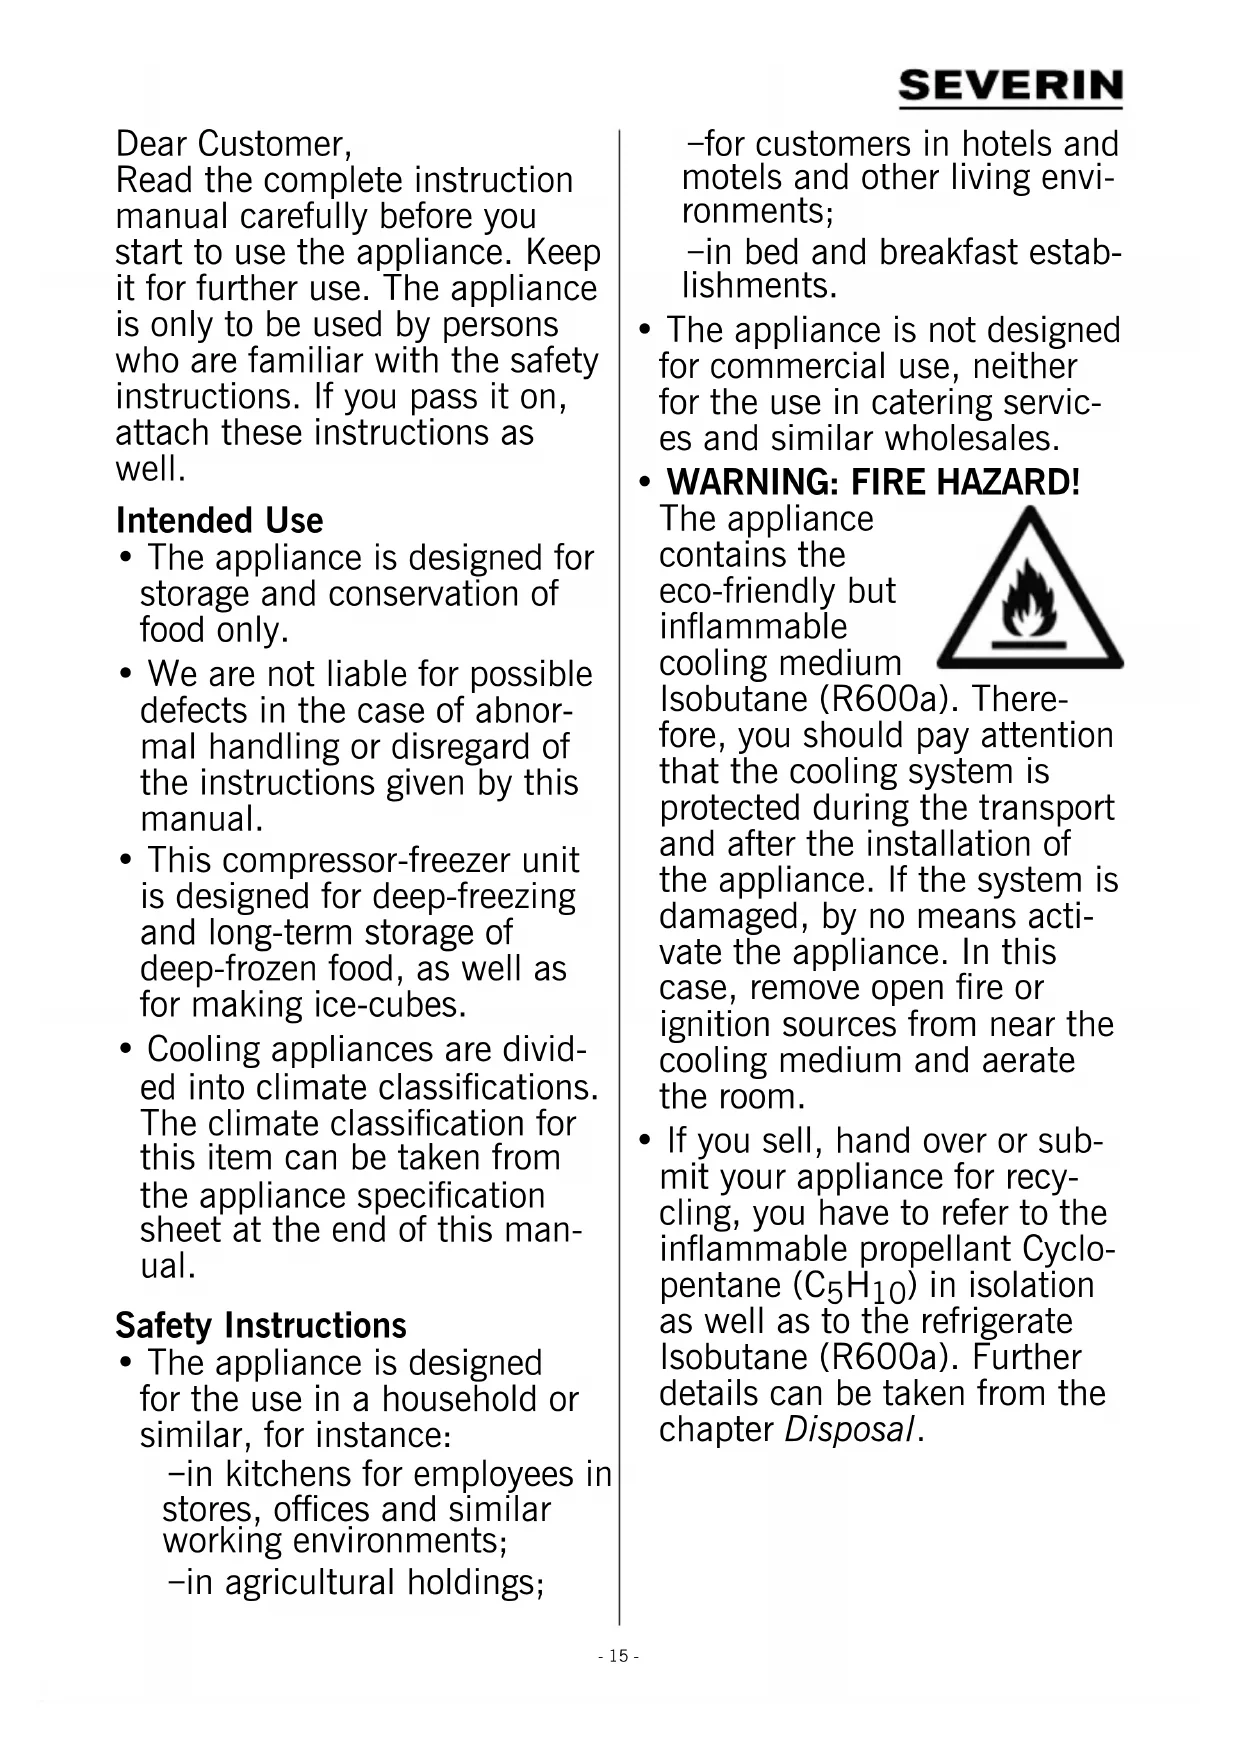
Technical line drawing of a refrigerator with open lid and side panel, showing internal compartments and mounting hardware (no text or symbols)Dear Customer, Read the complete instruction manual carefully before you start to use the appliance. Keep it for further use. The appliance is only to be used by persons who are familiar with the safety instructions. If you pass it on, attach these instructions as well.
Intended Use
- The appliance is designed for storage and conservation of food only.
- We are not liable for possible defects in the case of abnormal handling or disregard of the instructions given by this manual.
- This compressor-freezer unit is designed for deep-freezing and long-term storage of deep-frozen food, as well as for making ice-cubes.
- Cooling appliances are divided into climate classifications. The climate classification for this item can be taken from the appliance specification sheet at the end of this manual.
Safety Instructions
- The appliance is designed for the use in a household or similar, for instance:
-in kitchens for employees in stores, offices and similar working environments; -in agricultural holdings;
-for customers in hotels and motels and other living environments;
-in bed and breakfast establishments.
- The appliance is not designed for commercial use, neither for the use in catering services and similar wholesales.
• WARNING: FIRE HAZARD!
The appliance contains the eco-friendly but inflammable cooling medium
text_image
Warning sign depicting a flame symbol in a triangular shapeIsobutane (R600a). Therefore, you should pay attention that the cooling system is protected during the transport and after the installation of the appliance. If the system is damaged, by no means activate the appliance. In this case, remove open fire or ignition sources from near the cooling medium and aerate the room.
- If you sell, hand over or submit your appliance for recycling, you have to refer to the inflammable propellant Cyclopentane (C 5 H 10 ) in isolation as well as to the refrigerate Isobutane (R600a). Further details can be taken from the chapter Disposal.
- WARNING! Do not damage the cooling circuit. Leaking cooling medium can damage your eyes or cause inflammations.
- WARNING! Do not block the air inlets of the appliance panelling or the design with built-in furniture. A sufficient circulation of air has to be ensured.
- WARNING! Do not use any electric appliances (e.g., ice machines. etc.) that are not described in the manual.
- When positioning the appliance, ensure the supply cord is not trapped or damaged.
- Do not locate portable multiple socket-outlets or portable power supplies at the rear of the appliance.
- Before plugging it in, check for possible damage during shipping in the power cord or in the appliance itself. If this is the case, the appliance must not be put into operation.
- In this appliance, explosive substances such as an aerosol container with inflammable propellant cannot be stored.
- If reparations or interventions on the appliance are necessary, they have to be executed by an authorized repair service, in order to follow the safety regulations and to prevent endangerment. This also
applies to the replacement of the power plug.
- The appliance can be used by children of 8 years or older as well as persons with reduced physical, sensory or mental abilities or lack of experience and/or knowledge, but only if they are supervised or instructed relating to the safe use of the appliance and thus understand the resulting dangers.
- Children aged from 3 to 8 years are allowed to load and unload refrigerating appliances.
• Children are not allowed to play with the appliance. - Cleaning and maintenance must not be executed by children without supervision.
- Tepid water with an addition of washing-up liquid is suitable for regular maintenance. Further details of the cleaning can be taken from the chapter Cleaning and Defrosting (Maintenance).
- To avoid contamination of food respect the following instructions:
- Opening the door for long periods can cause a significant increase of the temperature in the compartments of the appliance.
- Clean regularly surfaces that can come in contact with
food and accessible drainage systems.
- Store raw meat and fish in suitable containers in the refrigerating appliance so that it is not in contact with or drip onto other food.
-
If the refrigerating appliance is left empty for long periods switch off, defrost, clean, dry and leave the door open to prevent mould developing within the appliance.
-
In order to prevent damage to persons or property, the appliance can only be transported in a box, and it requires two persons to be installed.
- Caution! Keep your children away from packaging material - choking hazard!
- Regularly check the power plug for damages. If this is the case, do not use the appliance.
- Do not use electric appliances on the storage space to prevent fire hazards. Also, do not put liquid containers on the appliance, so that possible leaking liquids do not interfere with the electronics and the isolation.
- Store high-proof alcoholic substances only tightly sealed and upright.
- Do not store glass bottles with freezable liquids or carbonated liquids in the appliance, since they could burst while freezing.
- Do not consume expired food. This could lead to food poisoning. Do not refreeze already defrosted groceries.
- Do not misuse any shelves, compartments, doors, etc., as a tread or for leaning on.
- Do not handle open fire or ignition sources in the interior space of the appliance.
- Pull the power plug:
- in case of disturbances during the operation;
- before every cleaning;
- while working on the appliance.
- Do not pull the power cord; always grab the power plug for this purpose.
• We reserve technical changes.
Configuration
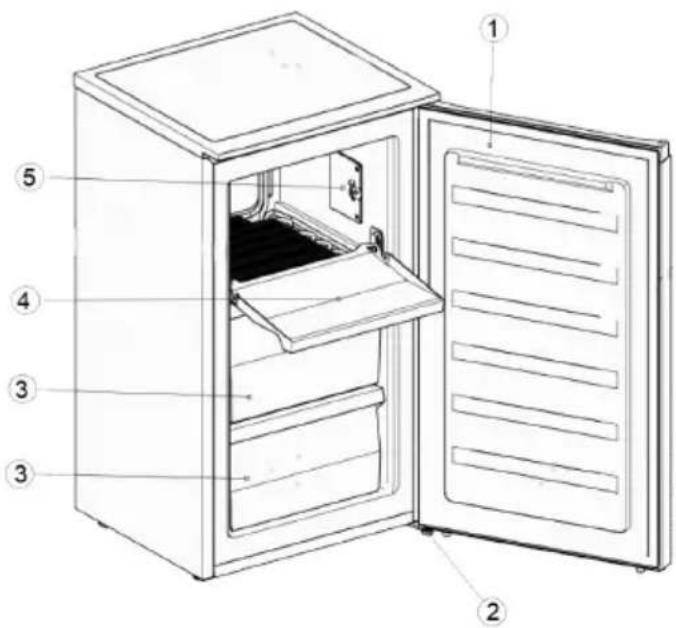
text_image
Diagram of a refrigerator with numbered parts for identification| 1 Freezer compartment door |
| 2 Adjustable feet |
| 3 Freezer boxes |
| 4 Freezer compartment with door |
| 5 Temperature controller |
Transport of the appliance
- During the transport, you have to secure all loose parts in and on the appliance, in order to prevent damage.
- The appliance should not be transported in a vertical position and at the same time not tilted over more than 30 degrees. Wait 30 minutes after the installation, before you connect the appliance to the mains.
- If the appliance was transported with a tilt of more than 30 degrees, wait 4 hours before you connect the appliance to the mains.
Before the initial operation
- Remove the protective sheets and all packaging material incl. the transport securing of the storage spaces and of the trays from the appliance.
- Dispose the packaging professionally.
- You might notice a slight ‘new smell’ when you start the appliance for the first time. It goes away once the appliance begins to cool.
- Clean the interior with tepid water with the addition of washing-up liquid. Clean the equipment separately with rinsing water, not in the dishwasher.
- Before you fill the appliance with food, let it work for 24 hour, so that the target temperature can be reached.
Installation of the appliance
- The appliance should be installed in a dry and well-aired room.
- The appliance can be operated at a humidity of max. 70 %.
- The surrounding temperature, at which the appliance can be operated, can be taken from the appliance specification sheet at the end of this manual.
- Do not install the appliance outdoors.
- Bear in mind that you can pull the power plug anytime.
- Protect the appliance from direct insolation. It should not be installed near heat sources (stove, heater, etc.). If this, however, cannot be avoided, you should put isolation between the heat source and the appliance.
- You must not imbed the appliance in a cabinet. The installation of the fridge directly under a board or a cabinet is disallowed.
- The unevenness of the floor can be compensated with the two vertically adjustable screw-in feet in the front, so that safe stability is attained.
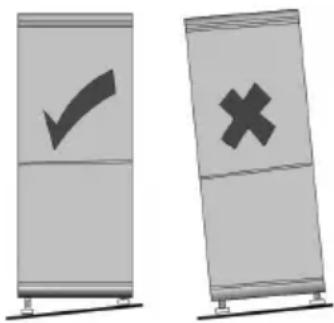
text_image
Two vertical panels with checkmarks and an 'X' symbol, likely indicating approval or rejection status.Installation measures
If the appliance is placed sideways on a wall, you will leave a lateral gap of at least 60 mm, so that the doors of the appliance can open in a 90-degree angle.

text_image
W H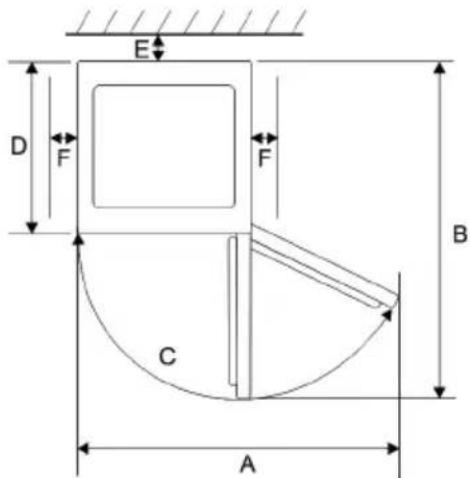
text_image
E D F F B C A| Width (W) | Depth (D) | Height (H) |
| 450 mm 475 | mm 840 mm |
| A B C E F | ||||
| 930 mm | 883 mm 180° | 30 mm | 100 mm | |
Ventilation
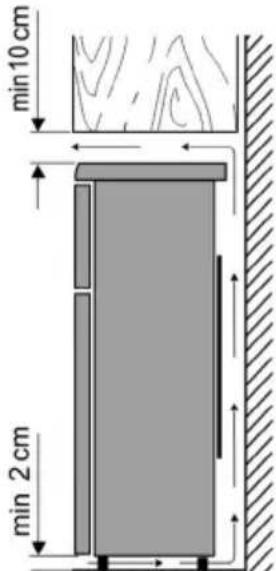
text_image
min 10 cm min 2 cmThe air warmed behind the appliance needs to circulate freely. For this reason, the circulation of air cannot be compromised.
Caution! Do not cover possible existing ventilation openings in the back area of the top cover plate!
Connection
- Before you connect the appliance, you have to make sure that itself and the power plug do not show any transport damages.
- Connect the appliance only to a shockproof outlet. The mains voltage has to correspond to the one stated on the tool identification plate.
- The appliance complies with the guidelines that are obligatory for CE marking.
- Do not connect the appliance to an inverter
- The power plug should not touch the back-side, in order to avoid possible vibration noise.
- The appliance can be put into operation by plugging the mains plug into the point.
- A complete switching-off only occurs by pulling the mains plug.
- If the appliance has been disconnected from the mains, wait approx. 5 minutes after plugging in the mains plug before setting the temperature controller to the desired position.
Operating elements
To set the temperature, use the controller at the back of the appliance.
Set the controller to a middle position (4) for an optimal operating temperature. The more you turn the controller up (5-7), the lower the temperature in the appliance.
The more you turn the controller down (1-3), the higher the temperature in the appliance.
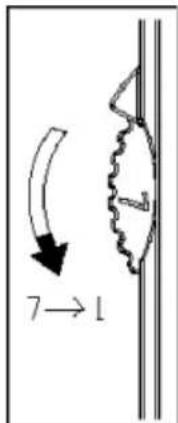
text_image
7→1Use a thermometer to check the temperature in the interior.
Freezer Door
The freezer door should always stay closed so that the food does not defrost. Thereby, the formation of ice and frost accretion is reduced. Therefore, make sure that the door is only open for withdrawal of food or rather for filling the freezer.
Freezing/Storing of Food
- The appliance is designed for the freezing of food, for the long-term storage of frozen food as well as for the appliance ion of ice cubes.
- Fresh food should be frozen to the core as quickly as possible, so that the nutritional value, the vitamins, etc. do not get lost. For this reason, put the food in one or two rows in the freezer.
- Do not bring them into contact with already frozen food.
- Do not exceed the freezing capacity per day! The respective value for the maximum freezing capacity can be taken from the appliance specification sheet at the end of the manual.
-
The freezing time shortens if the food to be frozen is divided into small portions.
-
Store the frozen food in the appliance only packaged. You can use uncoloured plastic sheets/bags or aluminium foil as packaging material. Remove the air from the packaging before freezing and check for airtightness. Provide every packaging with a label with the content, date of freezing and date of expiry on it.
- Do not freeze carbonated liquids, warm foods or liquids in a glass container or bottle.
- Defrost frozen appliances in a refrigerator. Foods keep their taste when they are defrosted slowly, and the emitted cooling energy from these appliances can be used to maintain the intended temperature in the refrigerator.
- If the appliance is turned off for a longer period of time, e.g., because of a mains failure, leave the door closed. Thereby, a more significant loss of cooling energy can be avoided. The maximum storage time during malfunction can be taken from the appliance specification sheet at the end of the manual. Because of the higher interior temperature, the storage time for food is shortened.
Data for expiry dates of frozen food are indicated in the chart per month.
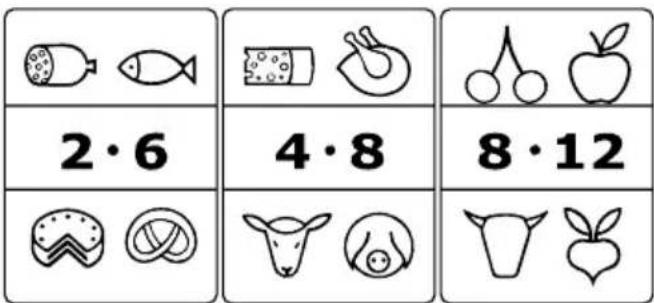
text_image
2·6 4·8 8·12Do not store the frozen food longer than the given time in the freezer. Pay attention to the expiry date of the frozen food indicated by producer.
Making ice cubes
A special ice-cube tray is provided for making ice cubes. Fill the tray up to 34 with drinking water and place it in the freezer compartment for a few hours. The ice cubes are easier to remove from the tray if the tray is left standing at room temperature for 5 minutes.
Cleaning and Defrosting (Maintenance)
Cleaning
• Always pull the mains plug before cleaning.
- Do not pour water into the appliance.
- Tepid water with a bit of washing-up liquid is suitable for the regular maintenance.
- Clean the equipment separately with rinsing water, not in the dishwasher.
- Do not use aggressive, abrasive or alcoholic detergents.
- After cleaning it with clear water, wipe the surface and carefully dry it off. Subsequently, plug the mains plug with dry hands.
- In order to save energy and maintain the efficiency, you should clean the condenser (on the backside) and the compressor at least twice a year with a broom or vacuum cleaner.
- The rating label in the interior of the appliance cannot be damaged or even removed while cleaning.
Defrosting
If the ice layer in the interior is 2-4 mm thick, the appliance must be defrosted. Clean it at least twice a year.
- Disconnect the mains plug from the socket.
- Remove food from the appliance and store it as cool as possible, e.g., together with ice packs and covered in a plastic recipient. Please remember that the lifetime of the goods is shortened by the temperature increase and that they should be consumed as quickly as possible.
- Leave the door open. To speed up defrosting, place one or more pots with hot but not boiling water in the freezer.
- Warning! Do not use other mechanical devices or any other means, e.g., heating appliances, to speed up defrosting.
- Dry the appliance thoroughly after cleaning.
- Plug in the mains plug. Wait approx. 5 minutes and set the temperature controller to the desired position.
Tips for Energy Saving
- For the installation of the appliance, choose a cool, dry and well-aired room.
- Protect the appliance from direct insolation. It should not be installed near heat sources (stove, heater etc.). If this cannot be avoided, some sort of isolation between heat source and appliance has to be used.
- Don't cover the ventilation openings and grid. Provide enough circulation of air on the backside of the appliance.
- Let warm food cool down before you store it in the fridge.
- Do not leave the door open too long when withdrawing or putting food inside. Otherwise, the formation of ice in the interior will be accelerated.
- Do not set the temperature lower than necessary. More details on temperature settings can be taken from the chapter ‘Operating elements’.
Operation Noises
There might be some typical operation noises when the appliance is turned on. These are:
- Noise of the electric motor is arising from the working compressor.
When the compressor starts to operate, then the noises get slightly louder for a short time.
- Noises in the tubes of the circulation of the refrigerant.
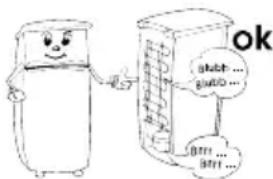
text_image
ok shch ... guto ... bri... bri...Changing the door hinge
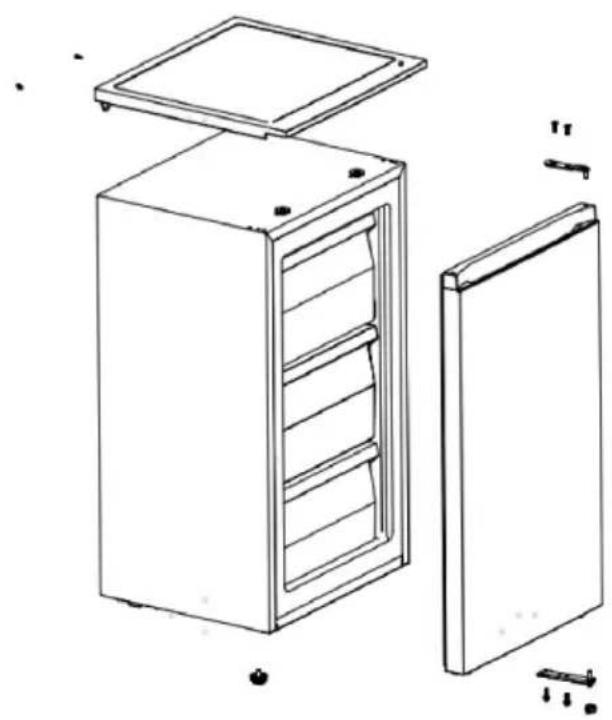
natural_image
Technical line drawing of a refrigerator with open lid and side panel, showing internal compartments and mounting hardware (no text or symbols)- Unscrew the two screws that fix the device cover from behind. Remove the device cover and put it away.
- Remove the screws from the top of the appliance and remove the top door hinge.
- Raise the door a bit and detach it from the lower hinge. Place the door in a safe area.
- Tilt the device slightly backwards and unscrew the adjustable front feet of the appliance.
- Unscrew the screws that hold the bottom door hinge in place and remove the door hinge.
Screw down the door hinge and the feet back on the other side. - Place the door on the pivot bolt of the bottom door hinge and press it lightly against the device.
Insert the top door hinge with the pivot bolt in the socket on the top of the door and secure it with the two screws. Screw the other two screws back in on the other side. -
Replace the device cover and screw it tight with the two screws.
-
If necessary, the door hinge can be switched from right to left.
- Warning! Before carrying out any work on the appliance, always disconnect the power plug from the mains.
- To avoid personal injury and material damage, carry out the shift of the door hinge with two people.
- We recommend that the door stop only be changed by qualified persons.
- Before you start, it is fundamental that you: –Always pay attention to the number of washers on the trunnion and screws. –Always align the doors so that they close tightly.
Step A
a) Unscrew the two screws ① which secure the appliance top ② from behind.
b) As you secure the door, remove the lid ② and the upper journal ③ and put the lid aside.
c) Raise the door a bit and detach it from the lower hinge. Place the door in a safe area.
d) Take out the journal holder ⑧ from the bottom right bore of the door.
e) Tilt the device slightly backwards and unscrew the adjustable front feet ④ of the appliance.
f) Unscrew the screws ⑤ which hold the bottom door hinge ⑥.
Step B
a) Refer to drawing B when unscrewing the journal of the lower hinge ⑥ from the plate.
b) Turn the plate so that its underside is facing upwards.
c) Then, replace the journal and secure it with the nut. The newly configured lower door hinge receives the number ⑦.
Step C
a) Using the screws ⑤, attach the lower door hinge ⑦ to the bottom left side of the appliance.
b) Screw the adjustable front feet ④ back on the appliance.
c) Put the entry ⑧ for the journal into the drill hole on the bottom left of the door.
d) Place the upper journal ③ into the bottom left bore of the cover ②.
e) Put the door onto the journal of the lower door hinge ⑦ and gently press it onto the appliance.
f) While holding the door, put the lid ② in place with the top journal ③ sliding into the door opening.
g) Attach the lid ② from behind using both screws ①.
| Screw |  | 1 |
| Appliance top |  | 2 |
| Upper journal | 3 | |
| Adjustable foot |  | 4 |
| Lower bolt | 5 | |
| Lower right-hand hinge | 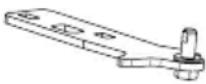 | 6 |
| Lower left-hand hinge | 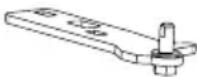 | 7 |
| Entry for journal | 8 |
Disposal

Appliances that are marked with this symbol have to be disposed of separately from household rubbish.
These appliances contain valuable resources that can be recycled. A correct waste disposal protects the environment and the health of those around you. To get informed about it, either defer to your municipal administration or the retailer.
- Pull the mains plug out of the socket and disconnect it from the appliance before getting rid of it.
- The cooling medium Isobutane (R600a) and the propellant in the isolation Cyclopentane (C5H10) are inflammable substances, thus, need to be appropriately disp
- Make sure the tubes of the cooling circuit don't get damaged before the proper disposal.
Details for After-Sales Service
If a repair is necessary, please contact the service hotline directly with an explanation of the defect. Before you do that, write down the article number from the rating label on the appliance (see figure), since this is needed for the smooth processing of your request.
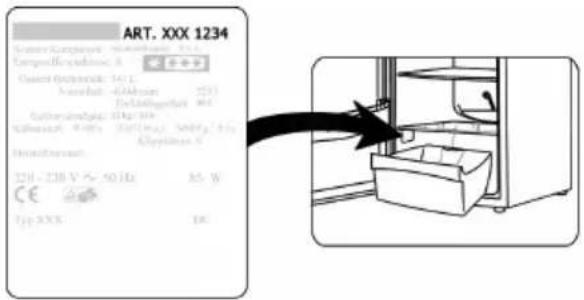
Subsequently, there is a table with possible malfunctions and recovery methods. Check if the recovery methods can repair the malfunctions. If this is not the case, then the appliance has to be disconnected from the mains supply, and the after-sales service has to be contacted.
| Fault Possible reason | and rectification |
| The appliance is not working. | Power cut.The main fuse has dropped out.The fuse in the wall socket is not working. Check this by plugging another appliance into the same point. |
| The noises are too loud (if the normal operation noises change). | Does the device have a solid stand?Does the running cooling unit set adjoining furniture or objects into vibration?Do objects positioned on the top of the appliance vibrate? |
Appliance specification sheet
| Model identifier GS 8863 | |||||
| Type of refrigerating appliance: | |||||
| Low-noise appliance: No Design type: Free-standing | |||||
| Wine storage appliance: No Other refrigerating appliance: Yes | |||||
| Overall dimensions (H ×W ×D in mm) 840 × 450 × 475 | |||||
| Total volume (in l) 61 | |||||
| EEI 99 | |||||
| Energy efficiency class E | |||||
| Annual energy consumption (in kWh/a)* 156 | |||||
| Airborne acoustical noise emission class | 38 | ||||
| Airborne acoustical noise emissions (in dB[A] re 1pW) | C | ||||
| Climate class | N-ST-T | ||||
| Ambient temperature (in °C) | 16-43 | ||||
| Storage time in case of power failure (in h) | 8 | ||||
| Weight (in kg) | 23.7 | ||||
| Winter setting | No | ||||
| Compartment Parameters: | |||||
| Type | Volume (in l) | Recommended temperature (in°C) | Freezing capacity (kg/24h) | Defrosting type A=auto M = manual | Fast freezing facility |
| 4-star freezer compartment | 61 | -18 | 3.0 | M | - |
| Light source parameters: | |||||
| Type of light source | - | ||||
| Energy efficiency class | - | ||||
| Electric data | See rating label | ||||
*) The actual consumption depends on the use and the location of the appliance.
text_image
Warning sign depicting a flame symbol in a triangular shapetext_image
Diagram of a refrigerator with numbered parts for identificationnatural_image
Two vertical panels with checkmarks and an 'X' symbol, no text or labels presentnatural_image
Technical line drawing of a refrigerator with open lid and side panel, showing internal compartments and mounting hardware (no text or symbols)WAARSCHUWING: BRANDGGEVAAR!
text_image
Warning sign depicting a flame symbol in a triangular shape, commonly used to indicate hazardous materials or hazard.text_image
Diagram of a refrigerator with numbered parts for identificationnatural_image
Two vertical panels with checkmarks and an 'X' symbol, no text or labels presenttext_image
ok blind ... blind ...Scharnier vervangen

natural_image
Technical line drawing of a refrigerator with open lid and side panel, showing internal compartments and mounting hardware (no text or symbols)text_image
Warning sign depicting a flame symbol in a triangular shape, commonly used to indicate hazard or caution.text_image
Diagram of a refrigerator with numbered parts for identificationtext_image
Two vertical panels with checkmark and cross symbols, likely indicating approval or rejection statusnatural_image
Technical line drawing of a refrigerator with open lid and side panel, showing internal compartments and mounting hardware (no text or symbols)text_image
Warning sign depicting a flame symbol in a triangular shapetext_image
Diagram of a refrigerator with numbered parts for identificationtext_image
Two vertical panels with check and cross icons, likely indicating approval or rejection statusnatural_image
Technical line drawing of a refrigerator with open lid and side panel, showing internal compartments and mounting hardware (no text or symbols)text_image
Warning sign depicting a flame symbol in a triangular shapetext_image
Diagram of a refrigerator with numbered parts for identificationtext_image
Two vertical panels with checkmarks and an 'X' symbol, likely indicating approval or rejection status.Installationsmått
text_image
ok butch... build... butt... butt...Byta dörrgångjärn