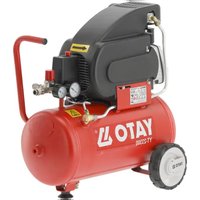
YT-23242 - Compressor Yato - Free user manual and instructions
Find the device manual for free YT-23242 Yato in PDF.

| Product Type | Cordless Compressor |
| Brand | Yato |
| Model | YT-23242 |
| Rated Voltage | 36 V DC |
| Rated Power | 800 W |
| Rated Pressure | 0.8 MPa / 8 bar / 116 PSI |
| Inflation Capacity | 98 L/min |
| Sound Pressure Level (L_out ± K) | 80.0 ± 3.0 dB(A) |
| Sound Power Level (L_out ± K) | 90.7 ± 3.0 dB(A) |
| Weight | 11 kg |
| Battery Type | Li-Ion (not included on this model) |
| Battery Capacity (for model with battery) | 3 Ah |
| Protection Degree | IPX0 |
| Power Supply | Two batteries (not included) |
| Switch | Automatic On/Off |
| Pressure Regulator | Yes, with output pressure gauge |
| Tank | With pressure gauge and drain valve |
| Air Filter | Yes, cleanable every 300 hours |
| Safety Valve | Yes, non-adjustable |
| Air Outlet | Quick connector |
| Included Accessories | Inflation gun and others (see manual) |
| Maintenance | Drain the tank after each use, clean the filter |
Frequently Asked Questions - YT-23242 Yato
User questions about YT-23242 Yato
0 question about this device. Answer the ones you know or ask your own.
Ask a new question about this device
Download the instructions for your Compressor in PDF format for free! Find your manual YT-23242 - Yato and take your electronic device back in hand. On this page are published all the documents necessary for the use of your device. YT-23242 by Yato.
USER MANUAL YT-23242 Yato
text_image
Labeled diagram of a mechanical device with numbered parts for identification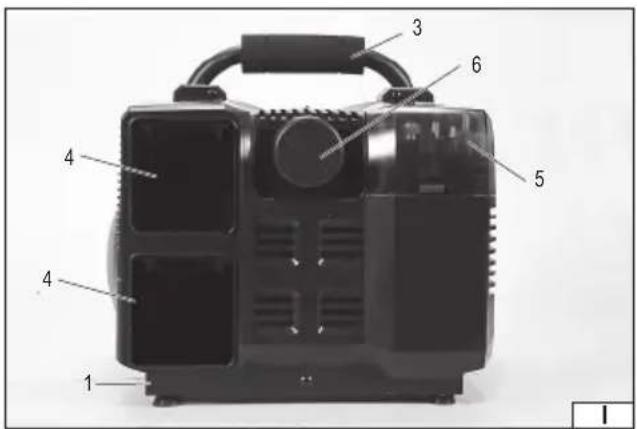
text_image
Labeled diagram of a portable air conditioner unit with numbered parts for identification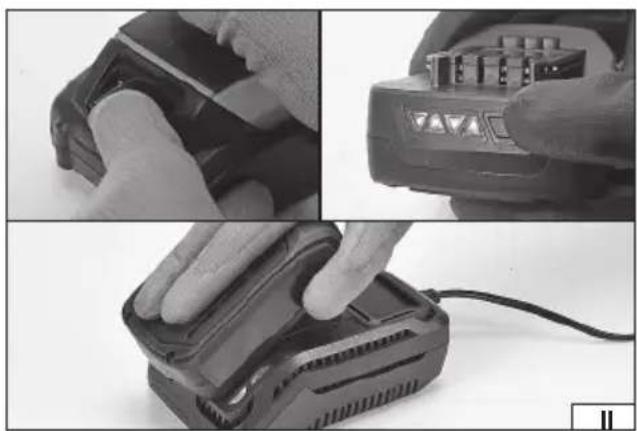
natural_image
Three-panel photo showing hands installing a component into a battery pack, plus close-up of the final part (no visible text or symbols)2022
Rok produkcji:
Production year:
Produktionsjahr:
Год выпуска:
Рік випуску:
Pagaminimo metai:
Ražošanas gads:
Rok výroby:
Rok výroby:
Gyártási év:
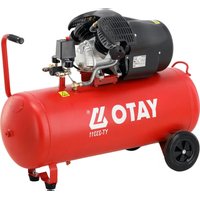
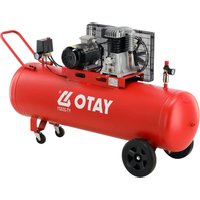
- base
- tank
- handle
- battery socket
- accessory compartment
- air filter
- power switch
- safety valve
- air outlet
- tank pressure gauge
- outlet pressure gauge
- drain valve
- pressure regulator
D
Read the operating instruction
Wear hearing protectors
Gehörschutz tragen
Wear protective goggles
Schutzbrille tragen
Warning! The compressor unit can start without a warning.
Warning! Risk of high temperatures.
This symbol indicates that waste electrical and electronic equipment (including batteries and storage cells) cannot be disposed of with other types of waste. Waste equipment should be collected and handed over separately to a collection point for recycling and recovery, in order to reduce the amount of waste and the use of natural resources. Uncontrolled release of hazardous components contained in electrical and electronic equipment may pose a risk to human health and have adverse effects for the environment. The household plays an important role in contributing to reuse and recovery, including recycling of waste equipment. For more information about the appropriate recycling methods, contact your local authority or retailer.
WYPOSAŻENIE PRODUKTU
The cordless compressor is a device that allows for inflating tyres or other objects, e.g., balls or mattresses with compressed air. It is also possible to supply some pneumatic tools from the compressor, e.g. a blow gun. The battery power supply increases the mobility of the product. The correct, reliable, and safe operation of the device depends on its proper use, therefore:
Read the entire instructions manual before the first use of the device, and keep it for future reference.
The supplier shall not be held liable for any damage resulting from failure to observe the safety regulations and recommendations specified in this manual.
PRODUCT EQUIPMENT
In the case of the YT-23241 article, the product is equipped with two batteries and a charger. The YT-23242 article is not equipped with batteries and a charger. Both articles are equipped with accessories to facilitate inflating of various products. A flexible hose is not included.
TECHNICAL DATA
| Parameter Unit Value | ||
| Catalogue No. YT-23241, YT-23242 | ||
| Rated voltage [VDC] 36 | ||
| Rated power [W] 800 | ||
| Rated pressure [MPa / bar / PSI] 0.8/8/116 | ||
| Inflating capacity [l/min] 98 | ||
| Noise level | ||
| - sound pressure L_pA ± K | [dB(A)] | 80.0 ± 3.0 |
| - power L_vA ± K | [dB(A)] | 90.7 ± 3.0 |
| Weight | [kg] | 11 |
| Protection rating | IPX0 | |
| Battery type | Li-Ion | |
| Battery capacity | [Ah] | 3 |
| Charger* | ||
| Input voltage | [VAC] | 220 - 240 |
| Mains frequency | [Hz] | 50 / 60 |
| Rated power [W] | 60 | |
| Output voltage | [V DC] | 21 DC |
| Output current | [A] | 2.4 |
| Charging time** | [h] | 1.5 |
* only for models equipped with a battery and charger
** the specified charging time applies only to the battery with the capacity listed in the table
The declared noise emission value has been measured using the standard test method and can be used to compare one tool to another. The declared noise emission value can be used in the initial exposure assessment.
Caution! Safety measures to protect the operator, which are based on an assessment of emission exposure under actual conditions of use (including all parts of the work cycle, such as the time when the tool is turned off or idle and the activation time), must be specified.
SAFETY INSTRUCTIONS
Learn how to use the tool. Do not start working or charging before reading the instructions manual. Following the guidelines contained in the instructions manual reduces the risk of injury, electric shock or fire.
The device is not intended for use in potentially explosive atmospheres and highly humid and dusty environments. The temperature at the workplace should be within the range of +5°C to +40°C, and the relative humidity should not exceed 80%. The device should not operate near places where water is sprayed.
Place the device only on a hard, even and flat at surface.
Make sure that the ventilation openings in the device housing are not obstructed during and after the operation.
During operation, some elements of the housing may become hot – touching them may cause burns. To carry the device grasp it only by the handle. The device must be turned off before carrying. The power switch must be in the off position and the batteries
EN
must be removed from the device.
Observe the maximum pressure of the inflated products. Use a pressure gauge (built-in or separate) to control the pressure inside the inflated product. Exceeding the maximum pressure may cause damage to the inflated product or even its rupture. Rupturing the product can cause serious injuries.
Periodically check that the readings of the pressure gauge built into the tool match those of the calibrated pressure gauge.
Check the tool for damage before each use. If you notice any cracks, abrasions or other damage, do not use the tool until the defects are removed.
The device is designed for use with flexible pressure hoses only. The hoses connected to the device should withstand at least the pressure that the compressor is capable of producing. Hoses for pressures higher than 7 bar / 0.7 MPa should have a protective cord, e.g. in the form of wire ropes.
Before connecting the hose to the device, check that the hose is not damaged. If abrasions, cracks or air leaks of the insulation are discovered, stop using the damaged hose and replace it with a new hose before commencing work.
Never bend or twist the hose during operation. Bending the hose can reduce its internal diameter even to the point where the air flow stops. This can lead to damage to the hose or even to its rupture, which can result in serious injuries. Bending and twisting the hose also speeds up hose wear. Never carry the tool holding it by the hose. Do not overtension the hose during operation.
Avoid creating long lines for transferring compressed air. Shorter lines are easier to control.
All devices and accessories connected to the compressor should withstand at least the pressure that the compressor is capable of producing.
It is forbidden to adjust or modify the safety valve on your own. The improperly adjusted or modified safety valve may cause damage to the product, which may result in serious injury.
Do not use the device as an artificial respiration device, for spraying any substance or any other application not described in the instructions manual.
Never point the air stream towards yourself, other people or animals. Do not use your finger or any other part of the body to check if the device is pumping air.
Make sure that the device is turned off before connecting the hose and accessories to the device.
The device is not intended to be used by children.
PRODUCT OPERATION
Preparing for operation
Unpack the product by removing all packaging components.
Check that the product power switch is in the off position - O.
Check that the drain valve is closed. The lever parallel to the valve means open valve, whereas the lever perpendicular to the valve means closed valve.
Reduce pressure with a pressure regulator. The regulator knob allows for rotation only after it has been unlocked. The regulator is unlocked by pulling the knob. Turn the knob as far as it will go in the direction indicated by the arrow marked with a minus sign.
Then lock the knob by pressing it. Locking the knob protects against an unintentional change of its position and thus unintentional pressure adjustment.
Connect a flexible hose to the air outlet. The outlet is equipped with quick-release coupling. When connecting, simply push the hose plug into the air outlet socket until the latch mechanism is engaged. A correctly attached hose cannot be disconnected otherwise than by pulling the sleeve around the air outlet in the opposite direction to the air outlet.
Mount the selected accessory to the other end of the hose, e.g. the inflating gun.
Connect both batteries to the device. Slide each battery into the battery socket guides so that the battery latch holds it in place in the compartment.
The tool is powered by two batteries. It will not start if one of the batteries is not installed in the tool or is flat. The batteries in the tool are connected in series, which means that the tool is supplied with the sum of their rated voltages. It is recommended that both batteries have the same capacity and are charged to the same level. The batteries used to supply the tool should also have the same level of wear. It is not recommended connecting a flat battery with a new one, even if both batteries are charged to the same level and have the same capacity. Failure to comply with the above recommendations will result in shorter operating times and faster wear of the batteries used to supply the tool.
The product is ready for use.
Turning on and off
The power switch is used to turn on the device. Move the power switch to the on position - I, the product will turn on. Moving the power switch to the off position - O stops the product operation.
If the product is turned on, it will automatically turn on and off the compressor that will fill the tank. Tank filling will start when the pressure in the tank drops below 6 bar and finish when the pressure in the tank reaches 8 bar. This process will continue until the device is turned off or the supplying batteries run flat. The tank pressure gauge marked TANK allows for checking the current pressure in the tank.
EN
Using the device
Adjust the outlet pressure before commencing the use of the device. The pressure regulator knob must be unlocked and rotated in the direction indicated by the arrow marked with a plus. This will gradually increase the outlet pressure. On the outlet pressure gauge marked TOOL, the set outlet pressure can be read. Once the desired pressure has been set, lock the regulator knob.
In addition to inflating, the compressor can also be used to drive pneumatic tools, however, pay attention to whether the compressor provides the required pressure and the required air flow. It should also be noted that the compressor does not purify or humidify the air blown out with oil in any way. If filtered and/or humidified air is required to supply the tool, it must be provided by external devices.
During the operation of the product, the compressor will automatically fill the tank as the pressure drops. Increasing the intensity of the compressor operation will result in the battery running flat faster.
Safety recommendations for battery loading
Attention! Before loading may start make sure the body of the charger, the cable and the plug are not broken or damaged. It is prohibited to use a damaged loading dock and charger! For the purpose of loading batteries only the charging dock and the charger provided may be used. Using another charger may be a cause of fire or damage the tool. Batteries may be charged only in a dry room, protected from unauthorised persons, particularly children. Do not use the charging dock and the charger without permanent supervision of an adult! If it is necessary to leave the room where loading is taking place, it is required to disconnect the charger from the mains, removing the charger from the mains socket. In case when smoke comes out of the charger, or a strange smell is emitted, etc., it is required to immediately remove the plug of the charger from the mains socket!
The drill and automatic return screwdriver is provided with an unloaded battery, so before work may commence, it is required to charge it following the procedure below, using the charger and charging dock provided. Li-ION batteries do not show the so called “memory effect”, so it is allowed to charge them at any moment. However, it is recommended to discharge them during normal work, and then load them to their full capacity. If due to the nature of the task it is not possible to do so each time, then it is required to do it at least from time to time. Under no circumstances is it allowed to discharge the batteries short-circuiting the electrodes, since this would cause irreversible damage! It is also prohibited to check the load of the batteries, short-circuiting the electrodes for sparking.
Storage of the battery
In order to prolong the life of the battery, it is required to provide adequate storage conditions. The batteries can go through approximately 500 „loading - discharging” cycles. The battery must be stored between 0 and 30°C, at the relative humidity of 50%. In order to store the battery for a prolonged period, it is required to charge it to approximately 70% of its capacity. In case of prolonged storage, it is required to recharge the battery once a year. Do not permit excessive discharging of the battery, since this would reduce its life and may cause irreversible damage.
During storage, the battery will be gradually unloading due to leakage conductance. The process of automatic unloading depends on the temperature of storage, since the higher the temperature, the fastest the process. In case of incorrect storage of batteries, there is a danger of electrolyte leakage. In case of leakage, it is required to protect the leakage with neutralizing agent. In case of contact of electrolyte with the eyes, it is required to rinse the eyes abundantly, and then immediately seek medical assistance. It is prohibited to use a tool with a damaged battery.
In case the battery is completely worn out, it is required to deposit it at a special point dedicated to disposal of such waste.
Transport of the batteries
Lithium-ion batteries are in accordance with legal regulations treated as dangerous waste. The user of the tool may transport the tool with the battery or only batteries by land. Then no additional conditions must be complied with. In transport is realised by third parties (for example dispatch through courier service), then it is required to proceed in accordance with regulations for transport of dangerous materials. Before shipment, contact an authorised person.
It is prohibited to transport damaged batteries. During transport the battery must be removed from the tool, and the exposed contacts protected, e.g. with insulating tape. Protect the batteries so that they do not move inside the package during transport. It is also required comply with the national regulations for transport of dangerous materials.
Charging the battery
Attention! Before charging you should disconnect the charger from the mains by unplugging the power supply plug from the mains. In addition, you should clean the battery and its terminals of dirt and dust with a soft, dry cloth.
The battery has a built-in charge indicator. When you press the button, LEDs will light up (II), the more LEDs will light up, the more fully the battery pack is charged. If the button is pressed and the LEDs are off it means that the battery is discharged.
Disconnect the battery from the tool.
Push the battery in the charger socket (II).
Plug the charger into a mains socket.
When the red LED lights up, it means the loading process.
When charging is complete, the red LED goes off, and green LED lights up, indicating a full charge of the battery.
Unplug the charger from the mains outlet.
EN
Remove the battery from the charging station, by pressing the battery latch button.
Attention! If, when the charger is connected to the power supply, the green LED is on, this indicates a fully charged battery. In this case, the charger does not start charging.
MAINTENANCE
After each use of the device, turn off the compressor using the power switch and then disconnect both batteries.
Warning! All maintenance works must be carried out with the batteries disconnected from the device.
Then open the drain valve and drain the air from the tank. Take into account that the air coming out of the tank may stir up dust from the ground on which the compressor will be placed. If necessary, move the compressor to a place where it will be possible to safely empty the tank from the collected air.
After the air has stopped coming out of the tank, tilt the compressor so that the drain valve is in the lowest position. This will allow for emptying the tank of water that has accumulated in the tank. Do this thoroughly and after each use of the compressor. Otherwise, the water may lead to tank corrosion and cause its damage Precipitation of water from the air is a natural phenomenon associated with temperature changes. Therefore, do not neglect to empty the tank from the air.
Clean the air filter protecting the air inlet once every 300 hours of operation. Remove the filter from the air inlet, open its casing and clean it with a stream of compressed air at a pressure of not more than 0.3 MPa. After cleaning the filter, assemble it and install it at the air inlet. It is forbidden to use the compressor without an air filter. Impurities that will enter the compressor with the air can lead to its damage.
Clean the other parts of the device with a soft and damp cloth or a compressed air stream with a pressure of not more than 0.3 MPa. You can also clean the ventilation opening with a brush or a brush with soft plastic bristles. Do not use alcohol, solvents, acids or corrosive agents for cleaning. After cleaning, the compressor is ready for further operation or storage.
TRANSPORT AND STORAGE
Transport the device by grasping the handle or base. When transporting with means of transport, the compressor must be secured against movement. The device should only be transported and stored when turned off with the batteries disconnected and the air tank empty. Store the device in closed well-ventilated rooms. During storage and transport, the device should not be exposed to direct sunlight, heat sources and precipitation. The storage place should protect the device from access by unauthorised persons, especially children. Do not place anything on the device.
DE
GERÄTEBESCHREIBUNG
CARACTÉRISTIQUES DU PRODUIT
Transport van accu's
DECLARATION OF CONFORMITY
0122/YT-23241/EC/2022
We declare and guarantee with full responsibility that the following products:
Car air compressor; 36 V d.c.; 800 W; 8 bar; 98 l/min; item no. YT-23241, YT-23242
meet requirements of the following European Standards / Technical Specifications:
EN 60204-1:2018
EN 1012-1:2010
EN 55014-1:2017
EN 55014-2:2015
and fulfill requirements of the following European Directives:
2006/42/EC Machinery and safety elements
2014/30/EU Electromagnetic compatibility (EMC) Directive
2011/65/EU Restriction of the Use of Certain Hazardous Substances
Serial number: concern all serials numbers of item(s) mentioned in this declaration
The last two digits of the year in which the CE marking was affixed: 22
Year of production: 2022
The person authorized to compile the technical file:
Tomasz Zych
(Place and date of issue)

text_image
TOTA SPICŁA SECTŁNA SPECIALISTA DS. TECHNICZNYCH TOMASZ ZYCH(Name and signature of authorized person)
TOYA S.A.
DECLARATION OF CONFORMITY
0122/YT-23241/Noise/2022
We declare and guarantee with full responsibility that the following products:
Car air compressor; 36 V d.c.; 800 W; 8 bar; 98 l/min; item no. YT-23241, YT-23242
fulfil requirements of the following European Directive: 2000/14/WE
Conformity assessment procedure:
Manufacturer quality-control system, examination of the manufacturer's technical file and periodical inspection by notified body
Notified body:
TÜV SÜD Industrie Service GmbH; (0036)
Westendstraße 199, 80686 München, Germany
Measured sound power level on an equipment representative for this type: 90,7 dB(A)
Guaranteed sound power level for this equipment: 94 dB(A)
conformity and references of the other Community Directives applied:
2006/42/EC Machinery and safety elements
2014/30/EU Electromagnetic compatibility (EMC) Directive
2011/65/EU Restriction of the Use of Certain Hazardous Substances
Wrocław, 2022.01.03
(Place and date of issue)

text_image
TOTA SPATA SCYNA SPECIALISTA DS. TECHNICZNYCH TOMASZ ZYCH(Name and signature of authorized person)
TOYA S.A.