USER MANUAL AC3501 Wifi Eurom
Caravan and Home Air Conditioner AC4201 & AC5201 Wi-Fi
NL 3
EN 24
DE 43
FR 64
User manual
natural_image
Exterior view of two white EUROM air purifiers with fan and control buttons (no text or symbols on main body)
Model: Product code:
AC3501 382440
AC3501 (Swiss plug) 382457
AC5001 382532
Caravan and Home Air conditioner AC4201
Wi-Fi
Art.nr. 382440
Power
220-240V / 50Hz
Power usage
480 - 510 Watt
Cooling capacity
3500 - 4200 BTU
Refrigerant
R290 (95gr)
High pressure
1,7 MPa
Low pressure
0,48 MPa
Max. allowed pressure
2,84 MPa
Outdoor unit
IPX4
Batchno.
BC0064

EUROM - KOKOSSTRAAT 20 - 8281 JC - GENEMUIDEN - NETHERLANDS
Figuur 1.
Figuur 2.
Specifications
| Type | Caravan and Home Air Conditioner AC 4201 Wi-Fi | Caravan and Home air conditioner AC 5201 Wi-Fi |
| Beschermingsklasse Klasse I Klasse I | | |
Figuur 3.
Figuur 7.

Figuur 8.
Figuur 9.

Figuur 10.

Figuur 11.
Figuur 12.

Figuur 13.
Figuur 14.

Figuur 15.

Figuur 16.
Afstandsbediening
Figuur 17.
Werking

WAARSCHUWING
Figuur 18.
Figuur 19.
Wifi-verbinding resetten
- Houd de ventilatorknop ingedrukt.
Figuur 20.
natural_image
3D diagram of a plastic container with a mesh basket and an arrow pointing to it, labeled with number 1 (no text or symbols beyond labels)
Figuur 21.
Probleemoplossing

LET OP
natural_image
Symbolic representation of a recycling machine with no text or labels
Please read and understand these safety instructions. Incorrect use can cause injury and will void EUROM's warranty.
- Read all the safety instructions carefully before use and keep this instructions for further use.
- This appliance can be used by children aged from 8 years and above and persons with reduced physical, sensory or mental capabilities or lack of experience and knowledge if they have been given supervision or instruction concerning use of the appliance in a safe way and understand the hazards involved. Children shall not play with appliance. Cleaning and user maintenance shall not be made by children without supervision.
- If the supply cord is damaged, it must be replaced by the manufacturer, its service agent or similarly qualified persons in order to avoid a hazard.
•The appliance shall be installed in accordance with national wiring regulations.
- When using this appliance in the Caravan mode, then this appliance is only suitable for use in caravans and motorhomes. Never use this appliance in other environments than caravans and motorhomes when the appliance is set on Caravan mode.
Additional warnings for appliances with R290 refrigerant gas
CAUTION
R290 is flammable: risk of fire.
•R290 refrigerant gas complies with European environmental directives. This appliance contains approximately 95 g (AC 4201) / 110 g (AC 5201) of R290 refrigerant gas.
- Do not use any means to accelerate the defrosting process or to clean the appliance, other than those recommended by the manufacturer.
- The appliance shall be stored in a room without activated ignition sources (for example: open flames, an activated gas appliance or an activated electric heater).
- Do not pierce or burn.
- Do not perforate any part of the refrigerant circuit and do not set the appliance on fire.
- Be aware that refrigerants do not have a discernible odour – you cannot smell a gas leak!
- The appliance shall be installed, operated and stored in a room with a floor area larger than 4m^2 .
- Always provide some ventilation in the room where the appliance is installed, operated and stored.
- The appliance must be installed, operated and stored in such a way that any mechanical defects are prevented. Be especially careful with the refrigerant hose between the indoor and outdoor unit.
- Persons working on the cooling circuit must be in possession of the correct qualifications that state the person in question is competent to use coolant in accordance with a special evaluation that is recognised by the sector association.
- Repairs must be carried out according to the recommendations of the manufacturer of the device. Maintenance and repairs that require the assistance of other qualified persons must be carried out under supervision of someone who is specialised in the use of flammable coolant.
Considering this is an appliance using R290 refrigerants, a service and operation manual for this appliance is available on request. It is strictly forbidden for end-users to charge refrigerant by themselves.
General safety instructions

WARNING
- Prevent splashing water on or in the device.
- Do not immerse any part of the device in water or other liquids.
- Never insert fingers or other objects into the openings of the device.
- Do not expose the device to strong vibrations or mechanical stress.

CAUTION
Make sure the device remains upright at all times. If the device or part of it has been lying horizontally, wait 2 hours before use.
CAUTION
Do not cover the device during usage or usage. To reduce the risk of fire, keep textiles, curtains, tent canvasses and other flammable material at a minimum distance of 50 centimeters from the device.
Safety during operation
WARNING
Do not use the device:
- lying, leaning, hanging crooked or tilted;
- if any parts are dirty or wet;
- if there is a strange noise, smell or smoke;
•near a water source, like a sink, shower or swimming pool;
• in the rain (outdoor unit resistance up to 10 liters per minute);
• in constant direct sunlight exposure;
- near or in a dusty and dirty environment, like a construction site;
- near flammable materials, liquids or fumes, like insect repellent sprays, splattering oil, gas cylinders or gas hoses;
•near a heat source or open fire;
- with an appliance that automatically switches the device on, such as a timer, dimmer or any other similar device.
If the device, the electric cable or plug shows damage or is malfunctioning, immediately take the appliance out of use and disconnect the power supply.


WARNING
The indoor unit does not have a protection rating against moisture and water. Never use the indoor unit in a damp or wet environment.
Warranty
EUROM offers a 24-month warranty on this device from the date of purchase. The warranty does not cover wear and tear from normal use. The warranty expires if a defect is the result of unintentional or careless use of the device. The manufacturer, importer and supplier are not liable for incorrect connections.
Introduction
Thank you for choosing this EUROM device. You have purchased a quality device that you will enjoy for many years. Using this device with respect and care will reduce the risk of personal injury or material damage.

CAUTION
It is important to read and understand this instruction manual before assembling, installing and using the device.
This manual describes the correct and safe use of this device. Keep this manual for future reference. The manual is an essential part of the device and must be given to the new owner upon resale or exchange. This manual has been compiled with the utmost care. Nevertheless, we reserve the right to improve and adjust this manual at any time. The images used may differ.
The following symbols and terms are used in this manual to alert the reader to safety issues and important information:

WARNING
Indicates a hazardous situation which, if the safety instructions are not followed, can lead to injuries to the operator or bystanders, light and/or moderate damage to the product or to the environment.

CAUTION
Indicates a hazardous situation which, if the safety instructions are not followed, can lead to light and/or moderate damage to the product or to the environment.
Identification
EUROM®
POWERFUL PRODUCTS SINCE 1974
Caravan and Home Air conditioner AC4201
Wi-Fi
Art.nr. 382440
| Power | 220-240V / 50Hz |
| Power usage | 480 - 510 Watt |
| Cooling capacity | 3500 - 4200 BTU |
| Refrigerant | R290 (95gr) |
| High pressure | 1,7 MPa |
| Low pressure | 0,48 MPa |
| Max. allowed pressure | 2,84 MPa |
| Outdoor unit | IPX4 |
| Batchno. | BC0064 |
EUROM - KOKOSSTRAAT 20 - 8281 JC - GENEMUIDEN - NETHERLANDS
Figure 22.
EUROM®
POWERFUL PRODUCTS SINCE 1974
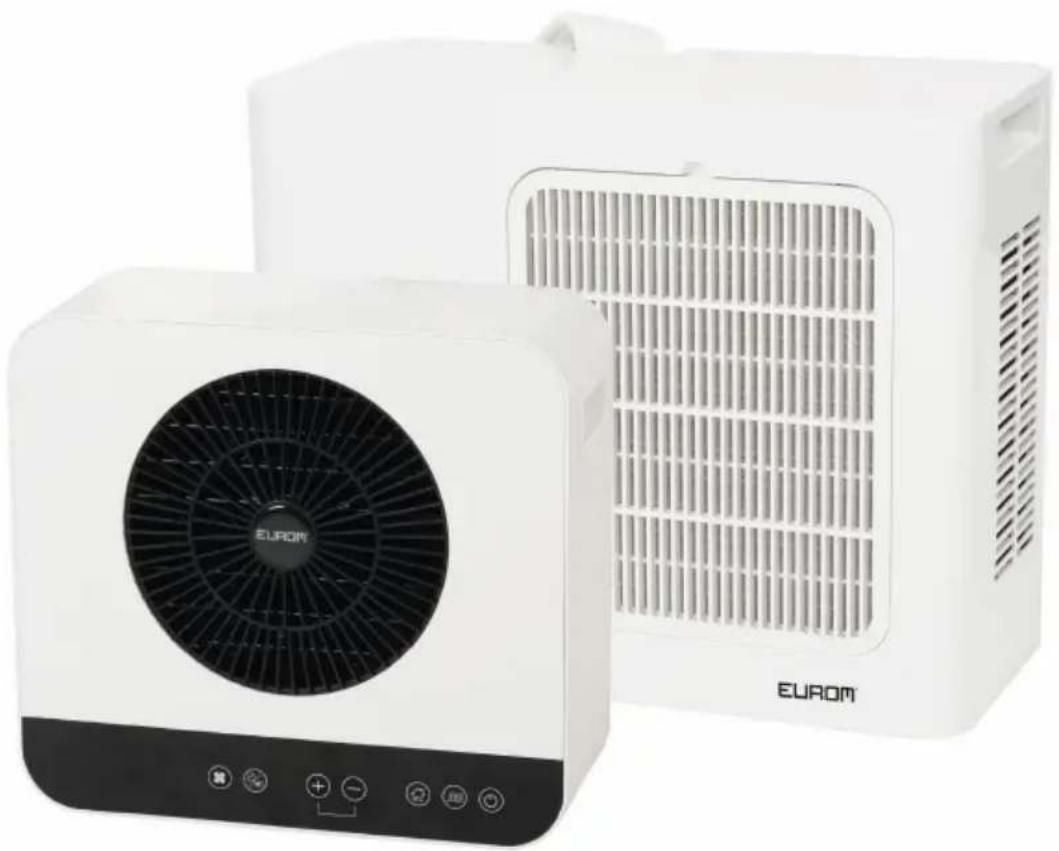
Caravan and Home Air conditioner AC5201
Wifi
Art.nr. 382532
| Power | 220-240V / 50Hz |
| Power usage | 550 - 585 Watt |
| Cooling capacity | 4300 - 5000 BTU |
| Refrigerant | R290 (110gr) |
| High pressure | 1,8 MPa |
| Low pressure | 0,46 MPa |
| Max. allowed pressure | 2,94 MPa |
| Outdoor unit | IPX4 |
| Batchno. | |

EUROM - KOKOSSTRAAT 20 - 8281 JC - GENEMUIDEN - NETHERLANDS
Figure 23.
Specifications
| Type | Caravan and Home air conditioner AC 4201 Wi-Fi | Caravan and Home air conditioner AC 5201 Wi-Fi |
| Product size indoor unit 409 x 191.2 x 378 mm 409 x 191.2 x 378 mm |
| Product size outdoor unit 507.6 x 205 x 389.2 mm 507.6 x205 x 389.2 mm |
| Weight 23 kg 23 kg | | |
| Voltage 220-240V~ / 50-60Hz 2 | 20-240V~ / 50Hz | |
| Power consumption 480-510W | 550-585W | |
| Current consumption 2.1-2.2A | 2.5-2.7A | |
| Cooling capacity 3500-4200 BTU | 4300-5000 BTU | |
| Cooling liquid R290 (95 g) R290 | (110 g) | |
| Compressor type Rotating Rotating | |
| Airflow indoor-unit 98/122/155 m ^3 /h (low, medium, high) | 98/122/155 m ^3 /h (low, medium, high) |
| Working temperature 16-42 °C | 16-42 °C | |
| Protection rating outdoor unit IPX 4 | PX 4 |
| Protective class | Class I | Class I |
Hereby, Euromac b.v. declares this product is in compliance with Directive 2014/53/EU.
The full text of the EU declaration of conformity is available at the following internet address: www.eurom.nl/declaration-of-conformity.
• Wi-Fi and Bluetooth Frequency Band: 2.4 \~ 2.4835GHz
• Maximum radio-frequency power transmitted in this frequency band(s):
- Wi-Fi: 17.5dBm
- Bluetooth: 6.5dBm
Description
This EUROM device is an easy-to-use portable caravan and home air-conditioner. It is suitable for use in a caravan or motorhome and for indoor home use. The device provides continuous cooling and produces condensed water.
Unboxing

WARNING
Plastic bags can be dangerous. To avoid danger of suffocation, keep this bag away from babies and children.
The device is packed in one box. Remove all packaging material and check that the device is not damaged. Do not use the device if it is damaged, but always contact your supplier. Keep the packaging for safe storage and transport.
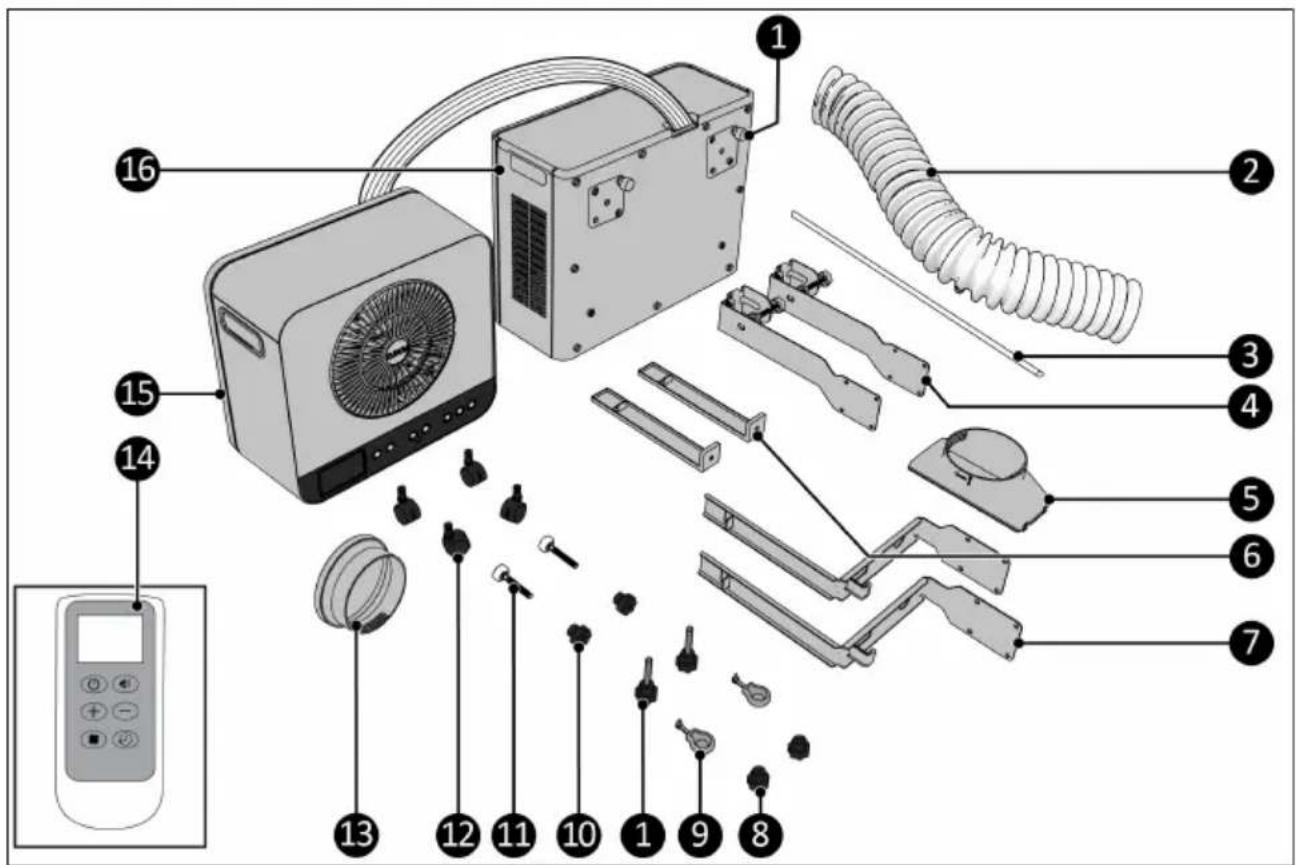
Figure 24.
| No. | Description No. Description | | |
| 1 Screw caps (4x) 9 Rubber hooks | | |
| 2 Hot air exhaust hose 10 Adjustment nut spacer | | |
| 3 Water drainage hose 11 Adjustment bolts spacer | | |
| 4 Bottom caravan brackets 12 Wheels | | |
| 5 Hot air exhaust outlet adapter 13 Adapter to connect the hot air exhaust hose of the Caravan air conditioner to the optionally available EUROM Window Way out (art.nr. 867701) |
| 6 Top caravan brackets 14 Remote control | | |
| 7 Indoor brackets 15 Fan unit (indoor unit) | | |
| 8 Screw caps 16 Cooling unit (outdoor unit) | | |
Control panel and LED display
- LED display
- Fan speed / Wi-Fi button
- Timer / mute button
- Plus button
- Minus button
- Home mode button
- Caravan mode button
- ON/OFF button
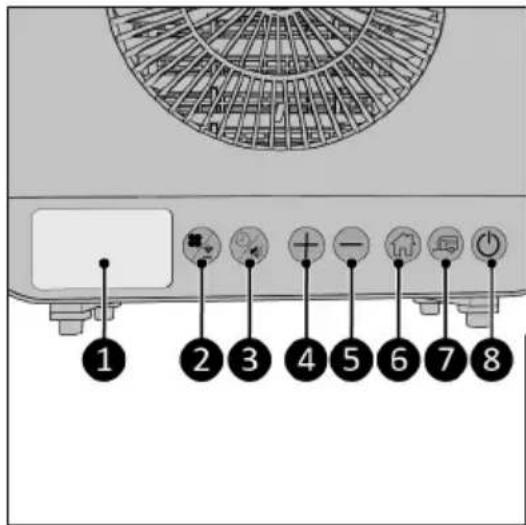
Figure 25.
- Home mode indicator
- Temperature indicator
- Celsius symbol
- Caravan mode indicator
- Timer indicator
- Wi-Fi indicator
- Normal fan speed indicator
- Turbo fan speed indicator
-
Sleep fan speed indicator
-
Empty internal water tank indicator
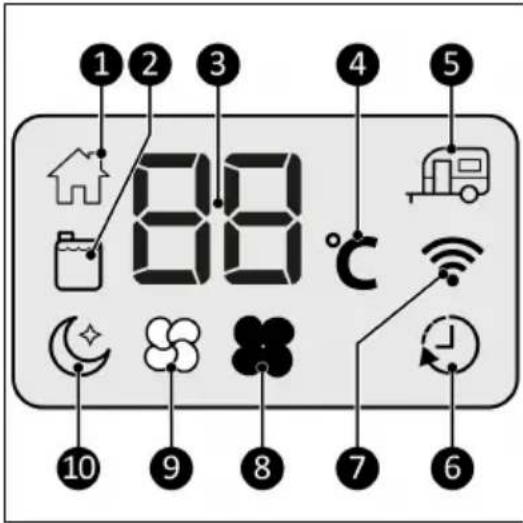
Figure 26.
Remote control

CAUTION
The display of the remote control will only show the SET temperature.

CAUTION
It is not possible to choose Home or Caravan mode with the remote control. This can only be done using the control panel.
- Timer indicator
- Set temperature
- Mute button
- Minus button
- Timer button
- Speed button
- Plus button
- ON/OFF button
- Turbo mode
- Normal mode
- Sleep mode
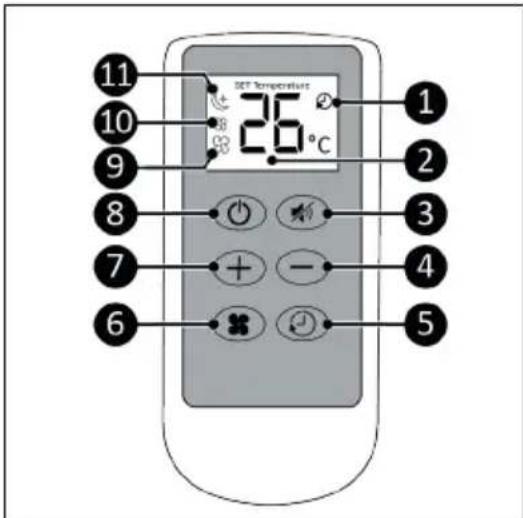
Figure 27.
Transport and storage

CAUTION
Do not leave the device hanging while transporting the caravan or motorhome.

CAUTION
Before moving the indoor unit, first drain the water by removing one of the two sealing caps.
- Clean the device before storing it.
- Transport the device in an upright position.
- Store the device in an upright position, in its original packaging, in a cool, dry and dust-free area.
Installation

WARNING
- Do not put the power plug into the wall socket before the device is correctly mounted. Do not use an extension cable; this can cause overheating and fire. If using an extension cable is unavoidable, make sure it is undamaged and earthed. Use an extension cable with a minimum power of 500 Watt. Always unwind the extension cable completely to prevent overheating.

CAUTION
Make sure that the main voltage is the same as indicated on the identification label of the device. All electrical connections must stay dry under all circumstances.
Caravan installation
Scan the QR code (Figure 28) to open the video. This video demonstrates the installation of this device.
- Place the indoor unit (Figure 29, pos. 1) loose on top of the outdoor unit (Figure 29, pos. 5).
- Remove the four screw caps (Figure 29, pos. 4).
- Attach both bottom caravan brackets (Figure 29, pos. 2) to the outdoor unit by tightening two screws per bracket (Figure 29, pos. 4).
- Make sure to screw the adjustment bolts (Figure 29, pos. 3) as far out as possible.
- Attach the distance holders (Figure 29, pos. 6) to the outdoor unit (Figure 29, pos. 5).

Figure 28.
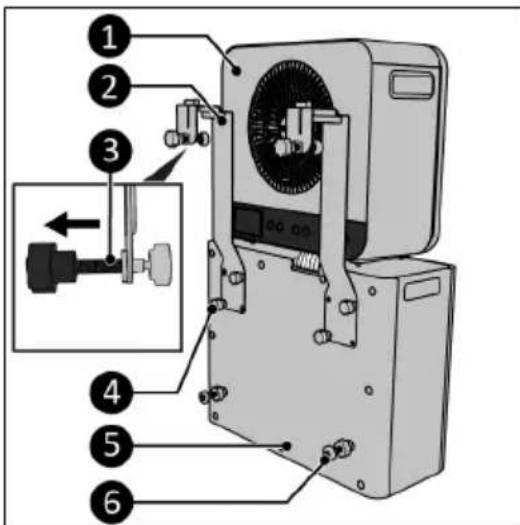
Figure 29.
-
Attach the top caravan brackets (Figure 30, pos. 3) to the indoor unit (Figure 30, pos. 1) by using the rubber hooks (Figure 30, pos. 2).
-
Open the caravan window as far as possible.
-
Place the complete unit in the window using the side handles of the outdoor unit (Figure 31, pos. 2). Make sure the gray blocks are in the window seal.
-
Tighten the bolts (Figure 31, pos. 1) hand tight on the caravan.
-
Make sure you have the screw caps (Figure 24, pos. 8) within reach for the threads on the bracket (Figure 31, pos. 4).
-
Lift the indoor unit through the window and place the hooks (Figure 32, pos. 1) on the threaded end (Figure 32, pos. 2).
-
Tighten the screw caps (Figure 24, pos. 8) on the threads (Figure 32, pos. 2).
-
Make sure the outdoor unit is level by adjusting the distance screws spacer (Figure 29, pos. 6).
-
The refrigerant hose (Figure 32, pos. 3) is guided between the indoor- and outdoor unit. Avoid bending the refrigerant hose in smaller bends than 30 mm.
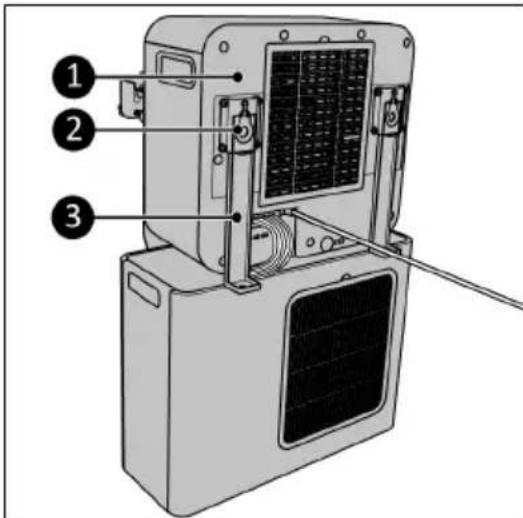
Figure 30.
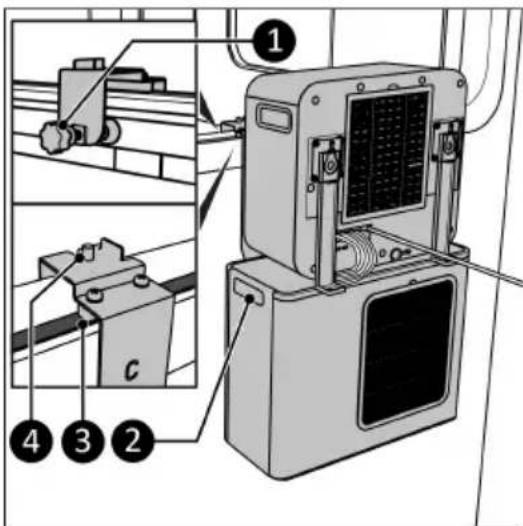
Figure 31.

Figure 32.
- Close and lock the caravan window in the ventilation position.
Home use installation
-
Scan the QR code (Figure 33) to open the video. This video demonstrates the installation of this device.
-
Attach the wheels (Figure 34, pos. 2) to the outdoor unit (Figure 34, pos. 1) by pushing them into the holes on the bottom of the outdoor unit.
- Attach the indoor brackets (Figure 34, pos. 4) to the outdoor unit (Figure 34, pos. 1) by tightening two screw caps per bracket (Figure 34, pos. 3).

Figure 33.

Figure 34.
- Slide the indoor unit (Figure 35, pos. 1) over the brackets (Figure 35, pos. 3).
- Guide the refrigerant hose (Figure 35, pos. 4) between the indoor and outdoor unit. Avoid bending the refrigerant hose in smaller bends than 30 mm.
- Remove the water stop plug (Figure 35, pos. 2).
- Connect the condensed water drainage hose (Figure 36, pos. 2) to the back of the indoor unit (Figure 36, pos. 1).
- Guide the condensed water drainage hose (Figure 36, pos. 2) into a bucket (Figure 36, pos. 3).
- Connect the adapter (Figure 37, pos. 1) to the side of the outdoor unit (Figure 37, pos. 1).
- Stretch the heat exhaust hose (Figure 37, pos. 2) slightly at one end and screw it (anticlockwise) onto the adapter.
- Guide the heat exhaust hose outside.
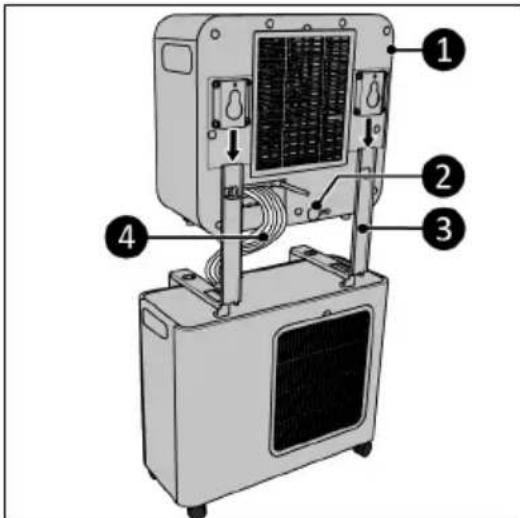
Figure 35.

Figure 36.
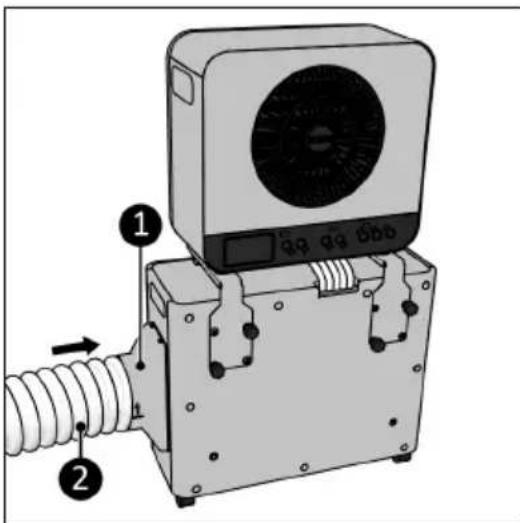
Figure 37.
Remote control
- Remove the battery cover (Figure 38, pos. 1).
- Insert two batteries (AAA 1.5 V) (Figure 38, pos. 2) as indicated in the battery compartment. Make sure to insert the batteries correctly.
- Replace the cover.
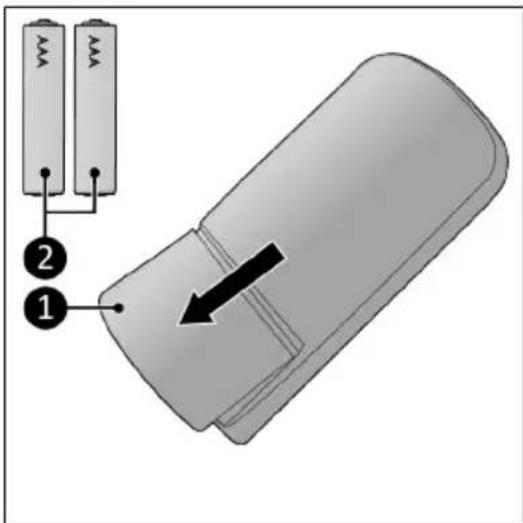
Figure 38.
Operation

WARNING
Before every use, make sure that:
• the door and window(s) are closed;
•you operate the device with dry hands;
•the device is clean and dry;
•the device is not damaged;
•the device is not covered or blocked;
•the device stands or hangs securely and horizontally.

CAUTION
The device works at an ambient temperature of max. 42^ C on high speed and max. 38^ C on low speed.

CAUTION
It is not possible to change from caravan mode to home mode or vice versa when you have already selected one of these modes. If you wish to change to the selected mode switch off the device. Wait for 99 seconds (see display) and switch the device back on.

CAUTION
Make sure that the home or caravan mode corresponds with the way you installed the device. Using the wrong mode with the wrong installation can lead to water damage.
- Make sure the device is correctly mounted.
- Place the power plug into an earthed wall socket that is easily accessible. Use an earthed wall socket with a minimum power of 500 Watt.
- Three beeps will sound to indicate the device is ready for use.
- Press the ON/OFF button (Figure 25, pos. 8) and a beep will sound.
- The home mode indicator (Figure 26, pos. 1) and the caravan mode indicator (Figure 26, pos. 5) will start flashing.
- Choose which mode you wish to use.
Choosing caravan mode

CAUTION
The water is discharged directly through the bottom of the outdoor unit.
- Make sure both water stop plugs are in the indoor unit reservoir (Figure 39, pos. 1 and 2).
- Make sure the outdoor unit is placed outside and the water can be discharged safely.
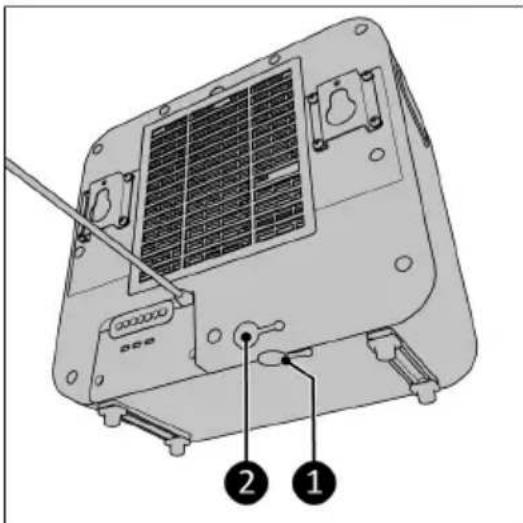
Figure 39.
When choosing caravan mode:
- The current ambient temperature will be displayed (Figure 26, pos. 3).
• The caravan mode indicator will light up (Figure 26, pos. 5).
•The fans starts.
- For 5 minutes the 'C' will be flashing on the display, indicating the compressor protection function is active.
•After 5 minutes: if the SET temperature (preset SET temperature is 21^ C) is lower than the ambient temperature the device will start cooling.
Choosing home mode
- The water-tank indicator will start flashing (Figure 26, pos. 2) and 'CO' will be displayed. The following needs to be done:
- The condensed water drainage hose (Figure 36, pos. 2) must be connected to the back of the indoor unit and be guided into a bucket (Figure 36, pos. 3).
-
The adapter (Figure 37, pos. 1) and the heat exhaust hose (Figure 37, pos. 2) need to be connected to the side of the outdoor unit.
-
The water stop plug on the bottom of the indoor unit needs to be plugged in (Figure 39, pos. 1).
-
Press the '+' and '-' button at the same time for 3 seconds to confirm the condensed water drainage hose and the heat exhaust hose are mounted.
-
The fans start working.
°For 5 minutes the 'C' will be flashing on the display, indicating the compressor protection function is active.
°After 5 minutes: if the SET temperature (preset SET temperature is 21 °C) is lower than the ambient temperature the device will start cooling.
Temperature setting
- Use the '+' and '-' buttons on the control panel or remote control to change the desired SET temperature. The temperature range of the device is 16^ C – 28^ C.
Speed setting
- Press the Speed button (Figure 25, pos. 2) repeatedly to set the required speed setting:
°turbo;
°normal;
°sleep.
Timer

CAUTION
The countdown timer is available in the Eurom Smart App.
At the end of the set countdown timer time the device will automatically switch off.
- Press the Timer / Mute button (Figure 25, pos. 3) to start the countdown timer of 0h - ..., 9h.
Mute
- Press the Timer / mute button (Figure 25, pos. 3) for 3 seconds.
°The display goes dark.
•The fan speed goes to sleep setting.
°All beep noises are cancelled, except the error alarms.
Press the Timer button again for 3 seconds to deactivate mute mode.
Testing your Caravan air conditioner\*
*Only available on model AC 5201, not available on model AC 4201.
- Switch on your Caravan air conditioner and let it cool (SET temperature lower then ambient temperature).
- Let the air conditioner cool for 15 minutes.
- HOLD the Caravan mode button for 3 seconds and the display shows the temperature of the air blown out by the indoor unit.
- Release the Caravan mode button and display shows the temperature from the incoming air.
If the difference between incoming and outgoing air is at least 8 °C the air conditioner function is correct.
Compressor protection function
The compressor protection function gives the compressor a 5-minute delay to protect the device.
Eurom Smart App

CAUTION
It is recommended to switch on Bluetooth on your smart phone when connecting your Eurom device for the first time. Doing so will make connecting quicker and easier.

CAUTION
- When the device is connected with Wi-Fi, the wi-fi symbol appears on the display.
- If the Wi-Fi symbol is blinking there is no connection.
The device can be operated using an app on a smartphone or tablet. The Eurom Smart App can be used:
• to switch the device on and off;
•regulate the temperature;
- adjust the fan speeds;
- switch the mute mode on and off;
- activate the countdown timer.
- Open the Eurom Smart App manual with the QR code (Figure 40) or go to www.eurom.nl/nl/manuals.
- Complete the Eurom Smart App manual.
°When the device is connected with Wi-Fi, the Wi-Fi symbol appears on the screen.
°If the Wi-Fi symbol is blinking there is no connection.

Figure 40.
Reset wifi connection
- Press and hold the Fan button.
Existing connections will be deleted. The Wi-Fi symbol will start blinking. A new connection can be made.
After operation

CAUTION
Do not use the power cable to unplug or carry the device. Do not wind the power cable too tightly or in sharp corners. Do not wrap the power cable around the device.

CAUTION
If the device is turned off it will activate the intern dry function. The fan will operate for 99 seconds at low volume. The display will show a countdown of 99 seconds. Do not interrupt this function.
- Make sure the device is switched off and the plug is removed from the power outlet.
- Let the device cool down before touching it.
- Wind the power cable.
- Drain the water from the indoor-unit (Figure 39, pos. 1).
Maintenance

WARNING
Do not perform any repairs or modifications to this device.
Maintenance and repairs must be carried out by a EUROM authorized professional. If the electric cable and/or electric plug is damaged, it should be replaced by the manufacturer or its service employee or persons with similar qualifications to prevent risks.
Cleaning

CAUTION
Do not use:
- scouring pads;
- hard brushes;
- flammable, aggressive or chemical cleaning products.
Prevent water from entering the device. Do not immerse any part of the device in water or other liquids.
It is recommended to clean the device after each use and prior to storage.
- Make sure the device is switched off and the plug is removed from the power outlet.
- Carefully vacuum all openings to remove dust and dirt.
- Wipe the device with a damp, clean, soft, lint-free cloth or a soft brush.
- Let the device dry completely prior to use and storage.
Filter cleaning
- Make sure that:
•the device is switched off;
•the plug is removed from the power outlet.
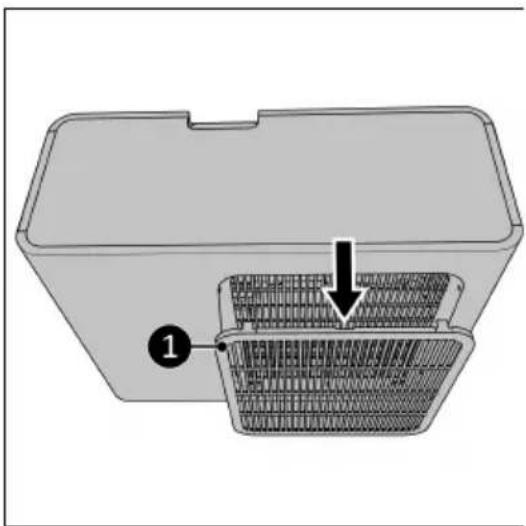
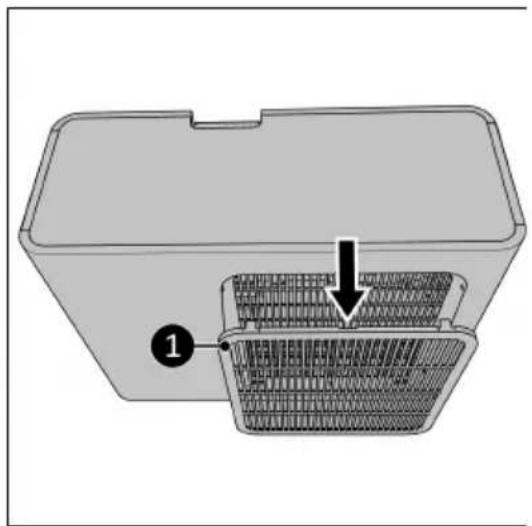
- Remove the frame (Figure 41, pos. 1 for the indoor unit and Figure 42, pos. 1 for the outdoor unit) and remove the filter.
- Carefully clean the filter.
- The filter can be cleaned with clean water.
- Let the filter dry completely before putting it back into place.
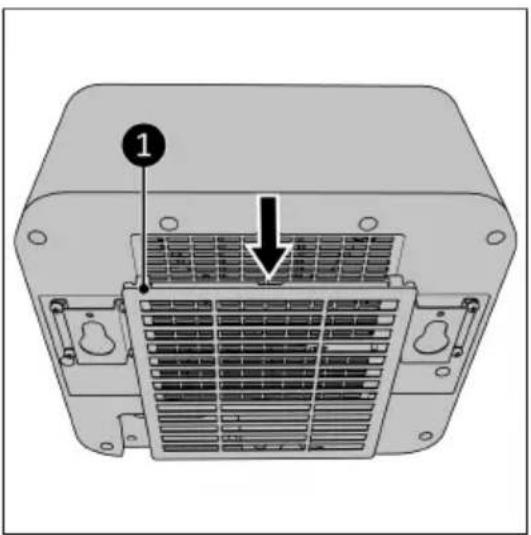
Figure 41.

natural_image
3D diagram of a plastic container with internal mesh structure and labeled component (1), no text or symbols present.
Figure 42.
Troubleshoot

CAUTION
Contact a EUROM authorized professional:
•in the event of regularly recurring errors;
- if the errors are not solved.
The LCD can display the following error codes:
Table 2.
| Error Code Problems Solution Safety instruction | | |
| CO Indicates the | condensed water drainage hose and the heat exhaust hose need to be connected. | 1. Connect water drainage hose.2. Connect heat exhaust hose.3. Press and hold '+' and '-' for 3 seconds. | |
| Er0 Temperature sensor cutting out. | Contact a EUROM authorized professional. | Do not use the device. |
| Er1 DC motor cutting out. Contact a EUROM | authorized professional. | Do not use the device. |
| Er2 Indoor unit water | tank is full. Buzzer beeps 10 times and the device stops. | Drain the water tank from the indoor unit. | |
| Er3 Water pump error | for 2 minutes. Buzzer beeps 10 times and the device stops. | Contact a EUROM authorized professional. | Do not use the device. |

This marking indicates that this product should not be disposed of with other household waste throughout the EU. To prevent possible harm to the environment or human health from uncontrolled waste disposal, recycle it responsibly to promote the sustainable reuse of material resources. To return your used device, please use the return and collection systems or contact the retailer where the product was purchased. They can take this product for environmentally safe recycling.
Caravan and Home Air conditioner AC4201
Wi-Fi
Art.nr. 382440
Power
220-240V / 50Hz
Power usage
480 - 510 Watt
Cooling capacity
3500 - 4200 BTU
Refrigerant
R290 (95gr)
High pressure
1,7 MPa
Low pressure
0,48 MPa
Max. allowed pressure
2,84 MPa
Outdoor unit
IPX4
Batchno.
BC0064

EUROM - KOKOSSTRAAT 20 - 8281 JC - GENEMUIDEN - NETHERLANDS
Abbildung 43.

Abbildung 44.
Spezifikationen
Abbildung 45.
Caravan Installation
Abbildung 49.

Abbildung 50.
Abbildung 51.

Abbildung 52.

Abbildung 53.
Abbildung 54.
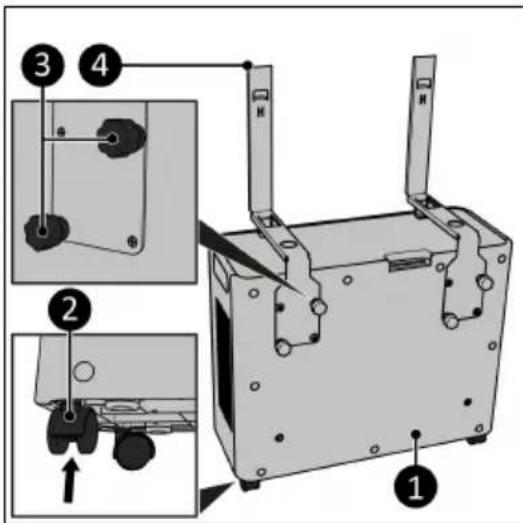
Abbildung 55.
Abbildung 56.
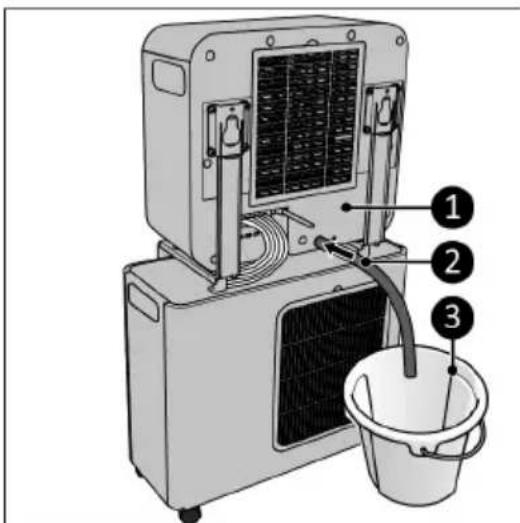
Abbildung 57.

Abbildung 58.
Fernbedienung
Abbildung 59.
Betrieb

WARNUNG
Abbildung 60.
Abbildung 61.
Abbildung 62.

natural_image
3D diagram of a plastic container with internal mesh structure and labeled component (1), no text or symbols present.
Abbildung 63.
Fehlerbehebung

VORSICHT
Caravan and Home Air conditioner AC4201
Wi-Fi
Art.nr. 382440
Power
220-240V / 50Hz
Power usage
480 - 510 Watt
Cooling capacity
3500 - 4200 BTU
Refrigerant
R290 (95gr)
High pressure
1,7 MPa
Low pressure
0,48 MPa
Max. allowed pressure
2,84 MPa
Outdoor unit
IPX4
Batchno.
BC0064

EUROM - KOKOSSTRAAT 20 - 8281 JC - GENEMUIDEN - NETHERLANDS
Figure 64.

Figure 65.
Spécifications
Figure 66.
Figure 70.

Figure 71.
Figure 72.

Figure 73.

Figure 74.
Figure 75.
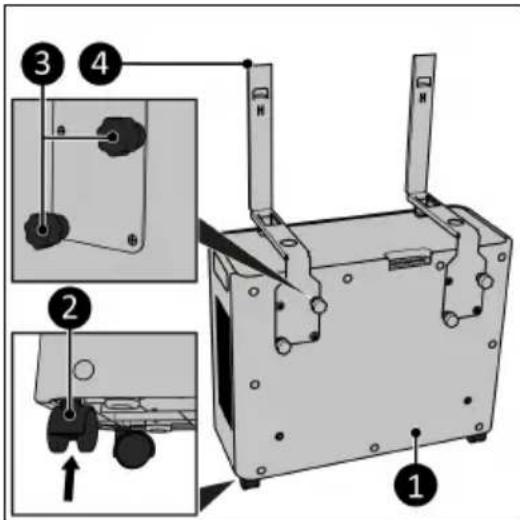
Figure 76.
Figure 77.
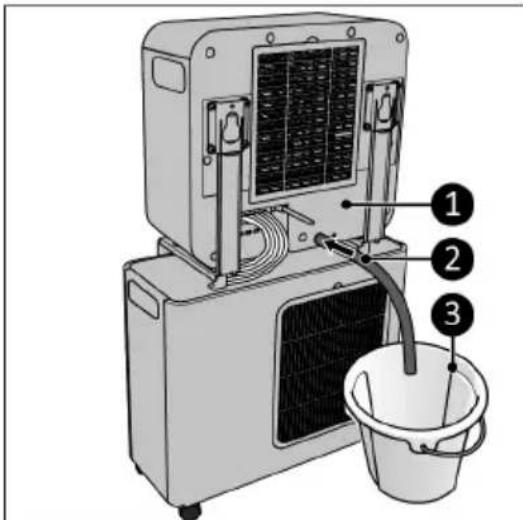
Figure 78.

Figure 79.
Télécommande
Figure 80.
Utilisation

AVERTISSEMENT
Figure 81.
Figure 82.
Figure 83.
natural_image
3D diagram of a plastic container with internal mesh structure and labeled component (1), no text or symbols present.
Figure 84.
Dépannage

PRUDENCE
natural_image
Symbolic representation of a bin with a 'No' and a recycling symbol (no text or labels)