
RV4 - Rear Camera AEG - Free user manual and instructions
Find the device manual for free RV4 AEG in PDF.
| Product Type | Wireless Solar Backup Camera |
| Brand | AEG |
| Model | RV4 (ref. 10997) |
| Camera Power Supply | Rechargeable lithium battery 2600 mAh, charging via solar panels (2 x 0.18 W) or USB port (5 V DC, 500 mA) |
| Monitor Power Supply | 12-24 V DC via cigarette lighter socket |
| Camera Power Consumption | < 250 mA in operation, < 0.3 mA in standby |
| Monitor Power Consumption | < 260 mA in operation, < 80 mA in standby |
| Camera Resolution | 640 x 480 pixels (CMOS sensor) |
| Screen Resolution | 480 x 272 pixels |
| Screen Size | 4.3 inches (10.9 cm / 11.7 cm diagonal), TFT LCD screen |
| Transmission Frequency | 2.4 GHz (ISM band) |
| Transmission Range | Approximately 30 meters |
| Operating Temperature | -10 °C to +40 °C |
| Main Functions | Night vision (infrared LEDs), adjustable guide lines, brightness/contrast/color adjustment, split display for two cameras, reversible mounting, wireless pairing |
| Safety | Built-in fuse T1AL 250 V, short-circuit protection, automatic shutdown in case of overheating, installation and operating instructions |
| Cleaning and Maintenance | Clean with a soft, dry cloth. Do not immerse. Protect from moisture. |
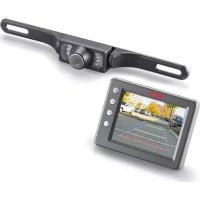
| Package Contents | Camera, monitor, suction cup mount, 12 V cable, USB cable, pairing needle, user manual |
Frequently Asked Questions - RV4 AEG
User questions about RV4 AEG
0 question about this device. Answer the ones you know or ask your own.
Ask a new question about this device
Download the instructions for your Rear Camera in PDF format for free! Find your manual RV4 - AEG and take your electronic device back in hand. On this page are published all the documents necessary for the use of your device. RV4 by AEG.
USER MANUAL RV4 AEG
GB Instructions for use
Solar reversing camera
FR Mode d'emploi
natural_image
Line drawing of a rectangular electronic device with control buttons and a blank screen (no text or symbols)
natural_image
Illustration of a computer monitor with two ports and a circular button, no text or symbols present.AEG
DE - Seite 3
Read these instructions before using the charger. Follow all instructions and recommendations.
FR - Page 37
4 www.aeg-automotive.com
EINLEITUNG
14 www.aeg-automotive.com
20 www.aeg-automotive.com
TABLE OF CONTENTS
Introduction....22
Normal use....23
Contents 23
Technical data 24
Safety 24
Product description 29
Installation 30
Charging the battery pack....30
Installing the reversing camera 30
Adjusting the reversing camera....31
Installing the LCD monitor....31
Operation 31
Information about use....32
Switching the monitor on/off....32
Operating the monitor ....32
Troubleshooting 34
Cleaning, care and maintenance. 35
Changing the fuses ....35
Service....35
Disposal....35
EU Declaration of Conformity.... 36
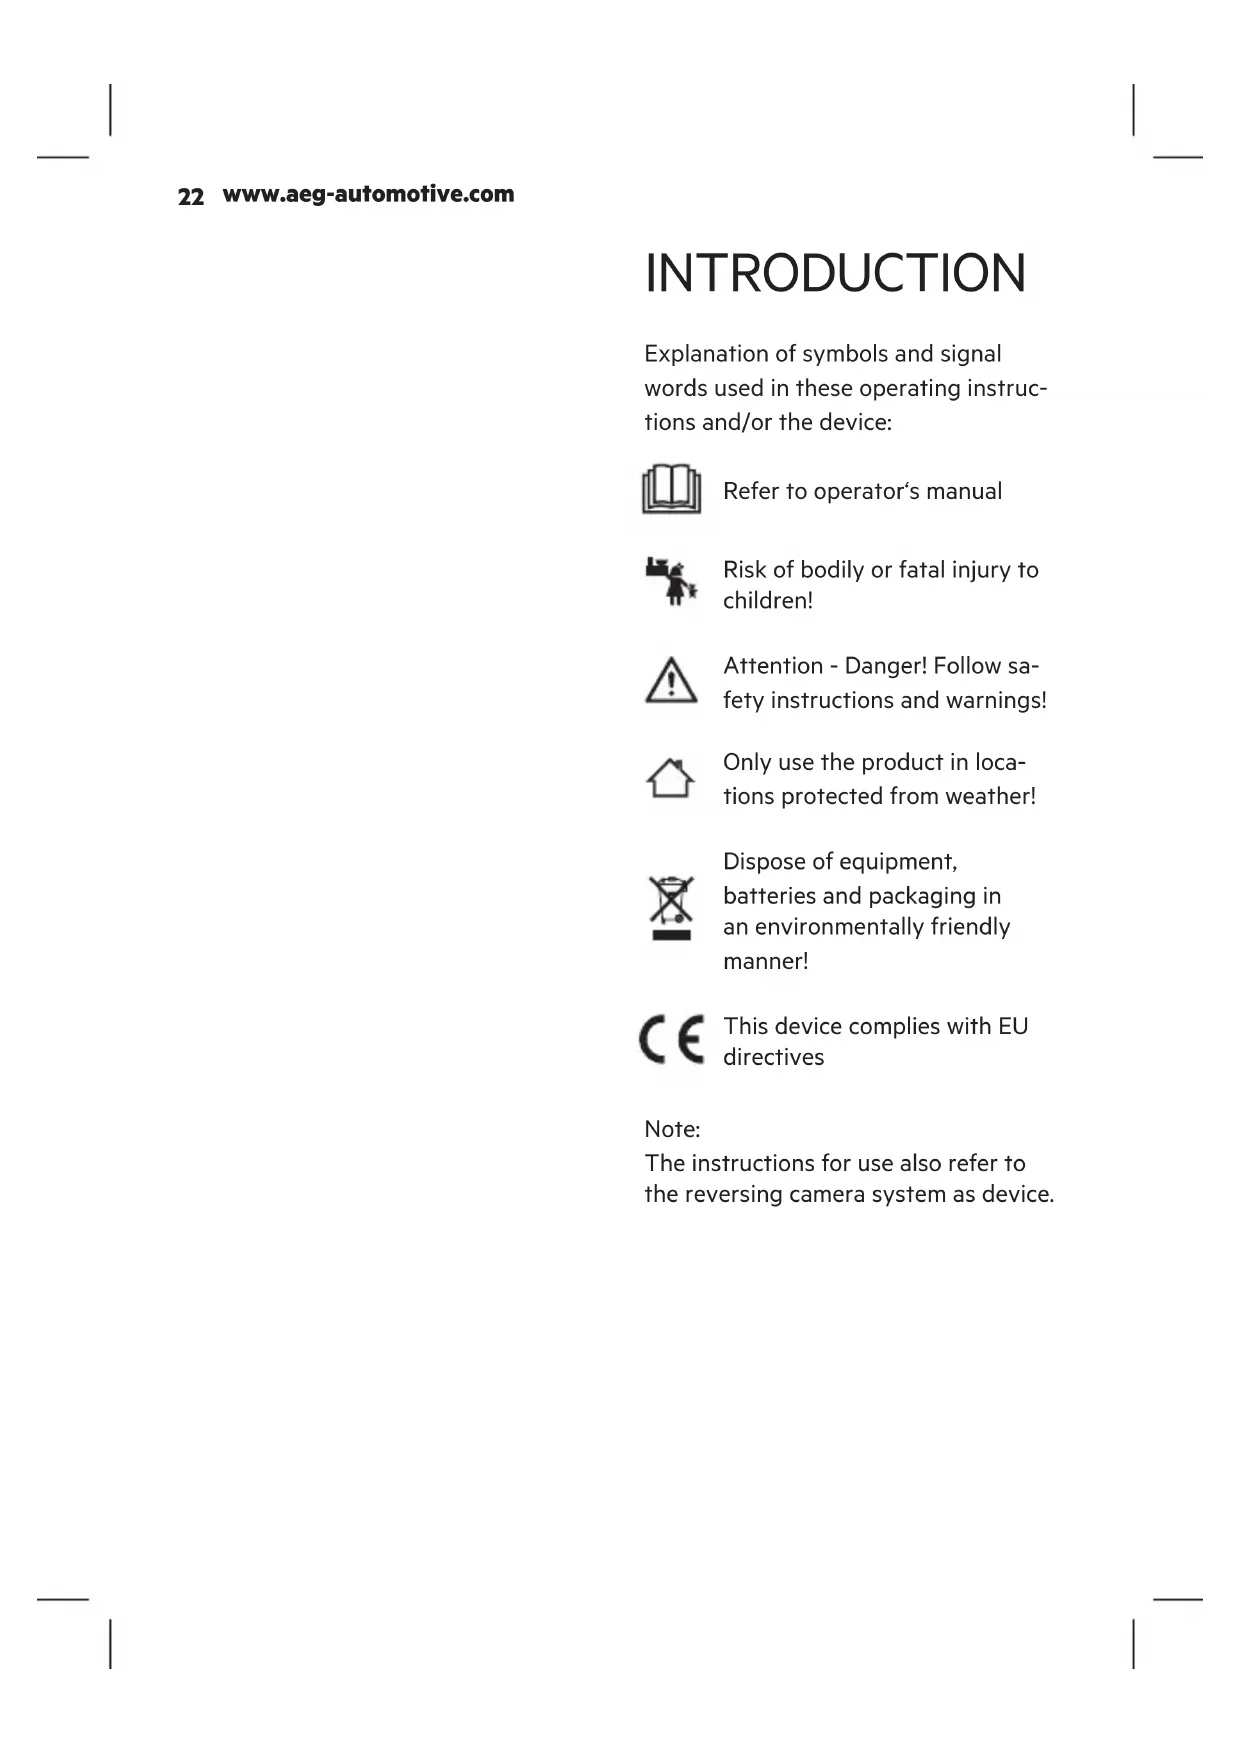
INTRODUCTION
Explanation of symbols and signal words used in these operating instructions and/or the device:

Refer to operator's manual

Risk of bodily or fatal injury to children!

Attention - Danger! Follow safety instructions and warnings!

Only use the product in loca- tions protected from weather!

Dispose of equipment, batteries and packaging in an environmentally friendly manner!

This device complies with EU directives
Note:
The instructions for use also refer to the reversing camera system as device.
Normal use
The solar reversing camera is only intended to improve the view when briefly reversing a vehicle.
The solar reversing camera does not release you from traffic regulations, the Highway Code and your obligation to drive carefully and turn your head when reversing to particularly mind pedestrians and other traffic! This reversing camera is intended for a max. 3km/h (kilometres per hour) reversing speed and for a coverage of max. 30m.
The device may be used in countries within the EU.
This device may be used by children age eight (8) years and up and persons with limited physical, sensory or mental capacity or lacking experience and/or knowledge when supervised or instructed on the safe use of the device and having understood the risks involved. Children must not play with this device. Cleaning and user maintenance must not be performed by children without supervision.
This device is not intended for commercial use.
Any other use or modification of the device is considered improper and involves significant risks. The manufacturer assumes no liability for damages due to improper use.
Contents
Check the package contents immediately after unpacking. Check the device and all parts for damage. Do not use a defective device or parts.
Solar reversing camera with mounting plate
LCD monitor
Monitor arm with suction cup
Monitor cable with 12 V car plug
USB cable
Pin for pairing
●operating instruction
Please include all relevant documentation to other users!
The operating instructions are also available at the following Internet address:
24 www.aeg-automotive.com
Technical data
| Model Solar reversing camera | |
| Article No. 10997 | |
| Ambient temperature | -10 °C ~ +40 °C |
| Transmission frequency | 2,4 GHz (ISM band) |
| Transmission range approx. 30 m | |
| Frequency range Monitor: TX: 2410 - 2473 MHz RX: 2406 - 2469 MHz Camera: TX: 2410 - 2473 MHz RX: 2406 - 2469 MHz | |
| Max. transmission power | Monitor: 18,30 dBm EIRP Camera: 18,49 dBm EIRP |
| Camera | |
| Solar cell capacity 2 x max. 0,18 W | |
| USB port 5 V DC, max. 500mA | |
| Battery pack capacity | 2600 mAh |
| Power input Use: < 250 mA Standby: < 0,3 mA | |
| Sensor CMOS | |
| Resolution 640 x 480 px | |
| Lens optics 1,7 mm / F2.0 | |
| Monitor | |
| Power supply 12-24 V | DC |
| Display 10.9 cm / 4.3 inchTFT LCD (11.7 cm) | |
| Resolution 480 x 272 px | |
| Power input Operation: < 260 mASstandby: < 80 mA | |
| Fuse T1AL 250 V glassfuse | |
SAFETY
General Safety Guidelines
Read all safety notes and instructions. Failure to observe the safety notes and instructions may result in electric shock, fire and/or serious injuries. Please keep all safety notes and instructions for future reference.
Include all documentation when passing this product on to other users or subsequent owners!
The manufacture is not responsible for damages caused by:
Improper connection and/or operation.
External forces, damage to the device and/or damage to parts of the device due to mechanical impacts or overload.
Any type of modifications to the device.
Using the device for purposes not described in this operating manual.
Subsequent damages from improper and/or incorrect use and/or defective batteries.
Subsequent damages from improper and/or incorrect use.
Unauthorised opening of the device.
This will void the warranty.

Warning!

Risk of bodily or fatal injury to children! Risk affocation or strangulation-keep the machine out of each of children.
Children are unable to assess the risks associated with use of this product!

Danger!
Damaged leads may cause fatal electric shock. Discontinue use if leads are damaged.

Fire hazard!
Ensure the on-board voltage matches the input voltage (12-24 V DC) specified on the device to prevent a fire hazard and damage to the device.
Do not modify the plug in any way.
The equipment will heat up during use. Always place the backup camera system in a safe, well ventilated location.
Do not cover the device during use, as it may be damaged from extreme heating.
Immediately stop using the device if you notice smoke or an unusual odour.

Risk of electrical shock!
Do not expose the monitor to rain or wet conditions. Avoid spilling or dripping water or other liquids on it. Water entering electrical devices will increase the risk of electric shock.
The camera is protected against rain but not waterproof! Do not immerse camera in water or other liquids!
Please verify there is no moisture on plugs and cables. Never connect the device to the on-board power with wet hands.
Do not use device if damaged. Damage to the device or the charging cable increases the risk of electrical shock.
Do not attempt to disassemble or repair the device. Immediately have the device repaired or replaced by a specialty shop if defective.
Never use the cable to carry or pull the device.
Never operate the device if it has been dropped or damaged in any other
way. For inspection and repair, take it to a qualified electrician.
Do not use other cables or accessories. Do not extend the cables.
Always unplug the 12 V plug from the power source to disconnect the monitor when not in use. Never pull on the connecting cable!

Risk of injury!
Before installing the backup camera system and before each functionality test of the backup camera system, secure the vehicle to prevent it from rolling away. Attention – risk of injury and property damage! Always engage the hand brake and shift into gear! Automatic transmissions must be put into Park and the hand brake engaged!
Do not run or start the vehicle while installing the backup camera system!
Always follow safety instructions if the vehicle is on jacks or a car lift or the like!
Follow the automaker's safety instructions and manual!
Only install the backup camera system in a safe environment! Keep clothing, hair, limbs and the backup camera system away from moving and hot engine-and car parts!
When installing the backup camera system always be sure the safety and functionality of other systems and equipment in the vehicle is not impaired! Please follow the instructions of the automaker's manual.
If operation system mal- functions and damage to the backup camera system occurs during operation, immediately disconnect the equipment from the 12 V vehicle power supply!
Be sure the ignition and all vehicle loads are powered off before starting with installation of the backup camera system!

Risk of damage!
Improper installation of the backup camera system may damage the vehicle's electrical equipment.
Do not use the backup camera system to power auxiliary automotive equipment or other external devices.
Special notes
The reversing camera works with shortwave radio signals. These can interfere with the operation of other electronic and medical devices. Switch off the device in areas where its use is prohibited. Do not use the device in medical facilities, on aircraft, at gas stations, or near automatic fire alarms or automatically controlled devices. Keep the device at least 20 cm away from pacemakers and other medical devices.
Depending on ambient conditions, the camera and monitor may not always correctly display individuals or objects.
Extreme high or low temperatures or rapid temperature changes may cause the camera to not function
properly or cause the monitor to not show objects correctly.
Bright light hitting the camera lens directly may result in objects being overexposed and not being displayed clearly.
After using a car wash, the camera's detection range may change due to mechanical effects. Be sure to check for this and readjust the camera if necessary.
Even if the fuse inside the 12 V plug is tripped, back-up camera system's camera and wireless transmitter will remain ready for use.
When removing dirt or ice and snow from the camera lens be extremely careful so as not to scratch it.
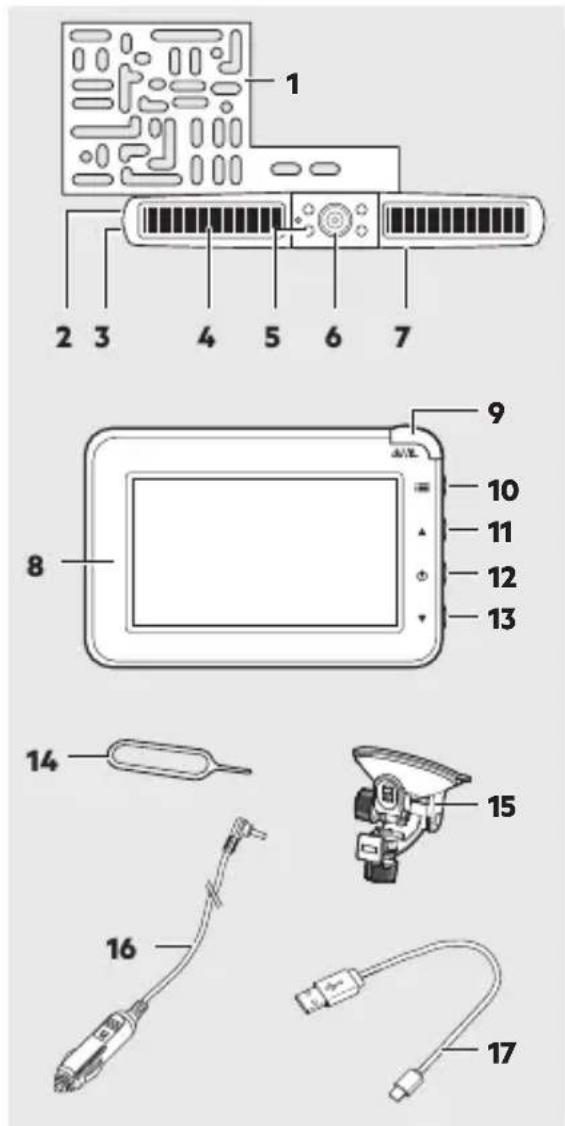
PRODUCT DESCRIPTION

- Mounting bracket
- Pairing button
- USB port
- Solar cells
- Infrared LEDs
- Reversing camera
30 www.aeg-automotive.com
- „ON/OFF“ slide switch (back)
- LCD monitor
- „Wake/Standby“ button
- „Menu“ button
- „Up“ button
- „Power/Enter“ button
- „Down“ button
- Pairing pin
- Monitor arm with suction cup
16.1 Monitor cable with 12 V plug - USB cable
INSTALLATION
Charging the battery pack
The reversing camera is powered by the integrated battery pack, which is charged via the built-in solar cells or the USB port.
The storage battery should be fully charged prior to first use.
the battery is drained due to lack of sun exposure, also charge via the USB port.
- Open the rubber cover at the side.
- Plug the USB cable into the USB port.
- Connect the other end of the USB cable to a USB power supply.
- The charging process will start automatically. The charging time is approx. 6-7 hours.
Installing the reversing camera
Verify the battery of the reversing camera is fully charged.
Ensure the slide switch (7) at the back of the camera is in the „ON“ position before installing.
the device will not be used for an extended period, switch off the device with the slide switch (7) to prevent battery damage due to deep discharging.
The monitor shows the battery charge when on.
The mounting bracket (1) may need to be turned depending on if the reversing camera is installed above or below the number plate.
- Loosen the screws at the back to turn the mounting bracket.
- Turn the mounting bracket (1) 180^ .
- Fix the mounting bracket (1) with the screws.
Attention!
Due to differences in technical and design-related vehicle types, these instructions for use do not apply to all vehicle models.
- Remove the number plate from its bracket.
- Unscrew and remove the number plate holder.
- Centre the mounting plate behind the number plate holder.
Attention!
The location of the camera brackets may not impair the functionality of the license number light! If it impairs the license number light mount the camera on the opposite side.
- Attach the mounting plate and the number plate holder to the vehicle.
- Attach the number plate.
Adjusting the reversing camera
The reversing camera can be swivelled in one direction.
- To adjust the reversing camera, loosen the screws at the bottom of the reversing camera.
- Swivel the camera into the desired position.
- Tighten the screws.
Installing the LCD monitor
Attention!
The location of the monitor may not impair the visibility of the driver! Further, do not impair the functionality and operation of equipment, control units and systems inside the vehicle. Follow applicable laws and safety regulations for vehicles!
-
Clean the area of the windshield where you would like to attach the suction cup base.
-
Press the suction cup against the windscreen and push the locking lever toward the suction cup.
- Insert the monitor mount of the monitor arm (15) into the designated opening at the back of the monitor.
- Slide the monitor bracket up until it locks in place.
- Open the locknut and adjust the monitor to a comfortable angle. Then tighten the locknut again to fix the monitor.
- Connect the monitor cable (16) to the monitor and the 12 V vehicle socket. Route the monitor cable so it does not impair or jeopardise the safety of the vehicle and its occupants.
Remember the vehicle's battery will be discharged when the vehicle is not running.
OPERATION
Warning!
Do not operate the monitor whilst driving, as this distracts from traffic. Maintain your focus on driving and traffic.
Attention!
In extremely bright conditions the monitor will take a few seconds to adjust to the light conditions. Wait for the image to stabilise before reversing.
32 www.aeg-automotive.com
Information about use
You may have to turn the ignition to activate the vehicle's 12 V socket. Please refer to the owner's manual for your vehicle. Contact a specialised shop if you are unsure.
Do not cover the device during use and ensure proper ventilation.
Switching the monitor on/off
- Press the "Standby" button (9) to activate the screen.
- Press the button again to switch off the screen.
Operating the monitor
- Press the "Menu" button (10) to open the menu.
- Use the "Up" (11) and "Down" (13) buttons to select a symbol or setting.
- Press the "Enter" button (12) to confirm a selection or open a submenu.
- Press the "Menu" button (10) to go back or exit the menu.
"Screen settings" menu
- Select the respective camera (camera 1 or camera 2).
- Select a setting:
Brightness
Contrast
Colour
"Orientation" menu
This setting allows you to install the camera inverted and still see the image correctly.
- Select the respective camera (camera 1 or camera 2).
- Press the "Enter" button (12) to invert the image.
"Setup" menu
Pairing
This menu is used to pair the camera with the monitor. The device can be connected to two cameras.
- Select the camera you want to pair ("PAIR1" for camera 1 or "PAIR 2" for camera 2).
- Hold the pairing button (2) with the included pairing pin (14) or a paper-clip until the pairing has been confirmed and the monitor shows the camera image.
Time-Out
This menu is used to configure how long the camera image will be displayed after pressing the "Standby" button.
30 sec.
45 sec.
60 sec.
SplitScreen
If you have two paired cameras, you can use this menu to configure how to split the screen:
horizontal split
vertical split
"Information" menu
Select this menu to view the firmware version of the device.
Distance guidelines
You can display distance guidelines to help with reversing:
- Press the "Standby" button (9) for 5 seconds to show the guidelines.
- Press the button for 5 seconds again to hide the guidelines.
34 www.aeg-automotive.com
TROUBLESHOOTING
| Problem Possible cause Solution | ||
| The monitor stays dark. The blue LED doesn’t light up. | The 12 V monitor cable plug is not plugged into the vehicle’s cigarette lighter or a 12 V outlet. | Plug the 12 V monitor cable plug into the cigarette lighter or a 12 V vehicle outlet. |
| The fuse inside the 12 V monitor cable plug is burnt out and must be replaced. | Replace the defective fuse inside the 12 V monitor cable plug with a new fuse (also see “Replacing fuses”). | |
| The monitor displays no image. | The camera is not connected to the monitor. | Check the battery charge. If necessary, recharge the reversing camera. |
| The image on the monitor shows interference. | The wireless connection between monitor and camera is too weak, thus interfering with data transmission. | Position the transmitter closer to the monitor or adjust the position of the monitor. |
| The monitor image is not displayed clearly. | The camera lens may be dirty. | Carefully clean the camera lens. |
| Bright light is hitting the camera lens. | The image quality will improve once you move out of the area of the interfering light. | |
CLEANING, CARE AND MAINTE- NANCE
Minimal care will ensure your device remains functional for years.
●Carefully wind the cable when storing the device. This will help prevent accidental damage to the cable and the device.
●clean the product with a soft, dry cloth.
Store the machine in a clean, dry place.
Changing the fuses
A fuse inside the car plug safeguards the device. This will respond in the event of a short circuit or voltage peaks and must then be replaced.
Attention!
Do not use higher rated fuses. The electronics may otherwise be damaged.

- Unscrew the retaining pin (1) with the fuse cover (2) from the car plug (4).
- Insert a new micro-fuse (3) of the same rating (see Technical Data).
- Replace the retaining pin (1) with the fuse cover (2) in the car plug (4).
Service
Should you have any questions regarding commissioning or operating in spite of studying these operating instructions, or if a problem should occur against all expectations, please get in contact with your specialist supplier.
Disposal
The packaging consists of non-contaminating materials that you can dispose of at your local recycling point.

Do not throw electrical appliances in with domestic waste!
In accordance with European Directive 2012/19/EC for waste electrical and electronic equipment (WEEE) and conversion to national law, used electrical appliances must be collected separately and taken to a recycling point. For ways to dispose of old electrical appliances please contact your community or city administration.

Do not dispose of waste devices with household rubbish. Discharge used battery packs and return the battery packs to a public waste management or collection site. Properly dispose of damaged or defective battery packs in compliance with local regulations.
36 www.aeg-automotive.com
EU Declaration of Conformity
MTS MarkenTechnikService GmbH & Co. KG hereby declares the radio equipment model Solar reversing camera (10997) complies with Directive 2014/53/EU. For the full text of the EU declaration of conformity please visit: http://iuqr.de/10997
Illustrations may vary slightly from the product itself. We reserve the right to modify the product in accordance with technical advances. Decoration not included.
TABLE DES MATIÈRES
Introduction 38
40 www.aeg-automotive.com
Données techniques
44 www.aeg-automotive.com
48 www.aeg-automotive.com
52 www.aeg-automotive.com

Li-Ion
64 www.aeg-automotive.com
30 sec.
5 sec.
60 sec.
Split screen
68 www.aeg-automotive.com
72 www.aeg-automotive.com
Technická data
74 www.aeg-automotive.com
84 www.aeg-automotive.com
94 www.aeg-automotive.com
ZARYS PRODUKTU
100 www.aeg-automotive.com

Li-Ion
104 www.aeg-automotive.com
Technické údaje
| Model Solárna spätnákamera | |
| Císlo výrobku 10997 | |
| Okolitá teplota -10 °C | ~ +40 °C |
| Prenosová frekvencia | 2,4 GHz (ISMpásmo) |
| Dosah prenosu ca. 30 | m |
| Rozsah frekvencie Monitor:TX: 2410 - 2473 MHzRX: 2406 - 2469 MHzKamera:TX: 2410 - 2473 MHzRX: 2406 - 2469 MHz | |
| Maximálny vy-sielací výkon | Monitor: 18,30 dBmEIRPKamera: 18,49 dBmEIRP |
| Kamera | |
| Výkon solárnejbunky | 2 x max. 0,18 W |
| USB vstup 5 V DC, max. 500mA | |
| Kapacita batérie 2600 mAh | |
| Spotreba prúdu Prevádzka: < 250mAPohotovostný režim:< 0,3 mA | |
| Senzor | CMOS |
| Rozlíšenie 640 x 480 | px |
| Optika šošoviek 1,7 mm / F2.0 | |
| Monitor | |
| Zdroj prúdu 12-24 V DC | |
| Obrazovka 10.9 cm / 4,3 palca TFT LCD (11,7 cm) | |
| Rozlíšenie 480 x 272 px | |
| Spotreba prúdu Prevádzka: < 260 mA Pohotovostný režim: < 80 mA | |
| Poistka Sklenená poistka T1AL, 250 V |
BEZPEČNOST
112 www.aeg-automotive.com
116 www.aeg-automotive.com
www.aeg-automotive.com
AEG is a registered trademark used under license from AB Electrolux (publ).
- AEG
- DE - Seite 3
- FR - Page 37
- www.aeg-automotive.com
- EINLEITUNG
- www.aeg-automotive.com
- TABLE OF CONTENTS
- INTRODUCTION
- Normal use
- Contents
- www.aeg-automotive.com
- SAFETY
- General Safety Guidelines
- Warning!
- Danger!
- Fire hazard!
- Risk of electrical shock!
- Risk of injury!
- Risk of damage!
- Special notes
- PRODUCT DESCRIPTION
- www.aeg-automotive.com
- INSTALLATION
- Charging the battery pack
- Installing the reversing camera
- Attention!
- Adjusting the reversing camera
- Installing the LCD monitor
- OPERATION
- www.aeg-automotive.com
- Information about use
- Switching the monitor on/off
- Operating the monitor
- "Screen settings" menu
- "Orientation" menu
- "Setup" menu
- Pairing
- Time-Out
- SplitScreen
- "Information" menu
- Distance guidelines
- www.aeg-automotive.com
- TROUBLESHOOTING
- CLEANING, CARE AND MAINTE- NANCE
- Changing the fuses
- Service
- Disposal
- www.aeg-automotive.com
- EU Declaration of Conformity
- TABLE DES MATIÈRES
- www.aeg-automotive.com
- www.aeg-automotive.com
- www.aeg-automotive.com
- www.aeg-automotive.com
- www.aeg-automotive.com
- Split screen
- www.aeg-automotive.com
- www.aeg-automotive.com
- www.aeg-automotive.com
- www.aeg-automotive.com
- www.aeg-automotive.com
- ZARYS PRODUKTU
- www.aeg-automotive.com
- www.aeg-automotive.com
- BEZPEČNOST
- www.aeg-automotive.com
- www.aeg-automotive.com
Brand : AEG
Model : RV4
Category : Rear Camera