
VP4165 - Vacuum Cleaner Concept - Free user manual and instructions
Find the device manual for free VP4165 Concept in PDF.



| Product type | Stick vacuum |
| Model | VP4165 |
| Brand | Concept |
| Battery voltage | 25.2 V |
| Power adapter | Input: AC 100-240 V ~ 50/60 Hz, output: DC 32 V, 0.4 A |
| Power | 170 W |
| Noise level | ≤ 82 dB (A) |
| Charging time | 6 to 8 hours |
| Runtime | ≥ 28 min (high power), ≥ 65 min (low power) |
| Filters | HEPA filter, outer filter |
| Features | Foldable handle, detachable handheld vacuum, turbo brush with LED, wall charging dock |
| Dustbin emptying | Removable dirt collection bin, empty after each use |
| Filter maintenance | Wash with water, dry completely before reassembly |
| Brush maintenance | Disassemble and clean hair and fibers regularly |
| LED indicator | Blue (on), blinking blue (low battery), blinking red (discharged), red (charging), blue (charged), blinking red/blue (battery defective) |
| Safety | Automatic shut-off on dock, electrical protection, do not use without filter, do not vacuum liquids or hot objects |
| Warranty | 24 months on product, 6 months on battery |
| Recycling | WEEE compliant, do not throw with household waste |
Frequently Asked Questions - VP4165 Concept
User questions about VP4165 Concept
0 question about this device. Answer the ones you know or ask your own.
Ask a new question about this device
Download the instructions for your Vacuum Cleaner in PDF format for free! Find your manual VP4165 - Concept and take your electronic device back in hand. On this page are published all the documents necessary for the use of your device. VP4165 by Concept.
USER MANUAL VP4165 Concept
natural_image
Black and white photo of a black vacuum cleaner (no visible text or symbols)VP4165
CZ
HU LV DE FRNSK PL
IT ES
RO
concept
CZ
PODĚKOVÁNÍ


concept
concept

Ruční vysavač
SESTAVENÍ SPOTŘEBIČE
Sklopná rukojeť
natural_image
Technical line drawing of a mechanical component with no visible text or symbols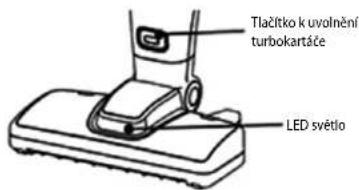
natural_image
Illustration of a hand holding a small container with seeds, showing four stages of cleaning or packaging (no text or symbols)natural_image
Exploded view diagram of a mechanical component showing internal parts and assembly (no text or labels)CZ
concept
concept
CZ
natural_image
Technical line drawing of a mechanical component with internal channels and mounting brackets (no text or symbols)natural_image
Mechanical assembly diagram showing a clamping mechanism with no visible text or symbols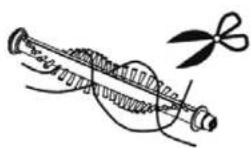
Rotačni kartac vyjmete. Odstraňte vlasy z rotačniho kartace.
ŘEŠENÍ POTÍŽÍ
SK
concept
concept
SK
Ručný vysávač
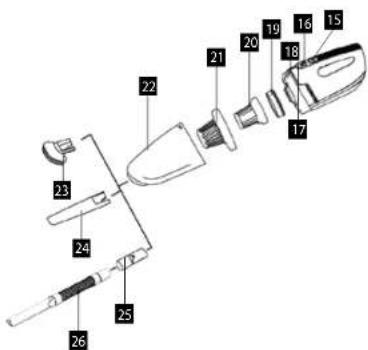
15 Tlačidlo zapnutia/vypnutia
16 Indikátor batérie/nabijania
17 Tlačidlo na uvořenie nádoby na nečistoty
18 LED indikátor
19 Tesniaci krúžok
20 HEPA filter
21 Vonkajší filter
22 Nádoba na nečistoty
23 Hubica s kefou
24 Štrbinová hubica
25 Redukcia na ohybnú hadicu
26 Ohybná hadica
ZOSTAVENIE SPOTREBIČA
Sklopná rukovát
natural_image
Technical line drawing of a mechanical component with no visible text or symbols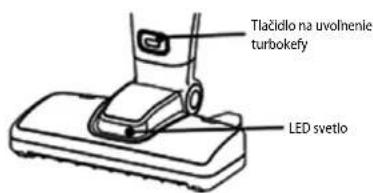
NABÍJANIE SPOTREBIČA
SK
concept
concept
SK
LED INDIKÁTOR
natural_image
Illustration of a handbag with internal components and a final container pouring granular material (no text or symbols)natural_image
Exploded view diagram of a mechanical component showing internal parts and assembly (no text or labels)SK
concept
concept
SK
Čistenie rotačnej kefy
Posuňte zámok kefy. Otočte a otvorte kryt kefy.
natural_image
Technical line drawing of a mechanical component with internal channels and mounting brackets (no text or symbols)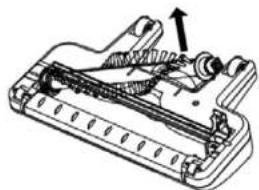
natural_image
Mechanical assembly diagram showing a clamping mechanism with no visible text or symbolsOdkurzacz ręczny
SKOMPLETOWANIE URZĄDZENIA
Składana rękojeść
natural_image
Technical line drawing of a mechanical component with no visible text or symbols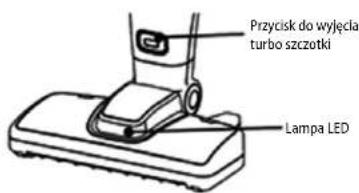
natural_image
Exploded view diagram of a mechanical component showing internal parts (no text or labels)natural_image
Technical line drawing of a mechanical component with internal channels and mounting brackets (no text or symbols)szczotki.
natural_image
Technical line drawing of a mechanical assembly with no visible text or symbolsKézi porszívó
HU
concept
concept
HU
Kézi porszívó
natural_image
Technical line drawing of a mechanical component with no visible text or symbols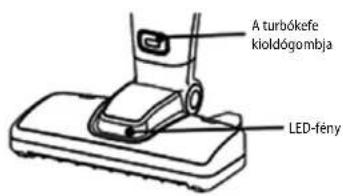
natural_image
Illustration of a hand holding a small container with granular material, showing internal components and directional arrows (no text or symbols)natural_image
Exploded view diagram of a mechanical component showing internal parts and assembly (no text or labels)HU
concept
concept
HU
natural_image
Technical line drawing of a mechanical component with internal channels and mounting brackets (no text or symbols)burkolatát.
natural_image
Mechanical assembly diagram showing a clamping mechanism with no visible text or symbolsLV
concept
concept
LV
Rokas puteklsücëjs
15 leslègsanas/izslègsanas taustiņš
16 Akumulatora uzlades indikators
17 Netirumu tvertnes atbrivošanas taustinš
18 LED indikators
19 Blivgredzens
20 HEPA filtrs
21 Arejais filtrs
22 Netirumu tvertne
23 Sprausla ar birsti
24 Rievotā sprausla
25 Elastigas caurules pareja
26 Elastiga caurule
IERICES UZSTĀDĪŠANA
Lokāms rokturis
natural_image
Technical line drawing of a mechanical component with no visible text or symbols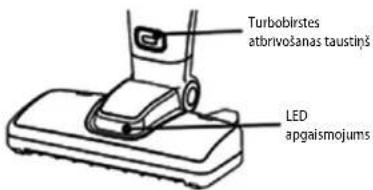
natural_image
Illustration of a handbag with three views of the lid and a spool of seeds, showing different stages of packaging (no text or symbols)- Nomazgājiet filtrus ar üdeni. Pirms atkārtotas uzstādišanas nosusiniet tos.
PIEZIME: Putekjsücëju nedrikst tîrît ar škîdinâtăju vai kimiskiem škîdumiem, jo tie varëtu bojât iërïci. - levietojlet iekšejo un arejo filtru atpakaj netirumu tvertne. Pärliecinieties, ka tvertnes iekspuse ir sausa.
- levietojiet tvertni atpakal rokas puteklsüceja.
natural_image
Exploded view diagram of a mechanical component showing internal parts and assembly (no text or labels)48
LV
concept
concept
LV
natural_image
Technical line drawing of a mechanical component with internal channels and mounting brackets (no text or symbols)pārsegu.
natural_image
Mechanical assembly diagram showing a clamping mechanism with no visible text or symbolsThank you for purchasing a Concept product. We wish you much joy with your new appliance every day you use it. Please read the instruction manual carefully before initial use. To refer to this manual any time you need to, we recommend you to keep it in a safe place. And please pass it to any future owner of the appliance.
| Technical specifications | |
| Battery voltage 25.2 V | |
| Charger voltage | Input: AC 100-240 V ~ 50/60 Hz output: DC 32 V, 0.4 A |
| Input 170 W | |
| Sound level ≤ 82 dB (A) | |
| Full charging time 6–8 hours | |
| Operation time | ≥ 28 min (high power), ≥ 65 min (low power) |
IMPORTANT SAFETY PRECAUTIONS
- Do not use the appliance in any other way than as described in this manual.
- Make sure the mains voltage and current protection correspond to the values on the rating plate of the charging station.
- Do not leave the appliance without supervision when it is turned on.
- When disconnecting the unit from the wall outlet, never pull the power cord, grasp the charger and disconnect it by removing it from the receptacle.
- Do not allow children or unauthorized people to handle the appliance, use it out of their reach.
- Pay extra attention if the appliance is used near children.
- Do not use the appliance as a toy.
- Do not use any accessories other than those recommended by the manufacturer.
- Do not use a charger with a damaged cord or plug and have it repaired immediately by an authorized service centre.
- Keep the appliance away from heat sources such as radiators, ovens, etc. Protect it from direct sunlight and humidity.
- Do not touch the appliance with wet hands.
- Do not insert any objects into the openings. Do not use the appliance if
EN
concept
concept
EN
any of the openings is clogged.
• Take extra caution when vacuuming on stairs.
- If the appliance intake is clogged, switch off the appliance and remove the dirt before switching on again.
- When attaching accessories during cleaning or in the event of a malfunction, switch off the appliance and disconnect the charger from wall socket.
- The appliance is only suitable for home use and is not intended for commercial use.
- Do not vacuum anything burning like cigarettes, matches or hot ash.
- Do not use the appliance in rooms with increased air humidity, do not vacuum flammable liquids (such as petrol) and do not use the appliance in rooms where these substances may be present.
- Never vacuum without vacuum cleaner filters. Every time you use the appliance, make sure the vacuum cleaner filters are properly installed.
- Do not immerse the power cord or the charger in water or any other liquid.
- Check the appliance and the charger cord for damage regularly. Never switch on a damaged appliance.
- Before cleaning and after use of the appliance, switch off the appliance and allow it to cool down.
- Before vacuuming, remove all large or sharp objects from the surface intended for vacuum cleaning, such objects may damage one of the vacuum cleaner filters.
- Do not use the appliance with dirty filters.
- Do not put the battery in fire or expose it to temperatures above 40^ .
- Do not touch the moving parts of the appliance during operation.
- Do not repair the appliance yourself. Contact an authorized service centre.
- This appliance can be used by children aged from 8 years and above and persons with reduced physical, sensory or mental capabilities or lack of experience and knowledge if they have been given supervision or instruction concerning the use of the appliance in a safe way and understand the hazards involved. Cleaning and maintenance performed by the user must not be carried out by children unless they are 8 years old and under supervision. Children aged under 8 years of age must be kept away from the appliance and its power cord. Do not let children play with the appliance.
Damages from failure to follow the manufacturer's instructions are not covered by the warranty.
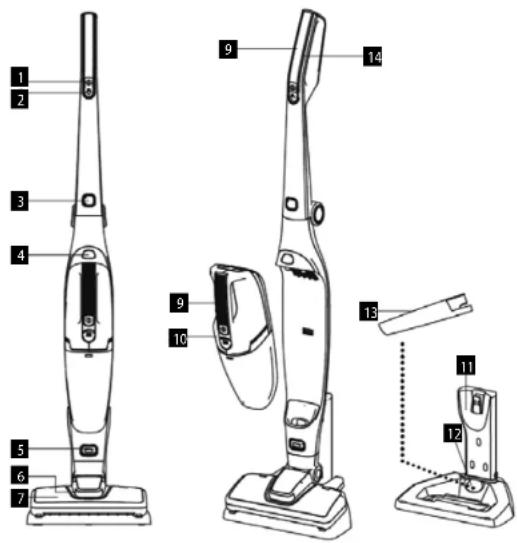
PRODUCT DESCRIPTION
Rod Vacuum Cleaner
1 Power button
2 ECO speed switch
3 Handle folding button
4 Rod vacuum cleaner release button
5 Rotary brush nozzle release button
6 LED light
7 Turbo nozzle
8 Folding handle
9 Hand-held vacuum handle
10 Body of the hand-held vacuum cleaner
11 Charging base
12 Accessory holder
13 Slot nozzle
14 LED backlights

EN
concept
concept
EN
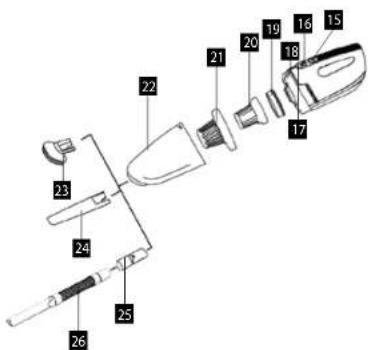
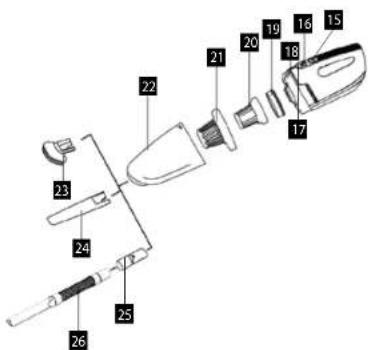
Hand-held vacuum cleaner
15 On/Off button
16 Battery/charge indicator
17 Dust cup release button
18 LED indicator
19 Sealing ring
20 HEPA filter
21 External filter
22 Dust cup
23 Nozzle with a brush
24 Slot nozzle
25 Flexible hose reducer
26 Flexible hose
ASSEMBLING THE APPLIANCE
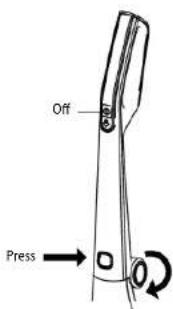
Folding handle
To fold the handle, press the fold the handle button. When lifting the handle vertically, it will automatically lock into the correct position.
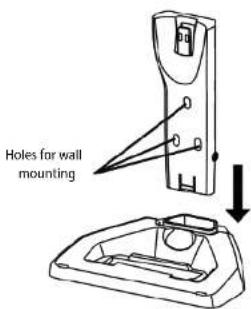
Assembling the charging base
The charging base must be placed on a flat surface, using screws and wall plugs it can be attached to the wall. The assemble the base, slide the upper part into the base.
Place the screws and wall plugs on the underside of the charging base. Drill holes into the wall and insert the wall plugs into the holes. Then, fasten the charging base with the screws.
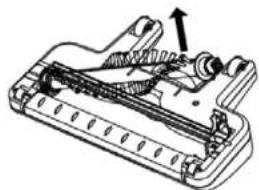
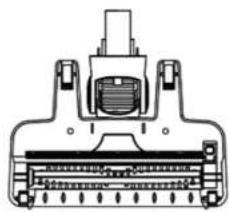
Removable turbo nozzle
natural_image
Technical line drawing of a mechanical component with no visible text or symbols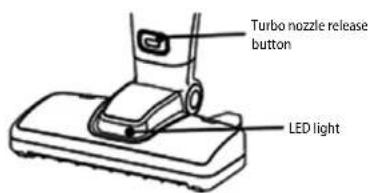
CHARGING THE APPLIANCE
- Insert the hand-held vacuum cleaner into the rod vacuum cleaner. Ensure that the rod vacuum cleaner is off.
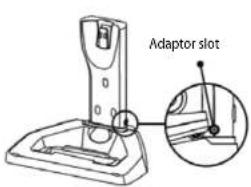
- Place the rod vacuum cleaner into the charging base. Ensure that the charging base is placed on a level and stable surface. Make sure there is no dust between the hand-held vacuum cleaner and the rod vacuum cleaner. If necessary, clean the contacts.
- Plug the power cord into the socket. The charging indicator lights up red, indicating that the vacuum cleaner is charging. When charging, it is normal for the vacuum cleaner or the charging base to heat up.
Note: Even if the rod vacuum cleaner is on, if it is placed in the charging base, it automatically shuts off. While the rod vacuum cleaner is charging, the vacuum cleaner has a current protection element. Even if you press the power button, the appliance will remain switched off.

VP4165VP4165
EN
concept
concept
EN
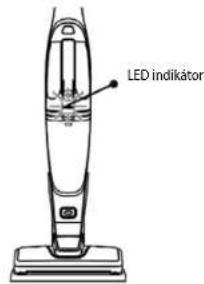
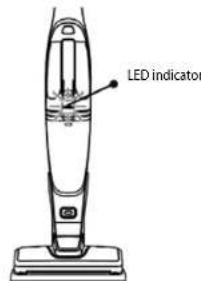
LED INDICATOR
| State LED indicator colour | |
| On Blue | |
| Low battery Blue flashing | |
| Empty battery Red flashing | |
| Charging Red | |
| Charging completed Blue | |
| Bad battery (charging) Red and blue flash alternately | |
Battery care
To prolong the life of the vacuum cleaner battery, follow these instructions:
Do not leave the vacuum cleaner fully charged or completely discharged for a long time.
Prolonged discharged of the battery will result in loss of its capacity.
Do not let the vacuum cleaner to be completely discharged.
It is ideal to keep the capacity of the battery between 20% - 80%.
USE
Operation of the rod vacuum cleaner
- Press the on/off button to turn on the rod vacuum cleaner.
- During operation, press the ECO speed button and select between high speed and ECO speed. At high speed, the suction power of the appliance will be at its maximum, while the ECO speed mode will provide less noise and longer operating times.
- During operation, the LED indicator on the rotating brush nozzle lights up.
- If the appliance is standing in the upright position, always turn the rod vacuum cleaner off as the bristles could damage the floor or the carpet.
- If you are not using the appliance, it is recommended to store it in an upright position leaning up against the wall. Do not let children play with the appliance.
Operation of the hand-held vacuum cleaner
- Press the button on the hand-held vacuum cleaner and release the vacuum from the rod vacuum cleaner. Press the on/off button to turn on the hand-held vacuum cleaner. The hand-held vacuum cleaner starts to vacuum.
- Vacuum the surface in any direction until the surface is clean.
- Press the on/off button to turn off the hand-held vacuum cleaner. Before turn off, turn the front of the hand-held vacuum cleaner upwards to prevent the dust from falling out of the dust cup.
- Before vacuuming, empty and clean the dust cup.
- Insert the hand-held vacuum cleaner back into the rod vacuum cleaner.
CLEANING AND MAINTENANCE
Emptying the dust cup
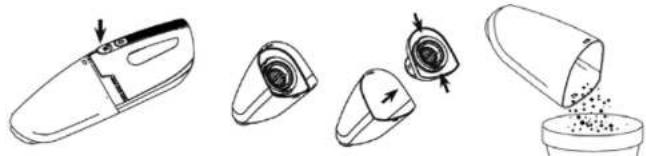
Empty the dust cup after each use or when the dust level exceeds the maximum level. Always switch off the appliance before cleaning it.
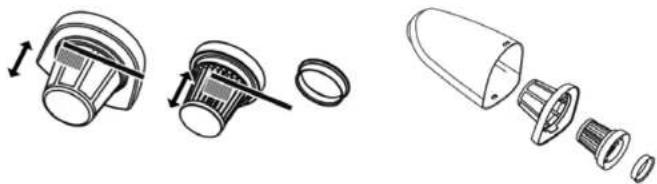
- Press the release button on the top of the vacuum cleaner, release the dust cup, empty it and remove the filter holder from it.
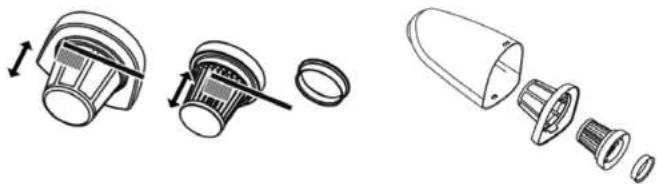
- Press both sides of the external filter and remove the filters from the dust cup. Dump the dirt.
natural_image
Illustration of a handbag with three views of the lid and a spool of seeds, showing different stages of packaging (no text or symbols)- Wash the filters. Allow them to dry before reassembly.
NOTE: Do not clean the vacuum cleaner with thinner or chemical solutions, as this will damage the appliance - Insert the internal and external filters back into the dust cup Make sure you dry the inside of the dust cup.
- Place the dust cup back into the hand-held vacuum cleaner.
natural_image
Exploded view diagram of a mechanical component showing internal parts and assembly (no text or labels)EN
concept
concept
EN
Cleaning the rotary brush
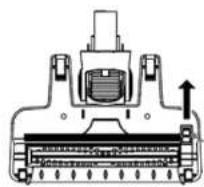
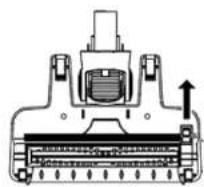
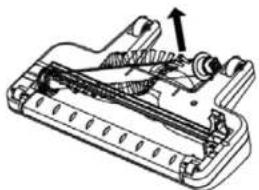
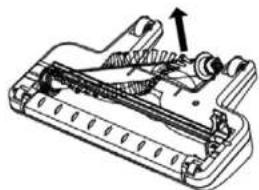
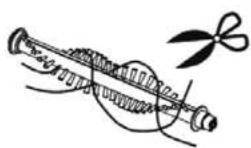
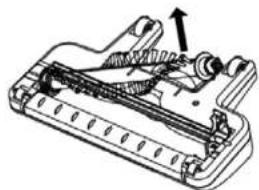
Slide the brush lock. Turn and open the brush cover.
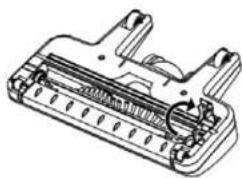
natural_image
Technical line drawing of a mechanical component with internal channels and mounting brackets (no text or symbols)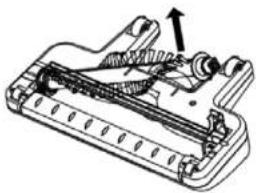
natural_image
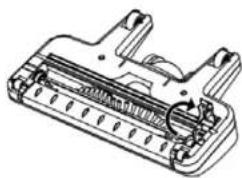
Technical line drawing of a mechanical assembly with no visible text or symbolsTake out the rotary brush.
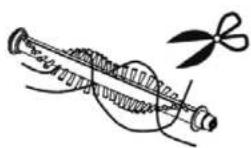
Remove hair from the rotary brush.
TROUBLESHOOTING
| Problem Cause Remedy | ||
| Rotary brush does not rotate Rotary brush is blocked. | Clean the rotary brush as described in the instruction manual. | |
| The vacuum cleaner is not vacuuming | The dust cup is full. Empty the dust cup. | |
| The filter is dirty. | Clean the filter as described in the instruction manual. | |
| The vacuum cleaner is not working | The vacuum cleaner is discharged. | Charge the vacuum cleaner as described in the instruction manual. |
SERVICE CENTRE
Extensive maintenance or repair, which requires access to internal parts of the product, has to be performed by a qualified specialist or the service centre.
ENVIRONMENTAL CONCERNS
- Packaging materials and old appliances should be recycled.
• Packaging materials may be disposed of as sorted waste. - Dispose the plastic bags made of polyethylene (PE) of as sorted waste.
Recycling of the appliance at the end of its lifespan:

This appliance is labelled in accordance with European Directive 2012/19/EU concerning used electrical and electronic appliances (waste electrical and electronic equipment - WEEE). The symbol on the product or on its packaging indicates that this product may not be treated as household waste. Instead it should be taken to the appropriate collection point for the recycling of electrical and electronic equipment. By ensuring this product is disposed of correctly, you will help prevent potential negative consequences for the environment and human health, which could otherwise be caused by inappropriate waste handling of this product. The disposal of such material has to be done according to the recycling regulations. For more detailed information about recycling of this product, please contact your local council, your household waste disposal service or the shop where you purchased the appliance.

The product meets all the necessary requirements of the EU directives applicable to the specific product.
Changes in text, design, and technical specifications are subject to change without prior notice and we reserve the right to change them.
60
Danksagung
Handstaubsauger
natural_image
Technical line drawing of a mechanical component with no visible text or symbols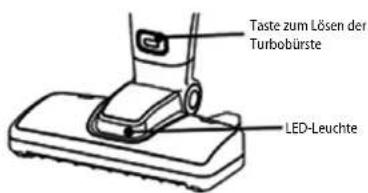
natural_image
Exploded view diagram of a mechanical component showing internal parts (no text or symbols)natural_image
Technical line drawing of a mechanical component with no visible text or symbolsnatural_image
Technical line drawing of a mechanical assembly with no visible text or symbols12 Support accesspire
13 Suceur plat
FR
concept
concept
FR
Aspirateur manuel
ASSEMBLAGE DE L'APPAREIL
Poignée pliable
natural_image
Technical line drawing of a mechanical component with no visible text or symbols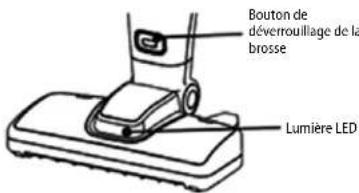
natural_image
Illustration of a handbag with internal components and a final container filled with granular material (no text or symbols)natural_image
Exploded view diagram of a mechanical component showing internal parts and assembly (no text or labels)FR
concept
concept
FR
natural_image
Technical line drawing of a mechanical component with internal channels and mounting brackets (no text or symbols)natural_image
Mechanical assembly diagram showing a clamping mechanism with no visible text or symbols
VP4165VP4165
IT
concept
concept
IT
ASSEMBLAGGIO DELL'APPARECCHIO
Maniglia pieghevole
natural_image
Technical line drawing of a mechanical component with no visible text or symbols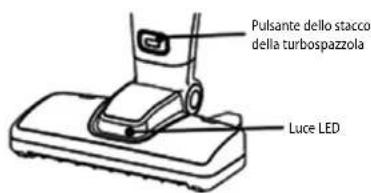
natural_image
Illustration of a handbag with internal components and a final container filled with granular material (no text or symbols)natural_image
Exploded view diagram of a mechanical component showing internal parts and assembly (no text or labels)IT
concept
concept
IT
natural_image
Technical line drawing of a mechanical component with internal channels and mounting brackets (no text or symbols)natural_image
Mechanical assembly diagram showing a lever mechanism with no visible text or symbolsEstrarre la spazzola rotante.
ES
concept
concept
ES
Aspiradora de mano
ARMAR EL ARTEFACTO
Mango plegable
natural_image
Technical line drawing of a mechanical component with no visible text or symbols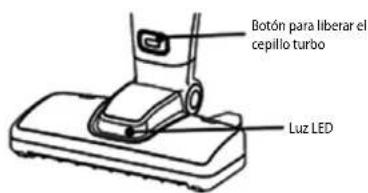
ES
concept
concept
ES
INDICADOR LED
natural_image
Illustration of a hand holding a small object with arrows indicating motion, showing internal components and particle distribution (no text or symbols)natural_image
Exploded view diagram of a mechanical component showing internal parts and assembly (no text or labels)ES
concept
concept
ES
natural_image
Technical line drawing of a mechanical component with internal channels and mounting brackets (no text or symbols)natural_image
Mechanical assembly diagram showing a lever mechanism with no visible text or symbolsRetire el cepillo giratorio.
Retire los pelos del cepillo.
RO
concept
concept
RO
Aspirator de mână
ASAMBLAREA APARATULUI
Måner rabatabil
natural_image
Technical line drawing of a mechanical component with no visible text or symbols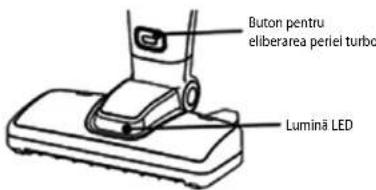
RO
concept
concept
RO
INDICATOR LED
natural_image
Illustration of a handbag with internal components and a capsule pouring contents (no text or symbols)natural_image
Exploded view diagram of a mechanical component showing internal parts and assembly (no text or labels)RO
concept
concept
RO
natural_image
Technical line drawing of a mechanical component with internal channels and mounting brackets (no text or symbols)periei.
natural_image
Mechanical assembly diagram showing a clamping mechanism with no visible text or symbolsCONCEPT POLSKA sp. z o.o.
The manufacturer (or Importer) is responsible for ensuring the product complies with the requirements of applicable legal regulations as well as those of the relevant technical standards. Moreover, they are responsible for ensuring the product has the properties the manufacturer described in documents related to the goods or those reasonably expected by the customer with regard to the nature of the goods or based on advertising produced by the manufacturer, and further they are responsible for ensuring the product is fit for the purpose proposed by the manufacturer or that a product of the same type is normally used for.
The quality warranty term is 24 months from product takeover by the customer.
The warranty does not apply to wear and tear caused by regular use. The customer shall not be entitled to any warranty claims if, prior to taking the product over, they knew the product contained a defect or if the defect is attributable to the customer.
In terms of these warranty conditions, a defective battery is considered a battery that is electronically inoperative (i.e., does not communicate with the base unit, the charging or discharging circuits are defective, etc.) or has an internal short circuit.
Defects or changes in parameters caused by normal use and wear (e.g. natural capacity decrease) are in no way considered a defect in terms of warranty.
The battery is provided warranty service for a period of 6 months. In terms of these warranty conditions, the battery has the nature of a consumable, for more details see „Consumables“.
Consumables
For consumables (batteries, etc.) we guarantee the preservation of technical parameters for 6 months, in case it was not damaged by improper use and its lifetime has not expired.
The warranty specifically does not apply:
- If the product installation, operation and service conditions stipulated in the product operating manual have not been adhered to,
- to malfunctions caused due to mechanical, heat or chemical damage, short circuit, over voltage or incorrect installation.
• to malfunctions caused by an inexpert third-party intervention,
• to malfunctions caused by natural disaster, - to malfunctions caused by insufficient or inappropriate maintenance in violation of the operating manual, including malfunctions caused by water and other sediments.
• to changes in colour of the heating surface or to scratching of the surface caused as a result of using the products in an unusual manner,
• to appearance and functional changes caused by exposure to sunlight, thermal radiation of water and other sediments, - If the service life of certain product parts expires, e.g. for accumulators, bulbs, etc.
The warranty does not apply to any products and services provided along with the product (gifts, promotional articles, etc.).
Filing a complaint
A complaint against a product defect must be filed as soon as identified, yet no later than before the end of the warranty term.
The customer must file a product complaint with the dealer from which they have purchased the product, or with any authorised service centre, a list of which is included in the product package, or available at www.my-concept.com.
While filing a product complaint, the product must be duly cleaned and securely packed so as to prevent any damage during its transport to an authorised service centre, where relevant, unless the product is delivered in person.
The customer must submit proof of having concluded a purchase contract for the product by producing the receipt.
While filing their complaint, the customer must indicate the noted defect and identify the preferred complaint application method.
Complaints processing
As long as the noted defect may be removed, the user has the right to have the defect duly removed free of charge on a timely basis.
If the noted defect is not removable, or if the customer becomes entitled to replacement of the product or a part thereof, yet the replacement is not possible, for example due to the product having been sold out, the customer has the right to return the product (withdrawal from the contract).
The customer shall have the right to a new product (replacement) or to replacement of a part of the product even if the defect can be removed, provided they cannot properly use the product due to repeated occurrence of the defect or due to a high number of such defects. In such a case, the customer also has the right to return the product (by withdrawing from the contract).
If the product is not returned (the customer does not withdraw from the contract), or if the customer does not apply the right to a new defect-free product (replacement), to replacement of a part thereof or to repair of the product, they may request a reasonable discount. The customer also has a right to a reasonable discount if a new defect-free product cannot be supplied to them, or if a product part cannot be replaced or the product repaired unless the situation is remedied within a reasonable time limit, or if remedying the situation would create major discomfort on the part of the customer.
The seller, authorised service centre or a staff member authorised by them must decide about each complaint immediately or within three business days in complicated cases. This term does not include a reasonable period of time, depending on the type of product concerned, required for the defect to be assessed by an expert. A complaint, including defect removal, must be dealt with without any undue delay, yet no later than within 30 calendar days of the complaint filing date, unless the seller and the customer agree on a later deadline.
On returning the product (withdrawing from the contract) the customer must return any accessories and documents supplied along with the product.
The customer does not have the right to keep the defective parts and components of the product replaced as part of a repair of the product.
This shall be without prejudice to any other rights the customer may have in relation to the purchase of the product.
Remark: Complaints against products damaged in transport are governed by the carrier's complaints procedure.
Manufacturer
Jindřich Valenta - Concept
Vysokomytská 1800, 565 01 Chocen
Czech Republic
tel.: +420 465 471 400
tax +420 465 473 304
Company ID No. 13216660
email: servis@my-concept.cz
www: www.my-concept.com
Product data
| Model: | |
| Production number: | |
| Date of purchase: Seal and signature of vendor: | |
concept concept
DE
GARANTIEBEDINGUNGEN
Garantie
CONDITIONS DE GARANTIE
Garantie
SEZNAM SERVISNÍCH MÍST | List of service points
ver 1.11-2021
Zoznam servisnych stredisiek | Wykaz punktów servisovych | Szolgáltatók listáját Popis uslužnih mjesta | Lista unităților service

- concept
- PODĚKOVÁNÍ
- Ruční vysavač
- SESTAVENÍ SPOTŘEBIČE
- Sklopná rukojeť
- Ručný vysávač
- ZOSTAVENIE SPOTREBIČA
- Sklopná rukovát
- NABÍJANIE SPOTREBIČA
- Odkurzacz ręczny
- SKOMPLETOWANIE URZĄDZENIA
- Składana rękojeść
- Kézi porszívó
- Rokas puteklsücëjs
- IERICES UZSTĀDĪŠANA
- Lokāms rokturis
- IMPORTANT SAFETY PRECAUTIONS
- EN
- Damages from failure to follow the manufacturer's instructions are not covered by the warranty.
- PRODUCT DESCRIPTION
- Rod Vacuum Cleaner
- Hand-held vacuum cleaner
- ASSEMBLING THE APPLIANCE
- Folding handle
- Assembling the charging base
- Removable turbo nozzle
- CHARGING THE APPLIANCE
- Battery care
- USE
- Operation of the rod vacuum cleaner
- Operation of the hand-held vacuum cleaner
- CLEANING AND MAINTENANCE
- Emptying the dust cup
- SERVICE CENTRE
- ENVIRONMENTAL CONCERNS
- Recycling of the appliance at the end of its lifespan:
- Danksagung
- Handstaubsauger
- FR
- Aspirateur manuel
- ASSEMBLAGE DE L'APPAREIL
- Poignée pliable
- IT
- ASSEMBLAGGIO DELL'APPARECCHIO
- Maniglia pieghevole
- ES
- Aspiradora de mano
- ARMAR EL ARTEFACTO
- Mango plegable
- RO
- Aspirator de mână
- ASAMBLAREA APARATULUI
- Måner rabatabil
- Consumables
- Filing a complaint
- Complaints processing
- Manufacturer
- concept concept
- GARANTIEBEDINGUNGEN
- Garantie
- CONDITIONS DE GARANTIE
- SEZNAM SERVISNÍCH MÍST | List of service points
- Zoznam servisnych stredisiek | Wykaz punktów servisovych | Szolgáltatók listáját Popis uslužnih mjesta | Lista unităților service
Brand : Concept
Model : VP4165
Category : Vacuum Cleaner