
CVP41810 - Lawn mower Earthwise - Free user manual and instructions
Find the device manual for free CVP41810 Earthwise in PDF.
| Product Type | 4-in-1 Electric Convertible Combo (Chainsaw, Pole Saw, Hedge Trimmer, Hedge Trimmer with Pole) |
| Brand | Earthwise |
| Model | CVP41810 |
| Power Source | 120 V, 60 Hz, AC, corded |
| Rated Current (Chainsaw) | 7 A |
| Rated Current (Hedge Trimmer) | 4.5 A |
| Guide Bar Length | 25.4 cm (10 in) |
| Hedge Trimmer Blade Length | 45.7 cm (18 in) |
| Maximum Extended Length (Telescoping Pole) | 2.68 m (8.8 ft) |
| Chain Speed | 12 m/s |
| Hedge Trimmer Stroke | 3200 strokes/min |
| Chainsaw Assembly Weight | 4.66 kg (10.27 lb) |
| Hedge Trimmer Assembly Weight | 4.4 kg (9.7 lb) |
| Maximum Cutting Capacity (Hedge Trimmer) | 1.78 cm (0.7 in) |
| Double Insulation | Yes |
| Automatic Chain Lubrication | Yes |
| Chain Type | Oregon, 25.4 cm (10 in) |
| Cutting Angle Adjustment | -20° to +60° |
| Chain Brake | Yes, hand guard |
| Box Contents | Chainsaw head, hedge trimmer head, telescoping pole with shoulder strap, rear handle, protective sheaths, instruction manual |
| Warranty | 2-year limited |
Frequently Asked Questions - CVP41810 Earthwise
User questions about CVP41810 Earthwise
0 question about this device. Answer the ones you know or ask your own.
Ask a new question about this device
Download the instructions for your Lawn mower in PDF format for free! Find your manual CVP41810 - Earthwise and take your electronic device back in hand. On this page are published all the documents necessary for the use of your device. CVP41810 by Earthwise.
USER MANUAL CVP41810 Earthwise
This product is covered by U.S. patents and other international patents
Copyright. All Rights Reserved
Model CVP41810

natural_image
Exploded view of a mechanical tool assembly showing a chain, bracket, and blade components (no text or symbols visible)

This product has been engineered and manufactured to our high standard for dependability, ease of operation, and operator safety. Properly cared for, it will give you years of rugged, trouble-free performance.

WARNING: To reduce the risk of injury, the user must read and understand the operator's manual before using this product.
Thank you for your purchase.
DO NOT RETURN THIS PRODUCT TO THE STORE. OPERATING, ASSEMBLY, PARTS, SERVICE QUESTIONS? CALL 1-800-313-5111 BETWEEN 7:30 AM—4:30 PM EST FOR ASSISTANCE.
SAVE THIS MANUAL FOR FUTURE REFERENCE
IMPORTANT SAFETY WARNINGS
TO REDUCE RISK OF INJURY:
Before any use, be sure everyone using this tool reads and understands all safety instructions and other information contained in this manual.
CAUTION: Wear appropriate personal hearing protection during use. Under some conditions and duration of use, noise from this product may contribute to hearing loss.
Save these instructions and review frequently prior to use and in instructing others.
⚠ WARNING: When using electric gardening appliances, basic safety precautions should always be followed to reduce risk of fire, electric shock, and personal injury, including the following:
READ ALL INSTRUCTIONS
GENERAL SAFETY
DON'T ABUSE CORD: Never carry this product by cord or yank it to disconnect from receptacle. Keep cord from heat, oil and sharp edges.
KEEP CHILDREN AWAY - All visitors, children and pets should stay at a safe distance from the work area.
DRESS PROPERLY – Don't wear loose clothing or jewelry. Wear protective hair covering to contain long hair. They can be caught in moving parts. Use of rubber gloves and substantial footwear is recommended when working outdoors.
USE SAFETY GLASSES –Wear safety glasses with side shields or goggles that are marked to comply with ANSI Z87.1 standard when operating this product. Use face or dust mask if environment is dusty.
GROUND FAULT CIRCUIT INTERRUPTER (GFCI) protection should be provided on the circuit(s) to be used. Receptacles are available having built-in GFCI protection and may be used.
EXTENSION CORD. Make sure your extension cord is in good condition. When using an extension cord, be sure it is heavy enough to carry the current your product will draw. An undersized extension cord will cause a drop in line voltage resulting in loss of power and overheating. The following table shows the correct size to use depending on cord length and nameplate ampere rating. If in doubt, use the next heavier gage. The smaller the gage number, the heavier the cord.
| Minimum Gage for Cord Sets | |||||
| Volts120V | Total Length of cord in Feet | ||||
| 0-25 | 26-50 | 51-100 | 101-150 | ||
| Ampere Rating | |||||
| More Than | Not More Than | American wire Gage | |||
| 0 | - 6 | 18 | 16 | 16 | 14 |
| 6 | - 10 | 18 | 16 | 14 | 12 |
| 10 | - 12 | 16 | 16 | 14 | 12 |
| 12 | - 16 | 14 | 12 | Not Recommended | |
⚠ WARNING: Use out door extension cords marked SW-A, SOW-A, STW-A, SJW-A, or SJTW-A. These cords are rated for outdoor use and reduce the risk of electric shock.
DOUBLE INSULATION—Double Insulation is a concept in safety in electric power tools, which eliminates the need for the usual three-wire grounded power cord. All exposed metal parts are isolated from the internal metal motor components with protecting insulation. Double insulated tools do not need to be grounded.
NOTE: The double insulated system is intended to protect the user from shock resulting from a break in the tool's internal insulation. Observe all normal safety precautions to avoid electrical shock.
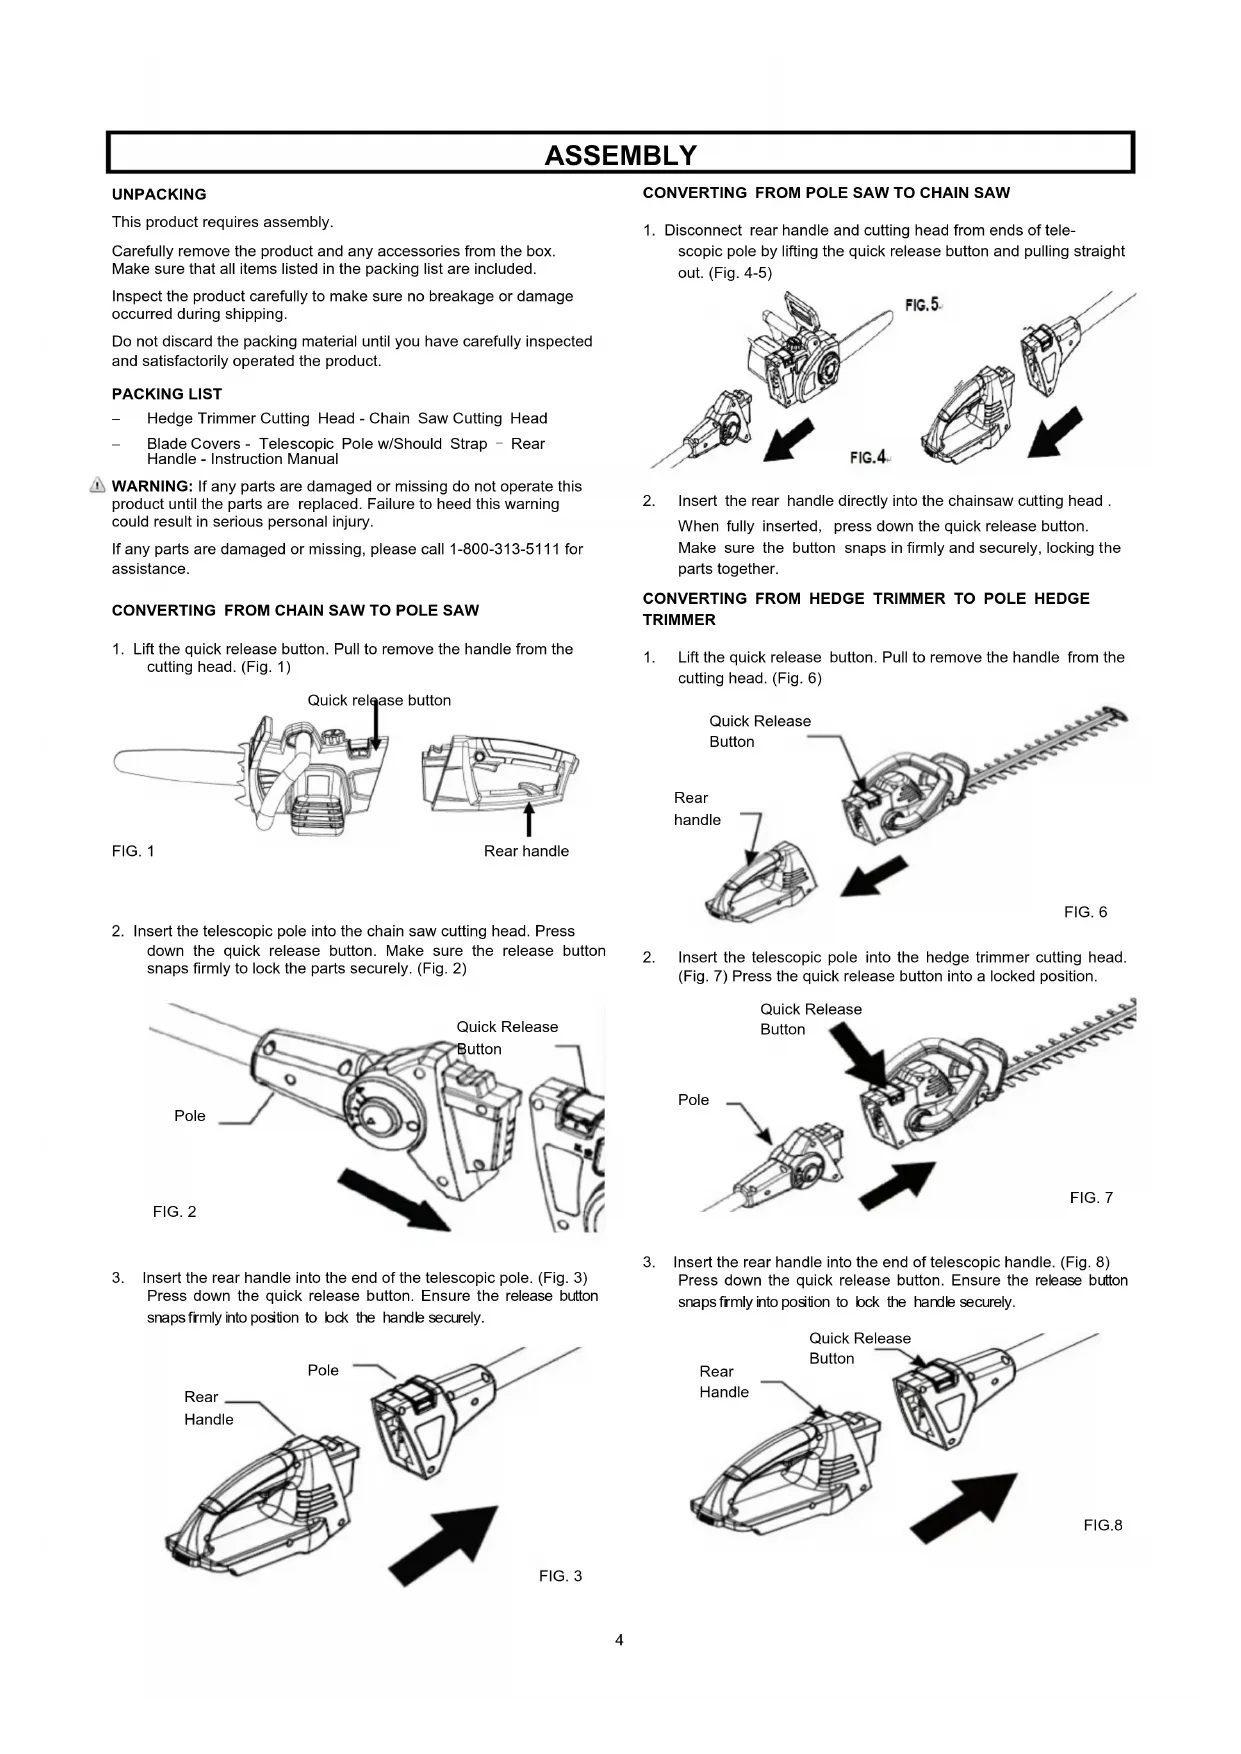
It is possible to tie the extension cord and power cord in a knot to prevent them from becoming disconnected during use. Make the knot as shown, then connect the plug end of the power cord into the receptacle end of the extension cord,. This method can also be used to tie two extension cords together.
POLARIZED PLUGS—To reduce the risk of electric shock, this equipment has a polarized plug (one blade is wider than the other). This equipment must be used with a suitable polarized 2 wire or 3 wire extension cord. Polarized connections will fit together only one way. Make sure that the receptacle end of the extension cord has large and small blade slot widths. If the plug does not fit fully into the extension cord, reverse the plug. If it still does not fit obtain a suitable extension cord. If the extension cord does not fit fully into the outlet, contact a qualified electrician to install the proper outlet. Do not change the tool plug or extension cord in any way.
USE RIGHT APPLIANCE – Do not use an appliance for any job except that for which it is intended.
DISCONNECT the product from the power supply when not in use or when servicing or cleaning. Do not leave unattended.
CHECK DAMAGED PARTS – Before further use of the tools, a guard or other part that is damaged should be carefully checked to determine that it will operate properly and perform its intended function. Check for alignment of moving parts, binding of moving parts, breakage of parts, mounting and any other condition that may affect its operation. A guard or other part that is damaged should be properly repaired or replaced. Call our customer service help line at 1-800-313-5111 for assistance.
LIGHTING - Only operate the product in daylight or good artificial light.
DON'T OVERREACH – Keep proper footing and balance at all times.
WARNING: Do Not use the tool with any type of accessory or attachment not provided. Such usage might be hazardous. AVOID DANGEROUS ENVIRONMENTS – Don't use the product in rain, damp or wet locations. Do not operate product in gaseous or explosive atmospheres. Motors in these tools normally spark, and the sparks might ignite fumes.
AVOID UNINTENTIONAL STARTING – Don't carry the product with finger on switch. Be sure switch is off before plugging in.
DANGER: Risk of cut. Keep hands away from the blades. Keep both hands on handles when power is on.
DANGER: DO NOT ATTEMPT to remove cut material or hold material to be cut when blades are moving. Make sure the switch is off when clearing jammed material from blades. Do not grasp the exposed cutting blades or cutting edges when picking up or holding the tools.
CAUTION: Blades coast after turned off.
DON'T FORCE THE PRODUCT – It will do the job better and with less likelihood of a risk of injury at the rate for which it was designed.
STAY ALERT – Watch what you are doing. Use common sense. Do not operate the product when you are tired or under the influence of drugs, alcohol or medications.
STORE IDLE PRODUCT INDOORS – When not in use, the product should be stored indoors in a dry and high or locked-up place, out of reach of children.
MAINTAIN PRODUCT WITH CARE – Keep cutting blades sharp and clean for best performance and to reduce the risk of injury. Inspect extension cord periodically and replace if damaged. Keep handles dry, clean and free from oil and grease.
WARNING: California Proposition 65: This product contains chemicals known to the State of California to cause cancer, birth defects or other reproductive harm.
WARNING: Some dust and debris created by this tool could contain chemicals known to the State of California to cause cancer, birth defects or other reproductive harm. Some examples of these chemicals are:
-chemicals in fertilizers
-compounds in insecticides, herbicides and pesticides
-arsenic and chromium from chemically treated lumber
Your risk of exposure to these chemicals varies depending on how often you do this type of work. To reduce your exposure, work in a well ventilated area and with approved safety equipment such as dust masks that are specially designed to filter out microscopic particles.
PRODUCT SPECIFICATIONS
CVP41810
| Pole/ Chain Saw | Pole/ Hedge Trimmer | |
| Input | 120V, 60Hz, 7A, AC Only | 120V, 60Hz, 4.5A, AC Only |
| Speed | 12m/s | 3200 Strokes per Min. |
| Bar Length | 10 in. Oregon Bar | 18 in. |
| Extended Length | 8 ft. | 8.8 ft. |
| Max. Cut | 0.7 in. | |
| Weight | 10.27 lbs. | 9.7 lbs. |
Steel Blade Support - Hardened Steel Blades - Telescopic Pole - Blade Guard - Bar Cover

ASSEMBLY
UNPACKING
This product requires assembly.
Carefully remove the product and any accessories from the box. Make sure that all items listed in the packing list are included.
Inspect the product carefully to make sure no breakage or damage occurred during shipping.
Do not discard the packing material until you have carefully inspected and satisfactorily operated the product.
PACKING LIST
- Hedge Trimmer Cutting Head - Chain Saw Cutting Head
- Blade Covers - Telescopic Pole w/Should Strap - Rear Handle - Instruction Manual
WARNING: If any parts are damaged or missing do not operate this product until the parts are replaced. Failure to heed this warning could result in serious personal injury.
If any parts are damaged or missing, please call 1-800-313-5111 for assistance.
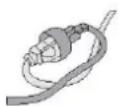
CONVERTING FROM CHAIN SAW TO POLE SAW
- Lift the quick release button. Pull to remove the handle from the cutting head. (Fig. 1)
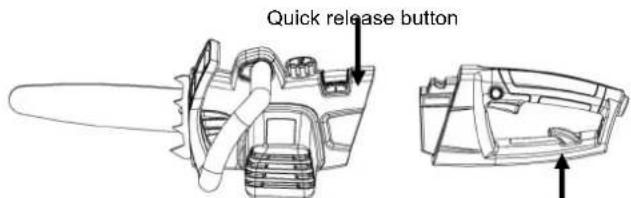
FIG. 1
Rear handle
- Insert the telescopic pole into the chain saw cutting head. Press down the quick release button. Make sure the release button snaps firmly to lock the parts securely. (Fig. 2)
- Insert the rear handle into the end of the telescopic pole. (Fig. 3) Press down the quick release button. Ensure the release button snaps firmly into position to lock the handle securely.

CONVERTING FROM POLE SAW TO CHAIN SAW
- Disconnect rear handle and cutting head from ends of telescopic pole by lifting the quick release button and pulling straight out. (Fig. 4-5)
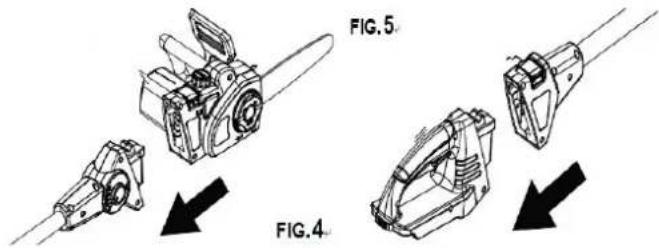
- Insert the rear handle directly into the chainsaw cutting head. When fully inserted, press down the quick release button. Make sure the button snaps in firmly and securely, locking the parts together.
CONVERTING FROM HEDGE TRIMMER TO POLE HEDGE TRIMMER
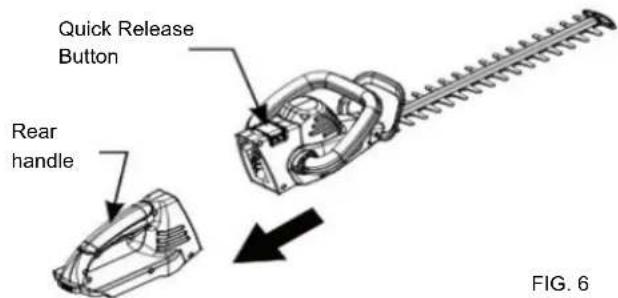
- Lift the quick release button. Pull to remove the handle from the cutting head. (Fig. 6)
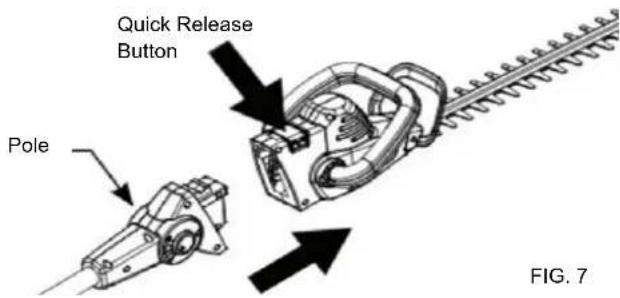
- Insert the telescopic pole into the hedge trimmer cutting head. (Fig. 7) Press the quick release button into a locked position.
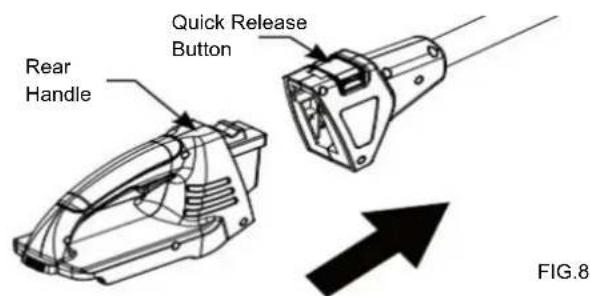
- Insert the rear handle into the end of telescopic handle. (Fig. 8) Press down the quick release button. Ensure the release button snaps firmly into position to lock the handle securely.
ASSEMBLY
CONVERTING FROM POLE HEDGE TRIMMER TO HEDGE TRIMMER
- Disconnect rear handle and cutting head from ends of telescopic pole by lifting the quick release button and pulling straight out. (Fig. 9-10)
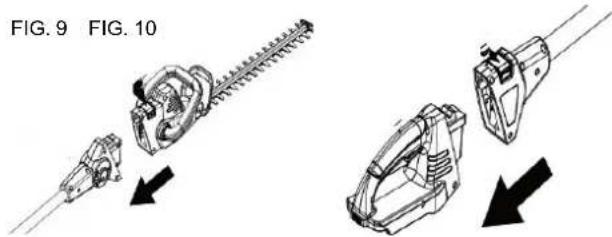
- Insert the rear handle directly into the chainsaw cutting head. When fully inserted, press down the quick release button. Make sure the button snaps in firmly and securely, locking the parts together.
ADJUSTING THE LENGTH OF THE TELESCOPIC POLE (FIG.11)
- To adjust the telescopic pole, disconnect the product from the power supply. Rotate the collar counterclockwise to loosen. Extend the pole to the desired length.
NOTE: Only extend the pole to minimum length required to reach the limb or shrub to be cut.
- Lock the pole in position by turning the collar clockwise firmly to secure.

⚠ WARNING: Failure to lock the telescopic pole collars as directed could result in personal injury.
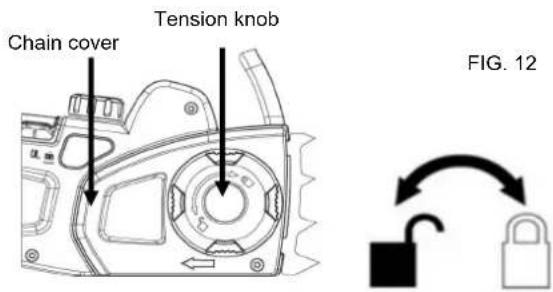
INSTALLING/REPLACING THE GUIDE BAR AND CHAIN
DANGER: Never start the motor before installing the guide bar, chain, chain cover and tension knob. Without all these parts in place, the clutch can fly off or explode, exposing the user to possible serious injury.
WARNING: To avoid serious personal injury, read and understand all the safety instructions provided.
WARNING: Before performing any maintenance, make sure the tool is unplugged from the power supply. Failure to heed this warning could result in serious personal injury.
CATUION: Always wear gloves when handling the bar and chain; these components are sharp and may contain burrs, which can cause serious injury.
WARNING: Never touch or adjust the chain while the motor is running. The saw chain is very sharp. Always wear protective gloves when performing maintenance to the chain to avoid possible serious lacerations.
NOTE: When replacing the guide bar and chain, use only identical replacement parts.
- Disconnect the saw from power supply.
- Loosen the tension knob by turning counterclockwise.
- Remove the chain cover. (Fig. 12)
- Remove the bar and chain from the mounting surface.
- Remove the old chain from the bar.
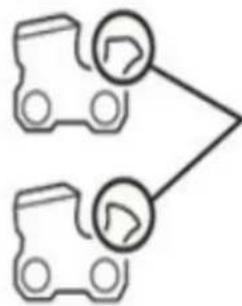
- Lay out the new chain in a loop, and straighten any kinks. The cutters should face in the direction of the chain rotation. If they face backwards, turn the loop over. (Fig. 13)

- Place the chain drive links into the bar groove.
NOTE: Make certain of the direction of chain. - Position the chain so there is a loop at the back of the bar. (Fig. 14)

natural_image
Close-up of hands holding a chain drive (no text or symbols visible)- Hold the chain in position on the bar and place the loop around the sprocket. (Fig. 15)

natural_image
Mechanical chain saw with visible teeth and meshing (no text or symbols)INSTALLING/REPLACING THE GUIDE BAR AND CHAIN
- Fit the bar flush against the mounting surface so that the bar stud is in the slot of the bar.
NOTE: When placing the bar on the bar stud, ensure that the adjusting pin is in the chain tension pin hole.
- Replace the chain cover.
- Tighten the tension knob. Remove all slack from the chain by turning the knob clockwise until the chain seats snugly against the bar with the drive links in the bar groove. (Fig. 16)

- When the tension knob is fully tightened, the chain is the tightest. To minor adjust the chain tension, loosen the tension knob and turn it counter-clockwise slightly until the chain is correctly tensioned.
NOTE: The chain is correctly tensioned when there is no sag on the underside of the guide bar, then chain is snug, but it can be turned by hand without binding.
NOTE: A new chain tends to stretch, check chain tension frequently and tension as required.
- After a period of usage, the chain may get loose. To tighten the chain, loosen the tension knob by turning counter-clockwise, repeat 12 and 13 to correctly adjust the chain tension.
CHAIN TENSION AND MAINTENANCE
CHAIN TENSION
Stop the motor before setting the chain tension. Make sure the tension knob is loosened to finger tight, turn the tension knob clockwise to tension the chain. A cold chain will be correctly tensioned when there is no slack on the underside of the guide bar, the chain is snug, but it can be turned by hand without binding.
Chain must be re-tensioned whenever the flats on the drive links hang out of the bar groove.
During normal saw operation, the temperature of the chain will increase. The drive links of a correctly tensioned warm chain will hang approximately .050 in. (1.25mm) out of the bar groove. (Fig. 17) Be aware that chain tensioned while warm, may be too tight upon cooling. Check the "cold tension" before next use.

FIG. 17
NOTE: A new chain tends to stretch, check chain tension frequently and tension as required.
CHAIN MAINTENANCE
CAUTION: Disconnect the saw from the power supply and make sure the chain has stopped before you do any work on the saw.
For smooth and fast cutting, chain needs to be maintained properly. The chain requires sharpening when the wood chips are small and powdery, the chain must be forced through the wood during cutting, or the chain cuts to one side. During maintenance of your chain remember:
- Improper filing angle of the side plate can increase the risk of severe kickback.
- Raker (depth gauge) clearance.
• Too low increases the potential for kickback.
• Not low enough decreases cutting ability.
- If cutter teeth have hit hard objects such as nails and stones, or have been abraded by mud or sand on the wood, have service dealer sharpen chain.
NOTE: Inspect the drive sprocket for wear or damage when replacing the chain. If signs of wear or damage are present in the areas indicated, have the drive sprocket replaced by a qualified individual.
HOW TO SHARPEN THE CUTTERS
Be careful to file all cutters to the specified angles and to the same length, as fast cutting can be obtained only when all cutters are uniform.
Wear gloves for protection. Properly tension the chain prior to sharpening. Refer to "Chain Tension Section" earlier in this manual. Do all of your filing at the midpoint of the bar.
Use a 5/32 in. diameter round file and holder.
Keep the file level with the top plate of the tooth. Do not let the file dip or rock. Using light but firm pressure, stroke towards the front corner of the tooth. (Fig. 18)
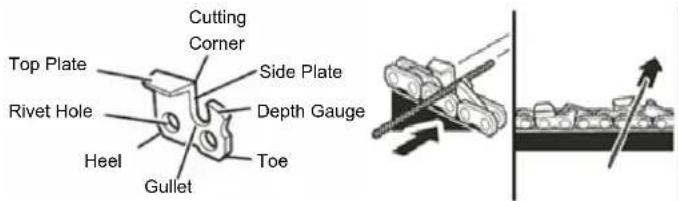
FIG. 18
CHAIN TENSION AND MAINTENANCE
Lift file away from the steel on each return stroke.
Put a few firm strokes on every tooth. File all left hand cutters in one direction. Then move to the other side and file the right hand cutters in the opposite direction. Occasionally remove filing from the file with a wire brush. (Fig. 19)
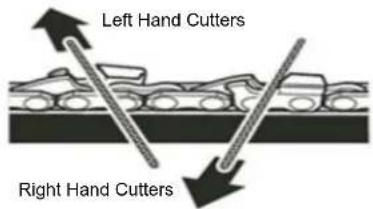
FIG. 19
WARNING: Improper chain sharpening increases the potential of kickback.
WARNING: Failure to replace or repair damaged chain can cause serious injury.
WARNING: The saw chain is very sharp, always wear protective gloves when performing maintenance to the chain.
TOP PLATE FILING ANGLE (Fig. 20)
Correct 30 degrees – File holders are marked with guide marks to align file properly to produce top plate angle.
Less than 30 degrees – for cross cutting.
More than 30 degrees – feathered edge dulls quickly.

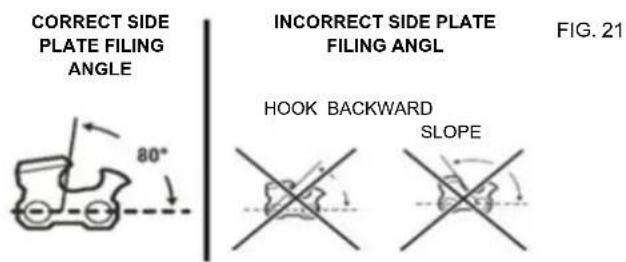
SIDE PLATE ANGLE (Fig. 21)
Correct - 80 degrees produced automatically if correct diameter file is used in file holder.
Hook – “Grabs” and dulls quickly. Increases potential of kickback. Results from using a file with a diameter too small, or file held too low.
Backward Slope – Needs too much feed pressure, causes excessive wear to bar and chain. Results from using a file with a diameter too large, or file held too high.
DEPTH GAUGE CLEARANCE (Fig. 22)
The depth gauge should be maintained at a clearance of .025 in. (0.6 mm). Use a depth gauge tool for checking the depth gauge clearances.
Every time the chain is filed, check the depth gauge clearance.
Use a flat file and a depth gauge jointer to lower all gauges uniformly. Depth gauge jointers are available in .020 in. to .035 in. (0.5 mm to 0.9 mm). Use a .025 in. (0.6 mm) depth gauge jointer. After lowering each depth gauge, restore original shape by rounding the front. Be careful not to damage adjoining drive links with the edge of the file.
Depth gauges must be adjusted with the flat file in the same direction the adjoining cutter was filed with the round file. Use care not to contact cutter face with flat file when adjusting depth gauges.
FIG. 22

DEPTH GAUGE JOINTER

flowchart
graph TD
    A["Step 1"] --> B{Decision Point}
    B --> C["Step 2"]
RESTORE ORIGIINAL SHAPE BY ROUNDING THE FRONT
OPERATING
Before you start the unit, make sure the pole/chain saw is not contacting any object.
STARTING THE POLE/CHAIN SAW
Push the safety button in with your thumb and then squeeze the switch trigger with your fingers. Once the tool is running, you can release the safety button. To turn the tool OFF, release the switch trigger. (Fig. 23)

WARNING: To guard against injury, observe the following:
- Read instruction manual before using.
- Save instruction manual.
- Keep hands away from blades.
- Keep hands on handles. Don't overreach.
A good, firm grip on the pole/ chain saw with both hands will help you maintain control. Grip the rear handle with your right hand whether you are right or left handed. Wrap the fingers of your left hand over and around the front handle when using the chainsaw, or around the pole shaft when using the pole saw. A firm grip together with positioning handle against your body will help you maintain control of the saw. Don't let go.
⚠ WARNING: Do not operate pole saw in a tree, on a ladder, or on a scaffold; this is extremely dangerous.
CAUTION: Chain coasts after pole saw is turned off. Do not use under wet conditions.
Use extreme caution when cutting small size brush, saplings or limbs under tension, because slender and tense material may catch the saw and be whipped toward you, pull you off balance or spring back.
CHAIN BRAKE
When using the chainsaw, in case an emergency stop is necessary, use the back of your hand to push hard the hand guard forward. Chain will stop immediately. (Fig. 24)

CAUTION: Failure to lubricate the chain will cause damage to the bar and chain. Use only a good quality bar and chain oil or, if not available, unused SAE 30 weight motor oil may be substituted. One minute of use will consume approx. 0.15 fl. oz. (5ml) of oil.
NOTE: It is normal for oil to seep from the chainsaw cutting head when not in use. To prevent seepage, empty the oil tank after each use. When storing the unit for a long period of time (3 months or longer) be sure the chain is lightly lubricated; this will prevent rust on the chain and bar sprocket.
WARNING: Do Not use the pole saw with any type of accessory or attachment. Such usage might be hazardous.
⚠ WARNING: Beware of the cord while operating the saw. Keep the cord away from the chain. Be careful not to trip over the extension cord.
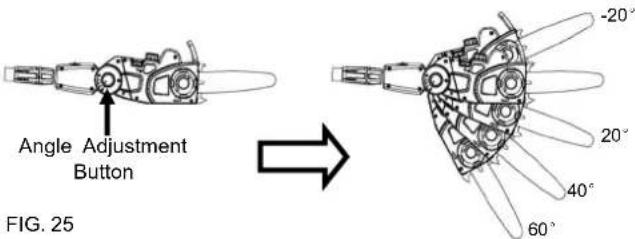
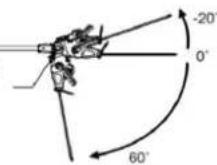
ADJUSTING THE ANGLE OF POLE SAW HEAD (Fig. 25)
- To adjust the sawing angle, pressing the angle adjustment button.
- Turn the saw to the desired angle.
- The angle can be kept between -20 and 60 degrees.
WARNING: Kickback may occur when the moving chain contacts an object at the upper portion of the tip of the guide bar or when the wood closes in and pinches the chain saw in the cut. Contact at the upper portion of the tip of the guide bar can cause the chain to dig into the object and stop the chain for an instant. The result is a lightening fast, reverse reaction which kicks the guide bar up and back toward the operator. If the chain saw is pinched along the top of the guide bar, the guide bar can be driven rapidly back toward the operator. Either of these reactions can cause loss of saw control which can result in serious
injury. Do not rely exclusively upon the safety devices built into the saw. As a chain saw user, you should take several steps to keep your cutting jobs free from accident or injury.

The following precautions should be followed to minimize kickback:
- Always grip the pole and/or handles firmly with both hands when unit is running. When using the chainsaw, place your right hand on the rear handle and your left hand on the front handle with your thumbs and fingers encircling the chainsaw handles. When using as a pole saw, place one hand on the pole and your other hand on the rear handle with your thumbs and fingers encircling the pole and handle. A firm grip together with positioning handle against your body will help you maintain control of the saw if kickback occurs.
- Make sure that the area in which you are cutting is free from obstructions. Do not let the nose of the guide bar contact a log, branch, fence or any other obstruction that could be hit while you are operating the saw.
- Always cut with the unit running at full speed. Fully squeeze the throttle trigger and maintain a steady cutting speed.
- Wear non-slip gloves for maximum grip protection.
Cut lower branches first to allow the top branches more room to fall.
Work slowly, keeping both hands on the saw with a firm grip.
Maintain secure footing and balance.
WARNING: To protect yourself from electrocution, maintain a min. of 50 ft. (15m) from over head electrical lines.
WARNING: Keep bystanders at least 50 ft. away.
WARNING: Do not cut trees near electrical wires or buildings.
OPERATING AND INSTRUCTIONS
PROPER CUTTING STANCE
Weight should be balanced with both feet on solid ground.
Keep left arm with elbow locked in a "straight arm" position to withstand any kickback force when using pole saw. Your right hand should be gripping the handle and positioned firmly against body for added support.
Your body should always be to the left of the chain line.
BASIC CUTTING PROCEDURE
Do not use the pole saw to fell saplings. Use the chain saw without the pole attachment.
Small trees up to 6-7 inches in diameter are usually cut in a single cut. Large tree limbs require notch cuts. Notch cuts determine the direction the tree will fall.
WARNING: If the tree limb starts to fall in the wrong direction, or if the saw gets caught or hung up during the fall, leave the saw and save yourself.
WARNING: Periodically glance at the top of the tree during the back-cut to assure the tree limb is going to fall in the desired direction.
Practice cutting a few small limbs using the following technique to get the "feel" of using the saw before you begin a major sawing operation.
Take the proper stance in front of the wood with the saw in the "off" position.
Squeeze the trigger and let the chain accelerate to full speed before entering the cut.
Always hold the saw firmly with both hands.
Keep the unit running the entire time you are cutting, maintain a steady speed.
Allow the chain to cut for you; exert only light downward pressure. If you force the cut, damage to the bar, chain, or unit can result in serious injury.
Do not put pressure on the saw at the end of the cut.
When felling the top of a small tree, keep everyone a safe distance from the cutting area. During felling operations, the safe distance should be at lease twice the height of the largest trees in the felling area. If the tree makes contact with any utility line, the utility company should be notified immediately.
Always cut with both feet on solid ground to prevent being pulled or knocked off balance.
Do not extend arms above shoulder level when operating the pole saws.
Do not cut above chest height when using the chain saw.
FELLING A TREE
When bucking and felling operations are being performed by two or more persons, at the same time, the felling operation should be separated from the bucking operation by a distance of at least twice the height of the tree being felled. Trees should not be felled in a manner that would endanger any person, strike any utility line or cause any property damage. If the tree does make contact with any utility line, the utility company should be notified immediately.
WARNING: Check the tree for damaged or dead branches that could fall and hit you during felling.
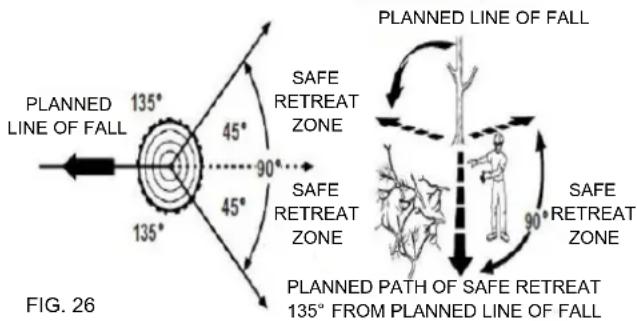
Before any cuts are started, pick your escape route (or routes in case the intended route is blocked); clear the immediate area around the tree and make sure there are no obstructions in your planned path of retreat. A clear path of safe retreat is approximately 135 degrees from planned line of fall. The retreat path should extend back and diagonally to the rear of the expected line of fall.(Fig. 26)
Before felling is started, consider the force and direction of the wind, the lean and balance of the tree, and the location of large limbs. These things influence the direction in which the tree will fall. Do not try to fall a tree along the line different from its natural line of fall.
The saw operator should keep on the uphill side of the terrain as the tree is likely to roll or slide downhill after it is felled.
Remove dirt, stones, loose bark, nails, staples, and wire from the tree where felling cuts are to be made.
NOTCHED UNDERCUT— Cut a notch about 1/3 diameter of the tree, perpendicular to the direction of the fall. Make the cuts of the notch so they intersect at a right angle to the line of fall. This notch should be cleaned out to leave a straight line. To keep the weight of the wood off the saw, always make the lower cut of the notch before the upper cut.
WARNING: Do not fell trees during periods of high wind or heavy precipitation. Wait to do your cutting until the hazard has ended.
WARNING: Do not cut down trees having an extreme lean or large trees that have rotten limbs, loose bark, or hollow trunks. Have these trees pushed or dragged down with heavy equipment, then cut them up.
FELLING BACK-CUT
The back-cut is always made level and horizontal, and at a minimum of 2 inches (5cm) above the horizontal cut of the notch.
Never cut through to the notch. Always leave a band of wood between the notch and back-cut (approximately 2 inches (5cm) or 1/10 the diameter of the tree). This is called "hinge" or "hinge wood". It controls the fall of the tree and prevents slipping or twisting or shoot-back of the tree off the stump.
This saw is not designed to fell large diameter tree tops, or tree trunks.
OPERATING
CUTTING INSTRUCTIONS
As the tree limbs starts to fall, stop the saw and immediately retreat along the cleared path. Watch the action in case something falls your way. Be alert for overhead limbs or branches that may fall and watch your footing.

WARNING: Never cut through to the notch when making a back-cut. The hinge controls the fall of the tree, this is a section of wood between the notch and back-cut.(Fig. 27)

BACK CUT 2 IN. (5 CM)

HINGE
FIG. 27
BUCKING
Bucking is the term used for cutting a fallen tree to the desired log length.
Always make sure your footing is secure and your weight is distributed evenly on both feet.
Cut only one log at a time, Support small logs on a saw horse or another log while bucking.
Keep a clear cutting area. Make sure that no objects can contact the guide bar nose and chain during cutting, this can cause kickback.
When bucking on a slope, always stand on the uphill side of the log. When "Cutting through", to maintain complete control of the pole saw, release the cutting pressure near the end of the cut without relaxing your grip on the pole saw handles. Do not let the chain contact the ground After completing the cut, wait for the saw chain to stop before you move the pole saw. Always stop the motor before moving from tree to tree.
BUCKING LOGS UNDER STRESS
When the log is supported along its entire length, it should be cut from the top or over-bucking.
When the log is supported on one end, cut 1/3 diameter from the underside or under-bucking. Then make the finishing cut by over-bucking to meet the first cut.
As the log is being cut, it will tend to bend The saw can become pinched or hung in the log if you make the first cut deeper than 1/3 of the diameter of the log.
Give special attention to logs under stress to prevent the bar and chain from pinching.
OVERBUCKING - Begin on the top side of the log with the button of the saw against the log; exert light pressure downward. Note that the saw will tend to pull away from you. (Fig. 28)
UNDER-BUCKING - Begin on the under side of the log with the top of the saw against the log; exert light pressure upward. During under-bucking, the saw will tend to push back at you. Be prepared for this reaction and hold the saw firmly to maintain control. (Fig. 28)
OVERBUCKING UNDER-BUCKING

natural_image
Technical line drawings of two mechanical components, one showing a saw cutting through a wooden block and the other a moving car (no text or symbols)Fig. 28
LIMBING (Fig. 29)
Limbing is removing branches from a fallen tree.
Work slowly, keeping both hands on the pole saw with a firm grip.
Always make sure your footing is secure and your weight is distributed evenly on both feet.
Leave the larger support limbs under the tree to keep the tree off the ground while cutting.
Limbs should be cut one at a time. Remove the cut limbs from the work area often to help keep the work area clean and safe.
Branches under tension should be cut from the bottom up to avoid binding the pole saw.
Keep the tree between you and the pole saw while limbing. Cut from the side of the tree opposite the branch you are cutting.
WARNING: Never climb into a tree to limb or prune. Do not stand on ladders, platforms, a log, or in any position which can cause you to lose your balance or control of the saw.
LIMBING
FIG. 29

CUT LIMBS ONE AT A TIME AND LEAVE SUPPORT
LIMBS UNDER TREE UNTIL LOG IS CUT
PRUNING (Fig. 30)
Pruning is trimming limbs from a live tree.
FIG. 30
Work slowly, keep both hands on the pole saw with a firm grip and the handle positioned firmly against your body for added control and ease of handling. Always make sure your footing is secure and your weight is distributed evenly on both feet.
When pruning trees it is important not to make the finishing cut next to the main limb or trunk until you have cut off the limb further out to reduce the weight. This prevents stripping the bark from the main member.
PRUNING
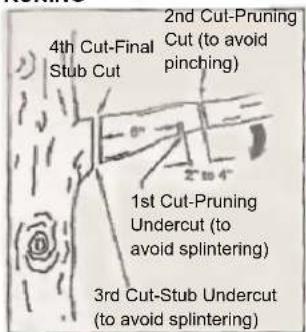
Make first cut six inches from tree trunk as possible on underside of limb stub. Use top of guide bar to make this cut. Cut 1/3 through diameter of stub.
Move two to four inches farther out on limb. Make second cut from above limb. Continue cut until you cut limb off.
Make third cut as close to tree trunk as possible on underside of limb stub. Use top of guide bar to make this cut. Cut 1/3 through diameter of stub.
Make fourth cut directly above third cut. Cut down to meet third cut. This will remove limb stub.
SPRINGPOLES
A spring pole is branch, or sapling which is bent under tension by other wood so that it springs back if the wood holding it is cut or removed.

WARNING: Watch out for spring poles, they are dangerous, They could result in severe or fatal injury.
OPERATING
Before you start the unit, make sure the pole/ hedge trimmer is not contacting any object.
STARTING THE POLE HEDGE TRIMMER/ HEDGE TRIMMER (Fig. 31)
When using the hedge trimmer, use your left hand to grip the front handle with double switch, while the right hand press the safety button and squeeze the trigger switch to start unit. Release the safety button once the trimmer is started.
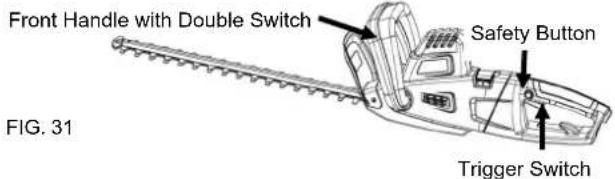
When using the pole hedge trimmer, grip the pole shaft with your left hand, while use your right handle to press the safety button and squeeze the trigger switch to start unit. Once the tool is running, you can release the safety button.
Release either the trigger switch or front handle to stop the machine when using the hedge trimmer. Release the trigger switch to stop the machine when using the pole hedge trimmer.
⚠️ CAUTION: Blade coasts after turned off.
- Do not use under wet condition.
- Do not use with damaged extension cord.
- Do not unplug or store with switch locked on.
WARNING: To guard against injury, observe the following:
- Read instruction manual before using.
- Save instruction manual.
- Keep hands away from blades.
- Keep hands on handles. Don't overreach.
⚠ WARNING: Do not allow familiarity with this type of product to make you careless. Remember that a careless fraction of a second is sufficient to inflict serious injury.
ADJUSTING THE ANGLE OF POLE HEDGE TRIMMER HEAD (Fig. 32)
- To adjust the sawing angle, pressing the angle adjustment button.
- Turn the saw to the desired angle.
- The angle can be kept between -20 and 60 degrees.
FIG. 32
Angle Adjustment Button
TRIMMING INSTRUCTIONS
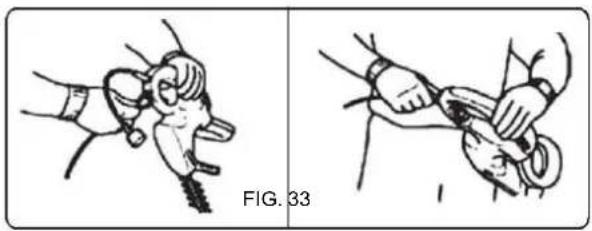
EXTENSION CORD - Always keep extension cord behind trimmer and away from the trimming operation. Never drape it over a hedge being trimmed. If you cut or damage the cord, unplug it at the electrical outlet immediately, before inspection or repairing the cord.
You may also place the extension cord in the cord retainer. Form a loop in extension cord and push the loop through the hole in the rear handle. Position the loop over the cord retainer and pull back to secure. Connect power cord of unit to extension cord. (Fig. 33)
natural_image
Illustration showing two hand positions in a physical procedure, one holding a tool and the other handling a circular object (no text or symbols)WORKING POSITION—Maintain proper footing and balance and do not overreach. Wear safety goggles, non-skid footwear and rubber gloves when trimming. Hold the tool firmly in both hands and turn the tool ON. Always hold the trimmer with right hand on the switch handle and left hand on the front handle or telescopic pole if using as a pole trimmer. Never hold the tool by the blade guard.
USING THE POLE HEDGE TRIMMER
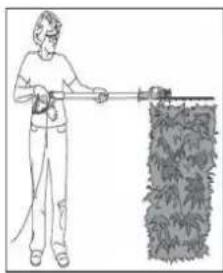
To use the pole hedge trimmer for trimming tall, hard-to-reach hedges or shrubs, hold the trimmer at the positions shown below. (Fig. 34) Pivot the power head to several different positions to shape or sculpt shrubs or hedges.

natural_image
Illustration of a person using a manual power tool to clean leafy plants (no text or symbols)FIG. 34
To use the pole trimmer for trimming smaller hedges or shrubs, hold the pole hedge trimmer at the position as shown. (Fig. 35)
natural_image
Illustration of a person spraying water onto a wall with dense vegetation (no text or symbols)FIG. 35
To use the pole hedge trimmer for trimming the bottoms and sides of hedges and shrubs. Hold the pole hedge trimmer at the positions as shown. (Fig. 36)

natural_image
Illustration of a person using a manual power shaver to clean or adjust vegetation (no text or symbols present)FIG. 36
To use the pole hedge trimmer for trimming low-lying foliage or ground cover, hold the pole hedge trimmer at the position as shown.
(Fig. 37)
natural_image
Line drawing of a person using a lawn power tool to clean or dig soil (no text or symbols)FIG. 37
TRIMMING INSTRUCTIONS
USING THE HEDGE TRIMMER
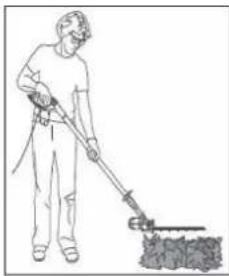
LEVEL HEDGES - To obtain exceptionally level hedges, a piece of string can be stretched along the length of the hedge as a guide. (Fig. 38)

natural_image
Illustration of a person using a power shaver to cut a saw (no text or symbols present)FIG. 38
CAUTION: Do not use the 18 inch trimmer for cutting stems greater than .7". Use the trimmer only for cutting normal shrubbery found around houses and buildings.
TRIMMING NEW GROWTH—A wide, sweeping motion, feeding the blade teeth through the twigs is most effective. A slight downward tilt of the blade in the direction of the motion gives the best cutting.
SIDE-TRIMMING HEDGES—Begin at the bottom and sweep up. (Fig. 39)

natural_image
Illustration of a person using a tool to lift or rotate a rope, with an arrow indicating rotational motion (no text or symbols)FIG. 39
Do not force the trimmer through dense growth. A slight back and forth sawing action may ease the cutting of larger, more dense growth. If the trimmer begins to slow down, reduce the rate of speed at which you are trying to cut. If the trimmer becomes jammed, immediately turn trimmer off. Disconnect trimmer from the power supply and remove the jammed debris from the cutting blades.
MAINTENANCE
BEFORE USING: Fill oil well with new quality bar and chain oil. Unused SAE30 weight motor oil may be substituted.
If you drop the product, carefully inspect it for damage. If the blade is bent or cracked, handles broken or if you see any other condition that may affect the product's operation, it must be repaired before putting it back into use. Call our customer service help line at 1-800-313-5111 for assistance.
CAUTION: Do not at any time let brake fluids, gasoline, petroleum based products, penetrating oils, etc., come in contact with plastic parts. They contain chemicals that can damage, weaken or destroy plastic.
Make sure the unit is detached from the power supply, then use only mild soap and a damp cloth to clean the tool. Never let any liquid get inside the tool; never immerse any part of the tool into a liquid.
IMPORTANT: To assure product SAFETY and RELIABILITY, repairs, maintenance and adjustment should be performed by a qualified individual using identical replacement parts only.
Ensure that the plastic bar covers are in place when storing.
For smooth and fast cutting, chain needs to be maintained properly.
The chain requires sharpening when the wood chips are small and powdery, the chain must be forced through the wood during cutting, or the chain cuts to one side. Refer to instructions earlier in this manual for instructions on properly sharpening the chain.
LUBRICATION SYSTEM FOR POLE/CHAIN SAW
The chain is automatically lubricated.
Use only new bar and chain oil or unused SAE 30 weight motor oil may be substituted. Never use wasted oil, low quality oil, or insufficient oil. This could damage the pump; the bar and the chain which may result in serious personal injury.
Check oil level before each work session, refill if less than 14 full. If the lubrication system does not work properly, check if the oil filter and all oil-ways are clean and free from obstructions. If it is still not working, call our customer service help line at 1-800-313-5111 for assistance.
GUIDE BAR MAINTENANCE
When the guide bar shows signs of wear, reverse it on the saw to distribute the wear for maximum bar life. The bar should be cleaned every day of use and checked for wear and damage.
Feathering or burring of the bar rails is a normal process of bar wear. Such faults should be smoothed with a file as soon as they occur.
A bar with any of the following faults should be replaced.
- Wear inside the bar rails which permits the chain to lay over side ways.
- Bent guide bar
- Cracked or broken rails
- Spread rails
In addition, guide bars with a sprocket at their tip must be lubricated frequently with a grease syringe to extend the guide bar life. Using a grease syringe, lubricate weekly in the lubricating hole.
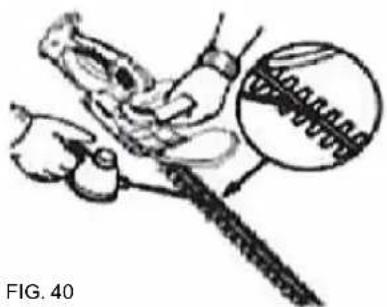
LUBRICATION SYSTEM FOR POLE HEDGE TRIMMER/HEDGE TRIMMER (Fig. 40)
The cutting blades are made from high quality, hardened steel and with normal usage, they will not require re-sharpening. However, if you accidentally hit a wire fence, stones, glass or other hard objects, you may put a nick in the blade. There is no need to remove this nick as long as it doesn't interfere with the movement of the blade. If it does interfere, make sure the unit is detached from the power supply and use a fine toothed file or sharpening stone to remove the nick.
Fertilizers and other garden chemicals contain agents which greatly accelerate the corrosion of metals Do not store the tool on or adjacent to fertilizers or chemicals.
LUBRICATE BLADES - Stop the unit and disconnect the power cord. Then remove any debris on blades. Apply a light machine oil along the edge of the top and bottom blade supports. Make sure handles remain clean and dry.
natural_image
Illustration of a hand holding a tool with a magnified inset showing a circular object (no text or symbols)STORAGE
Store the tool in a dry, clean area out of reach of children.
During extended periods of storage, ensure that the tool is protected against corrosion and rust.
At the end of the season, or if the tool is not being used for longer than a month, wipe over all metal surfaces with an oil impregnated cloth to protect them from corrosion or spray with a fine coat of oil.
TROUBLE SHOOTING
Problem Possible Cause Possible Solution
| — Unit does not run — Extension cord not connected to the plug | — Check extension cord is fully connected to tool |
| — Cord not connected to power source | — Check extension cord is fully connected to a live receptacle |
| — Trigger switch not fully operated | — Check that safety lock of button is fully depressed prior to moving trigger |
| — Chain brake is engaged | — Pull hand guard back toward front handle |
| — Slow running, noisy or hot blades | — Dry, corroded blades — Lubricate blades |
| — Blades or blade support bent — Straighten blade or blade support | |
| — Bent or damaged teeth — Straighten teeth | |
| — Loose blade bolts — Tighten blade bolts | |
| — Bar and chain running hot and smoking | — Check chain tension for over-tight condition — Adjust chain tension |
| — Chain oil tank empty — Fill tank with chain oil | |
| — Chain installed in wrong direction — Reverse chain so that cutters face the right direction | |
| — Motor runs but chain is not rotating | — Chain tension too tight — Adjust chain tension |
| — Check guide bar and chain for damage — Replace damaged bar and chain with identical replacement parts. |
SERVICE
Now that you have purchased your tool, should a need ever exist for repair parts or service, simply contact us at 1-800-313-5111. Be sure to provide all pertinent facts when you call or visit.
REPAIR PARTS
Please record your serial number in the space provided below.
- NAME OF ITEM
ELECTRIC CONVERTIBLE 4 IN 1 COMBO
- MODEL NUMBER
CVP41810
- SERIAL NUMBER
CALL US FIRST !!
OPERATOR'S MANUAL
ELECTRIC CONVERTIBLE 4 IN 1 COMBO
CHAIN SAW/ POLE SAW/ HEDGE TRIMMER/ POLE HEDGE TRIMMER
This product is covered by U.S. patents and other international patents
Copyright. All Rights Reserved.
WARRANTY
LIMITED WARRANTY FOR CORDED ELECTRIC MODELS
This product is manufactured for The Great States Corporation/American Lawn Mower Company. The Great States Corporation/American Lawn Mower Company, Shelbyville, Indiana, has been making lawn mowers for over 100 years and warrants to the original owner that each new product and service part is free from defects in material and workmanship and agrees to repair or replace under this warranty any defective product or part from the original date of purchase for two (2) years except for the conditions and circumstances listed below. Proof of purchase (original dated sales receipt) must accompany all warranty claims.
THIS WARRANTY IS NOT TRANSFERABLE AND DOES NOT COVER:
Products sold damaged or incomplete, sold "as is", sold reconditioned, or used as rental equipment.
Delivery, installation, or normal adjustments explained in the operator's manual.
Damage or liability caused by shipping, improper handling, improper installation, incorrect voltage or improper wiring, improper maintenance, improper modification, or the use of accessories and/or attachments not specifically recommended.
Repairs necessary because of operator abuse or negligence, or the failure to install, operate, maintain, or store the product according to the instructions in the operator's manual.
Damage caused by cold, heat, rain, excessive humidity, corrosive environments and materials, or other contaminants.
Expendable items that become worn during normal use, including, but not limited to, bar and chain.
Cosmetic defects that do not interfere with tool functionality.
Freight costs from customer to vendor.
Repair and transportation costs of products or parts determined not to be defective.
ANY INCIDENTAL, INDIRECT, OR CONSEQUENTIAL LOSS, DAMAGE, OR EXPENSE THAT MAY RESULT FROM ANY DEFECT, FAILURE, OR MALFUNCTION OF THE PRODUCT. Some states do not allow the exclusion or limitation on how long an implied warranty lasts, so the above limitations may not apply to you.
ANY NON-RESIDENTIAL USE OR COMMERCIAL USE VOIDS ALL WARRANTIES.
AJUSTARLATELESCÓ PICO
natural_image
Close-up of hands holding a chain-linking wire with a circular blade (no text or symbols visible)natural_image
Mechanical chain saw with labeled part 90, shown as a mechanical assembly (no text or symbols on the diagram itself)INSTALACIÓ N / REEMPLAZO DE LA BARRA GUÍA Y LA CADENA
natural_image
Illustration of a person using a long tool to lift a wall, with no text or symbols present.FIG. 34
natural_image
Illustration of a person using a power shaver to cut a saw (no text or symbols present)FIG. 38
natural_image
Illustration of a person using a tool to lift or rotate a rope, with an arrow indicating upward motion (no text or symbols)FIG. 39
natural_image
Illustration of a hand holding a tool with a magnified inset showing a circular object (no text or symbols)ALMACENAMIENTO
The Great States Corporation
American Lawn Mower Company
830 Webster Street
SPÉ CIFICATIONS DU PRODUIT
CVP41810
natural_image
Technical illustration of a mechanical tool assembly showing how to move from a single tool to a multi-tool (no text or symbols present)natural_image
Close-up of hands holding a chain drive (no text or symbols visible)natural_image
Mechanical chain cutter with visible teeth and meshing (no text or symbols)REPLACEMENT DU GUIDE-CHAÎNE ET DE LA CHAÎNE
natural_image
Illustration of two hands performing a manual manipulation or massage technique (no text or symbols present)natural_image
Illustration of a person using a long-handled tool to clean leafy plants (no text or symbols visible)FIG. 34
natural_image
Illustration of a person using a tool to spread over dense vegetation (no text or symbols)FIG. 35
natural_image
Line drawing of a person using a long-handled tool to clean leafy soil (no text or symbols)FIG. 36
natural_image
Line drawing of a person using a manual lawn power tool to clean or brush (no text or symbols)FIG. 37
INSTRUCTIONS POUR LA COUPE
UTILISER LE TAILLE-HAIE
natural_image
Illustration of a person using a power shaver to cut a saw (no text or symbols present)FIG. 38
natural_image
Illustration of a person using a tool to lift a circular object, with an arrow indicating upward motion (no text or symbols)FIG. 39
natural_image
Illustration of a hand holding a tool with a magnified inset showing a circular detail (no text or symbols)REMISAGE
The Great States Corporation
American Lawn Mower Company
830 Webster Street


- Model CVP41810
- IMPORTANT SAFETY WARNINGS
- GENERAL SAFETY
- PRODUCT SPECIFICATIONS
- ASSEMBLY
- UNPACKING
- PACKING LIST
- CONVERTING FROM CHAIN SAW TO POLE SAW
- CONVERTING FROM POLE SAW TO CHAIN SAW
- CONVERTING FROM HEDGE TRIMMER TO POLE HEDGE TRIMMER
- CONVERTING FROM POLE HEDGE TRIMMER TO HEDGE TRIMMER
- ADJUSTING THE LENGTH OF THE TELESCOPIC POLE (FIG.11)
- INSTALLING/REPLACING THE GUIDE BAR AND CHAIN
- CHAIN TENSION AND MAINTENANCE
- CHAIN TENSION
- CHAIN MAINTENANCE
- HOW TO SHARPEN THE CUTTERS
- TOP PLATE FILING ANGLE (Fig. 20)
- SIDE PLATE ANGLE (Fig. 21)
- DEPTH GAUGE CLEARANCE (Fig. 22)
- OPERATING
- STARTING THE POLE/CHAIN SAW
- CHAIN BRAKE
- ADJUSTING THE ANGLE OF POLE SAW HEAD (Fig. 25)
- The following precautions should be followed to minimize kickback:
- OPERATING AND INSTRUCTIONS
- PROPER CUTTING STANCE
- BASIC CUTTING PROCEDURE
- FELLING A TREE
- FELLING BACK-CUT
- CUTTING INSTRUCTIONS
- BUCKING
- BUCKING LOGS UNDER STRESS
- LIMBING
- SPRINGPOLES
- TRIMMING INSTRUCTIONS
- USING THE POLE HEDGE TRIMMER
- USING THE HEDGE TRIMMER
- MAINTENANCE
- LUBRICATION SYSTEM FOR POLE/CHAIN SAW
- GUIDE BAR MAINTENANCE
- LUBRICATION SYSTEM FOR POLE HEDGE TRIMMER/HEDGE TRIMMER (Fig. 40)
- STORAGE
- TROUBLE SHOOTING
- SERVICE
- REPAIR PARTS
- CALL US FIRST !!
- OPERATOR'S MANUAL
- ELECTRIC CONVERTIBLE 4 IN 1 COMBO
- CHAIN SAW/ POLE SAW/ HEDGE TRIMMER/ POLE HEDGE TRIMMER
- WARRANTY
- LIMITED WARRANTY FOR CORDED ELECTRIC MODELS
- AJUSTARLATELESCÓ PICO
- INSTALACIÓ N / REEMPLAZO DE LA BARRA GUÍA Y LA CADENA
- ALMACENAMIENTO
- SPÉ CIFICATIONS DU PRODUIT
- REPLACEMENT DU GUIDE-CHAÎNE ET DE LA CHAÎNE
- INSTRUCTIONS POUR LA COUPE
- UTILISER LE TAILLE-HAIE
- REMISAGE
Brand : Earthwise
Model : CVP41810
Category : Lawn mower