
ST00090 - Lawn mower Earthwise - Free user manual and instructions
Find the device manual for free ST00090 Earthwise in PDF.
| Product Type | Electric string trimmer (weed trimmer) |
| Brand | Earthwise |
| Model | ST00090 |
| Cutting Width | 23 cm (9 in) |
| Weight | 1.2 kg (2.65 lb) |
| Line Diameter | 1.65 mm (0.065 in) |
| Line Feeding | Automatic bump feed |
| Adjustable Height | Yes |
| Double Insulation | Yes |
| Power Source | 120 V AC, electric cord |
| Handle Type | Rear handle with trigger and auxiliary handle |
| Safety Guard | Protective guard with line cutting blade |
| Maintenance | Clean with damp cloth and mild soap; store indoors |
| Safety | Trigger start, retaining cord, double insulation; wear PPE (goggles, gloves, shoes) |
| Replacement Parts | Guard kit (ST90-PGK-1) and spool kit (RS90109) |
| Warranty | 1-year limited warranty, household use, original purchaser |
| Customer Service | 1-800-313-5111 (United States) or www.americanlawnmower.com |
Frequently Asked Questions - ST00090 Earthwise
User questions about ST00090 Earthwise
0 question about this device. Answer the ones you know or ask your own.
Ask a new question about this device
Download the instructions for your Lawn mower in PDF format for free! Find your manual ST00090 - Earthwise and take your electronic device back in hand. On this page are published all the documents necessary for the use of your device. ST00090 by Earthwise.
USER MANUAL ST00090 Earthwise
Copyright. All Rights Reserved.
Model ST00090

natural_image
Exterior view of a handheld cleaning tool with lever and handle (no text or symbols visible)
Your string trimmer has been engineered and manufactured to our high standard for dependability, ease of operation, and operator safety. Properly cared for, it will give you years of rugged, trouble-free performance.

WARNING: To reduce the risk of injury, the user must read and understand the owner's manual before using this product.
Thank you for your purchase.
DO NOT RETURN THIS PRODUCT TO THE STORE. OPERATING, ASSEMBLY, PARTS, SERVICE QUESTIONS? GO TO WWW.AMERICANLAWNMOWER.COM, OR CALL 1-800-313-5111 BETWEEN 8:00AM-5:00PM EST FOR ASSISTANCE.
SAVE THIS MANUAL FOR FUTURE REFERENCE

IMPORTANT SAFETY WARNINGS

TO REDUCE RISK OF INJURY:
Before any use, be sure everyone using this tool reads and understands all safety instructions and other information contained in this manual.
CAUTION: Wear appropriate personal hearing protection during use. Under some conditions and duration of use, noise from this product may contribute to hearing loss.
Save these instructions and review frequently prior to use and in instructing others.
⚠ WARNING: When using electric gardening appliances, basic safety precautions should always be followed to reduce risk of fire, electric shock, and personal injury, including the following:
READ ALL INSTRUCTIONS
GENERAL SAFETY
DON'T ABUSE CORD – Never carry the string trimmer by the cord or yank the cord in order to disconnect from the receptacle. Keep cord from heat, oil, and sharp edges.
KEEP CHILDREN AWAY - All visitors, children and pets should stay at a safe distance from the work area.
DRESS PROPERLY – Don't wear loose clothing or jewelry. Wear protective hair covering to contain long hair. They can be caught in moving parts. Use of rubber gloves and substantial footwear is recommended when working outdoors.
USE SAFETY GLASSES – Wear safety glasses with side shields or goggles that are marked to comply with ANSI Z87.1 standard when operating this product. Use face or dust mask if environment is dusty.
GROUND FAULT CIRCUIT INTERRUPTER (GFCI) protection should be provided on the circuit(s) or outlet(s) to be used for the string trimmer. Receptacles are available having built-in GFCI protection and may be used.
USE RIGHT APPLIANCE – Do not use an appliance for any job except that for which it is intended.
EXTENSION CORD. Make sure your extension cord is in good condition. When using an extension cord be sure it is heavy enough to carry the current your product will draw. An undersized extension cord will cause a drop in line voltage resulting in loss of power and overheating. The following table shows the correct size to use depending on cord length and nameplate ampere rating. If in doubt, use the next heavier gage. The smaller the gage number, the heavier the cord.
| Minimum Gage for Cord Sets | |||||
| Volts | Total Length of cord in Feet | ||||
| 120V | 0-7 | 8-15 | 16-30 | 31-45 | |
| Ampere Rating | |||||
| More | Not More | American wire Gage | |||
| Than | Than | ||||
| 0 | 6 | 18 | 16 | 16 | 14 |
| 6 | 10 | 18 | 16 | 14 | 12 |
| 10 | 12 | 16 | 16 | 14 | 12 |
| 12 | 16 | 14 | 12 | Not Recommended | |
It is possible to tie the extension cord and power cord in a knot to prevent them from becoming disconnected during use. Make the knot as shown, then connect the plug end of the power cord into the receptacle end of the extension cord. This method can also be used to tie two extension cords together.

⚠ WARNING: Use outdoor extension cords marked SW-A, SOW-A, STW-A, STOW-A, SJW-A, SJTW-A, or SJTOWA. These cords are rated for outdoor use and reduce the risk of electric shock.
POLARIZED PLUGS – To reduce the risk of electric shock, this equipment has a polarized plug (one blade is wider than the other). This equipment must be used with a suitable polarized 2 wire or 3 wire extension cord. Polarized connections will fit together only one way. Make sure that the receptacle end of the extension cord has large and small blade slot widths. If the plug does not fit fully into the extension cord, reverse the plug. If it still does not fit, obtain a suitable extension cord. If the extension cord does not fit fully into the outlet, contact a qualified electrician to install the proper outlet. Do not change the tool plug or extension cord in any way.
WARNING: Do Not use the string trimmer with any type of accessory or attachment. Such usage might be hazardous.
DOUBLE INSULATION – Double Insulation is a concept in safety in electric power tools, which eliminates the need for the usual three-wire grounded power cord. All exposed metal parts are isolated from the internal metal motor components with protecting insulation. Double insulated tools do not need to be grounded.
NOTE: The double insulated system is intended to protect the user from shock resulting from a break in the tool's internal insulation. Observe all normal safety precautions to avoid electrical shock.
DISCONNECT STRING TRIMMER from the power supply when not in use or when servicing or cleaning. Do not leave unattended.
AVOID DANGEROUS ENVIRONMENTS – Don't use trimmer in rain, damp or wet locations. Do not operate trimmer in gaseous or explosive atmospheres. Motors in these tools normally spark, and the sparks might ignite fumes.
AVOID UNINTENTIONAL STARTING – Don't carry plugged in string trimmer with finger on switch. Be sure switch is off when plugging in.
⚠️ DANGER: Risk of cut. Keep hands away from the line. Keep both hands on handles when power is on.
DO NOT ATTEMPT to remove cut material or hold material to be cut when lines are moving. Make sure trimmer switch is off when clearing jammed material from guard. Do not grasp the guard or lines when picking up or holding the trimmer.
CAUTION: Lines coast after turn off.
DON'T FORCE TRIMMER – It will do the job better and with less likelihood of a risk of injury at the rate for which it was designed.
STAY ALERT – Watch what you are doing. Use common sense. Do not operate string trimmer when you are tired or under the influence of drugs, alcohol or medications.
STORE IDLE STRING TRIMMER INDOORS – When not in use, the string trimmer should be stored indoors in a dry and high or locked-up place, out of reach of children.
MAINTAIN TRIMMER WITH CARE – Keep clean for best performance and to reduce the risk of injury. Inspect extension cord periodically and replace if damaged. Keep handles dry, clean and free from oil and grease.
CHECK DAMAGED PARTS – Before further use of the trimmer, a guard or other part that is damaged should be carefully checked to determine that it will operate properly and perform its intended function. Check for alignment of moving parts, binding of moving parts, breakage of parts, mounting and any other condition that may affect its operation. A guard or other part that is damaged should be properly repaired or replaced. For assistance call our customer service help line at 1-800-313-5111. LIGHTING - Only operate trimmer in daylight or good artificial light. DON'T OVERREACH – Keep proper footing and balance at all times.
WARNING: Some dust created by this product contains chemicals known to the State of California to cause cancer, birth defects or other reproductive harm. Some examples of these chemicals are: -compounds in fertilizers
-compounds in insecticides, herbicides and pesticides -arsenic and chromium from chemically treated lumber
Your risk from exposure to these chemicals varies depending on how often you do this type of work. To reduce your exposure to these chemicals, wear approved safety equipment such as dust masks that are specially designed to filter out microscopic particles.
WARNING: California Proposition 65: This product contains chemicals known to the State of California to cause cancer, birth defects or other reproductive harm.
WARNING: Cancer and Reproductive Harm - www.P65Warnings.ca.gov.
FEATURES
PRODUCT SPECIFICATIONS
ST00090
Input 120 V, 60 Hz, 2.4 Amp
Speed 11000 RPM
Cutting Width 9 in.
Weight 2.65 lb (1.2 kg).
- Dual Line - .065 Line Diameter - Bump Feed -

| No. Description No. Description | |||
| A | Switch trigger | E | Cable sleeve |
| B | Cord retainer | F | Trimmer head |
| C | Rear handle | G | Safety Guard |
| D | Auxiliary handle | ||
ASSEMBLY
PACKING LIST
- String Trimmer
- Connection Tube
- Safety Guard
- Owner's Manual
- Hardware Bag
- Cable Sleeve
UNPACKING
This product requires some assembly.
Carefully remove the product and accessories from the box. Make sure that all items listed in the packing list are included.
Inspect the product carefully to make sure no breakage or damage occurred during shipping.
Do not discard the packing material until you have carefully inspected and satisfactorily operated the product.
If any parts are damaged or missing, please call customer service at 1-800-313-5111 for assistance.
⚠ WARNING: Do not connect to power supply until assembly is complete. Failure to comply could result in accidental starting and possible serious personal injury.
⚠ WARNING: If any parts are damaged or missing do not operate this product until the parts are replaced. Failure to heed this warning could result in serious personal injury.
WARNING: Do not operate the trimmer without the guard attached.
ASSEMBLING THE CONNECTION TUBE
- Attach the bottom and top sections of string trimmer to the connection tube. (Fig 1)

natural_image
Two sequential diagrams showing a tool with labeled points A and B, no text or symbols present.Fig 1
- Insert the bolt into the upper handle and connection tube and secure with nut. (Fig 2)

Fig 2
- Insert the bolt into the trimmer head and connection tube and secure with nut. (Fig 3)

natural_image
Two views of a mechanical tool with labeled parts: 'Nut' and 'Bott', showing different grip configurations (no text beyond labels)Fig 3
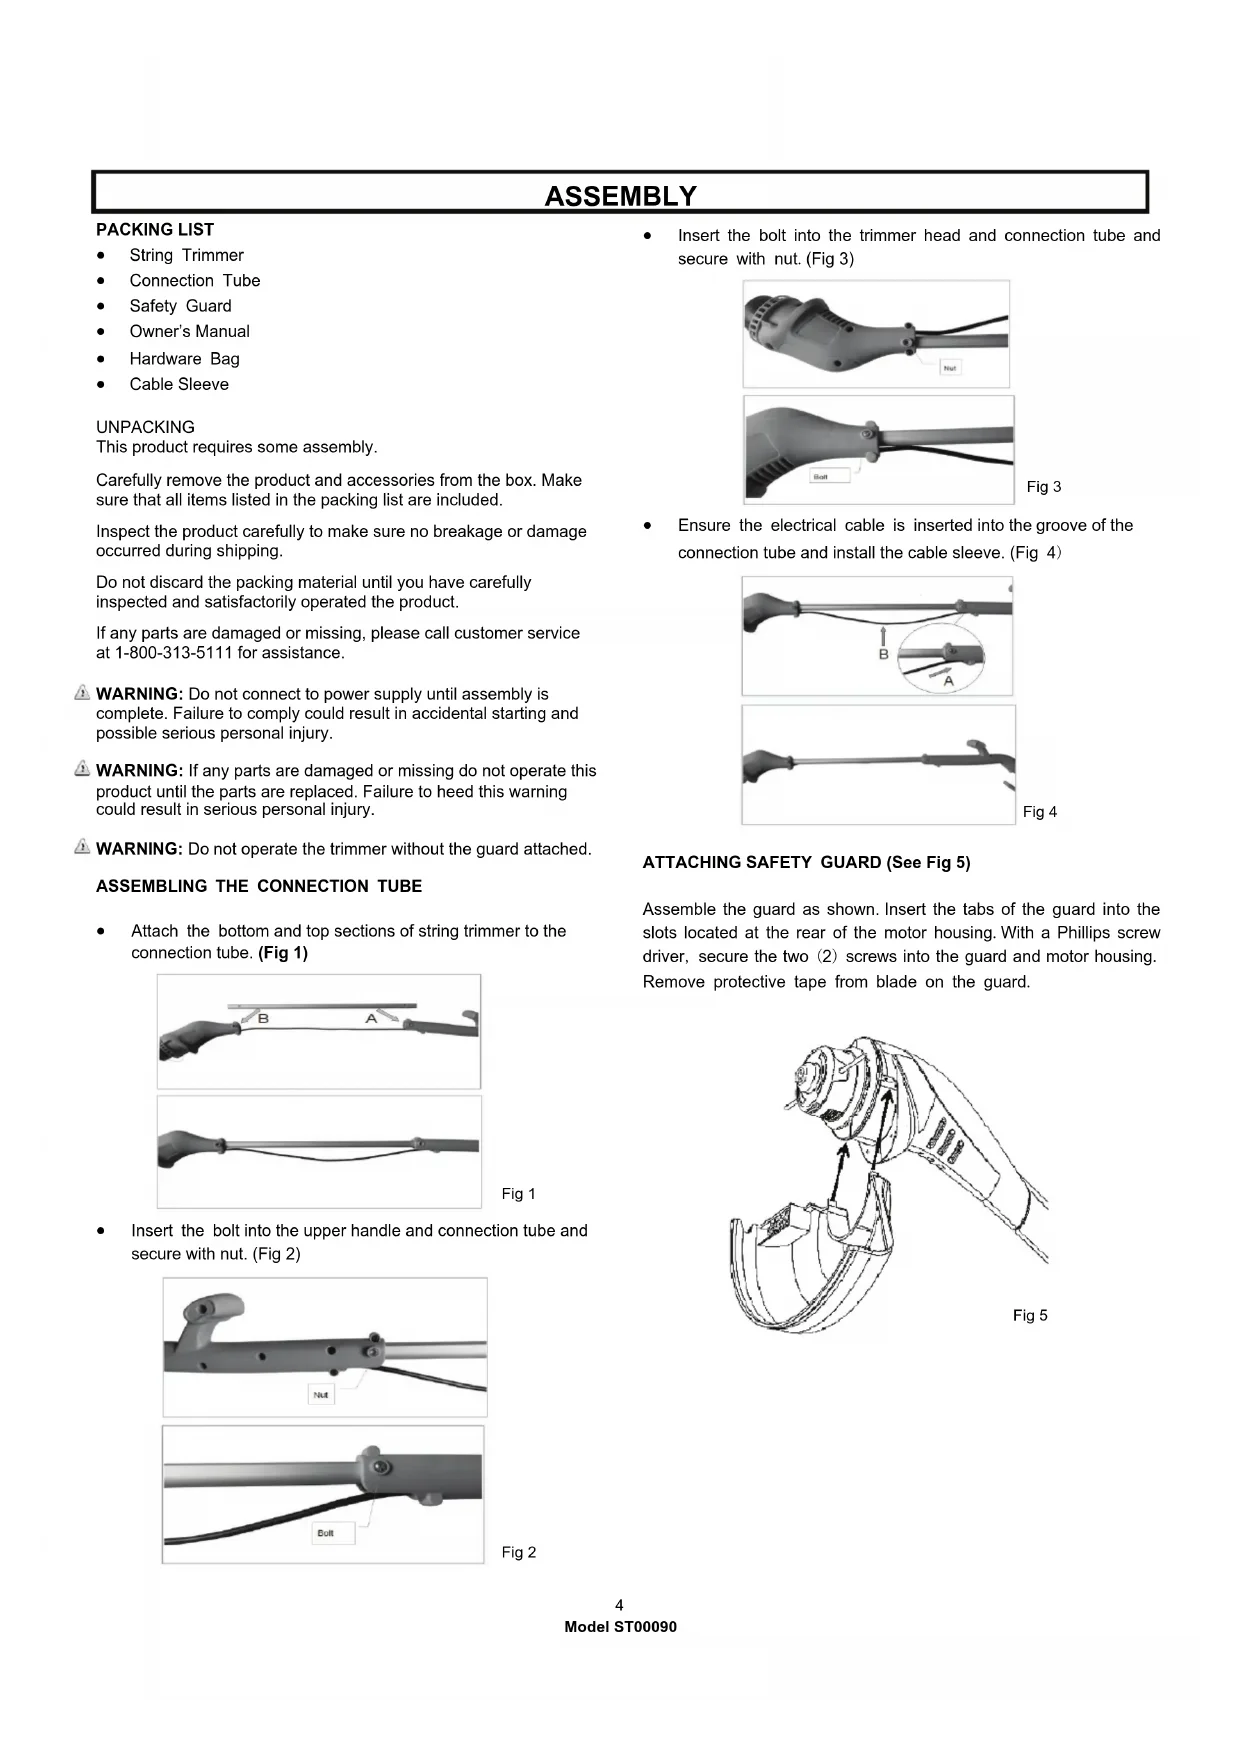
- Ensure the electrical cable is inserted into the groove of the connection tube and install the cable sleeve. (Fig 4)
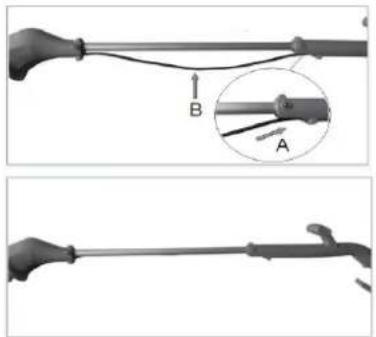
natural_image
Two-panel diagram showing a mechanical tool with labeled parts A and B, no text or symbols present.Fig 4
ATTACHING SAFETY GUARD (See Fig 5)
Assemble the guard as shown. Insert the tabs of the guard into the slots located at the rear of the motor housing. With a Phillips screw driver, secure the two (2) screws into the guard and motor housing. Remove protective tape from blade on the guard.

natural_image
Technical line drawing of a mechanical assembly with arrows indicating motion or force direction (no text or symbols)OPERATING
TO TURN THE TOOL ON
• To start the string trimmer, press the switch trigger.
• To stop the string trimmer, release the switch trigger.
Before you start the unit, make sure the trimmer is not contacting any object.
CAUTION: Inspect area to be trimmed and remove any wire, cord, or string-like objects which could become entangled in the rotating line or spool. Be particularly careful to avoid any wire which might be bent outwardly into the path of the tool, such as barbs at the base of a chain link fence.
If you strike or become entangled with a foreign object, stop tool immediately, check for damage and have any damage repaired before further operation is attempted. Do not operate with a broken hub or spool.
⚠ WARNING: Do not allow familiarity with this type of product to make you careless. Remember that a careless fraction of a second is sufficient to inflict serious injury.
⚠️ CAUTION: Lines coasts after turn off.
Do not use under wet conditions.
Do not use with damaged extension cord.
⚠ WARNING: Stones, pieces of metal and other objects can be thrown out at high speed by the line. The unit and guard are designed to reduce the danger.
⚠ WARNING: To guard against injury, observe the following: Read instruction manual before using.
Save instruction manual.
Keep hands away from lines.
Keep hands on handles. Don't overreach.
CUTTING INSTRUCTIONS
Basic Cutting Procedure
Wear non-slip gloves for maximum grip and protection.
For the best cutting action against walls, fences and in high grass, move trimmer slowly so grass is cut WITH THE TIP of the high speed nylon line.
Avoid running trimmer with hub in contact with ground.
Trim only when grass and weeds are dry.
NOTE: As the weather becomes cooler, the tendency for the nylon line to break becomes greater. DO NOT USE WHEN TEMPERATURE IS BELOW 50 degrees F.
Cut tall grass from top down.
Hold the trimmer with your right hand on the rear handle and your left hand on the front handle. Trimmer should be held at a comfortable position with the rear handle about hip height.
⚠ WARNING: Always hold trimmer away from body. Any contact with the string trimmer cutting head while operating can result in serious personal injury.
The life of your nylon line is dependent upon following instructions for proper use, as well as what is being cut, and where the cutting is being done.
WARNING: Do not trim near electrical wires.
WARNING: Do not operate a string trimmer in a tree, on a ladder, or on a scaffold; this is extremely dangerous.
TRIMMING INSTRUCTIONS
- Tilt trimmer at a slight angle from the ground(10°-30°).
- Lower to grass or weeds you intend to cut. (If they are over 20cm(8 in.) high, start cutting at top.)
- Slowly swing unit into and out of area being cut, hold the unit off the ground at desired cutting height.
LINE FEEDING
In order to feed a length of cutting line, strike the bump cap on the lawn while the trimmer is running. This will automatically feed a new length of line and trim it to the correct length. A firm but gentle motion should be used to strike the bump cap. The unit should be angled slightly forward to prevent the guard from contacting the ground. This process may be repeated as often as necessary. If unit fails to feed, unplug extension cord at trimmer and clean out the bump cap.
ADVANCING THE LINE MANUALLY
If the nylon line is too short and cannot be lengthened by tapping. They must be pulled from the spool by hand.Disconnect the string trimmer from the power supply. Place the unit on the floor.
Using one hand, press the underside of the spool and pull both nylon lines out until they reach slightly further than the edge of the guard. The nylon line will be cut to the correct length by the blade next time the unit is used.
OPERATING
CUTTING INSTRUCTIONS
REPLACING SPOOL / CLEARING JAMS AND TANGLED LINES
• Unplug the string trimmer.
- Firmly push the tabs on both sides of the hub to release it and remove along with the spool from the cutting head.
NOTE: The cutting line is quite springy and can be awkward to handle.
- Remove any broken line, wrap the remaining line tight and re-insert spool into hub as follows:
a. Wind the line tight enough so that it is all below the edge of the flange on the spool. If it extends past the flange, it won't fit into the hub. Leave yourself 3 or 4 inches of line to work with.
b. Make sure that two free ends of the line are secured in the opposite gaps on the spool flange.
c. While holding the ends in the gaps, insert them through the eyelets and slip the spool into the hub. Press gently to ensure the spool is seated.
d. Pull straight out on the ends of the cutting line to release them from the gaps. - Position hub over spring and align tabs with rectangular openings. Press firmly on tabs and until hub snaps into place.

REWINDING SPOOL FROM BULK LINE (USE ONLY .065" DIAMETER LINE)
Bulk line for your trimmer/edger is available at extra cost from your local dealer or service center. To install bulk line, follow these steps:
- Unplug the string trimmer.
- Remove the spool from the string head.
NOTE: Remove any old line remaining on the spool. - Use approximately 9ft.of.065" replacement line. Loop the line into 2 equal lengths. Insert looped center into slot of spool.
- Wind the line tightly around the spool according to the direction of the arrow on the spool. Tightly wind it until there is about 6" of line left.
- Lock each end of line into opposite gaps on the spool flange.

MAINTENANCE
CAUTION: Do not at any time let brake fluids, gasoline, petroleum based products, penetrating oils, etc., come in contact with plastic parts. They contain chemicals that can damage, weaken or destroy plastic.
Make sure the trimmer is unplugged from the power supply, then use only mild soap and a damp cloth to clean the tool. Never let any liquid get inside the tool; never immerse any part of the tool into a liquid.
Fertilizers and other garden chemicals contain agents which greatly accelerate the corrosion of metals Do not store the tool on or adjacent to fertilizers or chemicals.
⚠️ IMPORTANT: To assure product SAFETY and RELIABILITY, repairs, maintenance and adjustment should be performed by a qualified individual using only identical replacement parts.
If you drop the trimmer, carefully inspect it for damage. If the guard is bent or cracked, handles broken or if you see any other condition that may affect the trimmer's operation, it must be repaired before putting it back into use. Call our customer service help line at 1-800-313-5111 for assistance.
TROUBLESHOOTING
| Problem | Possible Cause | Possible Solution |
| - Unit does not run | - Extension cord not connected to the plug- Cord not connected to power source | - Check extension cord is fully connected to tool- Check extension cord is fully connected to a live receptacle |
| - Line won't feed | - Line tangled in spool | - Untangle line |
| - Line fails to cut off | - Line cutter in guard is damaged or missing- Line extends past guard | - Replacement/repair line cutter- Rewind or trim line to line cutter |
CALL US FIRST !!
Call us first with questions about operating or maintaining your product at 1.800.313.5111 between 8:00 a.m. – 5:00 p.m. Eastern Standard Time, or or get assistance on www.americanlawnmower.com.
PARTS AND SERVICE
For parts or service, please call 1-800-313-5111 or visit us online at www.americanlawnmower.com. Be sure to provide all relevant information when you call or visit.
REPAIR PARTS (KITS/ ITEMS)
The model/ serial number of this tool is found on a plate or label attached to the housing. Please record the serial number in the space provided below.
MODEL NUMBER ST00090
SERIAL NUMBER
Always mention the model number when ordering kits/items for this tool.
| No. | Kit/Item Number | Description | QTY |
| 1 ST90-PGK-1 | Protective Guard Kit | 1 | |
| 2 | RS90109 | Spool Kit | 1 |
CALL US FIRST !!
Call us first with questions about operating or maintaining your product at 1.800.313.5111 between 8:00 a.m. – 5:00 p.m. Eastern Standard Time, or or get assistance on www.americanlawnmower.com.
NOTES
OWNER'S MANUAL
ST00090 9-IN ELECTRIC STRING TRIMMER
Copyright. All Rights Reserved.
WARRANTY POLICY
One (1) year limited warranty on Earthwise outdoor power equipment.
Earthwise warrants to the original owner that each new product and service part is free from defects in materials and workmanship and agrees to repair or replace any defective product or part for the warranty period as stated above from the original date of purchase except for the conditions and circumstances listed below:
This warranty applies only to the original purchaser at retail and may not be transferred.
Warranty applies if the product is used for personal, household or family use. Warranty is void if product is used for commercial, industrial or rental purposes.
Warranty does not include repairs necessary due to operator's abuse or negligence (including overloading the product beyond capacity or immersion in water), or the failure to assemble, operate, maintain or store the product according to the instructions in the owner's manual.
This warranty is not transferable and only applies to product sold directly from an authorized retailer. This warranty does not apply to any product, new or used, purchased through unauthorized third-party channels.
ANY INCIDENTAL, INDIRECT OR CONSEQUENTIAL LOSS, DAMAGE, OR EXPENSE THAT MAY RESULT FROM ANY DEFECT, FAILURE OR MALFUNCTION OF THE PRODUCT IS NOT COVERED BY THE WARRANTY. Some states do not allow the exclusion or limitation on how long an implied warranty lasts, so the above limitation may not apply to you.
Products sold damaged or incomplete, sold "as is", or sold as reconditioned are not covered under the warranty.
Damage or liability caused by shipping, improper handling, improper assembly, incorrect voltage, improper wiring, improper maintenance, improper modification or the use of accessories and/or attachments not specifically recommended is not covered by this warranty.
Expendable items that become worn during normal use are not covered by the warranty.
Warranty does not cover damage caused by cold, heat, rain, excessive humidity, corrosive environments and materials, or other contaminants.
Warranty does not include installation, assembly or normal adjustments explained in the operator's manual.
The expense of delivering the product to the vendor and the expense of returning the product or replacement parts to the owner is not covered by the warranty.
The warranty does not cover normal deterioration of the exterior finish, including but not limited to scratches, dents, paint chips or any corrosion or discoloration caused by heat, abrasive and chemical cleaners.
Proof of purchase, original dated sales receipt, must accompany all warranty claims.

American Lawn Mower Company
The Great States Corporation
7444 Shadeland Station Way
Indianapolis, IN 46256 USA
Phone 1-800-313-5111
www.americanlawnmower.com
EARTHWISE™
MANUAL DEL OPERARIO
9-EN DESBROZADORA ELÉCTRICA
natural_image
Exterior view of a gray handheld cleaning tool with lever handle and handle (no text or symbols visible)
natural_image
Two-panel image showing a hand holding a tool with labeled points A and B, connected by wires (no text or symbols beyond labels)Fig 1
natural_image
Two-panel diagram showing a mechanical tool with labeled parts A and B, no text or symbols present.Fig 4
natural_image
Technical line drawing of a mechanical assembly with arrows indicating motion or force direction (no text or symbols)Fig 5
FUNCIONAMIENTO
natural_image
Two hand-drawn diagrams showing a mechanical device being twisted with a pulley, no text or symbols present.

MANTENIMIENTO
American Lawn Mower Company
The Great States Corporation
7444 Shadeland Station Way
Indianapolis, IN 46256
Estados Unidos
natural_image
Exterior view of a handheld cleaning tool with lever and handle (no text or symbols visible)
Intertek
3120341

SPÉCIFICATIONS PRODUIT
ST00090
Entrée .....120 V, 60 Hz, 2.4 A
Vitesse....11000 tr/mn
natural_image
Two-panel diagram showing a mechanical tool with labeled parts A and B, no text or symbols present.Fig 4
FIXATION DE LA GARDE DE SÉCURITÉ (Voir Fig. 5)
natural_image
Technical line drawing of a mechanical component with arrows indicating assembly or motion (no text or symbols)UTILISATION
MISE EN MARCHE DE L'OUTIL
natural_image
Two hand-drawn diagrams showing a mechanical device being adjusted, with no text or symbols present.
MAINTENANCE

American Lawn Mower Company
The Great States Corporation
7444 Shadeland Station Way


- IMPORTANT SAFETY WARNINGS
- GENERAL SAFETY
- FEATURES
- PRODUCT SPECIFICATIONS
- ASSEMBLY
- PACKING LIST
- UNPACKING
- ASSEMBLING THE CONNECTION TUBE
- ATTACHING SAFETY GUARD (See Fig 5)
- OPERATING
- TO TURN THE TOOL ON
- CUTTING INSTRUCTIONS
- Basic Cutting Procedure
- TRIMMING INSTRUCTIONS
- LINE FEEDING
- ADVANCING THE LINE MANUALLY
- REPLACING SPOOL / CLEARING JAMS AND TANGLED LINES
- REWINDING SPOOL FROM BULK LINE (USE ONLY .065" DIAMETER LINE)
- MAINTENANCE
- CALL US FIRST !!
- PARTS AND SERVICE
- REPAIR PARTS (KITS/ ITEMS)
- NOTES
- OWNER'S MANUAL
- ST00090 9-IN ELECTRIC STRING TRIMMER
- WARRANTY POLICY
- EARTHWISE™
- MANUAL DEL OPERARIO
- 9-EN DESBROZADORA ELÉCTRICA
- FUNCIONAMIENTO
- MANTENIMIENTO
- FIXATION DE LA GARDE DE SÉCURITÉ (Voir Fig. 5)
- UTILISATION
- MISE EN MARCHE DE L'OUTIL
Brand : Earthwise
Model : ST00090
Category : Lawn mower