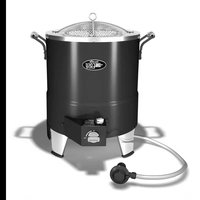
14101480 - Barbecue CHAR BROIL - Free user manual and instructions
Find the device manual for free 14101480 CHAR BROIL in PDF.


| Brand | CHAR BROIL |
| Model | 14101480 |
| Product Type | Gas Barbecue |
| Power Source | Liquid Propane Gas (LPG) |
| Use | Outdoor, domestic use only |
| Ignition System | Electronic ignition and match ignition |
| Cooking Technology | Infrared |
| Gas Tank Capacity | 9 kg (20 lb) max, diameter 30.5 cm x height 45.7 cm |
| Material | Stainless steel and painted surfaces |
| Cooking Surface | Steel cooking basket |
| Meat Thermometer Included | Yes |
| Warranty | 1 year parts and labor (conditions apply) |
| Cleaning | Regular cleaning of burners, surfaces with mild detergent |
| Maintenance | Check hoses before each use |
| Safety | Leak detection, safety valve, overfill prevention device |
| Precautions | Do not use indoors, keep 1 m away from combustibles |
| Country of Manufacture | China |
| Assembly Required | Yes, according to instructions |
| Serial Number | On rating label |
| Customer Service | 1-888-430-7870 |
| Spare Parts | Available through service center, burner, regulator, etc. |
| Functions | Cooking, searing, keeping warm |
| Flame Adjustment | From High to Low, check before use |
Frequently Asked Questions - 14101480 CHAR BROIL
User questions about 14101480 CHAR BROIL
0 question about this device. Answer the ones you know or ask your own.
Ask a new question about this device
Download the instructions for your Barbecue in PDF format for free! Find your manual 14101480 - CHAR BROIL and take your electronic device back in hand. On this page are published all the documents necessary for the use of your device. 14101480 by CHAR BROIL.
USER MANUAL 14101480 CHAR BROIL
PRODUCT GUIDE GUIDE DES PRODUITS GUÍA DEL PRODUCTO
MODEL | MODÈLE | MODELO
17102065
The Big Easy™ Oil-less Turkey Fryer
Tools needed for assembly:
Screwdriver (not provided)
Tournevis (non fourni)
See rating Label on grill for serial number.
If you have questions or need assistance
during assembly, please call 1-888-430-7870.
FOR OUTDOOR USE ONLY POUR USAGE EN MILIEU EXTÉRIEUR UNIQUEMENT ESTE JUEGO SÓLO SE PUEDE USAR EXTERIORS
TABLE OF CONTENTS
Product Record Information .... 1
For Your Safety....2
Safety Symbols....2
Installation Safety Precautions 3
Food Safety 4
Use and Care 5-10
Limited Warranty....11
Assembly 32-36
Troubleshooting 37-38
Parts List....43
Parts Diagram....44
Registration Card 47
This instruction manual contains important information necessary for the proper assembly and safe use of the appliance.
Read and follow all warnions and instructions before assembling and using the appliance.
Follow all warnings and instructions when using the appliance.
Safety Symbols
The symbols and boxes shown below explain what each heading means. Read and follow all of the messages found throughout the manual.

DANGER

DANGER: Indicates an imminently hazardous situation which, if not avoided, will result in death or serious injury.

WARNING

WARNING: Indicates a potentially hazardous situation which, if not avoided, could result in death or serious injury.

CAUTION

CAUTION: Indicates a potentially hazardous situation or unsafe practice which, if not avoided, may result in minor or moderate injury.

DANGER

- Never operate this appliance unattended.
- Never operate this appliance within 3ft (1m) of any structure, combustible material or other gas cylinder.
- Never operate this appliance within 25 ft (7.5 m) of any flammable liquid.
- If a fire should occur, keep away from the appliance and immediately call your fire department.
Failure to follow these instructions could result in fire, explosion or burn hazard, which could cause property damage, personal injury or death.

DANGER

If you smell gas:
- Shut off gas to the appliance.
- Extinguish any open flame.
- Open lid.
- If odor continues, keep away from the appliance and immediately call your fire department.
Failure to follow these instructions could result in fire or explosion, which could cause property damage, personal injury or death.

WARNING

Do not attempt to repair or alter the hose/valve/regulator for any “assumed” defect. Any modification to this assembly will void your warranty and create the risk of a gas leak and fire. Use only authorized replacement parts supplied by manufacturer.

CAUTION

For residential use only. Do not use for commercial cooking.
Installation Safety Precautions
- Use your appliance, as purchased, only with LP (propane) gas and the regulator/valve assembly supplied.
- The appliance installation must conform with local codes, or in their absence of local codes, with either the National Fuel Gas Code, ANSI Z223.1/ NFPA 54, Natural Gas and Propane Installation Code, CSA B149.1, and Propane Storage and Handling, CSA B149.2, Canadian Electrical Code, CSA C22.1 or the Standard for Recreational Vehicles, ANSI
A 119.2/NFPA 1192, and CSA Z240 RV Series, Recreational Vehicle Code, as applicable. - This appliance is not for use in or on recreational vehicles and/or boats.
- This appliance is safety certified for use in the United States and/or Canada only. Do not modify for use in any other location. Modification will result in a safety hazard.

WARNING

CALIFORNIA PROPOSITION 65
- Combustible by-products produced when using this product contains chemicals known to the State of California to cause cancer, birth defects, or other reproductive harm.
- This product contains chemicals, including lead and lead compounds, known to the State of California to cause cancer, birth defects or other reproductive harm.
Wash your hands after handling this product.

CAUTION

If grill should go out accidentally, turn the burner control ○ OFF, wait 5 minutes and repeat the lighting procedure.

CAUTION
Grease Fires
- Putting out grease fires by closing the lid is not possible. Grills are well ventilated for safety reasons
- Do not use water on a grease fire. Personal injury result. If a grease fire develops, turn knobs and I off.
- If grill has not been regularly cleaned, a grease t occur that may damage the product. Pay close a while preheating or burning off food residue to i that a grease fire does not develop. Follow instr on General Grill Cleaning and Cleaning The Bur Assembly to prevent grease fires.
•The best way to prevent grease fires is regular cleaning of the grill.
Food Safety
Food safety is a very important part of enjoying the outdoor cooking experience. To keep food safe from harmful bacteria, follow these four basic steps:
Clean: Wash hands, utensils, and surfaces with hot soapy water before and after handling raw meat and poultry.
Separate: Separate raw meats and poultry from ready-to-eat foods to avoid cross contamination. Use a clean platter and utensils when removing cooked foods.
Cook: Cook meat and poultry thoroughly to kill bacteria. Use a thermometer to ensure proper internal food temperatures.
Chill: Refrigerate prepared foods and leftovers promptly.
For more information call: USDA Meat and Poultry Hotline at 1-800-535-4555 In Washington, DC (202) 720-3333, 10:00 am-4:00 pm EST.
Grease Tray
- Never use drippings directly from the grease tray to make gravy. Use the included foil tray liner to catch drippings, then reheat the drippings to kill bacteria. Replacement foil tray liners and other accessories can be found at www.charbroil.com.
How To Tell If Meat Is Cooked Thoroughly
- Meat and poultry cooked in the appliance often browns very fast on the outside. Use only thawed meat and a meat thermometer to be sure food has reached a safe internal temperature, and cut into food to check for visual signs of doneness.
- We recommend food to be at least 40°F before cooking in your appliance.
- Whole poultry should reach 165° F. Juices should run clear and flesh should not be pink.
- Beef, veal and lamb steaks, roasts and pork chops can be cooked to 145° F.
- NEVER partially cook meat or poultry and finish cooking later. Cook food completely to destroy harmful bacteria.
- Use a meat thermometer to ensure proper internal food temperatures.
USDA Recommended
Internal Cooking Temperatures
Ground Meat
| Beef, Pork, Veal, Lamb | 160°F |
| Turkey, Chicken | 165°F |
Fresh Beef, Veal, Lamb
| Medium Rare | 145°F |
| (let stand 3 minutes before cutting) | |
| Medium | 160°F |
| Well Done | 170°F |
Poultry
| Chicken & Turkey, whole | 165°F |
| Poultry Parts | 165°F |
| Duck & Goose | 165°F |
Fresh Pork
| Medium Rare | 145°F |
| (let stand 3 minutes before cutting) | |
| Medium | 160°F |
| Well Done | 170°F |
Storing Your Appliance
- Clean cooking basket.
- Store in dry location.
- When LP cylinder is connected to appliance, store outdoors in a well-ventilated space and out of reach of children.
- If the regulator is disconnected from the LP cylinder, a hook is provided to hang the regulator from the handle as shown.

- Cover appliance if stored outdoors. Choose from a variety of covers offered by the manufacturer.
- Store indoors ONLY if LP cylinder is turned off and is disconnected, removed from appliance and stored outdoors.
- When removing appliance from storage, follow "Cleaning the Burner Assembly" instructions before starting.
USE AND CARE

DANGER

- NEVER store a spare LP cylinder under or near the appliance or in an enclosed area.
- Never fill a cylinder beyond 80% full.
- An over filled or improperly stored cylinder is a hazard due to possible gas release from the safety relief valve. This could cause an intense fire with risk of property damage, serious injury or death.
- If you see, smell or hear gas escaping, immediately get away from the LP cylinder/appliance and call your fire department.
- Keep LP tank at a minimum distance of 24" (inches) away from appliance at all times.
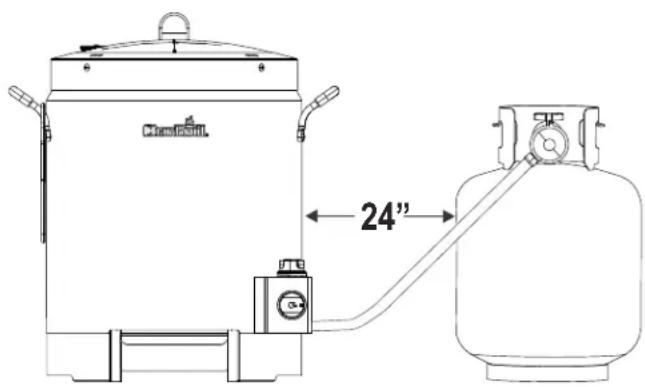
LP Cylinder Removal, Transport and Storage
- Turn OFF the control knob and LP cylinder valve. Turn coupling nut counterclockwise by hand only - do not use tools to disconnect. Install safety cap onto LP cylinder valve. Always use cap and strap supplied with valve. Failure to use safety cap as directed may result in serious personal injury and/or property damage.
LP (Liquefied Petroleum Gas)
- LP gas is nontoxic, odorless and colorless when produced. For Your Safety, LP gas has been given an odor (similar to rotten cabbage) so that it can be smelled.
-
LP gas is highly flammable and may ignite unexpectedly when mixed with air.
-
A disconnected LP cylinder in LP Cylinder Valve storage or being transported must have a safety cap installed (as shown). Do not store an LP cylinder in enclosed spaces such as a carport, garage, porch, covered patio or other building. Never leave an LP cylinder inside a vehicle which may become overheated by the sun.
- Do not store an LP cylinder in an area where children play.
LP Cylinder
- The LP cylinder used with your appliance must meet the following requirements:
- Use LP cylinders only with these required measurements: 12" (30.5cm) (diameter) x 18" (45.7 cm) (tall) with 20 lb. (9 kg.) capacity maximum.
- LP cylinders must be constructed and marked in accordance with specifications for LP cylinders of the U.S. Department of Transportation (DOT) or the National Standard of Canada, CAN/CSA-339, Cylinders, Spheres and Tubes for Transportation of Dangerous Goods; and commission, as applicable. See LP cylinder collar for marking.
- LP cylinder valve must have:
- Type 1 outlet compatible with regulator or appliance.
- Safety relief valve.
- UL listed Overfill Protection
Device (OPD). This OPD safety

OPD Hand Wheel
feature is identified by a unique triangular hand wheel. Use only LP cylinders equipped with this type of valve.
- LP cylinder must be arranged for vapor withdrawal and include collar to protect LP cylinder valve. Always keep LP cylinders in upright position during use, transit or storage.
LP Cylinder Filling
- Use only licensed and experienced dealers.
- LP dealer must purge new cylinder before filling.
- Dealer should NEVER fill LP cylinder more than 80% of LP cylinder volume. Volume of propane in cylinder will vary by temperature.
- A frosty regulator indicates gas overfill. Immediately close LP cylinder valve and call local LP gas dealer for assistance.
- Do not release liquid propane (LP) gas into the atmosphere. This is a hazardous practice.
- To remove gas from LP cylinder, contact an LP dealer or call a local fire department for assistance. Check the telephone directory under "Gas Companies" for nearest certified LP dealers.

LP Cylinder Exchange
- Many retailers that sell this appliance offer you the option of replacing your empty LP cylinder through an exchange service. Use only those reputable exchange companies that inspect, precision fill, test and certify their cylinders. Exchange your cylinder only for an OPD safety feature-equipped cylinder as described in the "LP Cylinder" section of this manual.
- Always keep new and exchanged LP cylinders in upright position during use, transit or storage.
- Leak test new and exchanged LP cylinders BEFORE connecting to the appliance.
LP Cylinder Leak Test
For your safety
- Leak test must be repeated each time LP cylinder is exchanged or refilled.
- Do not smoke during leak test.
- Do not use an open flame to check for gas leaks.
- This appliance must be leak tested outdoors in a well-ventilated area, away from ignition sources such as gas fired or electrical appliances. During leak test, keep appliance away from open flames or sparks.
- Use a clean paintbrush and a 50/50 mild soap and water solution. Brush soapy solution onto areas indicated by arrows in figure below.
- Do not use household cleaning agents. Damage to gas train components can result.
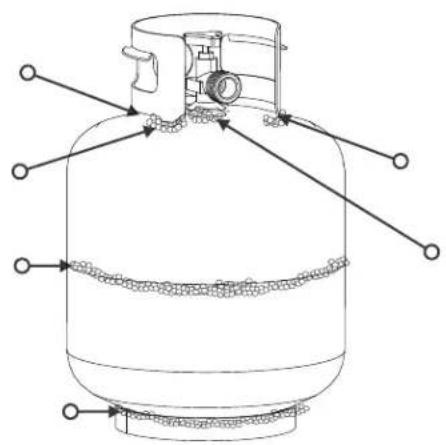

WARNING

If "growing" bubbles appear do not use or move the LP cylinder. Contact an LP gas supplier or your fire department!
Connecting Regulator to the LP Cylinder
- LP cylinder must be properly secured onto appliance. (Refer to assembly section.)
- Turn all control knobs to the OFF position.
- Turn LP cylinder OFF by turning hand-wheel clockwise to a full stop.
- Remove the protective cap from LP cylinder valve. Always use cap and strap supplied with valve.


Do not use a POL transport plug (plastic part with external threads)! It will defeat the safety feature of the valve.
- Hold regulator and insert nipple into LP cylinder valve. Hand-tighten the coupling nut, holding regulator in a straight line with LP cylinder valve so as not to cross-thread the connection.
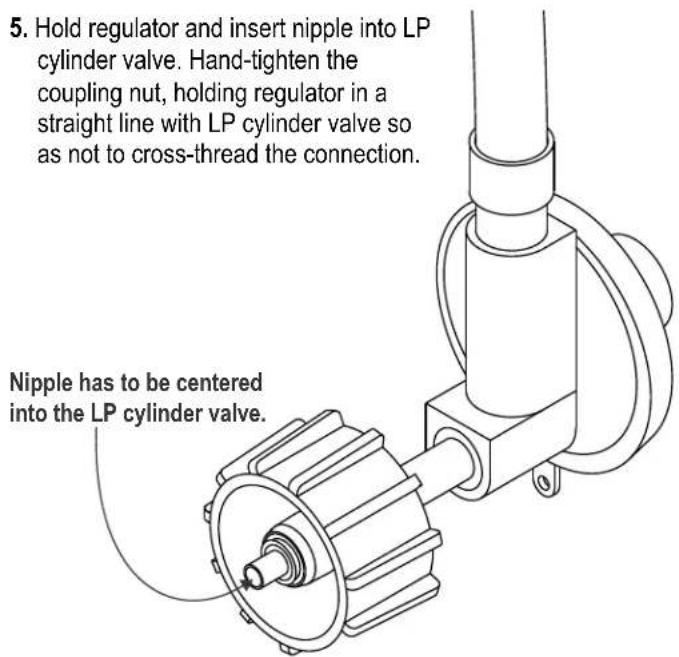

- Turn the coupling nut clockwise and tighten to a full stop. The regulator will seal on the back-check feature in the LP cylinder valve, resulting in some resistance. An additional one-half to three-quarters turn is required to complete the connection. Tighten by hand only – do not use tools.
NOTE:
If you cannot complete the connection, disconnect regulator and repeat steps 5 and 6. If you are still unable to complete the connection, do not use this regulator!

DANGER

- Do not insert any tool or foreign object into the valve outlet or safety relief valve. You may damage the valve and cause a leak. Leaking propane may result in explosion, fire, severe personal injury, or death.

WARNING

- This appliance is not intended to be installed in or on a boat.
- is not intended to be installed in or on an This appliance RV.
- Never attempt to attach this to the self-appliance contained LP gas system of a camper trailer or motor home.
- Do not use until leak-tested.this appliance
- If a leak is detected at any time, STOP and call the fire department.
- If you cannot stop a gas leak, immediately close LP cylinder valve and call LP gas supplier or your fire department!
Leak Testing Valves, Hose and Regulator
- Turn control knob to OFF.
- Be sure regulator is tightly connected to LP cylinder.
- Completely open LP cylinder valve by turning hand wheel counterclockwise. If you hear a rushing sound, turn gas off immediately. There is a major leak at the connection. Correct before proceeding.
- Brush soapy solution onto areas circled below.


-
If "growing" bubbles appear, there is a leak. Close LP cylinder valve immediately and retighten connections. If leaks cannot be stopped do not try to repair. Call for replacement parts. Order new parts by giving the serial, model number and name and part number of items needed (see parts list) to the Grill Service Center at the number listed on front cover.
-
Always close LP cylinder valve after performing leak test by turning hand wheel clockwise.
WARNING
For Safe Use of Your appliance and to Avoid Serious Injury:
- The use of alcohol, prescription or non-prescription drugs may impair the consumer's ability to properly assemble or safely operate the appliance.
- When cooking, the appliance must be on a level, stable noncombustible surface in an area clear of combustible material. An asphalt surface (blacktop) may not be acceptable for this purpose.
- Do not leave appliance unattended. Keep children and pets away from the appliance at all times.
- Do not place empty cooking vessel on the appliance while in operation. Use caution when placing anything in cooking vessel while the appliance is in operation.
- Do not move the appliance when in use. Allow the cooking vessel to cool to 115°F (45°C) before moving or storing.
- This appliance is not intended for and should never be used as a heater.
- This appliance will be hot during and after use. Use insulated oven mitts or gloves and long-handled barbecue utensils for protection from hot surfaces or splatter from cooking liquids.
- Keep appliance area clear and free from materials that burn.
- Keep appliance area clear and free from combustible materials, gasoline and other flammable vapors and liquids.
- Keep fuel supply hose away from any heated surfaces.
- Use only in well-ventilated space. NEVER use appliance in enclosed space such as carport, garage, porch, covered patio, or under an overhead structure of any kind.
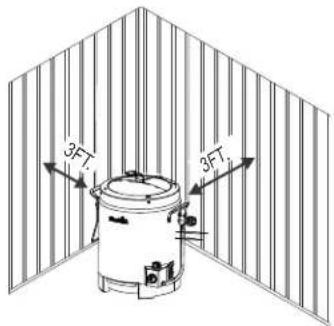
- Use appliance at least 3 ft. from any wall or surface. Maintain 10 ft. clearance to objects that can catch fire or sources of ignition such as pilot lights on water heaters, live electrical appliances, etc.
- Apartment Dwellers:
Check with management to learn the requirements and fire codes for using an LP gas appliance in your apartment complex. If allowed, use outside on the ground floor with a three (3) foot clearance from walls or rails. Do not use on or under balconies.
- NEVER attempt to light burner with any type of closed cover. A buildup of non-ignited gas inside a closed appliance is hazardous.
- Never operate appliance with LP cylinder out of correct position specified in assembly instructions.
• Always close LP cylinder valve and remove coupling nut before moving LP cylinder from specified operation position.
Safety Tips
- Before opening LP cylinder valve, check the coupling nut for tightness.
- When this appliance is not in use, turn off control knob and LP cylinder valve.
- The grease tray must be inserted into appliance and emptied after each use.
- If you notice grease or other hot material dripping from appliance onto valve, hose or regulator, turn off gas supply at once. Determine the cause, correct it, then clean and inspect valve, hose and regulator before continuing. Perform a leak test.
- Do not store objects or materials under the appliance enclosure that would block the flow of combustion air to the underside of either the control panel or the firebox bowl.
- The regulator may make a humming or whistling noise during operation. This will not affect safety or use of the appliance.
- If you have an appliance problem see the "Troubleshooting Section".
- If the regulator frosts, turn off appliance and LP cylinder valve immediately. This indicates a problem with the cylinder and it should not be used on any product. Return to supplier!
Ignitor Lighting
- Do not lean over appliance while lighting.
- Turn ON LP gas cylinder.
-
Press and turn the control knob to 🍒
-
Turn ROTARY IGNITOR knob rapidly.
-
If ignition does not occur in 5 seconds, turn the burner control knob OFF, wait 5 minutes, and repeat lighting procedure.
If ignition still does not occur, follow match-lighting instructions.

WARNING

Turn control knob and LP cylinder OFF when not in use.
CAUTION

If ignition does NOT occur in 5 seconds, turn the control knob OFF, wait 5 minutes and repeat the lighting procedure. If the burner does not ignite with the valve open, gas will continue to flow out of the burner and could accidentally ignite with risk of injury.
Match-Lighting
Do not lean over appliance while lighting.
- Turn ON LP cylinder.
- Swing match hole plate to expose match lighting hole. Place lit match into match lighting hole of appliance as pictured below. Make sure lit match is placed inside hole and near burner.
- Push in and turn control knob to 🤒 Be sure burner lights and stays lit.
- Once lit, swing match hole plate back to cover up match lighting hole. Caution: Plate maybe hot.
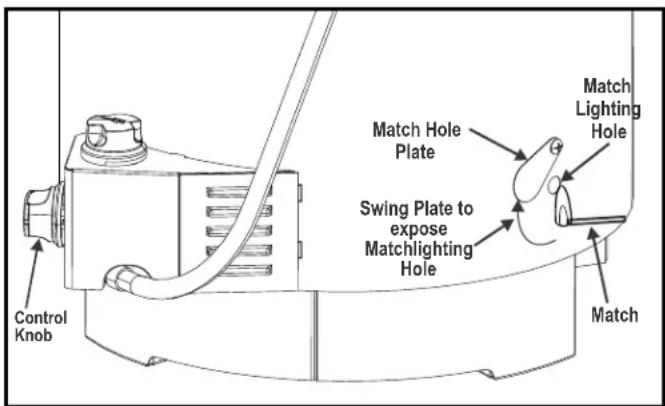
View is from side of appliance
Burner Flame Check
- Light burner. Looking through viewing hole on top of appliance, you should see the flame height as shown below. Turn control knob from 🔊 to OFF. The Flame height should decrease and then go out. Always check flame prior to each use. If only low flame is seen refer to "Sudden drop or low flame" in the Troubleshooting Section.

High Flame
Low Flame

Turning Appliance Off
- Turn control knob to ○ position. Turn LP cylinder off by OFF turning hand-wheel clockwise to a full stop.
Ignitor Check
- Turn gas off at LP cylinder. Turn ignitor knob. "Click" should be heard each time at electrode. See "Troubleshooting" if no click or spark.
Valve Check
- Important: Make sure gas is off at LP cylinder before checking valve. Knob locks in OFF position. To check valve, first push in knob and release, knob should spring back. If knob does not spring back, replace valve assembly before using this appliance. Turn knob to position then turn back to OFF position. Valve should turn smoothly.
Hose Check
- Before each use, check to see if hose is cut, worn or kinked. Replace damaged hose before using appliance. Use only valve/hose/regulator specified by manufacturer.
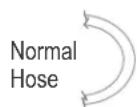
Kinked Hose

General Appliance Cleaning
- Meat Thermometer: Do not immerse or soak in water. Wash with warm soapy water and wipe dry.
- Do not mistake brown or black accumulation of grease and smoke for paint. Interiors are not painted at the factory (and should never be painted). Apply a strong solution of detergent and water or use a grill cleaner with scrub brush on insides of appliance lid and bottom. Rinse and allow to completely air dry. Do not apply a caustic grill/oven cleaner to painted surfaces. A black surface improves the appliances performance.
- Plastic parts: Wash with warm soapy water and wipe dry. Do not use citrisol, abrasive cleaners, degreasers or a concentrated grill cleaner on plastic parts. Damage to and failure of parts can result.
- Painted surfaces: Wash with mild detergent or non-abrasive cleaner and warm soapy water. Wipe dry with a soft non-abrasive cloth.
- Stainless steel surfaces: To maintain the high quality appearance, wash with mild detergent and warm soapy water and wipe dry with a soft cloth after each use. Baked-on grease deposits may require the use of an abrasive plastic cleaning pad. Use only in direction of brushed finish to avoid damage. Do not use abrasive pad on areas with graphics.

CAUTION
SPIDER ALERT!
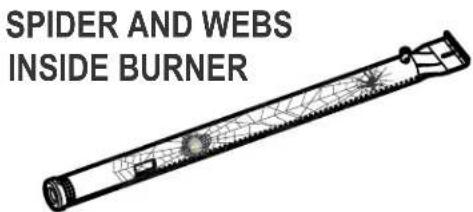
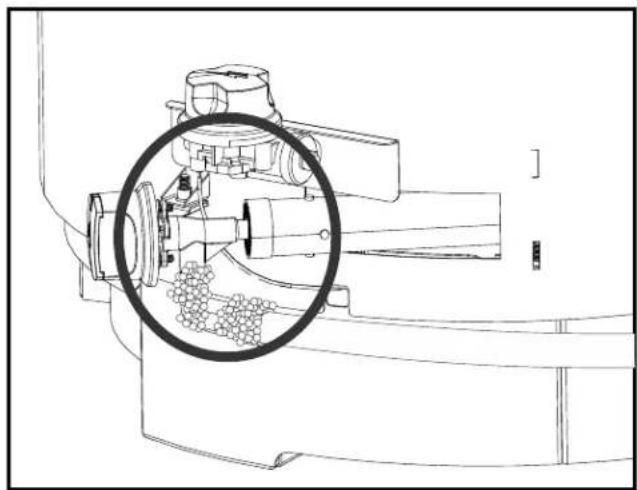
If your appliance is getting hard to light or the flame is weak, check and clean the venturi's and burners.
Spiders or small insects are known to create "flashback" problems by building nests and laying eggs in the appliance venturi or burner obstructing the flow of gas. The back-up gas can ignite behind the control panel. This flashback can damage your appliance and cause injury. To prevent flashbacks and ensure good performance the burner and venturi tube assembly should be removed and cleaned when ever the appliance has been idle for an extended period of time.
Cleaning the Burner Assembly
Follow these instructions to clean and/or replace parts of burner assembly or if you have trouble igniting appliance.
- Turn gas OFF at control knob and LP cylinder and disengage regulator from cylinder.
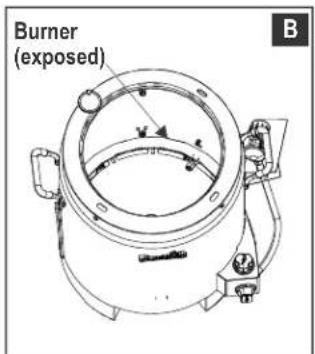
- Remove top cover, cooking basket and cooking pot, shown A. This will expose the burner from inside, shown B.
- Wire brush entire outer surface of burner to remove food residue and dirt.
- Clean any blocked ports with a stiff wire such as an open paper clip.
- Disconnect electrode wire underneath appliance, shown C.
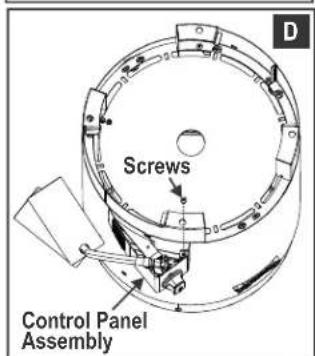
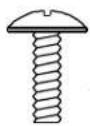
- Remove screws and disengage control panel assembly from unit, shown D.
Cleaning the Burner Assembly (Continued)
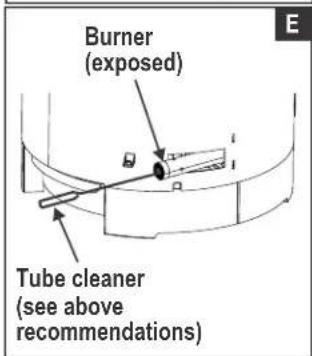
- Clean inner burner as recommended below, shown E. We suggest three ways to clean the burner tube. Use the one easiest for you.
(A) Bend a stiff wire (a light weight coat hanger works well) into a small hook. Run hook through burner tube several times.

(B) Use a narrow bottle brush with a flexible handle (do not use a brass wire brush), run the brush through burner tube several times.
(C) Wear eye protection: Use an air hose to force air into the burner tube and out the burner ports. Check each port to make sure air comes out each hole.
- Check burner for damage, due to normal wear and corrosion some holes may become enlarged. If any large cracks or holes are found replace burner.
- Attach electrode to burner.
- Carefully replace control panel assembly.
VERY IMPORTANT: Burner tube must re-engage over valve opening. See illustration, shown F.
- Reposition inner liner, cooking basket and top cover.



LIMITED WARRANTY
This warranty only applies to units purchased from an authorized retailer. Manufacturer warrants to the original consumer-purchaser only that this product shall be free from defects in workmanship and materials after correct assembly and under normal and reasonable home use for the periods indicated below beginning on the date of purchase*. The manufacturer reserves the right to require that defective parts be returned, postage and or freight pre-paid by the consumer for review and examination.
SCOPE OF COVERAGE PERIOD OF COVERAGE TYPE OF FAILURE COVERAGE
| All Parts | 1 year from date of purchase* | PERFORATION, MANUFACTURING, AND MATERIAL DEFECTS ONLY |
*Note: A dated sales receipt WILL be required for warranty service.
The original consumer-purchaser will be responsible for all shipping charges for parts replaced under the terms of this limited warranty.
This limited warranty is applicable in the United States and Canada only, is only available to the original owner of the product and is not transferable. Manufacturer requires proof of your date of purchase. Therefore, you should retain your sales slip or invoice. Registering your product is not a substitute for proof of purchase and the manufacturer is not responsible for or required to retain proof of purchase records.
This limited warranty applies to the functionality of the product ONLY and does not cover cosmetic issues such as scratches, dents, corrosions or discoloring by heat, abrasive and chemical cleaners or any tools used in the assembly or installation of the appliance, surface rust, or the discoloration of stainless steel surfaces. RUST is not considered a manufacturing or materials defect.
This limited warranty will not reimburse you for the cost of any inconvenience, food, personal injury or property damage.
ITEMS MANUFACTURER WILL NOT PAY FOR:
- Shipping cost, standard or expedited, for warranty and replacement parts
- Service calls to your home.
- Repairs when your product is used for other than normal, single-family household or residential use.
- Damage, failures, or operating difficulties resulting from accident, alteration, careless handling, misuse, abuse, fire, flood, acts of God, improper installation or maintenance, installation not in accordance with electrical or plumbing codes, or use of products not approved by the manufacturer.
- Any food loss due to product failures or operating difficulties.
- Replacement parts or repair labor costs for units operated outside the United States or Canada.
- Pickup and delivery of your product.
- Repairs to parts or systems resulting from unauthorized modifications made to the product.
- The removal and/or reinstallation of your product.
DISCLAIMER OF IMPLIED WARRANTIES and LIMITATION OF REMEDIES
Repair or replacement of defective parts is your exclusive remedy under the terms of this limited warranty. In the event of parts availability issues, the manufacturer reserves the right to substitute like or similar parts that are equally functional.
Manufacturer will not be responsible for any consequential or incidental damages arising from the breach of either this limited warranty or any applicable implied warranty, or for failure or damage resulting from acts of God, improper care and maintenance, grease fire, accident, alteration, replacement of parts by anyone other than Manufacturer, misuse, transportation, commercial use, abuse, hostile environments (inclement weather, acts of nature, animal tampering), improper installation or installation not in accordance with local codes or printed manufacturer instructions.
THIS LIMITED WARRANTY IS THE SOLE EXPRESS WARRANTY GIVEN BY THE MANUFACTURER. NO PRODUCT PERFORMANCE SPECIFICATION OR DESCRIPTION WHEREVER APPEARING IS WARRANTED BY MANUFACTURER EXCEPT TO THE EXTENT SET FORTH IN THIS LIMITED WARRANTY. ANY IMPLIED WARRANTY PROTECTION ARISING UNDER THE LAWS OF ANY STATE, INCLUDING IMPLIED WARRANTY OF MERCHANTABILITY OR FITNESS FOR A PARTICULAR PURPOSE OR USE, IS HEREBY LIMITED IN DURATION TO THE DURATION OF THIS LIMITED WARRANTY.
Neither dealers nor the retail establishment selling this product has any authority to make any additional warranties or to promise remedies in addition to or inconsistent with those stated above. Manufacturer's maximum liability, in any event, shall not exceed the purchase price of the product paid by the original consumer.
NOTE: Some states do not allow an exclusion or limitation of incidental or consequential damages, so some of the above limitations or exclusions may not apply to you. This limited warranty gives you specific legal rights as set forth herein. You may also have other rights which vary from state to state. In the state of California only, if refinishing or replacement of the product is not commercially practicable, the retailer selling this product or the Manufacturer will refund the purchase price paid for the product, less the amount directly attributable to use by the original consumer-purchaser prior to discovery of the nonconformity. In addition, in the state of California only, you may take the product to the retail establishment selling this product in order to obtain performance under this limited warranty.
If you wish to obtain performance of any obligation under this limited warranty, you should
write to:
Consumer Relations
P.O.Box 1240
Columbus, GA 31902-1240
Consumer returns will not be accepted unless a valid Return Authorization is first acquired. Authorized returns are clearly marked on the outside of the package with an RA number and the package is shipped freight/postage pre-paid. Consumer returns that do not meet these standards will be refused.
ÍNDICE DE MATERIAS
ADVERTENCIA


AVERTISSEMENT

2


3


5
A-4x

6

2ND

7
NOTE: Before cooking on your appliance for the first time, refer to the Outdoor Cooking Guide on how to prepare the appliance for cooking. It is recommended that you season your appliance prior to cooking.
- When cooking hang top cover on handle as shown.
- Once seasoning is complete, the appliance is now ready for use. The cooking pot will continue to darken with use. This will inhibit rusting along with improving the performance of the infrared cooking pot.
- Use of mesh top cover is optional. Heat will reflect off of the top cover and provide additional browning to the top of your meat. Be careful - the top cover can cause the heat to reflect too much, so as to burn the top of your meat. The top cover helps when cooking in temperatures below 40°F or in high-wind conditions.

EMERGENCIES: If a gas leak cannot be stopped, or a fire occurs due to gas leakage, call the fire department.
| Emergencies | Possible Cause | Prevention/Solution |
| Gas leaking from cracked/cut/burned hose. | Damaged hose. | Turn off gas at LP cylinder or at source on natural gas systems. If hose is cut or cracked, replace valve/hose/regulator. See LP Cylinder Leak Test and Connecting Regulator to the LP Cylinder. |
| Gas leaking from LP cylinder. | Mechanical failure due to rusting or mishandling. | Replace LP cylinder. |
| Gas leaking from LP cylinder valve. | Failure of cylinder valve from mishandling or mechanical failure. | Turn off LP cylinder valve. Return LP cylinder to gas supplier. |
| Gas leaking between LP cylinder and regulator connection. | Improper installation, connection not tight, failure of rubber seal. | Turn off LP cylinder valve. Remove regulator from cylinder and visually inspect rubber seal for damage. See LP Cylinder Leak Test and Connecting Regulator to the LP Cylinder. |
| Fire coming through control panel. | Fire in burner section of burner due to blockage. | Turn off control knob and LP cylinder valve. Allow flames to die down. After fire is out and fryer is cold, remove burner and inspect for spider nests or rust. See Natural Hazard and Cleaning the Burner Assembly pages. |
| Grease fire or continuous excessive flames above cooking surface. | Too much grease buildup in burner area. | Turn off control knob and LP cylinder valve. Allow flames to die down. After cooling, clean food particles and excess grease from inside appliance body, grease tray, and other surfaces. |
Troubleshooting
| Problem | Possible Cause | Prevention/Solution |
| Burner will not light using ignitor. | GAS ISSUES:• Burner not engaged with control valve.• Obstruction in burner.• No gas flow.• Vapor lock at coupling nut to LP cylinder.• Coupling nut and LP cylinder valve not fully connected.ELECTRICAL ISSUES:• Electrode cracked or broken; “sparks at crack.”• Electrode tip not in proper position• Wire and/or electrode covered with cooking residue.• Wire is loose or disconnected.• Wire is shorting (sparking) between ignitor and electrode. | Make sure valve is positioned inside of burner .Ensure burner is not obstructed with spider webs or other matter. See cleaning section of Use and Care.Make sure LP cylinder is not empty. If LP cylinder is not empty, refer to “Sudden drop in gas flow.”Turn off knob and disconnect coupling nut from LP cylinder. Reconnect and retry.Turn the coupling nut approximately one-half to three-quarters additional turn until solid stop. Tighten by hand only - do not use tools.Replace electrode.Tip of electrode should be pointing toward gas port opening on burner. The distance should be 1/8" to 1/4". Adjust if necessary.Clean wire and/or electrode with rubbing alcohol and clean swab.Reconnect wire or replace electrode/wire assembly.Replace ignitor wire/electrode assembly. |
| Burner will not light using ignitor. | Rotary knob rotates without clicking.Sparking between ignitor and electrode. | Replace knob.Inspect wire insulation and proper connection. Replace wire if insulation is broken. |
| Burner will not match light. | See “GAS ISSUES:” on previous page.Match will not reach.Improper method of match-lighting. | Use long-stem match (fireplace match).See “Match-Lighting” section of Use and Care. |
| Sudden drop in gas flow or low flame. | Out of gas.Excess flow valve on regulator tripped.Vapor lock at coupling nut/LP cylinder connection. | Check for gas in LP cylinder.Turn off control knob, wait 30 seconds and light appliance. If flames are still low, turn off knob and LP cylinder valve. Disconnect regulator. Reconnect regulator and leak-test. Turn on LP cylinder valve, wait 30 seconds and then light appliance.Turn off knob and LP cylinder valve. Disconnect coupling nut from cylinder. Reconnect and retry. |
| Flames blow out. | Low on LP gas.Excess flow valve tripped. | Refill LP cylinder.Refer to “Sudden drop in gas flow” above. |
| Flare-up. | Grease buildup.Excessive fat in meat.Excessive cooking temperature. | Clean burner and inside of fryer body.Trim fat from meat before grilling.Adjust (lower) temperature accordingly. |
| Persistent grease fire. | Grease trapped by food buildup around burner system. | Turn knob to OFF. Turn gas off at LP cylinder. Let fire burn out. After fryer cools, remove and clean all parts. |
| Flashback...(fire in burner). | Burner is blocked. | Turn knob to OFF. Clean burner. See burner cleaning section of Use and Care. |
| Cooking slower than expected | Vapor LockValve not properly aligned to burnerHigh wind conditions | Turn off control knob and disconnect coupling nut from LP cylinder. Reconnect and retry.Loosen control panel and valve. Be sure valve is centered top to bottom and left to right in burner. Tighten all components once proper alignment is achieved.Relocate the appliance to a less windy area. Use Top Cover during cooking. |
Three convenient ways to register your product: Trois façons pratiques d'enregistrer votre produit: Tres formas convenientes de registrar su producto:
www.charbroil.com/register
2

FOR US ONLY
Text "Register" to "GRILLS" (474557)
State | Estado | Province
Zip Code | Código Zip | Code Postal
* 2. E-mail Address | Dirección de correo electrónico | Adresse électronique
- Which product are you registering?
Char-Broil Warranty Registration
P.O. Box 1240
Columbus, GA 31902-1240

* 5. Attach copy of your sales receipt here.
- PRODUCT GUIDE GUIDE DES PRODUITS GUÍA DEL PRODUCTO
- THE BIG EASY™ OIL-LESS TURKEY FRYER
- TABLE OF CONTENTS
- THIS INSTRUCTION MANUAL CONTAINS IMPORTANT INFORMATION NECESSARY FOR THE PROPER ASSEMBLY AND SAFE USE OF THE APPLIANCE
- READ AND FOLLOW ALL WARNIONS AND INSTRUCTIONS BEFORE ASSEMBLING AND USING THE APPLIANCE
- FOLLOW ALL WARNINGS AND INSTRUCTIONS WHEN USING THE APPLIANCE
- SAFETY SYMBOLS
- DANGER
- WARNING
- CAUTION
- INSTALLATION SAFETY PRECAUTIONS
- CALIFORNIA PROPOSITION 65
- GREASE FIRES
- FOOD SAFETY
- GREASE TRAY
- HOW TO TELL IF MEAT IS COOKED THOROUGHLY
- USDA RECOMMENDED
- INTERNAL COOKING TEMPERATURES
- STORING YOUR APPLIANCE
- USE AND CARE
- LP CYLINDER REMOVAL, TRANSPORT AND STORAGE
- LP (LIQUEFIED PETROLEUM GAS)
- LP CYLINDER
- LP CYLINDER FILLING
- LP CYLINDER EXCHANGE
- LP CYLINDER LEAK TEST
- FOR YOUR SAFETY
- CONNECTING REGULATOR TO THE LP CYLINDER
- NOTE
- LEAK TESTING VALVES, HOSE AND REGULATOR
- FOR SAFE USE OF YOUR APPLIANCE AND TO AVOID SERIOUS INJURY
- APARTMENT DWELLERS
- SAFETY TIPS
- IGNITOR LIGHTING
- MATCH-LIGHTING
- BURNER FLAME CHECK
- TURNING APPLIANCE OFF
- IGNITOR CHECK
- VALVE CHECK
- HOSE CHECK
- GENERAL APPLIANCE CLEANING
- SPIDER ALERT
- CLEANING THE BURNER ASSEMBLY
- CLEANING THE BURNER ASSEMBLY (CONTINUED)
- VERY IMPORTANT: BURNER TUBE MUST RE-ENGAGE OVER VALVE OPENING. SEE ILLUSTRATION, SHOWN F
- LIMITED WARRANTY
- ITEMS MANUFACTURER WILL NOT PAY FOR
- DISCLAIMER OF IMPLIED WARRANTIES AND LIMITATION OF REMEDIES
- ÍNDICE DE MATERIAS
- ADVERTENCIA
- AVERTISSEMENT
- 7
- THREE CONVENIENT WAYS TO REGISTER YOUR PRODUCT: TROIS FAÇONS PRATIQUES D'ENREGISTRER VOTRE PRODUIT: TRES FORMAS CONVENIENTES DE REGISTRAR SU PRODUCTO
Brand : CHAR BROIL
Model : 14101480
Category : Barbecue