GMAX-6000 - Speaker GEMINI - Free user manual and instructions
Find the device manual for free GMAX-6000 GEMINI in PDF.
| Product type | Bluetooth party speaker |
| Brand | Gemini |
| Model | GMAX-6000 |
| Output power | 6000 W Peak |
| Speakers | Dual 15" and dual 6" tweeters |
| Frequency range | 20 Hz - 20 kHz |
| Power supply | 100 - 240 V AC, 50/60 Hz |
| Dimensions (H × W × D) | 1248 × 476 × 414 mm |
| Weight | 33.4 kg |
| Inputs | Microphone (wired), guitar, AUX (RCA), USB, SD card |
| Wireless connectivity | Bluetooth, FM radio |
| Lighting | Built-in LED, color control (RGB) |
| Additional functions | USB recording, echo, preset equalizer (POP/ROCK/JAZZ/NORMAL/CLASSIC) |
| Included accessories | Wired microphone, power cable, remote control |
| Maintenance and cleaning | Clean with a dry cloth. Do not open. |
| Safety | Replace fuse with same type and rating. Do not expose to water or flames. |
| Spare parts and repairability | Repairs by qualified personnel only. No user-serviceable parts. |
Frequently Asked Questions - GMAX-6000 GEMINI
User questions about GMAX-6000 GEMINI
0 question about this device. Answer the ones you know or ask your own.
Ask a new question about this device
Download the instructions for your Speaker in PDF format for free! Find your manual GMAX-6000 - GEMINI and take your electronic device back in hand. On this page are published all the documents necessary for the use of your device. GMAX-6000 by GEMINI.
USER MANUAL GMAX-6000 GEMINI
At Gemini, our highest priority is making your experience unforgettable.
Need help with setting up, troubleshooting, or looking for some tips?
We're here for you, Monday through Friday 9AM-5PM EST.

hello@geminisound.com

1-844-GEMINI9

www.geminisound.com
INDEX
ENGLISH //
CONTENTS 2
FUNCTION 3
DESCRIPTION 4
CONNECTION DIAGRAM 4
POWERING ON AND STANDBY 4
WARNINGS AND PRECAUTIONS 7
WARRANTY AND REPAIR 28
ESPAÑOL //
CONTENIDO 2
FUNCIÓN 8
DESCRIPCIÓN 9
ACCENSIONE E STANDBY 24
CONTROLLO DEL SUONO 24
USANDO BLUETOOTH 24
UTILIZZO DELLA RADIO FM 25
Please ensure that you find these accessories included with your GMAX-6000:
(1) GMAX-6000 Dual 15" Bluetooth Party System
(1) User Manual
(1) Wired Microphone
(1) Power cable
CONTENIDO ESPAÑOL //
- Guitar/Microphone Input
- USB Port
- SD Card Port
- Guitar Volume Knob
- Echo Knob
(Adjust to control amount of Echo) - Microphone Volume Knob
- Main Volume Knob
- Bass EQ Knob
- Treble EQ Knob
- Standby Button
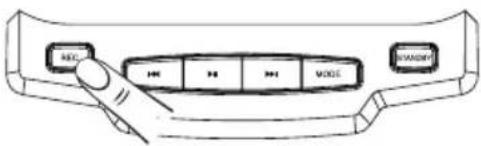
- Record Button
(Press to start/stop recording) - Previous Track (Press to jump to last track)
- Play Button (Press to play or pause music)
- Next Track Button (Press to jump to next track)
- Mode Switch Button (Press to cycle between Media Player/Bluetooth/FM Radio/AUX Input)
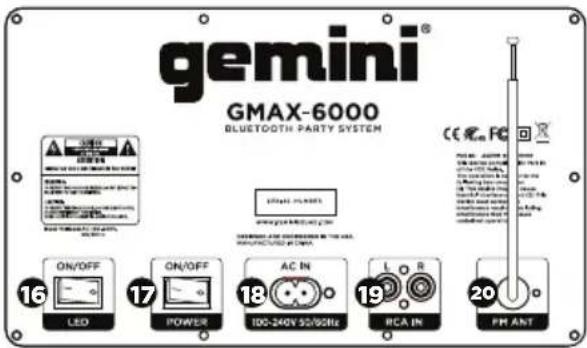
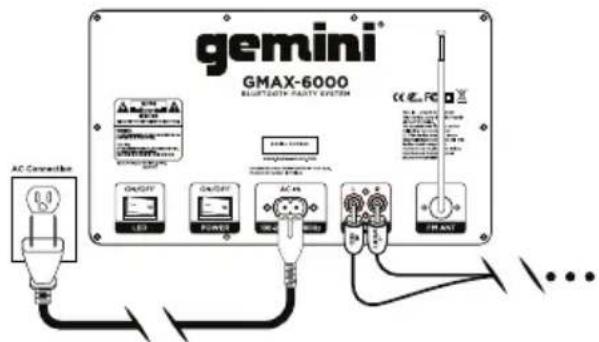
REAR PANEL
-
LED Light Switch (Toggle to turn lights on or off)
-
Main Power Switch (Toggle to turn unit on or off)
-
AC Power Input
-
AUX Line Input
-
Telescoping Antenna (for FM Radio)
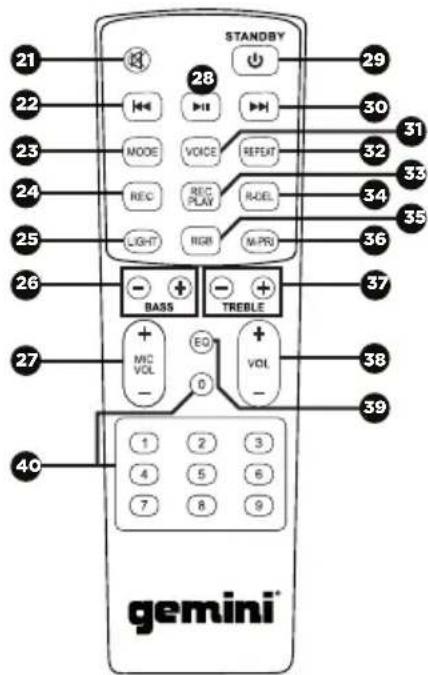
REMOTE CONTROL
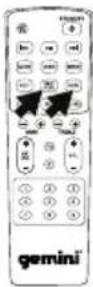
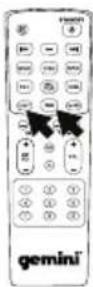
- Mute Button
- Previous Track Button
- Mode Button
- Recording Button
- LED Lights Button
- Bass EQ +/- Buttons
- Mic Volume +/- Buttons
- Play/Pause Button
- System Power Button
- Next Track button
- Voice Prompts On/Off Button
- Repeat Key (Repeat single track/Repeat all tracks/Repeat off)
- Play Recorded Files Button
- Delete Recorded File Button
- Mic Priority Button
- LED Color Button
- Treble EQ +/- Buttons
- Main Volume Button
- EQ Preset Button
(Cycles through EQ presets) - 0-9 Direct Entry Buttons
TOP PANEL

text_image
1 2 3 4 5 6 7 gemini 8 9 10 11 12 13 14 15REAR PANEL
text_image
gemini® GMAX-6000 BLUETOOTH PARTY SYSTEM CE RCn FC ON/OFF LED ON/OFF POWER AC IN 18 100-240V 55/60Hz L R RCA IN 20 PM ANTREMOTE CONTROL
text_image
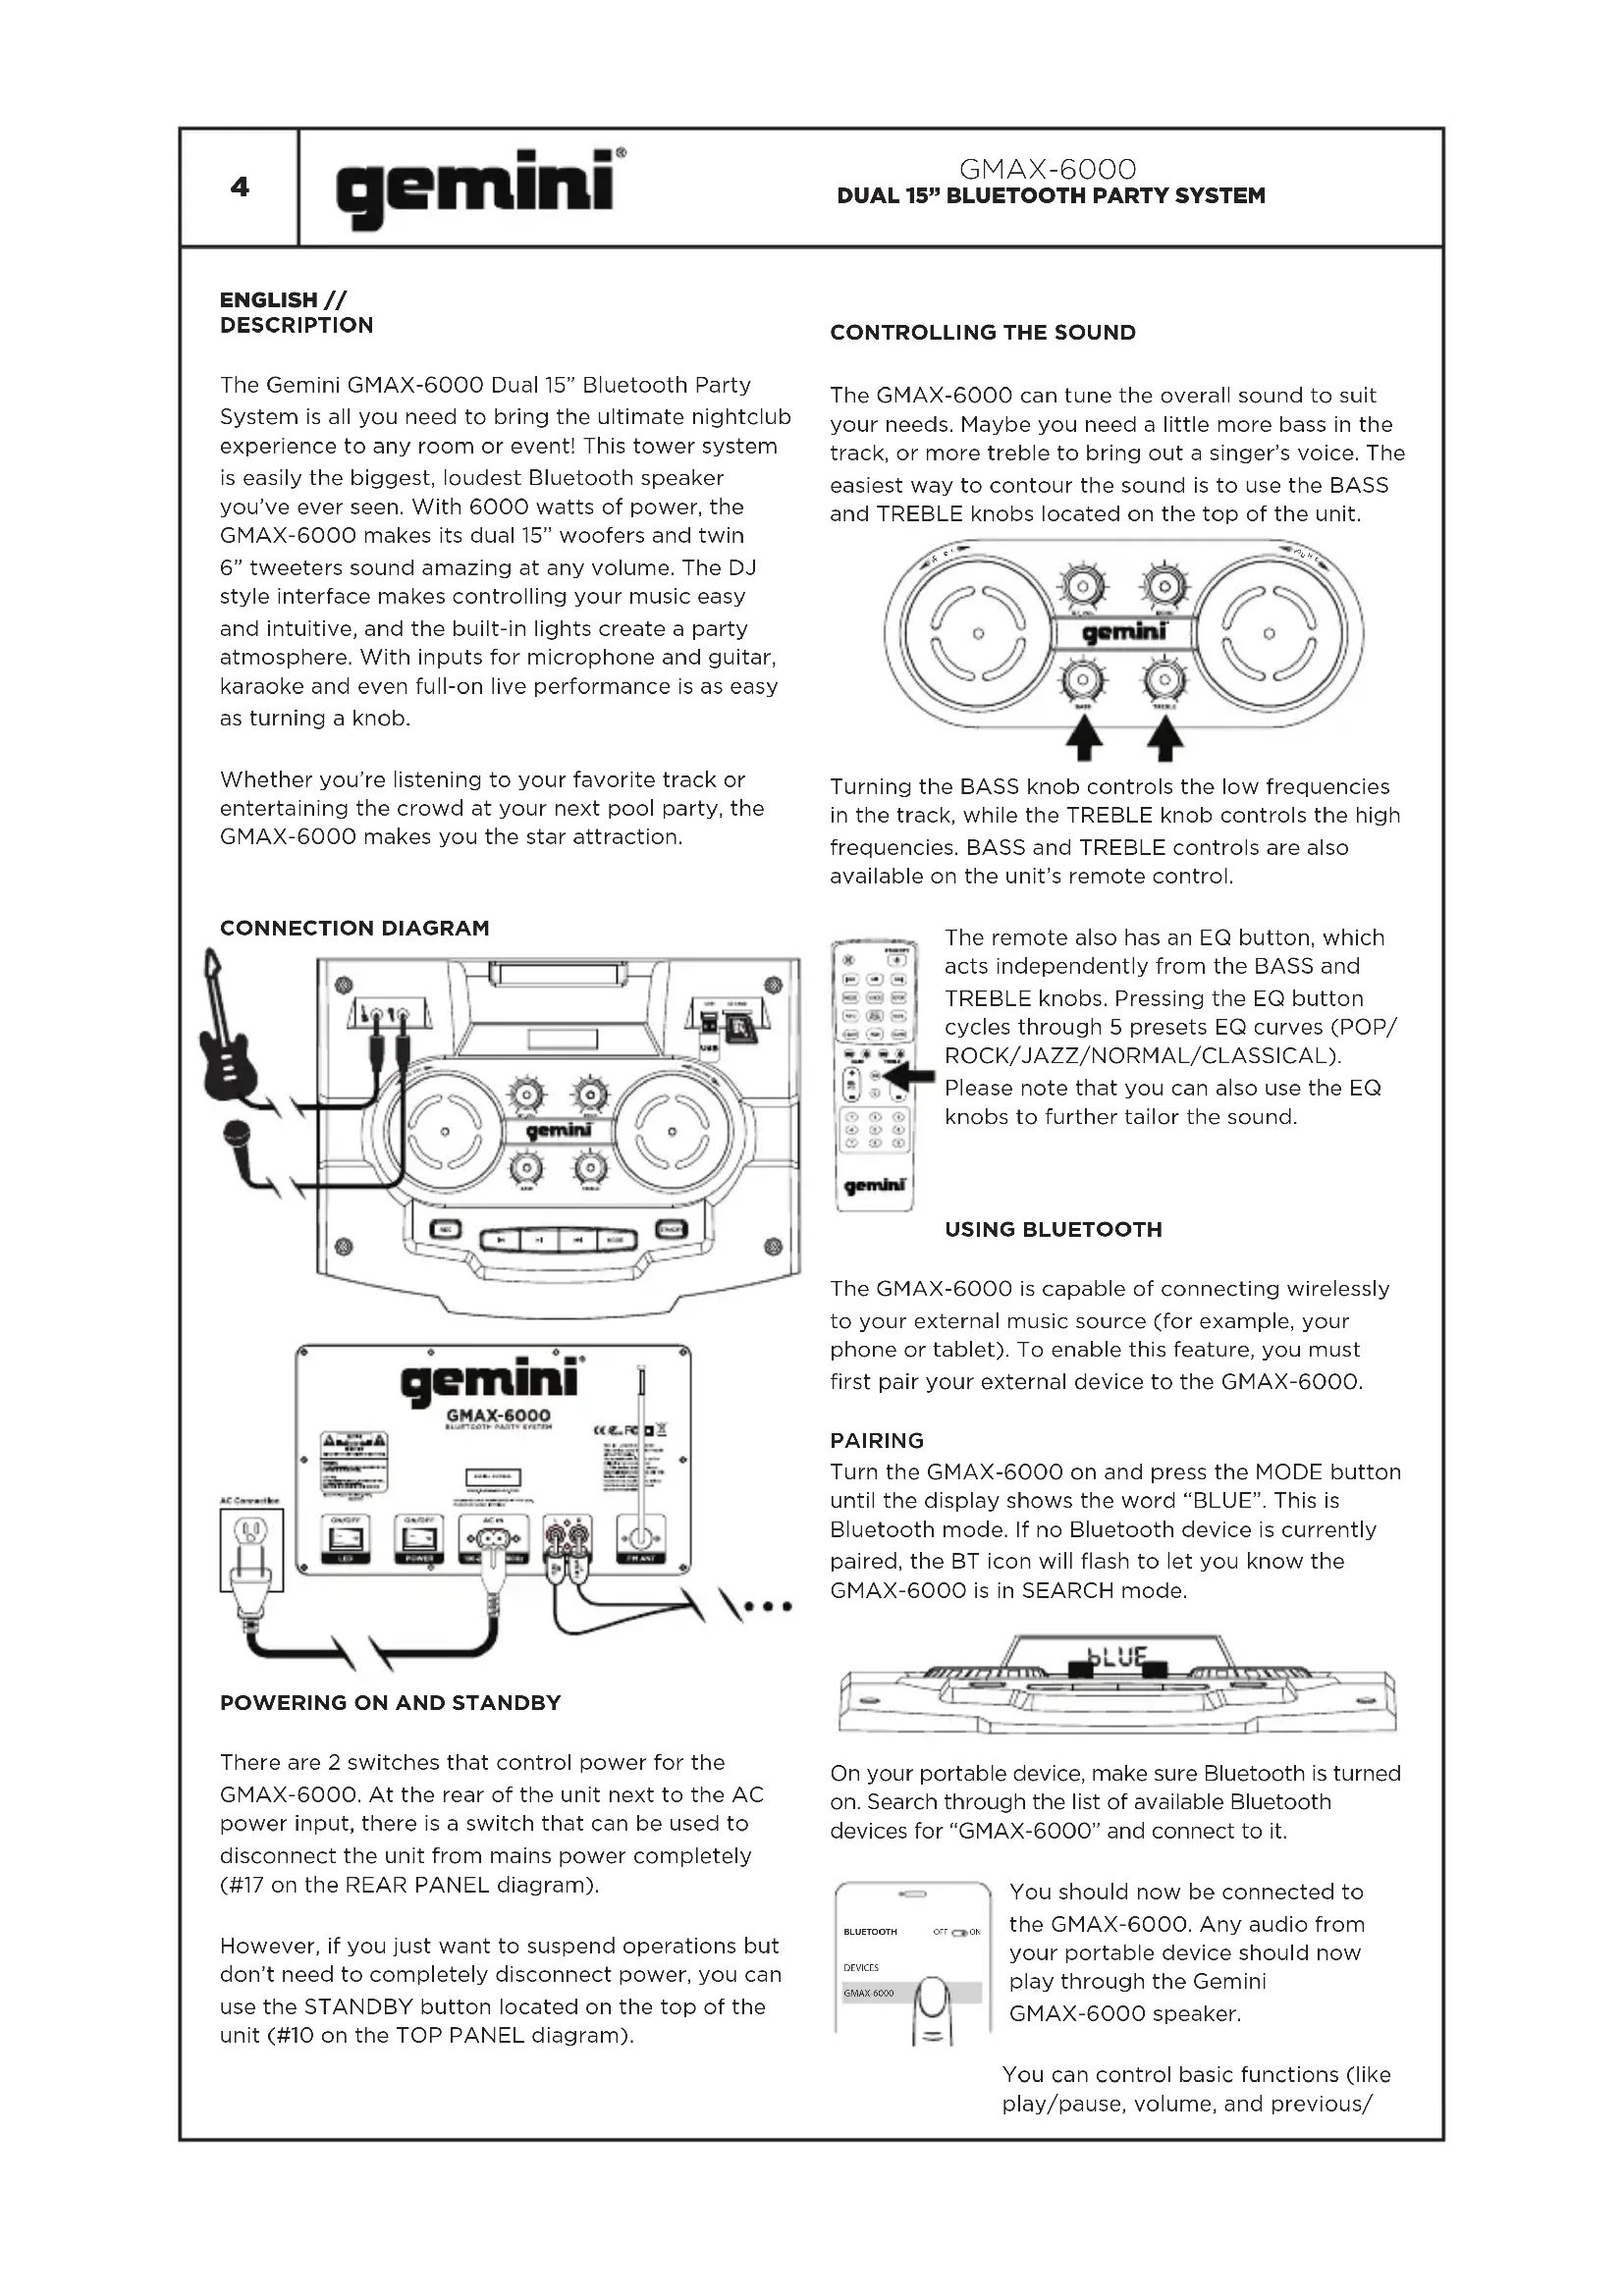
STANDBY 21 28 29 30 31 22 MODE VOICE REPEAT 32 23 REC REC PLAY RDEL 33 24 LIGHT RGB M-PRO 34 35 25 BASS TREBLE 36 26 + - + - + - + - 27 MIC VOL EO VOL - - - 38 39 40 1 2 3 4 5 6 7 8 9 gemini®ENGLISH // DESCRIPTION
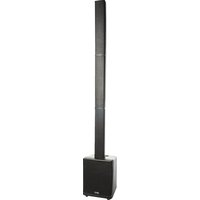
The Gemini GMAX-6000 Dual 15" Bluetooth Party System is all you need to bring the ultimate nightclub experience to any room or event! This tower system is easily the biggest, loudest Bluetooth speaker you've ever seen. With 6000 watts of power, the GMAX-6000 makes its dual 15" woofers and twin 6" tweeters sound amazing at any volume. The DJ style interface makes controlling your music easy and intuitive, and the built-in lights create a party atmosphere. With inputs for microphone and guitar, karaoke and even full-on live performance is as easy as turning a knob.
Whether you're listening to your favorite track or entertaining the crowd at your next pool party, the GMAX-6000 makes you the star attraction.
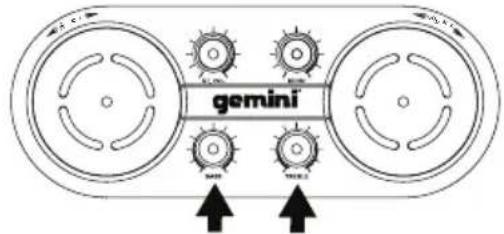
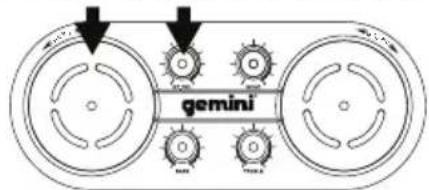
The GMAX-6000 can tune the overall sound to suit your needs. Maybe you need a little more bass in the track, or more treble to bring out a singer's voice. The easiest way to contour the sound is to use the BASS and TREBLE knobs located on the top of the unit.
text_image
geminiTurning the BASS knob controls the low frequencies in the track, while the TREBLE knob controls the high frequencies. BASS and TREBLE controls are also available on the unit's remote control.
CONNECTION DIAGRAM
text_image
gemini
The remote also has an EQ button, which acts independently from the BASS and TREBLE knobs. Pressing the EQ button cycles through 5 presets EQ curves (POP/ROCK/JAZZ/NORMAL/CLASSICAL). Please note that you can also use the EQ knobs to further tailor the sound.
USING BLUETOOTH
The GMAX-6000 is capable of connecting wirelessly to your external music source (for example, your phone or tablet). To enable this feature, you must first pair your external device to the GMAX-6000.
text_image
gemini® GMAX-6000 BLUERTOOTH PARTY SYSTEM AC Connection ON/OFF LED ON/OFF POWER AC VS USB COM CE FC ... ...PAIRING
Turn the GMAX-6000 on and press the MODE button until the display shows the word "BLUE". This is Bluetooth mode. If no Bluetooth device is currently paired, the BT icon will flash to let you know the GMAX-6000 is in SEARCH mode.

natural_image
Technical line drawing of a mechanical component with no visible text or symbolsPOWERING ON AND STANDBY
There are 2 switches that control power for the GMAX-6000. At the rear of the unit next to the AC power input, there is a switch that can be used to disconnect the unit from mains power completely (#17 on the REAR PANEL diagram).
However, if you just want to suspend operations but don't need to completely disconnect power, you can use the STANDBY button located on the top of the unit (#10 on the TOP PANEL diagram).
On your portable device, make sure Bluetooth is turned on. Search through the list of available Bluetooth devices for "GMAX-6000" and connect to it.
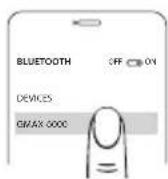
You should now be connected to the GMAX-6000. Any audio from your portable device should now play through the Gemini GMAX-6000 speaker.
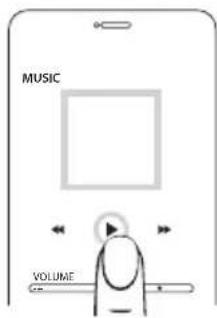
You can control basic functions (like play/pause, volume, and previous/
next track) with the buttons on the top of the GMAX-6000 (as well as with your media player). You should only ever have to pair with the GMAX-6000 once. It will remember paired devices and connect to them automatically after first pairing.
text_image
MUSIC VOLUMEUSING THE FM RADIO
The GMAX-6000 is equipped with an FM radio receiver and intelligent scanning capability, making finding and storing local stations fast and easy.

natural_image
Technical line drawing of a mechanical component with mounting holes and internal features (no text or symbols)Turn the GMAX-6000 on and press the MODE button until the display shows the word "FM". This is RADIO mode. Be sure to also extend the antenna on the back of the unit to increase the reception.
SCANNING FOR STATIONS
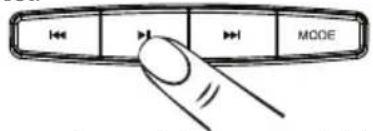
At first, there won't be any stations stored in the unit. To begin a station scan, press and hold the PLAY button. This will begin the scanning process. When the GMAX-6000 finds a strong station, it will store it as a preset.
text_image
MODEOnce the scan is complete, you can pick between the available stored preset by pressing the I<< and >>I buttons. The preset number and station frequency will appear in the display.

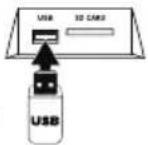
USB AND SD CARD PLAYBACK
It is possible to play music from either a USB Flash drive or an SD card without the need for an external device (like a phone or computer). Please note that supported file types are “.mp3” and “.wma”.
Turn the GMAX-6000 on and insert either a USB or SD card with compatible music on it.
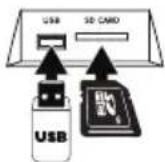
If the GMAX-6000 does not automatically switch to USB mode, press the MODE button until the display shows the word "USB" or "SD".

natural_image
Technical line drawing of a mechanical component with labeled USB ports (no text or symbols beyond 'USB')You will now be able to play music from your USB or SD device. Basic controls (for instance play/pause, next, and previous track) allow you to change songs, etc. You can use the REC PLAY button on the remote to play back any previous recordings stored on the USB or SD card.
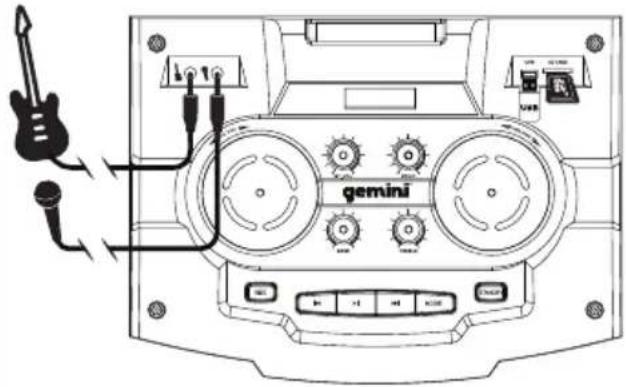
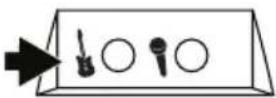
USING THE AUX AND GUITAR INPUTS
The GMAX-6000 lets you perform for an audience with the ability to mix external sources!
Turn the GMAX-6000 on and make sure the volumes are all down. Insert the included Mic and/or a Guitar into the inputs and make sure they are switched on. P until the display shows the v

natural_image
Technical line drawing of a mechanical component with no visible text or symbolsYou will now be able to play live audio from external devices like a microphone and guitar. Full control over volume is available with the left platter (Mic Volume) and top left knob (Guitar Volume). You may also use the Echo knob to add in an echo effect.
text_image
geminiUSB RECORDING
The Gemini GMAX-6000 is capable of recording your live performance! Please note that recording is only enabled when a USB drive and mic are attached.
To begin recording, unit can be in either AUX, USB, or FM mode.
- In AUX mode, audio from mic and AUX input will be recorded.
• In USB mode, mic input will be recorded.
• In FM mode, FM radio audio will be recorded.
Insert your USB drive. The GMAX-6000 will create a directory called "RECORD" that it will put your recordings.

natural_image
Technical line drawing of a mechanical component with RUX label (no text or symbols beyond the label)6
gemini®
GMAX-6000
Press the RECORD button to begin recording. You will see the display change to a time readout (starting at 00:01) showing elapsed recording time.
text_image
REC MODE WINDOWYou may now begin your recording. When you are finished recording, press the RECORD button again to stop. Please note that while unit is in recording mode, audio through the speakers is muted. You can use the included remote control to access your new recordings, or you can remove your USB drive and play them on any computer. REC PLAY lets you play back recordings you've created, R.DEL allows you to delete the currently selected recording.
CONTROLLING THE LIGHTING
There are 2 buttons on the remote that control the GMAX-6000 lighting. The LIGHT button turns the lights on or off. The RGB button allows you to change the lighting color, cycling through RED, GREEN, and BLUE. Please note that pressing the LIGHT button is how you return the lights to their normal multi-color, sound active mode. Lighting will change on the speakers shown in the diagram. Other lighting on the unit (for instance, the display color, button backlighting, etc.) will not change.
INTEGRATED CARRY HANDLES AND WHEELS
Integrated carry handles and 2 sturdy wheels at the base allow for easy movement.
SPECIFICATIONS
AUDIO
| Output Power | 6000W Peak |
| Frequency Range | 20Hz to 20KHz |
| Input Voltage | 100V - 240 VAC50/60Hz + 10% |
SPEAKERS
| Subwoofers | Dual 15" |
| Tweeters | Dual 6" |
GENERAL
| Dimensions | 49.13×18.74×16.3" |
| (H×W×D) | 1248×476×414mm |
| Weight | 73 lbs / 33.4 kg |
Specifications subject to change without notification for improvement.
TROUBLESHOOTING
UNIT WILL NOT POWER ON
- Check power cord is securely connected to mains power and wall outlet is powered and not switched.
CAN'T CONNECT VIA BLUETOOTH
- Make sure BLUETOOTH on your portable device is turned on.
• Make sure GMAX-6000 is in BLUETOOTH mode. - Verify another Bluetooth device is not currently connected to unit.
CAN'T HEAR BLUETOOTH OR EXTERNAL DEVICE
- Verify power is on and volume is turned up on your external device.
MICROPHONE IS NOT AUDIBLE
- Slowly raise MIC LEVEL until mic is audible.
- Make sure microphone is fully plugged in and turned on (if switched).
For all other issues, please contact GEMINI support at 1-844-GEMINI9
Responsible Party Name:
Innovative Concepts & Designs
Company address:
107 Trumbull St-F8 2nd Floor Elizabeth, NJ, 07206 USA

FCC Compliance Statement
This device complies with Part 15 of the FCC Rules. The operation is subject to the following two conditions:
(1) This device may not cause harmful interference, and (2) This device must accept any interference received, including interference that may cause undesired operation.
This device and its antenna(s) must not be co-located or operating in conjunction with any other antenna or transmitter.
The device has been evaluated to meet general RF exposure requirements. The device can be used in portable exposure conditions without restriction. Note: This equipment has been tested and found to comply with the limits for a class B digital device, pursuant to Part 15 of the FCC Rules. This equipment generates, uses and can radiate radio frequency energy and if not installed and used in accordance with the instructions, may cause harmful interference to radio communications. However, there is no guarantee that interference will not occur in a particular installation. If this equipment does cause interference to radio or television reception, which can be determined by turning the equipment off and then on, the user is encouraged to try to correct the interference by one or more of the following measures:
- Reorient or relocate the receiving antenna.
- Increase the separation between the equipment and receiver.
- Connect the equipment to a different outlet so that the equipment and receiver are on different branch circuits.
- Consult the dealer or an experienced radio/TV technician for help.
FCC ID: 2AE6G-GMAX6000


ENGLISH //
WARNINGS AND PRECAUTIONS
Please remember that the GMAX-6000 is capable of producing extremely high sound pressure levels. Exposure to loud music can not only impact your hearing temporarily, it can lead to permanent hearing loss. Please make sure to limit your exposure to high volume levels.
PREVENTIVE MEASURES
- Please read these instructions carefully.
- Keep all information and instructions in a safe place.
- Follow the instructions.
- Observe all safety warnings. Never remove safety warnings or other information from the equipment.
- Use the equipment only in the intended manner and for the intended purpose.
- Use only sufficiently stable and compatible stands and/or mounts (for fixed installations). Make certain that wall mounts are properly installed and secured. Make certain that the equipment is installed securely and cannot fall.
- During installation, observe the applicable safety regulations for your country.
- Never install and operate the equipment near radiators, heat registers, ovens or other sources of heat. Make certain that the equipment is always installed so that it is cooled sufficiently and cannot overheat.
-
Never place sources of ignition, e.g., burning candles, on the equipment.
-
Ventilation slits must not be blocked.
-
Keep a minimum distance of 20 cm around and above the device.
-
Do not use this equipment in the immediate vicinity of water (does not apply to special outdoor equipment - in this case, observe the special instructions noted below). Do not expose this equipment to flammable materials, fluids or gases. Avoid direct sunlight!
-
Make certain that dripping or splashed water cannot enter the equipment. Do not place containers filled with liquids, such as vases or drinking vessels, on the equipment.
-
Make certain that objects cannot fall into the device.
-
Use this equipment only with the accessories recommended and intended by the manufacturer.
-
Do not open or modify this equipment.
-
After connecting the equipment, check all cables to prevent damage or accidents, e.g., due to tripping hazards.
-
During transport, make certain that the equipment cannot fall and possibly cause property damage and personal injuries.
-
If your equipment is no longer functioning properly, if fluids or objects have gotten inside the equipment or if it has been damaged in another way, switch it OFF immediately and unplug it from the mains outlet (if it is a powered device). This equipment may only be repaired by authorized, qualified personnel.
-
Clean the equipment using a dry cloth.
-
Comply with all applicable disposal laws in your country. During disposal of packaging, please separate plastic and paper/cardboard.
-
Plastic bags must be kept out of reach of children.
-
Please note that changes or modifications not expressly approved by the party responsible for compliance could void the user's authority to operate the equipment.
FOR EQUIPMENT THAT CONNECTS TO THE POWER MAINS
-
CAUTION: If the power cord of the device is equipped with an earthing contact, then it must be connected to an outlet with a protective ground. Never deactivate the protective ground of a power cord.
-
If the equipment has been exposed to strong fluctuations in temperature (for example, after transport), do not switch it on immediately. Moisture and condensation could damage the equipment. Do not switch on the equipment until it has reached room temperature.
-
Before connecting the equipment to the power outlet, first verify that the mains voltage and frequency match the values specified on the equipment. If the equipment has a voltage selection switch, connect the equipment to the power outlet only if the equipment values and the mains power values match. If the included power cord or power adapter does not fit in your wall outlet, contact your electrician.
-
Do not step on the power cord. Make certain that the power cable does not become kinked, especially at the mains outlet and/or power adapter and the equipment connector.
-
When connecting the equipment, make certain that the power cord or power adapter is always freely accessible. Always disconnect the equipment from the power supply if the equipment is not in use or if you want to clean the equipment. Always unplug the power cord and power adapter from the power outlet at the plug or adapter and not by pulling on the cord. Never touch the power cord and power adapter with wet hands.
-
Whenever possible, avoid switching the equipment on and off in quick succession because otherwise this can shorten the useful life of the equipment.
-
IMPORTANT INFORMATION: Replace fuses only with fuses of the same type and rating. If a fuse blows repeatedly, please contact an authorized service center.
-
To disconnect the equipment from the power mains completely, unplug the power cord or power adapter from the power outlet.
-
Unplug the power cord and power adapter from the power outlet if there is a risk of a lightning strike or before extended periods of disuse.

To reduce the risk of electric shock, do not remove cover (or back). There are no user serviceable parts inside. Maintenance and repairs should be exclusively carried out by qualified service personnel.
The warning triangle with lightning symbol indicates dangerous uninsulated voltage inside the unit, which may cause an electrical shock.
The warning triangle with exclamation mark indicates important operating and maintenance instructions.
CAUTION! HIGH VOLUMES IN AUDIO
PRODUCTS! This device is meant for professional use. Hearing damage due to high volume and prolonged exposure: When in use, this product can produce high sound-pressure levels (SPL) that can lead to irreversible hearing damage in performers, employees, and audience members. For this reason, avoid prolonged exposure to volumes more than 90dB.
FUNCIÓN ESPAÑOL //
PANEL SUPERIOR
natural_image
Technical line drawing of a mechanical component with no visible text or symbols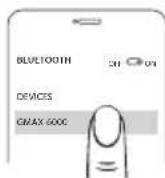
natural_image
Technical line drawing of a mechanical component with mounting holes and internal slots (no text or symbols)text_image
←← →← →← MODEnatural_image
Technical line drawing of a mechanical component with labeled USB ports (no text or symbols beyond 'USB')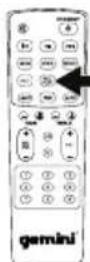
natural_image
Technical line drawing of a mechanical component with no visible text or symbolsnatural_image
Technical line drawing of a mechanical component with no visible text or symbolsnatural_image
Technical line drawing of a mechanical component with no visible text or symbolsnatural_image
Technical line drawing of a mechanical component with mounting holes and internal features (no text or symbols)natural_image
Technical line drawing of a mechanical component with labeled USB ports (no text or symbols beyond 'USB')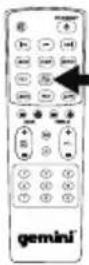
natural_image
Technical line drawing of a mechanical component with no visible text or symbolsnatural_image
Technical line drawing of a mechanical component with no visible text or symbolstext_image
HOC MICE ITNETHL'UNITÉ NE S'ALLUME PAS
natural_image
Technical line drawing of a mechanical component with no visible text or symbolsnatural_image
Technical line drawing of a mechanical component with mounting holes and internal features (no text or symbols)natural_image
Technical line drawing of a mechanical component with labeled USB ports (no text or symbols beyond the label)natural_image
Technical line drawing of a mechanical component with no visible text or symbolsnatural_image
Technical line drawing of a mechanical component with no visible text or symbolstext_image
REC MODE SINNINTACCENSIONE E STANDBY
text_image
gemini MASS THREEnatural_image
Technical line drawing of a mechanical component with no visible text or symbolsnatural_image
Technical line drawing of a mechanical component with mounting holes and internal features (no text or symbols)natural_image
Technical line drawing of a vehicle front panel with no visible text or symbolsnatural_image
Technical line drawing of a vehicle front panel with no visible text or symbolsnatural_image
Technical line drawing of a mechanical component with no visible text or symbolstext_image
GPIO H M TM RWARRANTY AND REPAIR:
All Gemini products are designed and manufactured to the highest standards in the industry. With proper care and maintenance, your product will provide years of reliable service.
LIMITED WARRANTY
A. Gemini guarantees its products to be free from defects in materials and workmanship for one (1) year from the original purchase date. Exceptions: Laser assemblies on CD Players, cartridges, and crossfaders are covered for 90 days.
B. This limited warranty does not cover damage or failure caused by abuse, misuse, abnormal use, faulty installation, improper maintenance or any repairs other than those provided by an authorized Gemini Service Center.
C. There are no obligations of liability on the part of Gemini for consequential damages arising out of or in connection with the use or performance of the product or other indirect damages with respect to loss of property, revenues, of profit, or costs of removal, installation, or reinstallation. All implied warranties for Gemini, including implied warranties for fitness, are limited in duration to one (1) year from the original date of purchase, unless otherwise mandated by local statutes.
RETURN/REPAIR
A. In the U.S.A., please call our helpful Customer Service Representatives at (732) 346-0061, and they will be happy to give you a Return Authorization Number (RA#) and the address of an authorized service center closest to you.
B. After receiving an RA#, include a copy of the original sales receipt, with defective product and a description of the defect. Send by insured freight to: Gemini and use the address provided by your customer service representative. Your RA# must be written on the outside of the package, or processing will be delayed indefinitely!
C. Service covered under warranty will be paid for by Gemini and returned to you. For non-warrantied products, Gemini will repair your unit after payment is received. Repair charges do not include return freight. Freight charges will be added to the repair charges.
D. On warranty service, you pay for shipping to Gemini, we pay for return shipping within the continental United States. Alaska, Hawaii, Puerto Rico, Canada, Bahamas, and the Virgin Islands will be charged for freight.
E. Please allow 2-3 weeks for return of your product.
Under normal circumstances your product will spend no more than 10 working days at Gemini. We are not responsible for shipping times.
IN THE USA:
If you experience problems with this unit, call 732-346-0061 for Gemini customer service. Do not attempt to return this equipment to your dealer.
Parts of the design of this product may be protected by worldwide patents. Information in this manual is subject to change without notice and does not represent a commitment on the part of the vendor. Gemini shall not be liable for any loss or damage whatsoever arising from the use of information or any error contained in this manual. No part of this manual may be reproduced, stored in a retrieval system or transmitted, in any form or by any means, electronic, electrical, mechanical, optical, chemical, including photocopying and recording, for any purpose without the express written permission of Gemini. It is recommended that all maintenance and service on this product is performed by Gemini or its authorized agents. Gemini will not accept liability for loss or damage caused by maintenance or repair performed by unauthorized personnel.
Gemini Worldwide Headquarters
107 Trumbull Street, Building F8 • Elizabeth, NJ 07206 • USA • Tel: (732)346-0061 • Fax: (732)346-0065
© Innovative Concepts and Design LLC, All Rights Reserved.