
POWEG6050 - String Trimmer PowerPlus - Free user manual and instructions
Find the device manual for free POWEG6050 PowerPlus in PDF.

| Product Type | Thermal Grass Trimmer |
| Brand | PowerPlus |
| Model | POWEG6050 |
| Engine | Air-cooled two-stroke, 25.4 cc, 0.75 kW |
| Fuel tank capacity | 0.45 L |
| Fuel mixture | Unleaded gasoline / oil (25:1) |
| Cutting width | 380 mm |
| Cutting line diameter | 2.0 mm |
| Weight | 5.6 kg |
| Sound pressure level (LpA) | 96 dB(A) |
| Sound power level (LwA) | 114 dB(A) |
| Starting type | Recoil starter |
| Drive shaft | Curved drive shaft |
| Safety devices | Plastic guard, safety lever, stop switch |
| Routine maintenance | Clean air filter, fuel filter, spark plug (gap 0.6-0.7 mm) |
| Recommended spark plug | TORCH L8RTC or equivalent |
| Warranty | 24 months |
| Standards | CE, EN ISO 11806-1:2011, EN ISO 14982:2009 |
| Included accessories | Grass trimmer, manual, cutting head, flat wrench 8-10 mm, screwdriver |
Frequently Asked Questions - POWEG6050 PowerPlus
User questions about POWEG6050 PowerPlus
0 question about this device. Answer the ones you know or ask your own.
Ask a new question about this device
Download the instructions for your String Trimmer in PDF format for free! Find your manual POWEG6050 - PowerPlus and take your electronic device back in hand. On this page are published all the documents necessary for the use of your device. POWEG6050 by PowerPlus.
USER MANUAL POWEG6050 PowerPlus
natural_image
Exterior view of a power tool with metal clamp and red handle (no text or symbols visible)
| NL | NEDERLANDS | VERTAALDE VERSIE VAN DE ORIGINELE HANDLEIDING |
| FR | FRANÇAIS | TRADUCTION DU MODE D'EMPLOI D'ORIGINE |
| EN | ENGLISH | ORIGINAL INSTRUCTION MANUAL |
| DE | DEUTSCH | ÜBERSETZUNG DER ORIGINALBETRIEBSANLEITUNG |
| ES | ESPAÑOL | TRADUCCIÓN DEL MANUAL DE INSTRUCCIONES ORIGINAL |
| IT | ITALIANO | TRADUZIONE DEL MANUALE DI ISTRUZIONI ORIGINALE |
| PT | PORTUGUÊS | TRADUÇÃO DO MANUAL DE INSTRUÇÕES ORIGINAL |
| NO | NORSK | OVERSETTELSE AV ORIGINAL BRUKERVEILEDNING |
| DA | DANSK | OVERSÆTTELSE AF DEN ORIGINALE BRUGSVEJLEDNING |
| CS | ČESKY | PŘEKLAD ORIGINÁLNÍHO NÁVODU K POUŽITÍ |
| RO | ROMÂNĂ | TRADUCEREA MANUALULUI DE INSTRUCTIUNI ORIGINALE |
| BG | БЪЛГАРСКИ | ПРЕВОД НА ОРИГИНАЛНОТО РЬКОВОДСТВО |

FIG. A
 Fig.1 Fig.1 |  Fig.2 Fig.2 |
 Fig.3 Fig.3 |    Fig.4 Fig.4 |
 d d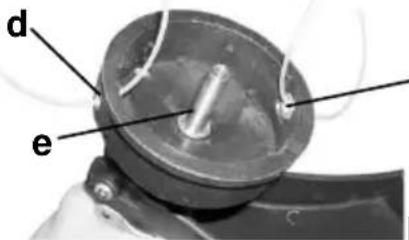 Fig.5 Fig.5 | 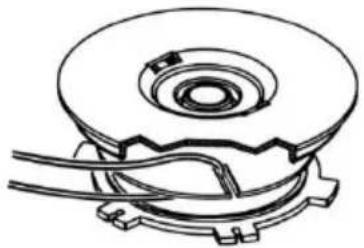 Fig. 6 Fig. 6 |
 Fig. 7 Fig. 7 | 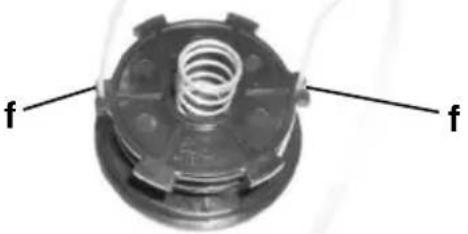 Fig. 8 Fig. 8 |
Fig. 8
POWERPLUS POWEG6050
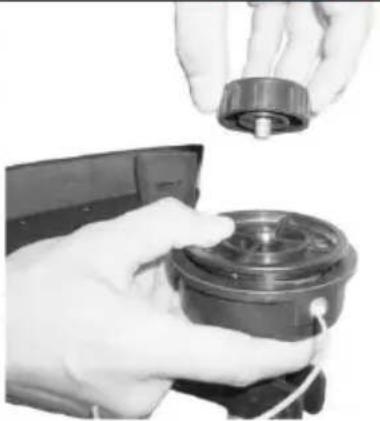 Fig. 9 Fig. 9 |  Fig. 10 Fig. 10 |
 Fig. 11 Fig. 11 |  Fig. 12 Fig. 12 |
 Fig. 13 Fig. 13 |  Fig. 14 Fig. 14 |
POWERPLUS POWEG6050
POWERPLUS POWEG6050 NL
1 GEBRUIKSDOELEINDEN....3
2 OVERZICHT VAN DE ONDERDELEN....3
3 INHOUD VAN DE VERPAKKING....3
4 TOELICHTING VAN DE SYMBOLEN 4
5 ALGEMENE VEILIGHEIDSVOORSCHRIFTEN....4
5.1 Werkplaats....4
5.2 Veiligheid van personen....4
5.3 Zorgvuldige omgang met en gebruik van benzinegereedschap....5
5.4 Service....5
6 BIJKOMENDE VEILIGHEIDSREGELS VOOR GRASTRIMMERS ..5
7 VEILIGHEIDSWAARSCHUWINGEN VOOR BENZINE....6
8 ASSEMBLAGE 6
8.1 De plastic afschermkap aanbrengen 6
8.2 Aanbrengen/vervangen van de spoel/snijdraad....6
8.3 De gekromde aandrijfas aanbrengen (Fig. 10)....7
8.4 De handgreep monteren (Fig. 11 - Fig. 12)....7
9 VOOR U START 7
9.1 Tanken (Fig. 13 – Fig. 14)......7
10 GEBRUIK....7
10.1 De grastrimmer starten....7
10.2 De grastrimmer uitschakelen 8
10.3 De motor laten inlopen 8
10.4 De grastrimmer gebruiken....8
11 REINIGING EN ONDERHOUD....9
11.1 Luchtfilter (Fig. 21)....9
11.2 Benzinefilter (Fig. 22)....9
11.3 De bougie controleren (Fig. 23)....9
11.4 Opslag en onderhoud na gebruik 9
12 PROBLEEMOPLOSSING....10
12.1 Vermogenverlies of plots uitvallen van de motor 10
12.2 Slecht maaikwaliteit.... 10
POWERPLUS POWEG6050 NL
13 TECHNISCHE GEGEVENS....10
14 GELUID....10
15 TRANSPORT 11
16 GARANTIE....11
17 MILIEU....11
18 CONFORMITEITSVERKLARING....12
POWERPLUS POWEG6050 NL GRASTRIMMER 25,4 CC POWEG6050
12 PROBLEEMOPLOSSING
10/09/2021, Lier - Belgium
POWERPLUS POWEG6050 FR
18 DÉCLARATION DE CONFORMITÉ CE

VARO-Vic. Van Rompuy N.V. - Joseph Van Instraat 9 - BE2500 Lier - BELGIQUE, déclare que :
natural_image
Simple hand-drawn sketch of a rounded rectangular shape with a small circle on top (no text or symbols)Philippe Vankerkhove
5 GENERAL SAFETY WARNINGS....4
5.1 Work area....4
5.2 Personal safety 4
5.3 Engine tool use and care....5
5.4 Service....5
6 SPECIFIC SAFETY INSTRUCTIONS FOR GRASS TRIMMERS..5
7 PETROL SAFETY WARNINGS....6
8 ASSEMBLY....6
8.1 Fitting the plastic guard 6
8.2 Fitting/replacing the spool/cutting line 6
8.3 Fitting the curvy drive shaft (Fig. 10)....7
8.4 Fitting the handle (Fig. 11 - Fig. 12)....7
9 BEFORE YOU START 7
9.1 Fuelling (Fig. 13 - Fig. 14)....7
10 OPERATION....7
10.1 Starting the grass trimmer 7
10.2 Stopping the grass trimmer 8
10.3 Running in the engine 8
10.4 Use of the grass trimmer....8
11 CLEANING AND MAINTENANCE 8
11.1 Air filter (Fig. 21)....8
11.2 Fuel filter (Fig. 22)....9
11.3 Checking the spark plug (Fig. 23)....9
11.4 Storage and maintenance after use....9
12 TROUBLESHOOTING 9
12.1 Power loss or sudden stopping of the engine....9
12.2 Bad quality cut....9
POWERPLUS POWEG6050 EN
13 TECHNICAL DATA....10
14 NOISE....10
15 TRANSPORTATION 10
16 WARRANTY....11
17 ENVIRONMENT 11
18 DECLARATION OF CONFORMITY 12
POWERPLUS POWEG6050 EN
GRASS TRIMMER 25.4 CC
POWEG6050
1 APPLICATION
Your grass trimmer has been designed for trimming and finishing lawn edges and to cut grass in confined spaces. This tool is intended for consumer use only.

WARNING! Read this manual and general safety instructions carefully before using the appliance, for your own safety. Your power tool should only be passed on together with these instructions.
2 OVERVIEW COMPONENTS (FIG. A)
-
Line cutting head
-
Plastic guard
-
Drive shaft ASM
-
Connecting screw
-
Secondary handle
-
Recoil starter
-
Fuel tank
-
Air filter
-
Choke lever
-
Primer bulb
-
Operating handle
-
Throttle button
-
Safety lever
-
Ignition switch
3 PACKAGE CONTENT LIST
- Remove all packing materials.
- Remove remaining packaging and transit supports (if existing).
- Check the completeness of the packing content.
- Check the appliance, the power cord, the power plug and all accessories for transportation damages.
- Keep the packaging materials as far as possible till the end of the warranty period. Dispose it into your local waste disposal system afterwards.

WARNING: Packing materials are no toys! Children must not play with plastic bags! Danger of suffocation!
1 x grass trimmer
1 x manual
1 x cutting head
1 x spanner 8-10 mm
1 x screwdriver
1 x carrying belt
1 x plastic guard
1 x spark plug wrench
1 x fuel mixing bottle

When parts are missing or damaged, please contact your dealer.
POWERPLUS POWEG6050 EN
4 SYMBOLS
In this manual and/or on the machine the following symbols are used:
 | Read the manual before using the machine. |  | Wear sturdy shoes with antiskid soles! |
 | Denotes risk of personal injury or damage to the tool. |  | Wear approved hearing protection and safety glasses. |
 | |||
 | In accordance with essential applicable safety standards of European directives. |  | Wear good and sturdy gloves! |
 | Keep a minimum distance of 15 m between the machine and third parties during use. |  | The exhaust fumes are toxic and can cause suffocation! |
 | Watch out for particles generated by the cutting installation. |  | WATCH OUT Fire hazard! Gasoline and vapours are easily inflammable! |
5 GENERAL SAFETY WARNINGS

Read all safety warnings and all instructions. Failure to follow all warnings and instructions may result in electric shock, fire and/or serious injury. Save all warnings and instructions for future reference.
5.1 Work area
- Keep work area clean and well lit. Cluttered and dark areas invite accidents.
- Do not operate tools in explosive atmospheres, such as in the presence of flammable liquids, gases or dust. Tools create sparks which may ignite the dust or fumes.
- Keep children and bystanders away while operating a tool. Distractions can cause you to lose control.
5.2 Personal safety
- Stay alert, watch what you are doing and use common sense when operating a tool. Do not use a tool while you are tired or under the influence of drugs, alcohol or medication. A moment of inattention while operating tools may result in serious personal injury.
- Use safety equipment. Always wear eye protection. Safety equipment such as dust mask, non-skid safety shoes, hard hat, or hearing protection used whenever conditions require will reduce personal injuries.
- Avoid accidental starting. Ensure the switch is in the off position before plugging in. Carrying tools with your finger on the switch or plugging in tools that have the switch on invites accidents.
- Remove any adjusting key or wrench before turning the tool on. A wrench or a key left attached to a rotating part of the tool may result in personal injury.
- Do not overreach. Keep proper footing and balance at all times. This enables better control of the tool in unexpected situations.
POWERPLUS POWEG6050 EN
- Dress properly. Do not wear loose clothing or jewellery. Keep your hair, clothing and gloves away from moving parts. Loose clothes, jewellery or long hair can be caught in moving parts.
- If devices are provided for the connection of dust extraction and collection facilities, ensure these are connected and properly used. Use of these devices can reduce dust related hazards.
5.3 Engine tool use and care
- Use the correct tool for your application. The correct tool will do the job better and safer at the rate for which it was designed.
- Store idle tools out of the reach of children and do not allow persons unfamiliar with the tool or these instructions to operate the tool. The tools are dangerous in the hands of untrained users.
- Maintain tools. Check for misalignment or sticking of moving parts, breakage of parts and any other condition that may affect the tool's operation. If damaged, have the tool repaired before use. Many accidents are caused by poorly maintained tools.
- Keep cutting tools sharp and clean. Properly maintained cutting tools with sharp cutting edges are less likely to stick and are easier to control.
- Use the tool, accessories and tool bits etc., in accordance with these instructions and in the manner intended for the particular type of tool, taking into account the working conditions and the work to be performed. Use of the tool for operations different from intended could lead to a hazardous situation.
5.4 Service
- Have your tool serviced by a qualified person using only identical replacement parts. This will ensure that the safety of the tool is maintained.
6 SPECIFIC SAFETY INSTRUCTIONS FOR GRASS TRIMMERS
- Grass trimmers must not be used by children or untrained persons.
■ Wear stout shoes or boots to protect your feet.
■ Wear long trousers to protect your legs.
- Check the appliance before use. If it is damaged, it must not be used.
■ If the unit is damaged, have the damage repaired by an authorized repair agent.
- Do not use the appliance in the presence of children and/or animals.
■ Only use the appliance in daylight or with good lighting.
■ Never use the appliance without the guard in place.
■ Before using the appliance, remove sticks, stones, wire and other obstacles from the surface on which you intend to work.
- Only use the appliance in an upright position, with the cutting line pointing to the ground. Never switch on the appliance in another position.
■ Always keep your hands and feet away from the cutting line.
- Avoid touching the cutting line.
- Before putting the appliance down, switch it off and wait for the cutting line to come to a complete standstill. Never attempt to bring the cutting line to a standstill yourself.

Beware. After switching off the appliance it continues to rotate for a short time.
- Only use the type of cutting line recommended by the manufacturer. Never use a metal cutting line or fishing line.
■ After use, always store the appliance safely and out of the reach of children.
- Do not cut against hard objects. This could cause injury or damage the trimmer.
- Do not use the trimmer to cut grass which is not in contact with the ground, for example, do not cut grass which is on walls or rocks etc.
POWERPLUS POWEG6050 EN
7 PETROL SAFETY WARNINGS

WARNING: Use extra care when handling fuels. They are inflammable and the vapours are potentially explosive. The following points must be observed.
- Use only an approved container.
- Never remove the fuel cap or add fuel when the engine is running. Allow engine exhaust components to cool before refuelling.
- Do not smoke.
■ Never refuel the machine indoors. - Never store the machine or fuel containers in places where there is a naked flame, such as a water heater.
- If fuel is spilt, do not attempt to start the power source before moving the machine away from the spillage area.
■ Always replace and securely tighten the fuel cap after refuelling. - Whenever the tank is drained, this should be done outdoors.
8 ASSEMBLY
It is necessary to fit the drive shaft, the handle safety guard, harness and adjust the handle and harness.
8.1 Fitting the plastic guard
- Slide the plastic guard over the drive shaft (Fig. 1).
- Place the plastic guard over the drive shaft until the metal piece fits in the guard and you can fit the bolt through the guard and metal piece. Afterwards, tighten the bolt (Fig. 2).
8.2 Fitting/replacing the spool/cutting line
- Unscrew the retainer screw (Fig. 3/a) in a counter-clockwise direction and remove retainer screw (Fig .4). If you fail to do this by hand, use a tool.
- Remove the spool (Fig. 5/b) and the spring (Fig. 5/c) from the spindle (Fig. 5/e).
The following steps only have to be carried out if only the line and not the entire spindle requires replacing:
- Remove the remaining cutting line from the spool.
- Hold the two halves of a new cutting line together in the middle and place the loop in one of the slots on the spool divider (Fig. 6).
- Wind the line with tension in a counter-clockwise direction as shown in the illustration (Fig. 7), with the two halves being separated by the spool divider. Wind up all of the line down to the last 15 ~cm of each end.
- Fasten each of the ends of the line in a slot (Fig. 8/f) on the opposite side of the spool.
- Fit the springs on the inside of the spool and thread each of the ends of the line through one of the eyelets in the spool holder (Fig. 5/d).
- Insert the spool in the spool holder. Make sure that the spring slides over the spindle and does not get stuck.
- Press the spool into the spool holder with your hand and use your other hand to fasten the retainer screw tightly (Fig. 9).
- Give each end of the line a strong tug to pull the line out of the slots.
- Cut off all excess line to reduce it to approx. 13 cm. This will reduce the load on the engine when starting up and warming up.
POWERPLUS POWEG6050 EN
8.3 Fitting the curvy drive shaft (Fig. 10)
Put the lower part into the shaft of the upper part. Push down the iron bullet and push forward until the bullet fits into the restrictor hole. Tighten the screw bolt manually.
8.4 Fitting the handle (Fig. 11 - Fig. 12)
Loosen the handle bar by unscrewing the bolt. Slide the O-Shaped handle bar over the drive shaft. Leave 135 mm between the O-shaped handle and the operating handle. Tighten the bolt to fix the O-shaped handle.

Warning: Do not use the line cutting head without the plastic guard.
9 BEFORE YOU START
9.1 Fuelling (Fig. 13 - Fig. 14)

Note: Mix the petrol and oil at 25:1 only.
- Use fresh unleaded petrol. You must use 100% synthetic oil specifically made for heavily stressed two-stroke engines.
- Mix the petrol and oil in an approved container.
- Never mix fuel directly in the line trimmer fuel tank.
- Place the grass trimmer upright on the ground or on a sturdy bench and wipe any debris from around the fuel cap.
- Unscrew the fuel tank cap and pour the mixture into the tank with the aid of a funnel.
- Be careful not to spill any mixture. If this happens, wipe the spill with a clean rag.
- Start the engine at least three meters away from the area where the fuel tank has been filled up in order to avoid any risk of fire.
10 OPERATION
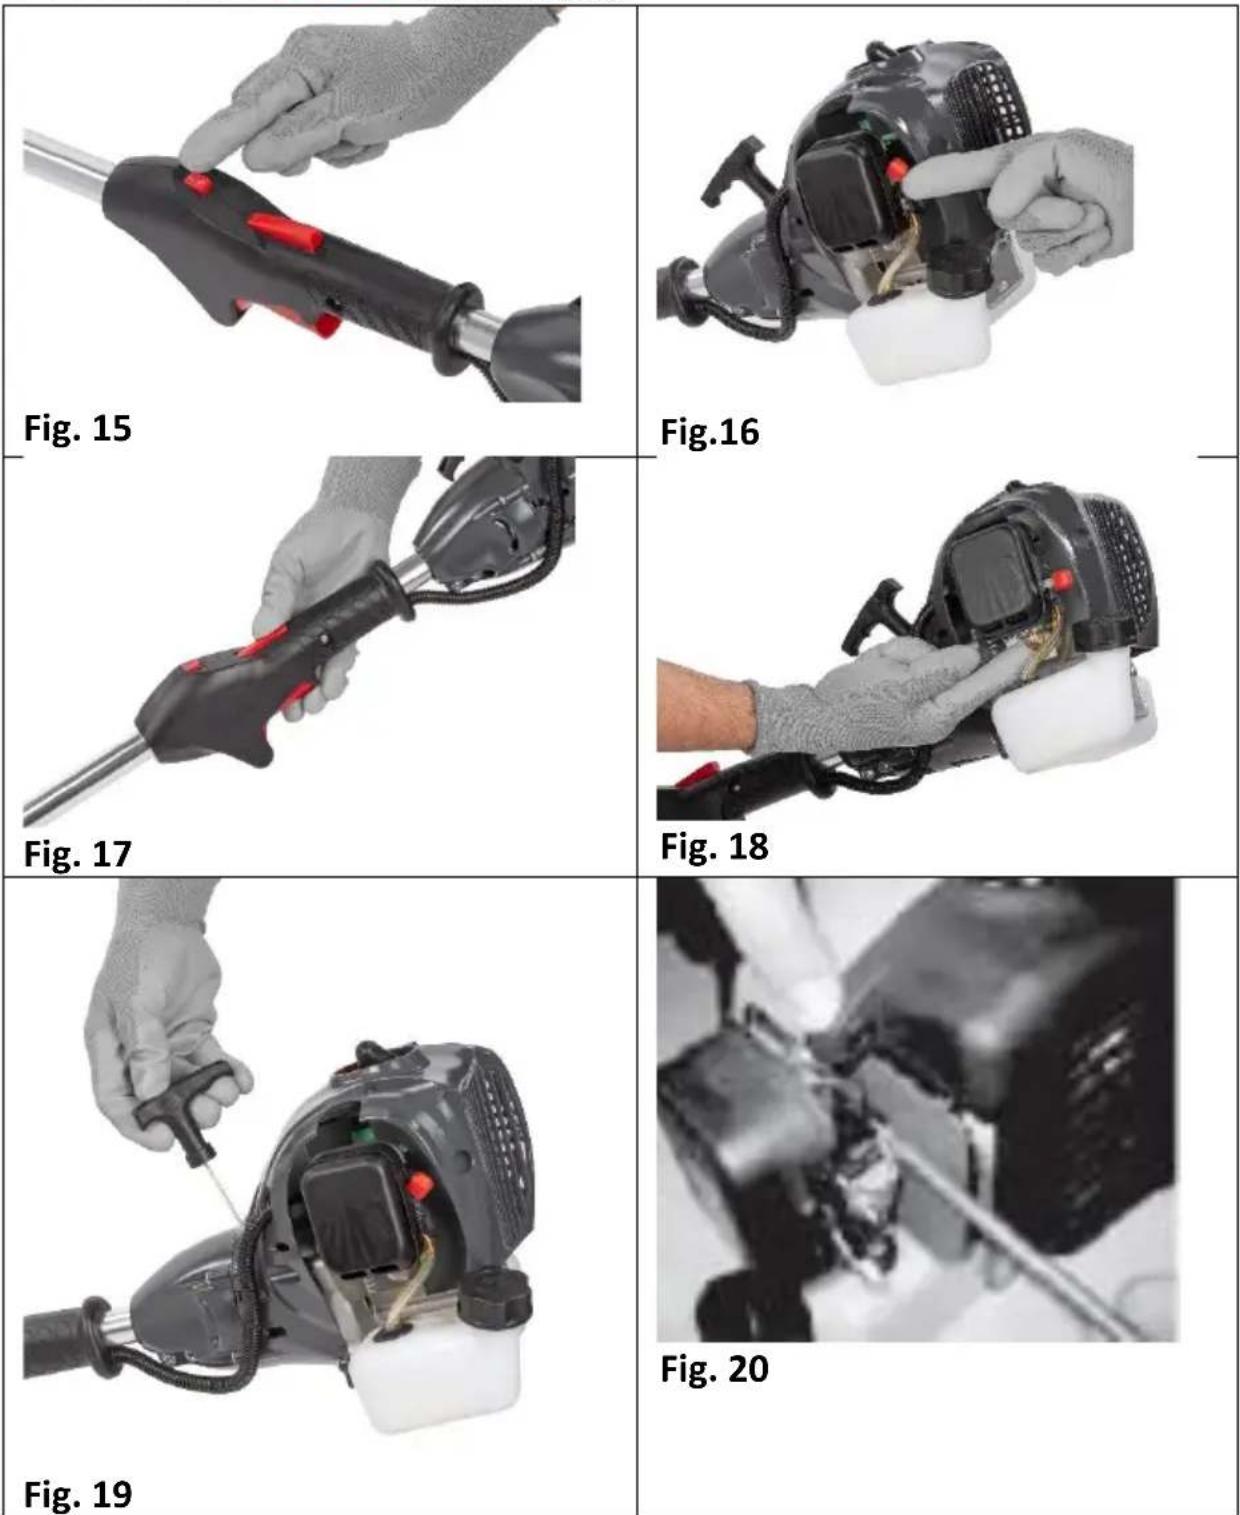
10.1 Starting the grass trimmer
-
Move the ignition switch to the "on" position marked I (Fig. 15).
-
Move the choke lever upwards to the start position (cold start) (Fig. 16).

Note! This is not required if the engine is already warm.
-
Push the trigger and press the lock button to lock the trigger on a start position (Fig. 17).
-
Push the primer bulb (10) 6 times, until the petrol/oil mixture flows in and out of the discharge hose located above the fuel tank (Fig. 18).
-
Push the lock button to unlock the trigger and keep the trigger pressed.
-
Pull the recoil starter 2-3 times until you hear the engine starting (Fig. 19).
-
Push the choke lever down to the run position (warm start).
-
The engine may start, or it may be required to pull on the recoil starter until the engine starts.
-
Allow the engine to run idle for around 10 seconds to let it warm up.
-
To engage the cutting line, squeeze the safety lever and throttle trigger.

Note! Check that the cutting line will not run at an idling revolution, if the cutting line rotates even a little, lower the idling revolution by a slow stop screw on the carburettor (Fig. 20).
POWERPLUS POWEG6050 EN
10.2 Stopping the grass trimmer

Warning: The cutting head will continue to rotate for a few seconds after the engine has stopped.
- Release the throttle trigger and allow the engine to idle for a few moments.
- Move the ignition switch to the off position marked STOP.
- The engine will now stop
10.3 Running in the engine
- During the first ten hours of work, run the engine at a moderate RPM.
- We advise you in any case not to maintain your engine at a high speed as the different components must settle with each other during the process of running in the engine.
- It is at the end of the run-in period that the engine will reach its maximum power.
- After the first two hours of work, stop and make sure that all nuts and screws are securely fastened, and tighten them if necessary.
10.4 Use of the grass trimmer
- Cut the grass like you are in a corridor about 1.5 m wide. Move step by step, moving the machine from left to right and vice-versa. Make sure at each step that you are still well balanced on your feet.
- The line trimmer has a bump feed mechanism which releases line without having to stop the engine. To release additional line lightly tap the cutting line and spool assembly on the ground while operating the unit at high speed.

Note. Always keep the trimming line fully extended. Line release becomes more difficult as the cutting line becomes shorter.
- Each time the head is bumped, it releases approximately 2 cm of line. The cut off knife on the guard will automatically cut off any excess line. For best results tap the head on hard soil or bare ground.
- Do not hit stones (even small ones), piles of earth, and small pieces of wood or anything else that could be hidden or poorly visible in the grass.
If you hit a large object by accident, or if you block the cutting tool due to overloading or having the cutter jammed with grass. Stop the engine.

Note. All protective devices of the machine as well as protective equipment must be maintained in a good operating condition during the period of use.
11 CLEANING AND MAINTENANCE
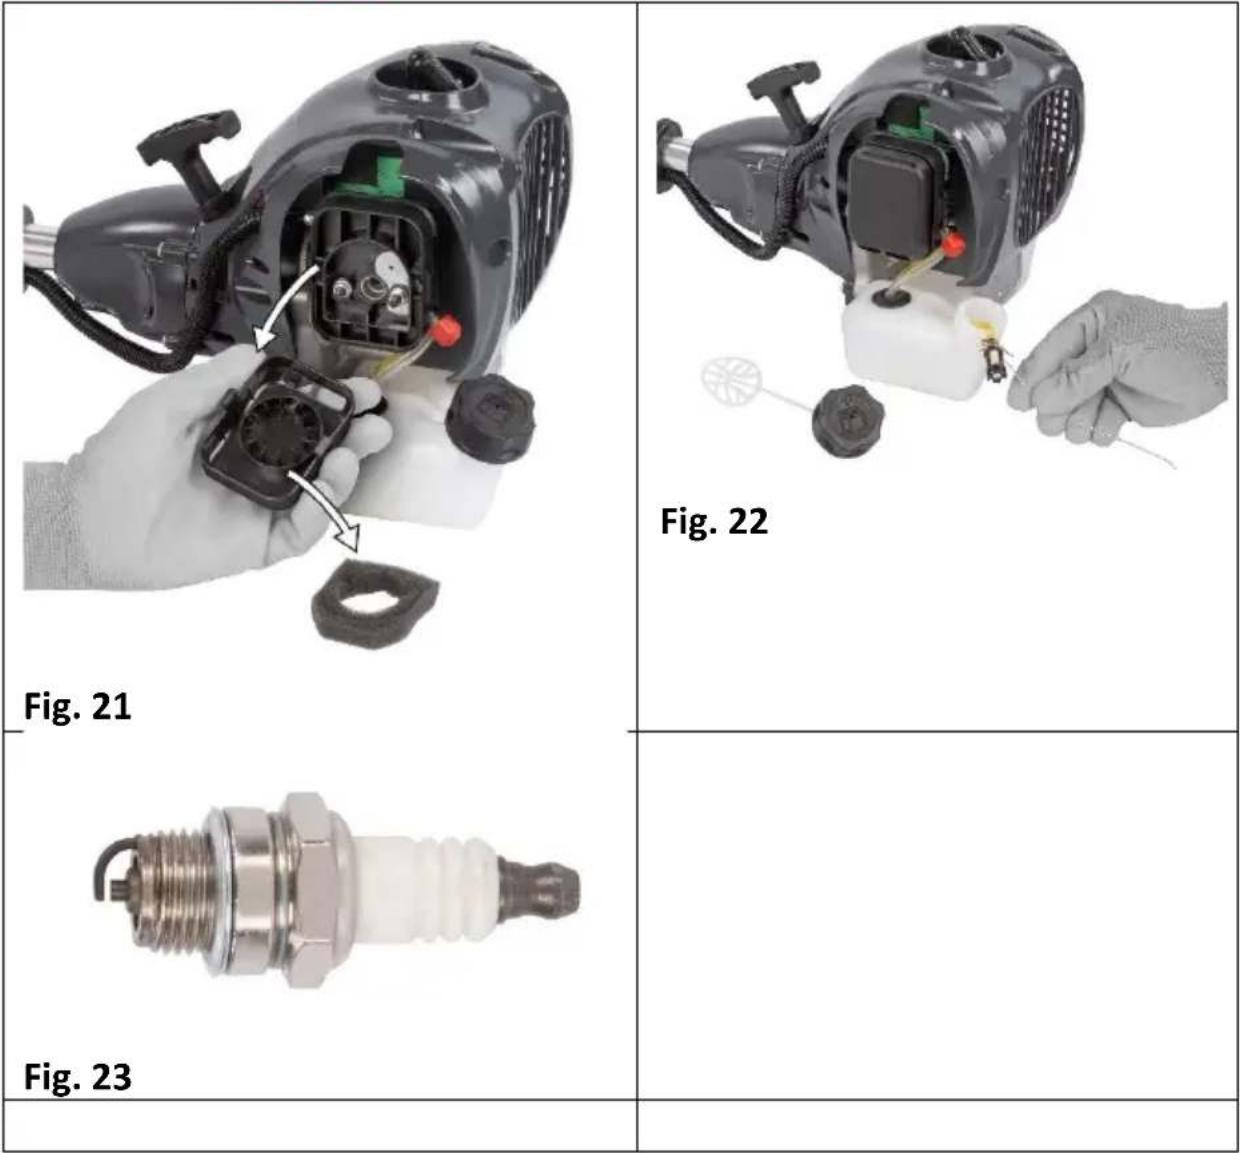
11.1 Air filter (Fig. 21)
Accumulated dust in the air filter will reduce efficiency. Increase fuel consumption and allow abrasive particles to pass into the engine. Remove the air filter as often as necessary to maintain a clean condition.
- Remove the filter cover by pressing the sides and lifting it off.
- Light surface dust can readily be removed by tapping the filter
- Heavy deposits should be washed out in suitable solvent.
POWERPLUS POWEG6050 EN
11.2 Fuel filter (Fig. 22)
■ The fuel tank is fitted with a filter.
- The filter is situated at the free end of the fuel pipe and can be picked out through the fuel port with a piece of hooked wire.
- Check the fuel filter periodically. Do not allow dust to enter the fuel tank. Clogged filter will cause difficulty when starting the engine or abnormalities in engine performance.
- When the filter is dirty, replace the filter.
- When the inside of the fuel tank is dirty, it can be cleaned by rising the tank out with petrol.
11.3 Checking the spark plug (Fig. 23)

Note. Check the spark plug every 10-15 hours of use.
- Remove the spark plug cover.
- Use the spark plug wrench to remove the spark plug, by turning it counter-clockwise.
- Clean and adjust the spark plug gap to 0.6-0.7 mm.
- Replace any damaged or visibly worn plug with a TORCH L8RTC or equivalent spark plug.
- Install the spark plug finger tight in the cylinder head, then tighten it firmly with the spark plug wrench.
11.4 Storage and maintenance after use
- When you finish working. Clean the petrol grass trimmer completely. Making sure there is no grass or dirt wrapped in the cutting tools.
- Be aware to not hit or cut the fuel tank if you put it onto the ground. Do not let the petrol grass trimmer fall down or you may damage the machine.
- Do not store the machine inside a nylon bag.
- At the end of the season, give the petrol grass trimmer an overall cleaning and a thorough check.
- Do not leave the petrol grass trimmer resting on the floor for extended periods as it could cause the shape of the guard to alter, posing a safety risk. Hang it off the floor by the top handgrip.
- Whenever the machine is not used for a long period of time. Proceed as follows:
○ Empty the fuel tank completely. - Protect all metal engine parts from corrosion by coating them with oil.
○ Remove the spark plug, put a few drops of oil into the cylinder and then pull the recoil starter 2 to 3 times in order to distribute the oil evenly. Replace the spark plug.
12 TROUBLESHOOTING
12.1 Power loss or sudden stopping of the engine
- Check whether the fuel tank is empty.
- The mixture does not reach the carburettor. Clean the fuel filter in the fuel tank.
- There is water in the mixture. Drain and rinse all the fuel system with fuel.
■ The air filter is dirty. Clean the air filter. - There are carbon deposits in the cylinder exhaust pipe or the muffler. Clean those or change the muffler.
12.2 Bad quality cut
- Overloaded cutting due to too high grass or too thick for engine power.
- Wrapped vegetal material on the cutting tool.
POWERPLUS POWEG6050 EN
13 TECHNICAL DATA
| Model | POWEG6050 |
| Engine | Air cooled 2 stroke engine |
| Cylinder content | 25.4 CC |
| Power | 0.75 kW |
| Tank content | 0,45 l |
| Mowing width threading head | 380 mm |
| Wire diameter | 2.0 mm |
| Weight | 5.6 kg |
14 NOISE
Noise emission values measured according to relevant standard. (K=3)
| Acoustic pressure level LpA | 96 dB(A) |
| Acoustic power level LwA | 114 dB(A) |

ATTENTION! Wear hearing protection when sound pressure is over 85 dB(A)
aw (Vibration)
5.8 m/s²
K = 1.5 ~m / s^2
15 TRANSPORTATION
■ Turn off the motor during transportation of the tool.
- During transportation, the protection should be fastened around the blade.
- During transportation in a vehicle, the tool should be placed in such a way as to prevent any fuel leakage.
- If your appliance is to be transported, the fuel tank must be completely emptied.
- When unloading your appliance from the vehicle after transportation, make sure that the motor does not hit hard against the ground. This could cause severe damage to the fuel tank.
POWERPLUS POWEG6050 EN
16 WARRANTY
- This product is warranted as provided by law for a 24-month period effective from the date of purchase by the first user.
- This warranty covers all material or production flaws excluding: batteries, chargers, defective parts subject to normal wear & tear such as bearings, brushes, cables, and plugs, or accessories such as drills, drill bits, saw blades, etc.; damage or defects resulting from maltreatment, accidents or alterations; nor the cost of transportation.
- Damage and/or defects resulting from inappropriate use also do not fall under the warranty provisions.
- We also disclaim all liability for any bodily injury resulting from inappropriate use of the tool.
- Repairs may only be carried out by an authorized customer service centre for Powerplus tools.
- You can always obtain more information at the number 00 32 3 292 92 90.
- Any transportation costs shall always be borne by the customer, unless agreed otherwise in writing.
- At the same time, no claim can be made on the warranty if the damage of the device is the result of negligent maintenance or overload.
- Definitely excluded from the warranty is damage resulting from fluid permeation, excessive dust penetration, intentional damage (on purpose or by gross carelessness), inappropriate usage (use for purposes for which the device is not suitable), incompetent usage (e.g. not following the instructions given in the manual), inexpert assembly, lightning strike, erroneous net voltage. This list is not exhaustive.
- Acceptance of claims under warranty can never lead to the prolongation of the warranty period nor commencement of a new warranty period in case of a device replacement.
- Devices or parts which are replaced under the warranty therefore remain the property of Varo NV.
- We reserve the right to reject a claim whenever the purchase cannot be verified or when it is clear that the product has not been properly maintained. (Clean ventilation slots, carbon brushes serviced regularly, etc.).
- Your purchase receipt must be kept as proof of date of purchase.
- Your appliance must be returned undismantled to your dealer in an acceptably clean state, (in its original blow-moulded case if applicable to the unit), accompanied by proof of purchase.
17 ENVIRONMENT
Should your appliance need replacement after extended use, do not discard it with the household rubbish but dispose of it in an environmentally safe way.
Please dispose of used motor oil in a manner that is compatible with the environment. We suggest you take it in a sealed container to your local service station for reclamation. Do not throw it in the trash or pour it on the ground.
POWERPLUS POWEG6050 EN
18 DECLARATION OF CONFORMITY


VARO N.V. - Joseph Van Instraat 9 - BE2500 Lier - BELGIUM, declares that,
Product: Grass trimmer - Gasoline operated
Trade mark: PowerPlus
Model: POWEG6050
is in conformity with the essential requirements and other relevant provisions of the applicable European Directives, based on the application of European harmonized standards. Any unauthorized modification of the apparatus voids this declaration.
European Directives (including, if applicable, their amendments up to the date of signature):
2006/42/EC
2014/30/EU
2000/14/EC Annex V LwA
Measured 114 dB(A)
Guaranteed 114 dB(A)
European harmonized standards (including, if applicable, their amendments up to the date of signature):
EN ISO 11806-1 : 2011
EN ISO 14982 : 2009
Keeper of the Technical Documentation: Philippe Vankerkhove, VARO – Vic. Van Rompuy N.V.
The undersigned acts on behalf of the company CEO,
natural_image
Simple line drawing of a curved shape with a small mark on top (no text or symbols)Philippe Vankerkhove
Regulatory Affairs – Compliance Manager
10/09/2021, Lier - Belgium
POWERPLUS POWEG6050 DE
10/09/2021, Lier - Belgium
POWERPLUS POWEG6050 ES
1 APLICACIÓN ....3
natural_image
Simple hand-drawn sketch of a rounded rectangular shape with a small arrow on top (no text or symbols)Philippe Vankerkhove
10/09/2021, Lier - Belgium
POWERPLUS POWEG6050 IT
Regulatory Affairs – Compliance Manager
10/09/2020, Lier - Belgium
POWEG6050 PT
1 APLICACÃO....3
4 SYMBOLFORKLARING ....4
5 GENERELLE SIKKERHETSADVARSLER 4
10/09/2021, Lier – Belgia
POWERPLUS POWEG6050 DA
10/09/2021, Lier - Belgium
POWERPLUS POWEG6050 CS
natural_image
Simple hand-drawn sketch of a rounded rectangular shape with no text or symbolsPhilippe Vankerkhove
Divizia de reglementare – Director de conformitate
10/09/2021, Lier - Belgia
POWERPLUS POWEG6050 BG
10/09/2021, Lier - Belgium

natural_image
Close-up of a manual tool with adjustable arm and head (no visible text or symbols)varo
WWW.VARO.COM
DESIGNED AND MARKETED BY VARO
©copyright by varo
VARO - VIC. VAN ROMPUY nv
JOSEPH VAN INSTRAAT 9 - 2500 LIER - BELGIUM
OFFICES:


- POWERPLUS POWEG6050
- POWERPLUS POWEG6050 NL
- POWERPLUS POWEG6050 NL GRASTRIMMER 25,4 CC POWEG6050
- PROBLEEMOPLOSSING
- POWERPLUS POWEG6050 FR
- DÉCLARATION DE CONFORMITÉ CE
- POWERPLUS POWEG6050 EN
- GRASS TRIMMER 25.4 CC
- POWEG6050
- APPLICATION
- OVERVIEW COMPONENTS (FIG. A)
- PACKAGE CONTENT LIST
- SYMBOLS
- GENERAL SAFETY WARNINGS
- Work area
- Personal safety
- Engine tool use and care
- Service
- SPECIFIC SAFETY INSTRUCTIONS FOR GRASS TRIMMERS
- Beware. After switching off the appliance it continues to rotate for a short time.
- PETROL SAFETY WARNINGS
- ASSEMBLY
- Fitting the plastic guard
- Fitting/replacing the spool/cutting line
- Fitting the curvy drive shaft (Fig. 10)
- Fitting the handle (Fig. 11 - Fig. 12)
- BEFORE YOU START
- Fuelling (Fig. 13 - Fig. 14)
- OPERATION
- Starting the grass trimmer
- Stopping the grass trimmer
- Warning: The cutting head will continue to rotate for a few seconds after the engine has stopped.
- Running in the engine
- Use of the grass trimmer
- Note. Always keep the trimming line fully extended. Line release becomes more difficult as the cutting line becomes shorter.
- Note. All protective devices of the machine as well as protective equipment must be maintained in a good operating condition during the period of use.
- CLEANING AND MAINTENANCE
- Air filter (Fig. 21)
- Fuel filter (Fig. 22)
- Checking the spark plug (Fig. 23)
- Note. Check the spark plug every 10-15 hours of use.
- Storage and maintenance after use
- TROUBLESHOOTING
- Power loss or sudden stopping of the engine
- Bad quality cut
- NOISE
- ATTENTION! Wear hearing protection when sound pressure is over 85 dB(A)
- TRANSPORTATION
- WARRANTY
- ENVIRONMENT
- DECLARATION OF CONFORMITY
- POWERPLUS POWEG6050 DE
- POWERPLUS POWEG6050 ES
- POWERPLUS POWEG6050 IT
- POWEG6050 PT
- POWERPLUS POWEG6050 DA
- POWERPLUS POWEG6050 CS
- POWERPLUS POWEG6050 BG
Brand : PowerPlus
Model : POWEG6050
Category : String Trimmer