Pixma G2430 - Printer CANON - Free user manual and instructions
Find the device manual for free Pixma G2430 CANON in PDF.

User questions about Pixma G2430 CANON
0 question about this device. Answer the ones you know or ask your own.
Ask a new question about this device
Download the instructions for your Printer in PDF format for free! Find your manual Pixma G2430 - CANON and take your electronic device back in hand. On this page are published all the documents necessary for the use of your device. Pixma G2430 by CANON.
USER MANUAL Pixma G2430 CANON
Read Safety and Important Information (addendum) first.
natural_image
Icon showing a printer with a paper airplane and a paper airplane, symbolizing document processing or sync (no text present)Installing the Printer......page 1
natural_image
Line drawing of a printer with hands operating it (no text or symbols)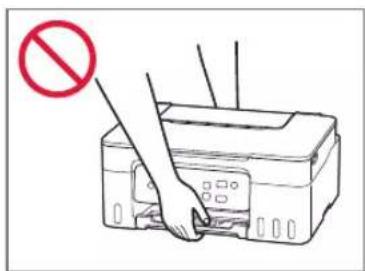
text_image
Diagram showing a printer with a prohibition symbol, indicating no printing or discharging process.Setting Up the Printer
1. Box Contents
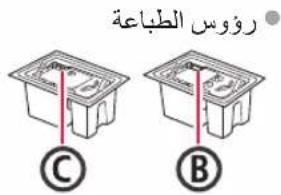
- Print Heads
- Ink Bottles
Power Cord - Setup CD-ROM
• Safety and Important Information
• Getting Started (this manual)
2. Turning on the Printer
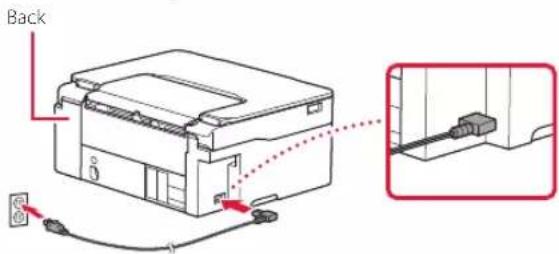
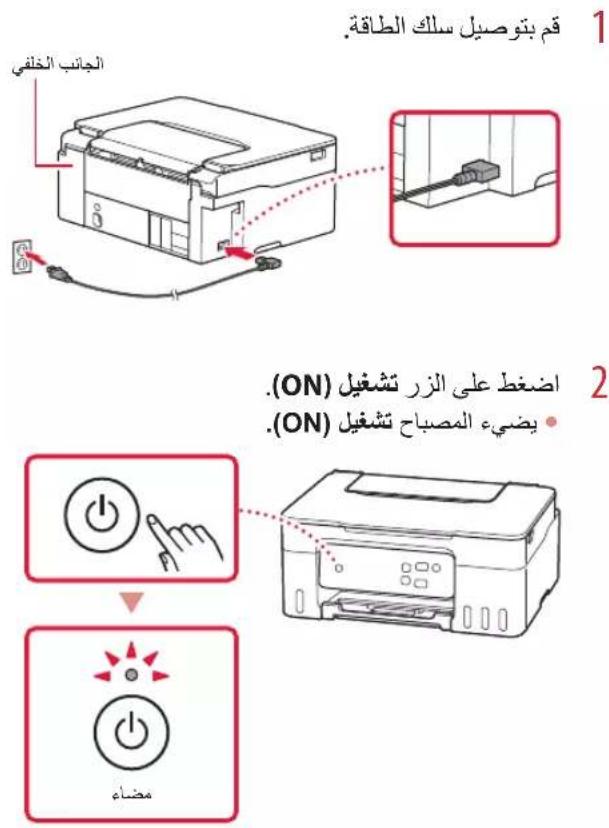
1 Connect the power cord.
text_image
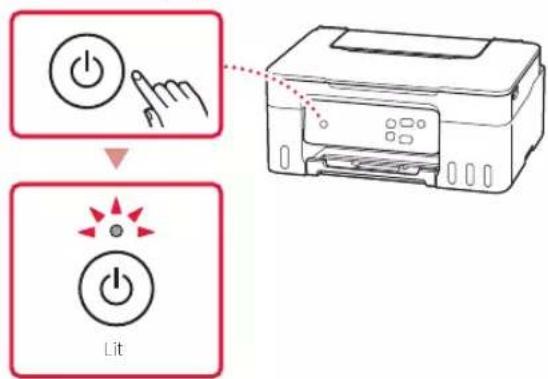
Back2 Press the ON button.
• The ON lamp lights.
text_image
Diagram illustrating the process of inserting a power button into a printer, with labeled icons and a red dotted arrow indicating the process.Setting Up the Printer
Easy Setup Using Computer Setup Using this Manual

Computer

Getting Started

3
Easy Setup Using Computer
Simple, easy-to-follow instructions are displayed on your computer.
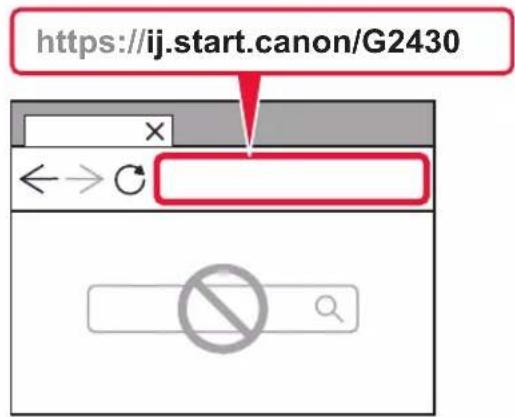
1 Visit the URL below to start setup.
text_image
https://ij.start.canon/G2430 ←→ C2 Follow the instructions to complete setup and print.
1

natural_image
Illustration of a printer with three speech bubbles containing icons: power button, documents, and a document (no text or symbols)2

natural_image
Simple line drawing of a printer connected to a laptop (no text or symbols)4. Installing the Print Heads
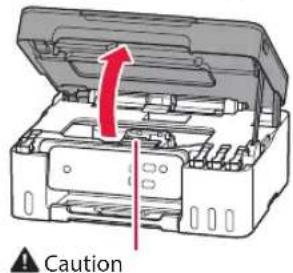
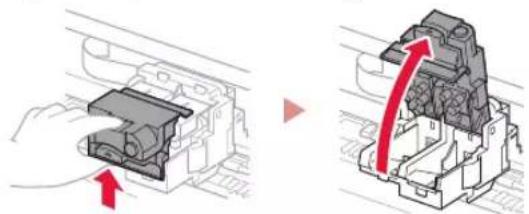
1 Open the scanning unit / cover.
text_image
CautionDo not touch the print head holder until it stops moving.
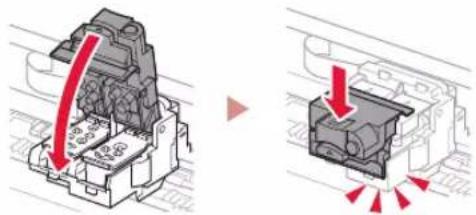
2 Open the print head locking cover.
natural_image
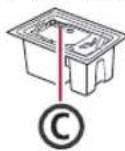
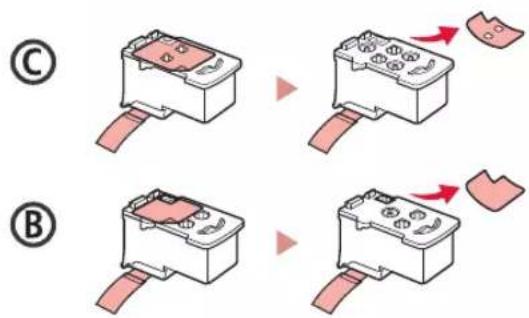
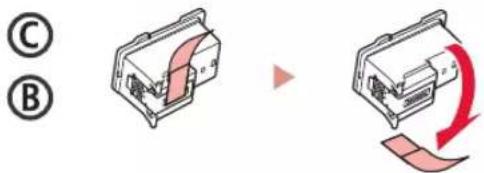
Diagram showing a hand inserting a component into a device, with red arrows indicating direction (no text or symbols present)3 Take out each print head from the package and remove the label.
text_image
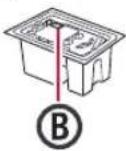
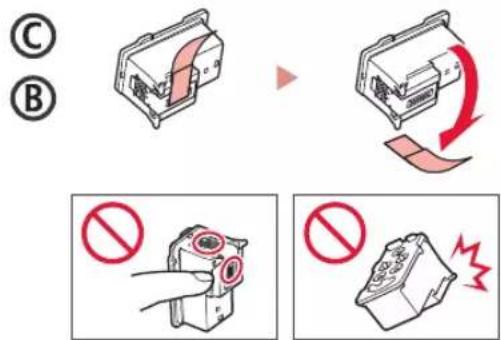
(C) (B)4 Remove the orange tape.
text_image
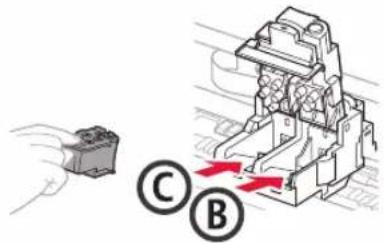
Diagram illustrating a mechanical device operation with labeled parts and prohibition signs5 Insert the C (color) print head on the left and the B (black) print head on the right.
text_image
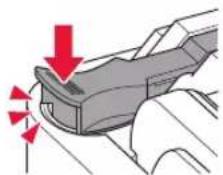
Diagram showing a device with labeled parts C and B, indicating a process or operation with red arrows.6 Close the print head locking cover and press down until it clicks.
text_image
Technical diagram showing mechanical assembly with red arrows indicating force direction and highlighted componentsSetting Up the Printer
5. Pouring Ink

Important
This product requires careful handling of ink. Ink may splatter when the ink tanks are filled with ink. If ink gets on your clothes or belongings, it may not come off.
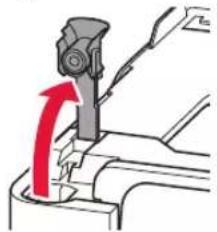
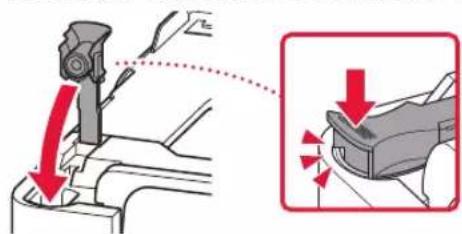
1 Open the tank cap on the left of the printer.
natural_image
Mechanical assembly diagram showing a lever mechanism with red arrow indicating motion (no text or symbols)2 Hold the ink bottle upright and gently twist the bottle cap to remove.
Check!
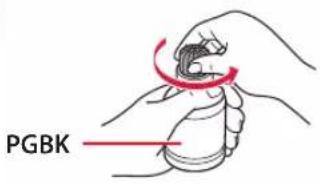
text_image
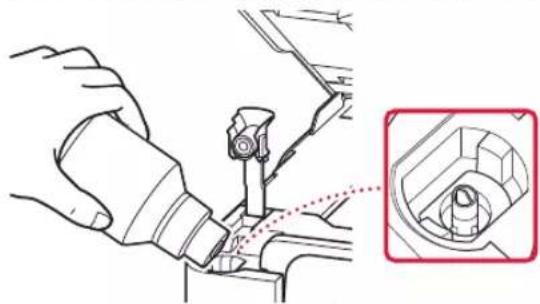
PGBK3 Align the nozzle of the ink bottle with the inlet.
natural_image
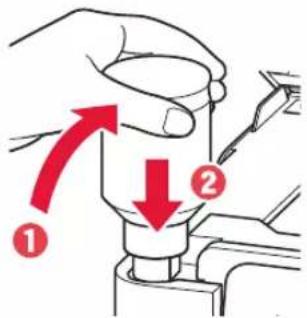
Illustration of a mechanical assembly with tool and component details (no text or symbols)4 Slowly stand the ink bottle upside down and push down to pour the ink.
- If the ink does not pour, gently remove the ink bottle and try again.
text_image
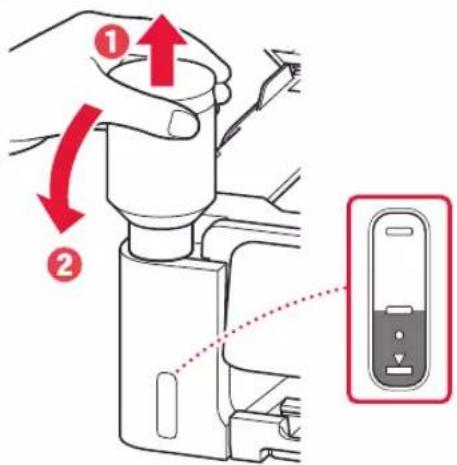
Diagram showing a hand operating a tool with two red arrows indicating direction of movement or force, labeled ① and ②.5 Gently remove the ink bottle from the inlet.
- Be careful not to spill the ink.
text_image
Diagram showing hand operating a device with red arrows indicating rotation and movement, labeled with step numbers ① and ②.6 Replace the tank cap securely.
text_image
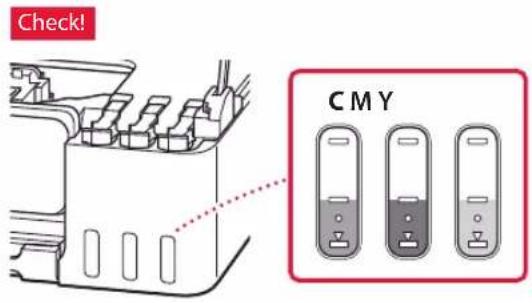
Diagram illustrating a mechanical assembly with red arrows indicating force or direction, showing a lever mechanism and a close-up of the lever's motion.7 Repeat steps 1 through 6 to pour all ink into the corresponding ink tanks on the right.
text_image
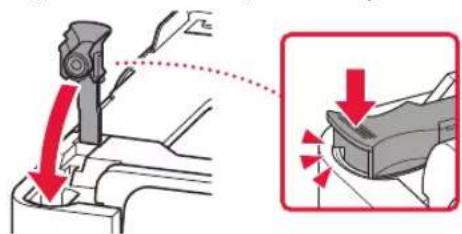
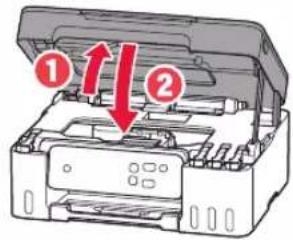
Check! CMY8 Close the scanning unit / cover.
- If you lift the scanning unit / cover slightly and release it, it will close by itself.
text_image
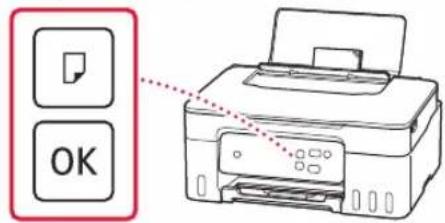
Diagram of a printer with labeled parts and red arrows indicating downward movement or transformation9 Press the OK button.
- The ON lamp flashes and the ink system preparation starts. It takes about 6 minutes to complete.

text_image
OK Flashing
If the Alarm lamp flashes or lights

Count the number of flashes.
• 4 times
Print heads are not installed correctly.
→ "4. Installing the Print Heads" on page 3
- 5 times
Print heads cannot be recognized.
→ "4. Installing the Print Heads" on page 3
For all other cases, refer to the Online Manual.
6. Connecting to a Computer

If you are using multiple computers, perform these steps on each computer.
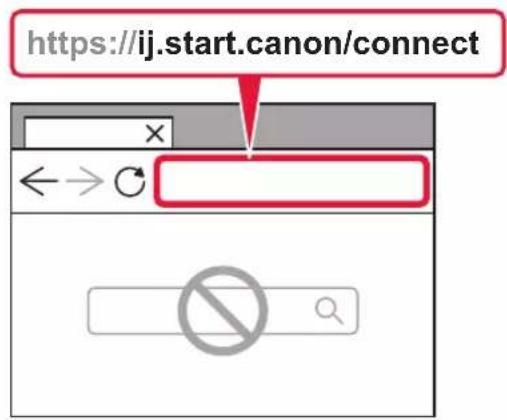
1 Access the Canon website directly. No need to search.
text_image
https://ij.start.canon/connect2 Enter your printer's model name and click Go.
3 Follow the on-screen instructions.

Using the Setup CD-ROM
- Double click EasySetup.exe on the screen that appears.
- If the printer selection screen appears, select G2430. If the installation screen appears, click Next.
- Follow the on-screen instructions.
If nothing appears, start Explorer and then run EasySetup.exe in the CD-ROM.
Loading Paper
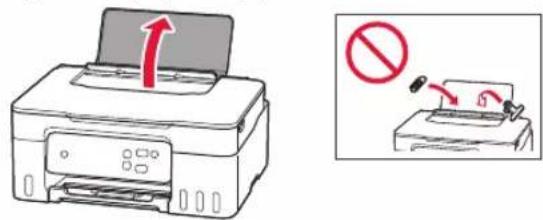
1 Open the paper support.
text_image
Diagram showing printer printing process with red upward arrow and prohibition symbol indicating no printing or disassembly2 Slide the right-hand side paper guide to the far right.
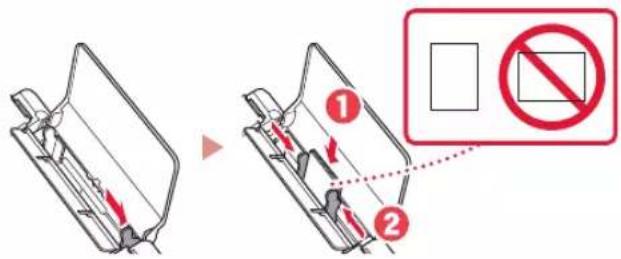
3 Load several sheets of paper with the print side facing up and slide the side paper guide against the edge of the paper stack.
text_image
Diagram illustrating a mechanical assembly process with numbered steps and a prohibition symbol in the inset.4 Press the Paper Select button, select a paper size, and then press the OK button.
text_image
Diagram showing printer operation with OK button and printer icon, likely illustrating print or print process steps5 Extend the paper output tray.

natural_image
Diagram showing two views of a printer's internal structure, one with a red arrow indicating compression or disassembly (no text or symbols present)Transporting Your Printer
When relocating the printer, check the following. Refer to the Online Manual for details.
Check if the tank caps are completely closed.
natural_image
Diagram of a mechanical component with red arrows indicating motion or force direction (no text or symbols)If the print head holder is in the center of the printer, check that the cover is closed.
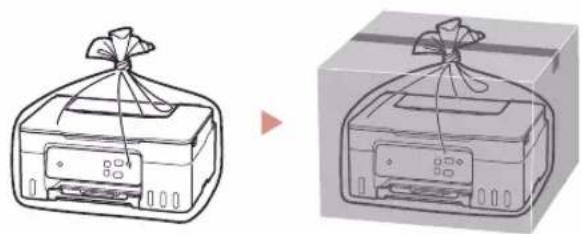
Pack the printer in a plastic bag in case ink leaks.
- Pack the printer in a sturdy box so that it is placed with its bottom facing down, using sufficient protective material to ensure safe transport.
- Do not tilt the printer. Ink may leak.
- Please handle with care and ensure the box remains flat and NOT turned upside down or on its side, as the printer may be damaged and ink in the printer may leak.
- When a shipping agent is handling transport of the printer, have its box marked "THIS SIDE UP" to keep the printer with its bottom facing down. Mark also with "FRAGILE" or "HANDLE WITH CARE".
natural_image
Illustration of a printer with a cloth and paperclip, shown from front and side views (no text or symbols)text_image
https://ij.start.canon/G2430natural_image
Illustration of a printer with three speech bubbles containing icons: power button, documents, and phone (no text or symbols)2

natural_image
Simple line drawing of a printer connected to a laptop (no text or symbols)natural_image
Diagram showing a hand inserting a component into a device, with red arrows indicating the process (no text or symbols present)text_image
Diagram illustrating a device operation with labeled steps (C, B) and prohibition symbols for disassembly or reassembly.text_image
Diagram showing a connector pinout and a mechanical assembly with labeled parts C and B, indicating a process or connection.text_image
Technical diagram showing mechanical assembly with red arrows indicating force or direction of movement, likely illustrating a process or assembly.natural_image
Mechanical assembly diagram showing a lever mechanism with red arrow indicating motion (no text or symbols)text_image
Illustration showing a hand performing a PGBK technique with a red arrow indicating motion direction, labeled '¡Comprobar!'natural_image
Technical illustration of a mechanical assembly with tool and component detail (no text or symbols)text_image
Diagram showing a hand operating a tool with two red arrows indicating direction of movement or process, labeled ① and ②.text_image
Diagram showing a hand operating a device with labeled parts and directional arrows, including a zoomed-in view of the device.text_image
Diagram illustrating a mechanical assembly process with red arrows indicating direction of motion, including a magnified inset showing the hand's rotation.text_image
Diagram showing a computer interface with a CMY battery model and a warning label '¡Comprobar!'text_image
Diagram showing printer operation with numbered arrows indicating process stepstext_image
https://ij.start.canon/connecttext_image
Diagram showing printer printing process with red upward arrow and prohibition symbol indicating no printing or disassemblytext_image
Technical diagram showing mechanical assembly with numbered components and a prohibition symbol in Chinesetext_image
Diagram showing printer operation with 'OK' button and printer icon, likely illustrating print or printing processnatural_image
Two-step diagram showing a printer's internal structure before and after, with red arrows indicating the process (no text or symbols present)natural_image
Diagram of a mechanical component with red arrows indicating force or direction (no text or symbols)natural_image
Illustration of a printer with a wrapped bag, shown from front and side views (no text or symbols)Configurando a impressora
text_image
https://ij.start.canon/G2430natural_image
Illustration of a printer with three speech bubbles containing icons: power button, documents, and a document (no text or symbols)2

natural_image
Simple line drawing of a printer connected to a laptop (no text or symbols)natural_image
Diagram showing a hand inserting a component into a device, with no visible text or symbols.text_image
Diagram showing a device with labeled parts C and B, indicating a process or operation with red arrows indicating direction.text_image
Technical diagram showing mechanical assembly with red arrows indicating force or direction changes, likely illustrating a process or assembly step.Configurando a impressora
5. Colocando tinta
Importante
natural_image
Mechanical assembly diagram showing a lever mechanism with red arrow indicating motion (no text or symbols)natural_image
Illustration of a mechanical assembly with a close-up inset showing a component detail (no text or symbols)text_image
Diagram showing a hand operating a tool with two red arrows labeled ① and ② indicating direction of movement or process.5 Remova lentamente a garrafa de tinta da entrada.
text_image
Diagram showing a hand operating a device with red arrows indicating rotation and a close-up of the device's internal structure.6 Recoloque firmemente a tampa do cartucho.
text_image
Diagram illustrating a mechanical assembly with red arrows indicating force or direction of movement, alongside a magnified view of the lever mechanism.text_image
Verificar! CMYtext_image
Diagram showing printer operation with numbered arrows indicating process steps9 Pressione o botão OK.
text_image
https://ij.start.canon/connecttext_image
https://ij.start.canon/G2430natural_image
Illustration of a printer with three speech bubbles containing icons: power button, documents, and a document (no text or symbols)2

natural_image
Simple line drawing of a printer connected to a laptop (no text or symbols)natural_image
Diagram of a printer with an open lid and red arrow indicating rotation (no text or symbols)Attention
natural_image
Diagram showing a hand inserting a component into a device, with red arrows indicating direction (no text or symbols present)text_image
Diagram showing two battery compartments with labeled parts and directional arrows indicating process flow4 Retirez la bande orange.
text_image
Diagram showing two labeled mechanical components (C and B) with a red arrow indicating rotation or movement.
text_image
Two safety warning signs: one indicating no protection, the other showing a hazard with lightning.text_image
Diagram showing a device with labeled parts C and B, indicating a process or operation with red arrows indicating direction.text_image
Technical diagram showing mechanical assembly with red arrows indicating direction of motion or force, likely illustrating a process or assembly step.Configuration de l'imprimante
natural_image
Mechanical assembly diagram showing a lever mechanism with a red arrow indicating motion (no text or symbols present)natural_image
Illustration of a mechanical assembly with tool and component details (no text or symbols)text_image
Diagram showing a hand operating a tool with two red arrows indicating direction of movement or force, labeled ① and ②.text_image
Diagram showing a hand operating a device with labeled parts and directional arrows, including a zoomed-in view of the device.text_image
Diagram illustrating a mechanical assembly process with red arrows indicating force direction and a magnified inset showing the motion of a hand.text_image
Diagram showing printer internal structure with numbered arrows indicating assembly or process stepstext_image
https://ij.start.canon/connecttext_image
Diagram showing printer printing process with red upward arrow and prohibition symbol indicating no printing or disassemblytext_image
Technical diagram showing a mechanical component before and after disassembly, with a red prohibition symbol indicating no disassembly.text_image
Diagram showing printer operation with 'OK' button and printer icon, likely illustrating print or printing processnatural_image
Diagram showing two views of a printer's internal structure, one with a red arrow indicating rotation (no text or symbols present)natural_image
Diagram of a mechanical component with red arrows indicating force or direction (no text or symbols)natural_image
Illustration of a printer with a wrapped bag, shown from front and side views (no text or symbols)Настройка принтера
text_image
https://ij.start.canon/G2430natural_image
Illustration of a printer with three speech bubbles containing icons: power button, documents, and a document (no text or symbols)2

natural_image
Simple line drawing of a printer connected to a laptop (no text or symbols)natural_image
Diagram of a printer with an open lid and red arrow indicating rotation (no text or symbols)Осторожно
natural_image
Diagram showing a hand inserting a component into a device, with red arrows indicating direction (no text or symbols present)text_image
Diagram showing two battery compartments with labeled parts and directional arrows indicating process flowtext_image
Diagram showing two labeled components (C and B) with a red arrow indicating rotation or movement, likely illustrating a process or transformation.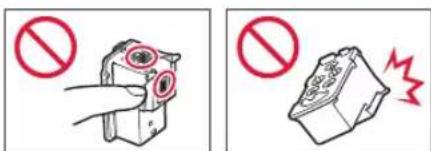
text_image
Two safety warning signs: one indicating no hazard, the other showing a broken device with red lightning bolts.text_image
Diagram showing a device with labeled components (C and B) and directional arrows indicating flow or movement.text_image
Technical diagram showing mechanical assembly with red arrows indicating direction of motion or force, likely illustrating a process or assembly.Настройка принтера
5. Заливка чернил
Внимание!
natural_image
Mechanical assembly diagram showing a lever mechanism with a red arrow indicating motion (no text or symbols present)natural_image
Technical illustration of a mechanical assembly with a close-up inset showing a component detail (no text or symbols)text_image
Diagram showing a hand operating a tool with two red arrows indicating direction of movement or force, labeled ① and ②.text_image
Diagram showing a hand operating a device with labeled parts and directional arrows, including a zoomed-in view of the device.text_image
Diagram illustrating a mechanical device with red arrows indicating force application and a magnified view of the lever mechanism.text_image
Diagram showing printer internal structure with numbered arrows indicating assembly or process stepstext_image
https://ij.start.canon/connecttext_image
Diagram showing printer printing process with red upward arrow and prohibition symbol indicating no printing or disassemblytext_image
Technical diagram showing a mechanical component before and after disassembly, with a red prohibition symbol indicating no disassembly.text_image
Diagram showing printer operation with OK button and printer icon, likely illustrating print or printing processnatural_image
Two-step diagram showing a printer's internal structure before and after assembly, with no visible text or symbols.natural_image
Diagram of a mechanical component with red arrows indicating motion or force direction (no text or symbols)natural_image
Illustration of a printer with a cloth cover and its 3D rendering showing its front view (no text or symbols)text_image
https://ij.start.canon/G2430natural_image
Illustration of a printer with three speech bubbles containing icons: power button, documents, and folder (no text or symbols)2

natural_image
Simple line drawing of a printer connected to a laptop (no text or symbols)natural_image
Diagram of a printer with an open lid and red arrow indicating rotation (no text or symbols)
Увага
natural_image
Mechanical assembly diagram showing a component being inserted into a housing, with red arrows indicating direction (no text or symbols present)text_image
Diagram showing two steps (C and B) of a battery pack being inserted, with arrows indicating process direction.text_image
Diagram illustrating three steps of a printer or scanner operation: no protection, no impression, and no impression.text_image
Diagram showing a connector with labeled parts C and B, indicating a process or assembly step.text_image
Technical diagram showing mechanical assembly with red arrows indicating force directions, likely illustrating a process or component.natural_image
Mechanical assembly diagram showing a lever mechanism with a red arrow indicating motion (no text or symbols present)natural_image
Mechanical assembly diagram showing tool path and component detail (no text or symbols)text_image
Diagram showing a hand operating a tool with two red arrows indicating direction of movement or force, labeled ① and ②.text_image
Diagram showing a hand holding a device with red arrows indicating movement and a labeled control panel, likely illustrating a step in a device operation.text_image
Diagram illustrating a mechanical assembly with red arrows indicating force or motion, showing a lever mechanism and a close-up of the lever's movement.text_image
Diagram showing printer internal structure with numbered arrows indicating assembly stepstext_image
https://ij.start.canon/connect ←→ Ctext_image
Diagram showing printer operation with OK button and printer icon, connected by dotted line to printer
natural_image
Illustration of a printer with a red arrow indicating compression or shift (no text or symbols)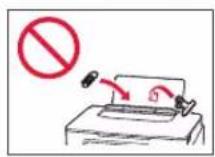
text_image
Diagram illustrating a mechanical or safety violation with numbered components and a prohibition symbolnatural_image
Illustration of two different printer designs, one with a ribbon and the other with a bag (no text or symbols)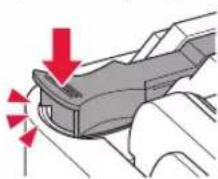
natural_image
Diagram of a mechanical component with red arrows indicating force or direction (no text or symbols)text_image
https://ij.start.canon/connect ←→ Cnatural_image
Technical line drawing of a mechanical component with no visible text or symbols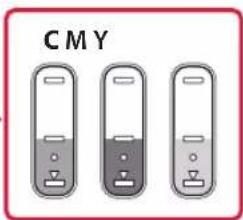
text_image
CMYtext_image
Diagram showing printer internal structure with numbered arrows indicating assembly or process stepsnatural_image
Line drawing of a printer with paper feed and paper tray (no text or symbols)
text_image
بومضtext_image
Diagram showing a hand holding a tool with two red arrows labeled ① and ② indicating direction of movement or process.text_image
Diagram showing hand operating a device with red arrows indicating rotation and movement, labeled with step numbers ① and ②.text_image
Diagram illustrating a mechanical assembly with red arrows indicating force or direction, alongside a magnified view of the component being adjusted.5. صب الحبر
三
natural_image
Mechanical assembly diagram showing a lever mechanism with red arrows indicating motion direction (no text or symbols)natural_image
Technical illustration of a mechanical assembly with tool and component details (no text or symbols)text_image
Diagram showing a hand holding a small component and a mechanical assembly with labeled parts C and B, indicating a process or operation.natural_image
Diagram showing a mechanical component with red arrows indicating direction, no text or symbols present4. retirement رؤس الطباعة
text_image
Diagram of a printer with a red arrow indicating rotation and warning symbol in Chinesenatural_image
Mechanical assembly diagram showing a component being inserted into a housing, with red arrows indicating direction (no text or symbols present)text_image
Diagram showing two printer printing process steps labeled C and B, with a red arrow indicating rotation direction.
text_image
Two safety warning signs: one pointing to a device with a red circle, the other showing a device emitting smoke.
text_image
https://ij.start.canon/G2430natural_image
Simple line drawing of a printer connected to a laptop (no text or symbols)
natural_image
Illustration of a printer with three speech bubbles containing icons: power button, documents, and folder (no text or symbols)2. تشغيل الطابعة
text_image
1 Tajajib alclafii Tajajib alclafii Tajajib alclafii Tajajib alclafii Tajajib alclafii Tajajib alclafii Tajajib alclafii Tajajib alclafii Tajajib alclafii Tajajib alclafii Tajajib alclafii Tajajib alclafii Tajajib alclafii Tajajik alclafii Tajajik alclafii Tajajik alclafii Tajajik alclafii Tajajik alclafii Tajajik alclafii Tajajik alclafii Tajajik alclafii Tajajik alclafii Tajajik alclafii Tajajik alclafii Tajajik alclafii Tajajik alclafi Tajajik alclafi Tajajik alclafi Tajajik alclafi Tajajik alclafi Tajajik alclafi Tajajik alclafi Tajajik alclafi Tajajik alclafi Tajajik alclafi Tajajik alclafi Tajajik alclafi Tajajik alclafi Tajajuk alclafii Tajajuk alclafii Tajajuk alclafii Tajajuk alclafii Tajajuk alclafii Tajajuk alclafii Tajajuk alclafii Tajajuk alclafii Tajajuk alclafii Tajajuk alclafii Tajajuk alclafii Tajajuk alclafii Tajajuk alclafii Tajajok alclafii Tajajok alclafii Tajajok alclafii Tajajok alclafii Tajajok alclafii Tajajok alclafii Tajajok alclafii Tajajok alclafii Tajajok alclafii Tajajok alclafii Tajajok alclafii Tajajok alclafii Tajajok alclafiii Tajajok alclafiii Tajajok alclafiii Tajajok alclafiii Tajajok alclafiii Tajajok alclafiii Tajajok alclafiii Tajajok alclafiii Tajajok alclafiii Tajajok alclafiii Tajajok alclafiii Tajajok alclafiii Tajajok alclafiii Tajajoku alclafiii Tajajuak alclafiii Tajajuak alclafiii Tajajuak alclafiii Tajajuak alclafiii Tajajuak alclafiii Tajajuak alclafiii Tajajuak alclafiii1. محتويات العليا
text_image
https://ij.start.canon

Frequently Asked Questions