
Magnus Comfort - Barbecue BARBECOOK - Free user manual and instructions
Find the device manual for free Magnus Comfort BARBECOOK in PDF.
| Brand | Barbecook |
| Model | Magnus Comfort |
| Type of product | Charcoal barbecue |
| Use | Outdoor use only |
| Materials | Enamel, stainless steel, cast iron, powder coating, plastic |
| Fuel capacity (max) | 1.2 kg of charcoal or briquettes |
| Cooking methods | Direct and indirect |
| Cooking grate | Yes, with upper grid (warming rack) |
| Charcoal grate | Yes, removable |
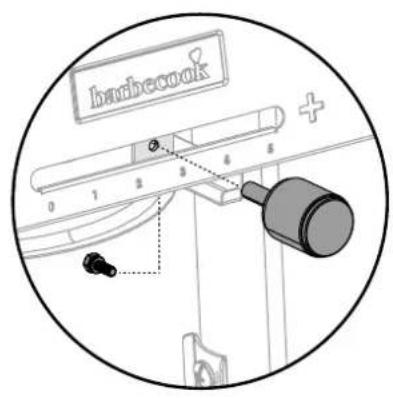
| Air regulator | Yes, positions 0 to 5 |
| Lid | Yes, with adjustable ventilation |
| Side tables | Yes, max weight 7.5 kg each |
| Wheels | Yes (mount on left or right) |
| Ash pan | Yes, removable |
| Charcoal chimney | Usable (not included on all models) |
| Charcoal baskets | Optional (available separately) |
| Warranty | 2 years |
| Spare parts | Available at www.barbecook.com |
| Maintenance | Clean after each use, store dry |
| Safety | Do not use indoors, do not move when hot, keep away from children |
| Estimated assembly time | 60 minutes |
| Recommended number of people for assembly | 2 |
| Protective cover | Recommended (sold separately) |
| Product registration | Recommended at www.barbecook.com |
| Standards | Firelighters compliant with EN 1860-3, charcoal EN 1860-2 |
Frequently Asked Questions - Magnus Comfort BARBECOOK
User questions about Magnus Comfort BARBECOOK
0 question about this device. Answer the ones you know or ask your own.
Ask a new question about this device
Download the instructions for your Barbecue in PDF format for free! Find your manual Magnus Comfort - BARBECOOK and take your electronic device back in hand. On this page are published all the documents necessary for the use of your device. Magnus Comfort by BARBECOOK.
USER MANUAL Magnus Comfort BARBECOOK
Register your Barbecook® on www.barbecook.com and enjoy the full Barbecook® experience!
THIS IS YOUR UNIQUE SERIAL N°

EN WARNING! Do not use spirit or petrol for lighting or re-lighting! Always use the barbecue on a safe, flat surface.
Thank you for purchasing a Barbecook barbecue We hope you enjoy using it and have many happy times with it! You can optimize your experience by registering your barbecue online to take advantage of the many benefits. You can optimize your experience by registering your barbecue online to take advantage of the many benefits:
- You gain access to the full online user guide, so you can learn the ins and outs of your appliance.
- We provide you with personalized after-sales service, which means you can quickly and easily find and order spare parts. This enables you to get the most out of the warranty service.
- You are kept informed of product updates.
- You learn many new tips and tricks and grillspiration to further improve your grillmaster talents.
- Ready for a new adventure? Register your appliance and join the #barbecook community!
For more information about registering your appliance, visit www.barbecook.com.
Barbecook respects your privacy. Your data will never be sold, distributed or shared with third parties.
REGISTER HERE:

2.ABOUT THIS MANUAL
This manual consists of two parts. Part 1 contains general instructions on assembly, use, maintenance and warranty. Part 2 (beginning on page 39) contains multiple illustrations:
- Exploded views, parts lists and assembly drawings of the devices described in this manual.
- Illustrations referring to the main instructions from the first part of the manual.
If an illustration exists for a particular instruction, that illustration is referenced in the instruction.
3. SAFETY INSTRUCTIONS
Read the instructions before using the device. Always follow the instructions carefully. If the device is mounted or used in any other way, this may result in fire and damage to property. Damage due to failure to follow the instructions (incorrect assembly, misuse, improper maintenance, etc.) is not covered under the warranty.
- WARNING! Keep children and pets away from the barbecue.
- WARNING! This barbecue gets very hot, do not attempt to move it when it is in use.
-
Use appropriate protection when you need to touch hot parts.
-
Keep flammable materials, flammable liquids and dissoluble objects at a safe distance from the appliance when it is in use.
- WARNING! Do not use spirits, gasoline or other flammable liquids to light or relight the appliance! You must only use firefighters that comply with EN 1860-3!
- WARNING! Do not start barbecuing until the charcoal has developed a layer of ash. This usually takes around 15 minutes (Fig. 3c)
- Do not leave the barbecue unattended when in use.
- Keep a bucket of water or sand nearby when you use the appliance, especially on very hot days and in dry environments.
- Do not use indoors! Only use the appliance outdoors. If you use the appliance indoors, even in a garage, enclosed space or shed, you risk carbon monoxide poisoning.
- Take into account the following when choosing a location:
- Place the appliance at least three meters from a building in a open, well-ventilated location.
- Do not place the barbecue below an overhanging structure (veranda, shelter etc.) or under foliage.
- Place the appliance on a flat and stable surface.
- Do not place the appliance on a moving vehicle (boat, trailer etc.).
4. RECURRENT CONCEPTS
This section lists the definitions of some less familiar concepts. These concepts are used when discussing various topics throughout the manual.
4.1. Enamel
Some parts of the appliance are covered in a layer of melted glass, also known as enamel. This enamel protects the underlying metal from corrosion. Enamel is a high-quality material: it is corrosion-resistant, it does not degrade under the influence of high temperatures, and it is very easy to maintain. Since the enamel is less flexible than the metal to which it is applied, pieces of enamel may break off when the appliance is used incorrectly. To avoid this problem, you must be careful when assembling enameled parts and you must always maintain the enamel according to the instructions in this manual.
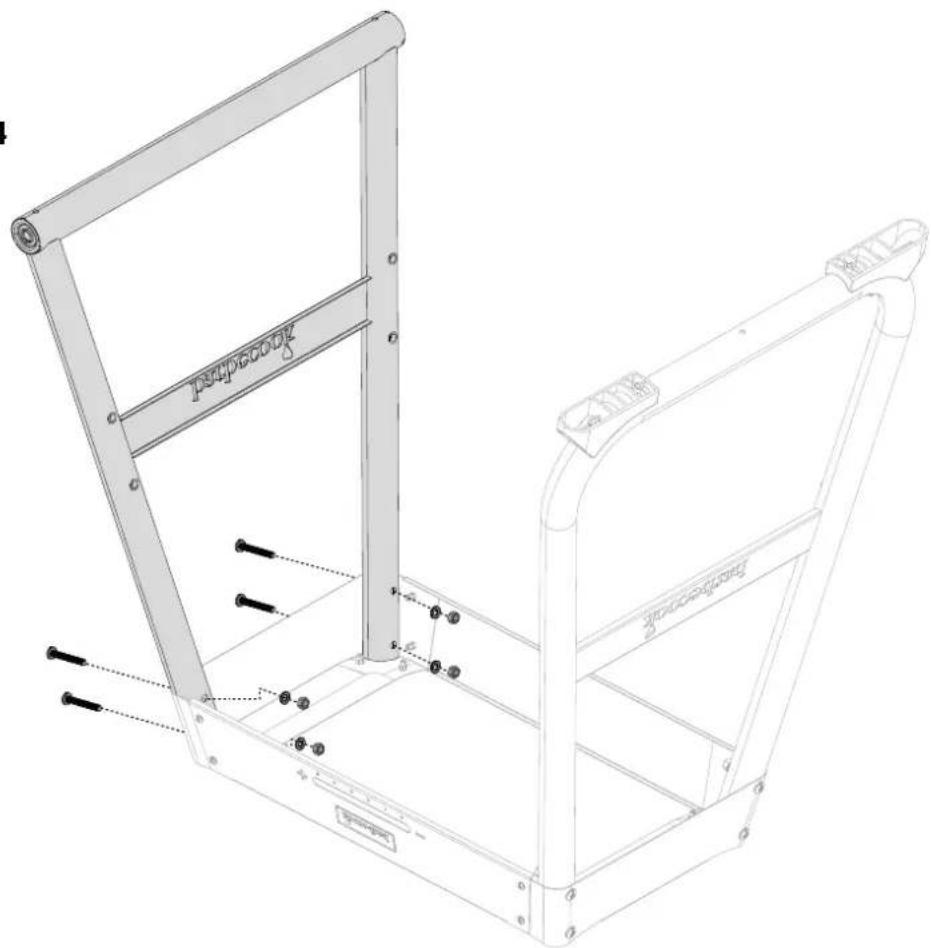
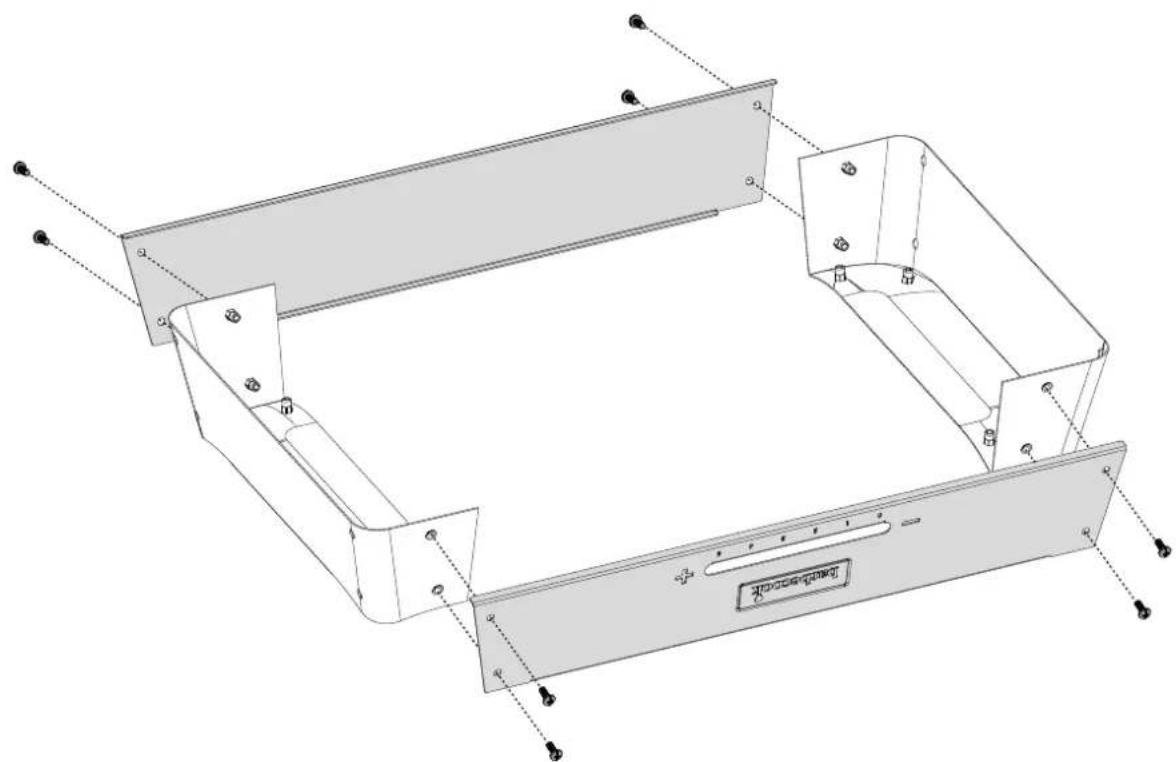
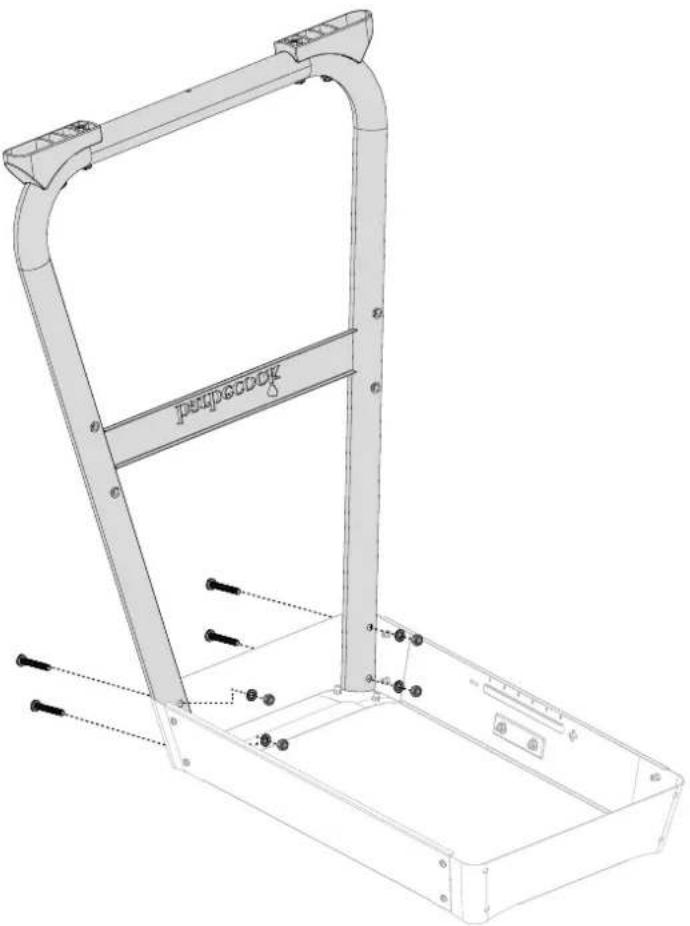
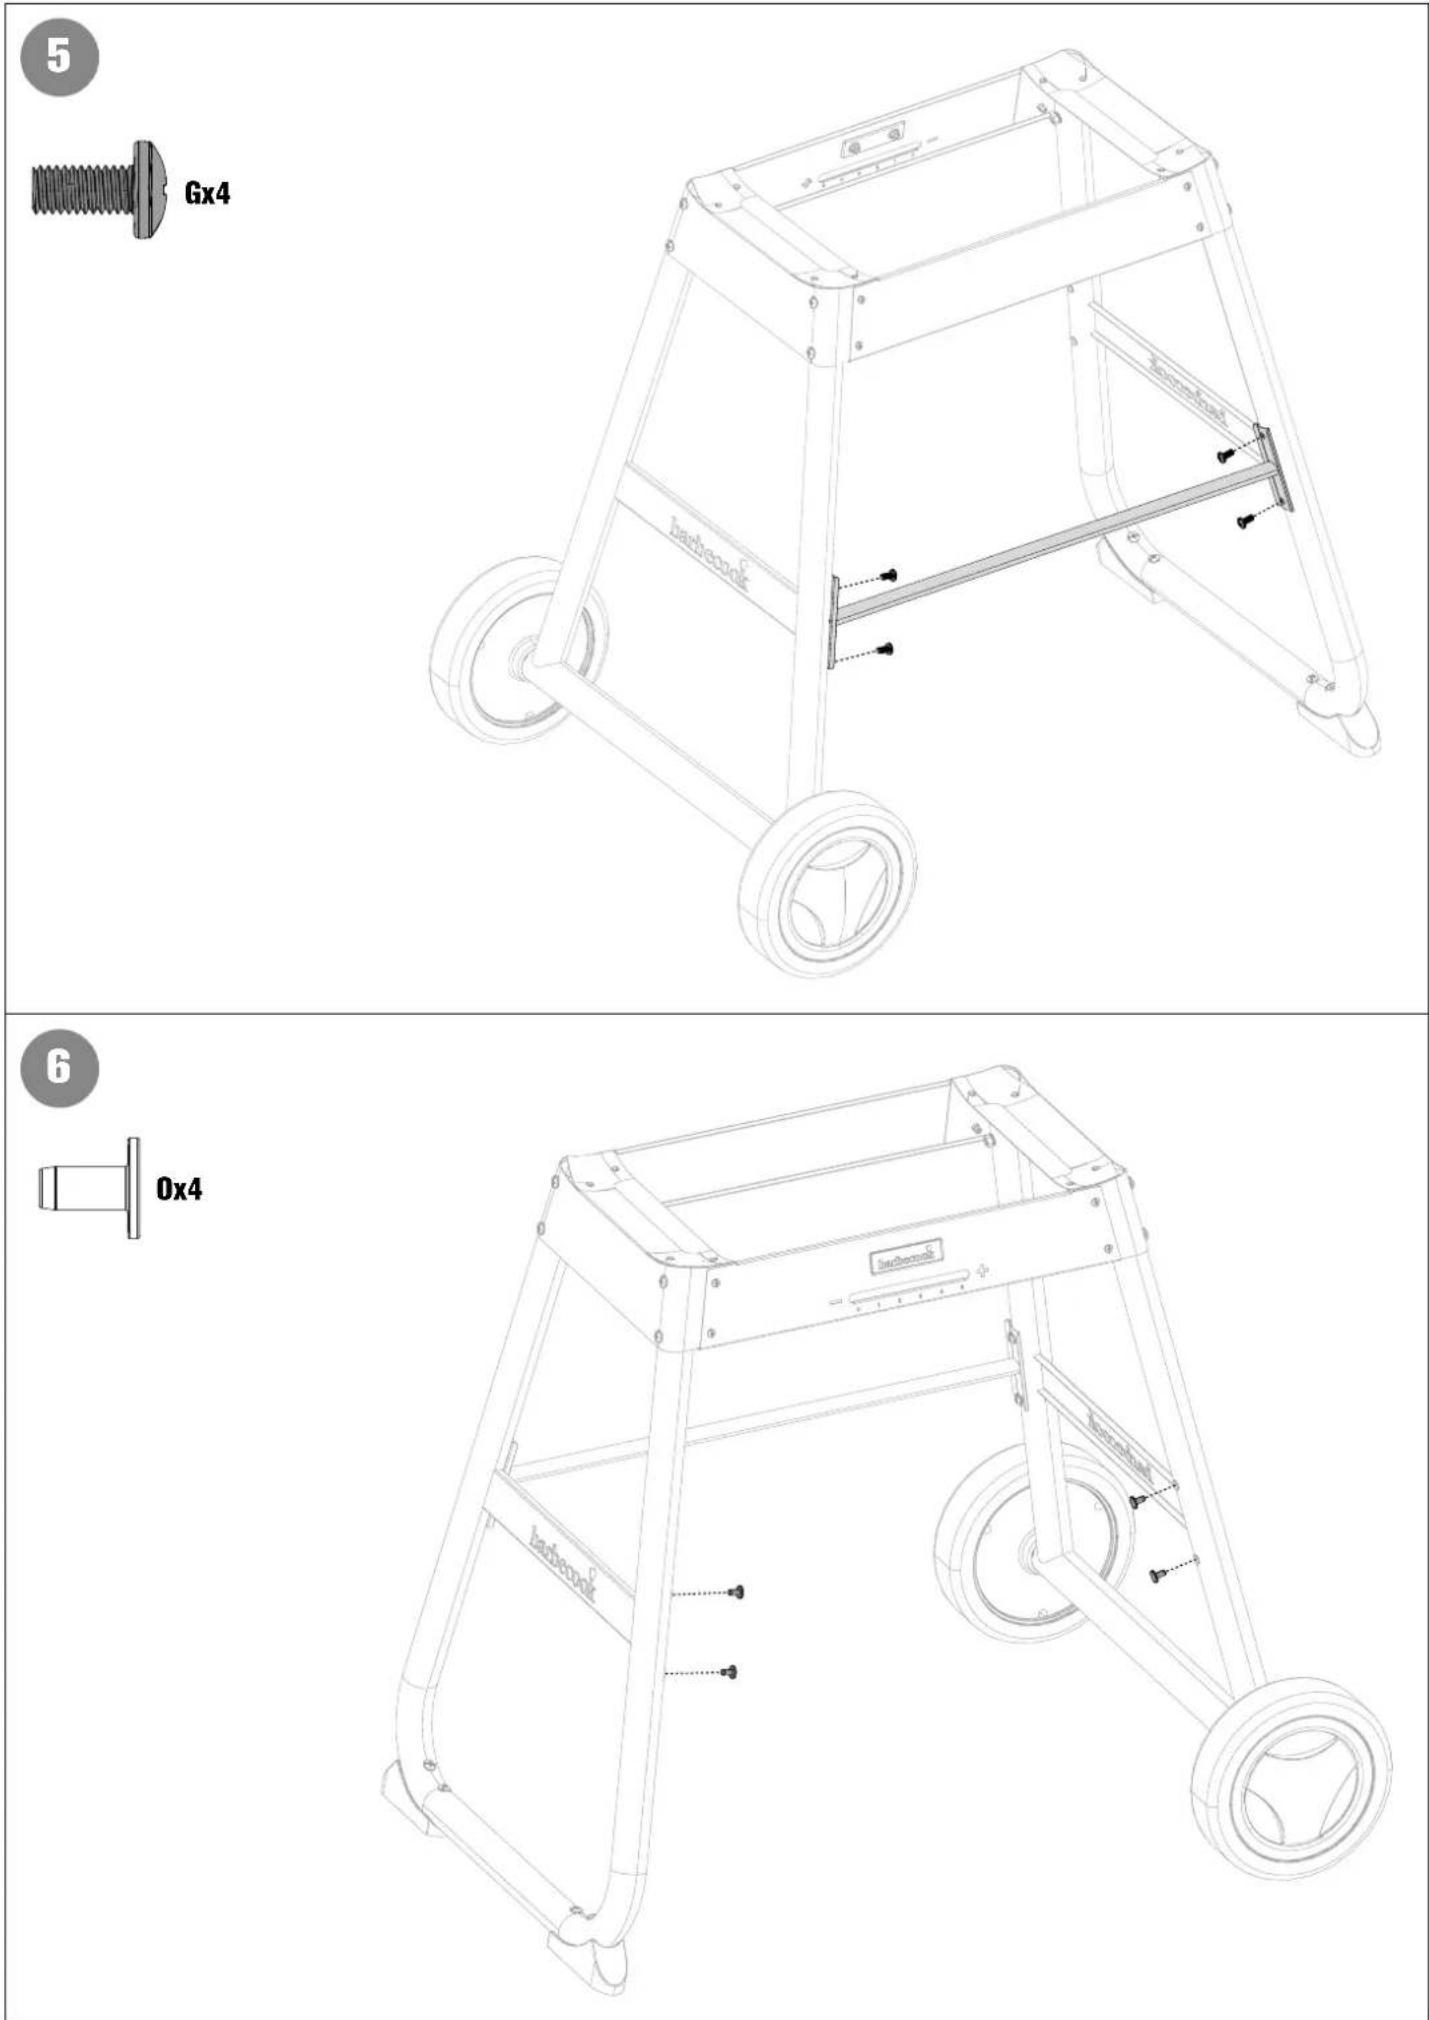
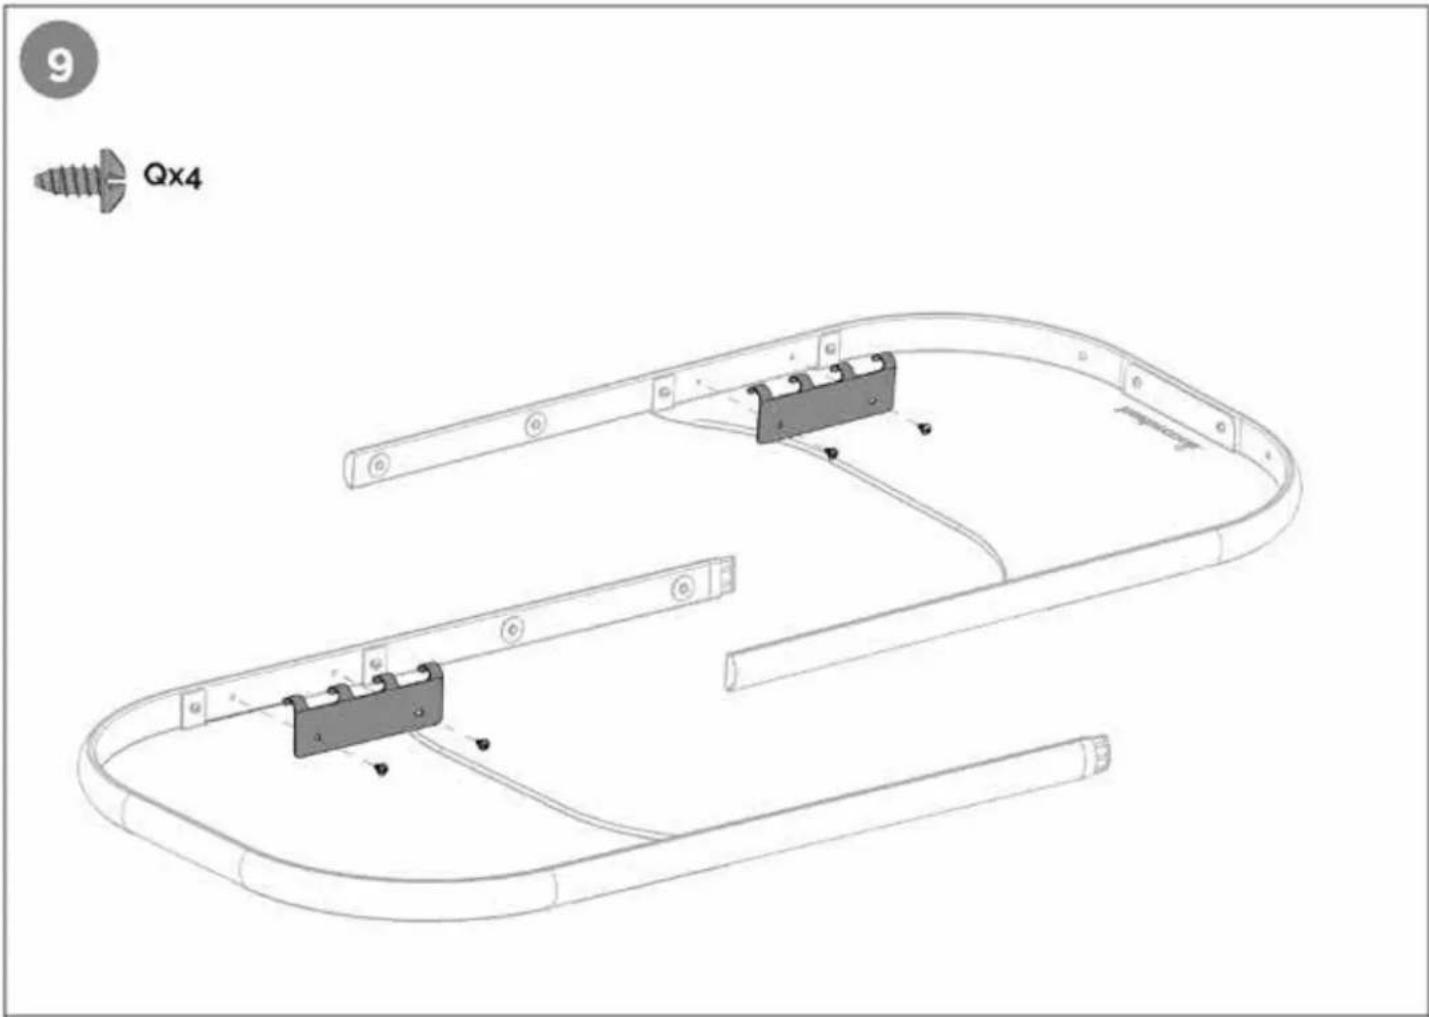
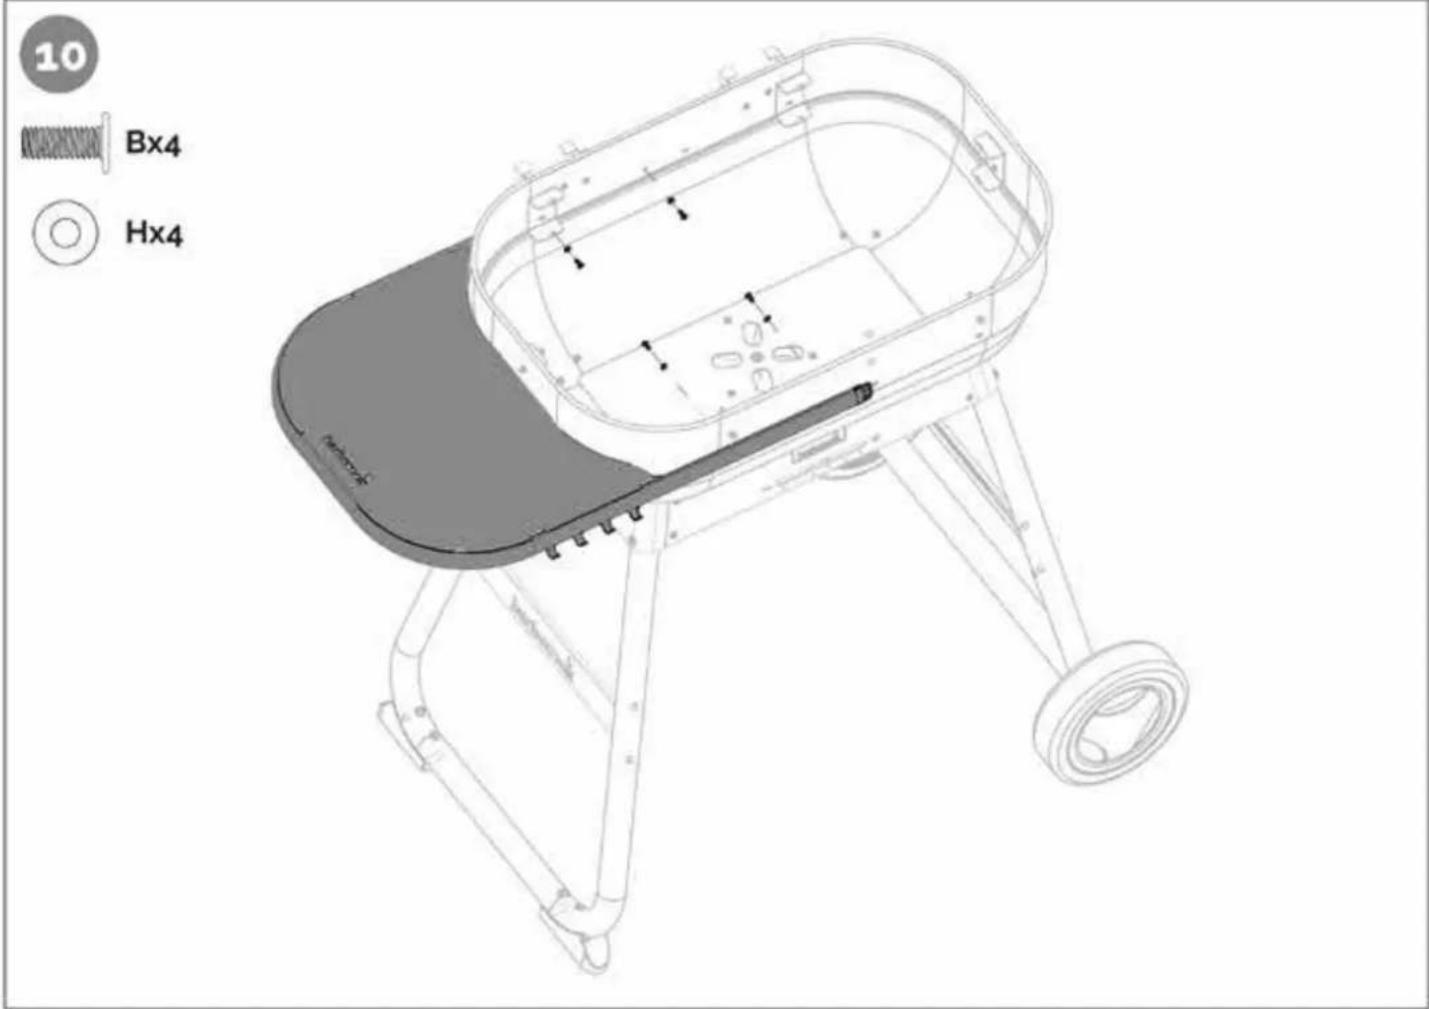
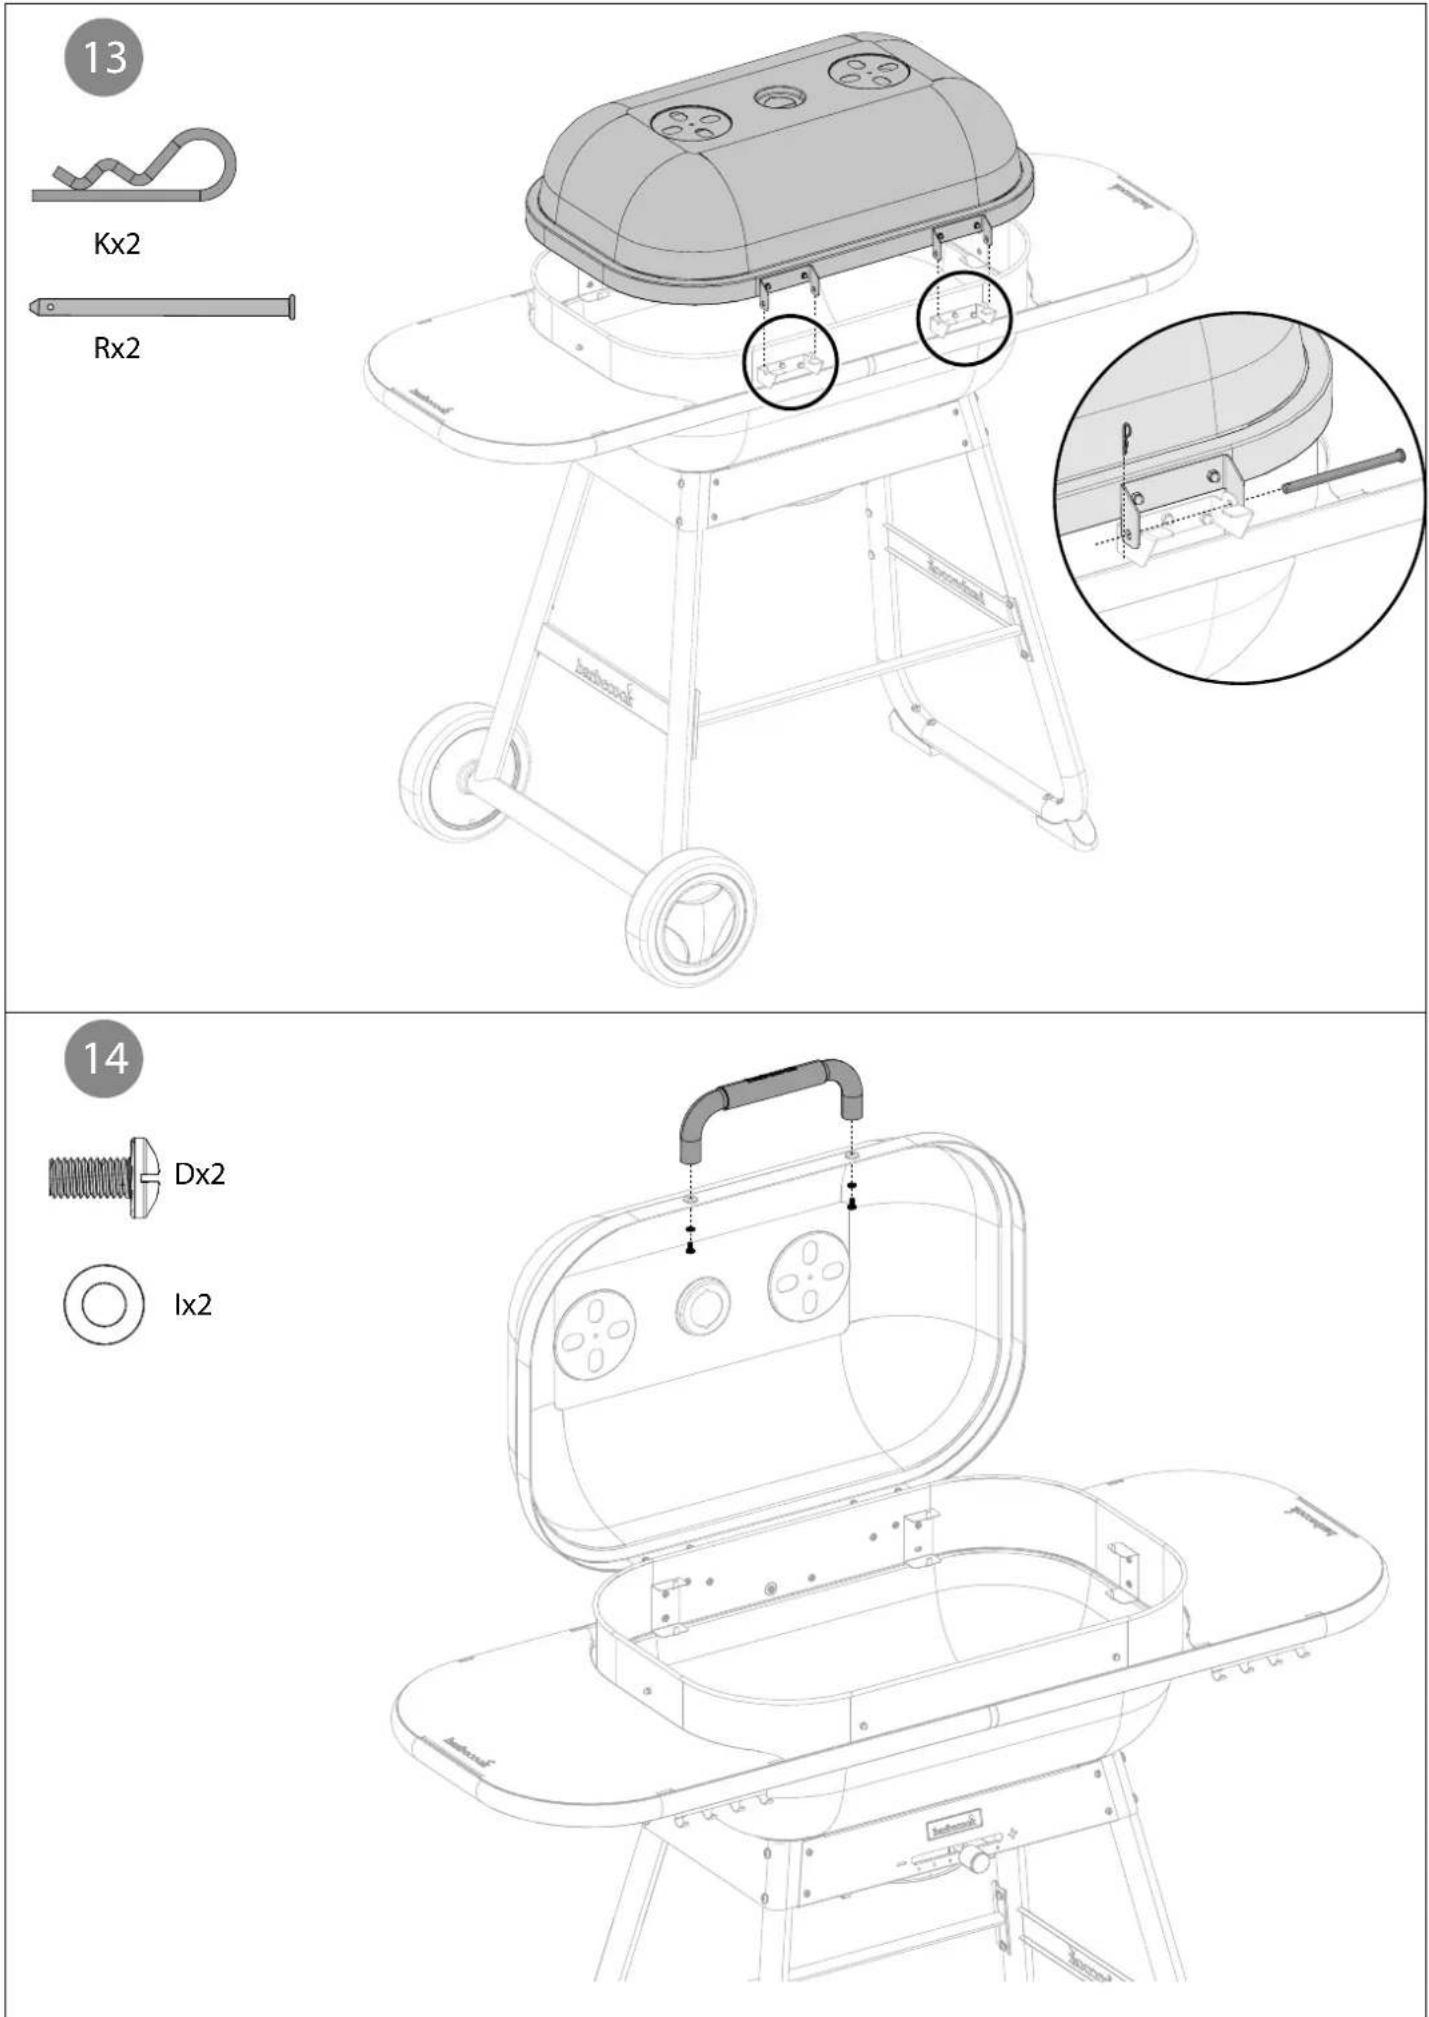
5. ASSEMBLING THE APPLIANCE
5.1. Safety instructions
- Remove all of the packaging.
- Do not make modifications to the appliance when assembling. You must not make changes to any of the parts of the appliance; this is very dangerous.
- Always carefully follow the assembly instructions.
- The user is responsible for the correct assembly of the appliance. Damage caused by incorrect assembly is not covered by the warranty.
5.2. To assemble the appliance
- Place the appliance on a flat and stable surface before use.
-
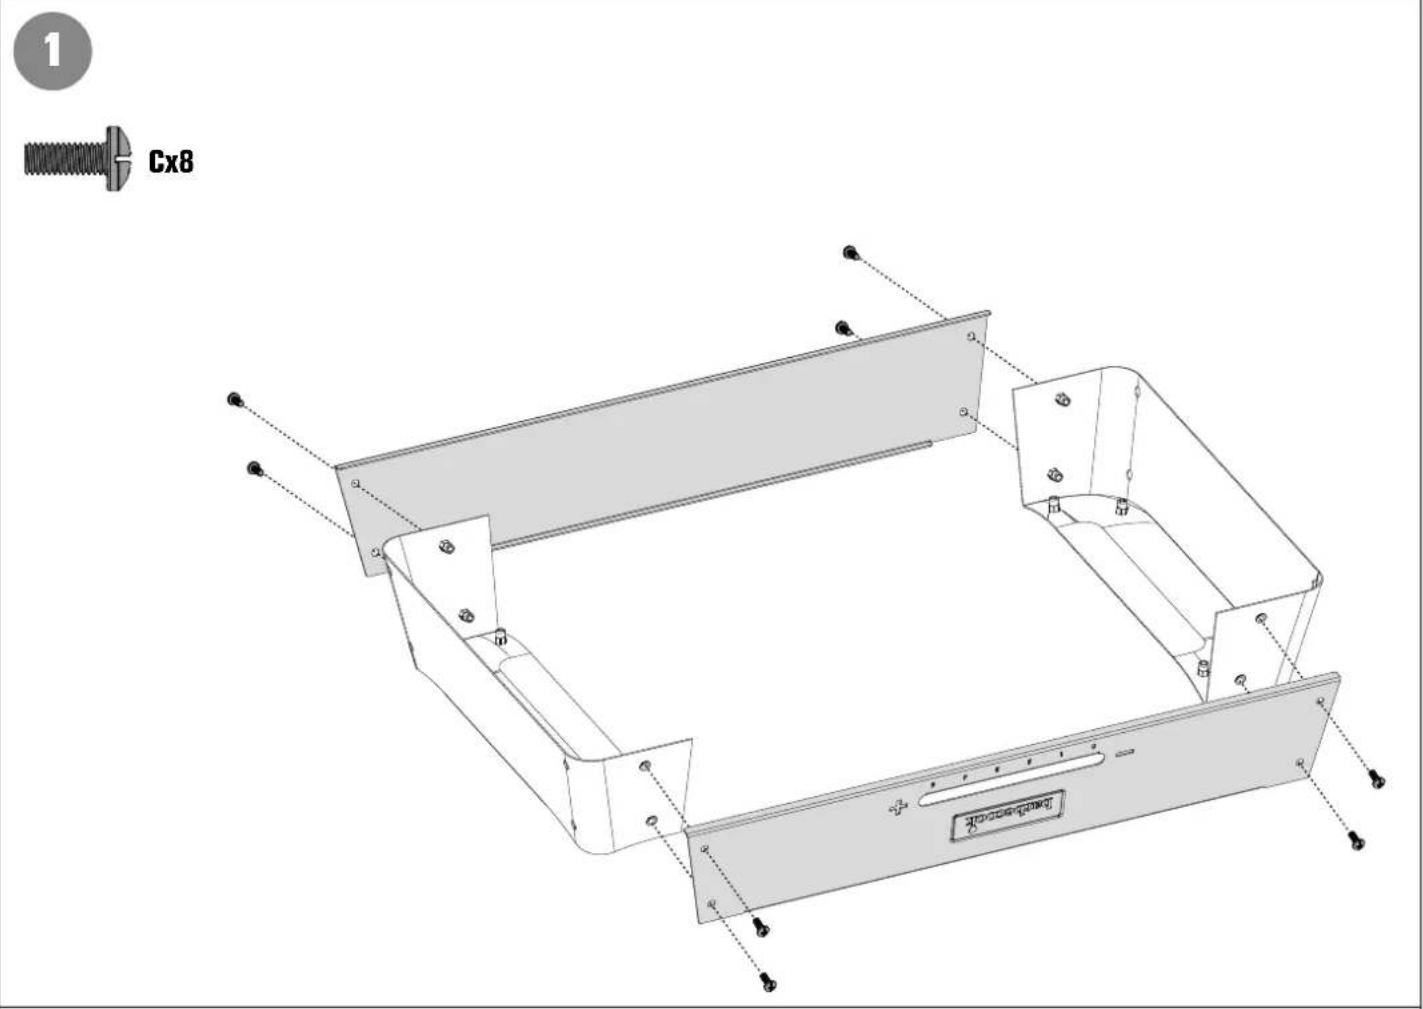
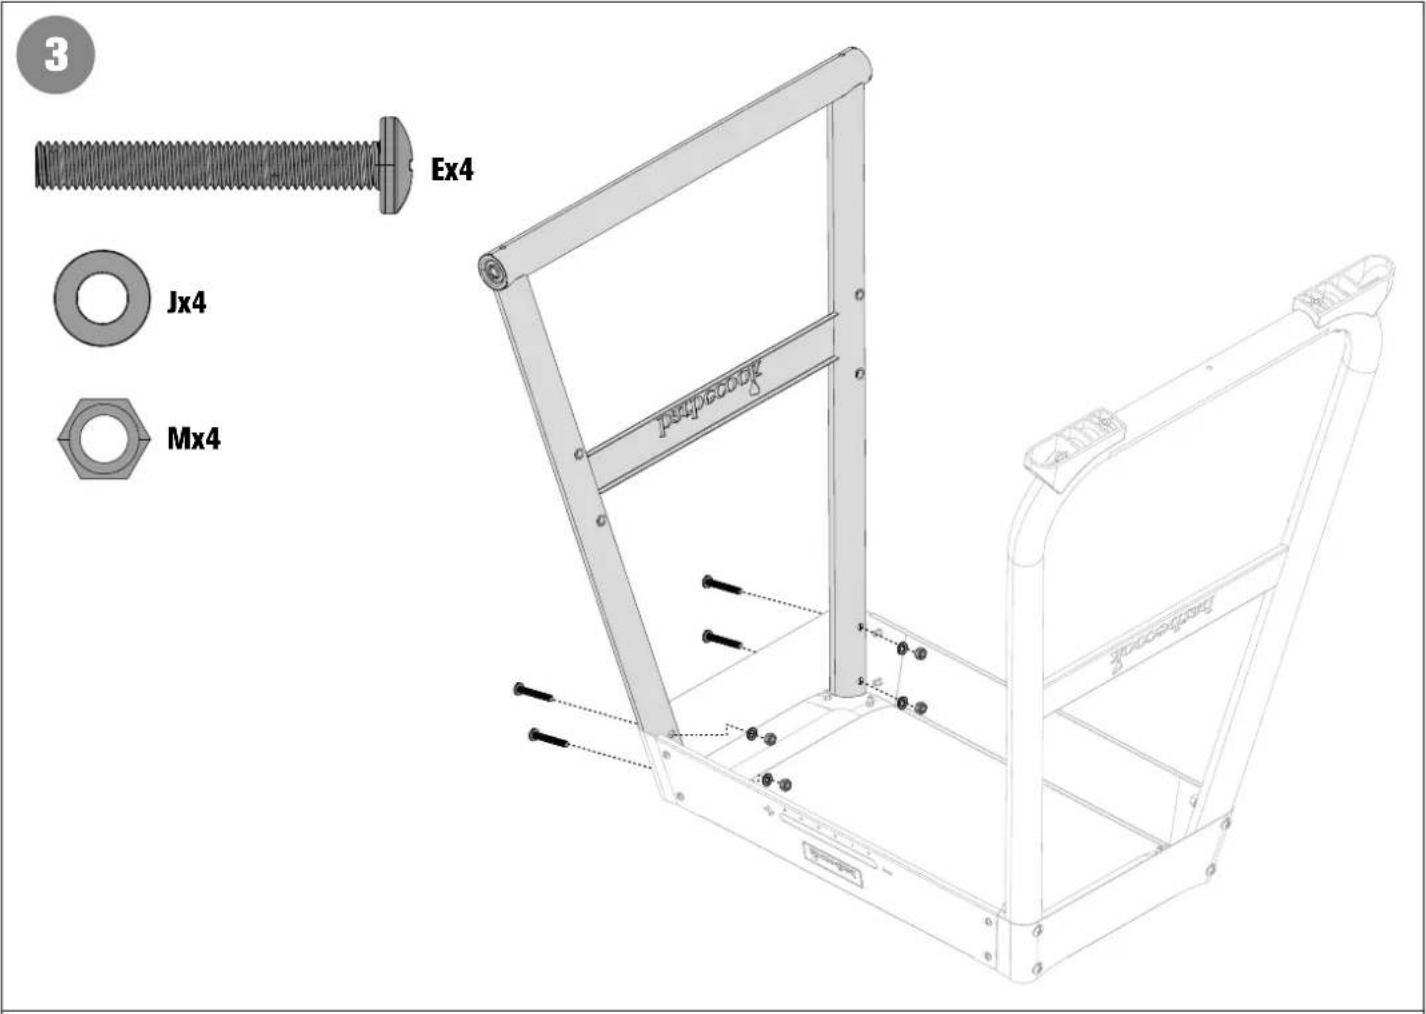
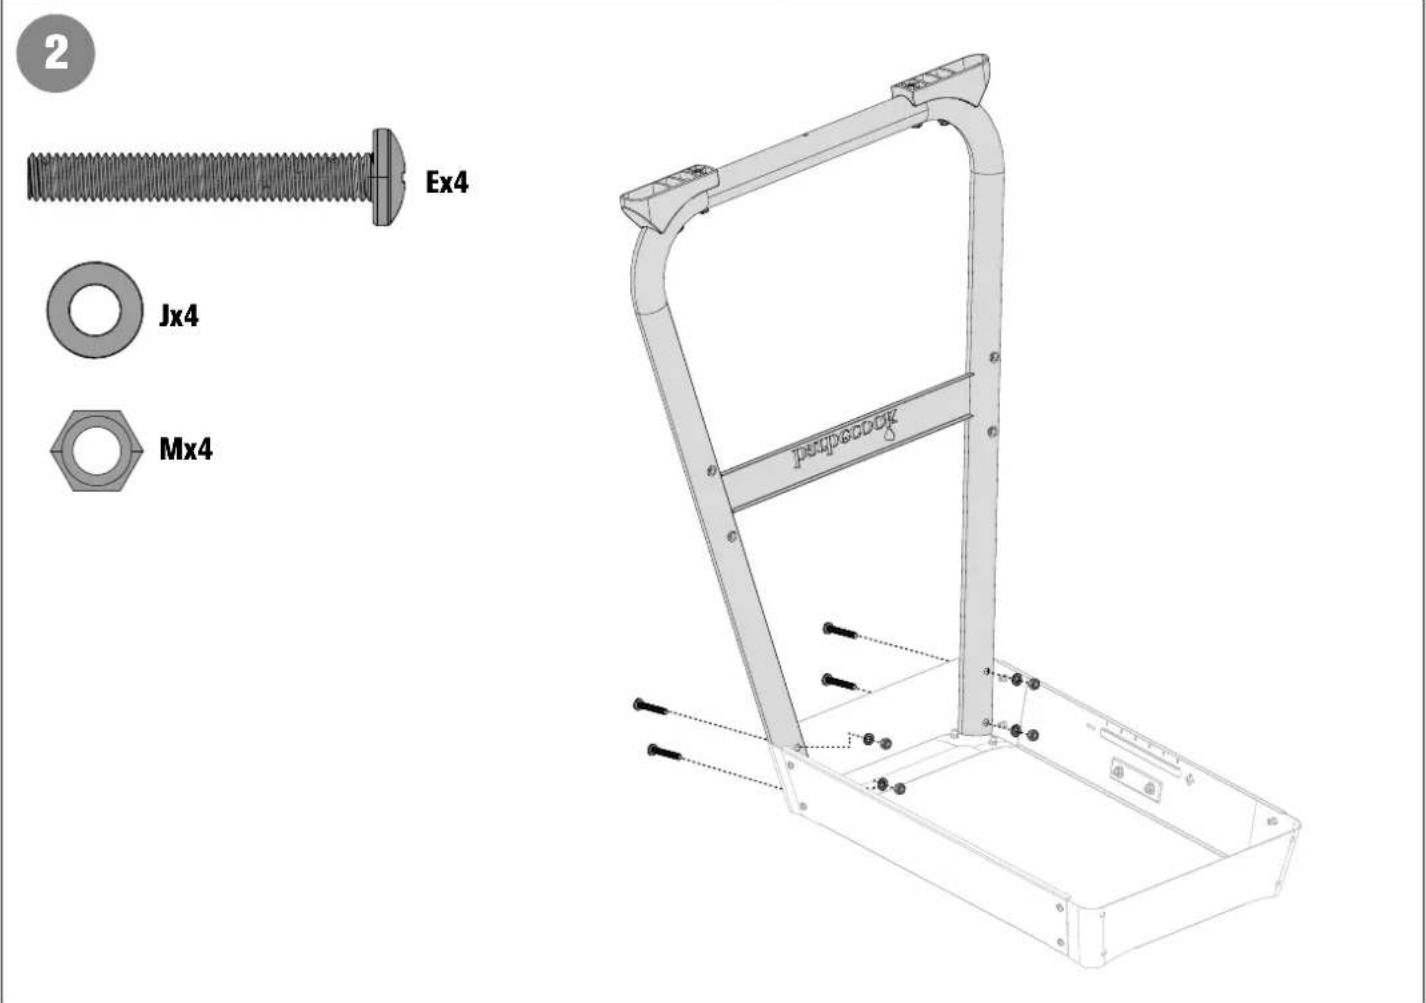
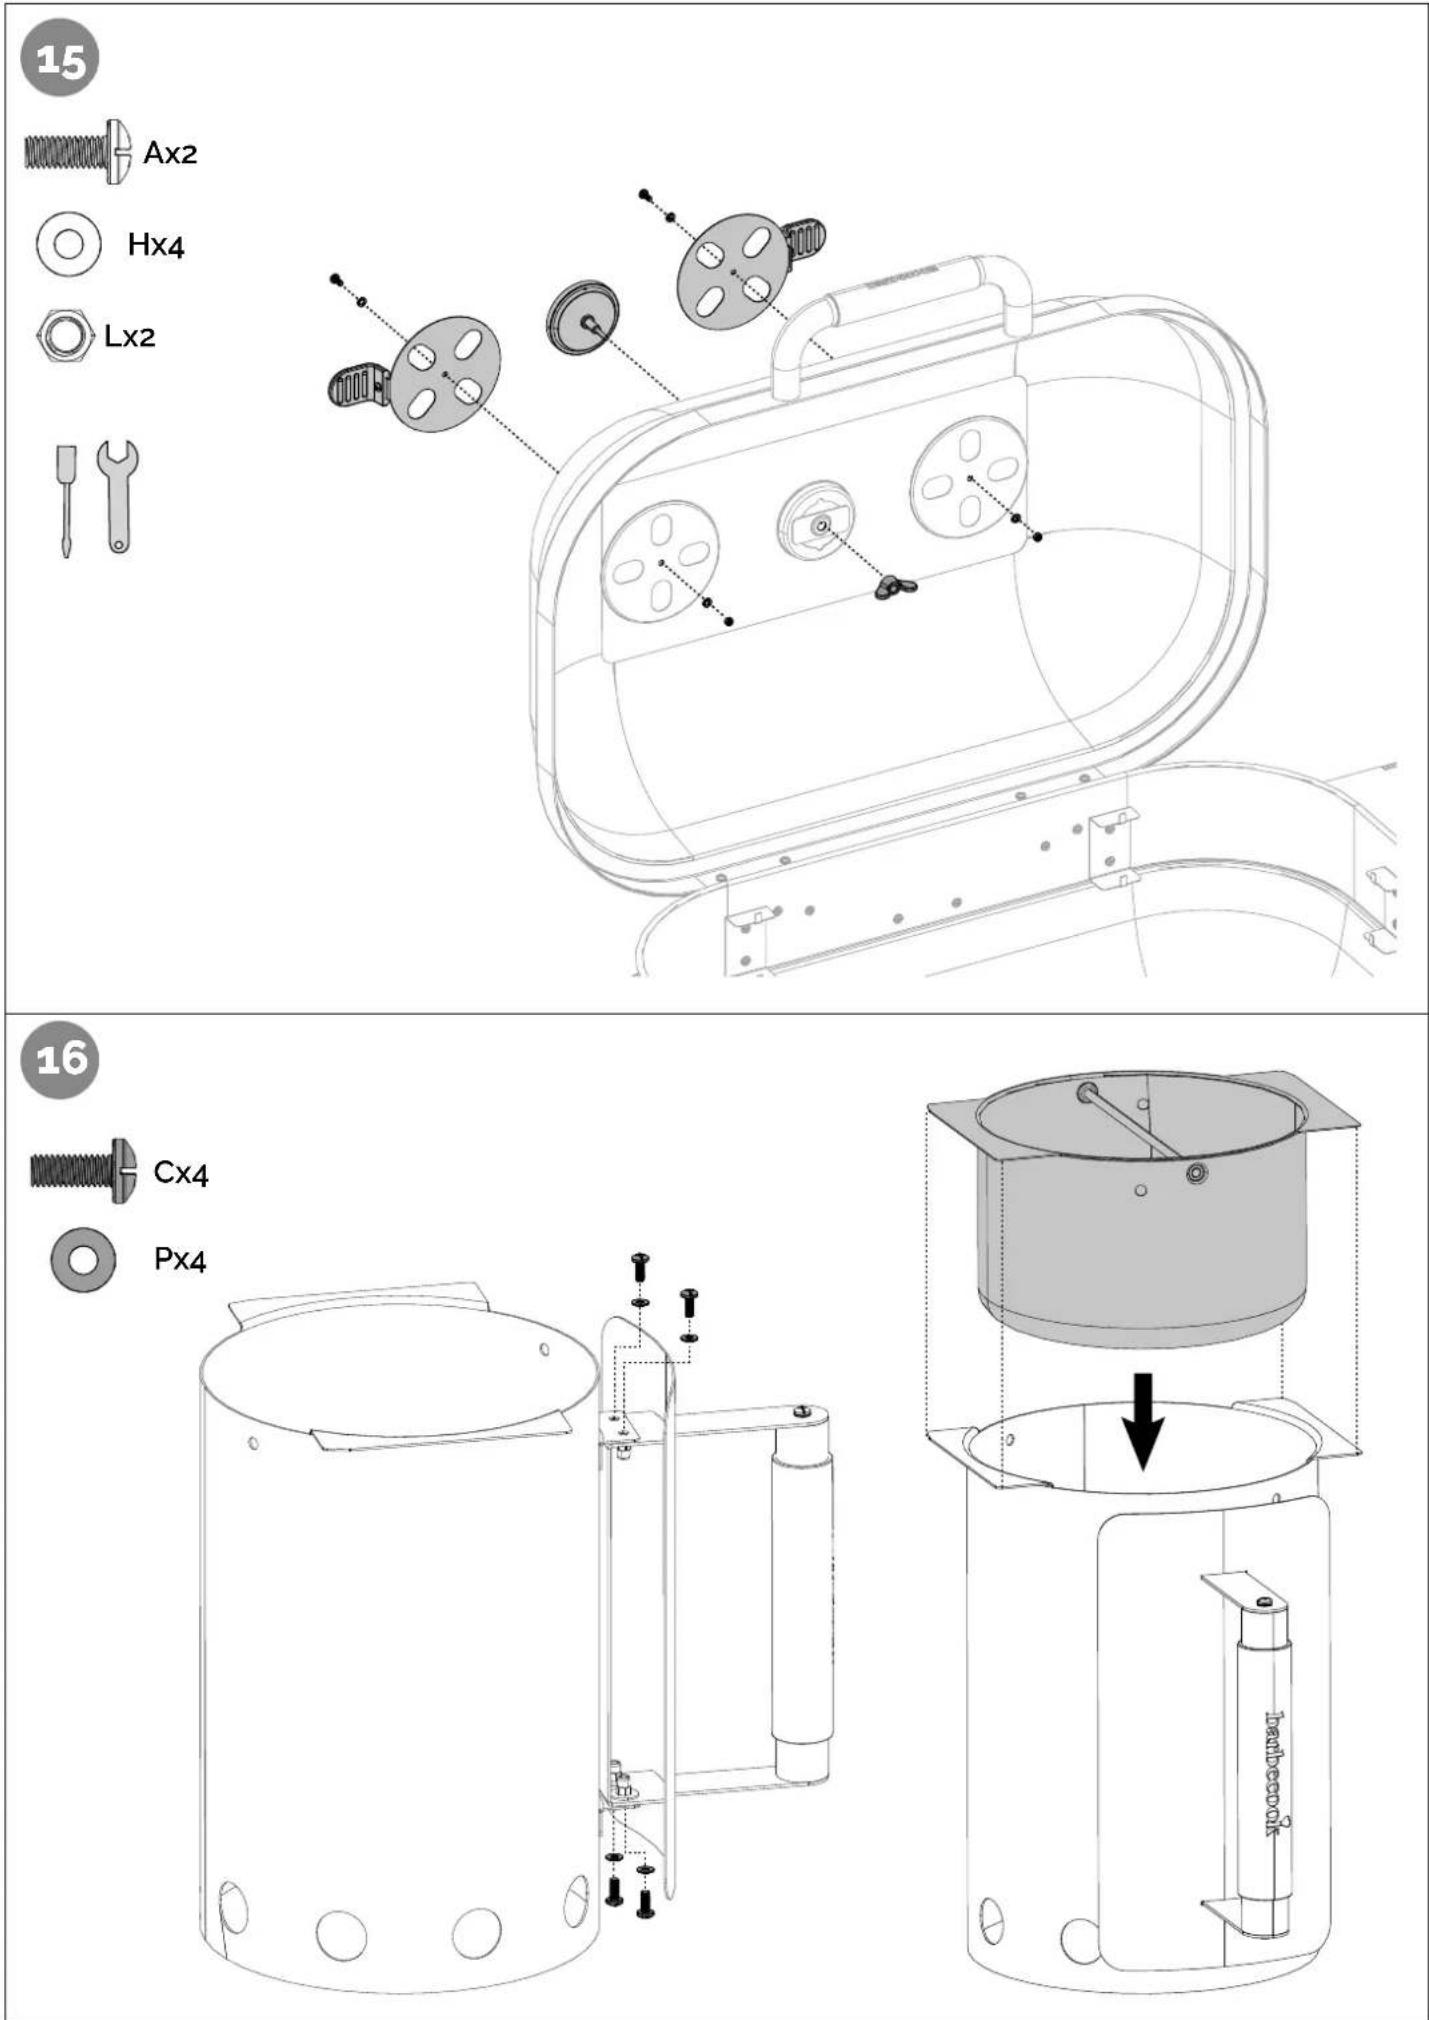
Assemble the appliance as shown on the assembly drawings. You will find the assembly drawings in the second part of this manual, after the exploded view of your appliance.
-
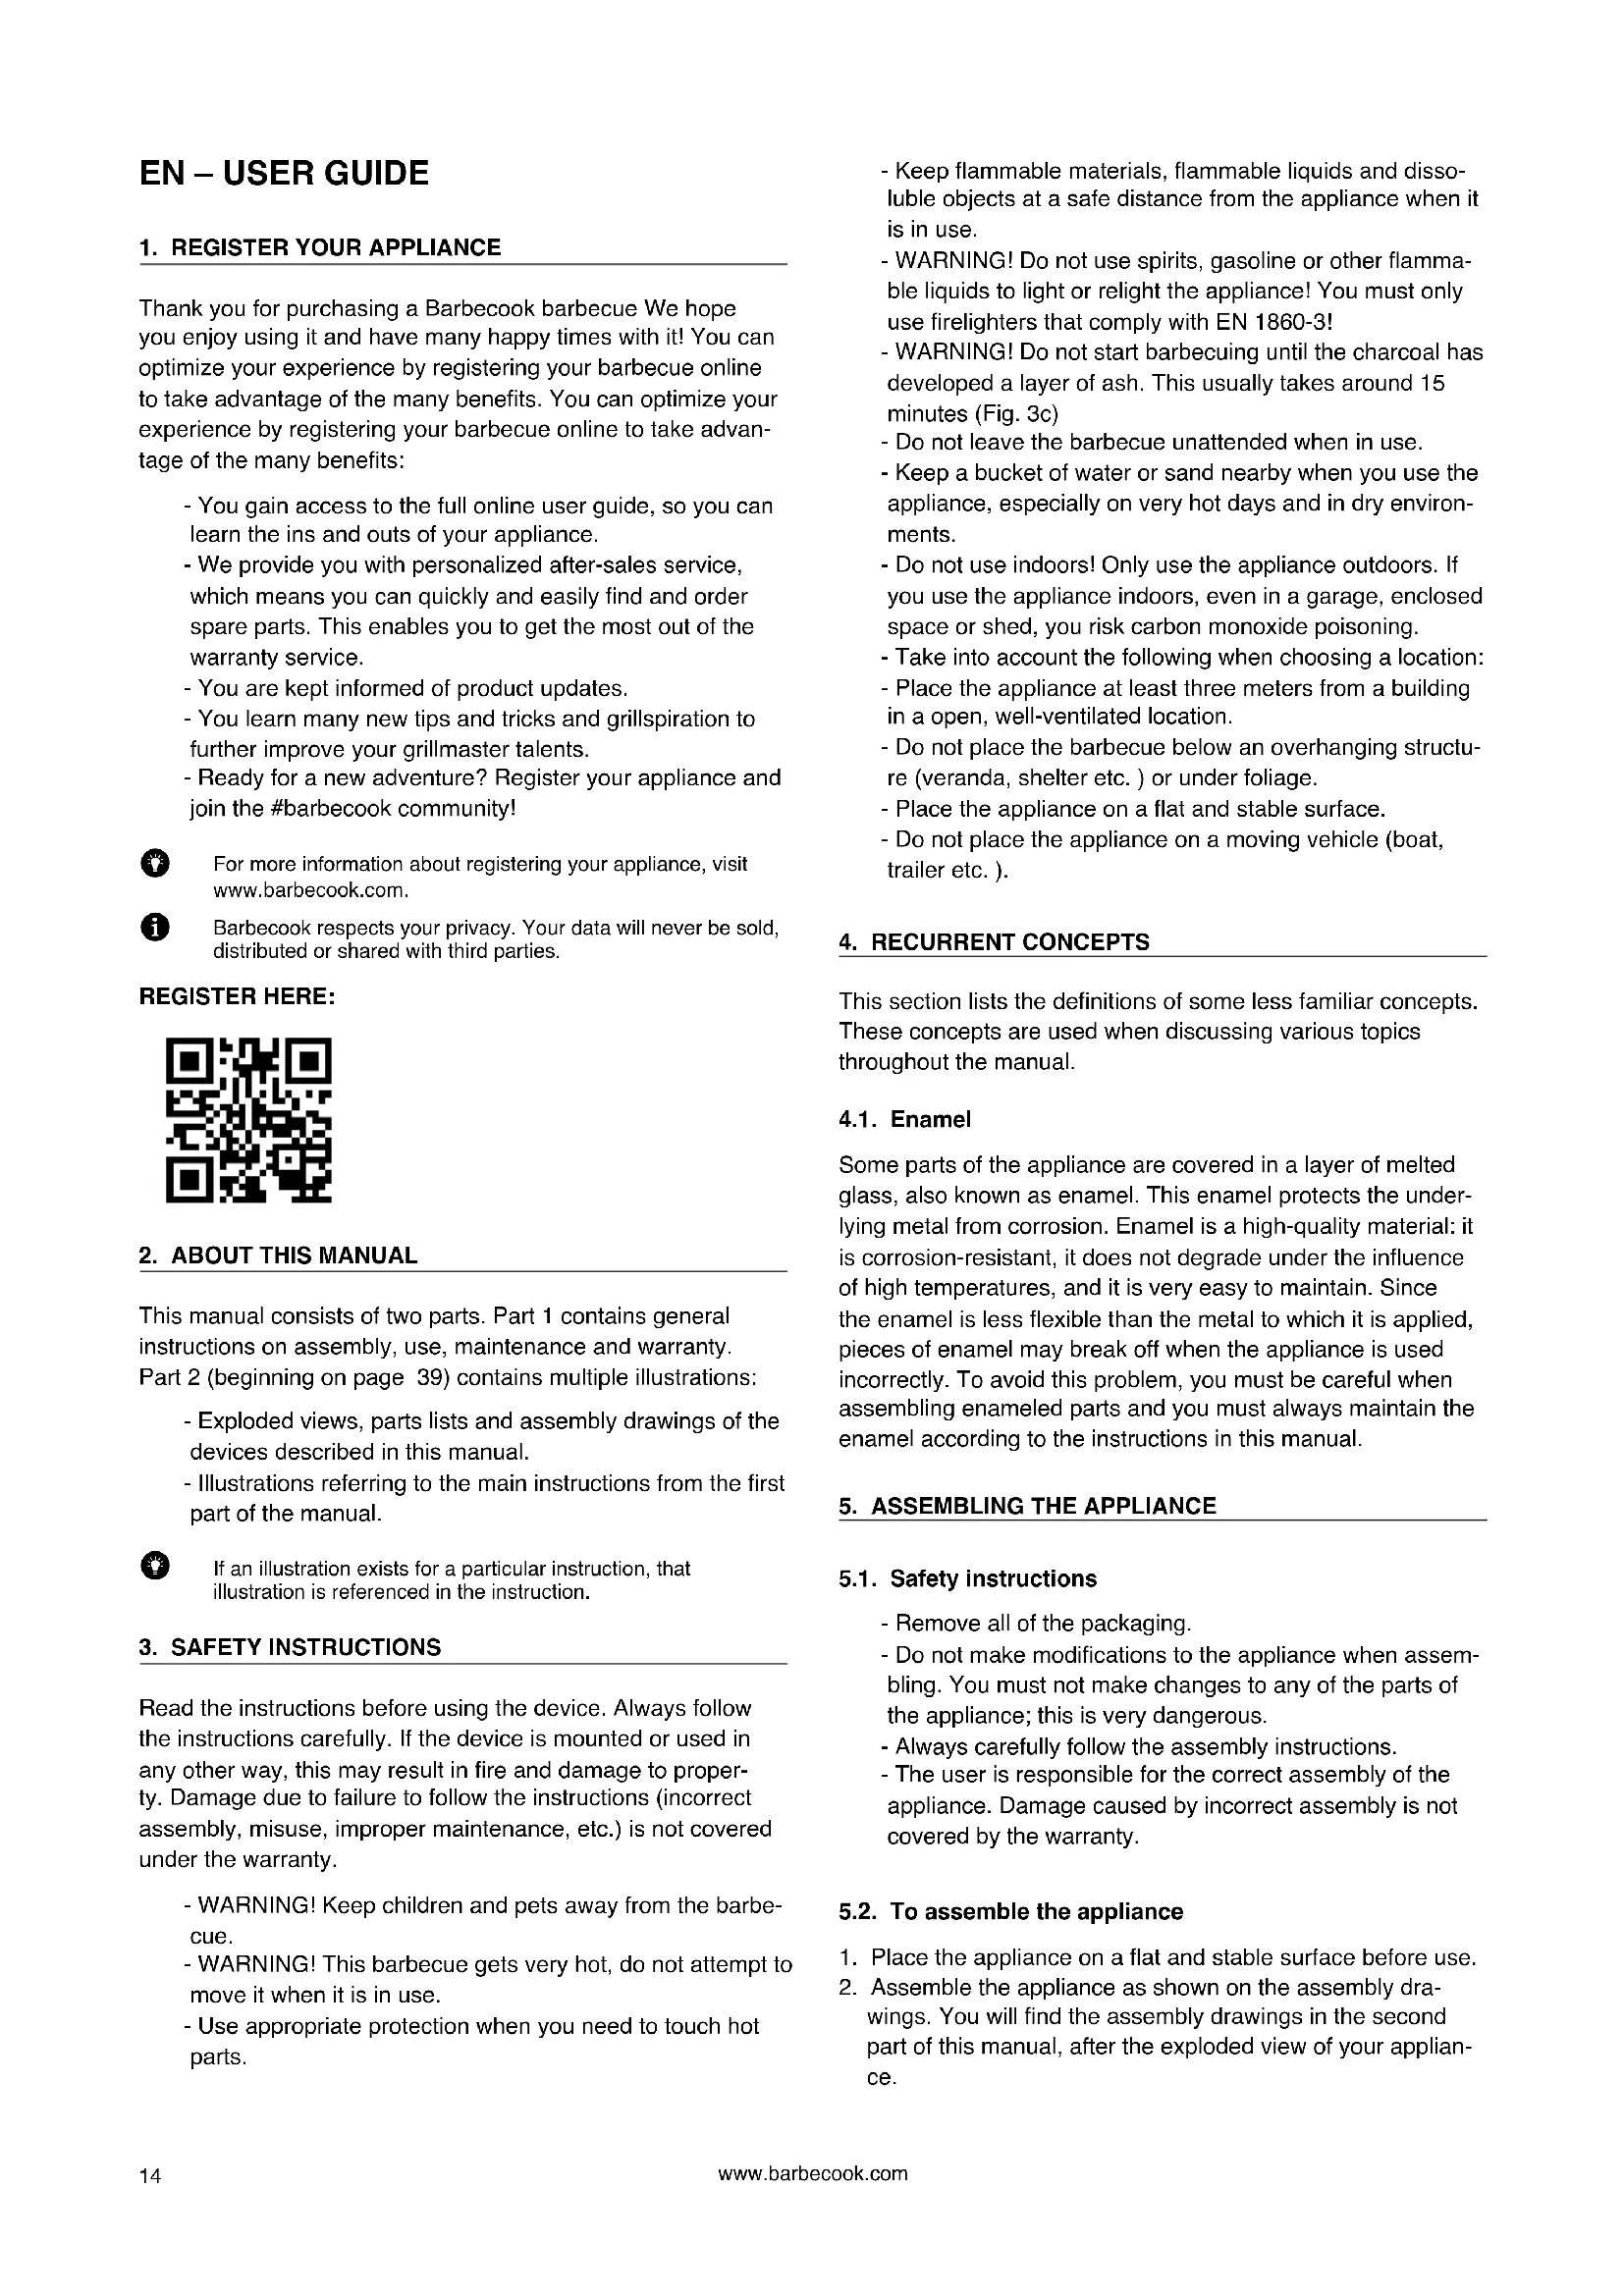
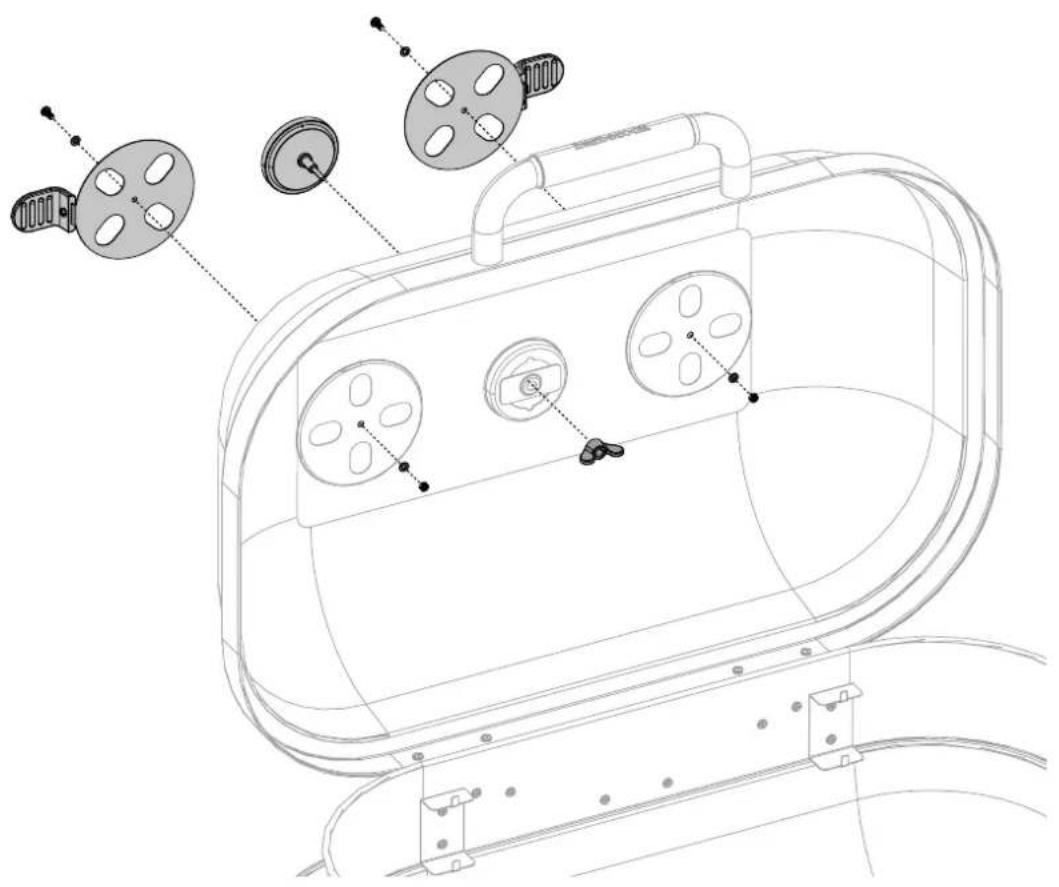
For each model you can decide whether to mount your wheels and/or side table on the left or right. In this way, the Magnus adapts flexibly to your preferences.
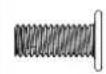
Be careful when assembling enameled parts. Use the fiber washers supplied to protect the enamel around the screws. You only need a cross head screwdriver and a spanner to adjust the tension on the clips at the bottom of the device.

For units equipped with one or more side tables: never lean on
them. Max. weight that these tables can carry is 7.5kg
6. PREPARING THE APPLIANCE FOR USE
6.1. First time use
It is recommended that the grill be heated up and the fuel kept red hot, with the lid on, for at least 30 minutes before cooking for the first time.
6.2. Which type of charcoal should I use and how much?
Always light your appliance with traditional charcoal, never with briquettes. When your appliance is lit, you can add briquettes. Use good quality charcoal to light the appliance, preferably charcoal that complies with EN 1860-2. Good- quality charcoal consists of large, shiny pieces and does not give off much dust. Preferably use Barbecook Premium charcoal (BC-ACC-7421) Close the bag of charcoal properly before storing it. Always store charcoal in a dry location, do not store charcoal in a basement. Make sure not to overfill your appliance. Overloading the bowl with charcoal/briquettes can seriously damage your barbecue due to the extreme heat. Use the maximum following maximum amounts of fuel:
6.3. Preparing the appliance for use
- Open the lid.
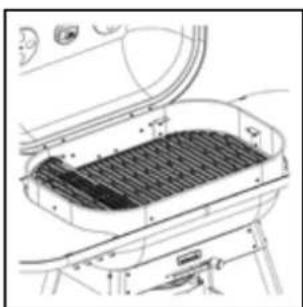
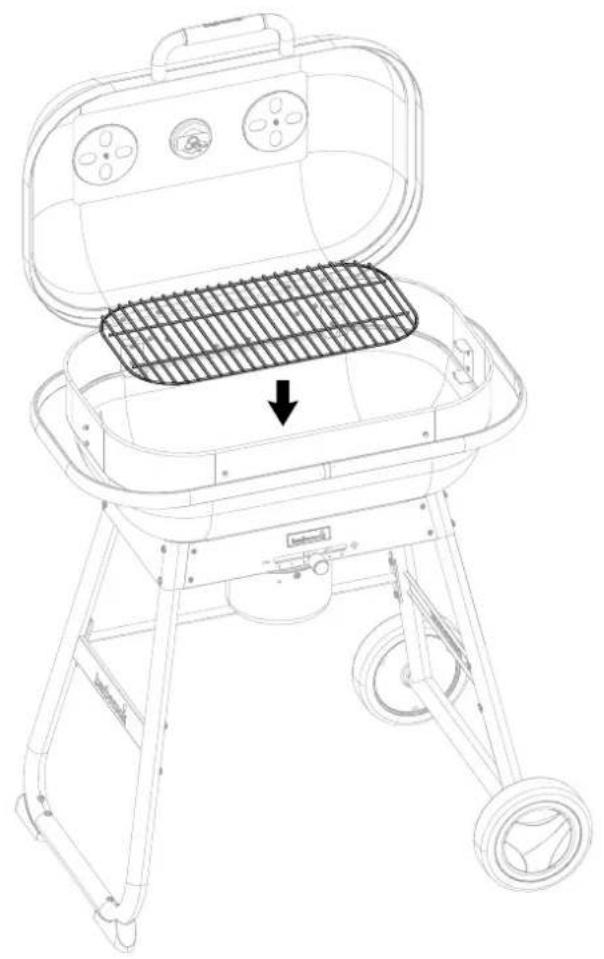
- Remove the cooking top grate from your grill. Start with the middle grate (use the supplied grill lifters).
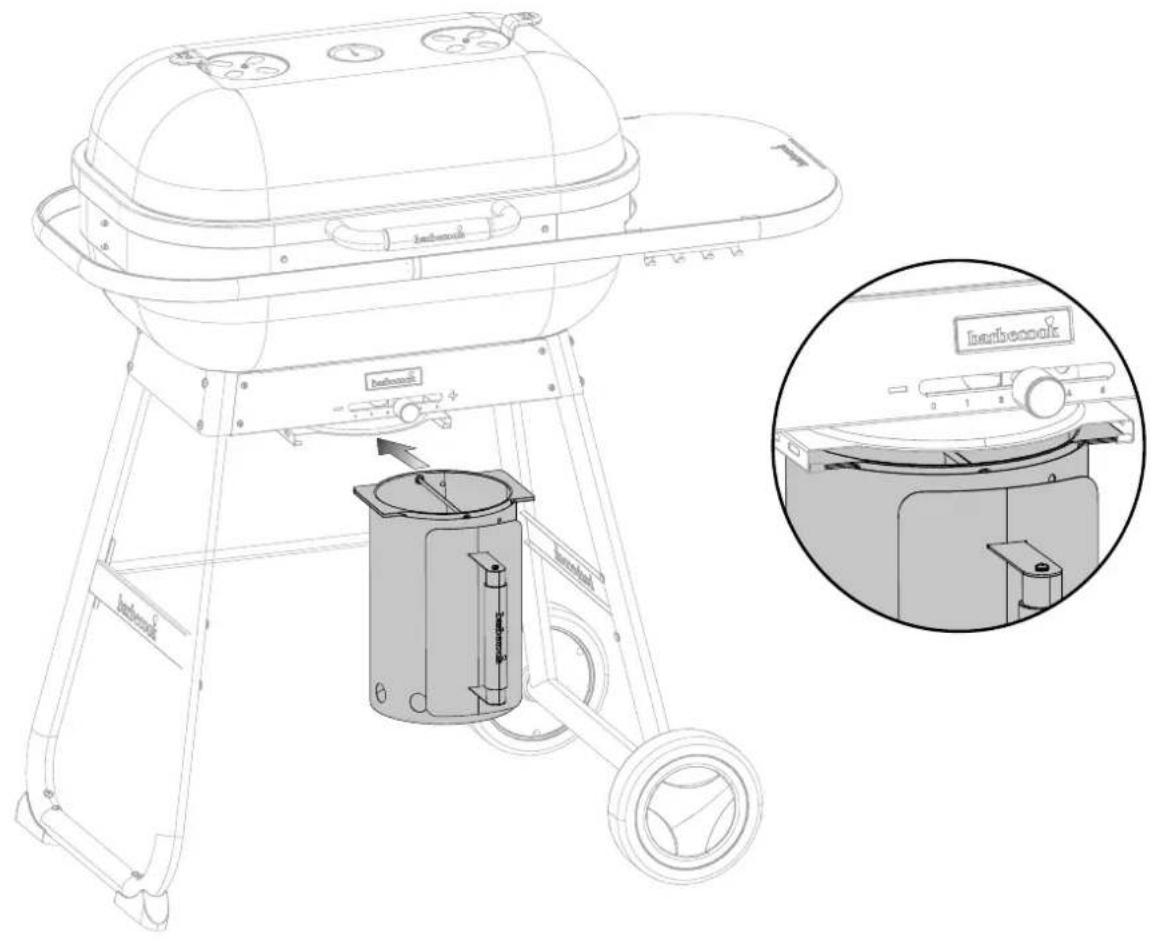
- Remove the charcoal (bottom) grate and clear ashes or chunks of old charcoal from the bottom of the bowl. Charcoal requires oxygen to burn, so be sure that nothing clogs the vents. (use the ventilation control at the front of the unit for this. The ashes then fall neatly into the ash catcher at the bottom of the bowl).
- Replace charcoal (bottom) grate.

ATTENTION! Never place charcoal directly into the bowl.
- Make sure the air supply is fully open (position 5)
6.4. Lighting charcoal
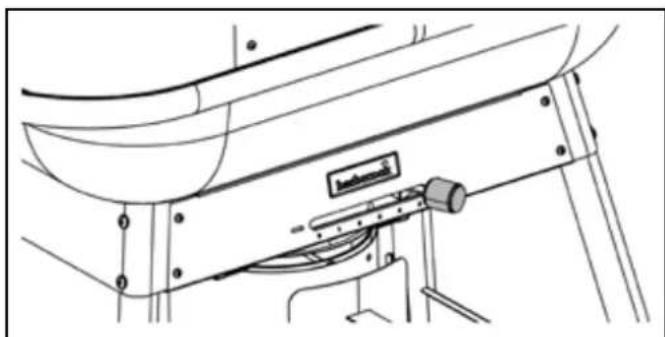
Lighting charcoal with a chimney starter
The easiest way to light any kind of charcoal is to use a chimney starter; (included with certain models, but also sold separately). Always leave the lid open when using a chimney starter.
- Put a few sheets of wadded up newspaper in the bottom of the chimney starter and set the chimney starter on the charcoal grate; or put a few lighter cubes in the centre of the charcoal grate and place the chimney starter over them.
- Fill the chimney starter with charcoal (max. up to the rim on top, certainly not more).
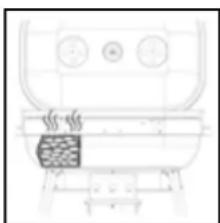
- Leave the chimney starter in place until the charcoal is completely covered with a white layer of ash. This takes about 15 to 20 minutes.
- Next, pour the glowing coals into the desired place on the coal grid. Always wear heat-resistant gloves when doing so.
- Add a few more fresh coals on top of the already hot coals. Wait again until these are covered with a white layer of ash.
- You are ready for the next steps

Lighting Charcoal Using lighter cubes or wood wool
- Place a heap of charcoal in the middle of the charcoal grate and insert a number of firefighters or wood wool.
- Use long matches or a lighter to light cubes or wood wool. These will in turn ignite the charcoal.
- Light the firelighters or wood wool through the openings at the bottom of the charcoal starter.
- Wait until the charcoal is completely covered with a white layer of ash.
- Add a few more fresh coals on top of the already hot coals. Wait again until these are covered with a white layer of ash. This takes about 15 to 20 minutes.
- You are now ready for the next steps

6.5. Grilling with direct heat
With direct heat, the fire is right below the food (A). It sears or browns the surfaces of the food, while it also cooks the food all the way to the centre. This method is ideal for small, tender pieces of food that take less than 20 minutes to cook.
- Always wear barbecue mitts or gloves conforming to EN 407, Contact Heat rating level 2 or greater, when using your charcoal barbecue. Note: The grill, including the handle and damper/vent handles, will become hot.
- Spread the charcoal evenly across the charcoal grate with long tongs
- Replace the cooking grate.
- Close the lid
- Open the ventilation holes in the lid
- Preheat the grate for approximately 10 to 15 minutes.
- Open the lid and place your food on the grate.
- Close the lid. Note: When opening the lid during your grilling sessions, do this in 2 steps in order to avoid ashes drawing up onto your food. You can find inspiring recipes on www. barbecook.com

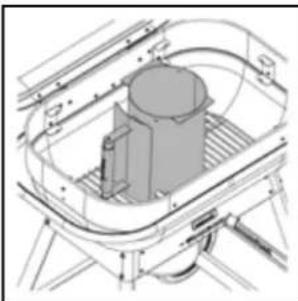
6.6. Grilling with indirect heat
With indirect heat, the fire is on both sides of the grill, or on one side of the grill. Place the food on the unlit part of the grill grate. This method is ideal for larger cuts of meat that require 20 minutes of grilling time or more, or for foods that would dry out or scorch if exposed directly to the heat. This method is also used for thicker foods or pieces of meat with bones that have been seared or browned first over direct heat. Keep the lid closed as much as possible.
- Always wear barbecue mitts or gloves conforming to EN 407, Contact Heat rating level 2 or greater, when using your charcoal barbecue. Note: The grill, including the handle and damper/vent handles, will become hot.
- Arrange the charcoal so that they will be set on either side of the food (either directly onto the charcoal grate or in the charcoal baskets (model depending).
- Replace the cooking grate.
- Close the lid
- Open the ventilation holes in the lid
- Preheat the grate for approximately 10 to 15 minutes.
- Open the lid and place your food on the grate.
- Close the lid. Note: When opening the lid during your grilling sessions, do this in 2 steps in order to avoid ashes drawing up onto your food. You can find inspiring recipes on www. barbecook.com.

6.7. Extinguish the appliance
When finished, close the vents at the top and bottom of the unit to extinguish the fire.
7. TIPS AND TRICKS
7.1. Adjusting the fire intensity
Charcoal fire needs air. The lid should be closed as much as possible, but keep the lid damper and bowl vent open. Remove the ashes on the bottom of the grill regularly to prevent them from blocking the vents. You can adjust the intensity of the fire by opening and closing the air supply holes at the bottom and in the lid. The more you open the vents, the more air is sucked into the pipe and the more intense the fire will be. The more you close the holes, the less air is sucked into the pipe and the less intense the fire will be.
supply with various positions:

Position 0-2 = Less oxygen = Temperature will drop
Position 3-5 = Extra oxygen = Temperature will rise
7.2. Preventing food from burning
To prevent your food from burning:
Never start grilling when there still are flames in the bowl. Wait until the charcoal is covered with a thin layer of white ash.
Avoid exposing your food to excessive heat. You can:
- Protect the food by moving the grill to a higher position.
- Reduce the heat by (partially) closing the vents at the bottom of the pipe.
Always provide a direct (searing) and indirect (cooking) grill zone on your appliance. This will allow you to move the food to a zone with a more modest temperature.

7.3. Preventing food from sticking to the grill
To prevent your food from sticking to the grill: Oil the food lightly with a brush before placing it on the grill. You can also oil the grill. Do not turn the food too quickly. First allow it to heat up thoroughly.
7.4. Preventing flare-ups
Flare-ups are sudden flames that spark from the bowl when you are grilling. They are usually caused by dripping fat or marinade. Flare-ups may occur when grilling. However, an excess of flare-ups increases the temperature of the bowl and can ignite accumulated fat.nTo prevent flare-ups:
- Make sure that the bowl is clean before you start grilling. We recommend cleaning the bowl after every use.
- Remove excess fat and marinade from the meat. You could also use the Barbecook grill mat or Barbecook grill pan for marinated meat.
- Keep the lid closed as much as possible.
7.5. Using the coal trays
- The simplest way to grill indirectly is by using the Barbecook charcoal trays (included with certain models, but also sold separately).
- These trays make sure that the charcoal or briquettes are kept nicely on top of each other for optimal combustion. In addition, you can use the trays to easily flexible heat zones in your appliance.
- After use, the remaining coals are still collected in the coal trays. The superfluous ashes will fall down through the openings of the trays. You can reuse the cooled coal later.


8. MAINTAINING THE APPLIANCE
8.1. Cleaning the bowl
We recommend cleaning the bowl after every use.
Proceed as follows:
- Allow the appliance to cool down fully and remove the grills (food and charcoal grills)
- Close the air supply holes at the bottom of the appliance.
- Sweep the remaining ashes into the ash collector.
- Empty and replace the ash collector.


8.2. Cleaning the grill
We recommend cleaning the grill with a Barbecook-cleaner after every use. You can also clean the grill with a mild detergent or with sodium bicarbonate. Never use oven cleaners to clean the grill.
8.3. Storing the appliance
Store the appliance in a dry location (indoors, under a shelter etc.) after each use. To extend the lifespan of your appliance, we strongly advise you to cover your barbecue with a Barbe-cook cover.
Register your appliance at www.barbecook.com to find out which cover you need. To prevent rust, make sure that the appliance is completely dry before you store it away.
8.4. Maintaining enamel, stainless steel, cast iron and powder coated parts.
The appliance is made of various materials. Each material must be maintained differently:
| Material Maintenance instructions | |
| Enamel • Do not use any sharp objects and do not knock the appliance against hard surfaces. • Avoid contact with cold liquids while the appliance is still hot. • You can use metal sponges and abrasive cleaning products. | |
| Stainless steel | • Do not use aggressive, abrasive or metal cleaning products. • Use mild cleaning products and leave to sit on the steel. • Use a soft sponge or cloth. • After cleaning, rinse the appliance thoroughly and allow the appliance to dry completely before storing. |
| Powder coating | • Do not use any sharp objects. Use non-aggressive cleaning agents and a soft sponge or cloth. • After cleaning, rinse the device thoroughly and allow the device to dry thoroughly before putting it away. |
| Cast iron • Use | a steel brush or steel wool to clean the surface. • After each use, rub the inside and outside with an oil suitable for food. This will prevent the grids from rusting. After a while, rusting will be a natural phenomenon. |
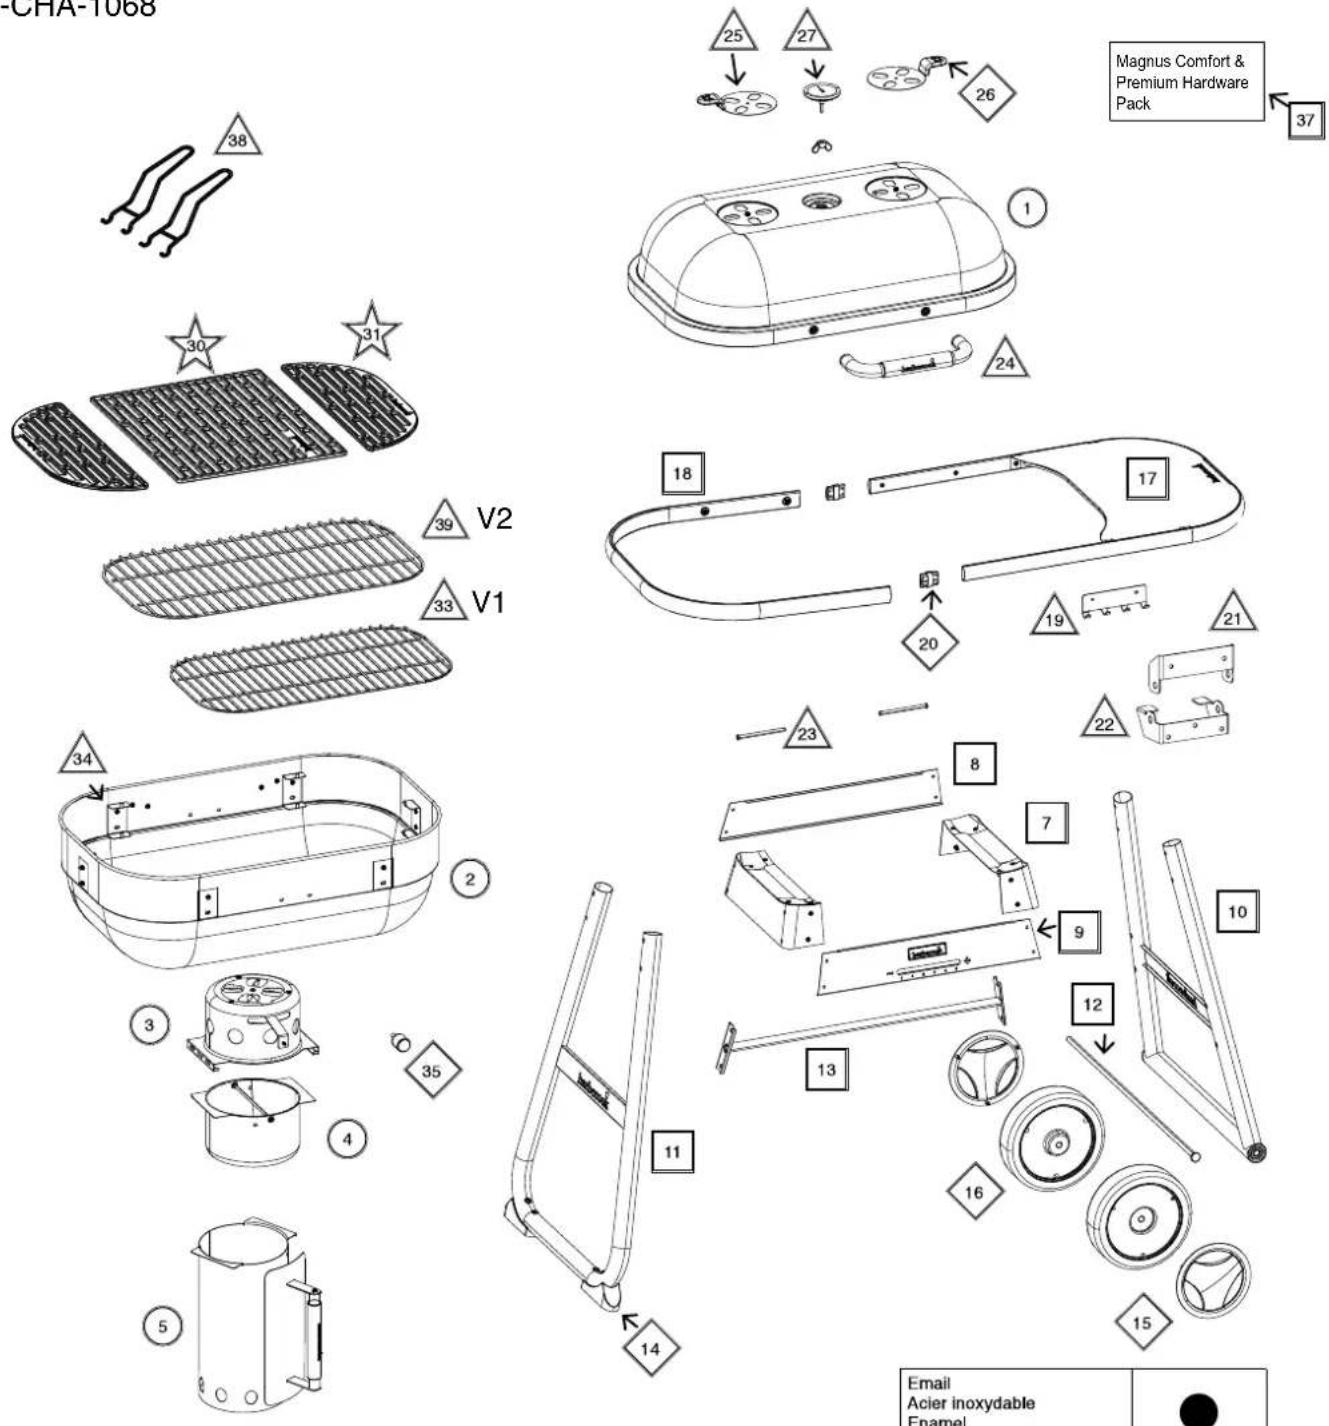
To prevent rusting on stainless steel parts, it is best to avoid any contact with chlorine, salt or iron. We recommend that you do not use the device in coastal areas, near railways or near a swimming pool. Damage due to failure to follow these instructions is considered faulty maintenance and is not covered by the warranty. You will find an overview of all parts that make up the device after the device's exploded views (second part of the manual). This list includes a symbol indicating the material of each part so that you can determine how to maintain each part.
The symbols used in the parts list are:
| Material Symbol | |
| Enamel | ● |
| Stainless steel | ▲ |
| Cast iron | ★ |
| Powder coating | ■ |
| Plastic | ◆ |
9. ORDERING SPARE PARTS
Parts that are exposed to fire or intense heat will eventually need to be replaced. To order spare parts:
- Find the reference number of the part you need. There is a list of all the reference numbers under the exploded drawing in the second part of this manual and on www.barbecook.com.
- If you have registered your appliance online, the correct list will automatically appear in your MyBarbecook account. You can also order spare parts via your account.
- Order the spare part via www.barbecook.com or at your point of sale. Parts under warranty can only be ordered via your point of sale.
10. WARRANTY
10.1. Covered
Your appliance has a two-year warranty, starting from the date of purchase. This warranty covers all manufacturing defects, provided that:
-
You have used, assembled and maintained your appliance according to the instructions in this manual. Damage resulting from misuse, incorrect assembly or improper maintenance is not regarded as a manufacturing defect.
-
You can present the receipt and the unique serial number of your appliance. This serial number starts with a C followed by 15 digits. The serial number is stated:
-
on this manual
- on the appliance's packaging
- on the bottom of the foot of the appliance
The Barbecook quality department will confirm that the parts are defective and that they proved defective under normal use, correct assembly and proper maintenance. If one of these conditions is not fulfilled, you are not covered by the warranty. In all cases, the warranty is limited to the repair or replacement of defective parts.
10.2. Not covered
- The following damage and defects are not covered by the warranty:
- Normal wear and tear (rust, deformation, discoloration etc.) of parts that are directly exposed to fire or intense heat. These parts will need to be replaced from time to time.
- Visual irregularities that are inherent to the manufacturing process. These irregularities are not regarded as manufacturing defects.
- All damage caused by inadequate maintenance, improper storage, incorrect assembly or modifications made to the pre-assembled parts.
-
All damage caused by the misuse of the appliance (not using it according to the instructions in this manual, using it for commercial purposes, using it as a fire basket etc.).
-
All consequential damage caused by careless or noncompliant use of the appliance.
- Rust or discoloration as a result of external factors, use of aggressive cleaning products, exposure to chlorine etc. This damage is not regarded as a manufacturing defect.
DE-BENUTZERHANDBUCH
1. REGISTRIEREN SIE IHR PRODUKT
All spare parts are available at www.barbecook.com.
| KeyPictureQty | ||
| A | 13 | |
| B | 8 | |
| C | 8 | |
| D | 2 | |
| E | 8 | |
| F | 1 | |
| G | 4 | |
| H | 23 | |
| I | 2 | |
| J | 8 | |
| K | 3 | |
| L | 2 | |
| M | 8 | |
| KeyPictureQty | ||
| N | 1 | |
| O | 4 | |
| P | 2 | |


Assembly video


Ex4

Jx4
Mx4


Kx1

Nx1


Bx4

Hx4


Bx4

Hx4


Fx1


Kx2

Px2


Dx2

lx2


Ax2

Hx4

Lx2


15

16


MAGNUS COMFORT
BC-CHA-1068
All spare parts are available at www.barbecook.com.
| KeyPictureQty | ||
| A | 13 | |
| B | 8 | |
| C | 12 | |
| D | 2 | |
| E | 8 | |
| F | 1 | |
| G | 4 | |
| H | 23 | |
| I | 2 | |
| J | 8 | |
| K | 3 | |
| L | 2 | |
| M | 8 | |
| KeyPictureQty | ||
| N | 1 | |
| O | 4 | |
| P | 4 | |
| Q | 2 | |
| R | 2 | |


Assembly video


Jx4
Mx4


17
18


MAGNUS PREMIUM
BC-CHA-1069

All spare parts are available at www barbecook.com
| KeyPictureQty | ||
| A | 13 | |
| B | 8 | |
| C | 12 | |
| D | 2 | |
| E | 8 | |
| F | 1 | |
| G | 4 | |
| H | 23 | |
| I | 2 | |
| J | 8 | |
| K | 3 | |
| L | 2 | |
| M | 8 | |
| KeyPictureQty | ||
| N | 1 | |
| O | 4 | |
| P | 4 | |
| Q | 4 | |
| P | 2 | |

Assembly video


17
18


19

20
barbecook®
THE TASTE OF FUN

www.barbecook.com
Register now and get access to:
Online Product Manuals
- Personalised Grillspiration
- Product Tips & Tricks
- Spare Parts Lists
.