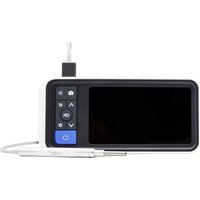
Otoscope LX-033 - Medical device Lifenaxx - Free user manual and instructions
Find the device manual for free Otoscope LX-033 Lifenaxx in PDF.


User questions about Otoscope LX-033 Lifenaxx
0 question about this device. Answer the ones you know or ask your own.
Ask a new question about this device
Download the instructions for your Medical device in PDF format for free! Find your manual Otoscope LX-033 - Lifenaxx and take your electronic device back in hand. On this page are published all the documents necessary for the use of your device. Otoscope LX-033 by Lifenaxx.
USER MANUAL Otoscope LX-033 Lifenaxx
Lifenaxx ^® \* User Manual
Otoscope LX-033
The Declaration of Conformity for this device is under the Internet link: www.technaxx.de/ (in bottom bar "Konformitätserklärung"). Before using the device the first time, please read the user manual carefully. Service phone No. for technical support: 01805 012643 (14 cent/minute from German fixed-line and 42 cent/minute from mobile networks).
Free Email: support@technaxx.de
Keep this user manual for future reference or product sharing carefully. Do the same with the original accessories for this product. In case of warranty, please contact the dealer or the store where you bought this product.
Warranty 2 years
This product is intended to use on humans and animals. The product may only be used for cleaning and checking the auditory canal or nasal cavity. When using the device, make sure that you do not penetrate too deeply into the openings, you could cause damage.
Features
● CMOS Camera 2MP.
● Resolution 1920 x 1080P 30FPS.
- 6 Axis Gyroskop
● Focus distance 1,5-3cm
- Battery indicator
- TF Card 32GB
● 180° picture Video rotation
Technical specifications
| USB (load in dry condition only) | 5V max. 1A |
| Battery | 3,7V / 2500mAh |
| Camera | 2MP 1920x1080 30FPS |
| Working time | 4 – 5 hours |
| Loading time | ~2 hours |
| LED | 6 |
| Diameter of the Lens | ∅3,9mm |
| Dimension | 15,6 x 7,5 x 1,9cm |
| Weight | 187g |
| Display/ Resolution | 4.5-inch /854 x 480 |
Accessory
| 3 x safety funnel | |
| 4 x ear spoon different designs | |
| 1 x Display stand | |
| 1 x 32GB TF card |
First use
- Load the device fully with the USB cable, this may take up to 2Hours - Conect the camera with the otoscope before power on the device. - insert the TF-Card into the (9) TF Card slot, make sure the contacts of the card show into direction of the Display (the card must click audibly into place) - Press the (8) Power on/off button for 1-2 seconds to start the Otoscope. - The default language is German, and the system supports English, Chinese, German, French, Spanish, Italian, Russian and Japanese. - To change the Language Press 2 times (7) settings button, go down to Language, press (6) OK Button and chose the language you want change to with the (7) up/down button. Press (6) OK button again to chose you preferred language. - In the same way you can adjust the Time and date under the point Date/Time, or the Auto Power off time under the relevant point under settings. - If you can not take pictures or videos, make sure the TF Card is formatted in the correct format (FAT32). - Press 2 times the (7) setting button, press the (4) up/down button to come to the point Format, press (6) OK Button, select ok on the menue to format the TF card.
text_image
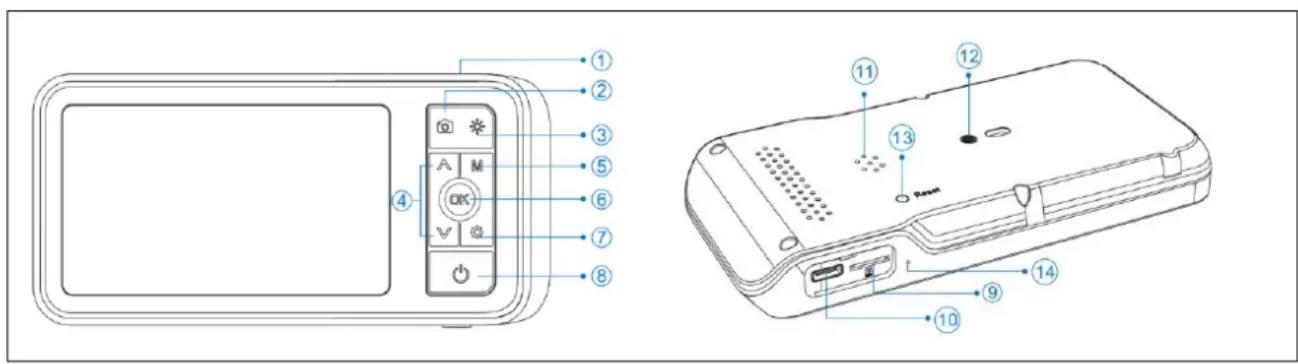
Diagram of a mobile phone control panel with labeled buttons and ports, including a detailed close-up of the device's front view.| 1 | Camera connector | 2 | Photo Video taking button |
| 3 | Light control to adjust LED brightness on camera | 4 | Up/ down in Menue and rotate Picture/Video on Camera |
| 5 | Mode, switch from Picture to Video and playback | 6 | OK, confirm changes, freeze picture |
| 7 | Settings | 8 | Power on/off (hold for 1 sec.) |
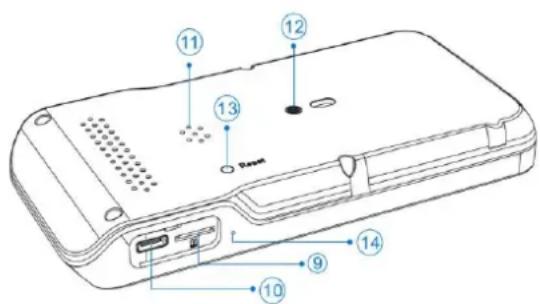
| 9 | TF Card slot 32GB included | 10 | Charging Port (USB-C max.5V, 1A) |
| 11 | Speaker | 12 | Installation hole for bracket |
| 13 | Reset | 14 | Microphone |
Instruction of use
- Conect the camera with the otoscope before power on the device. - insert the TF-Card into the (9) TF Card slot, make sure the contacts of the card show into direction of the Display (the card must click audibly into place) - Press the (8) Power on/off button for 1-2 seconds to start the Otoscope. - For the first view add one of the safety funnels. - The ear channel is not perfectly straight, gently adjust the position of the otoscope in your ear. - To have a clearer view without glare you can adjust the (3) LED brightness.
●The focal length of the camery is 1,5-3cm, adjust the distance between the camera lens and your ear to get focused.
To take a picture you can press (2), change to video press the MODE button and press (2) again to start and stop the video. To switch to your photo/video archive, press MODE button again, select the file with the (4) up down button and press ok for playback.
Connect to computer (Windows 10)
- Conect your USB cable to the Otoscope, then to an USB port of your computer. Switch on your Otoscope, you can find a new USB-device in your Explorer. ●The Folder DCIM contains your pictures and videos.
Normal use
● The otoscope should only be inserted into the auditory canal or nose when a spoon or safety funnel is fitted.
- Place the spoon, safety funnel on the otoscope so that it fits tightly.
- be careful auditory canal and nose are sensitive.
Cleaning
Before and after use you should clean the camera, spoon and safety funnel.
Safety Instructions
→ Do not look into the LED light. → Only recharge with supplied or compatible USB cable. → This device is not intended for use by children or persons with limited mental capacity or lacking experience and/or lacking expertise. → This
device is not intended for commercial use.→ Any other use or modification of the device is considered improper and involves significant risks. →The manufacturer assumes no liability for damages due to improper use. Check the correct operation of the device before use! →Do not use the device if there are visible signs of damage. →Do not use the device in fire- or explosive risk area (e.g. oxygen saturated or anaesthetic environments). →This product is not allowed to enter or be used in areas with strong magnetic fields e.g. MRI scanners. →Never leave the device charging unattended. →Make sure you disinfect the adapter. Clean the surface of the device with 75% medical alcohol before contacting with the skin. Disinfect the adapters with steam or in hot water for 10minutes. →This appliance is not suitable for people with limited physical, sensory or mental capabilities. Keep bystanders and children away while operating the tool.
WARNINGS & CAUTION:
WARNING: This product is not intended to use in professional health care environments unless specifically designated. For adult use only, do not use the device in the presence of a flammable anesthetic mixture with air, oxygen or nitrous oxide, or near flammable substances, vapors or gases. Do not operate the device near heating openings or in direct sunlight. Keep the device dry. Do not immerse the device in water.

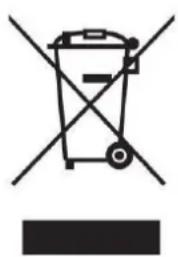
Security and Disposal Hints for Batteries: Hold children off batteries. When a child swallowed a battery go to a doctors place or bring the child into a hospital promptly! Look for the right polarity (+) and (−) of batteries! Always change all batteries. Never use old and new batteries or batteries of different types together. Never short, open, deform or load up batteries! Risk of injury! Never throw batteries into fire! Risk of explosion! Hints for Environment Protection: Packages materials are raw materials and can be recycled. Do not disposal old devices or batteries into the domestic waste.
natural_image
Symbol of a trash bin crossed with no text or labels, accompanied by a solid black rectangle below (no text or symbols present)Cleaning: Protect the device from contamination and pollution (use a clean drapery). Avoid using rough, coarse-grained materials or solvents/aggressive cleaner. Wipe the cleaned device accurately. Important Notice: Should battery fluid leak from a battery, wipe the battery case with a soft cloth dry.
text_image
Diagram of a mobile phone control panel with labeled buttons and ports, including a separate version of the device.text_image
Diagram of a mobile phone with labeled ports and buttons, including a screen control panel and a device casing.natural_image
Symbol of a trash bin crossed with no text or labels, accompanied by a solid black rectangle below (no text or symbols present)text_image
① ② ③ ⑤ ⑥ ⑦ ⑧ ④ A M OK V ★ ○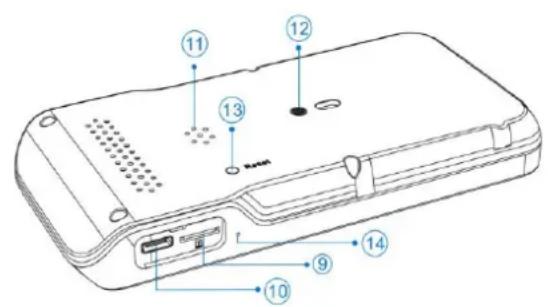
text_image
Diagram of a mobile phone rear panel with numbered component labels pointing to ports and buttonsnatural_image
Symbol of a trash bin crossed with no text or labels, representing waste sorting or disposal (no text present)text_image
Diagram of a mobile phone control panel with labeled buttons and ports, including a separate version of the device.text_image
Diagram of a mobile phone control panel with labeled buttons and ports, including a detailed close-up of the device's front view.WAARSCHUWINGEN EN OPGELET:
natural_image
Symbol of a trash bin with crossed lines indicating no waste or restriction, and a solid black rectangle below (no text or labels)text_image
① ② ③ ⑤ ⑥ ⑦ ⑧ ④ A M OK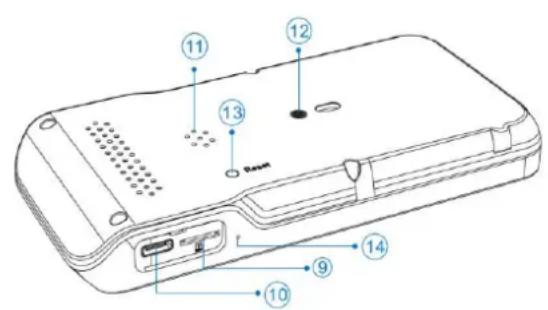
text_image
11 12 13 Reset 14 9 10text_image
Diagram of a remote control device with labeled buttons and function keys