
Windsor - Fan JAP - Free user manual and instructions
Find the device manual for free Windsor JAP in PDF.
| Product type | Stand fan |
| Brand | JAP |
| Model | Windsor (Bionic Blast Breeze) |
| Product code | TF-W |
| Power supply | 220–240 V, 50 Hz |
| Rated power | 50 W |
| Number of speeds | 3 (low, medium, high) |
| Oscillation | Yes (pull cord) |
| Control type | Push buttons (0, 1, 2, 3) |
| Assembly required | Yes, before first use |
| Components supplied | Front grille, rear grille, blade, motor, stand, safety ring, screws, nut and bolt |
| Cleaning | Soft damp cloth, then dry. Do not immerse. |
| Safety instructions | Read carefully before use. Do not insert objects, stable surface, unplug before cleaning. |
| Warranty | 2 years (parts and labor) |
| After-sales service | JAP Products: +31 736447405 |
| Manufacturing | Made in China, designed in the Netherlands |
Frequently Asked Questions - Windsor JAP
User questions about Windsor JAP
0 question about this device. Answer the ones you know or ask your own.
Ask a new question about this device
Download the instructions for your Fan in PDF format for free! Find your manual Windsor - JAP and take your electronic device back in hand. On this page are published all the documents necessary for the use of your device. Windsor by JAP.
USER MANUAL Windsor JAP
natural_image
Line drawing of a Bionic Breeze Windsor fan with no text or symbols on the fan bodyInstruction manual
Handleiding
Bedienungsanleitung
Made in China, designed in the Netherlands.
www.japproducts.nl


CE √ RoHS


Table of contents
Warning and safety precaution 4
Components 5
Montage 6
Functioning 8
Maintenance 9
Technical specifications 9
Disposal of electrical appliances 9
Support and warranty 10
Read these instructions carefully before using the appliance.
Keep this instruction manual for future use.
- This appliance is designed to be connected to a standard wall outlet.
• This appliance is designed for domestic use only
• Children should be supervised to ensure that they do not play with the appliance. - Pull from the plug, not the cord, to disconnect it from the wall plug.
- Do not leave the appliance unattended while in use.
- Do not use the device if it has been dropped or if there are any signs of damage.
- Do not attempt to repair any part of the product by yourself.
- Only use the device with the accessories supplied.
- Make sure your hands are dry before handling the plug or switching on the appliance.
- Do not place the appliance close to heat sources or flammable substances.
- Do not place the appliance close to wet sources or rain.
- Never insert fingers or other objects through the air exit when the appliance is operating.
- Place the appliance on a stable surface before usage.
- Do not open and remove any compartment during usage.
- Keep hair, loose clothing, fingers, and other bodyparts away from openings and moving parts.
- Store the appliance and its manual in a safe and dry place when not in use.
-
Never use this device without stand or in horizontal position.
-
Propeller
- Propeller headpiece
- Safety ring
- Safety cover (left, right)
- Motor with control panel
- Pedestal
- Nut and bolt
- Screws (3x)
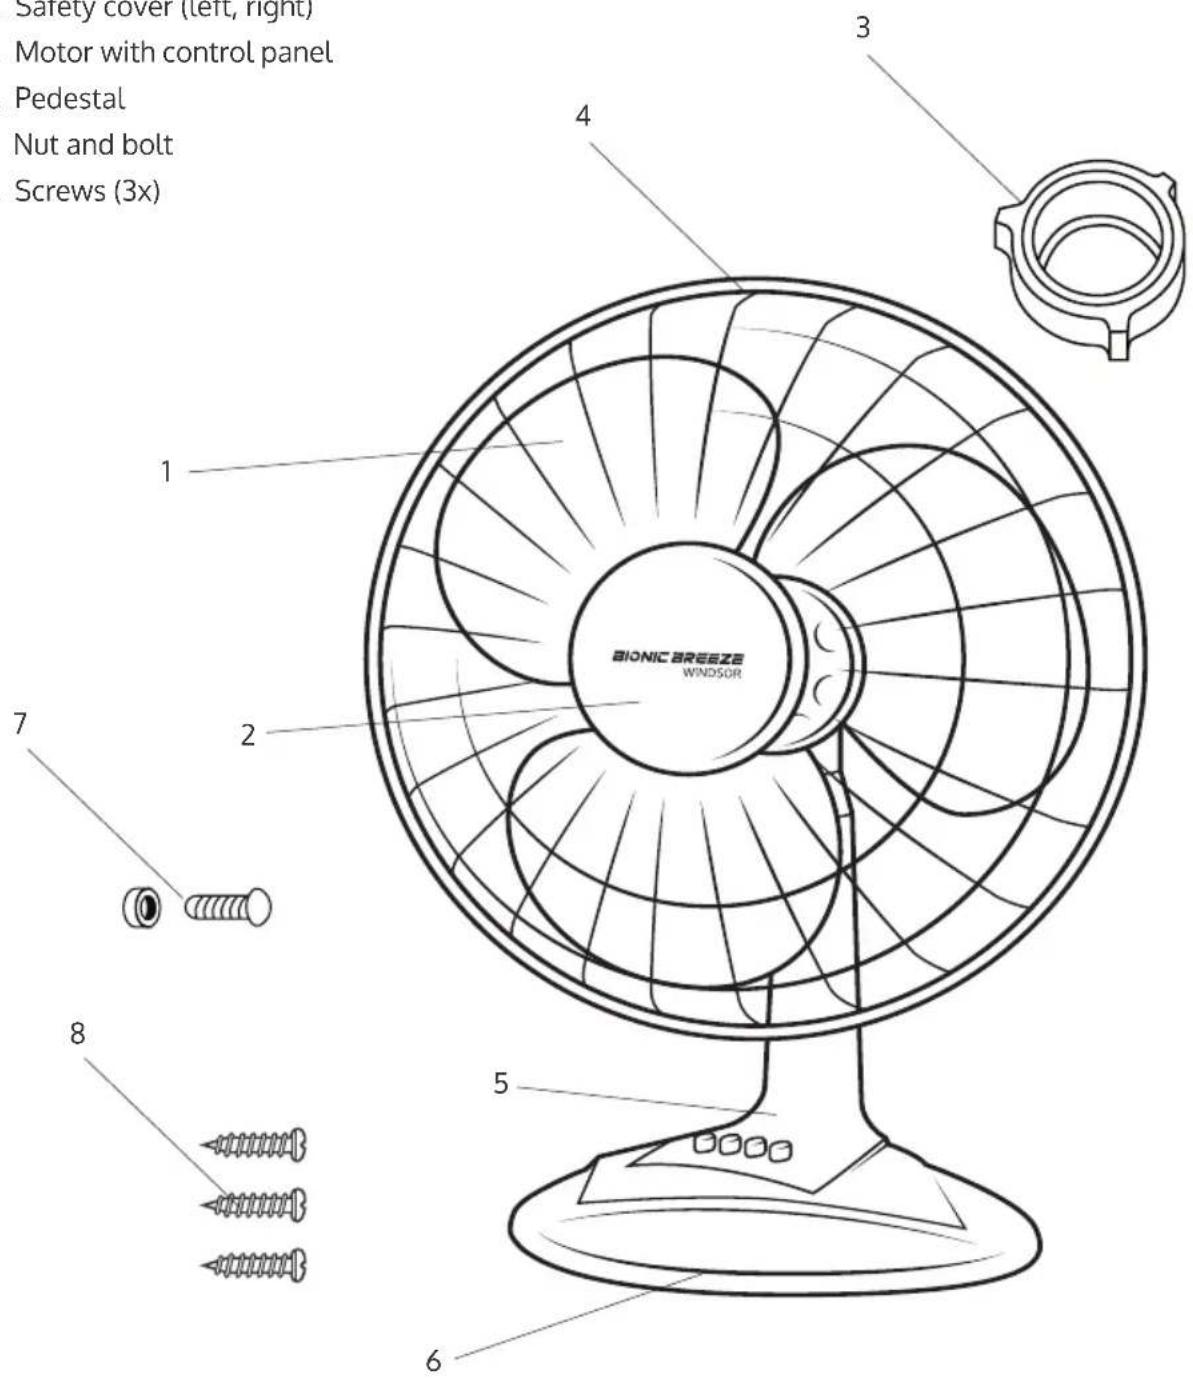
fig.1
Carefully read the warning and safety precaution.
Check the product for any visible damage. If any, contact japproducts as soon as possible.
Montage
Before using this appliance please assemble it following the instructions below step by step.
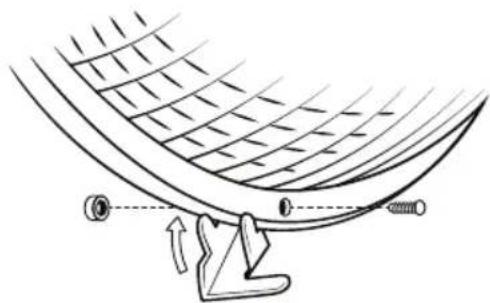
- First, put the cord through the pedestal. Then carefully push the motor with control panel through the base until it clicks into place. (Fig 2.A)
- Screw the base to the motor with control panel with the three screws provided. (Fig 2.B)
- Place the safety cover (right) against the head piece of the motor. Make sure the mounting pieces go through the appropriate holes. (Fig 2.C)
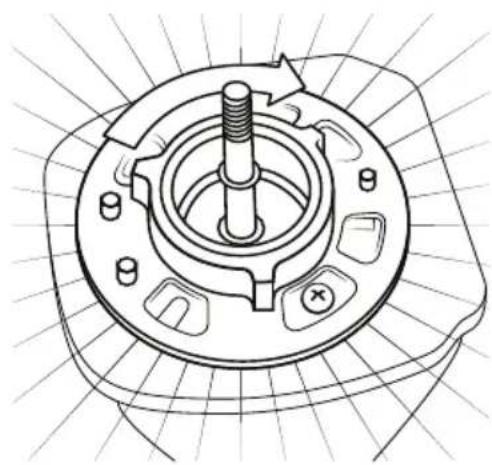
- Attach the safety ring to the head piece of the motor (Clockwise to fasten, counterclockwise to loosen). Make sure the safety cover (right) is properly secured. (Fig 2.C)
- Place the propeller on the head piece. Make sure that the recesses on the rear of the propeller fit snugly into the mounting pieces.
- Attach the propeller headpiece to the screw thread and tighten it (Counterclockwise to fasten, clockwise to loosen.) (Fig 2.D)
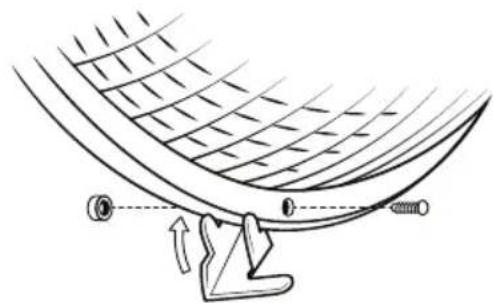
- Attach the safety cover (left) to the safety cover (right). Note that both safety covers have an opening to fasten the nut and bolt. Make sure that both openings overlap. (Fig 2.E)
- Close all mounting clips securing both security covers together. (Fig 2.F)
fig. 2A

natural_image
Simple line drawing of a mechanical component with downward arrows indicating force or motion (no text or symbols)
natural_image
Simple line drawing of a curved object with downward arrows indicating compression or damage (no text or symbols)fig. 2B
fig. 2C

natural_image
Technical line drawing of a mechanical component with no visible text or symbols
natural_image
Technical line drawing of a mechanical component with no visible text or symbolsfig. 2D
fig. 2E
natural_image
Diagram of a curved structural element with internal grid pattern and mechanical components (no text or symbols)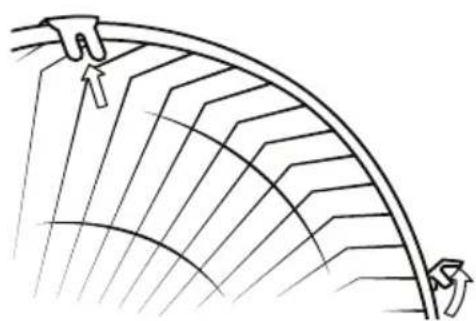
natural_image
Diagram of a curved pipe with radial grooves and a hand holding a handle (no text or symbols)fig. 2F
Functioning
- Insert the plug into a suitable wall socket.
- Select a fan level by pressing the corresponding switch.
a) Press [1] to use the quietest fan level.
b) Press [2] to use the middle fan level.
c) Press [3] to use the strongest fan level.
- Push to turn on the oscillate function.
a) Pull to turn off the oscillate fuction.
- Turn the fan off by pressing [0].
WARNING:
Press only one speed control button at a time. Permanent damage to the housing switch may result if two or more of the buttons are pressed.

Maintenance
• Always disconnect the fan from the power supply before cleaning it.
- Use soft, dampened clean cloth to clean the fan. Dry afterwards with a cry cloth.
- Never spill any liquid or immerse the fan in water or other liquids.
Specifications


Model: Bionic Breeze Windsor
Product reference: TF-W
Power supply: 220–240V, 50Hz.
Nominal power: 50W.
Made in China, designed in the Netherlands.
Disposal of electrical appliances

The European directive 2012/19/EU on Waste Electrical and Electronic Equipment (WEEE), specifies that old household electrical appliances must not be disposed of with the normal unsorted municipal waste. Old appliances must be collected separately, in order to optimise the recovery and recycling of the materials they contain, and reduce the impact on human health and the environment. The crossed out "wheeled bin" symbol on the product reminds you of your obligation to dispose of the appliance correctly. Consumers must contact their local authorities or retailer for information concerning the correct disposal of old appliances and/or their batteries.
Support and warranty
This product is under warranty for 2 years from the date of purchase, proof of purchase is required. The product must be in perfect physical condition and has followed given guidelines.
The warranty will not cover the following situations:
- The product has been used for purposes other than those intended for it, misused, beaten, exposed to moisture, immersed in liquid or corrosive substances, as well as any other fault attributable to the customer
- The product has been disassembled, modified, or repaired by persons, not authorised by iapproducts.
• Faults deriving from the normal wear and tear of its parts, due to use. - The warranty service covers every manufacturing defects of your appliance for 2 years, based on current legislation, except consumable parts. In the event of misuse, the warranty will not apply.
If at any moment you detect any problem with your product or have any doubt, do not hesitate to contact japproducts at +31 736447405.
Inhoudsopgave
natural_image
Simple line drawing of a mechanical component with downward arrows indicating force or motion (no text or symbols)
natural_image
Simple line drawing of a curved object with downward arrows indicating compression or damage (no text or symbols)fig. 2B
fig. 2C

natural_image
Technical line drawing of a mechanical component with no visible text or symbols
natural_image
Technical line drawing of a mechanical component with no visible text or symbolsfig. 2D
fig. 2E

natural_image
Diagram of a curved structural element with internal grid pattern and a mechanical component (no text or symbols)
natural_image
Diagram of a curved pipe with radial grooves and a hand holding a handle (no text or symbols)fig. 2F
Gebruik
natural_image
Simple line drawing of a mechanical part with two downward arrows indicating force or displacement (no text or symbols)
natural_image
Simple line drawing of a curved object with downward arrows indicating compression or deformation (no text or symbols)fig. 2B
fig. 2C
natural_image
Technical line drawing of a mechanical component with no visible text or symbols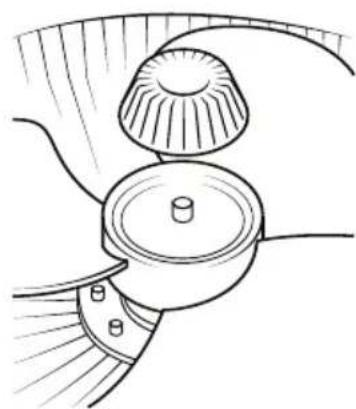
natural_image
Technical line drawing of a mechanical component with no visible text or symbolsfig. 2D
fig. 2E

natural_image
Diagram of a curved structural element with internal grid pattern and mechanical components (no text or symbols)
natural_image
Diagram of a curved pipe or duct with radial grooves, no text or symbols presentfig. 2F
Gebrauch
natural_image
Simple line drawing of a mechanical part with two downward arrows indicating force or movement (no text or symbols)
natural_image
Simple line drawing of a curved object with downward arrows indicating compression or deformation (no text or symbols)fig. 2B
fig. 2C

natural_image
Technical line drawing of a mechanical assembly with no visible text or symbols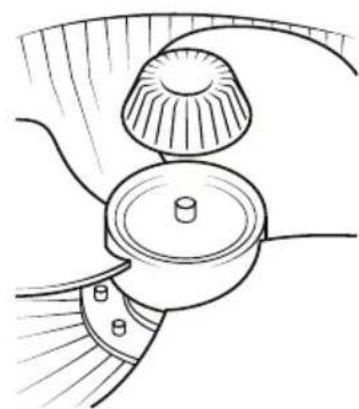
natural_image
Technical line drawing of a mechanical component with no visible text or symbolsfig. 2D
fig. 2E
natural_image
Diagram of a curved structural component with a base and spring, showing internal forces or motion (no text or symbols)
natural_image
Diagram of a curved pipe or duct with diagonal grooves and a hand holding a handle (no text or symbols)fig. 2F
natural_image
Simple line drawing of a mechanical component with downward arrows indicating force or motion (no text or symbols)
natural_image
Diagram showing a curved object with downward arrows and a rectangular block above it, no text or symbols present.fig. 2B
fig. 2C

natural_image
Technical line drawing of a mechanical component with no visible text or symbols
natural_image
Technical line drawing of a mechanical component with no visible text or symbolsfig. 2D
fig. 2E

natural_image
Diagram of a curved structural element with internal grid pattern and mechanical fasteners (no text or symbols)
natural_image
Diagram of a curved pipe or duct with radial grooves and a hand holding a handle (no text or symbols)fig. 2F
Funzionamento
natural_image
Simple line drawing of a mechanical part with two downward arrows indicating force or displacement (no text or symbols)
natural_image
Simple line drawing of a curved object with downward arrows indicating compression or damage (no text or symbols)fig. 2B
fig. 2C

natural_image
Technical line drawing of a mechanical component with no visible text or symbols
natural_image
Technical line drawing of a mechanical component with no visible text or symbolsfig. 2D
fig. 2E

natural_image
Diagram of a curved structural element with internal grid pattern and mechanical components (no text or symbols)
natural_image
Diagram of a curved pipe or duct with internal fan-like patterns, no text or symbols presentfig. 2F
Funcionamiento
Made in China, designed in the Netherlands.
www.japproducts.nl
BIONIC BREEZE
WINDSOR

Bionic Breeze Windsor
Model: TF-W
Power supply: 220–240V, 50Hz.
Nominal power: 50W.
Made in China, designed in the Netherlands.
www.japproducts.nl


Brand : JAP
Model : Windsor
Category : Fan