
VREC-170RS - Dashcam PIONEER - Free user manual and instructions
Find the device manual for free VREC-170RS PIONEER in PDF.
| Product type | Dashcam (on-board camera) |
| Brand and model | Pioneer VREC-170RS |
| Dimensions (L x H x D) | 89.5 mm x 54.3 mm x 29.9 mm |
| Weight | 94 g (without mount or cable) |
| Power supply | DC 5 V via cigarette lighter cable (12 V / 24 V) |
| Power consumption | Approx. 2.3 W while charging |
| Fuse (in cable) | F 2 AL / 250 V, dia. 5.0 mm, length 20 mm |
| Image sensor | High sensitivity 2-megapixel CMOS sensor |
| Video resolution | Full HD 1920 × 1080 p / HD 1280 × 720 p |
| Viewing angle (camera) | Horizontal 100°, vertical 52°, diagonal 139° |
| Aperture (F value) | F2.1 |
| Display | 3-inch LCD |
| Built-in GPS | Yes (satellite reception, recording of speed and position) |
| Wireless connection | Wi-Fi 802.11 b/g/n (for dedicated smartphone app) |
| Storage media | microSDHC card 16 GB to 32 GB, Class 10, exFAT file system |
| Recording modes | Normal, Event (automatic or gesture), Parking (security), Photo |
| Shock sensor (G-sensor) | 3-axis, adjustable to 4 levels (High/Medium/Low/Off) |
| ADAS functions | Lane departure warning system (LDWS), Forward collision warning system (FCWS), Speed limit alert |
| Audio recording | Enabled or disabled (built-in microphone) |
| Operating temperature | -20 °C to +60 °C |
| Internal battery | Consumable part (maintains time and temporary operation) |
| Repairability | Spare parts available from Pioneer customer service. Fuse replacement possible by the user. |
Frequently Asked Questions - VREC-170RS PIONEER
User questions about VREC-170RS PIONEER
0 question about this device. Answer the ones you know or ask your own.
Ask a new question about this device
Download the instructions for your Dashcam in PDF format for free! Find your manual VREC-170RS - PIONEER and take your electronic device back in hand. On this page are published all the documents necessary for the use of your device. VREC-170RS by PIONEER.
USER MANUAL VREC-170RS PIONEER
Thank you for buying this Pioneer product.
Please read through these instructions so you will know how to operate your model properly. After you have finished reading the instructions, keep this document in a safe place for future reference.
Precaution 5
Safety Precautions....6
Disclaimer 9
How to read this Manual....10
Usage Precautions ......11
Check the Accessories ....13
When replacing the Fuse ....13
Before Installing the Product....14
Installation Precautions....14
Installation Tips....14
Installation....15
Specified Installation Position on Front Windscreen 15
Install this product....16
Part Names....18
Function Buttons ....19
Inserting and Ejecting the microSD Card 20
Inserting the microSD Card....20
Ejecting the microSD Card....20
Backing Up Recorded Files....21
Folder and File Structure....21
Using this product 22
This product Power....22
Manually Turning the Power On and Off 22
System Indicator Display....22
How to View the Recording Screen....22
Video Recording 23
Event Recording 23
Security Mode....24
Playing Recorded Files....24
Advanced Driver Assistance Systems (ADAS)....26
This Product Settings 28
Configurable Features: Recording Setting....29
Configurable Features: System Setting....30
Guide to Recording Time....31
Exclusive App 32
Trademarks & Copyrights......33
GPS....34
Troubleshooting....35
Specifications....36
Declaration of Conformity with regard to the Radio Equipment Directive 2014/53/EU
Manufacturer:.
Pioneer Corporation
28-8 Honkomagome 2-chome, Bunkyo-ku,
Tokyo 113-0021, JAPAN
EU Authorised Representative's & Importer:
Pioneer Europe NV
Haven 1087, Keetberglaan 1, 9120 Melsele, Belgium/
Belgique
https://www.pioneer-car.eu/eur/
[\*] VREC-170RS
English:
Hereby, Pioneer declares that the radio equipment type [*] is in compliance with Directive 2014/53/EU. The full text of the EU declaration of conformity is available at the following internet address: https://www.pioneer-car.eu/eur/compliance
Suomi:
Declaration of Conformity with regard to the Radio Equipment Regulations 2017
Manufacturer:
Pioneer Corporation
28-8 Honkomagome 2-chome, Bunkyo-ku, Tokyo 113-0021, JAPAN
UK Authorised Representative's & Importer:
Pioneer Europe NV
Salamanca, Wellington Street, Slough, SL1 1YP, UK
http://www.pioneer-car.eu
[*] VREC-170RS
Hereby, Pioneer declares that the radio equipment type [*] is in compliance with UK SI 2017 No. 1206.
The full text of the UK declaration of conformity is available at the following internet address:
http://www.pioneer-car.eu/compliance
Precaution
Certain country and state laws may prohibit or restrict the placement and use of this product in your vehicle. Please comply with all applicable laws and regulations regarding the use, installation and operation of this product. It is the user's responsibility in compliance with all applicable laws and ordinance.
Information for users on collection and disposal of old equipment and used batteries
(Symbol for equipment) (Symbol examples for batteries)


These symbols on the products, packaging, and/or
accompanying documents mean that used electrical and electronic products and batteries should not be mixed with general household waste.
For proper treatment, recovery and recycling of old products and used batteries, please take them to applicable collection points in accordance with your national legislation.
By disposing of these products and batteries correctly, you will help to save valuable resources and prevent any potential negative effects on human health and the environment which could otherwise arise from inappropriate waste handling.
For more information about collection and recycling of old products and batteries, please contact your local municipality, your waste disposal service or the point of sale where you purchased the items
These symbols are only valid in the European Union.
For countries outside the European Union:
If you wish to discard these items, please contact your local authorities or dealer and ask for the correct method of disposal.
CAUTION
- There is a danger of explosion if the battery is incorrectly replaced. Replace only with the same or equivalent type.
- Do not expose a battery to high or low extreme temperatures during use, storage or transportation.
- Do not dispose of a battery into fire or a hot oven, or crush mechanically or cut a battery, that can result in an explosion.
- The graphical symbol --- placed on the product means direct current.
WARNING
- Batteries (battery pack or batteries installed) must not be exposed to excessive heat such as sunshine, fire or the like.
Safety Precautions
Always observe the precautions described here to prevent harm to yourself and others and to prevent damage to property before it happens.
Important safeguards
WARNING
- Do not install this product in your vehicle if its location or use would obstruct the driver's clear view of the road or the operation of any vehicle airbag. It is also the driver's responsibility to know and comply with the laws, rules, and regulations of the driving location, including, for example, passenger privacy rights, and not to use the device in any location where its installation or use is prohibited.
- Usage of the Advanced Driver Assistance Systems (ADAS) features in this product is not a substitute for driver awareness and is not for preventing accidents. The system alerts are to be used as a guidance only.
- It is the user's responsibility in compliance with all applicable laws and ordinance.
- Pioneer is not liable for any damage, due to installation other than described, or use of the product. Pioneer does take responsibility whatsoever for any damage or losses incurred as a result.
- It is the user's responsibility to drive whilst keeping a safe distance between vehicles, whilst correctly judging the road, traffic and weather, and surrounding conditions.
- Do not operate this product if doing so will divert your attention in any way from the safe operation of your vehicle. Always observe safe driving rules and follow all existing traffic regulations. If you experience difficulty in operating this product or reading the display, park your vehicle in a safe location and apply the handbrake before making the necessary adjustments.
- The laws in your location may require you to provide notice to passengers that a recording device is in use. If so, you should place the notice sticker in a location clearly visible to your passengers.
- Any obstruction of or other interference with the airbag, either deployed or non-deployed, or with the clear view of the road must be avoided and, accordingly, professional installation is required.
- We recommend that this product be set up and installed by a technician who has special training and experience in mobile electronics.
Important safety information
WARNING
- Do not allow this product to come into contact with liquids. Electrical shock could result. Also, damage to the product, smoke, and overheating could result from contact with liquids.
- If liquid or foreign matter should get inside this product, park your vehicle in a safe place, turn the ignition switch off (ACC OFF) and unplug the cigarette lighter plug immediately, and consult your dealer or the nearest authorised Pioneer Service Station. Do not use this product in this condition because doing so may result in a fire, electric shock, or other failure.
- If you notice smoke, a strange noise or odour from this product, or any other abnormal signs on the LCD screen, turn off the power immediately and consult your dealer or the nearest authorised Pioneer Service Station. Using this product in this condition may result in permanent damage to the system.
- Do not disassemble or modify this product, as there are high-voltage components inside which may cause an electric shock. Be sure to consult your dealer or the nearest authorised Pioneer Service Station for internal inspection, adjustments or repairs.
Before using this product, be sure to read and fully understand the following safety information:
- Do not operate this product if doing so will divert your attention in any way from the safe operation of your vehicle. Always observe safe driving rules and follow all existing traffic regulations. If you experience difficulty in operating this product or reading the display, park your vehicle in a safe location and apply the handbrake before making the necessary adjustments.
- Never set the volume of this product so high that you cannot hear outside traffic and emergency vehicles.
- Keep this manual handy as a reference for operating procedures and safety information.
- Certain functions (such as viewing of screen and certain button operations) offered by this product could be dangerous (possibly resulting in serious injury or death) and/or unlawful if used while driving. Screen display is disabled for this product while the vehicle is moving.
- Usage of the Advanced Driver Assistance Systems (ADAS) features in this product is not a substitute for driver awareness and is not for preventing accidents. The system alerts are to be used as a guidance only.
- It is the user's responsibility in compliance with all applicable laws and ordinance.
- Pioneer is not liable for any damage, due to installation other than described, or use of the product. Pioneer does take responsibility whatsoever for any damage or losses incurred as a result.
To ensure safe driving
WARNING
- In some countries the viewing of video image on a display inside a vehicle even by persons other than the driver may be illegal. Where such regulations apply, they must be obeyed.
Precautions before connecting the system
CAUTION
- Firmly install this product so it does not fall off the windscreen. If this product is not firmly installed, it may fall off the windscreen while driving and cause an accident. Periodically inspect this product.
- Secure all wiring with cable clamps or electrical tape. Do not allow any bare wiring to remain exposed.
- It is extremely dangerous to allow cables to become wound around the steering column or gearstick. Be sure to install this product, its cables, and wiring away in such so that they will not obstruct or hinder driving.
- Make sure that the cables and wires will not interfere with or become caught in any of the vehicle's moving parts, especially the steering wheel, gearstick, handbrake, sliding seat tracks, doors, or any of the vehicle's controls.
- Do not route wires where they will be exposed to high temperatures. If the insulation heats up, wires may become damaged, resulting in a short circuit or malfunction and permanent damage to the product.
- Do not shorten any cables. If you do, the protection circuit (fuse holder, fuse resistor or filter, etc.) may fail to work properly.
- Never feed power to other electronic products by cutting the insulation of the power supply cable of this product and tapping into the cable. The current capacity of the cable will be exceeded, causing overheating.
To prevent damage
WARNING
- When replacing the fuse, be sure to only use a fuse of the rating prescribed on this product.
Precautions before installation
CAUTION
Never install this product in places where, or in a manner that:
- Could injure the driver or passengers if the vehicle stops suddenly.
-
May interfere with the driver's operation of the vehicle, such as on the floor in front of the driver's seat, or close to the steering wheel or gearstick.
-
To ensure proper installation, be sure to use the supplied parts in the manner specified. If any parts are not supplied with this product, use compatible parts in the manner specified after you have the parts' compatibility checked by your dealer. If parts other than supplied or compatible ones are used, they may damage internal parts of this product or they may work loose and the product may become detached.
- Do not install this product where it may
(i) obstruct the driver's vision,
(ii) impair the performance of any of the vehicle's operating systems or safety features, including airbags, hazard lamp buttons or
(iii) impair the driver's ability to safely operate the vehicle.
- Never install this product in front of or next to the place in the dashboard, door, or pillar from which one of your vehicle's airbags would deploy. Please refer to your vehicle's owner's manual for reference to the deployment area of the frontal airbags.
- Consult with your nearest dealer if installation requires drilling holes or other modifications of the vehicle.
- Before making a final installation of this product, temporarily connect the wiring to confirm that the connections are correct and the system works properly.
- Do not install this product in places subject to high temperatures or humidity, such as:
— Places close to a heater, vent or air conditioner.
— Places that may be exposed to rain, such as close to the door or on the vehicle's floor.
Disclaimer
- Given the large number of variables and conditions that can be involved in an accident, Pioneer cannot guarantee that every accident or occurrence will trigger the recording feature in this device.
- This product features may not operate properly due to the effects of settings, how this product is installed, the condition of the microSD card, and driving conditions (including the road conditions).
- If brightly coloured objects are placed on the dashboard, they may be reflected in the front windscreen and the camera image. Do not place brightly coloured objects on the dashboard.
- This product is not guaranteed to be effective as evidence in an accident.
• This product is not guaranteed to save video in all situations. - You may not be able to recognise the conditions in the front of the vehicle in recorded video, depending on the ambient conditions, such as the weather and time.
- LED traffic signals or street lamps on the road may appear as flashing or flickering when recorded with this product. The colour may also not be correctly identifiable. Pioneer Corporation accepts no responsibility whatsoever for these phenomena.
- This product saves video before and after an accident occurs by detecting the impact (acceleration) with the G-sensor (accelerometer). However, this product is not guaranteed to save video in all situations.
- Pioneer Corporation accepts no responsibility whatsoever for product failures or damage that occur due to the microSD card wearing out.
- Pioneer Corporation does not make any assurances that microSD card problems will be repaired by formatting the card. Pioneer Corporation bears no responsibility for files that are erased from the microSD card or damage that occurs from formatting the card. Format the microSD card according to your own judgement and at your own responsibility.
- Always install this product in the specified installation position to ensure a safe field of view while driving and to achieve full performance from the product. Pioneer is not liable for any damage, due to installation or use of the product.
How to read this Manual
| Notation Meaning | |
 | These symbols are used to draw your attention to items you should be aware of when using this product and items you should be aware of to maintain its performance. |
| Note /Notes | Notes provide useful tips and extra information about product features. |
| [oo] | Square brackets are used to indicate selectable items displayed on the screen. |
| →“OOOO” | Quotation marks are used to indicate references and settings. |
- The illustrations and example screens used in this manual may differ from the actual product.
- The actual screens of the product may be changed without prior notification for the purpose of improvements to product performance and features.
- In this manual, the microSDHC memory card is referred to as "the microSD card" for convenience.
- In this manual, Parking Mode is also referred to as Security Mode as the feature name.
Usage Precautions
⚠ Precautions When Handling this product
- The driver may manually set the device to save video to assist in the monitoring of driver performance.
- There are limits to the scope of video that can be recorded with this product (→“Specifications”). First check the video that will be recorded before using this product.
- Do not use this product in locations subjected to high temperatures of 60^ or higher, low temperatures of -10^ or lower, or high humidity.
- Be careful not to infringe on the privacy of any subject in video recorded with this product when using said video. You are fully responsible for the use of said video. Video recorded with this product may include personal information, such as numbers on number plates.
- Recording time may shorten or recording may not be possible when the power supply to the product stops (vehicle engine is turned off, or the cigarette lighter power cable is removed).
- Be sure to use the included power cable for charging the battery.
- Pioneer Corporation does not offer a data recovery service for corrupted or deleted files.
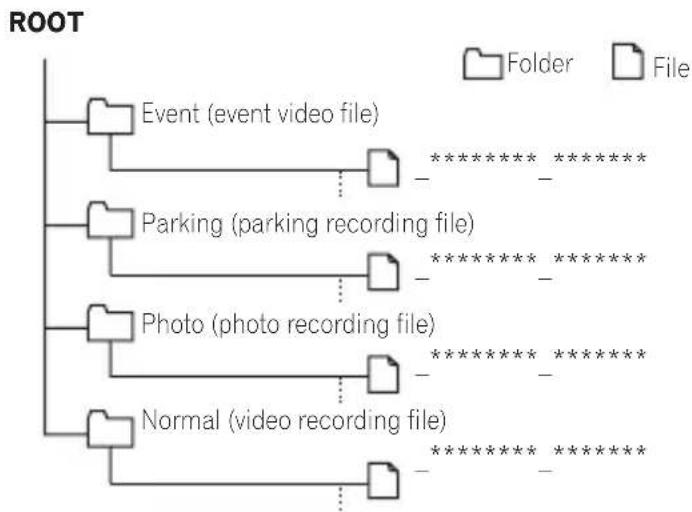
- The storage areas on the microSD card are split into the four areas shown in the following diagram according to the type of recording.
| Event video file storage area | |
| Parking mode recording file storage area | |
| Photo file storage area | |
| Normal video recording file storage area |
- Note that files will be overwritten when there is insufficient free space in the file storage areas. We recommend that you back up any important files you want to keep. "Backing Up Recorded Files"
- To ensure that important files, such as files containing records of accidents, are not overwritten, always turn the power off before removing the microSD card and store the card in a safe place. "Inserting and Ejecting the microSD Card"
- You can view video files on your PC. However, the video may stutter or stop depending on the performance of the PC.
- If this product is used near another device that uses GPS, such as a car navigation system, that device may temporarily be unable to receive radio waves from GPS satellites due to radio interference. There may also be a negative impact on the functions of surrounding devices.
- The internal battery is a consumable part. This battery is for retaining the time, and may fail to retain the time after repeated use. Contact Pioneer support if the time resets frequently.
- The internal battery is a consumable part. The operating time will slowly decrease as the battery is repeatedly charged. Contact Pioneer support if you feel that the operating time has become too short.
- Do not touch the lens with your hands. Wipe the lens off with a soft cloth if you touch it.
⚠️ Precautions When Handling the microSD Card
- Keep the microSD card out of the reach of small children to prevent them from accidentally swallowing it.
- To prevent data loss and damage to the microSD card, never remove it from this product while data is being transferred.
- If data loss or corruption occurs on the microSD card for any reason, it is usually not possible to recover the data. Pioneer accepts no liability for damages, costs or expenses arising from data loss or corruption.
- Never insert or eject an microSD card while driving.
• This product supports the following microSD Cards.
| microSDHC | |
| Capacity 16 GB ~ 32 GB | |
| File System exFAT | |
| Speed Class Class 10 or better |
English
- Not all microSD cards are guaranteed to work with this product.
- Pioneer does not guarantee microSD Card compatibility.
- microSDHC memory card (sold separately).
- Format the microSD card before using it. Do not use a microSD card that contains other data, such as that from a PC.
• Periodically format the microSD card. - Do not eject the microSD card when it is being accessed. The file or card may be corrupted.
- Even if the microSD card is used normally, you may no longer be able to write data to the card or erase data from the card normally.
- The service life of the microSD card is not covered under the warranty.
- The microSD card is a consumable part. We recommend that you regularly replace the microSD card with a new card. If you use the microSD card for a long period of time, this product may no longer be able to save data to the card correctly due to bad sectors, or an error may occur and the card will no longer be usable.
- On rare occasions, a microSD card that is recognised by your computer may not be recognised by this product. In this case, depending on the problem with the microSD card, this product may be able to recognise the card by formatting it with this product format feature "This Product Settings" - "Configurable Features" - "System" - "Format SD Card". However, all files, including protected files, saved to the microSD card will be erased when it is formatted. Always back up the files on the microSD card before formatting it.
- Pioneer Corporation does not make any assurances that microSD card problems will be repaired by formatting the card. Pioneer Corporation bears no responsibility for files that are erased from the microSD card or damage that occurs from formatting the card. Format the microSD card according to your own judgement and at your own responsibility.
Check the Accessories

Main Unit×1 Suction Mount Cradle
×1

Cigarette Lighter Power Cable 3.5 m×1


Quick Start Guide×1 Warranty×1 Safety Strap×1
Note
- All images in this document are for illustrative purpose only and subject to change.
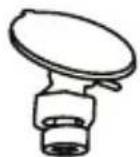
When replacing the fuse
If the product does not power on or charge even when the included cigarette lighter power cable is connected, then check if the fuse is blown.

CAUTION
If the fuse is blown, then replace this with a new standard glass tube fuse (diam. 5.0 mm/length 20 mm), and tighten the tip fully. Ensure that the fuse is replaced with one of the rated type and capacity (F 2 AL/250 V).
Before Installing the Product
WARNING
- When installing the product on vehicles installed with an air bag, never install on the cover of the air bag and at locations that might obstruct the deployment of the air bag. Doing so might prevent the air bag from being deployed normally, cause the product to fly out due to air bag deployment, and cause accident and injury.
CAUTION
- First check with the vehicle manufacturer for precautions related to the installation work when installing the product in a vehicle equipped with airbags. Otherwise there is a risk of airbag malfunction.
• Always use the included parts as specified. There is a risk of product failure if other parts are used.
• Install this product in a location where it will not hinder vehicle equipment and the ability to drive the vehicle.
Installation Precautions
- The main unit is for installation to the inside of the front window only. Do not install it anywhere else inside or outside of the vehicle.
- When installing the main unit to the inside of the front windscreen, be sure to install it to the specified positions of the front windscreen and within the specified dimensions.
- Make sure that the surface of the front windscreen is clean and dry, before attaching the mounting cradle.
- Depending on the vehicle, installation at the specified location and within the specified dimensions may not be possible. For details, consult with your dealer.
- Do not cover the main unit or get the lens dirty.
- Do not place reflective objects near the lens.
• Take care when handling the main unit that it does not drop and you do not touch the lens. - Recording quality may be affected if the front windscreen of the vehicle is coated or has been specially treated.
- This product may not be able to receive GPS signals if the front windscreen of the vehicle has been specially treated. Check the GPS reception status indicator displayed on the screen of this product. If a GPS signal cannot be received, this product cannot be installed in this vehicle. - " Using this product" - "How to View the Recording Screen"
- Choose a working location free from dust and debris in the air.
- When the temperature is low or there is condensation on the glass, turn on the heater and defroster to warm up the window in order to prevent poor adhesion of the mounting cradle.
- To avoid the windscreen mounted cradle from detaching, you may attach the safety strap (included in the box).
- Always install this product in the specified installation position to ensure a safe field of view while driving and to achieve full performance from the product.
- Pioneer is not liable for any damage, due to installation or use of the product.
Installation Tips
Before Installing and Securing the Product
- First, temporarily connect this product and confirm that it operates correctly, and then install it. If the product does not operate correctly, check again if there is a mistake in the connection.
Before Applying Mounting Cradle
- Clean the location where the mounting cradle will be applied.
CAUTION
- Install firmly so that it does not come off. Incorrect installation may cause this to detach whilst driving and cause an accident. Inspect the installation state from time to time.
Installation
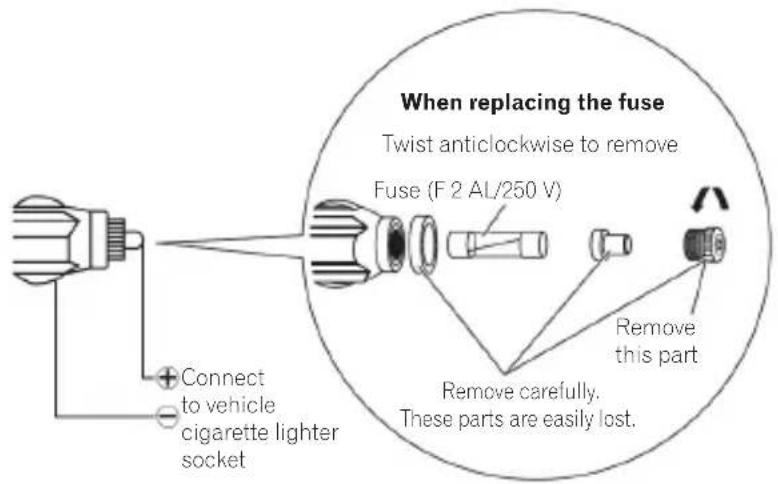
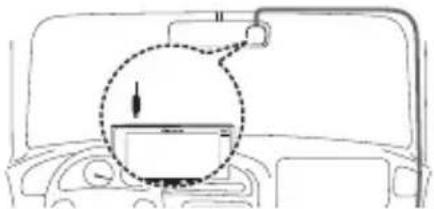
Specified Installation Position on Front Windscreen
When installing this product to the inside of the front windscreen, install in a vehicle and in a position that satisfies all of the following conditions.
- A position where this entire product is within 20% of the top edge of the height of the front windscreen (range within 20% of the actual length, excluding parts overlapping weather strips, mouldings, etc. and masked parts) or is in the shadow of the rear view mirror as viewed from the driver's seat. Note that "20%" as described above is a rough estimate. Please install the product in accordance with your country's laws and regulations.
- A position where the lens part of this product is within the wiping range of the wiper.
- A position where the lens part of this product does not hang over the sunshade and black ceramic lines/black ceramic pattern.
- A position where this product faces in the horizontal direction to the front and side to side.
- A position where the power cable can be routed without unnecessary force.
IMPORTANT
Always install this product in the specified installation position to ensure a safe field of view while driving and to achieve full performance from the product.
Install this Product
1 Clean the installation area

natural_image
Illustration of a hand cleaning a corner with arrows indicating texture or motion (no text or symbols)English
2 Install this product.
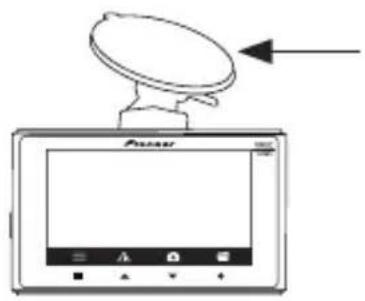
① Fix the mounting cradle to the Main Unit
② Install at the specified position of the front windscreen, adjusting the direction to make the image horizontal.
CAUTION
• Make sure that the surface of the front windscreen is clean and dry, before attaching the cradle.
- Firmly press the suction cradle installed on the windscreen.
- Do not install the cradle by itself. Always use it connected with the Dash Camera.
- Never touch the surface of the LCD.
- Install firmly so that it does not come off. Incorrect installation may cause this to drop while driving and cause an accident. Inspect the installation state from time to time.
- To avoid the windscreen mounted cradle from detaching, you may attach the safety strap (included in the box).
3 Adjust the installation angle.
Loosen the angle adjustment nut to adjust. After adjusting, tighten the loosened nut to secure.

English
1 Connect the cigarette lighter power cable to the vehicle accessory socket.
Route the power cable to the passenger seat side. Fully insert this into the vehicle accessory socket to make a good connection. (The location of the accessory socket will differ depending on the vehicle.)
natural_image
Diagram of a car dashboard with a circular dial indicator and directional arrow (no text or symbols)CAUTION
- The accessory socket will be extremely hot immediately after using the cigarette lighter. The tip of the cigarette lighter power cable may melt or short circuit if it is plugged in while the socket is hot. Wait for the socket to cool before plugging in the cigarette lighter power cable
2 Turn the vehicle engine on to display the recording screen.
Note
A protective film is applied to the lens when the product is purchased. Peel off this film.
3 Installing the Safety Strap.

① Hook the smaller loop of the safety strap around the Mounting Cradle where it connects to the Main Unit, and then connect the Mounting Cradle to the Main Unit.
② Hook the larger loop of the Safety Strap around the Rear View mirror attached to the windscreen.
③ Once the Safety Strap is connected to both the Rear View Mirror and the Dash Camera, attach the Dash Camera to the front windscreen close to the location of the Rear View Mirror.
Note
Always install this Safety Strap as described. Do not cut the Safety Strap or install it in any other way than as described. Pioneer is not liable for any damage, due to installation other than described, or use of the product.
4 Removing this product
① Unhook the mounting cradle from the windscreen.
② Remove this product.
Part Names
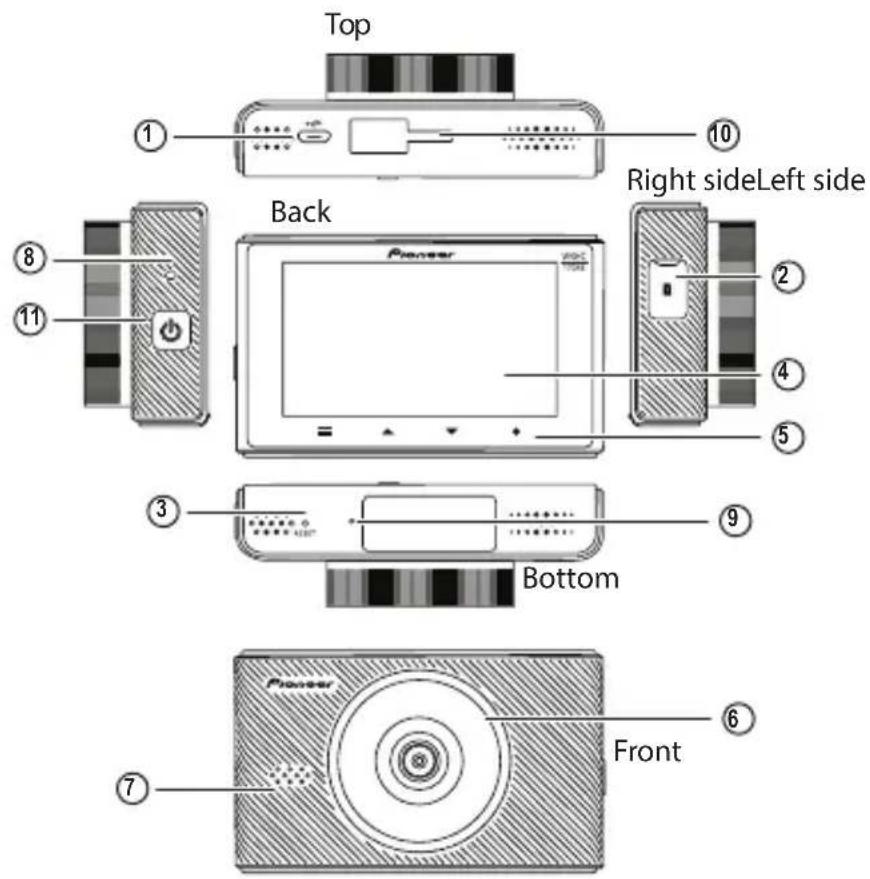
English
① Power Port
Connect the cigarette lighter power cable.
② microSD card Slot
Up to 32GB microSD Card capacity
③ Reset Button
Press this button with the tip of a ballpoint pen to reset this product.
④ LCD
⑤ Function Buttons
⑥ Lens
⑦ Speaker
⑧ System Indicator
⑨ Microphone
⑩ Suction Mount Cradle connection point
⑪ ON/OFF Power Button
Function Buttons
The functions of the function buttons are indicated by the icons displayed at the bottom of the screen. The functions of the buttons will depend on the displayed screen. (Icons are not displayed on some screens.)
In the playback screen or MENU screen, holding down the function button returns you to the previous screen.
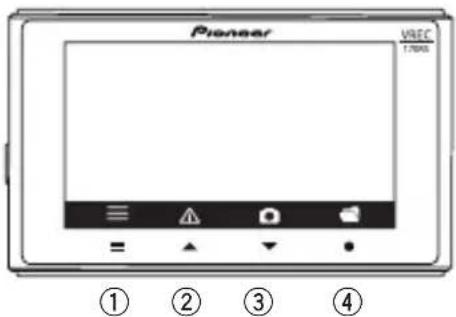
① Main Menu Display
② Manual recording of events (Event Recording)
③ Take photo
④ Playback recorded media
During MENU screen display
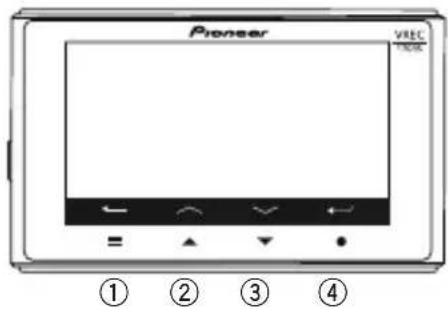
① Back
② Up
③ Down
④ Confirm
| Inserting and Ejecting the microSD™ Card
Turn off the power to this product when inserting and removing the microSD card.
→"Manually Turning the Power On and Off"
Inserting the microSD Card
Hold the top edge of the microSD card, position the microSD card so that the label is facing the lens side of this product, and slowly insert it into the microSD card slot until it clicks.
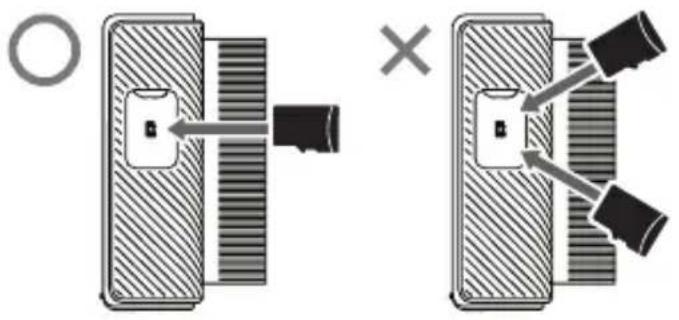
CAUTION
- Do not insert the microSD card at an angle. Doing so may cause damage.
- Do not insert and eject microSD card repeatedly in a short period.
• Always insert/eject the microSD card slowly
Ejecting the microSD Card
Slowly push in the top edge of the microSD card until it clicks ①. The lock will be released. Pull out the microSD card ②.

flowchart
graph TD
    A["Device"] -->|①| B["Play"]
    B -->|②| C["Control"]
CAUTION
- Ensure care is taken when handling the microSD card, as it becomes hot after being written.
Backing Up Recorded Files
When the free space of the file storage areas is low, files are deleted from the oldest file.
We recommend that you back up any important files you want to keep with the following procedure.
Note
Prepare a spare microSD card in advance.
1 Replace the microSD card.
Stop the vehicle in a safe location. Then turn off this product power, eject the microSD card, and replace it with a spare microSD card.
2 Copy or move the files to a PC.
Insert the microSD card into a PC, using a commercially available SD card adapter if necessary. Copy or move the videos and photo files to back up to a suitable location on the PC.
Folder and File Structure
The structure of folders and files in a microSD card is as follows.
flowchart
graph TD
    A["Event (event video file)"] --> B["Folder"]
    C["Parking (parking recording file)"] --> D["Folder"]
    E["Photo (photo recording file)"] --> F["Folder"]
    G["Normal (video recording file)"] --> H["Folder"]
    B --> I[********* * * * * * * * * * * * * * * * * * * * * * * * * * * * * * * * * * * * * * * * * * * * * * * * * * * * * * * * * * * * * * * * * * * * * * * * * * * * * * * * * * * * * * * * * * * * * * * * * * * * * *
Note
The year, month, day, hours, minutes, and seconds are automatically assigned at "******* _ *****".
Using this product
Before using this product, first stop the vehicle in a safe location and apply the handbrake.
This product Power
This product starts when the vehicle's engine is turned on (ACC ON), and it automatically starts recording. (Video recording) "Using this product" - "Video Recording"
CAUTION
- If you do not use the device for a long time, the battery power in the device may run out.
- If the internal battery is empty, you will need to rest the time / date from the setting menu.
- Please ensure the product is connected to the cigarette lighter socket, and powered on for a minimum of 30 seconds for sufficient battery charge to save the time.
Manually Turning the Power On and Off
This product can be manually turned on and off, from the side of the main unit. The Cigar Charger cable must be connected and the vehicle ACC ON at all times to power the main unit ON/OFF.
When the main unit power is off: Long press ON/OFF Button for 3 seconds to start up. When the main unit power is on: Long press ON/OFF Button for 3 seconds to shut down.
System Indicator Display
The operating status of this product is displayed with the system indicator.
| Blinking Green Menu Displayed Normal Recording Recording Event | Error Has Occurred (Including microSD Card not Inserted) | |||
| Illuminated green | — — — | ○ | ||
| Illuminated red | — | — | ○ | — |
| Blinking red | — — — | ○ | ||
| Not illuminated | ○ | — — — | ||
How to View the Recording Screen
The status display shows the operating status of this product
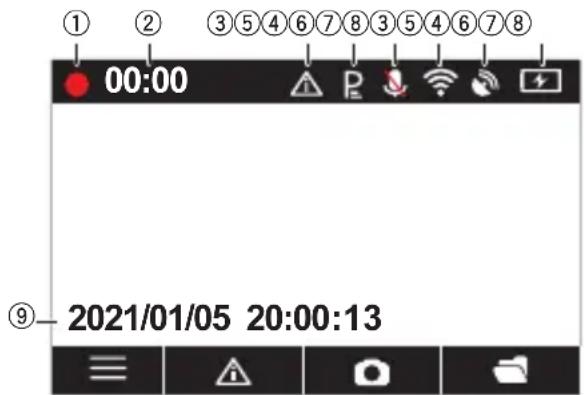
① Recording in progress
② Elapsed recording time
③ Event recording status*1
④ Parking Mode
⑤ Sound recording*2
⑥ Wireless connection status*3
⑦ GPS reception status*4
⑧ Power status
⑨ Date / Time / vehicle speed
*1 When manual event recording is performed or vibration is detected in the event recording mode, and event recording has been activated, the Event icon is displayed.
*2 A red “\” is displayed when sound recording is set to off.
*3 During a wireless connection, this is displayed in green, and when wireless connection is disconnected, this is displayed in white. A red "\" is displayed when wireless connection is set to off.
*4 During GPS reception, this is displayed in green, and when GPS cannot be received, this is displayed in white.
Video Recording
Recording automatically starts when this product is started. The recorded video is saved to the microSD card as one file of the set increment of time (default: 3 minutes), and when the microSD card runs out of free space, the files are overwritten starting from the oldest file.
Notes
- You can change the video recording time.
→“This Product Settings” - “Configurable Features” - “Recording Setting” - “Video Clip Length”
• Video recording will stop under the following circumstances.
— When the MENU screen is displayed
— When the power supply is stopped
— When parking mode has started
— When the microSD Card is removed
• The recording time may differ depending on the conditions.
Event Recording
Automatic Recording by Detecting Impacts (Event Recording)
The video recording file when an impact is detected by this product (the Dash Camera), such as an impact with another vehicle, is recorded as an event video file to the "Event" folder.
The number of event video files and recording times will differ depending on when an impact is detected. If an impact is detected, then the file records for 31 seconds after the impact is detected are recorded as an Event video files.
Manual Recording (Manual Event Recording)
If manual record button is pressed during video recording, then this is recorded as an event video file for 33 seconds, with the same specifications as an event recording.
Notes
- You can adjust the sensitivity for detecting impacts.
→“This product Settings” - “Configurable Features” - “Recording Setting” - “G-Sensor Sensitivity
Security Mode
When the power supply to this product is turned off (vehicle engine is turned off, or the cigarette lighter power cable is removed), the Security Mode is activated for a fixed period of time. The maximum operation time is approximately 40 minutes.
When this device detects vehicle movement caused by vibration while the Security Mode is activated, that event is saved for 60 seconds as a parking mode file. After recording has completed, the Dash Camera will automatically shut down. If there is parking surveillance video recorded, the user is prompted with the option to view the recorded video.
Notes
• In this manual, Parking Mode is also referred to as Security Mode as the feature name
• The Security Mode and be set to on or off.
- You can adjust the sensitivity for detecting vibration.
→“This product Settings” - “Configurable Features” - “Security Mode” - “Sensitivity”
Vibration that is detected for approximately three minutes after power supply to this device is stopped, and for approximately three minutes before power supply is started, is not covered by the notification message display feature.
If any video is recorded 3 minutes after the user stops the vehicle and turns off the ACC power, and 3 minutes before the user gets on the car and starts the engine, the triggered event will not be prompted. However, the recorded files are also stored in the Parking folder.
The recording time may differ depending on the conditions.
Notes
- If the product records a parking event after 'ACC OFF' from the dormant state, the screen will remain off and the recording will start in the background.
Playing Recorded Files
Automatic Recording by Detecting Impacts (Event Recording)
In each of the screens displayed from here on, the Monitor Display (screen) automatically goes black if you do not perform any operation for approximately 60 seconds.
(This is the Monitor Display default setting).
Video recording does not commence whilst the user is in any menu operation.
You can play recorded video files.
① Press the Playback recorded media button.

② Select the desired folder to view using the UP / DOWN hard key buttons. The thumbnails of files in the selected folder will be displayed.

③ Select the desired thumbnail using the hard key buttons to select the recorded media.

The thumbnails of files in the selected folder will be displayed.
① Return to the previous menu
② Previous file
③ Next file
④ Confirm
The selected file will play.
① Return to the previous menu
② Previous recording
③ Next recording
④ Press to delete the recording
Notes
- Select the file you want to delete and then press the confirm button again when prompted to do so from the on-screen GUI, to delete the selected file.
- If the video is too short, please insert the microSD Card into your PC to delete files.
Advanced Driver Assistance Systems (ADAS)
Lane Departure Warning System (LDWS)
This product continues to monitor road conditions. If the product detects Lane Departure, and the vehicle speed ≥ 60km/h, then a warning icon is displayed on the screen and a warning sound is played at the same time.
Notes
- Left Lane or Right Lane can be detected, so the left / right icon can be displayed.
- The yellow line is for setting the position when installing the equipment.
- This feature is set to OFF as default. You can activate the feature as below. → "This product Settings" - "Configurable Features" - "LDWS"

Front Collision Warning System (FCWS)
This product continues to monitor road conditions. If the product detects an object, such as a vehicle in front and the distance is 10 meter or less, and the vehicle speed ≥ 60km/h, then a warning icon is displayed on the screen and a warning sound is played at the same time.
Notes
- This feature is set to OFF as default. You can activate the feature as below → "This product Settings" - "Configurable Features" - "FCWS"

CAUTION
- Usage of the Advanced Driver Assistance Systems (ADAS) features in this product is not a substitute for driver awareness and is not for preventing accidents. The system alerts are to be used as a guidance only.
- It is the user's responsibility in compliance with all applicable laws and ordinance.
- Pioneer is not liable for any damage, due to installation other than described, or use of the product. Pioneer does take responsibility whatsoever for any damage or losses incurred as a result.
- This feature is not linked to the vehicle turn signals, or any other vehicle system.
- It is the user's responsibility to drive whilst keeping a safe distance between vehicles, whilst correctly judging the road, traffic and weather, and surrounding conditions.
- Whether or not the system is functioning correctly, it is the user's responsibility to react to changing road conditions to maintain vehicle control. Failure to do so can result in serious personal injury or death and/or severe property damage.
- Do not operate this product if doing so will divert your attention in any way from the safe operation of your vehicle. Always observe safe driving rules and follow all existing traffic regulations. If you experience difficulty in operating this product or reading the display, park your vehicle in a safe location and apply the handbrake before making the necessary adjustments.
Speed Limit Alert
This product gives an audio tone and visual warning if the user is over a pre-determined speed set by the user via the setting menu.
Notes
- This product calculates the vehicle speed via it's GPS.
- This feature is set to OFF as default. You can activate the feature as below
→“This product Settings” - “Speed Limit Alert”
This Product Settings
Before using this product, first stop the vehicle in a safe location and apply the handbrake.
These settings configure this product. You can reset the settings to the default settings. You can also format the microSD card and check this product version information. Note that it help video recording will stop while the MENU screen is displayed.
1 Press the Menu button to open the main menu.
In each of the screens displayed from here on, the Monitor Display (screen) automatically goes black if you do not perform any operation for approximately 60 seconds. (This is the Monitor Display default setting). Video recording does not commence whilst the user is in any menu operation.
2 Press Function Buttons to select the desired option.
In each menu setting, you can change the settings to your own preference.
Configurable Features
Recording Setting
| Setting Details Default Settings | ||
| Video Resolution | Sets the resolution quality of video recording.[Full HD 1920 × 1080 p or HD 1280 × 720 p]. | Full HD 1920 × 1080 p |
| Video Clip Length | Sets the recording time for one video recording video file, in video recording. [1 min / 3 min / 5 min]. | 3 min |
| Exposure Value Sets | the exposure of video recording. [-2 to +2]. 0 | |
| G-Sensor | Sets the sensitivity for detecting vibration or impact.This can also be set: [OFF / High / Middle / Low]. | Mid |
| Microphone | Sets whether or not to record sound around this product during video recording. [ON or OFF]. | OFF |
English
| Setting Details Default Settings | ||
| Parking Mode (Security Mode) | Sets the sensitivity to record an event, after vibration is detected and the vehicle is parked, and after the power is shut down.This can be set: [OFF/High / Middle / Low]. | Mid |
Configurable Features
System Setting
| Setting Details Default Settings | ||
| Language | Sets the language used to display the screen. [English / French / Spanish / German / Russian / Polish / Ukrainian]. | English |
| Monitor Display | Sets the time that the product enters the sleep mode. [Always ON/ 10 sec / 1 min / 3min / Auto].When selecting Auto;The Speed over 15 km/h for 5s: display will go OFF.The Speed below 15km/h for 5s: display will go ON.If no GPS: keeps the display status/no change. | Off in 1 min |
| Volume Sets volume level. [0 to 10]. 5 | ||
| Speed Unit Sets the Speed Units. [km/h or mph]. Km/h | ||
| Speed Limit Alert Sets the Speed Limit Alert ON/OFF. OFF | ||
| LDWS/FCWS Sets the LDWS/FCWS ON/OFF. OFF | ||
| Satellite Synchronisation | The Dash Camera time is synchronised by the built-in GPS. [ON or OFF]. | ON |
| Satellite Status GPS | signal can be checked via the Satellite Status. - | |
| Anti-Flicker Sets the lens recording frequency. [50Hz or 60Hz]. 50Hz | ||
| Time Zone Select | Sets the time zone.(When receiving GPS signal, time/date will be automatically set, but not time zone). | GMT+00:00 |
| Date/Time | Sets the time manually.[Year/Month/day] [Hour/Min/ Sec]. | - |
| Time Stamp | Add the time/date to the recording. [ON or OFF]. | ON |
| Format SD Card*1 | All files on the microSD card can be deleted. | - |
| Restore Factory Mode | Settings can be reset to the default settings. | - |
| Version | Allows you to check the product model number and firmware version information of this product. | - |
*1 When there is some problem with the microSD card, a message, such as "No SD Card" is displayed, and recording stops.
Wireless connection
| Setting Details | Default Settings | |
| Wireless Connection | Sets whether or not to connect a wireless connection tethering supported terminal to this product. [ON/OFF] | ON |
*Only one smartphone can be paired with the product at one time. In case of iOS, you cannot connect a different iOS device within 2 min after disconnecting a currently paired iOS smartphone. Auto Connection may not be supported for certain smartphones. If it is not supported, please connect your smartphone manually.
Guide to Recording Time
The following table provides estimates of the video recording times possible with different SD card capacities. The actual values will depend on various factors, such as the microSD card being used, subject being recorded, and recording conditions.
As a percentage of memory card capacity, the video recording time will be 59%, the event recording time will be 10%, the parking mode time will be 30%, and the number of photos will be 1%.
Guide to Recording Time with a 16 GB microSD Card
| Resolution Video type 16 GB | ||
| 1080p Normal | Recording | Approx. 1 hour 14 minutes |
| 1080p EVENT | Recording Approx. 12 videos | |
| 1080p Parking | Mode Recording Approx. 37 minutes | |
| 1080p No. of Photos | Approx. 330 |
Guide to Recording Time with a 32 GB microSD Card
| Resolution Video type 32 GB | |
| 1080p Normal Recording | Approx. 2 hour 46 minutes |
| 1080p EVENT Recording Approx. 24 videos | |
| 1080p Parking Mode Recording | Approx. 1 hour 14 minutes |
| 1080p No. of Photos Approx. 660 |
Notes
- Mode operation time: Approx. 40 minutes.
- The recording times are estimates, based on 1 min recordings. The actual recording times will depend on the scenery being recorded.
- Normal recording and EVENT Recording both use the cycle erase storage mode. For the key video that is not erased, please export and backup on your computer timely after the incident.
- After many repeated cycles erasing in this storage mode, the microSD Card may possibly get damaged with aging, resulting in unsaved data. If under this situation, please replace with a new microSD Card.
Exclusive App
The exclusive app "Dash Camera Connect" can be used on iPhone or Android™ smartphone to check the video recorded on this product or make settings on the screen of iPhone or Android™ smartphone. To use this app, a wireless connection must be made between this product and iPhone/Android™ smartphone beforehand.
① Set the wireless connection function of this product to on. →“This Product Settings”
② Operate the iPhone or smartphone (Android ^™ ) to select this product as the wireless connection device. The SSID name (access point name) and password of this product can be checked in the wireless connection settings screen.
- Only one iPhone/smartphone (Android™) device can be connected to this product at any one time. When a second device is connected, the first connected device is disconnected.
- While a wireless connection is made, no operations can be performed on this product. If a function button is pressed while a wireless connection is made, a message will be displayed prompting you to break the wireless connection. If you select [Yes], the wireless connection will be disconnected, and operations on this product will be enabled.
- You can change the SSID name of this product by operating the exclusive app "Dash Camera Connect". Note, however, when the SD card is formatted, the SSID name returns to its default setting.
- It is recommended to enter the search term "Dash Camera Connect" in the search field to search for the application.
Dash Camera Connect


Trademarks & Copyrights
• SD, microSD and microSDHC Logo are trademarks of SD-3C LLC.

• EU Conformity marking.

• UK Conformity marking.

- iPhone is a trademark of Apple Inc., registered in the U.S. and other countries.
- iOS is a trademark or registered trademark of Cisco in the U.S. and other countries.
• Android is a trademark of Google LLC.
GPS
• GPS (Global Positioning System) is a system that measures your current position by receiving position measurement radio signals from GPS satellites.
- The GPS satellite signals cannot pass through solid matter (except glass). The signals from GPS satellites may be blocked when this product is in the following locations.
— Inside tunnels and parking structures
— On the bottom level of a two-level highway
— Around concentrations of skyscrapers
— In dense forests
Troubleshooting
Check the following information before sending the product in for repairs.
| Symptom | Cause | Action |
| An error occurred during the display and operation of this product. | The microcomputer in this product is malfunctioning. | Press the reset button.→“Part Names” |
| A file that should have been saved cannot be found. | If there is insufficient space in the storage areas of the microSD card, the files will be overwritten in order from the oldest files. | We recommend that you back up any important files you want to keep.→“Backing up Recorded Files” |
| The product makes parking mode files when you get in and out of the vehicle. | The vibration when people get in and out of the vehicle and the movement of people are being detected. | Adjust the sensitivity of the sensors to use for detection.→“This Product Settings” - “Configurable Features” - “Values” - “Security Mode” - Sensitivity” |
| There are many videos where nothing happens in the files recorded while parked. | The sensitivity of impact detection may not be appropriate. | |
| My vehicle was hit while parked, but a video file wasn’t recorded. | ||
| An accident occurred during driving, but a video file wasn’t recorded. | The sensitivity of impact detection may not be appropriate. | Adjust the sensitivity of the sensors to use for detection.→“This Product Settings” - “Configurable Features” - “Recording Setting” - “G-Sensor” |
| There's no sound when I play a video file. | The sound recording setting may be OFF. | Check the sound recording setting again.→“This Product Settings” - “Configurable Features” - “Recording Setting” - “Microphone” |
| An error occurred during the display and operation of this product. | The microcomputer in this product is malfunctioning. | Press the reset button.→“Part Names” |
| Button response is slow. | The SD card may be worn out | Try formatting the SD card.→“This Product Settings” - “Configurable Features” - “Values” - “System” - “Format SD Card”If the symptom does not resolve, try a new SD card. |
| A message prompting me to format the SD card is appearing frequently. | The SD card may be worn out. | Try a new SD card. |
Specifications
| Recording Medium | microSDHC card, Class 10 (16 GB to 32 GB) |
| Imaging Element | Approx. 2 million pixels (Built-in high sensitivity CMOS sensor) |
| Recording Angles | Main unit: 100° horizontal, 52° vertical, 139° diagonal |
| F-Number | Main unit: F2.1 |
| Resolution | Full HD 1920x1080 p / HD 1280x720 p |
| GPS | Built-in |
| Wireless connection | On-board (for connection of iOS/Android exclusive apps) 802.11b/g/nOutput power: + 17 dBm Max.Frequency band(s): 2400 - 2483 MHz |
| G-Sensor | 3-Axis G-Sensor (level can be set in 4 steps) |
| Recording Methods | Video recording/Event recording/Manual event recording/Parking mode recording |
| Video File Structure | 1 min / 3 min / 5 min |
| Display | 3.0-inch LCD |
| Sound Recording | Can be set to ON or OFF (OFF as default) |
| Frame Rate | 30.0 fps |
| Compression Method | Video: MOV (H.264) / Photo: JPG |
| Video Playback Method | iOS/Android exclusive app, on Dash Camera or microSD card in PC |
| Power Supply Voltage | Main Unit: DC 5 V (12 V / 24 V) cigarette lighter power cable incl.) |
| Fuse Type. (Used in cigarette lighter power cable) | Standard glass type fuse |
| Fuse Capacity. (Used in cigarette lighter power cable) | F 2 AL/250 V |
| Fuse Size. (Used in cigarette lighter power cable) | Diam. 5.0 mm / Length 20mm |
| Power Consumption | Approx. 2.3 W while charging |
| Operating Temperature | -20° to +60°C |
| Dimensions (W x H x D) | Main Unit: 89.5 mm x 54.3 mm x 29.9 mm (W x H x D) |
| Weight | 94 g (Excluding mounting bracket, power cord, etc.) |
https://www.pioneer-car.eu/eur/
Visit www.pioneer-car.eu/uk/ (or www.pioneer-car.eu/eur/) to register your product.
PIONEER CORPORATION
28-8, Honkomagome 2-Chome,
Bunkyo-ku, Tokyo 113-0021
Japan
PIONEER EUROPE NV
Haven 1087, Keetberglaan 1, 9120 Melsele, Belgium/Belgique
Tel: +32 (0)3 570 05 11
Fax: +32 (0)3 570 08 86
Salamanca, Wellington Street, Slough, SL1 1YP, UK
Tel: +44 (0)208 836 35 00
Pioneer
VREC-170RS
CAMÉRA EMBARQUÉE
Application exclusive....32
28-8, Honkomagome 2-chome, Bunkyo-ku,
Tokyo 113-0021, Japon
28-8, Honkomagome 2-chome, Bunkyo-ku,
Tokyo 113-0021, Japon
natural_image
Illustration of a hand cleaning a corner with arrows indicating direction (no text or symbols)Francais
ATTENTION
natural_image
Diagram of a car dashboard with a circular dial indicator and directional arrow, no text or symbols presentATTENTION
① En arrière
③ En bas
② En haut
④ Confirmation
ATTENTION
①②③④
①②③④

ATTENTION
LA CORPORATION PIONEER
28-8, Honkomagome 2-chome,
Bunkyo-ku, Tokyo 113-0021
Japon
PIONEER EUROPE NV
Haven 1087, Keetberglaan 1, B-9120 Melsele, Belgique
Tél.: +32 (0)3 570 05 11
Fax: +32 (0)3 570 08 86
Salamanca, Wellington Street, Slough, SL1 1YP, Royaume-Uni
Tél.: +44 (0)208 836 35 00
Pioneer
VREC-170RS
DASHCAM
Bedienungsanleitung
© PIONEER CORPORATION, 2021
Inhalt
28-8, Honkomagome 2-chome, Bunkyo-ku,
Tokyo 113-0021, JAPAN
Representative and Importer in the United Kingdom: Pioneer Europe NV Salamanca, Wellington Street, Slough, SL1 1YP, UK http://www.pioneer-car.eu
[*] VREC-170RS
natural_image
Illustration of a hand cleaning a corner with a brush (no text or symbols)ACHTUNG
natural_image
Diagram of a car dashboard with a circular arrow pointing to the dashboard area, no text or symbols present.
ACHTUNG
① ② ③ ④
⚠️ ACHTUNG
①②③④
①②③④
Lane Departure Warning System (LDWS)
28-8, Honkomagome 2-Chome,
Bunkyo-ku, Tokyo 113-0021
Japan
PIONEER EUROPE NV
Haven 1087, Keetberglaan 1, 9120 Melsele, Belgium/Belgique
Tel.: +32 (0)3 570 05 11
Fax: +32 (0)3 570 08 86
Salamanca, Wellington Street, Slough, SL1 1YP, UK
Tel.: +44 (0)208 836 35 00
Pioneer
VREC-170RS
DASH CAMERA
Hereby, Pioneer declares that the radio equipment type [*] is in compliance with Directive 2014/53/EU. The full text of the EU declaration of conformity is available at the following internet address: https://www.pioneer-car.eu/eur/compliance
Suomi:
28-8, Honkomagome 2-chome, Bunkyo-ku,
Salamanca, Wellington Street, Slough, Berkshire, SL1 1YP, UK
http://www.pioneer-car.eu
[*] VREC-170RS
natural_image
Illustration of a hand cleaning a corner with arrows indicating direction (no text or symbols)Italiano
ATTENZIONE
natural_image
Diagram of a car dashboard with a circular inset showing a device or sensor, no text or symbols present.ATTENZIONE
①
②
③
④
ATTENZIONE


ATTENZIONE
28-8, Honkomagome 2-Chome,
Bunkyo-ku, Tokyo 113-0021
Giappone
PIONEER EUROPE NV
Haven 1087, Keetberglaan 1, 9120 Melsele, Belgium/Belgique
Tel: +32 (0)3 570 05 11
Fax: +32 (0)3 570 08 86
Salamanca, Wellington Street, Slough, Berkshire, SL1 1YP, UK
Tel: +44 (0)208 836 35 00
Pioneer
VREC-170RS
DASHBOARDCAMERA
Gebruiker's Leiding
Inhoud
28-8, Honkomagome 2-chome, Bunkyo-ku,
Tokyo 113-0021, Japan
Hereby, Pioneer declares that the radio equipment type [*] is in compliance with Directive 2014/53/EU. The full text of the EU declaration of conformity is available at the following internet address: https://www.pioneer-car.eu/eur/compliance
Suomi:
28-8, Honkomagome 2-chome, Bunkyo-ku,
Tokyo 113-0021, Japan
Salamanca, Wellington Street, Slough, Berkshire, SL1 1YP, UK
http://www.pioneer-car.eu
[*] VREC-170RS
natural_image
Illustration of a hand cleaning a corner with arrows indicating texture or motion (no text or symbols)Nederlands
AANDACHT
natural_image
Diagram of a car dashboard with a circular dial indicator and directional arrow, no text or symbols presentAANDACHT
① Terug
② Boven
③ Beneden
④ Bevestigen

AANDACHT
flowchart
graph TD
    A["Device"] -->|①| B["Arrow to next block"]
    B -->|②| C["Arrow to next block"]

AANDACHT
Lane Departure Warning System (LDWS)
28-8, Honkomagome 2-chome, Bunkyo-ku,
Bunkyo-ku, Tokyo 113-0021
Japan
PIONEER EUROPE NV
Haven 1087, Keetberglaan 1, B-9120 Melsele, Belgium/Belgique
Tel.: +32 (0)3 570 05 11
Fax: +32 (0)3 570 08 86
Salamanca, Wellington Street, Slough, Berkshire, SL1 1YP, UK
Tel.: +44 (0)208 836 35 00
Pioneer
VREC-170RS
28-8, Honkomagome 2-chome, Bunkyo-ku,
Tokyo 113-0021, Japan
Hereby, Pioneer declares that the radio equipment type [*] is in compliance with Directive 2014/53/EU. The full text of the EU declaration of conformity is available at the following internet address: https://www.pioneer-car.eu/eur/compliance
Suomi:
28-8, Honkomagome 2-chome, Bunkyo-ku,
Tokyo 113-0021, Japan
Salamanca, Wellington Street, Slough, SL1 1YP, UK
http://www.pioneer-car.eu
[*] VREC-170RS
natural_image
Illustration of a hand cleaning a corner with arrows indicating texture or motion (no text or symbols)Español
! iATENCIÓN!
natural_image
Diagram of a car dashboard with a circular arrow pointing to the front panel (no text or symbols)iATENCIÓN!
① Volver
③ Abajo
② Arriba
④ Confirmar

¡ATENCIÓN!
Lane Departure Warning System (LDWS)

¡ATENCIÓN!
Funciones configurables
Ajuste de grabación
28-8, Honkomagome 2-Chome,
Bunkyo-ku, Tokyo 113-0021
Japan
PIONEER EUROPE NV
Haven 1087, Keetberglaan 1, 9120 Melsele, Belgium/Belgique
Tel: +32 (0)3 570 05 11
Fax: +32 (0)3 570 08 86
Salamanca, Wellington Street, Slough, SL1 1YP, UK
Tel: +44 (0)208 836 35 00
Pioneer
VREC-170RS
CÂMARA DE TABLIER
Guia de usuário
Conteúdo
28-8, Honkomagome 2-chome, Bunkyo-ku,
Tokyo 113-0021, Japan
Hereby, Pioneer declares that the radio equipment type [*] is in compliance with Directive 2014/53/EU. The full text of the EU declaration of conformity is available at the following internet address: https://www.pioneer-car.eu/eur/compliance
Suomi:
28-8, Honkomagome 2-chome, Bunkyo-ku,
Tokyo 113-0021, Japan
Salamanca, Wellington Street, Slough, SL1 1YP, UK
http://www.pioneer-car.eu
[*] VREC-170RS
natural_image
Illustration of a hand cleaning a corner with arrows indicating direction (no text or symbols)Portugues
2 Coloque o dispositivo
ATENÇÃO
natural_image
Diagram of a car dashboard with a circular arrow pointing to the dashboard area, no text or symbols present.ATENÇÃO
① Para trás
③ Para baixo
② Para cima
④ Confirmar
ATENÇÃO
28-8, Honkomagome 2-Chome,
Bunkyo-ku, Tokyo 113-0021
Japan
PIONEER EUROPE NV
Haven 1087, Keetberglaan 1, B-9120 Melsele, Belgium/Belgique
Tel. +32 (0)3 570 05 11
Fax +32 (0)3 570 08 86
Salamanca, Wellington Street, Slough, SL1 1YP, UK
Tel. +44 (0)208 836 35 00
- Precaution 5
- Disclaimer 9
- How to read this Manual....10
- Usage Precautions ......11
- Check the Accessories ....13
- Before Installing the Product....14
- Installation....15
- Part Names....18
- Function Buttons ....19
- Inserting and Ejecting the microSD Card 20
- Backing Up Recorded Files....21
- Using this product 22
- This Product Settings 28
- Guide to Recording Time....31
- Exclusive App 32
- Trademarks & Copyrights......33
- GPS....34
- Troubleshooting....35
- Specifications....36
- Declaration of Conformity with regard to the Radio Equipment Directive 2014/53/EU
- [\*] VREC-170RS
- Declaration of Conformity with regard to the Radio Equipment Regulations 2017
- Pioneer Corporation
- Precaution
- Information for users on collection and disposal of old equipment and used batteries
- CAUTION
- WARNING
- Safety Precautions
- Important safeguards
- Important safety information
- To ensure safe driving
- Precautions before connecting the system
- To prevent damage
- Precautions before installation
- Disclaimer
- How to read this Manual
- Usage Precautions
- ⚠ Precautions When Handling this product
- ⚠️ Precautions When Handling the microSD Card
- Check the Accessories
- Note
- When replacing the fuse
- Before Installing the Product
- Installation Precautions
- Installation Tips
- Before Installing and Securing the Product
- Before Applying Mounting Cradle
- Installation
- Specified Installation Position on Front Windscreen
- IMPORTANT
- Install this Product
- Clean the installation area
- Install this product.
- Adjust the installation angle.
- Connect the cigarette lighter power cable to the vehicle accessory socket.
- Turn the vehicle engine on to display the recording screen.
- Installing the Safety Strap.
- Removing this product
- Part Names
- Function Buttons
- During MENU screen display
- | Inserting and Ejecting the microSD™ Card
- Inserting the microSD Card
- Ejecting the microSD Card
- Backing Up Recorded Files
- Replace the microSD card.
- Copy or move the files to a PC.
- Folder and File Structure
- Using this product
- This product Power
- Manually Turning the Power On and Off
- System Indicator Display
- How to View the Recording Screen
- Video Recording
- Notes
- Event Recording
- Automatic Recording by Detecting Impacts (Event Recording)
- Manual Recording (Manual Event Recording)
- Security Mode
- Playing Recorded Files
- Advanced Driver Assistance Systems (ADAS)
- Lane Departure Warning System (LDWS)
- Front Collision Warning System (FCWS)
- Speed Limit Alert
- This Product Settings
- Press the Menu button to open the main menu.
- Press Function Buttons to select the desired option.
- Configurable Features
- Guide to Recording Time
- Exclusive App
- Trademarks & Copyrights
- GPS
- Troubleshooting
- https://www.pioneer-car.eu/eur/
- PIONEER EUROPE NV
- Pioneer
- VREC-170RS
- Application exclusive....32
- ATTENTION
- LA CORPORATION PIONEER
- Inhalt
- ACHTUNG
- ⚠️ ACHTUNG
- ATTENZIONE
- Inhoud
- AANDACHT
- ! iATENCIÓN!
- iATENCIÓN!
- ¡ATENCIÓN!
- Funciones configurables
- Conteúdo
- Coloque o dispositivo
- ATENÇÃO
Brand : PIONEER
Model : VREC-170RS
Category : Dashcam