
Airfix Draw Aligner - Bodywork straightening tool GYS - Free user manual and instructions
Find the device manual for free Airfix Draw Aligner GYS in PDF.

User questions about Airfix Draw Aligner GYS
0 question about this device. Answer the ones you know or ask your own.
Ask a new question about this device
Download the instructions for your Bodywork straightening tool in PDF format for free! Find your manual Airfix Draw Aligner - GYS and take your electronic device back in hand. On this page are published all the documents necessary for the use of your device. Airfix Draw Aligner by GYS.
USER MANUAL Airfix Draw Aligner GYS
natural_image
Technical line drawing of a mechanical lifting device with a vertical column and base platform (no text or symbols)VIDEO

SETUP
FR 02-09 / 47-52
EN 10-16 / 47-52
DE 17-24 / 47-52
ES 25-32 / 47-52
NL 33-39 / 47-52
IT 40-46 / 47-52
AIRFIX DRAW ALIGNER AIRFIX DRAW ALIGNER G
CONSIGNE GÉNÉRALE

natural_image
Technical line drawing of a mechanical lifting device with a vertical frame and roller support (no text or symbols)natural_image
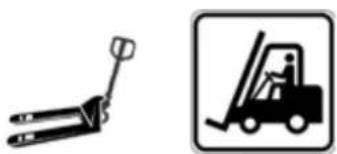
Two black-and-white icons: a manual pallet jack and a forklift, both without any text or symbols.MISE EN PLACE DU JOINT
natural_image
Close-up of hands holding a small object with a mechanical clamp (no visible text or symbols)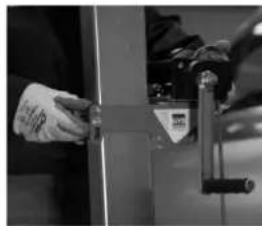
natural_image
Close-up of hands operating a mechanical clamp or fixture (no visible text or symbols)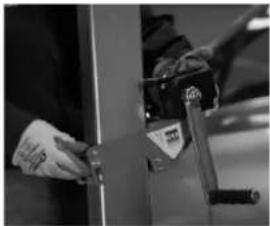
natural_image
Close-up of a hand using a tool to adjust or install a mechanical component (no visible text or symbols)
ANOMALIES, CAUSES, SOLUTIONS
This user's manual includes operating instructions for your device and safety warnings for your protection. Please read it carefully before first use and keep it for future reference. Do not use this machine if any parts are missing or damaged. This product must not be modified, in any way whatsoever. Fixings that are over- or under-tightened are susceptible to breakage, loosening, or spara-tion, which can lead to serious accidents.
Unsecured objects can become projectiles. Assemblies that require a specific torque should be checked with a torque gauge. If the markings indicating the nominal load, operating pressure or the warning labels are illegible or missing, they must be replaced. Both operators and maintenance staff must be physically capable of carrying the load, load and power of the connected equipment, and must be able to perform the task. The use of this unit is restricted to professionals.
PERSONAL SAFETY

To protect yourself and others, ensure the following safety precautions are taken:
Wear safety shoes in order to avoid an injury if a part is dropped during operation or assembly.
Wear protective gloves to reduce the risk of cut injuries during assembly and use of the equipment.

The operator should be positioned in such a way as to have access to the winch crank while working.
Do not stand directly in front of the post.
WORKING ENVIRONMENT
Slips, trips and falls are a major cause of serious injury and death. Beware of loose cables on the floor. Always use the tool at a safe distance from people and objects in or around the work area. The Airfix Draw Aligner is intended for use indoors in a well-lit environment, on a flat and smooth floor.
LIMITATIONS OF LIABILITY
The Airfix Draw Aligner is an automotive body straightening tool designed to comply with all relevant standards. All data and advice given in this manual have been compiled taking into account the applicable standards and regulations, as well as our own extensive knowledge and experience.
The Airfix Draw Aligner is not suitable for repairs and straightening of structural vehicle parts.
The manufacturer cannot be held responsible in case of material and physical damage that could lead to death by:
• Non-compliance with the operating instructions
- Improper or dangerous use
- Employment of unqualified and/or unauthorised persons
- Unauthorised alteration of the unit or its accessories
• Insufficient maintenance
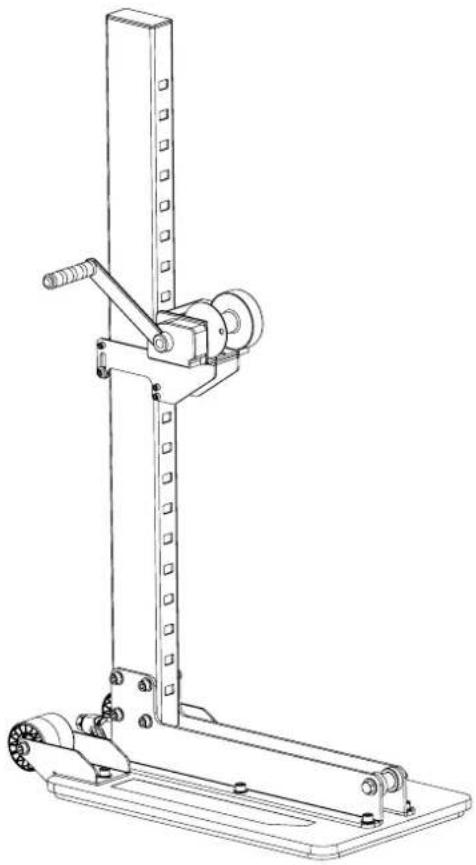
DESCRIPTION AIRFIX DRAW ALIGNER
The Airfix Draw Aligner is intended to be used for the straightening of panelling. Self-stabilising via an air vacuum anchoring system, it allows the user to work at a more comfortable height without having to bend down. Portable and easy to assemble, it enables fast straightening of automotive body panels.
The winch position can be adjusted easily.
PULLING CAPACITY
The Airfix Draw Aligner is designed to pull up to 350kg across its full height with a manual rope winch. The cord has a tensile strength limit of 1.5 T.
natural_image
Technical line drawing of a mechanical lifting device with a vertical frame and roller support (no text or symbols)UNPACKING AND UNLOADING
The packaging contains the user and maintenance manual for the unit. On delivery, check for external transport damage. If there is visible damage, leave the goods and packaging as is. Do not use the goods, and contact your dealer directly. Failing that, a statement of reservation must be made to the carrier. Under no circumstances can GYS be held responsible. Wear gloves and safety shoes. The weight of the goods is 31 kg. Packaging should not be put in a waste bin, but should be recycled.
natural_image
Two black-and-white icons: a manual pallet jack and a forklift, both without any text or symbols.ASSEMBLY OF THE SEAL
| Fit the seal, starting at the mark on the plate. | 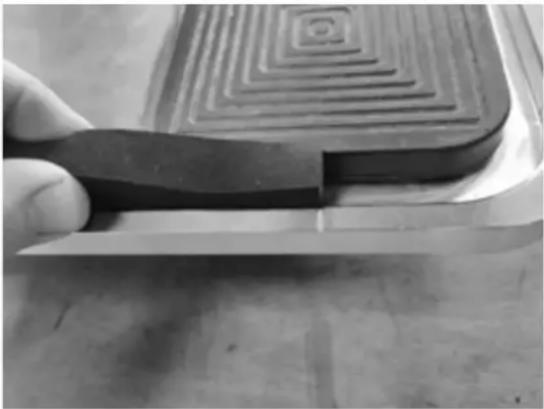 |
| Pinch the gasket into place in the groove.Be careful not to stretch the seal. | 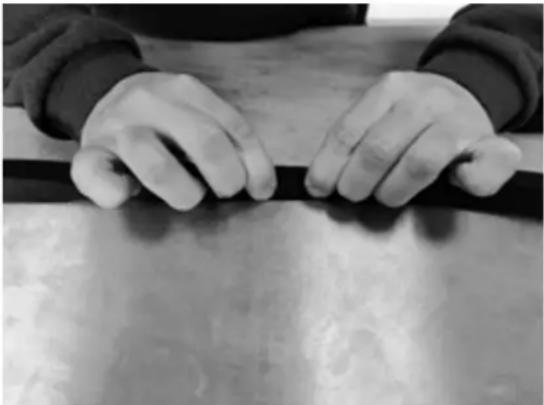 |
| Check that the seal is correctly inserted in the groove. | 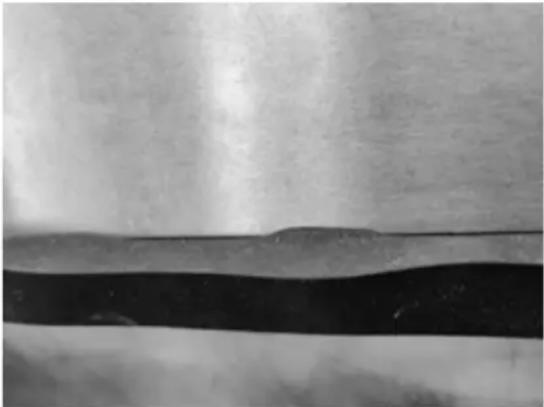 |
| Make the joint by slightly compressing the joint.The joint must not be cut. If there is too much length, the joint is overstretched. Put it back in place without stretching it. | 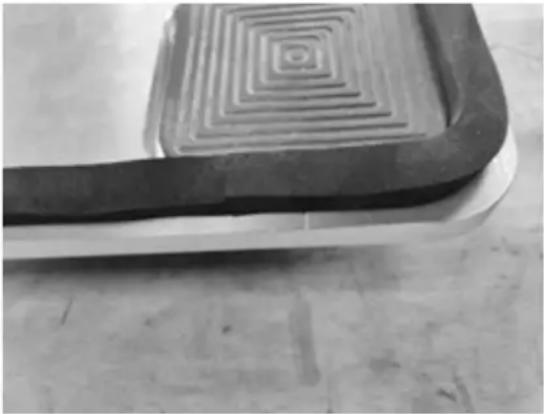 |
ASSEMBLY
| Screw the silencer onto the Venturi block by hand |
| Screw M10x25: 8 Safety washer M10: 8 |
| Screw the left and right brackets to the base of the co- lumn using an H8 spanner. Be careful to position the column with the notches on the right side, see image. |
| Screw M10x18: 6 Safety washer M10: 6 |
| Screw the column / brackets assembly to the plate using an H8 spanner. |
| Screw M10x18 : 2 Flat washer M10 : 2 Safety washer M10: 2 |
| Screw the wheel supports to the plate using an H8 spanner. |
| Screw M10x18: 4 Safety washer M10: 4 |
| Screw the wheels and their axles to the wheel brackets using an H8 spanner. |
| Screw M12x85: 1 Washer M12: 2 Nut M12: 1 |
| Screw the pulley to the bracket using two 19mm span- ners. |
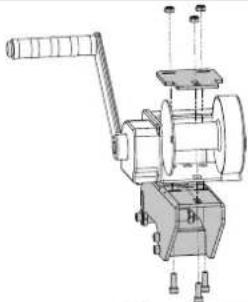 | Screw M6x18: 3Nut M6: 3 | ||
| Attach the winch to the bracket using the reinforcement plate and the 3 bolts. Use an H5 spanner. | |||
 | Place the trolley with the winch on the column. | ||
INSTALLATION AND INSPECTION CHECKS
REGULAR INSPECTION:
- Check that the screws are correctly tightened as described in the «assembly» section.
- Check that the foam gasket and pads are correctly positioned and undamaged.
- Check that the cord is correctly wound on the winch, and that it is not damaged.
If in doubt and/or if a defect is found, do not use the machine and contact the distributor or the manufacturer via the After Sales Service.
INSTALLATION:
To ensure maximum adhesion to the floor, it is essential to position the Airfix Draw Aligner in a clean area (free of dust liquids or other contaminants) with no cracks or joints between the tiles to ensure maximum vacuum performance. The Airfix Draw Aligner is fitted with two rear wheels, tilt the column taking care not to damage the seal which is located on the underside of the plate.
The Airfix Draw Aligner works with compressed air, the recommended pressure is between 5 and 8 bar.
USAGE:
- Move the pillar by tilting it backwards to the chosen work area.
- Position the Airfix Draw Aligner at an appropriate pulling distance, judged by the operator, as close as possible to the point being repaired.
- Connect the compressed air hose. Check that the Airfix Draw Aligner is firmly anchored to the ground by pushing it firmly.

If the column does not stay in position, check the placement of the seal and the condition of the floor, and repeat the previous operation.
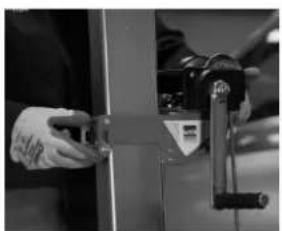
Adjust the winch position to the desired working level. To do this:
- Raise the safety pin at the rear of the winch stand, and tilt the front of the mount upwards.
- Lower or raise the winch while keeping the safety pin raised and the bracket tilted to the desired working position. Please ensure that the notch is correctly located in the opening in the column.
natural_image
Close-up of hands holding a small mechanical component, possibly a tool or clamp, in a dimly lit room (no visible text or symbols)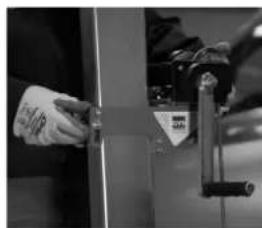
natural_image
Close-up of a hand holding a small object, possibly a tool or device, in a workshop setting (no visible text or symbols)
natural_image
Close-up of a hand using a tool to lift a metal component, no visible text or symbols
Make sure that the column is correctly aligned with the panel being straightened.
- The pulling force produced by the winch is 350Kg and is delivered by a mechanical system with an automatic load brake.
- To release the tension, simply turn the crank in the other direction. To make a downward pull, use the pulley on the front of the Airfix and pass the cable underneath.

Always keep a minimum of 3 wraps around the winch spool.
MAINTENANCE
Dust removal can be done with a compressed air blow gun before cleaning. Clean the Airfix Draw Aligner with a suitable cleaning product for painted steel surfaces. Follow the product's cleaning instructions. Wipe the Airfix Draw Aligner with a cloth after cleaning. Never use a high-pressure washer, as this will damage the paint.
WARRANTY
The warranty covers any defects or manufacturing faults for two years, from the date of purchase (parts and labour). The warranty excludes incidents due to misuse, dropping, dismantling, or any other damage due to transport. The warranty does not cover normal wear and tear of parts if maintenance is not kept up to date. Only spare parts from the manufacturer may be used for repairs.
DEFECTS, CAUSES, Solutions
| TROUBLESHOOTING CAUSES | Solutions | |
| When connected to the compressed air network, no noise is produced. | Fitting not properly connected. | Connect your compressed air fitting firmly to the Airfix Draw Align |
| No air in the network. | Check that your compressed air system is working properly (valve closed) | |
| The Airfix Draw Aligner does not stick to the floor. | Poorly positioned seal. | Reposition the seal correctly in the groove by placing it end to end (see marking on the plate) |
| Venturi not properly attached to the plate. | Tighten the two visible screws on the underside of the plate with an H5 spanner. | |
| Worn joint. | Change the seal with a new one (contact your distributor) | |
| Floor condition. | Position on a clean, non-porous floor with no major imperfections. | |
| Clogged muffler | Unscrew the silencer and blow it out. If too dirty, change it. To access the silencer, carry out step two in reverse order |
SPARE PART REFERENCES
TECHNICAL SPECIFICATIONS
| Product weight when unloaded Weight: 31 kg | |
| Pulling capacity 350 kg | |
| Product height 125cm | |
| Product width 37cm | |
| Product depth 60/70cm | |
| Equipment attachment method Lifting hook | |
| Storage temperature 0°C to 60°C | |
| Operating temperature 5°C to 50°C | |
NAMEPLATE
The technical identification plate is located at the bottom of the column, together with the product serial number, the year and month of manufacture.
| GYS SAS1 rue de la Croix des Landes - CS 5415953941 Saint-Berthevin Cedex - France | S/N |
| AIRFIX DRAW ALIGNER | |
| Weight : 31 kg |
Made in France
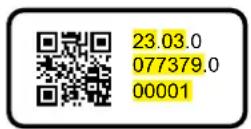
Serial number: 23.03.077379.000001
Year of manufacture: 23 (2023)
Month of manufacture: 03 (march)
Product reference: 077379
DECOMMISSIONING, DISASSEMBLY AND RECYCLING
Any item that appears to be damaged in any way (broken, bent, cracked or damaged parts), and does not function normally, or that has missing parts, should be taken out of service immediately.
To dismantle the Airfix Draw Aligner, refer to the assembly section and reverse the order.
This product must be disposed of in accordance with the current environmental and disposal guidelines of the country in which it is located.
ALLGEMEINER HINWEIS

natural_image
Technical line drawing of a mechanical lifting device with a vertical frame and wheels (no text or symbols)natural_image
Two black-and-white icons: a manual pallet jack and a forklift, both without any text or symbols.ANBRINGEN DER NAHT
natural_image
Technical line drawing of a mechanical assembly with a cylindrical component and a rectangular block (no text or symbols)natural_image
Mechanical assembly diagram showing a bracket with bolts and mounting holes (no text or symbols)natural_image
Technical line drawing of a mechanical assembly with mounting brackets and bolts (no text or symbols)natural_image
Technical line drawing of a mechanical bracket assembly with mounting holes and mounting feet (no text or symbols)natural_image
Technical line drawing of a mechanical assembly with two wheels and mounting brackets (no text or symbols)natural_image
Technical line drawing of a mechanical assembly with mounting brackets and a cylindrical component (no text or symbols)natural_image
Person using a mechanical clamp or clamp device to measure a piece of material (no visible text or symbols)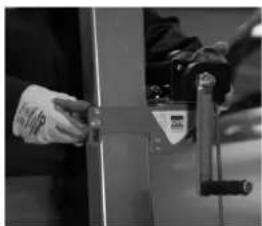
natural_image
Close-up of hands using a clamp to adjust or install a metal door (no visible text or symbols)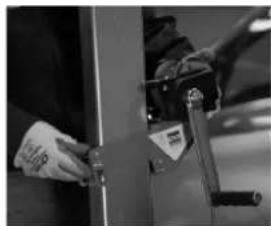
natural_image
Close-up of a hand using a tool to adjust or install a mechanical component (no visible text or symbols)
natural_image
Technical line drawing of a mechanical lifting device with a vertical frame and roller support (no text or symbols)DESEMBALAJE Y DESCARGA
natural_image
Two black-and-white icons: a manual pallet jack and a forklift, both without any text or symbols.natural_image
Technical line drawing of a mechanical assembly with mounting holes and a shaft (no text or symbols)Tornillo M12x85: 1
Arandela M12: 2
Tuerca M12: 1
natural_image
Close-up of hands operating a mechanical device with a clip (no visible text or symbols)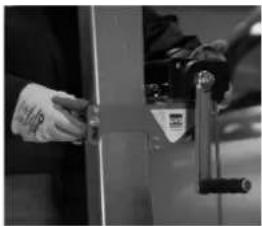
natural_image
Close-up of a hand holding a door panel, with no visible text or symbols
natural_image
Person cleaning a car door with a tool (no visible text or symbols)
natural_image
Technical line drawing of a mechanical lifting device with a vertical frame and wheels (no text or symbols)VERPAKKING EN UITLADEN
natural_image
Two black-and-white icons: a manual pallet jack and a forklift, both without any text or symbols.MONTAGE VAN DE AFDICHTING
natural_image
Close-up of hands operating a mechanical device with a clip (no visible text or symbols)
natural_image
Close-up of a hand holding a metal bracket with a label (no visible text or symbols)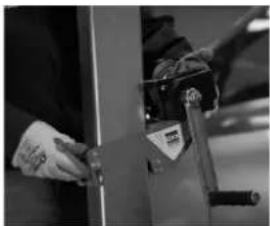
natural_image
Person using a tool on a vehicle door panel (no visible text or symbols)
natural_image
Technical line drawing of a mechanical lifting device with a vertical frame and base platform (no text or symbols)DISIMBALLAGGIO E SCARICO
natural_image
Two black-and-white icons: a manual pallet jack and a forklift, both without any text or symbols.ASSEMBLAGGIO DEL GIUNTO
natural_image
Close-up of hands holding a mechanical clamp or bracket (no visible text or symbols)
natural_image
Close-up of a hand holding a metal bracket with a clamp, no visible text or symbols
natural_image
Close-up of a hand adjusting a mechanical component, possibly a tool or fixture (no visible text or symbols)
| N° Désignation Réf. | ||
| 1 | Bouchon à lamelle rectangle/ Rectangular lamellar stopper/ Rechteckiger La-mellenstopfen/ Tappo a lamelle rettangolare/Rechthoekige latstopper | 43389 |
| 2 | Tôle de bridge treuil/ Winch clamping plate/ Flanschblech der Winde/ Piastra di bloccaggio del verricello/Klemplaat voor lier | K1024 |
| 3 | Treuil sans corde/ Winch without rope/ Seilwinde ohne Seil/ Argano senza fune/Lier zonder touw | 70523 |
| 4 Corde/ Rope/Seil/ Corda/ Touw 079588 | ||
| 5 | Support treuil/ Winch support/ Windenhalterung/ Supporto per verricello/ Liers-teun | F1023 |
| 6 | Cran d'indexage/ Indexing detent/ Indexraster/ Fermo di indicizzazione/ Indexe-ringsvergrendeling | M0476 |
| 7 | Entretoise épaulée/ Shouldered spacer/ Abgestützter Abstandshalter/ Distanziatore a spalla/ Schouder afstandhouder | M0482ST |
| 8 Axe taraudé/ Tapped shaft/ Gewindeachse/ Asse filettato/As met schroefdraad M0477ST | ||
| 9 Equerre gauche/ Left bracket/ Linker Winkel/ Quadrato sinistro/Links vierkant K1028Gf | ||
| 10 Equerre droite/ Right bracket/ Gerader Winkel/ Quadrato dritto/Recht vierkant K1027GF | ||
| 11 Roue/Wheel/ Rad/ Ruota/ Wiel 56209 | ||
| 12 Axe de roue/ Wheel axle/ Radachse/ Asse della ruota/ Wielas M0001 | ||
| 13 Chappe de roue/ Wheel cover/ Radkappe/ Copriruota/ Wieldop | Si SN > 23.07 : K1026Si SN < 23.07 : contacter le SAV | |
| 14 Platine/ Tray/ Platte/Vassoio/Dienblad | Si SN > 23.07 : M0471Si SN < 23.07 : contacter le SAV | |
| 15 Joint/Seal/ Dichtung/ Guarnizione per piastra/ Afdichting 079571 | ||
| 16 Patin/Pads/Pads/Pattini/ Schaatsen 56088 | ||
| 17 Poulie/ Pulley/ Riemenscheibe/Puleggia/Katrol | 90450 | |
| 18 | Mousqueton/ carabiner hook/ Karabinerhaken/Gancio a moschettone/Karabijn-haak | 71406 |
| 19 Anneau + vis/Ring + screw/ Ring + Schraube/ Anello + vite/ Ring + schroef | 42020 + 42042 | |
| 20 | Griffe 6 dents/ 6-tooth claw/Zughaken mit 6 Krallen/Artiglio a 6 denti/Trekklauw met 6 haken | 049734 |

| N° Désignation Réf. | ||
| 21 | Raccord pneumatique/ Pneumatic connection/ Pneumatischer Anschluss/ Collegamento pneumatico/ Pneumatische aansluiting | 71424 |
| 22 | Venturi M0473 | |
| 23 | Joint 16x2/Seal 16x2/ Dichtung 16x2/ Guarnizione 16x2/ Afdichting 16x2 55133 | |
| 24 | Bloc venturi/ Venturi block/Venturi-Block/Blocco Venturi/Venturiblok M0472 | |
| 25 | Silencieux/ Silencer/Schalldämpfer/Silenziatore/ Geluiddemper 55342 | |
| 26 | Joint 22x2/Seal 22x2/ Dichtung 22x2/ Guarnizione 22x2/ Afdichting 22x2 55271 | |
| 27 | Joint 6x2/Seal 6x2/ Dichtung 6x2/ Guarnizione 6x2/ Afdichting 6x2 55178 | |
| 28 | Grille/Grid/Raster/Griglia/ Rooster 43396 | |
| 29 | Circlip intérieur/ Inner circlip/ Innerer Sicherungsring/ Anello di sicurezza interno/ Binnenste borgring | 43395 |
PNEUMATIC DIAGRAM / PNEUMATISCHES SCHEMA/ DIAGRAMMA PNEUMATICO/ PNEUMATISCH DIAGRAM

flowchart
graph LR
    A["Compressed air supply"] --> B["Quick connector"]
    B --> C["Venturi"]
    C --> D["Silencer"]
GYS France
Siège social / Headquarter
