CK630 - Ice machine BUFFALO - Free user manual and instructions
Find the device manual for free CK630 BUFFALO in PDF.
| Product type | Ice cream maker |
| Brand | BUFFALO |
| Model | CK630 |
| Bowl capacity | 2 litres (max fill 60%) |
| Supply voltage | 230 V ~ 50 Hz |
| Power | 180 W |
| Current | 0.7 A |
| Refrigerant | R600a (28 g) |
| Dimensions (H x W x D) | 262 x 402 x 285 mm |
| Net weight | 12.2 kg |
| Operating modes | Ice, Cooling only, Mixing only |
| Adjustable timer | Yes (default: 60 min ice, 30 min cooling, 10 min mixing) |
| Bowl material | Removable food-grade plastic bowl |
| Display features | LCD screen showing duration |
| Control type | Tactile buttons (Power, Menu, Start/Pause) + timer dial |
| Safety | Motor overheat protection, lockable lid |
| Maintenance and cleaning | Bowl and accessories washable in soapy water; exterior surface with damp cloth; do not immerse |
| Package contents | Ice cream maker, spoon, measuring cup, instruction manual |
| Usage | Household only |
| Electrical wiring | Grounding mandatory (brown L, blue N, green/yellow E) |
Frequently Asked Questions - CK630 BUFFALO
User questions about CK630 BUFFALO
0 question about this device. Answer the ones you know or ask your own.
Ask a new question about this device
Download the instructions for your Ice machine in PDF format for free! Find your manual CK630 - BUFFALO and take your electronic device back in hand. On this page are published all the documents necessary for the use of your device. CK630 by BUFFALO.
USER MANUAL CK630 BUFFALO
natural_image
Exterior view of a modern stainless steel microwave oven with digital display and control buttons (no visible text or symbols)- A service agent/qualified technician should carry out installaon and any repairs if required. Do not remove any components or service panels on this product
- Consult Local and Naonal standards to comply with the following:
○ Health and safety at work legislaon
- BS EN Codes of pracce
o Fire Precauons
○ IEE wiring regulaons
○ Building regulaons
- DO NOT use jet/pressure washers to clean the appliance
• DO NOT immerse the appliance in water
• DO NOT use the appliance outside - DO NOT aempt to mix items that this machine is not designed for. This can damage the machine.
• DO NOT bypass the safety interlocks - DO NOT place hands near the rotang aachments when in use. This can result in injury.
- Never leave the appliance unaended when in use
• Always switch o and disconnect the power supply to the unit before cleaning - This appliance must only be used in accordance with these instrucons and by persons competent to do so.
- Keep all packaging away from children. Dispose of the packaging in accordance with the regulaons of local authorities
- If the power cord is damaged, it must be replaced by a BUFFALO agent or a recommended qualified technician in order to avoid a hazard
- This appliance is not intended for use by persons (including children) with reduced physical, sensory or mental capabilities, or lack of experience or knowledge, unless they have been given supervision or instrucon concerning the use of the appliance by a person responsible for their safety
• Children should be supervised to ensure that they do not play with the appliance
• Intended for Household use only
CAUTION RISK OF FIRE
- Do not store explosive substances such as aerosol cans with a flammable propellant in this appliance
- Warning: Keep clear of obstruction all ventilation openings in the appliance enclosure or in the structure for building-in
- Warning : Do not use mechanical devices or other means to accelerate the defrosting process, other than those recommended by the manufacturer
- Warning: Do not damage the refrigerant circuit
- Warning: Do not use electrical appliances inside the food storage compartments of the appliance, unless they are the type recommended by the manufacturer
Product Descripon
CK630 – BUFFALO Ice Cream Maker
Pack Contents
BUFFALO Ice Cream Maker Scoop
Measuring Cup Instrucon manual
BUFFALO prides itself on quality and service, ensuring that at the me of packaging the contents are supplied fully functional and free of damage. Should you find any damage as a result of transit, please contact your BUFFALO dealer immediately.
Installaon
Note: If the appliance has not been stored or moved in an upright position, let it stand upright for approximately 12 hours before operaon. If in doubt allow the appliance to stand.
- Remove the appliance from the packaging. Make sure that all protective plasc lm and coangs are thoroughly removed from all surfaces
- Maintain a distance of 20cm (7 inches) between the unit and walls or other objects for venlaon. Increase the distance of the object is a heat source. Do not block venlaon grills.
Note: Before using the appliance for the rst me, clean mixing bowl with soapy water.
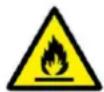
GETTING TO KNOW YOUR ICE CREAM MAKER
text_image
Transparent lid Rell lid Mixing blade Removable bowl Housing Venlaon LCD display Buon Timer knob CONTROL PANEL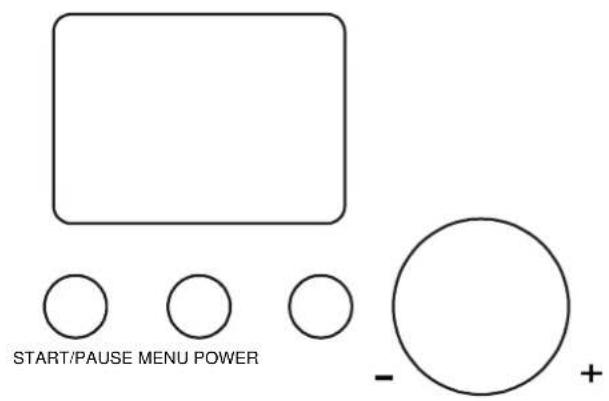
text_image
START/PAUSE MENU POWER - +[POWER]: Aer power up, the machine enters standby mode. Press the [POWER] buon to enter the seng mode, and LCD will display "60:00". Press the [POWER] buon during seng mode, the machine will enter the standby mode again.
[MENU]: Press [MENU] buon to select between the 3 mode opons, including: [ICE CREAM] [COOLING ONLY] and [MIXING ONLY]. Hold this buon for 3 seconds during operaon and the machine will return back to the menu selecon.
[Timer knob]: Turn the knob to set the working me. The default working me for [ICE CREAM] [COOLING ONLY] and [MIXING ONLY] is 60min, 30min, 10min, respectively. Rotate knob le to decrease the working me and rotate right to increase the working me.
[START/PAUSE]: Aer seng the menu and me, press this buon to start the working mode. During operaon, by pressing this buon, the mixing and the me countdown will pause. Press this buon again to connue the previous unnished operaon.
BEFORE FIRST USE
Before use, thoroughly wash all parts that will come into contact with the ice cream (including the removable bowl, blender blade, transparent lid, roll lid, measuring cup and scoop)
USING YOUR ICE CREAM MAKER
ICE CREAM MODE
- Place the removable bowl, with ingredients, into the machine
For fastest results ingredients should be pre-chilled
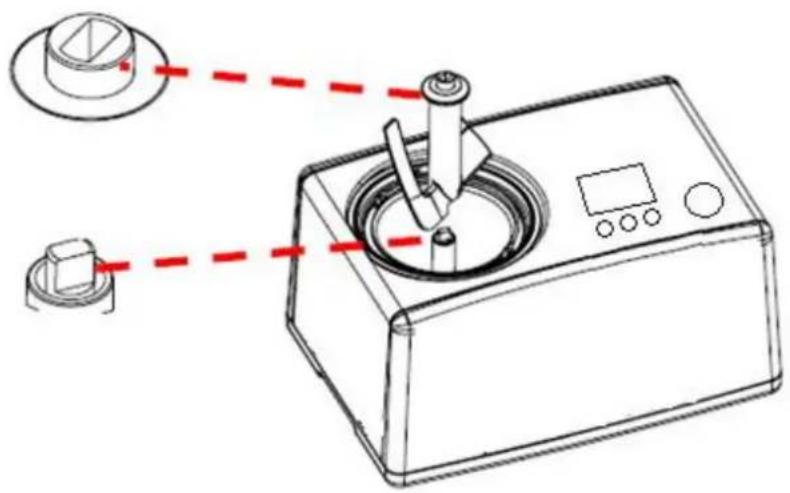
- Fix blender blade to machine insuring that the blade connects well with the motor axis (see below)
natural_image
Technical line drawing of a mechanical device with two components and red dashed lines indicating alignment (no text or symbols)- Fit the transparent lid onto the machine and lock into place
- Press the [POWER] button to enter the setting mode. The LCD will display "60:00".
- Press the [MENU] button to select [ICE CREAM] mode.
- Turn the [Timer knob] to set the working time. The default working time for [ICE CREAM] is 60min. Rotate knob left to decrease the working time and rotate right to increase the working time.
UK
- Press [START/PAUSE]. The blender blade will start to turn. After a short delay the compressor will start and the bowl will start to chill.
- When the machine is running you can increase/decrease the operating time by turning the [Timer knob].
• You can stop the machine at any me by pressing the [START/PAUSE] button
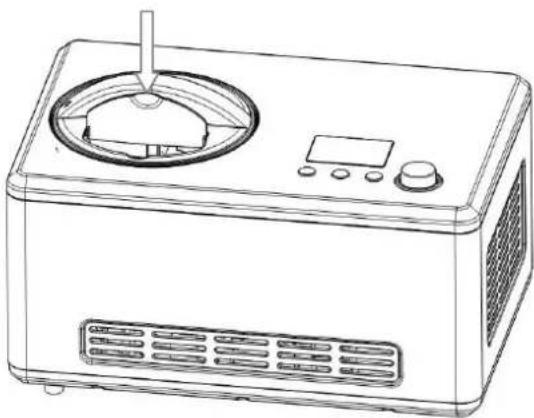
• You can add ingredients during operaon by opening the rell cover on located on the lid.
natural_image
Line drawing of a microwave oven with control panel and fan (no text or symbols)If produce becomes frozen blade will stop turning. Switch o the machine immediately to protect blade motor
To avoid overow and waste please make sure that the ingredients do not exceed 60% of the capacity of the removable bowl (ice cream expands when being formed)
COOLING ONLY MODE
The default working me is 30 minutes. Compressor will operate and bowl will freeze but there is no mixing funcon (Blades do not turn).
MIXING ONLY MODE
The default working me is 10 minutes. Blades will turn and ingredients will mix but compressor will not operate and bowl will not freeze.
CLEANING AND MAINTENANCE
- Unplug the appliance and wait for it to completely cool down before cleaning.
- Wipe over the outside surface of the unit with a dampened cloth and polish with a so dry cloth.
- Wipe any excess food from the power cord.
- Wash the removable bowl and accessories in warm soapy water and wipe dry.
STORAGE OF ICE CREAM
Transfer nished ice cream into another container using a plasc scoop or a wooden spoon and store in freezer. Do not use a metal scoop to avoid scratching the inside of the removable bowl.
Trouble Shoong
| Fault | Probable Cause | Acon |
| The unit is not working | The Unit is not switched on | Check the unit is plugged in correctly and switched on |
| Plug and lead are damaged | Call BUFFALO agent or qualified technician | |
| Fuse in the plug has blown | Replace the plug fuse | |
| Power supply | Check Power Supply | |
| Internal wiring fault | Call BUFFALO agent or qualified technician | |
| The ice cream is too so | Timer seng too short | Increase mer seng |
| The Ice Cream is too hard | Timer seng too long | Reduce mer seng |
| The mer has not reached 0 but the machine has stopped and the ice cream is hard | The ice cream has frozen solid stopping the blade from turning. The motor protecon system has engaged to stop the motor overheang | Allow the unit to cool before aempng to restart. |
| The blade is not turning | Blade not ed to motor axis correctly | Ensure the removable bowl is ed correctly and that the blade has a good conncon to the motor axis |
Technical Specicaon
| Model | Voltage | Power | Current | Capacity (Litres) | Refrigerant | Dimensions h x w x d mm | Weight (kg) |
| CK630 | 230v 50hz | 180w | 0.7A | 2.0 | R600a 28g | 262 x425 x 285 | 12.2 |
Electrical Wiring
This appliance is supplied with a 3 pin, moulded, BS1363 plug and lead, with a 3 amp fuse as standard. The plug is to be connected to a suitable mains socket.
This appliance is wired as follows:
• Live wire (coloured brown) to terminal marked L
- Neutral wire (coloured blue) to terminal marked N
- Earth wire (coloured green/yellow) to terminal marked E
This appliance must be earthed, using a dedicated earthing circuit.
If in doubt consult a qualified electrician.
Electrical isolaon points must be kept clear of any obstrucons. In the event of any emergency disconnecon being required they must be readily accessible.
Compliance
The WEEE logo on this product or its documentaon indicates that the product must not be disposed of as household waste. To help prevent possible harm to human health and/or the environment, the product must be disposed of in an approved and environmentally safe recycling process. For further informaon on how to dispose of this product correctly, contact the product supplier, or the local authority responsible for waste disposal in your area.
BUFFALO parts have undergone strict product tesng in order to comply with regulatory standards and specicaons set by internaonal, independent, and federal authorities.
BUFFALO products have been approved to carry the following symbol:

All rights reserved. No part of these instrucons may be produced or transmied in any form or by any means, electronic, mechanical, photocopying, recording or otherwise, without the prior written permission of BUFFALO.
Every eort is made to ensure all details are correct at the me of going to press, however, BUFFALO reserve the right to change speciaons without noce.
Veiligheidspss
CK630 – BUFFALO Ice Cream Maker
natural_image
Technical line drawing of a mechanical device with two components and red dashed lines indicating alignment or measurement (no text or symbols)natural_image
Line drawing of a microwave oven with control panel and fan (no text or symbols)natural_image
Technical line drawing of a mechanical device with two components and red dashed lines indicating alignment or measurement (no text or symbols)natural_image
Line drawing of a microwave oven with control panel and fan (no text or symbols)CK630 – Sorbeère BUFFALO
natural_image
Technical line drawing of a mechanical device with two components and red dashed lines indicating alignment (no text or symbols)natural_image
Line drawing of a microwave oven with control panel and fan (no text or symbols)natural_image
Technical line drawing of a mechanical device with two components and red dashed lines indicating alignment or measurement (no text or symbols)- Coloque la tapa
natural_image
Line drawing of a microwave oven with control panel and fan (no text or symbols)natural_image
Technical line drawing of a mechanical device with two components and red dashed lines indicating alignment or measurement (no text or symbols)natural_image
Line drawing of a microwave oven with control panel and fan (no text or symbols)CK630 – Gelaera BUFFALO
Gelaera BUFFALO Palea
natural_image
Technical line drawing of a mechanical device with two components and red dashed lines indicating alignment (no text or symbols)natural_image
Line drawing of a microwave oven with control panel and fan (no text or symbols)DECLARATION OF CONFORMITY
- Conformiteitsverklaring • Déclaration de conformité • Konformitätserklärung • Dichiarazione di conformità • - Declaración de conformidad • Declaração de conformidade
Equipment Type • Uitrustingstype • Type d'équipement • Gerätetyp • Tipo di apparecchiatura • Tipo de equipo • Tipo de equipamento
Application of Council Directives(s)
Toepassing van Europese Richtlijn(en) • Application de la/des directive(s) du Conseil • Anwendbare EU-Richtlinie(n) • Applicazione delle Direttive • Aplicación de la(s) directiva(s) del consejo • Aplicação de directiva(s) do Conselho
Standards
Standaarden • Normes • Normen • Standard • Estándares • Normas
LVD Directive 2006/95/EC EMC Directive 2004/108/EC
EN 60335-1:2012-1
EN 60335-2-24:2010-2-24
EN 62233:2008
EN 55014-2:2006+A1:2009
+A2:2011, EN 55014-2:1997
+A1:2001+A2:2008,
EN 61000-3-2:2006+
A1:2009 + A2:2009,
EN 61000-3-3:2013
Buffalo
Fourth Way,
Avonmouth,
Bristol,
BS11 8TB
United Kingdom