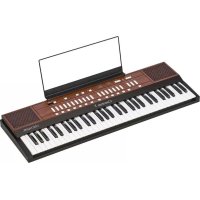
Cantorum V - Electronic keyboard Viscount - Free user manual and instructions
Find the device manual for free Cantorum V Viscount in PDF.


| Product type | Electronic keyboard / Electronic organ |
| Brand | Viscount |
| Model | Cantorum V |
| Power supply | 220 V AC |
| Power consumption | Not specified in the manual |
| Keyboard | Number of keys not specified, velocity-sensitive with 3 dynamic curves and 4 fixed values |
| Orchestral voices | 9 voices: male choir, female choir, 2 types of strings, celesta, harps, harpsichord, glockenspiel, piano |
| Organ styles | 3: Baroque, Romantic, Symphonic |
| Temperaments | 4: Equal, Meantone, Werckmeister III, Kirnberger II |
| Memories | 12 (6 presets + 6 user) with organ style save |
| MIDI connectivity | IN and OUT (5-pin DIN), 16 channels |
| Audio output | 6.35 mm line jack |
| Pedal inputs | Expression pedal (6.35 mm jack), Sustain pedal (terminal) |
| Headphones | Stereo jack, cuts internal speakers |
| Internal speakers | Yes, with built-in equalizer that can be disabled |
| Effects | Reverb, Ensemble (4 levels), Tremolo (adjustable speed and depth) |
| Split | Yes, adjustable split point (C3 to C7) with separate balance |
| Transpose | -3 to +2 semitones |
| Special functions | Demo songs (6), firmware update via MIDI, factory reset, Local Off mode |
| Included accessories | Power cable, user manual |
| Maintenance | Clean with a soft, dry cloth; do not use detergents, solvents, or alcohol |
| Dimensions (approx.) | Not provided in the manual |
| Weight (approx.) | Not provided in the manual |
Frequently Asked Questions - Cantorum V Viscount
User questions about Cantorum V Viscount
0 question about this device. Answer the ones you know or ask your own.
Ask a new question about this device
Download the instructions for your Electronic keyboard in PDF format for free! Find your manual Cantorum V - Viscount and take your electronic device back in hand. On this page are published all the documents necessary for the use of your device. Cantorum V by Viscount.
USER MANUAL Cantorum V Viscount
IMPORTANT SAFETY INSTRUCTIONS
WARNING: READ THIS FIRST!

This symbol is intended to alert the user to the presence of uninsulated "dangerous voltage" within the product's enclosure that may be of sufficient magnitude to constitute a risk of electric shock to persons.

This symbol is intended to alert the user to the presence of important operating and maintenance (servicing) instructions in the literature accompanying the appliance.
WARNING:
TO REDUCE THE RISK OF FIRE OR ELECTRIC SHOCK: DO NOT EXPOSE THIS APPARATUS TO RAIN OR MOISTURE AND OBJECTS Filled WITH LIQUIDS, SUCH AS VASES, SHOULD NOT BE PLACED ON THIS APPARATUS. DO NOT REMOVE COVER (OR BACK) NO USER-SERVICEABLE PARTS INSIDE REFER SERVICING TO QUALIFIED SERVICE PERSONNEL
"INSTRUCTIONS PERTAINING TO A RISK OF FIRE, ELECTRIC SHOCK OR INJURY TO PERSONS"
WARNING:
1) Read these instructions.
2) Keep these instructions.
3) Heed all warnings.
4) Follow all instructions.
5) Do not use this apparatus near water.
6) Clean only with dry cloth.
7) Do not block any ventilation openings. Install in accordance with the manufacturer's instructions.
8) Do not install near any heat sources such as radiators, heat registers, stoves or other apparatus (including amplifiers) that produces heat.
9) Do not defeat the safety purpose of the polarized or grounding-type plug. A polarized plug has two blades with one wider than the other. A grounding type plug has two blades and a third grounding prong. The wider blade or the third prong are provided for your safety. If the provided plug does not fit in to your outlet, consult an electrician for replacement of the obsolete outlet.
10) Protect the power cord from being walked on or pinched, particularly at plugs, convenience receptacles, and the point where they exit from the apparatus.
11)Only use attachments/accessories specified by the manufacturer.
12) Use only with the cart, stand, tripod, bracket, or table specified by the manufacturer, or sold, with the apparatus. When a cart is used, use caution when moving the cart/apparatus combination to avoid injury from tip-over.
13)Unplug this apparatus during lightning storms or when unused for long periods of time.
14) Refer all servicing to qualified service personnel. Servicing is required when the apparatus has been damaged in any way, such as power-supply cord or plug is damaged, liquid has been spilled or objects have fallen into the apparatus, the apparatus has been exposed to rain or moisture, does not operate normally, or has been dropped.
NOTE: The socket-outlet shall be installed near the equipment and shall be easily accessible.
INDEX
1 IMPORTANT NOTES. 2
1.1 LOOKING AFTER THE PRODUCT 2
1.2 NOTES ABOUT THE MANUAL. 2
2 FRONT PANEL. 4
3 REAR PANEL. 8
4 ADVANCED FUNCTIONS 9
4.1 SPLIT AND MANUALS 9
SET THE SPLIT POINT 9
BALANCE RESET 9
4.2 PITCH FINE TUNING 9
4.3 VOICES. 9
SELECT ANOTHER ORCHESTRAL VOICE. 10
REGULATE VOICES VOLUME. 10
REGULATE TREMOLO SPEED AND DEPTH. 10
4.4 MEMORIES 10
SAVE A USER MEMORY 11
RECALL A MEMORY 11
4.5 MIDI 11
MIDI BASICS. 11
TRANSMISSION OF MIDI CODES. 13
TOGGLE THE TRANSMISSION OF MIDI CODES. 13
MODIFY THE NUMBER OF ANY OF THE MIDI CHANNELS. 13
ACTIVATION OF THE LOCAL OFF FUNCTION. 14
TRANSMISSION OF PROGRAM CHANGE. 15
4.6 DEMO SONGS 15
4.7 SETTING DYNAMIC CURVE 16
4.8 EQUALIZER ON/OFF 16
4.9 FIMWARE UPDATE 16
4.10 FACTORY SETTINGS 17
1 IMPORTANT NOTES
1.1 LOOKING AFTER THE PRODUCT
- Do not apply excessive force to the product's structures or the controls (knobs, connectors, push Buttons, etc.).
- When possible, do not place the instrument close to units which generate strong interference, such as radios, TVs, computer videos, etc.
- Do not place the product close to heat sources, in damp or dusty places or in the vicinity of strong magnetic fields.
- Do not expose the product to direct sunlight.
- Never insert foreign bodies inside the product or pour liquids of any kind into it.
- For cleaning, use only a soft brush or compressed air; never use detergents, solvents or alcohol.
- Always use good quality screened cables for connection to amplification or diffusion systems. When disconnecting cables from sockets, always take hold of the connector and not the cable itself; when winding cables, do not knot or twist them.
- Before making the connections ensure that the other units (especially amplification and diffusion systems) you are about to connect are switched off. This will prevent noisy or even dangerous signal peaks.
-
Connect the net cable to an earthed socket.
-
Check that the voltage corresponds to the voltage shown on the serial number plate of the product.
- If the product is to be out of use for lengthy periods, disconnect the plug from the power socket.
1.2 NOTES ABOUT THE MANUAL
Take good care of this manual.
This manual is an integral part of the product. The descriptions and illustrations in this publication are not binding.
- While the product's essential characteristics remain the same, the manufacturer reserves the right to make any modifications to parts, details or accessories considered appropriate to improve the product or for requirements of a constructional or commercial nature, at any time and without undertaking to update this publication immediately.
All rights reserved; the reproduction of any part of this manual, in any form, without the
manufacturer's specific written permission is forbidden.
- All the trademarks referred to in this manual are the property of the respective manufacturers.
- Read all the information carefully in order to obtain the best performances from your product and waste no time.
- The codes or numbers in square brackets ([]) indicate the names of the buttons, sliders, trimmers and connectors on the product. For example, [TRANSPOSER] refers to the TRANSPOSER button.
- Illustrations showed are for information purposes only and may differ from your product.
2 FRONT PANEL
The Front panel of your instrument gives access to all the features and functions.
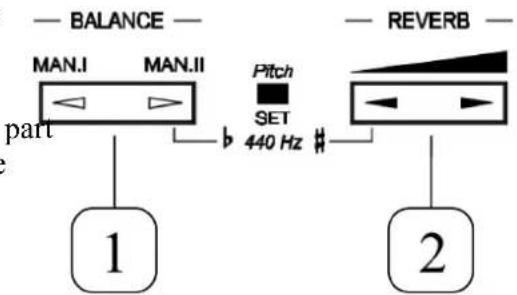
1.[BALANCE]: Balances the volume of the left (Bass and Manual I) and the right part (Manual II) of the keyboard.
2.[REVERB]: Controls the Reverb amount.
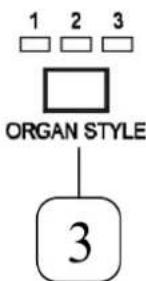
3.[ORGAN STYLE]: The Cantorum V has three different organ styles (left to right): Baroque, Romantic and Symphonic, that permit to chose a phonic adequate to the organ literature you are going to play.
4.[ENSEMBLE]: the Ensemble effect introduce
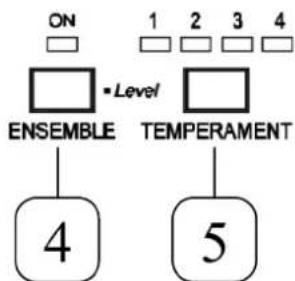
tiny natural differences in pitch between one organ pipe and another, in order to simulate the tuning error that occurs in the organ's pipes due to wear over time and variations in temperature the Ensemble effect can be adjusted on four levels. To cycle among the four levels, hold [ENSEMBLE] down and press [TEMPERAMENT] until you reach the desired level, indicated by the respective LED.
5.[TEMPERAMENT]: this parameter provides a selection of historical temperaments from various ages and different national origins. To select one, press the button several times until you reach the desired temperament (the respective LED will turn on). The available temperaments are: Equal, Meantone, WerckmeisterIII and Kirnberger II.
A BRIEF NOTE ON TEMPERAMENTS
In the "natural" tuning system, based on the acoustic phenomenon of harmonic voices, two important musical intervals, the major third and the perfect fifth, cannot be made to coexist in the "pure" state (i.e. beat-free). Therefore, over the centuries a variety of compromise solutions known as TEMPERAMENTS have been invented and realised.
These give the priority to one interval or the other, and modify them in various ways.. In ancient times and in the Middle Ages, until the end of the 15th Century, the "Pythagorean" tuning system, in which the fifths were kept perfectly pure, was used. The resulting major third interval was particularly unpleasant and was therefore considered a dissonance. However, the music of the time was mainly monodic and the first vocal and instrumental polyphonic forms made wide use of the interval of a fifth. With the early Renaissance and the start of the great age of vocal polyphony, the interval of a major third gradually came to be heard as a consonance. The instruments with fixed tuning, such as the organ and harpsichord, were adapted to this situation by using a system of temperament known as Meantone, which gave priority to the major third over the fifth. This temperament is particularly important since it was in normal use in Europe in the 16th and 17th Centuries, until the beginning of the 18th. Here are the temperaments offered by the Cantorum V, first of all the MEANTONE.
MEANTONE
-8 pure major thirds: E flat -G / B flat -D / F - A / C - E / G - B / D - F # / A - C # / E - G .
- 4 unusable major thirds (diminished fourths): B - D# / F# - A# / C# - E# / A flat - C.
-1 fifth known as the "wolf" (very dissonant extended fifth): G# - E flat.
- Highly irregular chromatic scale (meaning that chromatic compositions are given a very distinctive voice)
- Keys usable with this temperament: C maj. / D maj. / G maj. / A maj. / B flat maj. and the relative minors.
The temperaments which follow allow all the major and minor keys to be used, although those with the most alterations have a highly distinctive voice, in contrast with the modern equal temperament.
WERCKMEISTER
This temperament, invented by the organist and musical theorist Andreas Werckmeister, is recommended for performing the German musical repertoire of the late 1600s.
KIRNBERGER
This temperament, developed by Johann Philipp Kirnberger, pupil of J.S. Bach, is also suitable for playing the German baroque composers and the works of Bach.
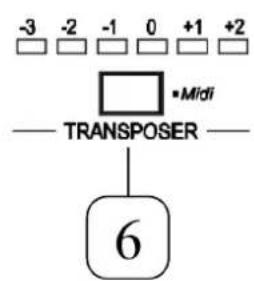
6.[TRANSPOSER]: sets the instrument's tuning within a range of -3 / + 2 semitones in steps of one semitone.
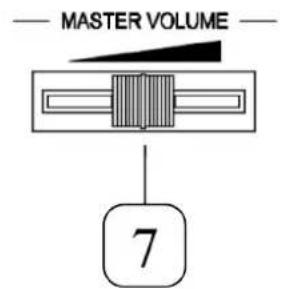
7.[MASTER VOLUME]: Controls the master volume.
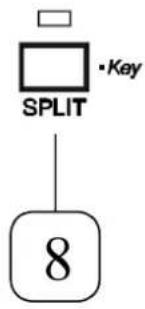





8.[SPLIT]: Activate/Deactivate keyboard split. In fact (see paragraph 4.1) the keyboard can play as if there are two separate manuals, one using Manual II voices and the other using Manual I and Bass voices. The split point is set to C4 (left included) by default. Moreover, the two keyboard parts can also play orchestral voices: one for left part, two for right part.
9.[MAN.14]: Transposes the notes of Manual I up an octave.
10.[MAN.II 16]: Transposes the notes of Manual II down an octave.
11.[ORCH. I]: Activate/Deactivate the orchestral voice on Manual I. Any of the nine orchestral voices can be associated to this button (see paragraph 4.3).
12.[ORCH. II A]: Activate/Deactivate orchestral voice A on Manual II. Any of the nine orchestral voices can be associated to this button (see paragraph 4.3).
13.[ORCH. II B]: Activate/Deactivate orchestral voice B on Manual II. Any of the nine orchestral voices can be associated to this button (see paragraph 4.3).
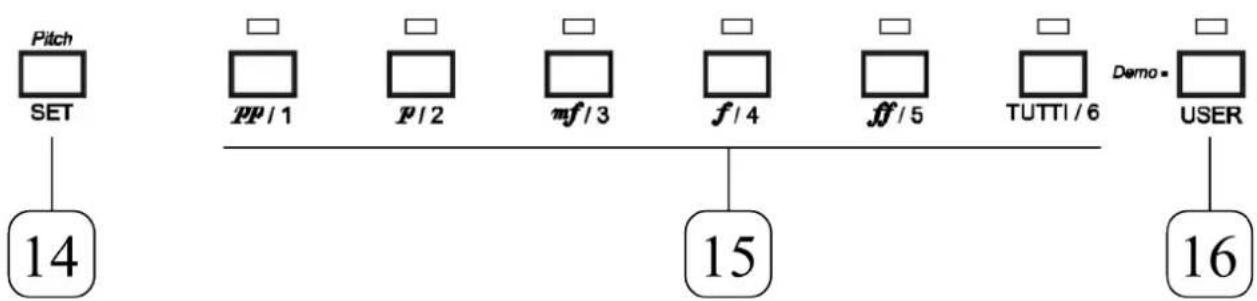
14.[SET]:Saves memories.
15.MEMORY BUTTONS: [pp/1] [p/2] [mf/3] [f/4] [ff/5] [TUTTI/6]: recall saved register combinations.
16.[USER]: switches between PRESET (LED off) and USER (LED on) memories.
Note: see paragraph 4.4 for the use of memories.
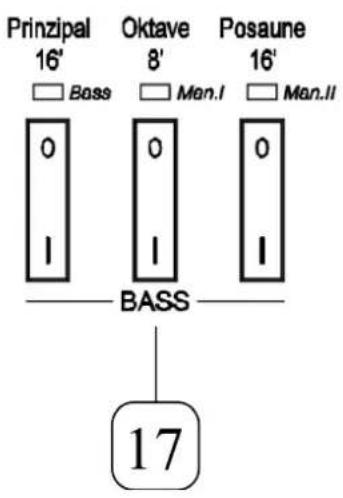
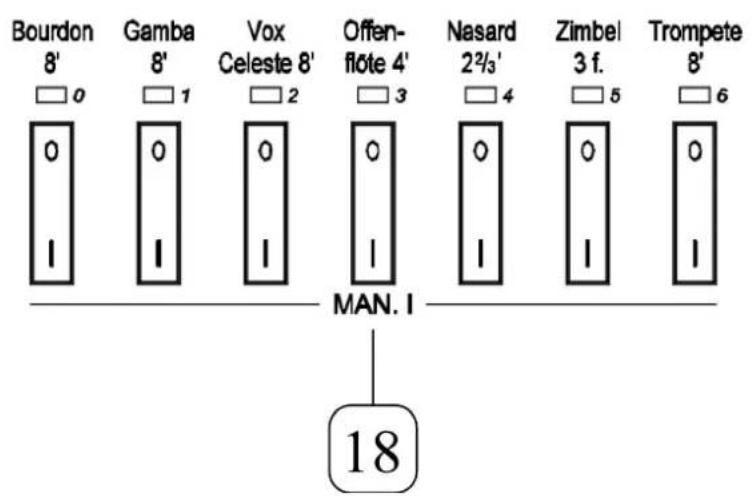
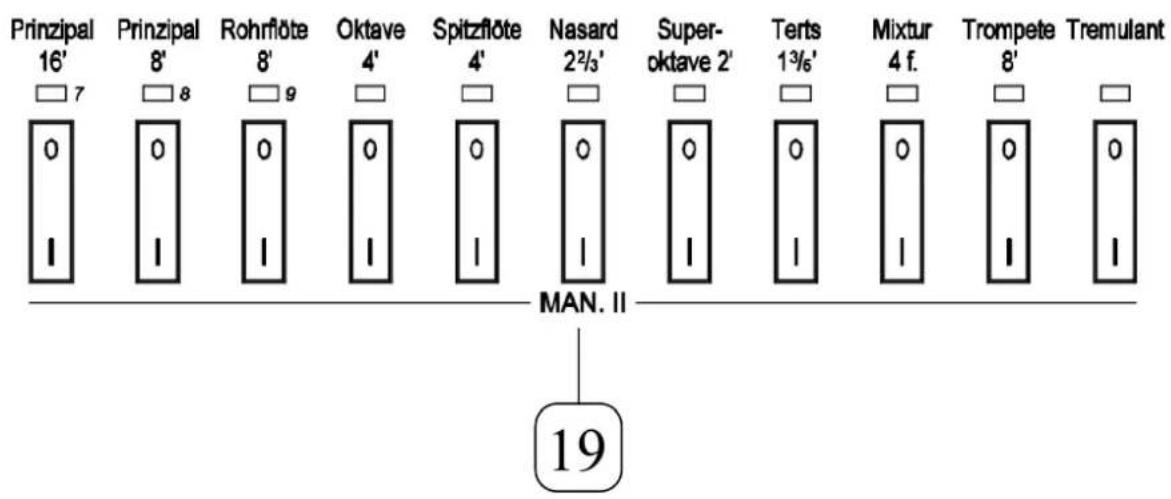
17.[BASS] stops: This section contains the voices of Bass.
18.[MAN. I] stops: This section contains the voices of Manual I.
29.[MAN. II] stops: This section contains the voices of Manual II.
3 REAR PANEL
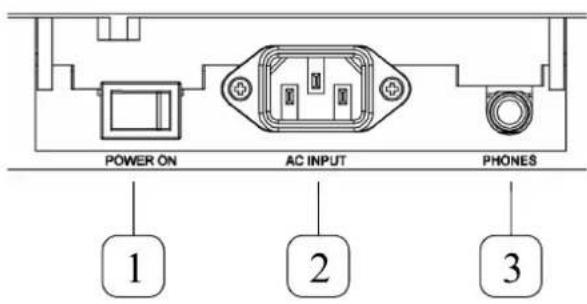
1.[POWER ON]: to switch Cantorum V on.
2.[AC INPUT]: AC Power source.
3.[PHONES]: Jack socket for connection of stereo headphones. Once they are connected, the organ's internal loudspeakers switch off.
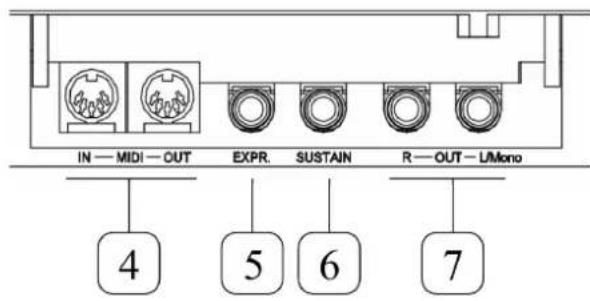
4.[MIDI]: The 5-pin DIN plugs provide connection to other MIDI musical instruments (see section 4.5 for an introduction to Musical Instrument Digital Interface). The [IN] connector receives MIDI messages from external sources, the [OUT] connector sends MIDI messages generated by the Cantorum V.
5.[EXPR.PEDAL]: 6.35mm-Jack socket to connect an expression pedal.
6.[SUSTAIN]: damper pedal connector, to be used with the piano sound. Use on/off switch pedals.
7.[OUT]: two 6.35mm-Jack socket line outputs for external organ amplification.
4 ADVANCED FUNCTIONS
4.1 SPLIT AND MANUALS
The default Split point between Manual I and Manual II is C4 (left included).
When the Split is disabled Manual II and Manual I voices play on the entire keyboard range.
When the Split is enabled Manual I and Bass voices play on the left part of the keyboard and Manual II play on the right part of the keyboard.
The Bass section is monophonic, with lowest-key-priority.
If Split Point is set over 32^nd key (G4), Bass section won't play above this key.

SET THE SPLIT POINT
To set the split point press and hold down the [SPLIT] button; when the LED starts blinking, keep pressing the [SPLIT] button and press the key on the keyboard that you want as the new Split Point. It is not possible to set a Split point higher than C7 or lower than C3. If the chosen Split Point exceeds the upper or lower limit it will be moved to C7 or C3 (depending on whether it has exceeded right or left).
Note: the Split point position is NOT modified by the TRANSPOSER.

BALANCE RESET
When the split point is enabled, the volume of the right (Manual II) and the left (Bass and Manual I) part of the keyboard can be balanced using the [BALANCE ] e [BALANCE ] keys. To reset BALANCE quickly push in sequence [BALANCE ], [BALANCE ] and [BALANCE ].
4.2 PITCH FINE TUNING
To fine-tune the pitch push [SET], then [BALANCE ] or [REVERB ] to decrease or increase it. To set it back to 440Hz , push [SET], then [BALANCE ] and [REVERB ] at the same time.
4.3 VOICES
There are nine orchestral voices, that can be associated to the three orchestra buttons (one for manual I, two for manual II). The orchestral voices are: male choir, female choir, strings1, strings2, celesta, harp, harpsichord, chimes and piano.
> SELECT ANOTHER ORCHESTRAL VOICE
To select another orchestral voice to be loaded on an orchestra button, activate the desired orchestra button, press [SET] together with the orchestra button. Repeat the procedure to move between the nine voices.
> REGULATE VOICES VOLUME
To adjust every single voice volume, follow this procedure:
Turn on the instrument while pressing [pp / 1] + [p / 2] + [mf / 3] . On startup every voice's LED will turn on for a while and the Transposer LEDs will show the voice level.
The six Transposer LEDs indicate six possible volume levels in dB (from left to right): -6, -4, -2, 0dB, +2, +4. When a voice is chosen, the stop LED will start blinking.
To modify the volume, press [TRANSPOSER] button, moving between the six levels. It is also possible to hear the voice playing on the keyboard. Turn on more than one voice to hear the global effect. In this case the LED will indicate the level of the last selected voice.
Note: this procedures regulates the voices volume only for the current Organ Style. It is, thus, possible to set a different volume for each Organ Style for a given voice.
> REGULATE TREMOLO SPEED AND DEPTH
To regulate tremolo speed and depth, follow the procedure indicated in previous paragraph for the regulation of voices volume, but instead of pressing a voice stop, press the Tremolo stop. Then pressing repeatedly the [TRANSPOSER] button it's possible to choose between six possible speed levels (indicated by Transposer LEDs) and pressing repeatedly [ENSEMBLE] between seven possible modulation depths, indicated by the memories LEDs (the six memories and the [USER] LED).
It's possible to evaluate the tremolo intensity by turning on a voice on Manual II and then by pressing the Tremolo stop again. The keyboard will play the voice with the Tremolo effect.
Note: Tremolo modulates only Manual II voices.
4.4 MEMORIES
The Cantorum V has 6 preset memories and 6 adjustable USER memories, to save your register configurations. The factory and USER combinations memorize the state of the entire voice set and the Organ Style of the instrument. The memory buttons are marked by the pp/1 , p/2 , mf/3 , f/4 , ff/5 , TUTTI/6 prints.
SAVE A USER MEMORY
To save a user memory push [SET] together with a memory button (buttons [pp / 1] to [TUTTI/6]).
RECALL A MEMORY
To recall a memory push the relative button (buttons [pp/1] to [TUTTI/6]). Push the [USER] button to switch from factory memories to USER memories and viceversa.
To recall a memory placed in the other bank always remember to press [USER] and then the desired memory button.
Note: please remember that memories also save the current Organ Style.
When a memory is active it is possible to turn off all the registers at the same time (this function is normally called Cancel), by pressing the active memory button. In this state the organ will still send MIDI messages, allowing the use of the Cantorum V as a "mute keyboard" (or Master Keyboard), that is capable of driving another keyboard, organ, sequencer, without generating sounds. For example it can be useful to connect it to another Viscount organ or expander (as CM100) to let its voices sound.
To let the Cantorum V sound again just activate registers or memories.
When no memory is employed (all memory LEDs are Off) the Cantorum V is in the "HR mode". If any memory is active it is sufficient to press it again to deactivate it and enter the HR mode. Under this mode, the state of the registers is always retained.
4.5 MIDI
MIDI BASICS
The MIDI (Musical Instrument Digital Interface) interface allows instruments of different makes and kinds to communicate with each other, using this very specific protocol of codes. This allows the creation of systems of MIDI instruments, offering much greater versatility and control than is possible with single instruments. To make this communication possible, all MIDI instruments have two or three 5-pin DIN connectors called:
- MIDI IN: The connector through which the instrument receives the MIDI data transmitted by other units.
- MID1 OUT: The connector through which the instrument sends the MIDI data it has generated to other units.
Most instruments equipped with MIDI interface transmit MIDI messages which specify, for example, which note has been played and with what dynamic, by means of the MIDI OUT connector. If this connector is connected to the MIDI IN connector of another MIDI instrument, such as an expander, the second instrument will respond exactly to the notes played on the transmitter instrument. The same type of information transfer is used for recording MIDI sequences. A computer or a sequencer can be used to record the MIDI data generated by the transmitter instrument. If the recorded
data is sent back to the instrument, it automatically repeats the recorded performance.
MIDI is able to transmit a multitude of digital data by means of just one cable, and thus just one connector. This is thanks to the MIDI channels. There are 16 MIDI channels, and in a similar way as for radio communications in which two stations can only communicate if they are tuned to the same frequency (or channel), two MIDI instruments connected together are only able to communicate if the transmitter instrument channel is the same as the receiver instrument channel.
MIDI messages subdivide into channel messages and system messages. The following is a short description of these messages:
CHANNEL MESSAGES
NOTE ON
This message is transmitted when a note is pressed on the keyboard. Each Note On message contains the following information:
Note On: when a key has been struck;
Note Number: the key which has been pressed, and therefore the relative note played;
Velocity: note dynamic (i.e. the force applied when the key was struck).
Note messages are expressed as a number from 0 to 127, with middle C represented by number 60.
NOTE OFF
This message is transmitted when a key struck previously is released.
When it is received, the sound of the note relating to the key is switched off. Each Note On message contains the following information:
Note Off: a key has been released;
Note Number: which key has been released;
Velocity: dynamic (i.e. how fast the note was released).
N.B.:
A Note On message with Velocity = 0 is considered equivalent to a Note Off message.
PROGRAM CHANGE
This message is used to select the programs or sounds of the receiver instrument.
There is also a specific standard called General MIDI which describes which sound should be recalled for each Program Change received. This association is usually described by means of a table included in the user manual of the instrument which adopts the standard.
This message contains the following information:
Program Change: voice or program change;
Program Change Number: the number of the program or voice to be activated;
CONTROL CHANGE
These are control messages (often associated to trimmers or pedals) used to add expression to the performance, allowing you to set (and control in real time if necessary) voice parameters such as volume (CC n.7) or the position of the expression pedals (CC n.11), etc.
This message contains the following information:
Control Change: a controller has been adjusted
Controller Number: which controller has been adjusted
Controller Position: the position of the controller
SYSTEMMESSAGE
SYSTEM EXCLUSIVE
These messages can only be interpreted by an instrument made by the same producer as the transmitter device (in some cases only by the same model). They mainly relate to the instrument's sound generation and programming parameters.
The Cantorum V uses these messages to control all the internal parameters and for switching the voices on and off.
REAL TIME
These messages are used for the real-time control of specific modules or functions of a connected instrument.
These messages include the Start, Stop, Pause/Continue and Clock commands. In the Cantorum V these messages are transmitted when the internal sequencer is used, as follows:
START: the sequencer has started to record or play back a MTDI sequence
STOP: the sequencer has been stopped
PAUSE / CONTINUE: the sequencer is in pause (this function isn't managed by Cantorum V)
CLOCK: the sequencer speed
The Real Time messages also include the Active Sensing code, sent to keep the dialogue between two MIDI instruments alive. When the receiver instrument does not receive any MIDI data or the Active Sensing code in a time interval of about 300 milliseconds, it considers the MIDI connection to have been deactivated, so it switches off any notes still active. Remember that the transmission and reception of this message is optional, so not all instruments are equipped to handle it.
TRANSMISSION OF MIDI CODES
MIDI channels for the Cantorum V are set to default values but can be modified by the user. The default values are:
- Channel 1 for Manual I
- Channel 2 for Manual II
- Channel 4 for Bass section
TOGGLE THE TRANSMISSION OF MIDI CODES
To toggle the transmission of MIDI codes for each section of the keyboard the Cantorum V must enter in MIDI mode. To enter the MIDI mode, turn on the Cantorum V while pressing the [TRANSPOSER] button. All the lights will shut down except for the three Bass section stops. To enable/disable the transmission of MIDI messages for the three sections turn on/off the respective stops in Bass section (note that the section names are written close to the stop LEDs). The Bass section LEDs relative to each section indicate whether MIDI messages are enabled or disabled for that section. The MIDI message that will be disabled are note messages, Program Changes, Control Changes and some SysEx.
> MODIFY THE NUMBER OF ANY OF THE MIDI CHANNELS
To modify the number of any of the MIDI channels for the MIDI messages transmission, first enter the MIDI mode as described above, by shutting down the instrument and turning it On while pressing the [TRANSPOSER] button. Now choose one of the three sections to modify its MIDI channel number, by pushing the bottom of one of the three stops in the Bass sections for approx. 2 seconds (the name of the section to be modified is printed in white under the three stops). The LED related to the selected section will start flashing. At the same time, the stops in the MAN.I and MAN.II sections, which will now work as a numeric keypad (with the numbers printed in white
below them), will blink once indicating the currently selected channel for MIDI messages transmission. Using the MAN.I and MAN.II stops as a numeric keypad it is possible to select the new MIDI channel number in the range from 01 to 15 (it is mandatory to type 2 digits). The first 2 LEDs from the [TEMPERAMENT] section will indicate the position of the digit that has to be typed (if the first LED is on, the first digit has to be typed, if the second LED is on the second digit has to be typed). Once the second digit has been typed, the LED of the first stop from MAN. I (that has "PG" printed below) will flash five times to indicate that the new MIDI channel number has been assigned successfully. The LED related to the section that has been modified will stop flashing. In case the number typed exceeds the valid range, the procedure is automatically aborted and the previous MIDI channel number is kept. To exit the MIDI channel select mode shut the instrument down and turn it on again.
To return to Normal mode shut the instrument down and turn it On again.
Note: MIDI receive is always active.
ACTIVATION OF THE LOCAL OFF FUNCTION
The Local Off function allows to stop the Cantorum V keyboard from driving the tone generation of any of the Cantorum V sections. When the Local Off function is activated, however, the tone generation is still driven by incoming MIDI messages (sent, e.g. by a MIDI pedalboard) and the [MIDI OUT] output of the Cantorum V still sends MIDI messages coming from its keyboard.
To activate the Local Off function, enter the MIDI mode by turning the instrument On while pressing the [TRANSPOSER] button. Now press the Bass section stop related to the keyboard section you want to put in Local Off upwards for approx. 2 seconds. The corresponding LED will start flashing. The MAN.I section will now work as a numeric keypad (with the numbers printed in white below them), and one of the two LEDs "0" and "1" of this numeric keypad will turn on to indicate the state of the Local Off for the selected section: "0" if it is disabled, "1" if it is enabled. To modify the status of that section, press one of the two LEDs "0" or "1". The "SPLIT" LED will flash 5 times to indicate that the new status was successfully set and the LED of the modified section will stop flashing. To exit the Local Off setup mode, turn Off the instrument and turn it On again.
TRANSMISSION OF PROGRAM CHANGE
For each of the 12 memories you can associate a Program Change number to be transmitted when the memory is recalled. The Program Change can be sent to any of the section (and their related MIDI channels).
To transmit and enable the transmission of Program Changes first enter the Program Change MIDI Set mode by pressing for approx. 2 seconds the [TRANSPOSER] button. The green [TRANSPOSER] LED will start flashing. To enable the transmission of a Program Change related to a memory, first press the button related to that memory (if necessary press the [USER] button to switch from factory and user memories). A Program Change number must be set. The stops of manual I and manual II will blink in sequence to show the actual Program Change number (numbers 0 to 9 are written under the stops of manual I and manual II; for example: if pressing the memory button [pp/1] , the stop labelled "0" blinks twice and then the stop with label "1" once, indicating that the Program Change number associated to the memory button [pp/1] is "001"). Meanwhile the Program Change number will be sent via MIDI.
Now you can enter a new Program Change number for the selected memory: press the stops corresponding to the number you want to enter.
Every number is made of 3 digits (e.g. to input the Program Change number nine you have to press, in the order: "0", "0", "9"). After the third digit has been pressed the [SPLIT] LED flashes five times to signal the success of the operation. If a value outside the 001-128 range is inputted the procedure aborts and the previous Program Change is retained.
Finally, use the Bass section registers to enable/disable sending of the Program Change to the related section.
To exit from the Program Change mode press [TRANSPOSER].
Note: If the transmission of MIDI messages has been disabled in every section, Program Changes (as other messages) won't be sent.
4.6 DEMO SONGS
There are six Demo songs to evaluate and appreciate at best the sound of the instrument. To play Demo songs press for about two seconds the [USER] button, then choose one of the songs by pressing one of the memory buttons (buttons [pp/1] to [TUTTI/6]).
Press again [USER] to exit from Demo mode.
4.7 SETTING DYNAMIC CURVE
The Cantorum V keyboard is touch sensitive. It is, thus, possible to choose among 3 dynamic curves and 4 fix velocity values that will influence the sound of orchestral voices and the MIDI messages sent by the instrument. Organ voices are not influenced by dynamic curve.
To select one from the seven options turn on the instrument while pressing [p / 2] + [mf / 3] + [f / 4] . One of the seven Memories LED (1 - 6 and User/Demo) will turn on indicating the actual selected curve in this order (left to right): Soft, Normal, Hard, Fixed at 32, Fixed at 64, Fixed at 96, Fixed at 127. Select one of them pressing repeatedly [ENSEMBLE].
To exit from this mode turn Off the instrument.
In order to provide the best acoustic performance, the Cantorum V features an audio equalizer specifically designed for the internal amplification system. However, when the instrument is amplified through another amplification system, the equalizer should be turned off. This can be done by turning On the instrument while pressing the memory buttons [pp/1], [ff/5] and [TUTTI/6]. Now, the first two registers of Manual I (those showing "0" and "1" printed above, close to the LED) can be used to enable the equalizer ("1") or disable it ("0").
4.9 FIMWARE UPDATE
To proceed with firmware upload turn on the instrument while pressing the first five "white" keys (from C2 to G2). All the LEDs of Temperament will turn on. The instrument will wait the transmission of new firmware modules to be sent via MIDI. Firmware modules are MIDI files that must be transmitted with an external sequencer and sent to the MIDI IN port of the Cantorum V. For example, if using a computer, it is necessary to make an appropriate program playing the MIDI file that sends it to the PC MIDI OUT port. During the reception of the Firmware the LED [SPLIT] will blink. At the end of the upload the instrument will automatically restart. In case of errors during the upload all the Temperament LEDs will start blinking. In this case restart and try with the procedure another time.
4.10 FACTORY SETTINGS
Factory settings are initial configuration of the instrument made at the production of the instrument. Restoring the Factory Settings means replacing all the configurations and memorizations made by user, with the original ones.
To restore the factory settings on the instrument turn on while pressing [ORCH. I] + [MAN.I 4"] + [MAN.II 16']: all LEDs will turn on for about 3 seconds, then the instrument will restart with the original factory settings.

Disposal of old Electrical & Electronic Equipment (Applicable throughout the European Union and other European countries with separate collection programs)
Dir. 2002/95/CE, 2002/96/CE e 2003/108/CE
This symbol, found on your product or on its packaging, indicates that this product should not be treated as household waste when you wish to dispose of it. Instead, it should be handed overt to an applicable collection point for the recycling of electrical and electronic equipment. By ensuring this product is disposed of correctly, you will help prevent potential negative consequences to the environment and human health, which could otherwise be caused by inappropriate disposal of this product. The recycling of materials will help to conserve natural resources. For more detailed information about the recycling of this product, please contact your local city office, waste disposal service or the retail store where you purchased this product.

This product complies with the requirements of EMCD 2004/108/EC and LVD 2006/95/EC.
FCC RULES
NOTE: This equipment has been tested and found to comply with the limits for a Class B digital Device, persuant to Part 15 if the FCC Rules. These limits are designed to provide reasonable protection against harmful interference in a residential installation. This equipment generates, uses and can radiate radio frequency energy and, if not installed and used in accordance with the instruction, may cause harmful interference to radio communications. However, there is no guarantee that the interference will not occur in a particular installation. If this equipment does cause harmful interference to radio or television reception, which can be determined by turning the equipment off and on, the user is encouraged to try to correct the interference by one or more of the following measures:
- Reorient or relocate the receiving antenna.
- Increase the separation between the equipment and receiver.
- Connect the equipment into an outlet on a circuit different from that to which the receiver is connected.
- Consult the dealer or an experienced Radio/Tv technician for help.
The user is cautioned that any changes or modification not expressly approved by the party responsible for compliance could void the user's authority operate the equipment.
ATTENZIONE: LEGGERE ATTENTAMENTE!

WARNING
RISK OF ELECTRIC SHOCK DO NOT OPEN
AVIS
RISQUE DE CHOC ÉLECTRIQUE NE PAS OUVRIR


INTRODUCTION AU MIDI
ACHTUNG: These Sections will be used to prepare the exercises.

4.1 MANUALSPLITSING 9
SPLIT POINT TE WIJZIGEN. 9
BALANCE TERUG TE ZETTEN 9
4.2 FIJNAFSTEMMING TOONHOOGTE 10
4.3 REGISTERS 10
KIES EEN ANDERE ORKESTSTEM 10
GELUIDSVOLUME VAN DE REGISTERS IN TE STELEN. 10
REGELEN VAN SNELHEID EN DIEPTE VAN DE TREMULANT. 10
4.4 GEHEUGENS 11
4.2 FIJNAFSTEMMING TOONHOOGTE
Organ Styles Baroque, Romantic, Symphonic
Temperaments Equal; Meantone; WerkmeisterIII; KimbergerII
TAB VOICES
Orchestra Voices Male choir, female choir, strings1, strings2, celesta, harp, harpsichord, chimes and piano
EFFECTS
Reverberation With Depth control
Tremulant Depth & Speed adjustable
Transposer -3 to +2 semitones
Pitch Control -100 Cent/Semitone to +100 Cent/Semitone
General Memories 6 buttons, Preset + User (12 total)
Controls Master Volume; Bass-Man.I/Man.II Balance; Reverb
Other Panel controls Split (set point) button; Man.I 4' & Man.II 16' buttons; Organ style 4 position button
Demo Songs Yes
AMPLIFICATION
Amplifiers 2x20Watt
Speakers 2x5"full range
Connections AC Main Input; Expression Pedal; Sustain Pedal; Stereo Line Out; Stereo Headphone; MIDI In & MIDI Out
MIDI IMPLEMENTATION CHART
Viscount CantorumV
Portable 61-keys organ
Version: 1.0
| FUNCTION... TRANSMITTED RECEIVED REMARKS | ||||
| BASIC CHANNEL | 1, 2, 4 1, 2, 4 Changed X X | |||
| MODE | Default Mode Messages Altered | 3 Mode 3 **** **** | **** **** | ***** |
| NOTE NUMBER | True Voice 36 | 33÷99 | 33÷99 | |
| ÷96 | 33÷99 | |||
| VELOCITY | Note ON | O | O | |
| Note OFF | XX | |||
| AFTER | Key's | XX | ||
| TOUCH | Ch's | XX | ||
| PITCH BENDER | X | O | ||
| CONTROL CHANGE | 7 | X | O Volume | Expression All sound off Reset All Controllers All Notes Off |
| 11 | O | O | ||
| 120 | O | O | ||
| 121 | O | O | ||
| 123 | O | O | ||
| PROGRAM CHANGE | True# | O | X | |
| SYSTEM EXCLUSIVE | O | O | ||
| SYSTEM COMMON | Song Pos | X | X | |
| Song Sel | XX | |||
| Tune | XX | |||
| SYSTEM REAL TIME | Commands | O | O | * |
| AUX MESSAGES | Local On-Off | XX | ||
| All notes off | O | O | ||
| Active Sense | O | O | ||
| Reset | X | X | ||
| NOTES: *: these messages are used to control the sequencer | ||||
Mode 1: Omni On, Poly Mode2: Omni On, Mono X=NO
Mode 3: Omni Off, Poly Mode 4: Omni Off, Mono O=YES
viscount
Viscount International S.p.A.
Via Borgo, 68 / 70 - 47836 Mondaino (RN), ITALY
Tel: +39-0541-981700 Fax: +39-0541-981052
Website: www.viscount.it
- IMPORTANT SAFETY INSTRUCTIONS
- WARNING:
- "INSTRUCTIONS PERTAINING TO A RISK OF FIRE, ELECTRIC SHOCK OR INJURY TO PERSONS"
- INDEX
- IMPORTANT NOTES
- LOOKING AFTER THE PRODUCT
- NOTES ABOUT THE MANUAL
- FRONT PANEL
- A BRIEF NOTE ON TEMPERAMENTS
- MEANTONE
- WERCKMEISTER
- KIRNBERGER
- REAR PANEL
- ADVANCED FUNCTIONS
- SPLIT AND MANUALS
- SET THE SPLIT POINT
- BALANCE RESET
- PITCH FINE TUNING
- VOICES
- > SELECT ANOTHER ORCHESTRAL VOICE
- > REGULATE VOICES VOLUME
- > REGULATE TREMOLO SPEED AND DEPTH
- MEMORIES
- SAVE A USER MEMORY
- RECALL A MEMORY
- MIDI
- MIDI BASICS
- CHANNEL MESSAGES
- NOTE ON
- NOTE OFF
- N.B.:
- PROGRAM CHANGE
- CONTROL CHANGE
- SYSTEMMESSAGE
- SYSTEM EXCLUSIVE
- REAL TIME
- TRANSMISSION OF MIDI CODES
- TOGGLE THE TRANSMISSION OF MIDI CODES
- > MODIFY THE NUMBER OF ANY OF THE MIDI CHANNELS
- ACTIVATION OF THE LOCAL OFF FUNCTION
- TRANSMISSION OF PROGRAM CHANGE
- DEMO SONGS
- SETTING DYNAMIC CURVE
- FIMWARE UPDATE
- FACTORY SETTINGS
- Disposal of old Electrical & Electronic Equipment (Applicable throughout the European Union and other European countries with separate collection programs)
- Dir. 2002/95/CE, 2002/96/CE e 2003/108/CE
- FCC RULES
- ATTENZIONE: LEGGERE ATTENTAMENTE!
- WARNING
- AVIS
- INTRODUCTION AU MIDI
- ACHTUNG: These Sections will be used to prepare the exercises.
- FIJNAFSTEMMING TOONHOOGTE
- TAB VOICES
- EFFECTS
- AMPLIFICATION
- MIDI IMPLEMENTATION CHART
Brand : Viscount
Model : Cantorum V
Category : Electronic keyboard